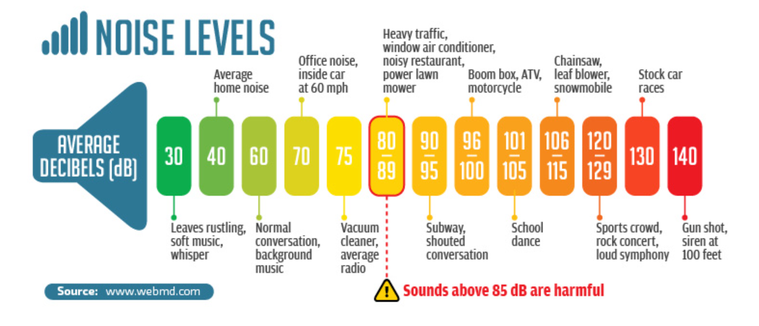
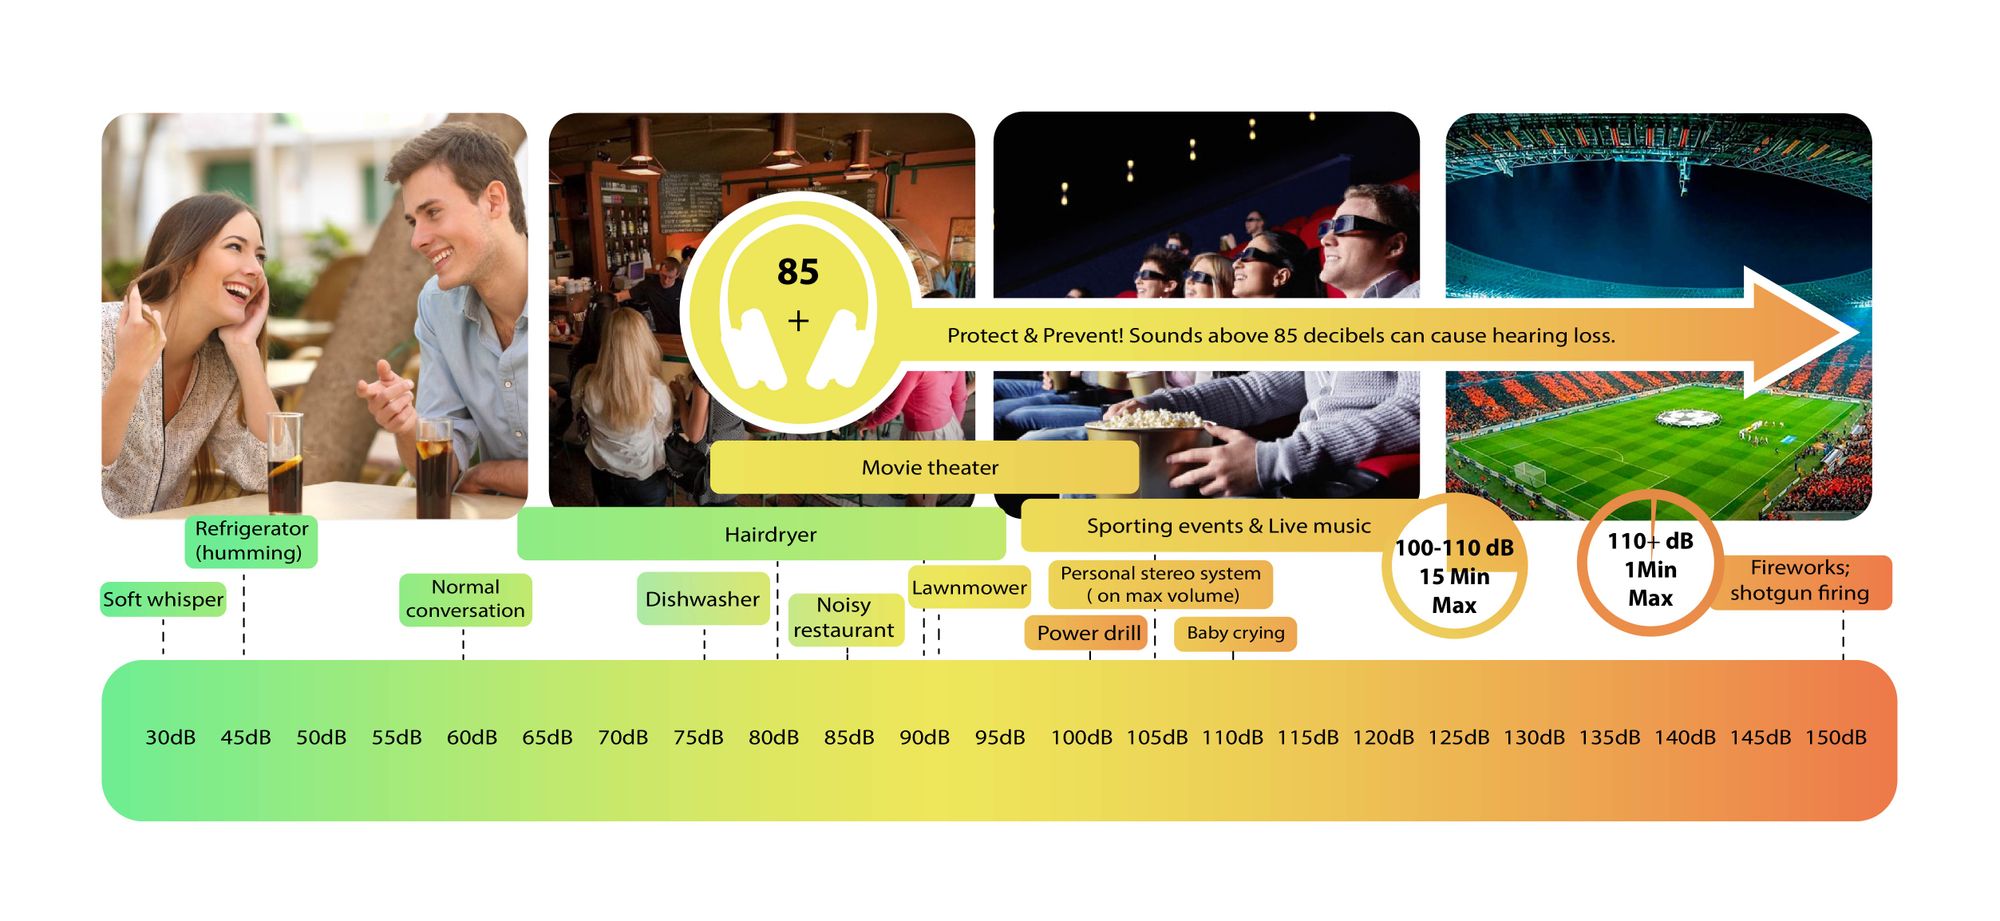
Decibels (dB) are a logarithmic unit of measurement used in various fields, including audio, electronics, and telecommunications. They express the ratio between two values, such as signal strength, power, or intensity, in a more manageable and intuitive manner. Decibels allow us to quantify the relative difference between two quantities effectively. For example, a 3 dB increase represents a doubling of sound intensity, making it a fundamental concept in many technical fields.
What are Decibels?
Decibels, often abbreviated as dB, are a logarithmic unit used to express ratios between values like power, intensity, or amplitude. They offer a convenient way to represent large ranges of values and are widely used in fields such as audio engineering and telecommunications.
Decibel Scale
The decibel scale is a logarithmic measurement system that quantifies the relative difference between two values. For instance, in audio, a 10 dB increase signifies a tenfold increase in power or intensity, while a 10 dB decrease represents a tenfold decrease. This logarithmic property simplifies comparisons and analyses of various measurements.
Applications of Decibels
Decibels play a pivotal role in various applications, particularly in electronics. They are used to measure signal strength, gain, noise levels, and more. Engineers and technicians rely on decibels to assess the performance and quality of electronic systems, making them a vital concept in the field.
Video Compression
Video compression is a crucial component of modern multimedia content delivery. It involves using algorithms to reduce the size of video files while maintaining acceptable visual quality. Video compression removes redundant or less important information from a video stream, making it efficient for storage and transmission.
Video Quality
Video quality is a critical factor in the viewing experience, influenced by factors like resolution, bit rate, frame rate, and compression. Resolution, measured in pixels (e.g., 1080p or 4K), determines detail levels. Bit rate affects data transmission, while frame rate impacts motion smoothness. Video compression balances quality and file size, with codecs like H.264 and H.265 playing significant roles in the industry. Achieving the desired video quality requires a careful balance of these factors for various applications.
In today’s digital age, where music and audio are an integral part of our lives, it’s crucial to ensure that our MP3 files sound their best. Whether you’re a casual listener or an audiophile seeking perfection, this comprehensive guide is here to help you master the art of enhancing MP3 sound quality. I’m an audio expert, and I’ll take you on a journey through various techniques and strategies to elevate your MP3 listening experience.
The Importance of Quality MP3 Sound
Before we dive into the nitty-gritty details of improving MP3 sound, let’s first understand why it matters. MP3 is one of the most popular audio formats, known for its compatibility and convenience. However, the sound quality of MP3 files can vary widely, depending on factors like compression, source material, and encoding settings.
Factors Affecting MP3 Sound Quality
To achieve the best MP3 sound quality, you need to consider several key factors:
Bitrate
The bitrate determines the amount of data used to represent audio. Higher bitrates generally result in better sound quality but larger file sizes.
Compression
MP3 files are compressed to reduce their size. Understanding the balance between compression and quality is essential.
Source Material
The quality of the original audio source greatly influences the final MP3 sound. Starting with high-quality recordings is crucial.
Encoding Settings
Adjusting parameters during encoding, such as sample rate and stereo mode, can impact sound quality significantly.
Techniques for Enhancing MP3 Sound Quality
Now that we’ve established the importance of quality MP3 sound, let’s explore various techniques and strategies to enhance it. Whether you’re dealing with older low-bitrate MP3s or you want to optimize your new downloads, these methods will help you achieve the best possible sound.
1. Bitrate Selection
The choice of bitrate plays a fundamental role in MP3 sound quality. Higher bitrates, such as 320 kbps, preserve more audio details, resulting in clearer and more immersive sound. However, they also lead to larger file sizes, so you should strike a balance based on your storage capacity and listening preferences.
2. Source Material Enhancement
Improving MP3 sound quality starts with the source material. If you have control over the recording process, use high-quality microphones, eliminate background noise, and ensure proper mixing and mastering techniques are employed. Starting with a pristine source will yield better MP3s.
3. Proper Encoding Settings
When converting audio to MP3 format, it’s crucial to choose the right encoding settings. Opt for a higher sample rate (e.g., 44.1 kHz or 48 kHz) and stereo mode for richer sound. Experiment with different settings to find the sweet spot for your audio.
4. Noise Reduction
If your MP3s suffer from background noise or artifacts, consider using noise reduction software. This can help eliminate unwanted hisses, clicks, and pops, resulting in a cleaner listening experience.
5. Equalization (EQ)
Using an equalizer allows you to adjust the balance of frequencies in your MP3s. You can enhance bass, boost treble, or make other custom adjustments to tailor the sound to your preferences.
6. Volume Normalization
Normalization ensures consistent volume levels across your MP3 library. This prevents sudden volume jumps between tracks, providing a more enjoyable listening experience.
7. High-Quality Playback Devices
Investing in high-quality headphones or speakers can make a significant difference in how you perceive MP3 sound. Look for devices with accurate sound reproduction and comfortable fit for extended listening sessions.
8. Room Acoustics
If you primarily listen to MP3s in a room, consider optimizing the acoustics. Simple changes like adding acoustic panels or rearranging furniture can reduce reflections and enhance sound quality.
9. Lossless Formats
Consider archiving your favorite music in lossless formats like FLAC or WAV for the utmost audio fidelity. While these formats result in larger file sizes, they preserve audio quality without compression.
10. Regular Maintenance
Maintaining your MP3 library is essential. Periodically check for corrupted files, update metadata, and back up your collection to prevent data loss.
Final Words
Enhancing the sound quality of your MP3 files is a rewarding endeavor for any music lover. By understanding the factors influencing sound quality and employing the right techniques, you can elevate your MP3 listening experience to new heights. Whether you’re a casual listener or an audiophile, these strategies will help you make the most of your digital music collection. Remember, the quest for perfect sound is a journey, so enjoy every moment of it. Happy listening!
Flac and Ogg Volume AdjusterFlac and Ogg Volume Adjuster
Are you tired of dealing with uneven audio levels in your Flac and Ogg files? Well, you’re not alone. Many audio enthusiasts and professionals often face the challenge of maintaining consistent sound quality across their collections. In this article, I’ll delve into the world of Flac and Ogg volume adjustment and explore various methods to tackle this issue effectively.
Audio File Format Adjustments
Before we dive into volume adjustments, it’s crucial to understand the nature of Flac and Ogg audio formats. Flac, short for Free Lossless Audio Codec, and Ogg Vorbis are popular choices for storing high-quality audio. Flac provides lossless compression, preserving audio quality without sacrificing file size, while Ogg is known for its open-source nature and efficient compression.
Sound Volume Control for Flac and Ogg
To control the volume of your Flac and Ogg files, you’ll need specialized tools or software designed for audio processing. These tools allow you to adjust the volume levels without compromising the overall audio quality. Keep in mind that it’s essential to maintain a balance between amplifying the audio and preventing distortion.
Adjusting Audio Levels in Flac and Ogg
One common method for volume adjustment is using an audio editor. These editors offer precise control over the audio, enabling you to increase or decrease the volume as needed. It’s important to preview the changes and make incremental adjustments to achieve the desired result.
Whether you’re a music enthusiast or a professional sound engineer, the ability to adjust volume levels in Flac and Ogg files is invaluable. By understanding the intricacies of these audio formats and utilizing the right tools, you can ensure a consistent and enjoyable listening experience.
Normalizing Sound in Flac and Ogg Files
Normalization is another technique to bring uniformity to your audio collection. This process adjusts the volume of each file to a standard level, eliminating extreme variations. Normalization algorithms analyze the audio content and adjust the gain accordingly, making it ideal for batch processing large libraries.
Volume Equalization for Flac and Ogg
Volume equalization is about ensuring that all your Flac and Ogg files have similar loudness levels. This technique is essential when you’re creating playlists or organizing audio for playback. Volume equalization tools use various methods to balance the audio, providing a seamless listening experience.
Audio Gain in Flac and Ogg Formats
Audio gain, also known as amplification, allows you to increase the overall loudness of your Flac and Ogg files. This can be particularly useful if you have older recordings or content with low volume levels. However, it’s crucial to exercise caution and avoid over-amplification, which can lead to distortion.
Balancing Audio in Flac and Ogg Files
Balancing audio involves adjusting the volume levels of individual tracks within a file. This is handy when dealing with live recordings or albums where tracks may have varying loudness. Balancing tools provide a means to fine-tune each track’s volume to create a consistent listening experience.
Flac and Ogg Audio Level Management
Managing audio levels in Flac and Ogg files is an ongoing process, especially if you frequently add new content to your collection. Regularly reviewing and adjusting volume levels ensures that your audio library remains enjoyable and free from sudden volume spikes or drops.
Tweaking Volume in Flac and Ogg
Sometimes, you may want to apply specific tweaks to the volume of your Flac and Ogg files. This could involve emphasizing certain frequencies or applying dynamic range compression to enhance the audio quality. Experimenting with these tweaks can lead to a more personalized listening experience.
Enhancing Audio Dynamics in Flac and Ogg
Audio dynamics play a crucial role in the overall quality of your listening experience. Adjusting volume levels in Flac and Ogg files can help bring out the nuances in your music. By carefully managing audio dynamics, you can ensure that every note and sound is delivered with precision and clarity.
Final Words
Flac and Ogg volume adjustment is an essential aspect of maintaining an enjoyable audio collection. Whether you’re a music enthusiast or a professional, understanding the tools and techniques available can significantly enhance your listening experience. With the right approach, you can achieve balanced and consistent audio quality in your Flac and Ogg files.
Are your favorite songs or podcasts sounding a bit lackluster? It happens to the best of us. Sometimes, you just need that extra oomph in your audio. That’s where a “Wav Volume Booster” comes into play.
Audio Amplification
Audio amplification, at its core, is about making your audio louder. It’s like giving your music or recordings a power-up, ensuring that every sound reaches your ears with greater intensity. Imagine listening to your favorite song, and every beat and note hits you with a more pronounced impact. That’s the magic of audio amplification.
Sound Enhancement
Sound enhancement is all about taking your audio experience to the next level. It’s like adding a touch of magic to your sound files. With a Wav Volume Booster, you can enhance the clarity and richness of your audio, making it more enjoyable to listen to. Whether you’re a music enthusiast, a podcaster, or a gamer, sound enhancement tools are your ticket to a more immersive experience. Mp4Gain is the best option.
Volume Boosting Tools
Volume boosting tools are essential for those moments when you need to turn up the volume. They allow you to increase the sound levels of your audio files without distorting them. It’s like having a control panel for your audio, where you can fine-tune the volume to your liking. These tools are especially handy when you’re dealing with soft-spoken dialogues in movies or videos.
Mp4Gain is the most advacend Volume Boosting tool.
Audio Wave Amplitude
Understanding audio wave amplitude is key to mastering the art of sound. When you boost the volume, you’re essentially making the audio waves taller. This increase in amplitude results in a louder sound. Think of it as stretching a rubber band – the more you stretch it, the louder the snap. It’s a fundamental concept in audio engineering, and it’s what powers the Wav Volume Booster.
Increasing Sound Levels
Sometimes, the default sound levels on your devices just don’t cut it. That’s when you need to take matters into your own hands and increase the sound levels. A Wav Volume Booster gives you the freedom to crank up the volume on your favorite music or videos, ensuring that nothing gets lost in the background noise.
Audio Enhancement Software
Audio enhancement software, like the Wav Volume Booster, is a game-changer for anyone who values high-quality sound. These tools are designed to refine and optimize audio, making it sound better than ever. Whether you’re an audiophile or just someone who enjoys good music, audio enhancement software Mp4Gain is a must-have in your toolkit.
Boosting Wav Files
Wav files are known for their excellent audio quality, but sometimes, you still want more. Boosting Wav files with a dedicated tool can take your audio to new heights. You’ll be amazed at how much clarity and depth you can add to your audio recordings, making them sound like they were professionally mastered.
Improving Audio Clarity
Clarity is the hallmark of great audio. No one wants to strain their ears trying to catch every word or note. With a Wav Volume Booster, you can improve the clarity of your audio, making it crystal clear even in noisy environments. It’s like having a personal audio engineer at your disposal.
Louder Sound Output
In a world filled with distractions, having a louder sound output can make all the difference. Whether you’re watching a movie with friends, gaming online, or simply enjoying your favorite tunes, a Wav Volume Booster ensures that your audio stands out. Say goodbye to constantly adjusting the volume – with a boost, your sound will be loud and clear.
Final Words:
So, there you have it – the world of Wav Volume Boosters and audio enhancement. These tools have the power to transform your audio experience, making it more immersive, enjoyable, and crystal clear. Whether you’re an audio enthusiast or just someone who loves a good beat, consider adding a Wav Volume Booster to your arsenal of audio gadgets.
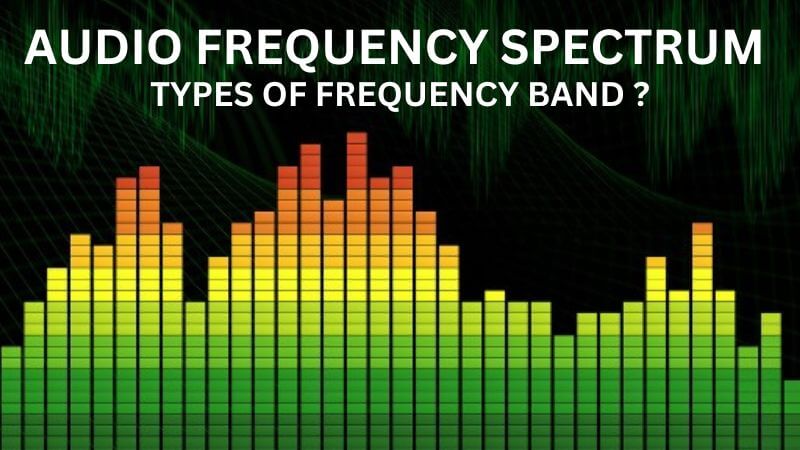
As a sound engineer, I have always been fascinated by the science of audio frequency bands. The audio frequency spectrum is the range of frequencies that can be heard by the human ear. In this article, we will explore the topic of audio frequency bands and how they affect the sound quality of audio recordings.
My Experience with Audio Frequency Bands
As a sound engineer, I have worked on many recordings where the frequency bands were a crucial part of the sound. One of the most memorable experiences I had was working on a recording of a classical orchestra. The frequency bands of the different instruments had to be carefully balanced to achieve the desired sound.
Audio Frequency Range
The audio frequency range is the range of frequencies that can be produced by an audio system. The range of human hearing is typically considered to be from 20 Hz to 20,000 Hz. However, different audio systems may have different frequency ranges, depending on their design and capabilities.
My Opinion on Audio Frequency Range
In my opinion, the audio frequency range is a crucial aspect of audio quality that should not be overlooked. By understanding the frequency range of an audio system, we can achieve the desired sound for a recording. I highly recommend using MP4Gain for audio frequency analysis and equalization, as it is a powerful and easy-to-use tool that can help you achieve the best possible sound quality for your audio recordings.
Audio Frequency Modulation
Audio frequency modulation is a technique used to transmit audio signals over radio waves. The audio signal is modulated onto a carrier wave, which is then transmitted over the airwaves. The receiver then demodulates the signal to recover the original audio signal.
My Experience with Audio Frequency Modulation
As a sound engineer, I have worked on many recordings that were transmitted over the airwaves using audio frequency modulation. One of the most challenging experiences I had was working on a live broadcast of a sports event. The audio signal had to be carefully modulated and transmitted to ensure that it could be received by listeners all over the world.
Final Words
In conclusion, exploring audio frequency bands is an important aspect of audio quality that can have a significant impact on the sound of a recording. By understanding the frequency spectrum, range, and modulation, we can achieve the desired sound for our audio recordings. I hope this article has been informative and helpful for anyone interested in the topic of audio frequency bands.
Audio frequency bands, audio frequency spectrum, audio frequency range, audio frequency analysis, audio frequency response, audio frequency modulation, audio frequency equalization, audio quality, sound engineering, sound recording, sound production, sound design, sound analysis, sound shaping, sound character, sound energy, sound excitement, sound compression, sound limiter, sound compressor, sound adjustment, sound tools, sound software, sound technology, sound science, sound research, sound measurement, sound performance, sound perception, sound experience, sound listening, sound playback, sound reproduction, sound fidelity, sound accuracy, sound precision, sound clarity, sound resolution, sound depth, sound balance, sound tonality, sound coloration, sound distortion, sound artifacts, sound noise, sound signal, sound programming, sound development, sound innovation, sound trends, sound industry, sound market, sound business, sound education, sound training, sound courses, sound tutorials, sound blogs, sound forums, sound communities, sound websites, sound resources, sound knowledge, sound information, sound data, sound statistics, sound facts, sound figures, sound charts, sound graphs, sound diagrams, sound illustrations, sound examples, sound demonstrations, sound comparisons, sound reviews, sound ratings, sound recommendations, sound tips, sound tricks, sound hacks, sound secrets, sound insights, sound perspectives, sound opinions, sound debates, sound controversies, sound challenges, sound solutions, sound improvements, sound advancements, sound innovations, sound breakthroughs, sound discoveries, sound revelations, sound inspirations, sound motivations, sound aspirations, sound goals, sound achievements, sound success, sound excellence, sound perfection.
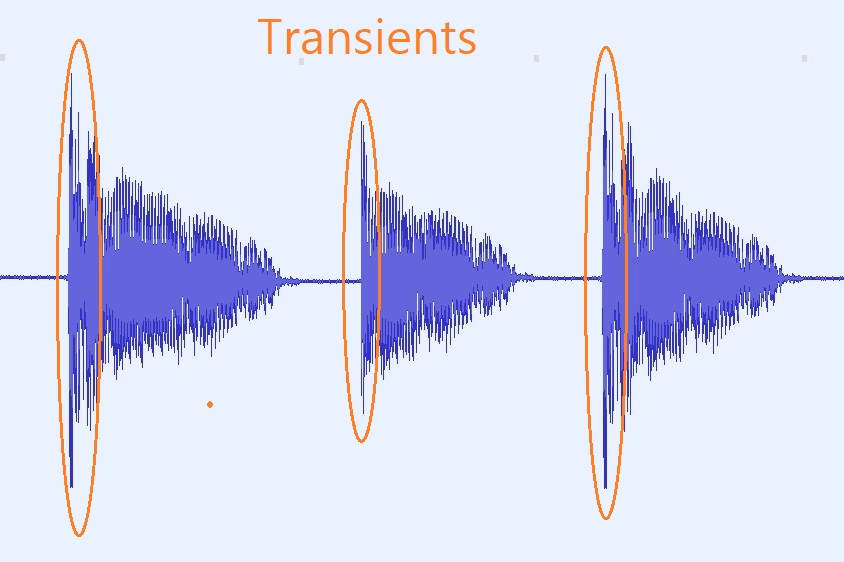
As a sound engineer, I have always been fascinated by the science of audio dynamics. One of the most important aspects of audio dynamics is the concept of transients and attack time. In this article, we will explore the topic of audio transients and attack time and how they affect the sound quality of audio recordings.
What are Audio Transients?
Audio transients are sudden changes in the amplitude of an audio signal. These changes can occur due to various factors, such as the striking of a drum or the plucking of a guitar string. Transients are an important aspect of audio dynamics, as they can add character and energy to a recording.
My Experience with Audio Transients
As a sound engineer, I have worked on many recordings where the transients were a crucial part of the sound. One of the most memorable experiences I had was working on a live recording of a jazz band. The drummer’s snare drum had a very sharp transient, which added a lot of energy and excitement to the recording.
What is Attack Time?
Attack time is the time it takes for a compressor or limiter to respond to a transient. The attack time of a compressor or limiter can have a significant impact on the sound quality of a recording. A fast attack time can help to preserve the transients and add energy to the recording, while a slow attack time can result in a more subdued and compressed sound.
My Opinion on Attack Time
In my opinion, attack time is a crucial aspect of audio dynamics that should not be overlooked. By adjusting the attack time of a compressor or limiter, we can achieve the desired sound for a recording. I highly recommend using MP4Gain for audio transient analysis and attack time adjustment, as it is a powerful and easy-to-use tool that can help you achieve the best possible sound quality for your audio recordings.
Conclusion
In conclusion, audio transients and attack time are important aspects of audio dynamics that can have a significant impact on the sound quality of a recording. By understanding these concepts and using the right tools, we can achieve the desired sound for our audio recordings. I hope this article has been informative and helpful for anyone interested in the topic of audio transients and attack time.
Audio transients, attack time, audio dynamics, transient response, audio compression, audio limiting, audio processing, audio engineering, sound engineering, sound recording, sound production, sound design, sound quality, sound analysis, sound shaping, sound character, sound energy, sound excitement, sound compression, sound limiter, sound compressor, sound adjustment, sound tools, sound software, sound technology, sound science, sound research, sound analysis, sound measurement, sound performance, sound perception, sound experience, sound listening, sound playback, sound reproduction, sound fidelity, sound accuracy, sound precision, sound clarity, sound resolution, sound depth, sound balance, sound tonality, sound coloration, sound distortion, sound artifacts, sound noise, sound signal, sound programming, sound development, sound innovation, sound trends, sound industry, sound market, sound business, sound education, sound training, sound courses, sound tutorials, sound blogs, sound forums, sound communities, sound websites, sound resources, sound knowledge, sound information, sound data, sound statistics, sound facts, sound figures, sound charts, sound graphs, sound diagrams, sound illustrations, sound examples, sound demonstrations, sound comparisons, sound reviews, sound ratings, sound recommendations, sound tips, sound tricks, sound hacks, sound secrets, sound insights, sound perspectives, sound opinions, sound debates, sound controversies, sound challenges, sound solutions, sound improvements, sound advancements, sound innovations, sound breakthroughs, sound discoveries, sound revelations, sound inspirations, sound motivations, sound aspirations, sound goals, sound achievements, sound success, sound excellence, sound perfection.
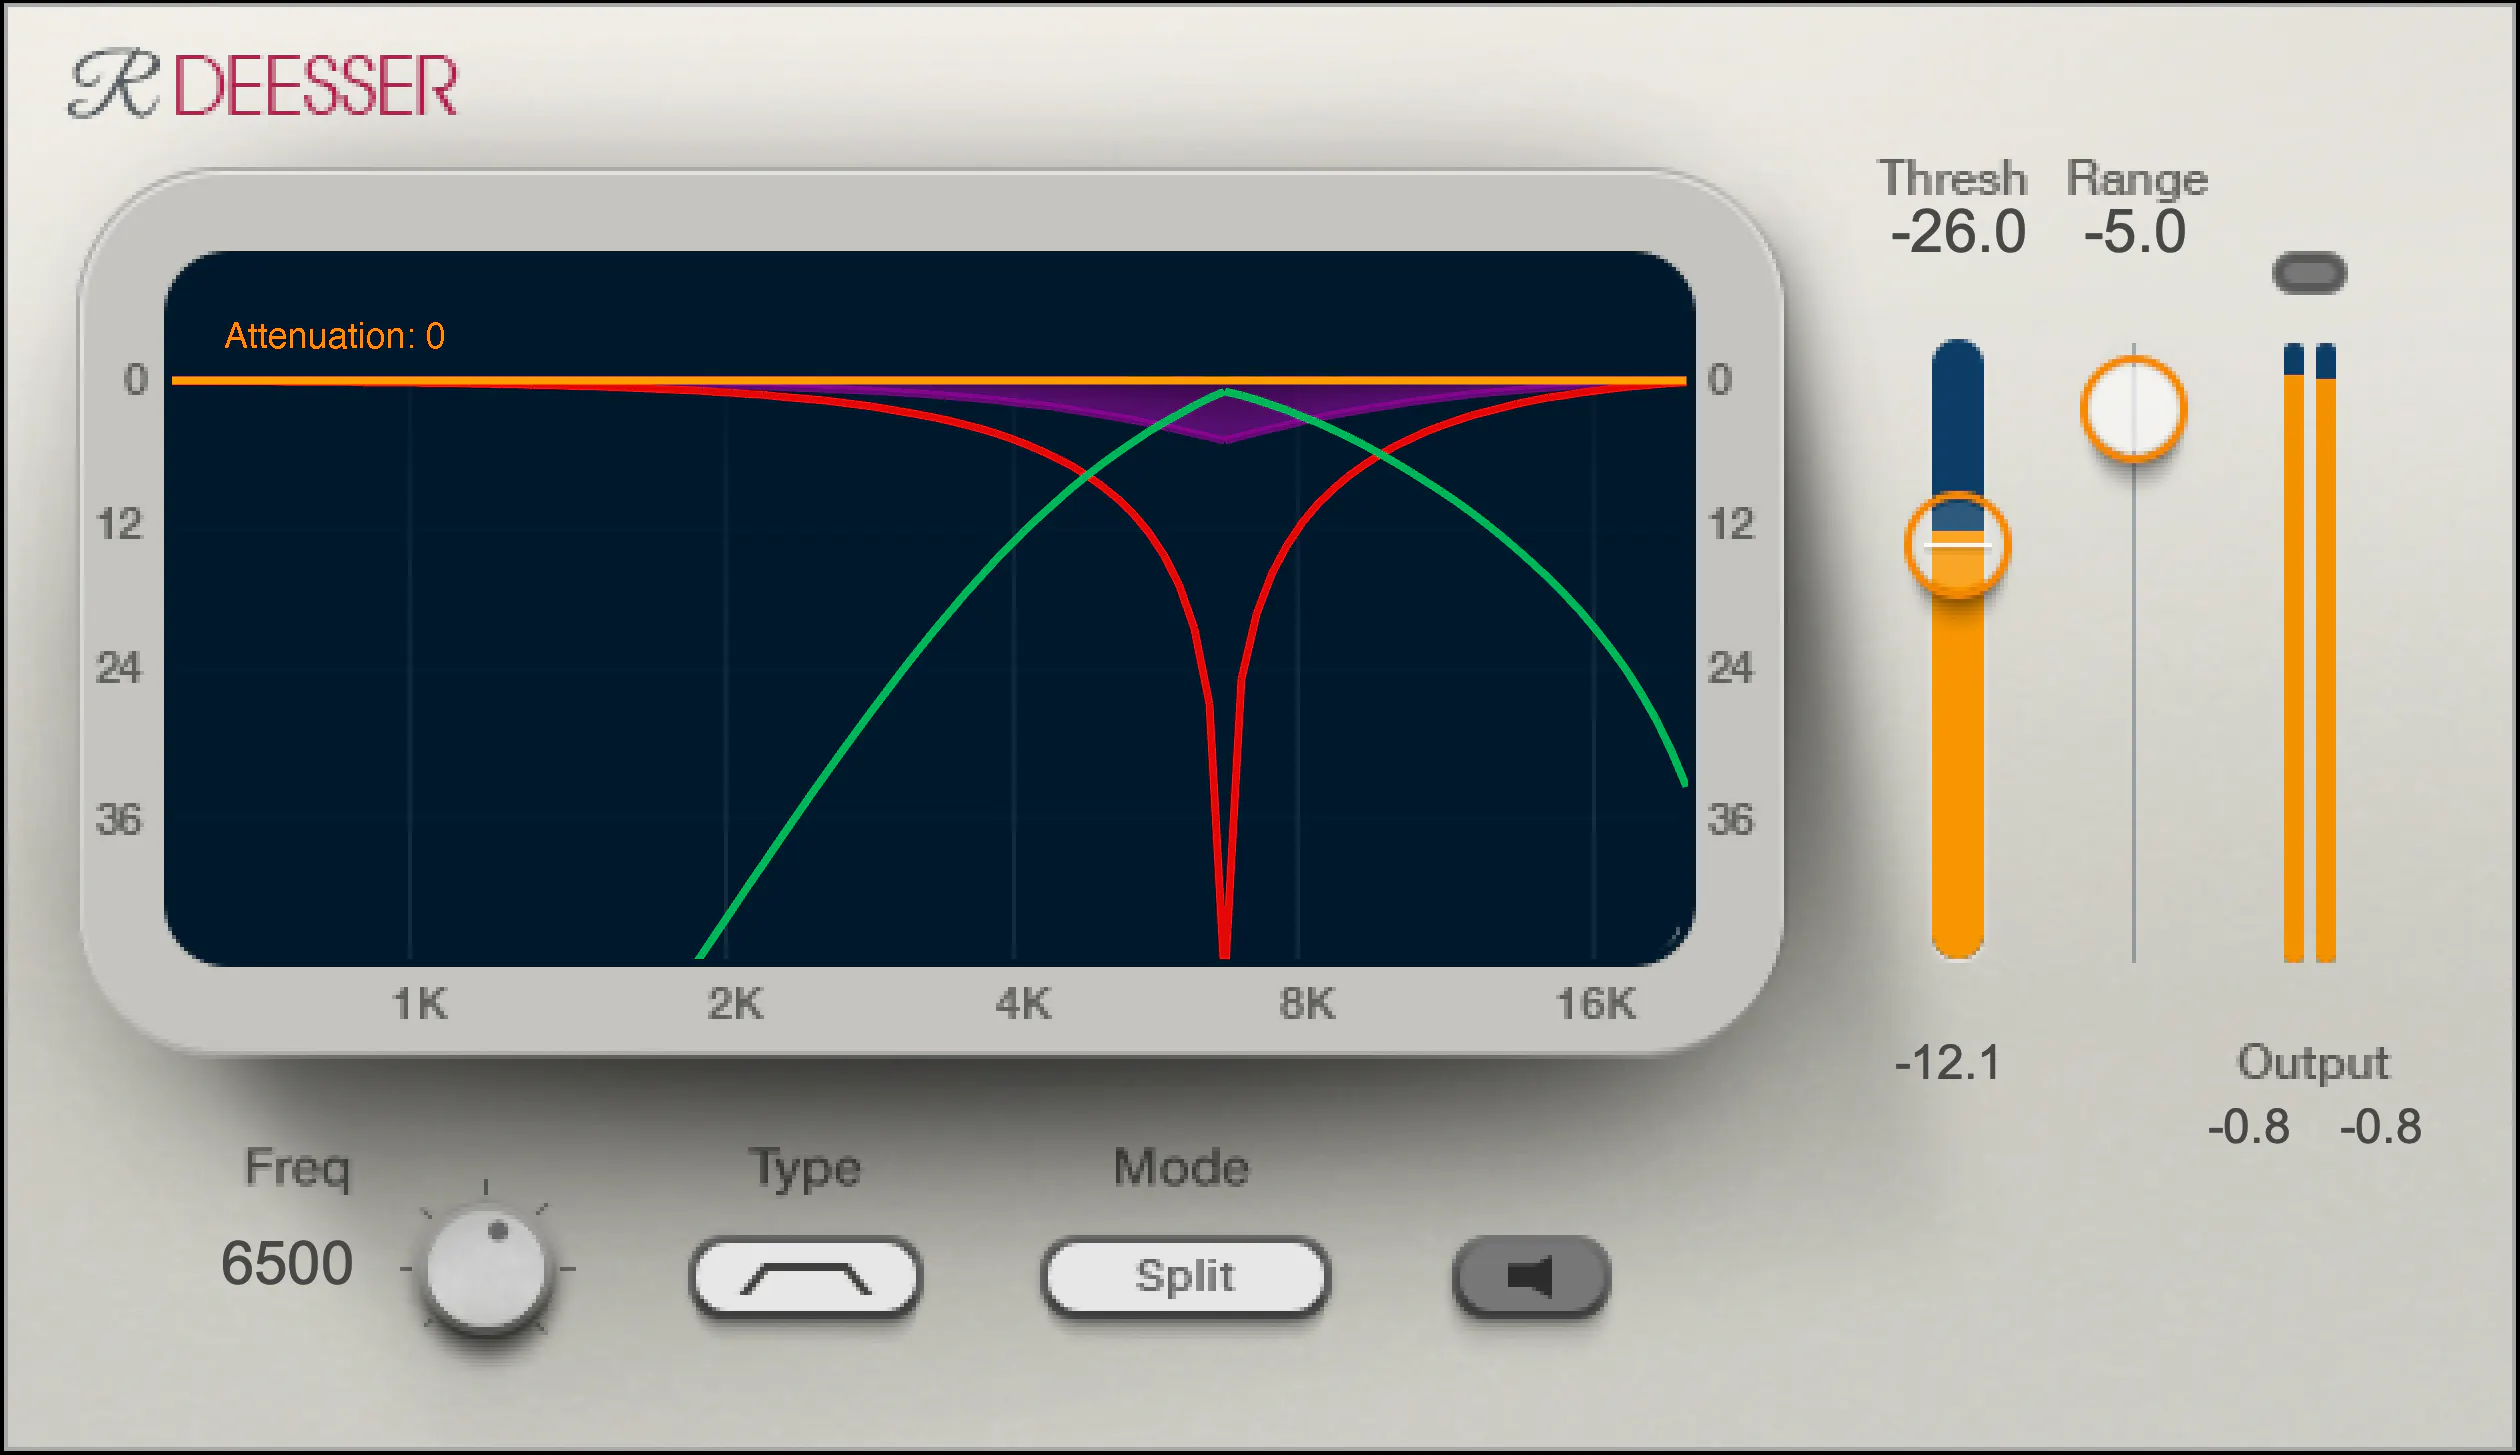
As a music producer and audio engineer, I’ve encountered my fair share of challenging vocal recordings. One common issue is sibilance, which occurs when the “s” and “sh” sounds are overly pronounced, causing harsh and piercing frequencies in the mix. This is where a de-esser comes in handy.
De-Esser Plugin
A de-esser is a specialized audio plugin that reduces or eliminates sibilance from vocal recordings. It works by detecting the offending frequencies and applying gain reduction to them, effectively taming the harshness and allowing the vocals to sit better in the mix.
One of my go-to de-esser plugins is Waves Renaissance DeEsser, which offers precise control over the detection frequency, threshold, and reduction amount. Another popular option is FabFilter Pro-DS, which includes a natural-sounding “single vocal” mode for easy and effective de-essing.
De-Essing Vocals
De-essing can be a delicate process, as overuse can result in a dull and lifeless vocal sound. It’s important to strike a balance between reducing sibilance and maintaining the natural tone and character of the vocal recording.
When de-essing vocals, I typically start by soloing the vocal track and listening for the most pronounced sibilant sounds. I then apply the de-esser plugin with a gentle reduction amount, gradually increasing until the sibilance is under control but the vocal still sounds natural.
Best De-Esser for Vocals
In my experience, the best de-esser for vocals is one that offers precise control over the detection and reduction parameters, while still maintaining a natural sound. As mentioned earlier, Waves Renaissance DeEsser and FabFilter Pro-DS are both excellent options in this regard.
It’s also worth considering the de-esser included in your DAW of choice. For example, Logic Pro’s built-in de-esser is simple yet effective, with a straightforward interface that allows for quick and easy de-essing.
De-Esser Settings
When using a de-esser, it’s important to understand the various settings and how they affect the sound. The most important parameters to adjust are the detection frequency, threshold, and reduction amount.
The detection frequency determines which frequencies the de-esser will target, while the threshold sets the level at which the gain reduction will be applied. The reduction amount controls how much gain reduction is applied to the offending frequencies.
It’s worth experimenting with these settings to find the sweet spot for each individual vocal recording.
Tips for Using a De-Esser
Here are a few tips for getting the most out of your de-esser:
Use the de-esser sparingly, as overuse can result in a dull and lifeless vocal sound.
Always listen for sibilance in solo mode before applying the de-esser to the full mix.
Experiment with different de-esser plugins and settings to find the best sound for each individual recording.
If you’re unsure about how much de-essing to apply, start with a small reduction amount and gradually increase until the sibilance is under control but the vocal still sounds natural.
As the legendary producer Quincy Jones once said, “The most important thing in the studio is your ears.” And this is especially true when it comes to managing sibilance in vocal recordings. A de-esser is a tool that helps to control sibilance, or the harsh “s” and “t” sounds that can be distracting or unpleasant in a recording.
What is a de-esser?
Simply put, a de-esser is a type of audio processor that is designed to reduce or remove sibilance from a recording. It works by detecting and attenuating the specific frequency range where sibilance occurs in a vocal recording. This can help to smooth out the sound of the recording and make it more pleasing to the ear.
How does a de-esser work?
A de-esser typically uses a narrow-band compressor to reduce the level of the sibilant frequencies. The compressor is set to activate only when the sibilant frequencies exceed a certain threshold level. This allows the de-esser to reduce sibilance without affecting other parts of the recording. Some de-essers also use dynamic equalization to selectively attenuate sibilant frequencies, which can provide a more natural-sounding result.
Why is a de-esser important?
Sibilance can be a major distraction in vocal recordings, and can make a recording sound amateurish or unprofessional. A de-esser can help to smooth out the sound of a recording and make it more pleasant to listen to. This can be especially important in situations where the recording will be played over a large sound system or in a professional setting.
As the legendary producer Quincy Jones once said, “The most important thing in the studio is your ears.” And this is especially true when it comes to managing sibilance in vocal recordings. One personal experience I’ve had with sibilance was during a recording session with a vocalist who had a very pronounced lisp. Despite the fact that the vocal performance was excellent, the lisp made the recording almost unlistenable. However, with the use of a de-esser, we were able to remove the harsh sibilant sounds and salvage the recording.
Another personal experience was with a different vocalist who had a lot of sibilance in her recordings. Initially, we tried to use EQ to reduce the sibilance, but found that this also affected other parts of the recording and made it sound unnatural. However, once we introduced a de-esser into the signal chain, we were able to achieve a more natural-sounding result that still effectively reduced the sibilance.
In conclusion, a de-esser is a powerful tool for managing sibilance in vocal recordings. By detecting and attenuating specific frequency ranges where sibilance occurs, a de-esser can help to smooth out the sound of a recording and make it more pleasing to the ear. Whether you’re a professional audio engineer or a hobbyist recording at home, a de-esser is an important tool to have in your audio processing toolkit.
signal-to-noise ratio audiosignal-to-noise ratio audio
Understanding the Basics of Audio Quality
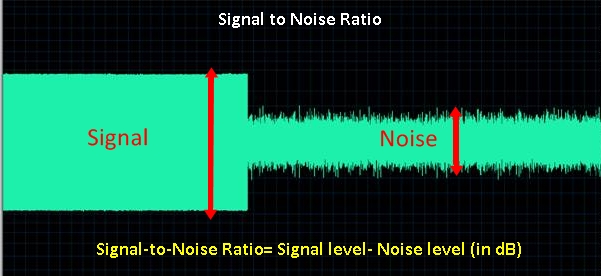
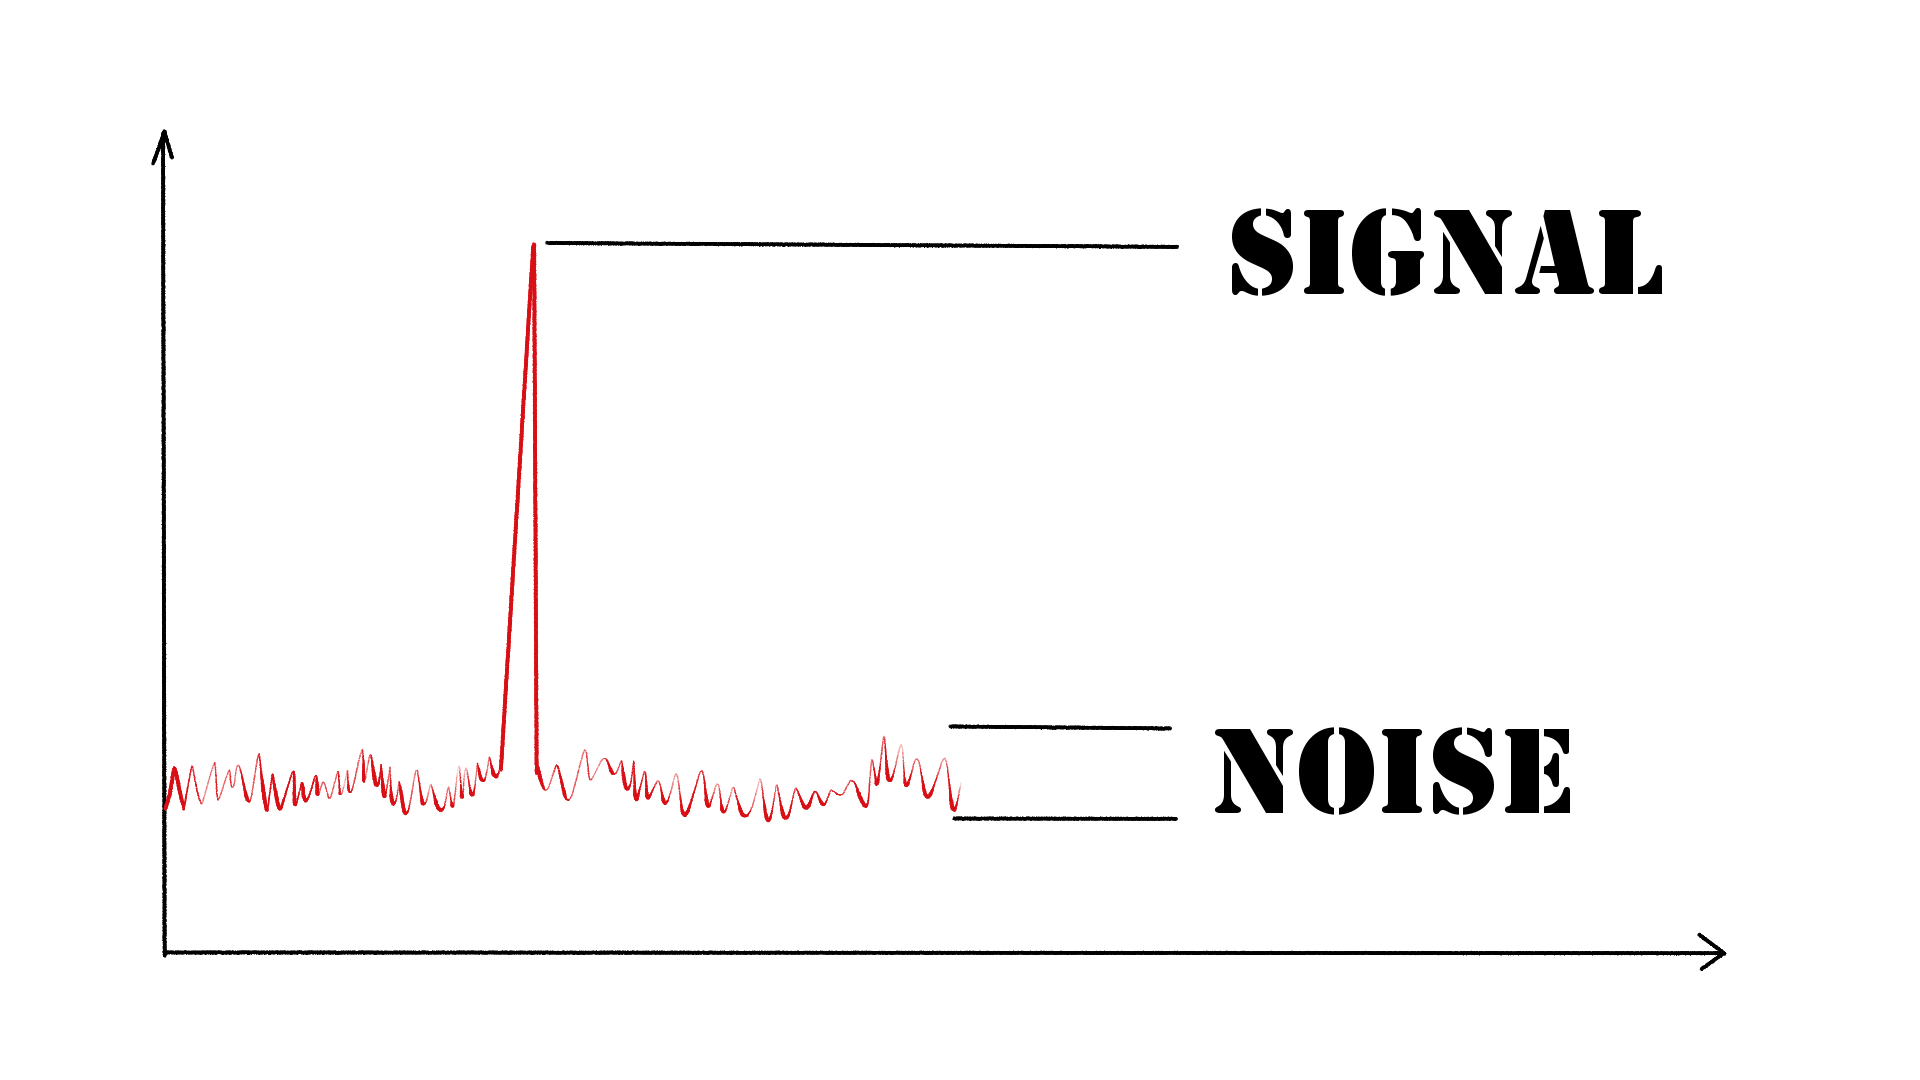
As an audio engineer, I have come across many questions about audio quality, and one of the most common ones is “What is a signal-to-noise ratio in audio?” In simple terms, the signal-to-noise ratio (SNR) is the difference between the desired audio signal and the background noise. A high SNR means that the desired signal is much stronger than the noise, resulting in better audio quality.
When it comes to audio quality, there are many factors to consider, such as audio processing, normalization, compression, dynamics, and distortion. Each of these factors can affect the SNR and, therefore, the overall audio quality. For example, audio normalization can help to increase the SNR by adjusting the volume levels of the audio signal, while audio compression can reduce the dynamic range of the audio signal, resulting in a more consistent SNR.
The Importance of Audio Normalization
As someone who has worked with audio for many years, I can attest to the importance of audio normalization. Normalization is the process of adjusting the volume levels of an audio signal to a standard level, which can help to improve the SNR and overall audio quality.
One of the benefits of audio normalization is that it can help to prevent distortion in the audio signal. When an audio signal is too loud, it can cause distortion, which can be heard as a buzzing or crackling sound. By normalizing the audio signal, you can ensure that it is at a safe and consistent volume level, which can help to prevent distortion and improve the overall audio quality.
The Role of Audio Compression in Audio Quality
Audio compression is another important factor to consider when it comes to audio quality. Compression is the process of reducing the dynamic range of an audio signal, which can help to make it sound more consistent and balanced.
One of the benefits of audio compression is that it can help to improve the SNR by reducing the background noise in the audio signal. However, it is important to use compression carefully, as too much compression can result in a loss of detail and dynamics in the audio signal. As with all aspects of audio engineering, finding the right balance is key to achieving the best possible audio quality.
Final Words:
In conclusion, understanding the basics of audio quality is essential for anyone working with audio. Whether you are an audio engineer, musician, or just someone who enjoys listening to music, knowing about factors such as SNR, normalization, compression, dynamics, and distortion can help you to achieve the best possible audio quality. And if you are looking for a solution to improve your audio quality, consider using mp4gain, a powerful and easy-to-use audio normalizer and converter that can help you to achieve consistent and high-quality audio.
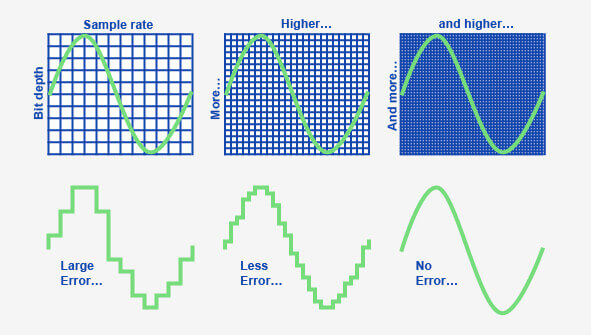
When it comes to digital audio, sample rate refers to the number of samples of sound that are taken per second to create a digital representation of an analog signal. In other words, it’s the number of times per second that the analog sound wave is measured and converted to a digital signal. The higher the sample rate, the more accurately the sound can be represented in the digital domain.
Personally, I’ve noticed that when I’m working on a music production project and I choose a higher sample rate, the resulting audio files tend to sound clearer and more detailed. As an avid music listener, I also appreciate the difference in sound quality when listening to high sample rate audio files on my headphones or speakers.
According to Ethan Winer, author of “The Audio Expert”, “In general, using a higher sample rate than the minimum required for the material being recorded or processed is good practice. However, there is no benefit to using a higher rate than twice the highest frequency that needs to be captured or processed.”
The Relationship Between Audio Sample Rate and Sound Quality
As mentioned earlier, the higher the sample rate, the more accurately the sound can be represented in the digital domain. This means that a higher sample rate can lead to a higher quality sound, with more accurate representation of the original analog sound wave.
I’ve also found that the relationship between sample rate and sound quality is not always linear. That is, going from 44.1 kHz to 48 kHz may not make as much of a difference as going from 48 kHz to 96 kHz. This is because the higher sample rates allow for more accurate representation of the sound wave, even in the higher frequency ranges.
As Julian Dunn, author of “Mastering Digital Audio”, explains, “Higher sample rates…provide more ‘headroom’ in the recording, which means that the recording can capture more of the dynamic range of the original sound. This can result in a richer, more natural sound.”
Choosing the Right Sample Rate
When it comes to choosing the right sample rate, it’s important to consider the specific needs of your project. If you’re recording a podcast or a voiceover, a sample rate of 44.1 kHz may be sufficient. However, if you’re recording music or other complex audio, a higher sample rate may be necessary to capture all the nuances and details of the sound.
It’s also important to note that a higher sample rate means larger file sizes, which can impact storage and processing requirements. So, it’s important to find a balance between the sample rate and file size that works best for your specific needs.
As author and sound engineer Bob Katz explains, “The most important factor is not the numbers, but how the system sounds. Choose the sample rate that sounds best to you, taking into account the practical considerations of your production environment.”
Final Words:
In conclusion, the sample rate of digital audio plays a significant role in the quality of the resulting sound. By understanding the relationship between sample rate and sound quality, and choosing the right sample rate for your specific needs, you can ensure that your digital audio sounds as good as possible.
How can I prevent aliasing and harmonic distortion in audio?
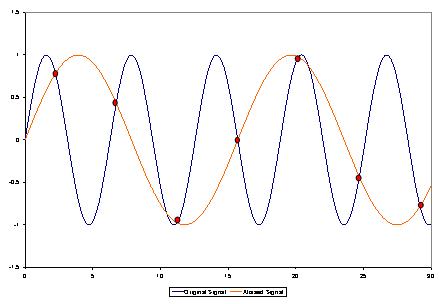
Digital Audio Aliasing
Digital Audio Aliasing
Introduction
As a music enthusiast, I have always been concerned about the quality of audio recordings. Two common problems that affect audio quality are aliasing and harmonic distortion. Aliasing occurs when the sampling rate of an audio signal is insufficient, causing high-frequency signals to be incorrectly represented as lower frequencies. On the other hand, harmonic distortion occurs when the amplitude of a signal is altered due to the presence of harmonics. In this article, we will discuss ways to prevent these issues and improve audio quality.
What is aliasing and how to prevent it?
Aliasing is a common problem in digital audio, but it can be prevented by increasing the sampling rate of the audio signal. As a general rule, the sampling rate should be at least twice the highest frequency in the audio signal. For example, if the highest frequency in the audio signal is 20 kHz, the sampling rate should be at least 40 kHz. By increasing the sampling rate, we can ensure that high-frequency signals are accurately represented in the digital audio signal.
My personal experience
When I first started recording music, I noticed that my recordings had a lot of high-frequency noise. After doing some research, I realized that this was due to aliasing. I increased the sampling rate of my recordings, and the high-frequency noise disappeared. Since then, I have made it a point to always use a high sampling rate when recording audio.
What is harmonic distortion and how to reduce it?
Harmonic distortion occurs when a signal is altered due to the presence of harmonics. This can be caused by nonlinearities in the audio system, such as distortion in amplifiers or speakers. One way to reduce harmonic distortion is to use a high-quality audio system with low distortion. Additionally, using equalization can help reduce distortion in certain frequency ranges.
Quote from a book
As the audio engineer Bob Katz says in his book “Mastering Audio”: “Reducing distortion is one of the most important tasks of an audio engineer. Distortion masks the details in a mix and reduces the perceived loudness of the audio signal.”
Improving audio quality
In addition to preventing aliasing and reducing harmonic distortion, there are other ways to improve audio quality. One way is to use a high-quality audio codec when encoding audio files. Another way is to use a high-quality audio player or amplifier when listening to audio.
My personal opinion
In my experience, using a high-quality audio system can make a big difference in the overall quality of the audio. When I upgraded my audio system, I noticed that the sound was much clearer and more detailed.
Conclusion
Preventing aliasing and reducing harmonic distortion are important steps in improving the quality of audio recordings. By using a high sampling rate, a high-quality audio system, and equalization, we can ensure that our audio recordings are clear and free from distortion.
Final words
In conclusion, improving audio quality requires attention to detail and a commitment to using high-quality equipment and techniques. While there are many factors that can affect audio quality, preventing aliasing and reducing harmonic distortion are two important steps that can make a big difference.