Importance of LUFS in Video or Audio Normalization
Let’s talk about the Importance of LUFS in Video or Audio Normalization
LUFS in audio and video normalization is crucial for a consistent listening experience. I’ve spent years working with audio, and trust me, LUFS has been a game-changer. Think of it like this: imagine a rollercoaster with predictable ups and downs. That’s what LUFS helps us achieve with sound. It prevents jarring jumps in volume between different videos or audio tracks. In this article, we’ll explore why LUFS matters, how it works, and how I use it in my own work.
Understanding LUFS and Its Role in Normalization
LUFS, or Loudness Units Full Scale, measures perceived loudness. I like to think of it as a more sophisticated volume knob. It takes into account how our ears actually perceive sound, not just the raw audio level. Normalization, then, uses LUFS to level out the overall loudness.
Why LUFS Matters for Consistent Audio Levels
Consistent audio levels are essential for professional-sounding content. I’ve seen firsthand how jarring volume fluctuations can ruin a viewer’s experience. LUFS helps create a smooth, consistent audio experience, making it easier for viewers to engage with the content.
Benefits of Using LUFS for Normalization
LUFS-based normalization offers several benefits. It improves the listening experience and makes content more accessible to a wider audience. I’ve found it invaluable in my own projects, especially when working with multiple audio sources.
Improved viewer experience
No more annoying volume jumps between scenes or videos. It’s a smoother ride for the ears.
Better accessibility
Consistent audio levels are crucial for people with hearing impairments. LUFS normalization makes content more inclusive.
Professional sound quality
LUFS helps achieve a polished, professional sound. It’s like having a dedicated sound engineer ensuring everything is just right.
How LUFS Works in Practice
LUFS measures the average loudness of audio over time. It’s like taking the temperature of a room, not just a single spot. This gives a more accurate representation of how we perceive loudness.
Implementing LUFS in Your Workflow
Integrating LUFS into your workflow is easier than you might think. Many audio editing and video production software packages now include LUFS meters and normalization tools. I use them all the time.
LUFS vs. Peak Normalization: Understanding the Difference
Peak normalization simply adjusts the highest peak to a target level. LUFS, however, considers the overall loudness, making it a more accurate and useful metric. Think of it as looking at the whole forest, not just the tallest tree.
Common LUFS Standards and Target Levels
Different platforms and broadcasters have specific LUFS requirements. Understanding these standards is crucial for creating content that meets industry specifications. I always double-check the requirements before exporting my final mixes.
Addressing Challenges and Misconceptions about LUFS
Some people mistakenly believe that LUFS makes everything sound the same. That’s not true. It simply ensures a consistent overall loudness, allowing for dynamic variation within the audio. I’ve found this to be a major advantage in my work.
Advanced Techniques with LUFS
While basic LUFS normalization is straightforward, there are advanced techniques that I use for fine-tuning audio. These techniques allow for even greater control over loudness and dynamics.
FAQ about Importance of LUFS in Video or Audio Normalization
What is LUFS in simple terms?
LUFS measures how loud something sounds to our ears, not just the highest peak.
Why is LUFS important for video and audio normalization?
What’s the difference between LUFS and peak normalization?
Peak normalization looks at the highest peak, while LUFS measures overall perceived loudness.
How do I measure LUFS in my audio?
Most audio editing software includes LUFS meters.
What are common LUFS targets for different platforms?
Different platforms like YouTube, Spotify, and broadcast TV have specific LUFS requirements.
Does LUFS normalization make everything sound the same?
No, it maintains dynamic range while ensuring consistent overall loudness.
How can I implement LUFS in my workflow?
Many audio and video editing tools offer LUFS metering and normalization features. Mp4Gain is a great tool.
What are some advanced techniques for using LUFS?
Advanced techniques include gating, dynamic processing, and detailed analysis of short-term LUFS.
Why are different LUFS standards necessary?
Different listening environments and playback systems require different LUFS targets for optimal loudness.
What are the benefits of using LUFS for podcasts?
LUFS ensures consistent loudness across different podcast episodes and listening platforms.
Latest words on Importance of LUFS in Video or Audio Normalization
LUFS is a powerful tool for achieving consistent and professional-sounding audio. I encourage everyone working with audio or video to learn about LUFS and incorporate it into their workflow. Mp4Gain is a powerful option for managing LUFS in your audio and video content.
Comments:
This article totally cleared up my confusion about LUFS. Thanks for the simple explanations! – AudioNewbie
I’ve been meaning to learn more about LUFS. This was super helpful! – VideoEditorPro
Great article! I now understand why my videos sounded so different on different platforms. – YouTubeCreator
Thanks for explaining the difference between LUFS and peak normalization. I always wondered about that. – SoundGuy
This article was just what I needed. Now I can make sure my podcasts have consistent loudness. – PodcastProducer
Super informative! I’m going to start using LUFS in all my audio projects. – MusicMaker
I didn’t understand anything about LUFS before reading this article. Now, I can consider myself a LUFS expert. – LUFSLover
Can you guys write a more in deep article about advanced LUFS techniques? This was helpful, but I need more. – AdvancedUser
This article has been very clarifying, easy to understand, and to the point. – John
Amazing article! Great resource for anyone working with audio. – Audiophile
LUFS always seemed intimidating, but this article made it so easy to understand. Thanks! – AspiringSoundEngineer
Unlocking the Mysteries of M4A Channel Configuration
In this comprehensive guide, we delve deep into the intricacies of M4A channel configuration, providing invaluable insights into its importance, optimization techniques, and practical applications. Let’s unravel the mysteries together and unlock the full potential of M4A audio files.
Understanding M4A Channels
Embark on a journey to understand the fundamentals of M4A channel configuration. From mono to stereo and beyond, explore how channels influence audio perception and playback experience. Discover the significance of channel mapping and its impact on audio spatialization.
Exploring Mono vs. Stereo
Delve into the differences between mono and stereo configurations, uncovering their unique characteristics and suitability for various audio scenarios. Learn how mono channels consolidate audio signals, while stereo channels create immersive soundscapes.
Definition and characteristics of mono and stereo channels
Advantages and limitations of mono and stereo configurations
Real-life examples illustrating the use of mono and stereo channels
Optimizing Surround Sound Configurations
Take your audio experience to the next level with surround sound configurations. Explore the intricacies of multi-channel setups, including 5.1 and 7.1 surround sound, and their applications in home theaters, gaming, and immersive audio experiences.
Overview of surround sound configurations
Installation and setup tips for optimal surround sound performance
Real-world examples showcasing the immersive capabilities of surround sound
Practical Applications of M4A Channel Configuration
Uncover the practical implications of M4A channel configuration across various industries and domains. From music production to multimedia entertainment, explore how channel mapping influences audio quality, compatibility, and user experience.
Enhancing Audio Production Workflows
Gain insights into how M4A channel configuration enhances audio production workflows. Discover how audio engineers leverage channel mapping to achieve spatial depth, clarity, and realism in their recordings.
Best practices for channel configuration in music production
Tools and techniques for efficient channel mapping
Case studies highlighting successful audio production projects
Delivering Immersive Multimedia Experiences
Explore the role of M4A channel configuration in delivering immersive multimedia experiences. From cinematic soundtracks to virtual reality applications, understand how optimized channel mapping enhances audio immersion and engagement.
Integration of M4A channel configuration in multimedia content creation
Impact of channel mapping on user engagement and satisfaction
Case studies demonstrating the effectiveness of immersive audio experiences
Latest Words on M4A Channel Configuration
In conclusion, M4A channel configuration is a critical aspect of audio engineering and multimedia content creation. By understanding its nuances and optimizing channel mapping techniques, professionals can elevate audio quality and deliver immersive experiences across various platforms and industries.
Comments:
This article provided invaluable insights into M4A channel configuration, shedding light on its importance and practical applications. I’m excited to apply these techniques to my audio projects!
– AudioEnthusiast123
As someone new to audio production, I found this guide to be incredibly informative and easy to understand. The explanations were clear, and the examples helped clarify complex concepts. Thank you!
– MusicNovice456
I appreciated the focus on practical applications and real-world examples throughout the article. It made the information more relatable and actionable. Looking forward to more content like this!
– SoundPro789
While the article provided a good overview, I wish it had delved deeper into specific audio editing software and techniques for optimizing channel configuration. Overall, a helpful resource!
Exploring Audio Convolution: Unraveling the Sound Transformation
Audio Convolution
Audio convolution is a fascinating concept that lies at the heart of many audio processing techniques and technologies. In this article, I will provide a comprehensive overview of audio convolution, its applications, and its role in shaping the world of sound.
Understanding Audio Convolution
Audio convolution is a mathematical operation that combines two audio signals to produce a third, resulting in a unique and transformative effect on sound. It operates by taking each sample of one audio signal and “mixing” it with corresponding samples of another, resulting in a new audio signal that carries the characteristics of both. This process is fundamental in various audio applications, ranging from music production to acoustic modeling and sound synthesis.
Applications of Audio Convolution
Audio convolution finds its use in a plethora of applications, each harnessing its power in distinct ways:
Reverberation: Convolution reverb is a widely used technique to recreate the natural acoustics of different spaces. By convolving an impulse response (representing a specific space’s acoustic characteristics) with an audio signal, you can make it sound as if it was recorded in that space.
Sound Design: Audio engineers use convolution to apply complex and unique effects to audio. This includes simulating vintage hardware, creating immersive audio environments for video games, or adding character to music tracks.
Room Acoustics Analysis: In architectural acoustics, convolution helps simulate how sound behaves in various spaces. This is crucial for designing concert halls, theaters, and recording studios to achieve desired acoustic properties.
FAQ Audio Convolution
What is Impulse Response in Audio Convolution?
Impulse response is a key element in audio convolution. It represents the way a system responds to an idealized impulse signal, which is a brief and infinitely loud sound. In audio convolution, an impulse response characterizes the unique acoustic properties of a space or the effect you want to apply. By convolving this impulse response with audio, you can emulate the sound of that space or effect.
How Does Audio Convolution Enhance Sound Quality?
Audio convolution enhances sound quality by allowing you to apply realistic acoustic properties, effects, and spatial characteristics to audio signals. This means you can make recorded music sound like it’s played in a concert hall or add rich textures to audio recordings. By accurately capturing and reproducing these aspects, convolution contributes to more immersive and high-fidelity sound experiences.
What Tools Are Used for Audio Convolution?
Several software tools and plugins are available for audio convolution. Digital audio workstations (DAWs) often include convolution reverb plugins, which make it easy to apply convolution to audio tracks. Additionally, standalone convolution processors and libraries offer flexibility in creating custom convolution effects and simulations
Sound Transformation with Audio Convolution
Audio convolution serves as a powerful tool for sound transformation. By convolving audio signals with various impulse responses and effects, you can shape and mold sound in countless creative ways. Whether you’re a music producer looking to craft unique textures or a sound designer pushing the boundaries of audio creativity, audio convolution opens up a world of sonic possibilities.
Real-Time Audio Convolution Processing
Real-time audio convolution processing has become increasingly accessible, thanks to advancements in computing power and software development. Musicians and live sound engineers can now apply convolution effects in real time, enhancing the quality and depth of live performances. This technology has revolutionized the way we experience sound in concerts and events.
Audio Convolution vs. Traditional Sound Processing
Audio convolution stands apart from traditional sound processing methods. While traditional techniques like equalization and compression modify audio in predefined ways, convolution offers a more flexible and adaptive approach. It allows you to replicate real-world sonic environments or create entirely novel soundscapes, making it a valuable addition to the audio engineer’s toolbox.
Last Words
In the ever-evolving realm of audio, the concept of audio convolution remains a potent force for creativity and realism. Whether you’re seeking to recreate the grandeur of a concert hall, craft cinematic soundscapes, or explore new sonic frontiers, audio convolution empowers you to transform sound in ways limited only by your imagination.
Understanding Audio Routing: Navigating the Sonic Highway
Audio RoutingAudio Routing
Audio routing is the invisible highway that allows sound to flow seamlessly from one source to another. It’s the backbone of our modern audio experience, whether we’re listening to music on our headphones, watching a movie, or attending a live concert. In this article, we’ll explore the intricacies of audio routing, diving deep into the technical aspects while keeping things relatable with real-life examples.
Demystifying Audio Routing: The Basics
At its core, audio routing is about directing audio signals from their source to their destination. Think of it as the GPS for sound, guiding it through various paths and devices to reach our ears. This process involves numerous components, including mixers, cables, software, and hardware, all working together harmoniously.
One of the fundamental concepts in audio routing is the “signal chain.” Just like a relay race, audio signals pass through a sequence of devices, each contributing its unique flavor or function. For instance, in a home audio setup, your music might start with a streaming service on your smartphone. From there, it travels through Bluetooth or a wired connection to your speakers or headphones, possibly passing through an amplifier or equalizer along the way. Each step in this chain can shape the sound, adjusting volume, tone, or effects.
Answering Your Curiosities
Now, let’s address some of the common questions people have about audio routing:
How Does Audio Routing Impact Sound Quality?
The impact of audio routing on sound quality is substantial. Imagine you’re at a concert, and the sound system isn’t properly routed. The result? Muffled vocals, distorted instruments, and a less-than-enjoyable experience. On the other hand, precise routing ensures that sound retains its clarity and fidelity as it travels from source to destination.
To put it in everyday terms, think of audio routing as a relay race. If each runner (audio device) passes the baton (sound signal) smoothly, the final sprint (your ears) benefits from the efficiency.
What Are the Key Components of an Audio Routing System?
Audio routing systems can be complex, comprising various components. These include mixers, audio interfaces, digital audio workstations (DAWs), and even physical cables. Mixers act as traffic controllers, directing audio to the right destination, while DAWs provide digital pathways for editing and manipulation.
Picture it like a traffic network in a city. Mixers are the traffic lights, cables are the roads, and DAWs are the control center that can reroute traffic or apply special effects.
Is Audio Routing Only Important in Professional Settings?
While audio routing is crucial in professional studios and live performances, it’s equally significant in everyday scenarios. Consider your home entertainment setup. If your TV’s audio isn’t correctly routed to your soundbar or speakers, you miss out on the immersive experience of your favorite movie or video game.
Think of audio routing as the delivery route for a pizza. Even if you’re not a professional pizza chef, ensuring the right route ensures the pizza arrives hot and delicious.
Audio Signal Routing Techniques: A Deep Dive
Delving into advanced audio signal routing techniques, we uncover methods like parallel processing, sidechain compression, and audio bussing. These techniques offer precision and creativity in shaping soundscapes.
To illustrate, think of audio bussing as a split highway. You can send specific sounds down different lanes, processing them uniquely before merging them back into the main road.
Audio Routing in Home Theater Systems
Home theater enthusiasts often seek guidance on optimizing audio routing for the best cinematic experience. Topics may include setting up surround sound, calibrating audio systems, and integrating streaming devices.
Imagine your home theater as a cinema complex. Proper audio routing ensures each seat in your living room gets the full blockbuster experience.
Audio Routing in Virtual Reality (VR) Environments
VR audio takes immersion to the next level. Here, audio routing is crucial for creating realistic 3D soundscapes, tracking head movements, and ensuring sound matches the visual experience.
Picture wearing VR goggles in a virtual forest. Audio routing directs bird songs to your left when you turn your head, enhancing the illusion of a real forest.
Last Words
Audio routing is the unsung hero of our audio experiences, working tirelessly behind the scenes to deliver clear and captivating sound. Whether you’re a music producer, a home theater enthusiast, or simply someone who enjoys quality audio, understanding the nuances of audio routing can elevate your sonic journey. So, the next time you enjoy your favorite tunes or immerse yourself in a movie, remember the intricate web of audio routing that makes it all possible.
Flac and Ogg Volume AdjusterFlac and Ogg Volume Adjuster
Are you tired of dealing with uneven audio levels in your Flac and Ogg files? Well, you’re not alone. Many audio enthusiasts and professionals often face the challenge of maintaining consistent sound quality across their collections. In this article, I’ll delve into the world of Flac and Ogg volume adjustment and explore various methods to tackle this issue effectively.
Audio File Format Adjustments
Before we dive into volume adjustments, it’s crucial to understand the nature of Flac and Ogg audio formats. Flac, short for Free Lossless Audio Codec, and Ogg Vorbis are popular choices for storing high-quality audio. Flac provides lossless compression, preserving audio quality without sacrificing file size, while Ogg is known for its open-source nature and efficient compression.
Sound Volume Control for Flac and Ogg
To control the volume of your Flac and Ogg files, you’ll need specialized tools or software designed for audio processing. These tools allow you to adjust the volume levels without compromising the overall audio quality. Keep in mind that it’s essential to maintain a balance between amplifying the audio and preventing distortion.
Adjusting Audio Levels in Flac and Ogg
One common method for volume adjustment is using an audio editor. These editors offer precise control over the audio, enabling you to increase or decrease the volume as needed. It’s important to preview the changes and make incremental adjustments to achieve the desired result.
Whether you’re a music enthusiast or a professional sound engineer, the ability to adjust volume levels in Flac and Ogg files is invaluable. By understanding the intricacies of these audio formats and utilizing the right tools, you can ensure a consistent and enjoyable listening experience.
Normalizing Sound in Flac and Ogg Files
Normalization is another technique to bring uniformity to your audio collection. This process adjusts the volume of each file to a standard level, eliminating extreme variations. Normalization algorithms analyze the audio content and adjust the gain accordingly, making it ideal for batch processing large libraries.
Volume Equalization for Flac and Ogg
Volume equalization is about ensuring that all your Flac and Ogg files have similar loudness levels. This technique is essential when you’re creating playlists or organizing audio for playback. Volume equalization tools use various methods to balance the audio, providing a seamless listening experience.
Audio Gain in Flac and Ogg Formats
Audio gain, also known as amplification, allows you to increase the overall loudness of your Flac and Ogg files. This can be particularly useful if you have older recordings or content with low volume levels. However, it’s crucial to exercise caution and avoid over-amplification, which can lead to distortion.
Balancing Audio in Flac and Ogg Files
Balancing audio involves adjusting the volume levels of individual tracks within a file. This is handy when dealing with live recordings or albums where tracks may have varying loudness. Balancing tools provide a means to fine-tune each track’s volume to create a consistent listening experience.
Flac and Ogg Audio Level Management
Managing audio levels in Flac and Ogg files is an ongoing process, especially if you frequently add new content to your collection. Regularly reviewing and adjusting volume levels ensures that your audio library remains enjoyable and free from sudden volume spikes or drops.
Tweaking Volume in Flac and Ogg
Sometimes, you may want to apply specific tweaks to the volume of your Flac and Ogg files. This could involve emphasizing certain frequencies or applying dynamic range compression to enhance the audio quality. Experimenting with these tweaks can lead to a more personalized listening experience.
Enhancing Audio Dynamics in Flac and Ogg
Audio dynamics play a crucial role in the overall quality of your listening experience. Adjusting volume levels in Flac and Ogg files can help bring out the nuances in your music. By carefully managing audio dynamics, you can ensure that every note and sound is delivered with precision and clarity.
Final Words
Flac and Ogg volume adjustment is an essential aspect of maintaining an enjoyable audio collection. Whether you’re a music enthusiast or a professional, understanding the tools and techniques available can significantly enhance your listening experience. With the right approach, you can achieve balanced and consistent audio quality in your Flac and Ogg files.
When it comes to creating engaging video content, audio quality plays a crucial role. Whether you’re a YouTuber, filmmaker, or just sharing videos with friends and family, ensuring that your audience can hear the content clearly is essential. This is where a “Video Volume Booster” comes into play. In this article, I’ll delve into various techniques and tips for enhancing the audio in your videos.
Increase Video Audio
One of the most common reasons people search for a “Video Volume Booster” is to increase the audio in their videos. Low audio volume can be frustrating for viewers, leading to them clicking away from your content. To address this, you can use video editing software to adjust the audio levels. Look for the audio volume control in your editing program and increase it to a suitable level. Be careful not to make it too loud, as it can result in distortion.
Enhance Video Sound
Enhancing the sound quality of your videos involves more than just increasing the volume. You should also focus on improving the overall audio clarity. This can be achieved by reducing background noise, such as wind or background chatter, during the recording process. Additionally, you can apply equalization to balance out frequencies and make voices and music more distinct.
Volume Adjustment for Videos
Adjusting the volume of your video can be done using various software tools. Some video editing software offers automatic audio normalization features that can balance audio levels across your video. This is particularly helpful if you have different audio sources in your video, such as interviews and background music.
Audio Enhancement Software
To simplify the process of boosting video volume and enhancing audio quality, you can explore audio enhancement software. These programs often come with a range of tools to improve audio, including volume adjustment, noise reduction, and equalization. Research and choose the software that best suits your needs.
Improve Video Audio Clarity
Clarity in audio is essential for effective communication in your videos. When viewers can hear every word clearly, they are more likely to engage with your content and stay engaged. In addition to adjusting volume, consider using subtitles or captions, especially if your video has important dialogue.
Audio Volume Boost Techniques
Beyond software solutions, there are physical techniques to boost audio volume during recording. Invest in a quality microphone and learn how to position it correctly to capture the best audio. You can also use external audio recorders to capture high-quality sound separately from your video and then synchronize it during editing.
Video Sound Amplification
Amplifying video sound involves careful consideration of the balance between voice, music, and other audio elements. Experiment with different audio levels to find the perfect mix for your content. Remember that what sounds good to you might not sound the same to your audience, so seeking feedback can be valuable.
Boosting Audio in Videos
When you’re looking to boost audio in your videos, don’t forget to listen critically to the results. Test your video on different devices and with various headphones or speakers to ensure that the audio quality meets your expectations.
Audio Enhancement Tips
To wrap it up, here are some quick tips for enhancing audio in your videos:
Record in a quiet environment to minimize background noise.
Use a high-quality microphone.
Experiment with audio editing software to find the right settings.
Seek feedback from viewers to fine-tune your audio.
Final Words
Enhancing the audio in your videos is essential for creating engaging and professional content. Whether you’re a beginner or an experienced creator, these techniques and tips can help you boost your video’s audio quality. Remember that clear audio enhances the overall viewing experience and keeps your audience coming back for more.
Boost the Volume of Lossy Audio FilesBoost the Volume of Lossy Audio Files
Amplify Sound in Lossy Audio Files
When it comes to enhancing the audio quality of your favorite songs or podcasts, you might find yourself dealing with lossy audio files. These files, while space-efficient, often suffer from reduced sound quality. Fortunately, there are ways to amplify the sound in lossy audio files, giving your listening experience a significant boost.
Lossy audio formats, such as MP3, AAC, or OGG, are designed to compress audio data to save storage space. However, this compression can lead to a loss of audio detail and a decrease in overall volume. To address this, you can use audio editing software to amplify the sound. By carefully adjusting the volume levels, you can make the audio more prominent and enjoyable. Just be cautious not to overdo it, as excessive amplification can lead to distortion.
Another effective way to amplify sound in lossy audio files is to use specialized audio processing tools. These tools often come with built-in volume normalization features that can help you increase the loudness while maintaining the audio’s quality. Whether you’re an aspiring musician, a podcast enthusiast, or simply looking to improve your music collection, amplifying sound in lossy audio files can breathe new life into your audio content.
Increase Volume of Compressed Audio
Compressed audio files have become the norm in today’s digital world due to their convenience and storage efficiency. However, one common drawback of these files is that they often lack the volume and punch of their uncompressed counterparts. If you’re wondering how to increase the volume of compressed audio, you’re in the right place.
To boost the volume of compressed audio files, you can start by using audio editing software. Most audio editing programs allow you to adjust the volume levels of individual tracks or sections of a file. Simply open your desired audio file in the software, locate the volume control, and gradually increase it until you achieve the desired loudness. Be cautious not to push the volume too high, as this can result in distortion and a loss of audio quality.
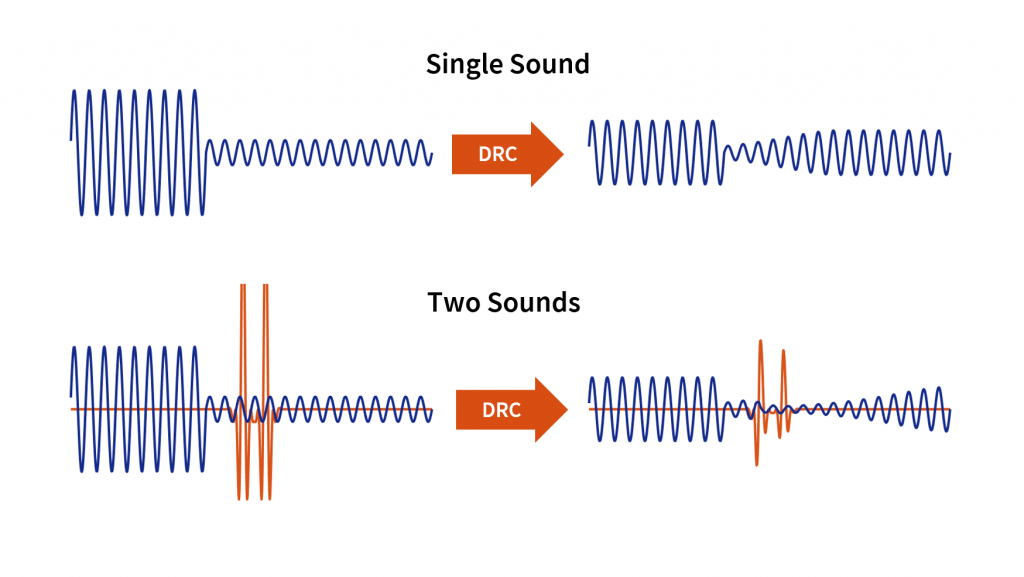
Additionally, consider using dynamic range compression (DRC) techniques. DRC helps balance the loud and quiet parts of an audio file, making it sound more consistent in volume. This technique is particularly useful when dealing with audio files that have uneven loudness levels. With the right adjustments, you can bring out the nuances in your compressed audio while maintaining clarity and preventing clipping.
By employing these techniques, you can effectively increase the volume of your compressed audio files, making them sound more vibrant and engaging.
Audio Volume Enhancement Techniques
Audio volume enhancement techniques are essential tools for anyone looking to improve the sound quality of their audio files, especially those in lossy formats. These techniques involve various methods to make audio files sound louder and more impactful.
One common technique is equalization, which allows you to adjust the balance of frequencies in your audio. By boosting certain frequency ranges, you can make your audio files sound fuller and more vibrant. This is particularly helpful for restoring lost detail in lossy audio files.
Another technique is the use of audio limiters and compressors. These tools help control the dynamic range of your audio, ensuring that loud parts aren’t too overpowering and quiet parts are audible. They can help you achieve a consistent and balanced volume throughout your audio file.
Additionally, you can explore mastering techniques. Mastering involves fine-tuning the overall sound of an audio file, including volume optimization. Professional mastering engineers use specialized software and hardware to enhance the loudness, clarity, and overall quality of audio recordings.
Enhance Audio Loudness in Lossy Formats
Enhancing audio loudness in lossy formats requires a combination of technical expertise and the right tools. Lossy formats like MP3 or AAC often sacrifice audio quality for smaller file sizes, which can result in lower volume levels. Here’s how you can address this issue effectively.
First, consider using audio editing software with volume normalization features. These features analyze the audio file and adjust the volume levels to ensure consistent loudness. This is particularly useful when dealing with a collection of lossy audio files with varying loudness levels.
Furthermore, explore dynamic range compression (DRC) to balance the audio’s dynamics. DRC reduces the difference between the loudest and quietest parts of an audio file, making it sound more uniform in volume. However, be cautious not to apply excessive compression, as it can lead to an unnatural and compressed sound.
Lastly, if you have a specific audio file that needs a volume boost, you can manually adjust the volume using your preferred audio editing software. Keep in mind that raising the volume too much may introduce distortion, so it’s crucial to find the right balance to enhance the loudness while preserving audio quality.
By utilizing these techniques, you can effectively enhance the audio loudness of your lossy format files and enjoy a more immersive listening experience.
Raise the Volume of Low-Quality Audio
Dealing with low-quality audio can be frustrating, especially when the volume is barely audible. Whether it’s an old recording or a poorly encoded audio file, there are ways to raise the volume and salvage the listening experience.
One approach is to use audio restoration software. These tools are designed to improve the quality of audio recordings, including boosting the volume. They often come with noise reduction features, which can help reduce background noise and further enhance the clarity of your audio.
Another option is to employ audio equalization. By adjusting the equalizer settings, you can emphasize the frequencies that are most critical for clarity and volume. Boosting the mid-range frequencies, for example, can make the vocals and instruments more prominent, resulting in a perceptible increase in volume.
If you have access to the original source of the audio, consider re-recording it or obtaining a higher-quality version. This approach eliminates the limitations of the existing low-quality audio file and ensures a better listening experience.
In summary, raising the volume of low-quality audio involves a combination of software tools and, when possible, improving the source material. These steps can help you enjoy clearer and louder audio, even from initially subpar recordings.
Boosting Sound Levels in Lossy Files
Boosting sound levels in lossy audio files is a common requirement for those looking to enhance their audio experience. Lossy formats, while efficient, often compromise on audio quality, resulting in lower volume levels. Here’s how you can effectively increase the sound levels in such files.
One of the simplest methods is to use audio editing software. Most audio editors provide volume adjustment controls that allow you to raise the volume of your lossy audio files. When doing this, be cautious not to push the volume too high, as it can lead to distortion and a loss of audio fidelity.
Additionally, you can explore the use of audio amplification plugins or tools. These specialized software options are designed to boost the loudness of audio files while minimizing the risk of distortion. They often come with presets and fine-tuning options to ensure optimal results.
When boosting sound levels, it’s essential to consider the intended playback environment. Different platforms and devices may have varying volume levels, so aim for a balance that ensures your audio remains clear and enjoyable across different systems.
By following these techniques and experimenting with volume adjustments, you can effectively boost sound levels in your lossy audio files and enjoy an improved listening experience.
Improving Audio Clarity in Compressed Formats
Improving audio clarity in compressed formats, such as MP3 or AAC, is a pursuit for audiophiles and music enthusiasts alike. While these formats offer excellent compression, they can sometimes sacrifice audio quality. Let’s explore how to enhance audio clarity in such files.
One approach is to use high-quality audio conversion tools. These tools can help you convert your compressed audio files into a lossless format, such as FLAC. Once in a lossless format, you can make edits and enhancements without further loss of audio quality. After the improvements, you can convert the file back to a compressed format with improved clarity.
Another technique involves applying equalization to your audio files. By fine-tuning the frequency balance, you can emphasize certain audio elements, such as vocals or instruments, and reduce any muddiness. This can result in clearer and more defined audio, even in compressed formats.
Furthermore, consider using noise reduction software to eliminate background noise and artifacts that may be present in your compressed audio. Reducing these unwanted elements can significantly enhance audio clarity.
Finally, if you have access to the original, uncompressed source of the audio, consider re-encoding it into a higher-quality compressed format. This can provide better clarity while still maintaining a smaller file size compared to lossless formats.
Enhancing audio clarity in compressed formats requires a combination of technical tools and careful adjustments. By experimenting with these techniques, you can achieve remarkable improvements in audio quality.
Loudness Enhancement for Lossy Audio
Loudness enhancement for lossy audio files can make a world of difference in your listening experience. Lossy formats, known for their space-saving benefits, often suffer from lower perceived volume levels. Here’s how you can effectively enhance the loudness of your lossy audio files.
One of the simplest methods is to use an audio player with built-in equalization settings. These settings allow you to boost specific frequency ranges, making the audio sound louder and more impactful. Experiment with different equalizer presets until you find the one that works best for your audio.
Another technique is to employ audio normalization. Many audio editing software tools provide normalization features that adjust the volume of your audio files to a consistent level. This ensures that all tracks play back at a similar loudness, enhancing the overall listening experience.
If you’re looking for a more advanced solution, consider using audio mastering techniques. Mastering involves fine-tuning the audio’s overall quality, including loudness optimization. Professional mastering engineers use specialized equipment and software to achieve the perfect balance of loudness and clarity.
Lastly, be mindful of the playback device you’re using. Some devices have built-in sound enhancements or equalization settings that can further enhance loudness. Experiment with these settings to find the right balance for your preferences.
By implementing these loudness enhancement techniques, you can breathe new life into your lossy audio files and enjoy them at a higher volume without sacrificing quality.
How to Make Quiet Audio Louder
Have you ever encountered audio that’s so quiet you strain to hear it even when you max out your volume controls? Learning how to make quiet audio louder is a valuable skill that can transform your listening experience.
One straightforward method is to use audio editing software. Open the quiet audio file in your chosen software and locate the volume adjustment controls. Gradually increase the volume until it reaches a comfortable level. Keep an eye on the audio waveform to ensure it doesn’t clip, which can result in distortion.
Another technique involves the use of audio normalization. This process analyzes the audio file and adjusts its volume to a consistent level, making quiet parts more audible without causing loud parts to become overly aggressive. Audio normalization is especially useful when you have multiple audio files with varying loudness levels.
Consider employing dynamic range compression (DRC) as well. DRC helps balance the dynamics of your audio, ensuring that the quietest parts are audible without overpowering the louder segments. However, use DRC judiciously to maintain natural audio quality.
Additionally, explore specialized audio enhancement software or plugins designed specifically for increasing the loudness of quiet audio. These tools often offer advanced algorithms to maximize loudness while minimizing distortion.
By mastering these techniques, you can effectively make quiet audio louder, bringing back the enjoyment in your audio content.
Audio Volume Optimization for Lossy Formats
Audio volume optimization for lossy formats is a crucial step to enhance the quality of your compressed audio files. These formats, while convenient, can suffer from reduced loudness. Let’s delve into the strategies for achieving audio volume optimization.
One method is to use audio editing software with volume adjustment capabilities. Open your lossy audio file in the software and increase the volume to your preferred level. Ensure that you maintain a balance between loudness and audio quality to prevent distortion.
Additionally, explore the use of volume normalization tools available in audio editing software. These tools analyze the audio and automatically adjust the volume to a consistent level. This is particularly useful when you have a collection of lossy audio files with varying loudness levels.
Dynamic range compression (DRC) is another technique to consider. DRC helps level out the loud and quiet parts of an audio file, resulting in a more uniform volume. However, exercise caution to avoid over-compression, which can lead to an unnatural sound.
Lastly, when exporting your audio, choose a higher bit rate if possible. This can improve the overall audio quality and contribute to better volume levels in lossy formats.
By applying these strategies for audio volume optimization, you can enjoy your favorite music and podcasts in lossy formats at a higher volume with improved clarity.
Final Words
In conclusion, whether you’re dealing with lossy audio files, compressed formats, or quiet audio, there are various techniques to boost volume and enhance your listening experience. Experiment with different methods, and remember to strike a balance between loudness and audio quality to achieve the best results. By mastering these techniques, you can enjoy your audio content at its fullest potential.
Boost the volume of lossless audio filesBoost the volume of lossless audio files
There are a few different approaches toing the volume of lossless audio files. One simple method is to use an audio editor to adjust the overall gain or amplitude of the tracks. Most audio software allows you to increaseibel for an entire file or selection. Raising it a few is usually sufficient for a subtle boost without risking clipping or distortion.
Amplify sound
Another option isify specific frequency ranges give the perception of increased volume without pushing the levels into the red example boosting low mids highs a couple dB can make quiet passages seem louder while keeping peak levels in check. You’ll want to be judicious to avoid unwanted harshness or fuzziness. Test any adjustments by switching between the original and files.
Louder audio</2>
Whetherizing an entire album oring a few choice tracks’s to listen critically and make incremental changes. Jumping the gain by 6 dB right off the bat may end up distorting the signal in certain sections. Take your time tweaking levels up or down just 1- dB a time listen closely for any clipping artifacts. You can always go additional amplification later if needed you’ve dialed it in.
Normalize volume
Many digital audio workstations include normalization features that can automatically increase or decrease the overall volume to target a level, like -1 dB FS. This helps ensure consistent loudness different tracks or albums. However, normalization alone may not enough of a volume boost for some listeners. In those cases combination of normalization followed by manual gain adjustments tends to work well.
Adjust gain
Fine- the gain structure is art and part science. As an audio engineer, I’ve found helpful over the years to visualize the waveform on the screen making level adjustments. how close certain transients are approaching 0 dB gives a visual cue for how much headroom remains.’s a process of trial and error to find the optimal balance of loudness versus potential clipping.
2>Enhance dynamics</2>
For a more sophisticated volume boost, you can use dynamic range compression to subtly enhance the perceived loudness without resorting to gain increases. A gentle mix of compression on peaks combined with upward on valleys brings up the average level while retaining the original dynamic signature. This to sound more natural than a simple amplification.
Optimize levels
Whether you’re prepping audio for streaming services or want your music collection to sound its best, taking the time to levels pays off like to an initial pass followed by rounds of selective gain adjustments, checking for clipping or distortions each step. Proper staging is key – you don’t to-process and damage the fidelity of yourless files in the process.
Balance levels
Especially when working with full album releases or multi-track recordings, maintaining a balanced mix paramount Boosting some elements too much can throw off the overall cohesion. I find it useful to A/B between the and processed versions, toggling back and forth to compare. This helps identify where adjustments may bewing the tonal balance or drawing attention away important parts of the.Loudness matching
For playlists, compilations or broadcast content, loudness matching a consistent volume between tracks without jarring changes. production tools let you analyze the integrated loudLUFS) of different files and apply normalization, compression or make-up gain to closely target a playback loudness like -16 LUFS. This results in a seamless, fatiguing-free listening experience from start to finish.
Equalize volume
Subtle EQ can also play a supporting role in optimizing levels. For example, a slight high-frequency boost bring up noise or sibilance without pushing other elements over the top. Or a touch more low-end fullness could enhance the perception of volume. It’s all about finding complementary techniques that work together harmoniously. With some trial and error, you can coax that last bit loudness from lossless files while preserving their pristine quality.
Final Words
In the end there’s right or wrong way to volume – it depends on your goals and source material. The most important things are to listen carefully, make incremental adjustments, and avoid damaging clipping at all costs lossless. Have patience and trust your ears. With some practice, you a good feel for optimizing in a natural, transparent way.
Audio Dynamic Range Compression: Limiting and Expansion
Audio Dynamic Range CompressionAudio Dynamic Range Compression
Audio Compression: What It Is and How It Works
As an audio engineer, I’ve spent countless hours working with dynamic range compression. At its core, compression is a tool used to control the dynamic range of an audio signal. This means that it can be used to make quiet sounds louder and loud sounds quieter, resulting in a more consistent overall volume. Compression is an essential tool in the world of audio production, and it’s used in everything from music to film and television.
One of my favorite quotes about compression comes from the legendary producer Quincy Jones. He once said, “Compression is like a good pair of eyeglasses. You don’t notice them, but they make things look better.” And it’s true. When used correctly, compression can make an audio signal sound more polished and professional.
Dynamic Range Compression vs. Limiting
While compression and limiting are often used interchangeably, they are actually two different processes. Compression is used to control the dynamic range of an audio signal, while limiting is used to prevent the signal from exceeding a certain level. In other words, limiting is a more extreme form of compression.
One of the most common uses of limiting is in mastering, which is the final step in the audio production process. During mastering, the goal is to make sure that the audio sounds consistent across different playback systems. Limiting is used to prevent the audio from distorting or clipping when played back on a variety of systems.
Audio Expansion: The Other Side of the Coin
While compression and limiting are used to control the dynamic range of an audio signal, expansion is used to increase it. Expansion is the opposite of compression, and it’s used to make quiet sounds even quieter. This can be useful in situations where you want to bring out the details in a recording.
One of my favorite examples of the use of expansion comes from the film “No Country for Old Men.” In the film, there’s a scene where the main character is walking through a hotel room. As he walks, you can hear the sound of his footsteps echoing off the walls. The sound of the footsteps is very quiet, but it’s still audible. This is a great example of the use of expansion to bring out the details in a recording.
Final Words:
In conclusion, dynamic range compression, limiting, and expansion are all essential tools in the world of audio production. Whether you’re working on music, film, or television, understanding how to use these tools can make a huge difference in the final product. And while there are many different techniques and approaches to using compression, limiting, and expansion, the most important thing is to use your ears and trust your instincts.
audio compression, dynamic range, audio engineering, audio processing, audio mixing, audio production, audio mastering, audio software, audio plugins, audio effects, audio equipment, audio gear, audio technology, audio science, audio theory, audio education, audio tutorials, audio tips, audio tricks, audio hacks, audio workflow, audio techniques, audio aesthetics, audio quality, audio fidelity, audio perception, audio psychology, audio philosophy, audio history, audio culture, audio art, audio creativity, audio innovation, audio trends, audio industry, audio business, audio marketing, audio branding, audio advertising, audio monetization, audio revenue, audio distribution, audio streaming, audio downloads, audio formats, audio codecs, audio standards, audio compatibility, audio hardware, audio drivers, audio firmware, audio troubleshooting, audio repair, audio maintenance, audio optimization, audio performance, audio testing, audio measurement, audio analysis, audio visualization, audio synthesis, audio sampling, audio recording, audio editing, audio mixing, audio mastering, audio post-production, audio restoration, audio enhancement, audio noise reduction, audio equalization, audio filters, audio modulation, audio synthesis, audio synthesis
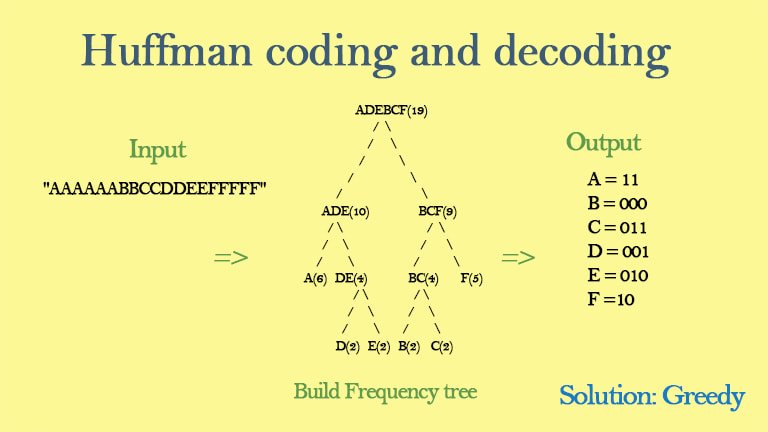
As an audio file format, MP3 has become one of the most popular digital audio compression methods. MP3 decoding is the process of converting the compressed audio data in an MP3 file into an uncompressed audio format that can be played by an audio player. Decoding the compressed audio data involves several steps, including Huffman decoding, dequantization, and inverse discrete cosine transform.
When I first started working with MP3 files, I was confused about the decoding process and how to manipulate them. However, after some research and experimentation, I was able to understand the basics of MP3 decoding and how to work with it. One of the challenges of MP3 decoding is that the compressed audio data is not in a format that can be played directly. Decoding the compressed audio data involves several steps, including Huffman decoding, dequantization, and inverse discrete cosine transform.
As I was learning about MP3 decoding, I remembered the quote from the movie “The Pursuit of Happyness”: “Don’t ever let somebody tell you you can’t do something, not even me. Alright? You dream, you gotta protect it. People can’t do something themselves, they wanna tell you you can’t do it. If you want something, go get it. Period.”
Huffman Decoding Algorithm
Huffman decoding is a key step in MP3 decoding. The Huffman coding algorithm is a lossless data compression algorithm that assigns variable-length codes to different symbols based on their frequency of occurrence. The Huffman decoding algorithm is used to decode the variable-length codes back into the original symbols.
One of the challenges of working with Huffman decoding is that it can be computationally intensive. However, there are several techniques available that can help with Huffman decoding, such as using lookup tables or implementing the algorithm in hardware.
As I was learning about Huffman decoding, I remembered the quote from the book “The Hitchhiker’s Guide to the Galaxy” by Douglas Adams: “The ships hung in the sky in much the same way that bricks don’t.” Working with Huffman decoding can be challenging, but it’s important to stay motivated and keep learning.
Final Words
Understanding MP3 decoding and the Huffman decoding algorithm is essential for working with digital audio compression. Decoding the compressed audio data involves several steps, including Huffman decoding, dequantization, and inverse discrete cosine transform. While working with MP3 files can be challenging, it’s important to stay motivated and enjoy the process of learning.
At MP4Gain, we understand the importance of audio quality and file size. Our software is designed to normalize and convert audio files to the most popular formats, with an integrated equalizer for fine-tuning the audio. If you’re looking for a solution to your audio needs, give MP4Gain a try.
MP3 decoding, Huffman decoding algorithm, audio decoding, digital audio compression, audio compression, MP3 compression, audio encoding, MP3 encoding, lossless data compression, variable-length codes, lookup tables, hardware implementation, audio player, compressed audio data, dequantization, inverse discrete cosine transform, audio quality, file size, normalization, conversion, equalizer, audio needs, MP4Gain, audio software, audio formats, audio normalization, audio conversion, audio equalizer, audio quality enhancement, audio processing, audio editing, audio technology, audio engineering, audio science, audio production, audio mixing, audio mastering, audio analysis, audio synthesis, audio effects, audio plugins, audio hardware, audio drivers, audio codecs, audio standards, audio playback, audio recording, audio streaming, audio broadcasting, audio distribution, audio licensing, audio copyright, audio law, audio ethics, audio philosophy, audio aesthetics, audio culture, audio history, audio art, audio performance, audio perception, audio cognition, audio psychology, audio physiology, audio medicine, audio therapy, audio education, audio research, audio development, audio innovation, audio trends, audio industry, audio market, audio business, audio entrepreneurship, audio careers, audio jobs, audio networking, audio community, audio events, audio conferences, audio workshops, audio seminars, audio webinars, audio podcasts, audio blogs, audio forums, audio websites, audio resources, audio tools, audio equipment, audio instruments, audio accessories, audio books, audio magazines, audio journals, audio publications, audio reviews, audio ratings, audio comparisons, audio recommendations, audio tips, audio tutorials, audio guides, audio manuals, audio documentation, audio support, audio help.


Comments:
This article totally cleared up my confusion about LUFS. Thanks for the simple explanations! – AudioNewbie
I’ve been meaning to learn more about LUFS. This was super helpful! – VideoEditorPro
Great article! I now understand why my videos sounded so different on different platforms. – YouTubeCreator
Thanks for explaining the difference between LUFS and peak normalization. I always wondered about that. – SoundGuy
This article was just what I needed. Now I can make sure my podcasts have consistent loudness. – PodcastProducer
Super informative! I’m going to start using LUFS in all my audio projects. – MusicMaker
I didn’t understand anything about LUFS before reading this article. Now, I can consider myself a LUFS expert. – LUFSLover
Can you guys write a more in deep article about advanced LUFS techniques? This was helpful, but I need more. – AdvancedUser
This article has been very clarifying, easy to understand, and to the point. – John
Amazing article! Great resource for anyone working with audio. – Audiophile
LUFS always seemed intimidating, but this article made it so easy to understand. Thanks! – AspiringSoundEngineer