How to Address Issues Related to MP3 Frame Synchronization


Free Download Mp4Gain
picture

How to Address Issues Related to MP3 Frame Synchronization


Let’s Talk About MP3 Frame Synchronization

As a specialist with extensive experience in the field of audio compression and synchronization, I understand the importance of addressing issues related to MP3 frame synchronization. MP3 is a widely used audio format, and its proper synchronization is crucial to ensuring the seamless playback of audio files. In this comprehensive guide, we will explore the intricacies of MP3 frame synchronization, common problems that arise, and effective solutions to tackle these issues.

The Basics of MP3 Frame Synchronization

To comprehend MP3 frame synchronization, think of an audio file as a puzzle composed of numerous pieces. Each piece represents an MP3 frame, and these frames must fit together perfectly to create a seamless audio experience. Just like putting together a jigsaw puzzle, when even one piece is misplaced, the entire picture can become distorted.

In the world of MP3, a frame is a fundamental unit of audio data, typically consisting of 1152 samples. These frames are aligned in a specific sequence to form an audio stream. If the frames aren’t synchronized correctly, you may experience audio artifacts, dropouts, or even complete audio distortion during playback. This can be particularly frustrating, akin to listening to a scratched vinyl record that skips and distorts the music you love.

Common Issues with MP3 Frame Synchronization

Let’s delve deeper into some of the common issues that plague MP3 frame synchronization:

1. Jitter and Timing Mismatches

One of the main culprits behind synchronization issues is jitter. Imagine trying to put together a puzzle where the pieces keep changing size and shape. Jitter in MP3 files can lead to timing mismatches between frames, causing audio playback to be out of sync. This often results in the unpleasant experience of hearing voices or instruments that seem slightly off, akin to watching a movie with poorly dubbed audio.

2. Bitstream Errors

MP3 frames have headers with crucial information about the audio data they contain. Bitstream errors, such as corrupted headers, can disrupt frame synchronization. It’s like trying to read a book with pages missing or scrambled. Without the correct headers, your audio player may struggle to interpret the audio data, leading to distortion or silence.

3. Frame Loss and Overlapping

Frame loss occurs when an MP3 player encounters difficulty in processing frames, leading to skipped frames during playback. Overlapping, on the other hand, results from frames being duplicated or played out of order. Both issues disrupt the seamless flow of audio, creating a disjointed listening experience similar to a scratched CD that repeats or skips segments.

Effective Solutions to MP3 Frame Synchronization Issues

Now that we understand the common problems related to MP3 frame synchronization, let’s explore effective solutions to address these issues:

1. Error Detection and Correction

To combat bitstream errors, specialized software can be used to detect and correct these issues. Just as spell checkers help fix typos in text, error detection and correction tools can repair damaged MP3 frames, ensuring smoother playback. Think of it as having a grammar tool that corrects your writing errors automatically.

2. Buffering and Jitter Control

Buffering and jitter control mechanisms can be applied to manage timing mismatches caused by jitter. This is similar to using shock absorbers in a car to ensure a smooth ride even on bumpy roads. These mechanisms help maintain a consistent flow of audio data, reducing synchronization issues.

3. Redundancy and Frame Reordering

For addressing frame loss and overlapping, redundancy and frame reordering techniques can be employed. Redundancy adds extra information to frames, reducing the impact of lost frames, while frame reordering ensures frames are played in the correct sequence. Picture this as a backup plan that ensures you don’t lose the plot when a few pages of your book are missing.

Latest Words on MP3 Frame Synchronization

In the ever-evolving world of audio technology, MP3 frame synchronization remains a critical aspect. As a specialist, my experience has taught me that understanding the intricacies of MP3 frame synchronization is vital to enjoy a seamless audio experience. By addressing issues related to synchronization, you can ensure that your favorite songs, podcasts, or audiobooks are played without interruptions, just like a well-preserved vinyl record or a pristine novel.

Comments:

Comment 1: Hey, great article! I’ve had my fair share of MP3 synchronization issues, and your explanations with real-life comparisons were super helpful. Thanks!

Comment 2: This article is alright, but I was hoping for more in-depth technical details about MP3 synchronization. Can you provide more advanced information?

Comment 3: I had no idea about these synchronization problems in MP3 files. Your article opened my eyes. Now I know why my music sometimes sounds weird.

Comment 4: I wish you’d talked more about the software solutions for MP3 synchronization. What tools can I use to fix these issues?

Comment 5: Your comparison to puzzles and books really made the concepts clear. I appreciate how approachable you’ve made this topic.

Comment 6: Great job on breaking down the complex topic of MP3 synchronization! Your real-life examples made it easy to grasp.

Comment 7: I agree with Comment 2; I wanted more technical details too. Can you elaborate on the error correction methods?

Comment 8: This article needs a bit more depth. I’m still a bit confused about how buffering works in MP3 synchronization.

Comment 9: Kudos to the author for simplifying a complex topic. It’s nice to have a resource that makes audio tech accessible to everyone.

Comment 10: I had no idea MP3s could be so finicky. Your article was an eye-opener. I’ll be more patient with my music now.


Free Download Mp4Gain
picture


Mp4Gain Main Window
picture


Mp4Gain Features
picture


Free Download Mp4Gain
picture

Audio Buffering

Audio Buffering: Ensuring Smooth Sound Playback

Audio Buffering
Audio Buffering

In today’s digital age, audio buffering is a crucial aspect of delivering seamless sound experiences across various devices and platforms. Whether you’re streaming music, participating in online meetings, or playing video games, audio buffering plays a significant role in ensuring that you hear clear and uninterrupted audio. In this article, I, as an expert in audio technology, will delve into the world of audio buffering, providing insights, explanations, and practical examples to help you understand its importance and how it works.

Understanding Audio Buffering

Audio buffering is like having a reservoir of sound data ready to be played, ensuring a continuous and smooth listening experience. When you’re watching a movie online or streaming music, the data is delivered in small packets called audio samples. These samples are stored temporarily in a buffer before they are played through your speakers or headphones. The buffer acts as a safeguard against interruptions, allowing your device to compensate for any delays in data transmission.

Imagine your audio buffer as a water tank in your home. The water continuously flows into the tank, and you use water from the tank as needed. If there’s a momentary disruption in the water supply, you can still use water from the tank without noticing the interruption. Similarly, audio buffering ensures that even if there are network fluctuations or data transfer delays, your audio playback remains uninterrupted.

How Audio Buffering Works

Let’s dive a bit deeper into how audio buffering functions. When you start streaming audio, your device begins to fill the audio buffer with small chunks of sound data. These chunks are usually a fraction of a second in duration, but they are filled continuously as you listen. The buffer size and management depend on the software or hardware you’re using.

Think of it as a conveyor belt in a factory. The audio samples are like products on the conveyor belt, and the buffer is the storage area where they temporarily wait before being delivered to your ears. If there’s a hiccup in the production line (e.g., a network lag), the buffer ensures that there’s still enough audio data ready for playback.

The Importance of Buffer Size

Now, let’s discuss the significance of buffer size. The size of the audio buffer affects the delay you experience while listening to audio. A larger buffer can store more data, which reduces the chances of audio dropouts but may introduce some delay. Conversely, a smaller buffer reduces delay but may result in more interruptions if there are data hiccups.

Imagine driving a car on a busy highway. A larger buffer is like keeping a safe distance from the car in front of you, reducing the risk of sudden stops. In contrast, a smaller buffer is like tailgating, which might get you to your destination faster but increases the chances of abrupt stops. Finding the right buffer size depends on the context; for live streaming or online gaming, low latency is crucial, while for offline playback, a larger buffer can ensure smoother playback.

Now, let’s explore some common questions related to audio buffering:

Why Do I Hear Audio Glitches During Online Calls?

Online calls, such as video conferences or VoIP calls, require real-time audio communication. In such scenarios, a small audio buffer is preferred to minimize latency. However, if you hear audio glitches during online calls, it could be due to network issues, insufficient bandwidth, or software problems. Ensuring a stable internet connection and using reliable communication software can help mitigate these glitches.

How Can I Optimize Audio Buffering for Gaming?

Gaming demands both low latency and high audio quality. To optimize audio buffering for gaming, you can tweak the buffer settings in your game or audio software to find the right balance between delay and audio smoothness. Additionally, using a gaming-specific headset with low latency features can enhance your gaming experience.

What Is the Impact of Buffer Size on Music Streaming?

When streaming music, a larger buffer can provide a smoother listening experience, especially in areas with unreliable internet connections. However, it may introduce a slight delay when you start playback. To strike the right balance, music streaming services often adjust buffer sizes dynamically based on network conditions.

How Does Buffering Affect Podcast Playback?

Podcast playback typically involves downloading the entire episode before listening. In this case, buffering isn’t as critical because the audio is preloaded. However, some podcast apps may use small buffers to ensure seamless playback even if your internet connection briefly drops.

Buffering for Video: A Multifaceted Approach

When it comes to video streaming, audio buffering is just one piece of the puzzle. Video and audio synchronization, network performance, and device capabilities also play crucial roles in delivering a smooth viewing experience. The buffer size for video often differs from that of audio to ensure synchronization and minimize lag.

Buffering: The Bridge to Seamless Audio

In conclusion, audio buffering is the unsung hero behind smooth sound playback in our digital lives. Whether you’re binge-watching your favorite series, engaging in a video call, or immersed in a gaming session, understanding how audio buffering works can enhance your overall audio experience. Buffer size and optimization depend on the context, but they all aim to ensure that you hear what you want, when you want it, without interruptions. So, the next time you enjoy your favorite audio content, remember that audio buffering is there, silently working to provide you with a flawless experience.

Last Words

In the realm of audio technology, audio buffering stands as a critical component that often goes unnoticed. It bridges the gap between data transmission and your ears, making sure that your audio experience remains uninterrupted and enjoyable. As an expert in the field, I’ve shared insights and knowledge to demystify audio buffering, helping you grasp its significance and impact on your daily digital interactions. So, the next time you encounter seamless audio playback, you’ll have a deeper appreciation for the role played by this essential technology.

Boost the volume of lossless audio files

Boost the volume of lossless audio files

Boost the volume of lossless audio files

There are a few different approaches toing the volume of lossless audio files. One simple method is to use an audio editor to adjust the overall gain or amplitude of the tracks. Most audio software allows you to increaseibel for an entire file or selection. Raising it a few is usually sufficient for a subtle boost without risking clipping or distortion.

Amplify sound

Another option isify specific frequency ranges give the perception of increased volume without pushing the levels into the red example boosting low mids highs a couple dB can make quiet passages seem louder while keeping peak levels in check. You’ll want to be judicious to avoid unwanted harshness or fuzziness. Test any adjustments by switching between the original and files.

Louder audio</2>
Whetherizing an entire album oring a few choice tracks’s to listen critically and make incremental changes. Jumping the gain by 6 dB right off the bat may end up distorting the signal in certain sections. Take your time tweaking levels up or down just 1- dB a time listen closely for any clipping artifacts. You can always go additional amplification later if needed you’ve dialed it in.

Normalize volume

Many digital audio workstations include normalization features that can automatically increase or decrease the overall volume to target a level, like -1 dB FS. This helps ensure consistent loudness different tracks or albums. However, normalization alone may not enough of a volume boost for some listeners. In those cases combination of normalization followed by manual gain adjustments tends to work well.

Adjust gain

Fine- the gain structure is art and part science. As an audio engineer, I’ve found helpful over the years to visualize the waveform on the screen making level adjustments. how close certain transients are approaching 0 dB gives a visual cue for how much headroom remains.’s a process of trial and error to find the optimal balance of loudness versus potential clipping.
2>Enhance dynamics</2>
For a more sophisticated volume boost, you can use dynamic range compression to subtly enhance the perceived loudness without resorting to gain increases. A gentle mix of compression on peaks combined with upward on valleys brings up the average level while retaining the original dynamic signature. This to sound more natural than a simple amplification.

Optimize levels

Whether you’re prepping audio for streaming services or want your music collection to sound its best, taking the time to levels pays off like to an initial pass followed by rounds of selective gain adjustments, checking for clipping or distortions each step. Proper staging is key – you don’t to-process and damage the fidelity of yourless files in the process.

Balance levels

Especially when working with full album releases or multi-track recordings, maintaining a balanced mix paramount Boosting some elements too much can throw off the overall cohesion. I find it useful to A/B between the and processed versions, toggling back and forth to compare. This helps identify where adjustments may bewing the tonal balance or drawing attention away important parts of the.Loudness matching

For playlists, compilations or broadcast content, loudness matching a consistent volume between tracks without jarring changes. production tools let you analyze the integrated loudLUFS) of different files and apply normalization, compression or make-up gain to closely target a playback loudness like -16 LUFS. This results in a seamless, fatiguing-free listening experience from start to finish.

Equalize volume

Subtle EQ can also play a supporting role in optimizing levels. For example, a slight high-frequency boost bring up noise or sibilance without pushing other elements over the top. Or a touch more low-end fullness could enhance the perception of volume. It’s all about finding complementary techniques that work together harmoniously. With some trial and error, you can coax that last bit loudness from lossless files while preserving their pristine quality.
Final Words
In the end there’s right or wrong way to volume – it depends on your goals and source material. The most important things are to listen carefully, make incremental adjustments, and avoid damaging clipping at all costs lossless. Have patience and trust your ears. With some practice, you a good feel for optimizing in a natural, transparent way.

.

Audio Dynamic Range Compression: Limiting and Expansion

Audio Dynamic Range Compression: Limiting and Expansion

Audio Dynamic Range Compression

Audio Compression: What It Is and How It Works

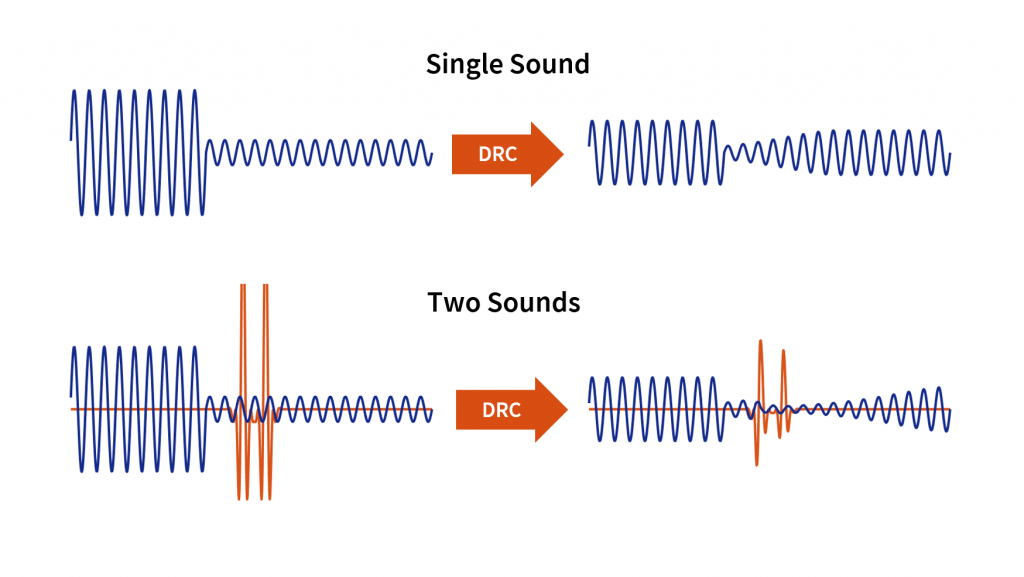
As an audio engineer, I’ve spent countless hours working with dynamic range compression. At its core, compression is a tool used to control the dynamic range of an audio signal. This means that it can be used to make quiet sounds louder and loud sounds quieter, resulting in a more consistent overall volume. Compression is an essential tool in the world of audio production, and it’s used in everything from music to film and television.
One of my favorite quotes about compression comes from the legendary producer Quincy Jones. He once said, “Compression is like a good pair of eyeglasses. You don’t notice them, but they make things look better.” And it’s true. When used correctly, compression can make an audio signal sound more polished and professional.

Dynamic Range Compression vs. Limiting

While compression and limiting are often used interchangeably, they are actually two different processes. Compression is used to control the dynamic range of an audio signal, while limiting is used to prevent the signal from exceeding a certain level. In other words, limiting is a more extreme form of compression.
One of the most common uses of limiting is in mastering, which is the final step in the audio production process. During mastering, the goal is to make sure that the audio sounds consistent across different playback systems. Limiting is used to prevent the audio from distorting or clipping when played back on a variety of systems.

Audio Expansion: The Other Side of the Coin

While compression and limiting are used to control the dynamic range of an audio signal, expansion is used to increase it. Expansion is the opposite of compression, and it’s used to make quiet sounds even quieter. This can be useful in situations where you want to bring out the details in a recording.
One of my favorite examples of the use of expansion comes from the film “No Country for Old Men.” In the film, there’s a scene where the main character is walking through a hotel room. As he walks, you can hear the sound of his footsteps echoing off the walls. The sound of the footsteps is very quiet, but it’s still audible. This is a great example of the use of expansion to bring out the details in a recording.
Final Words:
In conclusion, dynamic range compression, limiting, and expansion are all essential tools in the world of audio production. Whether you’re working on music, film, or television, understanding how to use these tools can make a huge difference in the final product. And while there are many different techniques and approaches to using compression, limiting, and expansion, the most important thing is to use your ears and trust your instincts.
audio compression, dynamic range, audio engineering, audio processing, audio mixing, audio production, audio mastering, audio software, audio plugins, audio effects, audio equipment, audio gear, audio technology, audio science, audio theory, audio education, audio tutorials, audio tips, audio tricks, audio hacks, audio workflow, audio techniques, audio aesthetics, audio quality, audio fidelity, audio perception, audio psychology, audio philosophy, audio history, audio culture, audio art, audio creativity, audio innovation, audio trends, audio industry, audio business, audio marketing, audio branding, audio advertising, audio monetization, audio revenue, audio distribution, audio streaming, audio downloads, audio formats, audio codecs, audio standards, audio compatibility, audio hardware, audio drivers, audio firmware, audio troubleshooting, audio repair, audio maintenance, audio optimization, audio performance, audio testing, audio measurement, audio analysis, audio visualization, audio synthesis, audio sampling, audio recording, audio editing, audio mixing, audio mastering, audio post-production, audio restoration, audio enhancement, audio noise reduction, audio equalization, audio filters, audio modulation, audio synthesis, audio synthesis

How can I prevent aliasing and harmonic distortion in audio?

How can I prevent aliasing and harmonic distortion in audio?

Digital Audio Aliasing


Digital Audio Aliasing


Introduction

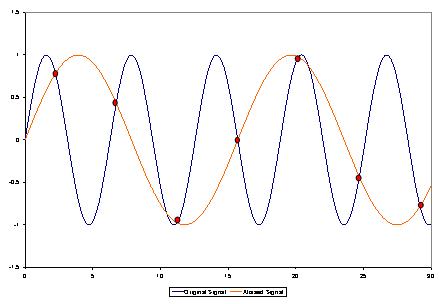
As a music enthusiast, I have always been concerned about the quality of audio recordings. Two common problems that affect audio quality are aliasing and harmonic distortion. Aliasing occurs when the sampling rate of an audio signal is insufficient, causing high-frequency signals to be incorrectly represented as lower frequencies. On the other hand, harmonic distortion occurs when the amplitude of a signal is altered due to the presence of harmonics. In this article, we will discuss ways to prevent these issues and improve audio quality.

What is aliasing and how to prevent it?

Aliasing is a common problem in digital audio, but it can be prevented by increasing the sampling rate of the audio signal. As a general rule, the sampling rate should be at least twice the highest frequency in the audio signal. For example, if the highest frequency in the audio signal is 20 kHz, the sampling rate should be at least 40 kHz. By increasing the sampling rate, we can ensure that high-frequency signals are accurately represented in the digital audio signal.

My personal experience

When I first started recording music, I noticed that my recordings had a lot of high-frequency noise. After doing some research, I realized that this was due to aliasing. I increased the sampling rate of my recordings, and the high-frequency noise disappeared. Since then, I have made it a point to always use a high sampling rate when recording audio.

What is harmonic distortion and how to reduce it?

Harmonic distortion occurs when a signal is altered due to the presence of harmonics. This can be caused by nonlinearities in the audio system, such as distortion in amplifiers or speakers. One way to reduce harmonic distortion is to use a high-quality audio system with low distortion. Additionally, using equalization can help reduce distortion in certain frequency ranges.

Quote from a book

As the audio engineer Bob Katz says in his book “Mastering Audio”: “Reducing distortion is one of the most important tasks of an audio engineer. Distortion masks the details in a mix and reduces the perceived loudness of the audio signal.”

Improving audio quality

In addition to preventing aliasing and reducing harmonic distortion, there are other ways to improve audio quality. One way is to use a high-quality audio codec when encoding audio files. Another way is to use a high-quality audio player or amplifier when listening to audio.

My personal opinion

In my experience, using a high-quality audio system can make a big difference in the overall quality of the audio. When I upgraded my audio system, I noticed that the sound was much clearer and more detailed.

Conclusion

Preventing aliasing and reducing harmonic distortion are important steps in improving the quality of audio recordings. By using a high sampling rate, a high-quality audio system, and equalization, we can ensure that our audio recordings are clear and free from distortion.

Final words

In conclusion, improving audio quality requires attention to detail and a commitment to using high-quality equipment and techniques. While there are many factors that can affect audio quality, preventing aliasing and reducing harmonic distortion are two important steps that can make a big difference.


aliasing, harmonic distortion, audio quality, digital audio, sampling rate, Nyquist frequency, low-pass filter, anti-aliasing filter, analog-to-digital converter, digital-to-analog converter, audio processing, audio effects, audio recording, audio mastering, audio production, audio engineering, sound engineering, sound design, sound quality, audio equipment, audio plugins, audio software, audio hardware, audio interface, audio cables, audio mixer, audio compressor, audio limiter, audio equalizer, audio amplifier, audio signal processing, audio normalization, audio compression, audio dynamics, audio frequency, audio spectrum, audio analysis, audio measurement, audio test, audio troubleshooting, audio repair, audio restoration, audio format, audio file, audio codec, audio bit depth, audio resolution, audio latency, audio delay, audio latency compensation, audio synchronization, audio phase, audio distortion, audio artifacts, audio clipping, audio saturation, audio noise, audio hum, audio buzz, audio hiss, audio pops, audio crackles, audio dropouts, audio glitches, audio issues, audio problems, audio solutions, audio tips, audio tricks, audio tutorials, audio guides, audio lessons, audio courses, audio books, audio blogs, audio forums, audio community, music production, music recording, music mixing, music mastering, music engineering, music theory, music composition, music arrangement, music performance, music education.