Advanced Error Correction in M4A and AAC Encoding


Free Download Mp4Gain
picture

Advanced Error Correction in M4A and AAC Encoding

Advanced Error Correction in M4A and AAC Encoding

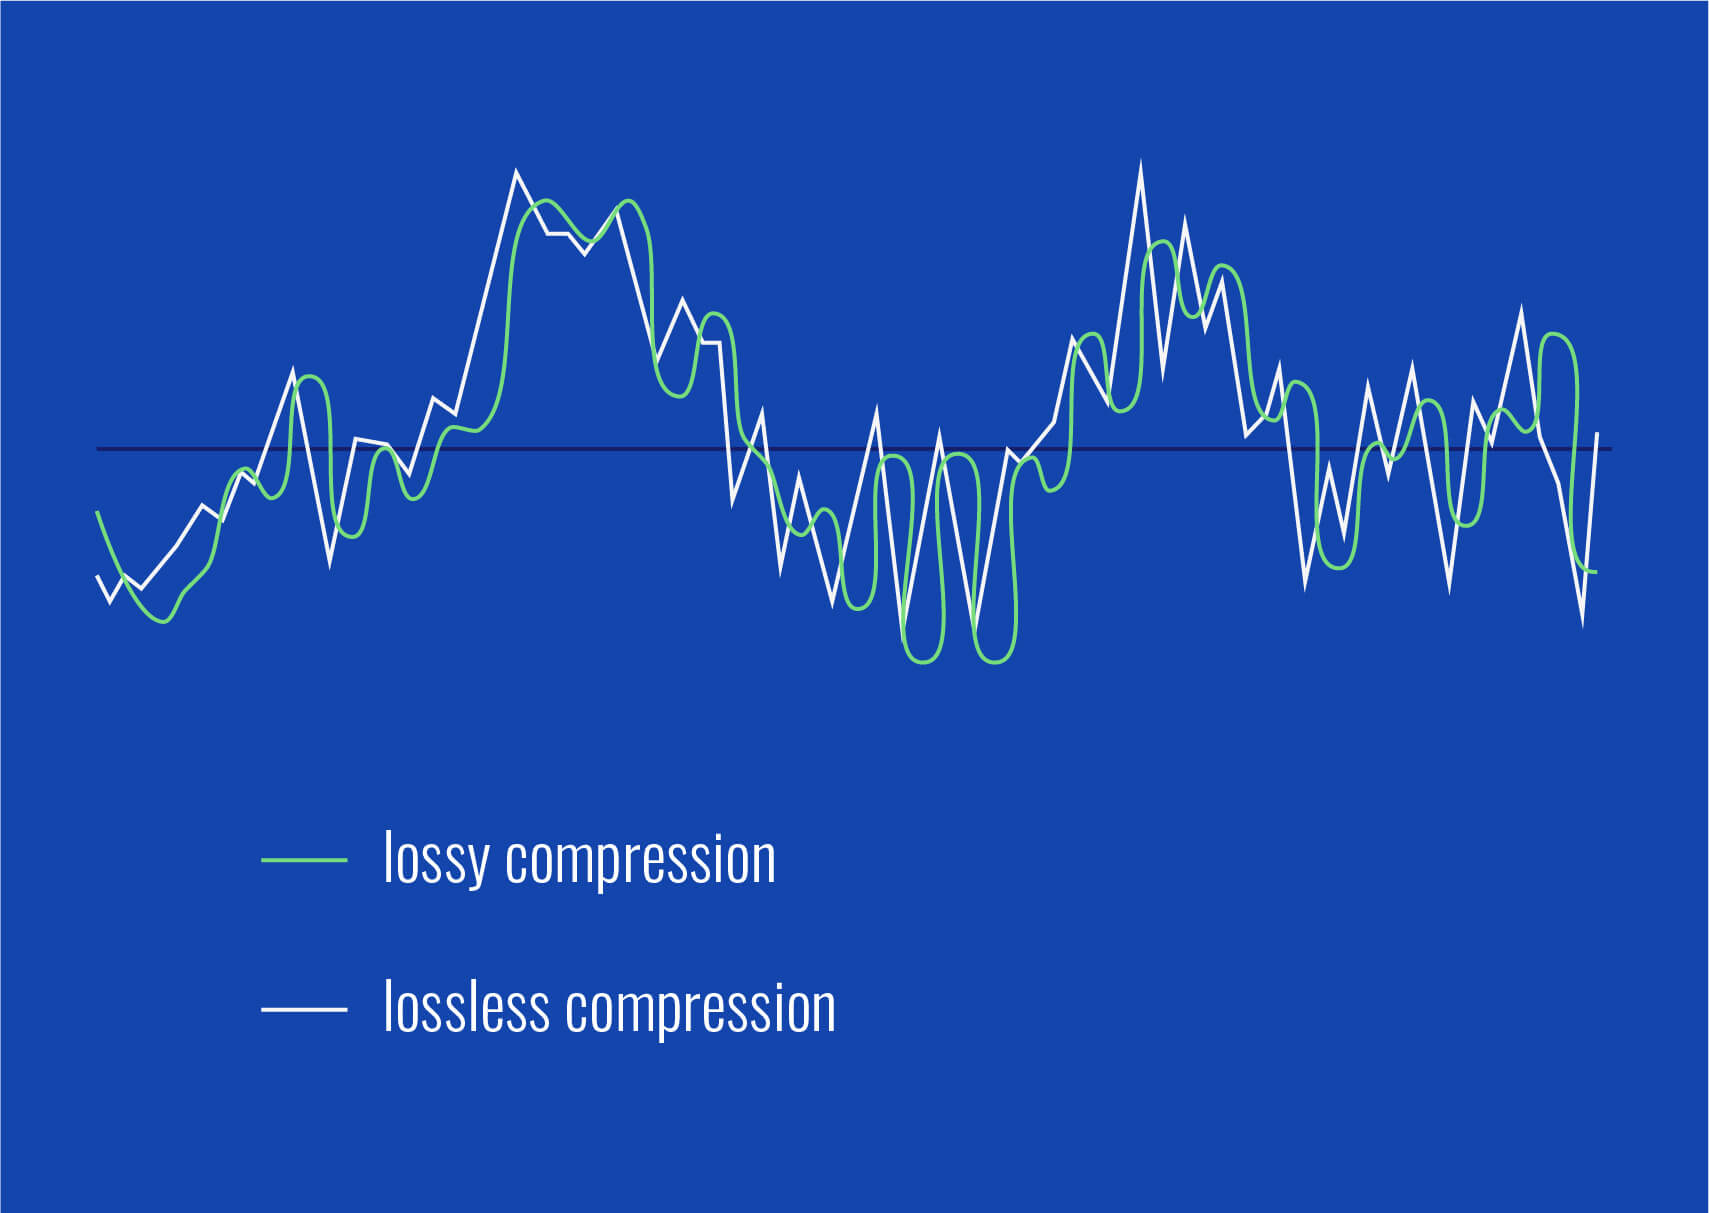
Let’s talk about Advanced Error Correction in M4A and AAC Encoding. Audio quality is crucial, and with lossy compression formats like M4A and AAC, maintaining fidelity despite errors is a top priority for audio engineers. As someone who’s been working with audio encoding for years, I’ve seen firsthand the evolution of error correction techniques, and how vital they are to delivering a clear sound. Error correction is essential to preserve audio information during compression and transmission in these formats, that reduce file size but may sacrifice some data. I aim to explain these methods clearly to everyone in this article, from the basic concepts to more complex procedures, using easy-to-understand examples, so everyone can grasp the importance of robust error correction in their audio experiences.

The Foundation of Audio Encoding Error Correction

Error correction in audio encoding, like in M4A and AAC, is vital for preserving audio quality. I like to think of it like sending a message through a noisy hallway; without error correction, some of the words get garbled or lost. These errors can occur during file compression, data transmission, or even storage. My experience shows that error correction methods try to identify corrupted data and reconstruct it. This way, the listener only perceives a smooth and seamless audio performance, without clicks, dropouts or other distortion. Error correction works by adding redundant information to the audio data stream, so the decoder can recover from minor damage without impacting the listening experience.

Redundancy Codes

  • Redundancy codes are a cornerstone of error correction, and the simplest form involves duplicating the audio data. Imagine making copies of a picture; if one gets smudged, you still have a good copy.
  • More sophisticated codes, like Cyclic Redundancy Checks (CRC), add extra data that can detect if an error is present.
  • CRC calculations are like a mathematical fingerprint of the original data; if it doesn’t match when decoding, there’s an error.
  • These methods help the decoder to decide if it can trust the data or if it must try to fix it.

Error Concealment Methods in M4A and AAC

Beyond just correcting errors, sometimes we need to make the errors less noticeable, especially in audio that is real-time. With M4A and AAC, error concealment techniques are used to “hide” the impact of data loss. I consider these techniques like a skilled magician; they may not fix the original problem, but they create the illusion that it never happened. These methods don’t replace the lost data, they aim to reconstruct it from the undamaged audio, making the damage less noticeable. The final sound, even with damaged parts, is perceived as continuous.

Prediction-Based Concealment

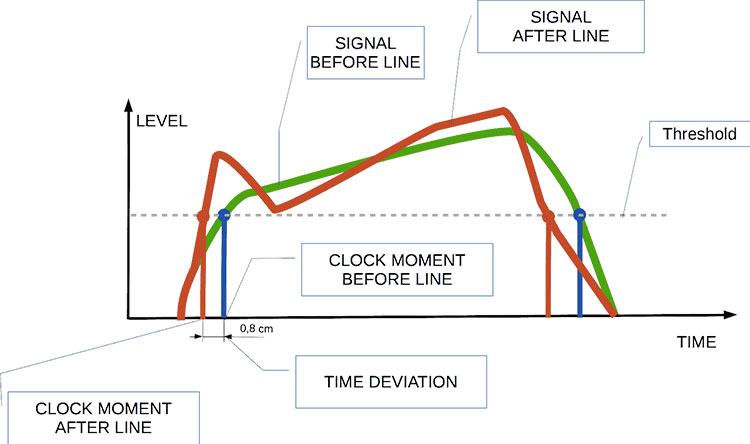
  • Predictive techniques analyze the audio signal just before the error occurred and guess at what should come next. This is kind of like guessing the next note in a song you already know well.
  • This works well for short errors, where you can make a pretty accurate estimate.

Interpolation

  • Interpolation involves taking audio data both before and after the error and averaging them to fill the gap. This is similar to blending the colors in a painting, using the ones around the damaged area to fill it.
  • It is very useful in filling in short gaps of lost audio, the result is very smooth, but is less accurate than prediction for large errors

Silence Insertion

  • The easiest solution is to simply insert silence during the error, which is used for large errors or if there is no prediction possible. This is like a short pause in a conversation; it is noticeable, but the least distracting way to hide the error.
  • While not ideal, it’s better than letting a loud pop or click occur. It’s the last resource, but helps to make the audio bearable.

Advanced Error Correction Techniques

Advanced error correction in M4A and AAC go a step further, trying to anticipate errors and prevent them from happening in the first place. I’ve seen these methods improve audio quality under a wide variety of scenarios. These methods include more complex coding schemes and adaptive techniques that adjust to the specifics of the audio being compressed. Such techniques provide better data protection and overall better audio performance when compared to simpler techniques.

Forward Error Correction (FEC)

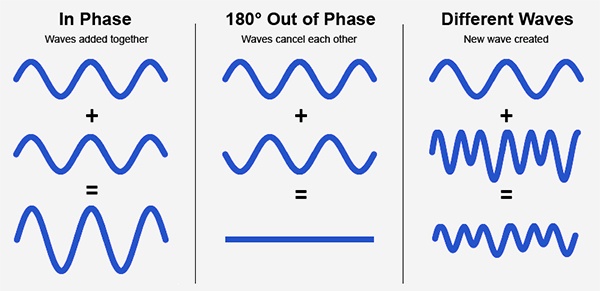
  • FEC adds redundant information to the audio data, which allows the decoder to correct some errors before they become noticeable, without asking to resend data. This is similar to a delivery service adding a spare package; if one gets damaged, there’s another to replace it.
  • FEC is especially useful when transmitting audio data through unstable networks, where retransmitting data is too slow or unreliable.

Adaptive Error Correction

  • Adaptive error correction methods vary the level of error protection, depending on the conditions, which gives a very efficient response. This is like having a car that automatically changes the air pressure in the tires according to the road; it is a system that reacts and adapts to conditions.
  • If the audio is being transmitted through a reliable network, less protection is needed and the compression can be more efficient, and when conditions are not good, the error correction system will use more redundancy to maintain sound quality.

Interleaving

  • Interleaving is a clever method where data is rearranged before transmission, so the errors are spread out. Think of shuffling a deck of cards; If a few cards are lost or damaged they will not affect a full hand of cards.
  • If a group of consecutive bits is damaged in transmission, interleaving makes those damaged bits occur in different parts of the audio information, making it easier for the decoder to recover them.

Specific Error Handling in AAC

AAC, as a complex audio encoding format, has specific strategies for error handling. My expertise in working with AAC has revealed some very intelligent solutions designed to preserve the integrity of the music. AAC’s error handling includes specific tools within the coding process that deal with the data at a very granular level, so the error handling is both very efficient and versatile. These strategies include special methods for different types of errors, from the loss of small parts of audio to loss of large chunks of data.

Frame Loss Concealment

  • AAC divides the audio data into frames, and if a full frame is lost, the encoder uses specific concealment algorithms to recover it, such as the ones that are mentioned before. This is like recovering a page from a book that got torn out; we try to fill the empty space with the most likely information.
  • These algorithms are very powerful and can sometimes reconstruct a missing frame with almost no loss in quality.

Spectral Band Replication (SBR)

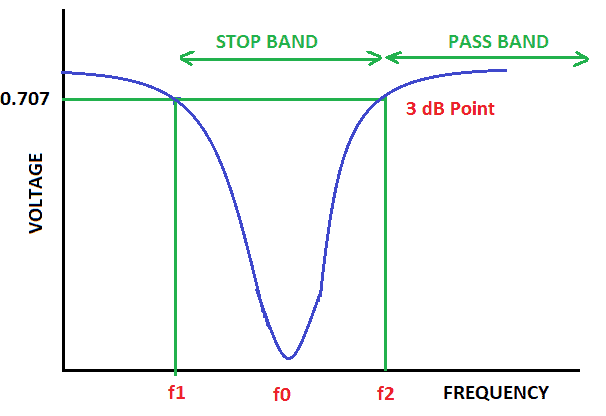
  • SBR is a technique that replicates high-frequency information. The missing high frequencies are estimated based on lower frequencies, so SBR can help compensate for data loss in those higher frequency ranges, which improves the perceived quality of the sound.
  • This is like having a high-fidelity amplifier that also amplifies the higher frequencies of sound, thus resulting in a much richer and clearer audio signal.

Channel Recovery

  • In stereo audio, the AAC encoder can also reconstruct a missing channel based on the information from the other, as stereo signals have great similarities. This helps to maintain a stereo feel for the listener, even if one of the channels is lost.
  • Channel recovery will try to use the left channel data to generate the right channel data, if it is missing.

Why Advanced Error Correction is Important

In my opinion, error correction is critical for a good listening experience, and these techniques are absolutely essential in digital audio. I think that without good error correction, music and other sound data would be plagued with pops, clicks, and other annoying sounds. It doesn’t matter if is is high-quality audio that you pay for, if it is not correctly transmitted, the user experience will be terrible. Advanced error correction prevents this, and it helps to achieve better quality with small files, and less data transmission. In my experience, the development of error correction has been one of the most important advances in modern digital audio.

Improved Quality

  • Error correction methods improve sound quality, by removing errors before the listener can perceive them. This results in cleaner audio with fewer audible artifacts.
  • Without the pops or clicks, the listening experience is much more immersive, since the user experience gets better without the distractions of artifacts.

Efficient Streaming

  • Error correction can improve stream efficiency, since FEC removes the need for resending audio data. This is particularly important for live audio and video streams where real-time delivery is crucial.
  • By adding data redundancy, the stream is more robust against data loss, which results in a smoother and better playback experience.

Robust Playback

  • Good error correction improves playback quality on all kinds of devices, like low power hardware and wireless connections.
  • This ensures audio files can be enjoyed without interruption, without matter the type of device or connection type used.

Data Integrity

  • Data integrity is preserved thanks to advanced error correction, the data is protected from damage during transmission, compression and storage.
  • This makes sure the audio is as the artist intended it to be, which is very important for all the professional audio tasks.

Latest words on Advanced Error Correction in M4A and AAC Encoding

Error correction is a complex but essential part of audio encoding and transmission. From basic redundancy to advanced adaptive strategies, these methods ensure the listener gets a smooth, clear audio experience without noticeable errors. My work in this field has shown me that continuous research and development in error correction are key to improving the quality of digital audio. Tools like Mp4Gain can help you with your audio needs. The quality is always the focus point in audio engineering and error correction plays an essential role in this quest for the best sound available. Now you have a very good understanding of how these complex techniques work, you can appreciate every little detail in the sound quality of the audio you are listening to.

What are the main goals of advanced error correction in M4A and AAC encoding?

The primary goals of advanced error correction in M4A and AAC are to preserve audio fidelity, prevent audio dropouts or clicks, improve the audio quality and enable robust audio streaming and playback in different kinds of devices. This also aims to improve data transmission and compression.

How does redundancy work in error correction for audio files?

Redundancy involves adding extra bits of data that allow the decoder to reconstruct damaged or missing information. These bits of data, which are redundant, allow the system to correct the errors in the original sound files, without losing any audio quality. This data duplication can be very simple or very complex.

What are the differences between error correction and error concealment?

Error correction focuses on identifying and fixing errors using redundant data. Error concealment, on the other hand, tries to make the errors less noticeable, filling the gaps with estimated data based on surrounding audio. Error correction is more precise, but error concealment is a valuable technique when error correction is not possible.

What is Forward Error Correction (FEC) and how does it work?

Forward Error Correction adds redundant data to the audio stream so the decoder can correct errors, without needing to request the audio stream to be sent again. FEC allows robust audio streaming on unstable networks, that will be able to recover from small data losses.

How do prediction techniques work in audio error concealment?

Prediction-based techniques analyze the audio just before the error and then “guess” or estimate what should come next. The decoder algorithm analyzes the audio patterns and predicts the most likely sound that is lost, based on the audio around it.

What is interleaving and how is it useful?

Interleaving rearranges the audio data so that errors are spread out, not all together in a single chunk. This makes it easier for the decoder to reconstruct the sound since the losses are not concentrated. If errors occur, they will impact different data blocks, which improves the error correction capabilities.

What is Spectral Band Replication (SBR) in the AAC context?

SBR is a technique in AAC encoding that replicates higher frequency information based on the lower frequency bands. SBR improves the sound quality of the audio file, especially when there are data losses in the higher frequency range, by adding the missing high frequencies from the lower ones.

How do M4A and AAC files handle channel recovery?

In stereo audio, AAC and M4A encoders can try to reconstruct a missing channel based on the information from the available channel. This helps to retain the stereo audio perception, even if one of the channels is completely missing, as there is a great similarity between stereo audio channels.

Why is adaptive error correction more efficient than non-adaptive methods?

Adaptive error correction methods adjust the level of protection depending on the audio, and transmission conditions. Non-adaptive methods provide a constant level of protection, which is less efficient since it can waste resources when those are not required. Adaptive error correction responds dynamically to the need for protection and saves data.

What does frame loss concealment mean in AAC encoding?

Frame loss concealment refers to the algorithms that the AAC encoder uses to restore a lost audio frame with data estimated from the surrounding frames. This process fills in the empty gaps with estimated data based on the adjacent audio and tries to recreate the missing audio content with the least impact in quality.

Comments:

Wow, this is way more detailed than anything I’ve read before about m4a and aac error correction. I always thought the sound just magically worked lol. Now i know how much work goes into it. Thanks!

-AudioGeek123

This article was awesome, man! I never understood why sometimes my music sounded weird on my phone, it was clearly because of those error correction things. Very helpful, very detailed, good explanation with things I understand. Keep up the good work!

-MusicLover77

I gotta say, this article is great, but kinda technical for me. I wish there were simpler examples or something. Maybe some more kid friendly analogies? I am not a techie or something. But good job.

-AverageJoe

Very cool info. I work on radio transmission and this advanced error correction stuff is something that we use all the time. But, I was surprised how deep it is, and I just knew the basics, I think. I learned a lot! Thanks for sharing this knowledge!

-RadioGuy

This is a really in depth article that really makes you understand how much work is behind the audio we enjoy every day. I had no idea this was so complex, but all the examples used made it very understandable. Impressive

-SoundFan

Interesting read! I have been looking for information about this topic and your article was better than most of them. I’d like a little more information about FEC and its impact on bandwidth usage but i think this article is pretty complete anyway

-DataStreamer

I love this article, it explained everything with easy to understand language and great examples. It’s awesome to know how the sound is transmitted with the minimum losses. Very good article about m4a and aac error correction!

-AudioEnthusiast


Free Download Mp4Gain
picture


Mp4Gain Main Window
picture


Mp4Gain Features
picture


Free Download Mp4Gain
picture

Variable Bitrate Encoding in M4A

Variable Bitrate Encoding in M4A

Variable Bitrate Encoding in M4A

Let’s talk about Variable Bitrate Encoding in M4A

Variable bitrate (VBR) encoding in M4A files is a game-changer for audio quality and file efficiency. I often find that when we’re talking about getting high-quality sound without oversized files, VBR encoding is the best solution. Unlike constant bitrate (CBR), which holds the data rate steady throughout a file, VBR dynamically adjusts. This flexibility means that audio can be compressed differently depending on the complexity of the sound at any given moment, resulting in great sound quality where it’s needed and data-saving where it’s not. Using real-life examples, think of it like a hose: VBR adjusts the “flow” depending on the music’s demands.

How VBR Encoding Differs from Constant Bitrate in M4A

One way I like to explain VBR versus CBR in M4A files is to imagine driving a car. With CBR, you’re holding a constant speed regardless of the road conditions, even if there’s traffic or clear roads. In contrast, VBR is like adjusting speed based on traffic; it slows down in complex audio sections and speeds up when it’s simpler. This approach can capture detailed, high-fidelity audio, while CBR might miss out on some of that nuance. VBR encoding allows M4A files to efficiently adapt the bitrate, creating an optimal balance between sound quality and file size.

Why Variable Bitrate Encoding Enhances Audio Quality

VBR encoding in M4A doesn’t just save space; it also prioritizes sound quality. In my experience, this difference becomes clear with high-energy music like classical or electronic, where subtle audio dynamics are crucial. VBR lets the M4A file devote more data to complex passages, capturing every detail. So, if you’ve ever felt like your favorite tracks sounded “compressed” or “flat,” switching to VBR M4A can make a noticeable difference. It’s like upgrading your audio experience without increasing the file size.

Technical Aspects of VBR Encoding in M4A Files

The technical workings behind VBR can get complex, but let’s break it down simply. VBR in M4A adjusts data allocation based on the audio’s dynamic range. More data is used during complex parts, while simpler sections use less. This dynamic allocation means that an M4A file will rarely waste data on silence or simplicity. As a result, files retain clarity and depth without excessive data. Think of it as only paying for a full tank when you’re on a long road trip – it’s efficient and smart.

Benefits of Using VBR Encoding in M4A

Using VBR in M4A comes with several perks. From my experience, here are some top advantages:

  • Improved Sound Quality

    VBR encodes audio based on complexity, leading to clear sound in all types of music.

  • Efficient File Size

    VBR reduces data use where audio is simpler, making it storage-friendly without compromising quality.

  • Dynamic Audio Capture

    Complex segments retain detail, while quieter parts save on data usage.

For those of us who care about quality and storage, VBR encoding in M4A hits the sweet spot between high-fidelity sound and efficient file size.

VBR Encoding vs. CBR Encoding in M4A

I often get asked why VBR is preferred over CBR in M4A files. It’s simple: VBR offers flexibility that CBR can’t match. While CBR might seem stable, it’s inefficient because it doesn’t adjust based on audio needs. In M4A files, VBR ensures that complex parts get more focus, unlike CBR, which applies the same rate to all parts. Imagine you’re in a bookstore where every book costs the same; with VBR, you pay only for the quality you want, which is why it’s so efficient.

Audio Compression in M4A with VBR

Audio compression in M4A VBR files is like packing a suitcase – you only take what’s needed. VBR helps prevent audio quality loss during compression, making the format excellent for those who prioritize quality over quantity. The difference in quality between compressed VBR and regular CBR audio can be surprising, especially in files with high dynamic range like orchestral pieces. With VBR, every aspect of a song can be heard without feeling over-compressed.

Optimizing File Size and Quality with VBR Encoding

One of my favorite things about VBR encoding is its ability to optimize both size and quality. We don’t always have space to spare on our devices, yet no one wants to compromise on sound. Using VBR in M4A files ensures that you don’t have to make that choice. You get a leaner file that sounds great without eating up unnecessary storage, making it ideal for large music libraries or mobile devices.

Limitations of VBR Encoding in M4A Files

While VBR encoding is effective, it’s not perfect. One challenge is that VBR encoding requires a bit more processing power during playback. This is rarely noticeable with modern devices but could pose a challenge on older hardware. Moreover, not every device or software supports VBR optimally, so there could be some compatibility issues. However, these limitations are minimal compared to the benefits of using VBR for high-quality M4A files.

Real-World Applications of VBR Encoding in M4A

When I’m traveling or out for a run, I often rely on M4A VBR files for music – I get quality without filling up my phone’s storage. For audiobooks or podcasts, VBR is equally efficient, as it doesn’t waste space on silence or long pauses. This application means you can carry more files without needing to sacrifice quality or storage. It’s a practical solution for those of us who enjoy high-quality audio on the go.

How VBR Encoding Adapts to Audio Complexity

VBR encoding’s ability to adjust bitrate based on audio complexity is a defining feature. Think of it like shading in a painting: the encoder decides where more detail is necessary. Quiet passages in M4A files don’t need as much data, while loud, complex segments get more. This flexibility provides a detailed sound that can capture nuances missed by other encoding methods. This is why, especially in music, VBR M4A files offer an experience that feels full and rich.

Latest Words on Variable Bitrate Encoding in M4A

When it comes to getting the best audio experience, Variable Bitrate Encoding in M4A is a top choice. It’s adaptable, offering excellent sound quality while managing file size. Unlike constant bitrate encoding, VBR doesn’t waste data on simple sections, which makes it efficient. For those looking for high-quality audio without massive files, M4A with VBR is a practical choice. And for those who want a powerful tool to optimize their audio experience, Mp4Gain can help you get the most out of your M4A files.

Comments:

Wow, this really helped me understand VBR better! I always thought one bitrate fit all, but now I get why adjusting makes a difference.

I tried switching to VBR on my M4A files, and I can already hear the improvement in sound quality, especially on complex tracks.

This article was really informative, but I wish there were more examples of VBR in real-life applications. Still, it was helpful!

Been using CBR all my life because I didn’t know there was a difference. Going to try VBR now, thanks!

I was so confused about bitrate settings before this. Now I’m excited to re-encode my music in VBR!

Never realized there was an option like VBR for M4A files. Makes so much sense to adjust bitrate based on the music. Thanks for this!

Great read! I think I’ll switch my whole library to M4A with VBR encoding to save on space. Thanks for the tips!

Wish there was more on the limitations of VBR – I think some older devices might struggle with it. But I’ll give it a go on my phone.

VBR encoding really makes the music sound better, like the difference between a regular camera and HD! Appreciate the detail here.

Always wondered if VBR was worth it over CBR. This article convinced me to make the switch. Loving the clarity in sound!

I like that you explain this in a simple way – makes it easier for non-tech folks like me to understand the value of VBR!

This article helped a lot, but I’d love

to know how VBR works with other formats, like MP3.

Been looking for a good VBR guide, and this hit the spot. Can’t wait to re-encode my favorite songs and hear the difference.

VBR sounds like the right choice for people who care about audio quality. Thanks for breaking down the technical side!

https://www.tumblr.com/mp3-mp4/765504331516624896/variable-bitrate-encoding-in-m4a-mp4gaincom

How to Address Issues Related to MP3 Frame Synchronization

How to Address Issues Related to MP3 Frame Synchronization


Let’s Talk About MP3 Frame Synchronization

As a specialist with extensive experience in the field of audio compression and synchronization, I understand the importance of addressing issues related to MP3 frame synchronization. MP3 is a widely used audio format, and its proper synchronization is crucial to ensuring the seamless playback of audio files. In this comprehensive guide, we will explore the intricacies of MP3 frame synchronization, common problems that arise, and effective solutions to tackle these issues.

The Basics of MP3 Frame Synchronization

To comprehend MP3 frame synchronization, think of an audio file as a puzzle composed of numerous pieces. Each piece represents an MP3 frame, and these frames must fit together perfectly to create a seamless audio experience. Just like putting together a jigsaw puzzle, when even one piece is misplaced, the entire picture can become distorted.

In the world of MP3, a frame is a fundamental unit of audio data, typically consisting of 1152 samples. These frames are aligned in a specific sequence to form an audio stream. If the frames aren’t synchronized correctly, you may experience audio artifacts, dropouts, or even complete audio distortion during playback. This can be particularly frustrating, akin to listening to a scratched vinyl record that skips and distorts the music you love.

Common Issues with MP3 Frame Synchronization

Let’s delve deeper into some of the common issues that plague MP3 frame synchronization:

1. Jitter and Timing Mismatches

One of the main culprits behind synchronization issues is jitter. Imagine trying to put together a puzzle where the pieces keep changing size and shape. Jitter in MP3 files can lead to timing mismatches between frames, causing audio playback to be out of sync. This often results in the unpleasant experience of hearing voices or instruments that seem slightly off, akin to watching a movie with poorly dubbed audio.

2. Bitstream Errors

MP3 frames have headers with crucial information about the audio data they contain. Bitstream errors, such as corrupted headers, can disrupt frame synchronization. It’s like trying to read a book with pages missing or scrambled. Without the correct headers, your audio player may struggle to interpret the audio data, leading to distortion or silence.

3. Frame Loss and Overlapping

Frame loss occurs when an MP3 player encounters difficulty in processing frames, leading to skipped frames during playback. Overlapping, on the other hand, results from frames being duplicated or played out of order. Both issues disrupt the seamless flow of audio, creating a disjointed listening experience similar to a scratched CD that repeats or skips segments.

Effective Solutions to MP3 Frame Synchronization Issues

Now that we understand the common problems related to MP3 frame synchronization, let’s explore effective solutions to address these issues:

1. Error Detection and Correction

To combat bitstream errors, specialized software can be used to detect and correct these issues. Just as spell checkers help fix typos in text, error detection and correction tools can repair damaged MP3 frames, ensuring smoother playback. Think of it as having a grammar tool that corrects your writing errors automatically.

2. Buffering and Jitter Control

Buffering and jitter control mechanisms can be applied to manage timing mismatches caused by jitter. This is similar to using shock absorbers in a car to ensure a smooth ride even on bumpy roads. These mechanisms help maintain a consistent flow of audio data, reducing synchronization issues.

3. Redundancy and Frame Reordering

For addressing frame loss and overlapping, redundancy and frame reordering techniques can be employed. Redundancy adds extra information to frames, reducing the impact of lost frames, while frame reordering ensures frames are played in the correct sequence. Picture this as a backup plan that ensures you don’t lose the plot when a few pages of your book are missing.

Latest Words on MP3 Frame Synchronization

In the ever-evolving world of audio technology, MP3 frame synchronization remains a critical aspect. As a specialist, my experience has taught me that understanding the intricacies of MP3 frame synchronization is vital to enjoy a seamless audio experience. By addressing issues related to synchronization, you can ensure that your favorite songs, podcasts, or audiobooks are played without interruptions, just like a well-preserved vinyl record or a pristine novel.

Comments:

Comment 1: Hey, great article! I’ve had my fair share of MP3 synchronization issues, and your explanations with real-life comparisons were super helpful. Thanks!

Comment 2: This article is alright, but I was hoping for more in-depth technical details about MP3 synchronization. Can you provide more advanced information?

Comment 3: I had no idea about these synchronization problems in MP3 files. Your article opened my eyes. Now I know why my music sometimes sounds weird.

Comment 4: I wish you’d talked more about the software solutions for MP3 synchronization. What tools can I use to fix these issues?

Comment 5: Your comparison to puzzles and books really made the concepts clear. I appreciate how approachable you’ve made this topic.

Comment 6: Great job on breaking down the complex topic of MP3 synchronization! Your real-life examples made it easy to grasp.

Comment 7: I agree with Comment 2; I wanted more technical details too. Can you elaborate on the error correction methods?

Comment 8: This article needs a bit more depth. I’m still a bit confused about how buffering works in MP3 synchronization.

Comment 9: Kudos to the author for simplifying a complex topic. It’s nice to have a resource that makes audio tech accessible to everyone.

Comment 10: I had no idea MP3s could be so finicky. Your article was an eye-opener. I’ll be more patient with my music now.

Audio Channel Remapping

Audio Channel Remapping


Audio Channel Remapping

Audio channel remapping is a powerful technique that allows you to reconfigure how audio signals are distributed across different speakers or channels in a sound system. This process is essential in the world of audio engineering, as it can significantly impact the quality of sound output in various applications. In this article, I will delve into the intricacies of audio channel remapping, providing you with a comprehensive understanding of the subject and addressing related questions that you might have.

The Basics of Audio Channel Remapping

To start, audio channel remapping involves the alteration of audio signals to achieve specific spatial audio effects or to adapt to various playback configurations. It’s commonly used in home theaters, surround sound setups, and even in professional audio production. Imagine you have a 5.1 surround sound system, and you want to enjoy a movie that’s mixed in 7.1 surround. Audio channel remapping can help redistribute the audio elements to your available channels, delivering an immersive experience.

Consider this scenario: You’re watching a high-octane action scene in a movie, and the sound of a car approaching from behind should be heard from the rear speakers. With audio channel remapping, the sound can be dynamically redirected to the appropriate speakers, creating a more realistic and engaging audio experience.

Remapping Audio Channels in Software

One of the most common questions related to audio channel remapping is, “How do I remap audio channels in software?” This is a crucial aspect, as software solutions offer a flexible way to adjust audio channel assignments. Various audio editing and playback software tools, such as Adobe Audition or VLC Media Player, allow you to remap channels to your liking.

For instance, you can change the default audio channel mapping for a video in VLC. By going to Tools > Preferences > Audio, you can set your preferred audio output configuration, effectively remapping the channels based on your sound system’s setup. This level of customization empowers you to optimize your audio experience for any media.

Enhancing Surround Sound with Audio Channel Remapping

Now, let’s address the question of whether audio channel remapping can improve surround sound. The answer is a resounding yes. By reallocating audio channels effectively, you can enhance the immersion of your surround sound setup. Let’s return to the example of a 5.1 system playing 7.1 content. Audio channel remapping allows you to adapt the audio so that you don’t miss out on any details. You can make sure that the dialogue remains clear from the center speaker, while ambient sounds and effects are distributed to the appropriate channels, delivering a more enveloping experience.

The Benefits of Audio Channel Remapping

Finally, let’s explore the benefits of audio channel remapping. This technique not only caters to home theater enthusiasts but also holds significance in the realm of professional audio production. It enables sound engineers to optimize audio for various playback scenarios, ensuring that the intended impact is achieved. In summary, audio channel remapping offers the following advantages:

Customization: You can adapt audio to your specific speaker configuration.
Enhanced Immersion: It improves surround sound experiences.
Compatibility: Allows you to enjoy diverse audio content on your system.
Last Words about Audio Channel Remapping

In conclusion, audio channel remapping is a valuable tool for audio enthusiasts and professionals alike. With the ability to customize audio distribution, enhance surround sound, and achieve compatibility with various audio formats, it plays a vital role in delivering an exceptional auditory experience. I hope this article has provided you with valuable insights into the world of audio channel remapping and its applications.

Audio Jitter

Understanding Audio Jitter


Audio Jitter
Audio Jitter

Audio Jitter, what is this?

Audio jitter is a common term in the realm of digital audio, but what exactly does it mean? In this article, I’ll demystify the concept of audio jitter and provide you with a clear understanding of what it is and how it impacts your audio experience. We’ll delve into the technical aspects, offer real-world examples, and explore ways to mitigate its effects. So, let’s embark on this journey to unravel the mysteries of audio jitter.

Audio jitter can be thought of as the irregular timing variations in the playback of digital audio signals. These timing variations can manifest as small deviations in the timing of audio samples, leading to audio artifacts like clicks, pops, and distortion. While it may seem like a technical concern, audio jitter can significantly affect your overall listening experience, even if you’re not a seasoned audiophile.

What is Audio Jitter?

Audio jitter, in essence, is the bane of digital audio playback. When you play a digital audio file, it gets converted into an analog signal for your speakers or headphones. The challenge arises when the conversion isn’t perfectly synchronized. Think of it like a metronome that occasionally skips a beat. This timing discrepancy, which we call audio jitter, can distort the sound and result in a less-than-ideal listening experience.

For a real-world analogy, consider a musical ensemble. If the musicians are out of sync, even by a tiny fraction of a second, the result can be dissonant and displeasing to the ear. Similarly, audio jitter disrupts the synchronization between the digital audio source and your playback system.

How Does Audio Jitter Impact Sound Quality?

Audio jitter affects sound quality by introducing unwanted artifacts. These artifacts can include audible clicks, pops, and distortions in the audio stream. To understand the impact, picture a pristine audio signal as a smooth, flowing river. Audio jitter is like tossing pebbles into that river, causing ripples and disturbances. These ripples manifest as audible imperfections in your music or audio.

Think of a jazz drum solo: the precision of the drummer’s beats is crucial to the experience. Even a slight deviation in the rhythm can disrupt the entire performance. Audio jitter works in a similar way, disrupting the timing and rhythm of your audio playback, ultimately degrading the sound quality.

The Technical Aspects of Audio Jitter

Now, let’s delve into the technical side of audio jitter. In the digital domain, audio is typically stored as discrete samples, each representing the amplitude of the sound at a specific moment. The timing of these samples is critical. Audio jitter occurs when the time intervals between these samples deviate from the ideal, leading to inconsistencies in playback.

To put this in context, think of a digital audio player as a conveyor belt, with each audio sample represented by a box. These boxes must move down the belt at precise intervals to maintain the audio’s integrity. If some boxes move faster or slower than others, you’ll encounter audio jitter, which translates to an erratic and unpleasant listening experience.

Addressing Audio Jitter: Practical Solutions

It’s clear that audio jitter can be a nuisance, but what can you do to mitigate its effects? Fortunately, there are practical solutions available. Some high-end audio equipment includes advanced jitter-reduction technologies. Additionally, using dedicated external digital-to-analog converters (DACs) can help improve audio synchronization.

Think of these solutions as a conductor guiding the musicians in an orchestra, ensuring they play in perfect harmony. Advanced equipment and DACs help maintain the precise timing necessary for high-quality audio playback.

Audio Jitter vs. Bit Depth: Exploring the Differences

While audio jitter deals with timing variations, bit depth relates to the depth of information in an audio signal. It’s essential to distinguish between the two. Bit depth determines the resolution of the audio signal, affecting the dynamic range and subtlety of sound. Audio jitter, on the other hand, impacts timing and synchronization. Both factors play a role in overall audio quality, but they address different aspects of the listening experience.

Think of bit depth as the number of colors on a painter’s palette, while audio jitter is akin to the painter’s brush strokes’ precision. They are both crucial for the final masterpiece, but they address different aspects of the artistic process.

The Importance of Low Jitter in High-End Audio Systems

In high-end audio systems, low jitter is a fundamental requirement for achieving audiophile-grade sound quality. Audiophiles demand the utmost precision and clarity in their audio playback, and any deviation in timing is unacceptable. To achieve this, specialized audio components and meticulous engineering are employed to minimize jitter.

Imagine a fine dining experience where every detail, from the presentation to the taste, is meticulously crafted. Audiophiles seek the same level of perfection in their audio experience, and low jitter is a crucial ingredient in achieving it.

Measuring and Analyzing Audio Jitter: Tools and Techniques

To assess and address audio jitter, various tools and techniques are available. One common method involves using dedicated audio analyzers that can pinpoint timing variations. Additionally, software applications can help diagnose and quantify audio jitter in your playback system.

Think of these tools as diagnostic instruments in a doctor’s office. They allow audio enthusiasts and professionals to diagnose and treat any issues related to audio jitter, ensuring the best possible audio quality.

Enhancing Your Audio Experience: Final Thoughts

In the world of digital audio, understanding and managing audio jitter is essential for achieving the best possible listening experience. Whether you’re a casual music lover or a dedicated audiophile, knowing how audio jitter affects your sound quality can lead to informed choices and better audio equipment investments.

So, the next time you enjoy your favorite music or immerse yourself in a captivating movie, remember the role that precise timing plays in your audio journey. Just as a conductor leads an orchestra to create beautiful music, minimizing audio jitter ensures that the symphony of sound reaches your ears with clarity and perfection.

Last Words

In conclusion, audio jitter is a subtle yet critical factor that can significantly impact your audio enjoyment. By delving into the technical aspects of audio jitter and exploring practical solutions, we’ve uncovered the key to enhancing your audio experience. Whether you’re an audiophile or simply someone who appreciates good sound, understanding and addressing audio jitter is a step toward audio perfection.

Audio Phase

Audio Phase: Unraveling the Mysteries of Sound

Audio Phase
Audio Phase

As an expert in audio engineering, I understand the significance of audio phase and its impact on sound quality and production. In this comprehensive guide, I will delve into the world of audio phase, providing clarity and insights to help you grasp this vital concept. Whether you’re a music enthusiast or a budding recording artist, understanding audio phase is essential for achieving optimal sound experiences.

Demystifying Audio Phase

Audio phase is a fundamental aspect of sound that relates to the timing of sound waves. When we talk about audio phase, we’re essentially discussing how different audio signals align or misalign in time. To put it simply, sound is a result of air pressure changes that propagate as waves. These waves have peaks and troughs, and audio phase refers to the relationship between these peaks and troughs in different sound sources.

Think of audio phase as a group of musicians playing in perfect harmony. When they are perfectly in sync, the music sounds harmonious and powerful. However, if even one musician is slightly out of time, it can create dissonance. Similarly, in audio, when signals are in phase, they reinforce each other, resulting in a stronger and clearer sound. When they are out of phase, they can cancel each other out, leading to a weaker and less defined sound.

Audio Phase in Music Production

Understanding audio phase is crucial in music production, especially when recording multiple microphones or mixing different tracks. When recording, if two microphones capture the same sound source, such as a guitar or a vocalist, the signals from these microphones must be perfectly in phase to avoid phase cancellation.

Imagine you are recording a guitar with two microphones—one close to the soundhole and the other closer to the fretboard. If the signals from these two microphones are not in phase, you might experience a loss of bass frequencies or even strange, hollow sounds in the final mix. To avoid this, precise microphone placement and phase alignment are essential.

Correcting Audio Phase Issues

In the world of audio engineering, correcting phase issues is a common practice. Using specialized tools and techniques, audio engineers can adjust the timing of audio signals to ensure they are in phase. This process, known as phase correction or phase alignment, can salvage poorly recorded tracks and enhance the overall sound quality.

Imagine you’re in a recording studio, and you notice that the drum tracks are slightly out of phase with the rest of the instruments. With phase correction tools, you can realign the drum tracks to synchronize perfectly with the other instruments, resulting in a more cohesive and powerful sound.

Audio Phase and Sound Quality: Key Considerations

Now, let’s address some common questions related to audio phase:

How Does Audio Phase Affect Sound Quality?

Audio phase has a direct impact on sound quality. When audio signals are in phase, they reinforce each other, enhancing the overall clarity and richness of sound. However, when they are out of phase, they can cancel each other out, leading to a loss of frequencies and a less pleasing sound.

What Are the Common Phase Issues in Music Production?

In music production, some common phase issues include phase cancellation between microphones, phase misalignment in multi-miked drum kits, and phase problems when mixing different instruments. Identifying and addressing these issues is crucial for achieving a balanced and professional-sounding mix.

How Can I Prevent Phase Issues When Recording?

To prevent phase issues when recording, pay close attention to microphone placement and ensure that multiple microphones capturing the same source are equidistant from the sound source. Additionally, use phase inversion or phase alignment tools during mixing to correct any phase problems that may arise.

Audio Phase: A Symphony of Sound Precision

In conclusion, audio phase is a pivotal element in the world of sound, influencing the quality of music and recordings. Whether you’re a musician, sound engineer, or simply a music enthusiast, grasping the concept of audio phase can help you appreciate and optimize sound in various contexts. Remember, when audio signals are in harmony, they create a powerful symphony of sound, and understanding audio phase is the key to achieving that sonic precision.

Last Words

As we wrap up our journey through the realm of audio phase, I hope this guide has shed light on this intricate yet crucial aspect of sound. Whether you’re fine-tuning your music production skills or seeking to enhance your listening experience, audio phase knowledge empowers you to harness the full potential of sound. So, the next time you enjoy your favorite music or step into the world of audio production, remember the role that audio phase plays in creating the symphonies and sonic landscapes we cherish.

Audio Notch Filter

Audio Notch Filter: Enhancing Sound Quality

Audio Notch Filter
Audio Notch Filter
Audio Notch Filter
Audio Notch Filter

Audio notch filters are indispensable tools in the world of audio engineering and signal processing. They play a crucial role in eliminating unwanted frequencies, enhancing sound quality, and ensuring crystal-clear audio reproduction. In this article, I will delve into the intricacies of audio notch filters, addressing common questions and shedding light on their applications and benefits.

The Power of Audio Notch Filters


Audio notch filters, also known as band-stop or band-reject filters, are essential components in audio processing and equalization. They are designed to target and remove specific frequencies within an audio signal, effectively “notching out” unwanted noise or interference. Imagine a scenario where you’re recording a podcast, and there’s an annoying hum from nearby electronic equipment. An audio notch filter can surgically remove that hum, leaving your audio clean and crisp.

These filters work on the principle of destructive interference, which cancels out the unwanted frequencies, leaving the desired audio intact. This technology is akin to noise-canceling headphones, which use anti-phase signals to eliminate external sounds. Audio notch filters are the audio engineer’s equivalent, ensuring that only the intended sounds are heard.

Common Applications of Audio Notch Filters

Live Sound Reinforcement: In live concerts and events, audio notch filters are invaluable for tackling feedback issues. When a microphone picks up its own amplified sound, it can lead to screeching feedback. Notch filters can pinpoint and remove the feedback frequency, allowing for a smoother performance.

Recording Studios: When recording vocals or instruments, background noise or electronic interference can creep into the audio. Audio notch filters are used to isolate and remove these unwanted elements, resulting in pristine recordings.

Telecommunications: In telecommunication systems, audio notch filters are used to eliminate unwanted interference, ensuring clear and uninterrupted communication. For example, when you make a phone call and hear static or buzzing, notch filters can mitigate these disturbances.

Choosing the Right Audio Notch Filter

Selecting the appropriate audio notch filter for your specific needs is crucial. Filters come in various types, including analog and digital, and offer different notch widths and attenuation levels. Consider factors such as the frequency of the unwanted noise, the desired audio quality, and your budget when making a choice.

People Also Asked: Exploring Common Queries

How do audio notch filters work?
Audio notch filters operate by creating an inverse phase of the unwanted frequency, causing destructive interference. This cancels out the undesired sound, leaving the desired audio intact.

Can I use software-based audio notch filters?
Yes, there are software plugins and digital audio workstations (DAWs) that offer audio notch filter capabilities. These digital solutions are versatile and allow for precise control over filtering.

Are audio notch filters suitable for home audio setups?
Absolutely. Audio notch filters can improve the sound quality of home theater systems and audio setups by eliminating background noise, hums, or other unwanted frequencies.

Keywords with Identical Search Intent

Frequency Notch Filter
Noise Reduction in Audio
Band-Reject Filter
Audio Signal Processing

Enhancing Sound Quality with Audio Notch Filters

Audio notch filters, with their ability to surgically remove unwanted frequencies, are indispensable tools for audiophiles, recording engineers, and anyone seeking to elevate their audio experience. These filters act as sonic sculptors, allowing you to chisel away noise and interference, revealing the true beauty of your audio. Whether you’re in a live concert hall, a recording studio, or your living room, audio notch filters are the unsung heroes that ensure your ears receive only the purest, most harmonious sounds.

Last Words

In the world of audio, clarity is king, and audio notch filters are the knights in shining armor that protect that clarity. By understanding how these filters work and where they can be applied, you can take your audio experiences to new heights. So, whether you’re a musician striving for pristine recordings or an audiophile seeking audio nirvana, consider the power of audio notch filters in your quest for sonic perfection.

Audio Signal Noise Reduction

Audio Signal Noise Reduction

Audio Signal Noise Reduction


Understanding Audio Noise Reduction

Audio noise reduction is a critical aspect of audio production, focused on improving the quality of sound recordings by minimizing unwanted background noise. Imagine trying to have a clear conversation in a noisy cafe; noise reduction techniques are like tuning out the surrounding chatter to hear your companion better. In this article, we’ll delve into the various techniques and methods used in audio noise reduction, uncovering the intricacies and challenges faced in this endeavor.

Noise reduction involves the application of specialized algorithms and processes to identify and reduce undesirable noise while preserving the desired audio content. It’s akin to distinguishing the melody of a song played in a bustling city square. Key steps in noise reduction include noise profiling, spectral analysis, and adaptive filtering.

How Noise Reduction Works in Audio

Noise profiling is analogous to collecting evidence at a crime scene. It entails capturing a sample of the background noise present in the audio recording, which serves as a reference for noise reduction. Spectral analysis dissects the audio signal into its frequency components, allowing us to pinpoint the frequencies dominated by noise. It’s akin to dissecting a rainbow to reveal its constituent colors.

The core of noise reduction lies in adaptive filtering. Think of it as using an intelligent eraser that selectively removes noise while leaving the primary audio content unaltered. Advanced algorithms adjust in real-time, adapting to changes in noise characteristics. It’s like a skilled chef who adds just the right amount of seasoning to enhance a dish’s flavor without overpowering it. In audio, this means reducing noise while preserving the original sound quality.

Challenges and Benefits of Audio Noise Reduction

Audio noise reduction is not without its challenges. Striking a balance between noise reduction and audio quality is akin to walking a tightrope. Excessive noise reduction can lead to artifacts and distortion, similar to overdoing it with photo editing, resulting in an unnatural appearance. Audio engineers aim to find the sweet spot where noise is minimized while maintaining audio integrity.

One significant challenge is dealing with dynamic noise environments. Just as a photographer adjusts settings to capture a moving subject, audio noise levels can change over time. For instance, in a live recording, the noise from the audience may fluctuate during the performance. Adaptive noise reduction techniques are crucial in such scenarios to maintain audio quality.

Noise reduction is essential in various fields, including music production, film, and telecommunication. It ensures that the final audio product is of high quality and free from distracting background noise, enhancing the overall listening experience.

Benefits of Effective Noise Reduction

Effective noise reduction in audio has several noteworthy advantages that significantly improve the listening experience and the quality of audio recordings. It’s like upgrading from a standard definition television to a high-definition one, where every detail becomes clearer and more vibrant. In this section, we’ll explore the key benefits of implementing noise reduction techniques in audio.

Enhanced Audio Clarity

One of the primary benefits of noise reduction is enhanced audio clarity. Imagine listening to your favorite song without the constant hum of background noise. Noise reduction techniques help eliminate distractions, allowing you to focus on the pure sound of the music. This is particularly important in critical audio recordings, such as music production and podcasting, where clarity is paramount.

Improved Speech Intelligibility

Noise reduction plays a crucial role in improving speech intelligibility. Think of it as tuning a radio to reduce static interference, making the broadcasted speech much clearer. In applications like conference calls, audio recordings, and voiceovers, noise reduction ensures that every word is easily understood, even in noisy environments.

Optimized Audio Quality

Audio quality is at the heart of noise reduction. It’s like restoring an old painting to its original brilliance. By removing unwanted noise, audio engineers can preserve the integrity of the audio signal, resulting in cleaner and more natural-sounding recordings. This is essential for producing high-quality music, films, and other audio content.

Enhanced User Experience

Consider noise reduction as the equivalent of upgrading from standard earphones to noise-canceling headphones. The reduction of background noise creates a more immersive and enjoyable listening experience. Whether you’re watching a movie, attending a live event, or simply enjoying your favorite music, noise reduction enhances the overall quality of audio consumption.

Challenges in Audio Noise Reduction

While audio noise reduction offers numerous benefits, it also presents unique challenges that audio engineers and professionals must navigate. It’s like solving complex puzzles to achieve the desired audio quality. In this section, we’ll delve into the key challenges associated with noise reduction in audio and explore how they impact the process.

Balancing Noise Reduction and Audio Quality

One of the central challenges in audio noise reduction is striking the right balance between noise reduction and audio quality. It’s akin to walking a tightrope, where too much noise reduction can lead to a loss of audio fidelity. Audio engineers must carefully adjust settings and algorithms to ensure that noise is minimized without compromising the integrity of the audio signal.

Dynamism of Noise Environments

Noise environments are seldom static; they can change over time. Consider a live concert where the audience noise varies throughout the performance. Adapting noise reduction techniques to dynamic noise environments is akin to adjusting the focus of a camera to capture a moving subject. Real-time adaptive filtering becomes essential in such scenarios to maintain audio quality.

Artifacts and Distortion

Excessive noise reduction can introduce artifacts and distortion into the audio signal. It’s similar to overediting a photograph, resulting in unnatural and undesirable effects. Audio engineers must carefully monitor the noise reduction process to prevent these artifacts from degrading the audio quality. Finding the right settings and algorithms is crucial to avoid such issues.

Complexity of Audio Content

Audio content varies in complexity, from simple voice recordings to intricate music compositions. Different types of audio content may require tailored noise reduction approaches. For instance, reducing noise in a symphony orchestra recording is different from cleaning up a podcast interview. Audio professionals must choose the appropriate techniques and settings for each type of content.

Real-Time Noise Reduction in Audio

Real-time noise reduction in audio is a valuable technology that allows for immediate noise suppression during audio capture or playback. It’s like having a live editor who removes unwanted noise as you speak or listen. In this section, we’ll explore the concept of real-time noise reduction and its significance in various audio applications.

Immediate Noise Suppression

Real-time noise reduction offers the advantage of immediate noise suppression. It’s as if a virtual assistant is actively removing background noise as you speak or record audio. This is particularly useful in applications like live broadcasting, video conferencing, and podcasting, where interruptions due to noise can be highly disruptive.

Live Performance Enhancement

Live performances, whether in music or public speaking, benefit greatly from real-time noise reduction. Think of it as having an invisible barrier that shields your performance from unwanted noise interference. This technology ensures that the audience experiences a clean and clear audio presentation, enhancing the overall impact of the performance.

Seamless Audio Playback

Real-time noise reduction also plays a role in audio playback devices. Imagine listening to your favorite music on your headphones, and the noise from your surroundings fades away. Noise reduction algorithms work in real-time to create an immersive listening experience, allowing you to enjoy your audio content without distraction.

Tools and Techniques for Audio Noise Reduction

Audio noise reduction relies on a range of tools and techniques, each designed to address specific noise-related challenges. These tools and methods are like a skilled craftsman’s toolbox, each serving a unique purpose. In this section, we’ll explore the essential tools and techniques used in audio noise reduction.

Audio Noise Reduction Software

Audio engineers often turn to specialized software applications for noise reduction. These software solutions employ advanced algorithms to identify and remove noise while preserving audio quality. It’s like having a digital assistant that fine-tunes your audio recordings for optimal clarity.

Noise Gate Filters

Noise gate filters act as gatekeepers for audio signals, allowing passage when the signal exceeds a specified threshold and blocking it when it falls below. They’re similar to automatic doors that open when you approach and close behind you. Noise gates are effective in suppressing background noise during pauses in audio recordings, such as in speech or music.

Spectral Subtraction

Spectral subtraction is a technique that focuses on identifying and subtracting noise components from the audio spectrum. It’s akin to removing specific colors from a painting to reveal the underlying image. This method is particularly useful for reducing stationary noise, such as constant background hums or hisses.

Adaptive Filtering

Adaptive filtering is a dynamic approach to noise reduction, where algorithms continuously adapt to changing noise characteristics. Think of it as a self-adjusting lens on a camera, ensuring a clear image regardless of shifting lighting conditions. Adaptive filtering excels in scenarios where noise levels fluctuate.

Machine Learning-Based Solutions

Machine learning has made significant strides in audio noise reduction. These solutions utilize trained models to recognize and remove noise patterns from audio. It’s like having an audio expert who has analyzed countless recordings and can instantly identify and reduce noise. Machine learning-based noise reduction is versatile and effective in various audio settings.

Boost the Volume of Lossy Audio Files

Boost the Volume of Lossy Audio Files

Boost the Volume of Lossy Audio Files

Amplify Sound in Lossy Audio Files

When it comes to enhancing the audio quality of your favorite songs or podcasts, you might find yourself dealing with lossy audio files. These files, while space-efficient, often suffer from reduced sound quality. Fortunately, there are ways to amplify the sound in lossy audio files, giving your listening experience a significant boost.
Lossy audio formats, such as MP3, AAC, or OGG, are designed to compress audio data to save storage space. However, this compression can lead to a loss of audio detail and a decrease in overall volume. To address this, you can use audio editing software to amplify the sound. By carefully adjusting the volume levels, you can make the audio more prominent and enjoyable. Just be cautious not to overdo it, as excessive amplification can lead to distortion.

Another effective way to amplify sound in lossy audio files is to use specialized audio processing tools. These tools often come with built-in volume normalization features that can help you increase the loudness while maintaining the audio’s quality. Whether you’re an aspiring musician, a podcast enthusiast, or simply looking to improve your music collection, amplifying sound in lossy audio files can breathe new life into your audio content.

Increase Volume of Compressed Audio

Compressed audio files have become the norm in today’s digital world due to their convenience and storage efficiency. However, one common drawback of these files is that they often lack the volume and punch of their uncompressed counterparts. If you’re wondering how to increase the volume of compressed audio, you’re in the right place.
To boost the volume of compressed audio files, you can start by using audio editing software. Most audio editing programs allow you to adjust the volume levels of individual tracks or sections of a file. Simply open your desired audio file in the software, locate the volume control, and gradually increase it until you achieve the desired loudness. Be cautious not to push the volume too high, as this can result in distortion and a loss of audio quality.

Additionally, consider using dynamic range compression (DRC) techniques. DRC helps balance the loud and quiet parts of an audio file, making it sound more consistent in volume. This technique is particularly useful when dealing with audio files that have uneven loudness levels. With the right adjustments, you can bring out the nuances in your compressed audio while maintaining clarity and preventing clipping.

By employing these techniques, you can effectively increase the volume of your compressed audio files, making them sound more vibrant and engaging.

Audio Volume Enhancement Techniques

Audio volume enhancement techniques are essential tools for anyone looking to improve the sound quality of their audio files, especially those in lossy formats. These techniques involve various methods to make audio files sound louder and more impactful.
One common technique is equalization, which allows you to adjust the balance of frequencies in your audio. By boosting certain frequency ranges, you can make your audio files sound fuller and more vibrant. This is particularly helpful for restoring lost detail in lossy audio files.

Another technique is the use of audio limiters and compressors. These tools help control the dynamic range of your audio, ensuring that loud parts aren’t too overpowering and quiet parts are audible. They can help you achieve a consistent and balanced volume throughout your audio file.

Additionally, you can explore mastering techniques. Mastering involves fine-tuning the overall sound of an audio file, including volume optimization. Professional mastering engineers use specialized software and hardware to enhance the loudness, clarity, and overall quality of audio recordings.

Enhance Audio Loudness in Lossy Formats

Enhancing audio loudness in lossy formats requires a combination of technical expertise and the right tools. Lossy formats like MP3 or AAC often sacrifice audio quality for smaller file sizes, which can result in lower volume levels. Here’s how you can address this issue effectively.
First, consider using audio editing software with volume normalization features. These features analyze the audio file and adjust the volume levels to ensure consistent loudness. This is particularly useful when dealing with a collection of lossy audio files with varying loudness levels.

Furthermore, explore dynamic range compression (DRC) to balance the audio’s dynamics. DRC reduces the difference between the loudest and quietest parts of an audio file, making it sound more uniform in volume. However, be cautious not to apply excessive compression, as it can lead to an unnatural and compressed sound.

Lastly, if you have a specific audio file that needs a volume boost, you can manually adjust the volume using your preferred audio editing software. Keep in mind that raising the volume too much may introduce distortion, so it’s crucial to find the right balance to enhance the loudness while preserving audio quality.

By utilizing these techniques, you can effectively enhance the audio loudness of your lossy format files and enjoy a more immersive listening experience.

Raise the Volume of Low-Quality Audio

Dealing with low-quality audio can be frustrating, especially when the volume is barely audible. Whether it’s an old recording or a poorly encoded audio file, there are ways to raise the volume and salvage the listening experience.
One approach is to use audio restoration software. These tools are designed to improve the quality of audio recordings, including boosting the volume. They often come with noise reduction features, which can help reduce background noise and further enhance the clarity of your audio.

Another option is to employ audio equalization. By adjusting the equalizer settings, you can emphasize the frequencies that are most critical for clarity and volume. Boosting the mid-range frequencies, for example, can make the vocals and instruments more prominent, resulting in a perceptible increase in volume.

If you have access to the original source of the audio, consider re-recording it or obtaining a higher-quality version. This approach eliminates the limitations of the existing low-quality audio file and ensures a better listening experience.

In summary, raising the volume of low-quality audio involves a combination of software tools and, when possible, improving the source material. These steps can help you enjoy clearer and louder audio, even from initially subpar recordings.

Boosting Sound Levels in Lossy Files

Boosting sound levels in lossy audio files is a common requirement for those looking to enhance their audio experience. Lossy formats, while efficient, often compromise on audio quality, resulting in lower volume levels. Here’s how you can effectively increase the sound levels in such files.
One of the simplest methods is to use audio editing software. Most audio editors provide volume adjustment controls that allow you to raise the volume of your lossy audio files. When doing this, be cautious not to push the volume too high, as it can lead to distortion and a loss of audio fidelity.

Additionally, you can explore the use of audio amplification plugins or tools. These specialized software options are designed to boost the loudness of audio files while minimizing the risk of distortion. They often come with presets and fine-tuning options to ensure optimal results.

When boosting sound levels, it’s essential to consider the intended playback environment. Different platforms and devices may have varying volume levels, so aim for a balance that ensures your audio remains clear and enjoyable across different systems.

By following these techniques and experimenting with volume adjustments, you can effectively boost sound levels in your lossy audio files and enjoy an improved listening experience.

Improving Audio Clarity in Compressed Formats

Improving audio clarity in compressed formats, such as MP3 or AAC, is a pursuit for audiophiles and music enthusiasts alike. While these formats offer excellent compression, they can sometimes sacrifice audio quality. Let’s explore how to enhance audio clarity in such files.
One approach is to use high-quality audio conversion tools. These tools can help you convert your compressed audio files into a lossless format, such as FLAC. Once in a lossless format, you can make edits and enhancements without further loss of audio quality. After the improvements, you can convert the file back to a compressed format with improved clarity.

Another technique involves applying equalization to your audio files. By fine-tuning the frequency balance, you can emphasize certain audio elements, such as vocals or instruments, and reduce any muddiness. This can result in clearer and more defined audio, even in compressed formats.

Furthermore, consider using noise reduction software to eliminate background noise and artifacts that may be present in your compressed audio. Reducing these unwanted elements can significantly enhance audio clarity.

Finally, if you have access to the original, uncompressed source of the audio, consider re-encoding it into a higher-quality compressed format. This can provide better clarity while still maintaining a smaller file size compared to lossless formats.

Enhancing audio clarity in compressed formats requires a combination of technical tools and careful adjustments. By experimenting with these techniques, you can achieve remarkable improvements in audio quality.

Loudness Enhancement for Lossy Audio

Loudness enhancement for lossy audio files can make a world of difference in your listening experience. Lossy formats, known for their space-saving benefits, often suffer from lower perceived volume levels. Here’s how you can effectively enhance the loudness of your lossy audio files.
One of the simplest methods is to use an audio player with built-in equalization settings. These settings allow you to boost specific frequency ranges, making the audio sound louder and more impactful. Experiment with different equalizer presets until you find the one that works best for your audio.

Another technique is to employ audio normalization. Many audio editing software tools provide normalization features that adjust the volume of your audio files to a consistent level. This ensures that all tracks play back at a similar loudness, enhancing the overall listening experience.

If you’re looking for a more advanced solution, consider using audio mastering techniques. Mastering involves fine-tuning the audio’s overall quality, including loudness optimization. Professional mastering engineers use specialized equipment and software to achieve the perfect balance of loudness and clarity.

Lastly, be mindful of the playback device you’re using. Some devices have built-in sound enhancements or equalization settings that can further enhance loudness. Experiment with these settings to find the right balance for your preferences.

By implementing these loudness enhancement techniques, you can breathe new life into your lossy audio files and enjoy them at a higher volume without sacrificing quality.

How to Make Quiet Audio Louder

Have you ever encountered audio that’s so quiet you strain to hear it even when you max out your volume controls? Learning how to make quiet audio louder is a valuable skill that can transform your listening experience.
One straightforward method is to use audio editing software. Open the quiet audio file in your chosen software and locate the volume adjustment controls. Gradually increase the volume until it reaches a comfortable level. Keep an eye on the audio waveform to ensure it doesn’t clip, which can result in distortion.

Another technique involves the use of audio normalization. This process analyzes the audio file and adjusts its volume to a consistent level, making quiet parts more audible without causing loud parts to become overly aggressive. Audio normalization is especially useful when you have multiple audio files with varying loudness levels.

Consider employing dynamic range compression (DRC) as well. DRC helps balance the dynamics of your audio, ensuring that the quietest parts are audible without overpowering the louder segments. However, use DRC judiciously to maintain natural audio quality.

Additionally, explore specialized audio enhancement software or plugins designed specifically for increasing the loudness of quiet audio. These tools often offer advanced algorithms to maximize loudness while minimizing distortion.

By mastering these techniques, you can effectively make quiet audio louder, bringing back the enjoyment in your audio content.

Audio Volume Optimization for Lossy Formats

Audio volume optimization for lossy formats is a crucial step to enhance the quality of your compressed audio files. These formats, while convenient, can suffer from reduced loudness. Let’s delve into the strategies for achieving audio volume optimization.
One method is to use audio editing software with volume adjustment capabilities. Open your lossy audio file in the software and increase the volume to your preferred level. Ensure that you maintain a balance between loudness and audio quality to prevent distortion.

Additionally, explore the use of volume normalization tools available in audio editing software. These tools analyze the audio and automatically adjust the volume to a consistent level. This is particularly useful when you have a collection of lossy audio files with varying loudness levels.

Dynamic range compression (DRC) is another technique to consider. DRC helps level out the loud and quiet parts of an audio file, resulting in a more uniform volume. However, exercise caution to avoid over-compression, which can lead to an unnatural sound.

Lastly, when exporting your audio, choose a higher bit rate if possible. This can improve the overall audio quality and contribute to better volume levels in lossy formats.

By applying these strategies for audio volume optimization, you can enjoy your favorite music and podcasts in lossy formats at a higher volume with improved clarity.

Final Words
In conclusion, whether you’re dealing with lossy audio files, compressed formats, or quiet audio, there are various techniques to boost volume and enhance your listening experience. Experiment with different methods, and remember to strike a balance between loudness and audio quality to achieve the best results. By mastering these techniques, you can enjoy your audio content at its fullest potential.

Normalize audio tracks

Normalize audio tracks

Normalize audio tracks

Audio normalization is a crucial process in the world of audio production. It involves adjusting the volume levels of audio tracks to ensure a consistent and balanced listening experience. Whether you’re a music producer, a filmmaker, or a podcaster, the need to normalize audio tracks frequently arises to deliver high-quality content.

Normalize audio files

When you normalize audio files, you’re essentially making sure that the loudest and softest parts of your track are brought to a consistent level. This means that no part of your audio will be too quiet or too loud, allowing your listeners to enjoy a seamless experience without constantly adjusting the volume.

Audio track leveling

Audio track leveling is the process of ensuring that all the individual tracks in your audio project have a similar volume level. This is particularly important in music production, where you want all instruments and vocals to blend harmoniously without any one element overpowering the others.

Audio track equalization

Equalization (EQ) is another aspect of audio track optimization. While normalization focuses on overall volume levels, EQ allows you to fine-tune the frequency balance of your tracks. By adjusting the EQ settings, you can enhance the clarity and presence of different elements in your audio, such as vocals, instruments, or ambient sounds.

Soundtrack volume adjustment

In the world of film and video production, soundtrack volume adjustment plays a vital role. You want the dialogue, background music, and sound effects to be well-balanced to create an immersive cinematic experience. Normalizing the audio tracks ensures that viewers won’t have to constantly adjust their volume settings to hear the dialogue clearly.

Audio track enhancement

Audio track enhancement goes beyond normalization. It involves using various audio processing techniques to improve the overall quality of your tracks. This can include reducing background noise, adding special effects, or applying dynamic processing to make the audio more engaging.

Audio track optimization

Optimizing audio tracks is a comprehensive approach to ensuring the best possible sound quality. It combines normalization, equalization, and other audio processing techniques to create audio that sounds professional and polished.

Normalize sound in tracks

Normalizing sound in tracks is particularly useful when working with multiple audio sources or recordings that have inconsistent volume levels. It guarantees that all tracks will blend seamlessly and sound cohesive when played together.

Track audio balancing

Track audio balancing is an essential skill for mixing and mastering engineers. It involves adjusting the volume levels of individual tracks within a multitrack recording to achieve a well-balanced and harmonious final mix.

Track audio improvement

Audio improvement is the ultimate goal when working with audio tracks. It’s about taking the raw audio material and transforming it into something that sounds exceptional. This may involve not only normalization but also editing, effects, and creativity to make the audio truly stand out.

Final Words

Normalizing audio tracks is just one step in the journey of audio production and enhancement. Whether you’re an aspiring musician, a filmmaker, or a content creator, understanding how to effectively normalize and optimize audio tracks is essential for delivering a top-notch listening experience to your audience.