Importance of LUFS in Video or Audio Normalization


Free Download Mp4Gain
picture

Importance of LUFS in Video or Audio Normalization

Importance of LUFS in Video or Audio Normalization

Let’s talk about the Importance of LUFS in Video or Audio Normalization

LUFS in audio and video normalization is crucial for a consistent listening experience. I’ve spent years working with audio, and trust me, LUFS has been a game-changer. Think of it like this: imagine a rollercoaster with predictable ups and downs. That’s what LUFS helps us achieve with sound. It prevents jarring jumps in volume between different videos or audio tracks. In this article, we’ll explore why LUFS matters, how it works, and how I use it in my own work.

Understanding LUFS and Its Role in Normalization

LUFS, or Loudness Units Full Scale, measures perceived loudness. I like to think of it as a more sophisticated volume knob. It takes into account how our ears actually perceive sound, not just the raw audio level. Normalization, then, uses LUFS to level out the overall loudness.

Why LUFS Matters for Consistent Audio Levels

Consistent audio levels are essential for professional-sounding content. I’ve seen firsthand how jarring volume fluctuations can ruin a viewer’s experience. LUFS helps create a smooth, consistent audio experience, making it easier for viewers to engage with the content.

Benefits of Using LUFS for Normalization

LUFS-based normalization offers several benefits. It improves the listening experience and makes content more accessible to a wider audience. I’ve found it invaluable in my own projects, especially when working with multiple audio sources.

  • Improved viewer experience

    No more annoying volume jumps between scenes or videos. It’s a smoother ride for the ears.

  • Better accessibility

    Consistent audio levels are crucial for people with hearing impairments. LUFS normalization makes content more inclusive.

  • Professional sound quality

    LUFS helps achieve a polished, professional sound. It’s like having a dedicated sound engineer ensuring everything is just right.

How LUFS Works in Practice

LUFS measures the average loudness of audio over time. It’s like taking the temperature of a room, not just a single spot. This gives a more accurate representation of how we perceive loudness.

Implementing LUFS in Your Workflow

Integrating LUFS into your workflow is easier than you might think. Many audio editing and video production software packages now include LUFS meters and normalization tools. I use them all the time.

LUFS vs. Peak Normalization: Understanding the Difference

Peak normalization simply adjusts the highest peak to a target level. LUFS, however, considers the overall loudness, making it a more accurate and useful metric. Think of it as looking at the whole forest, not just the tallest tree.

Common LUFS Standards and Target Levels

Different platforms and broadcasters have specific LUFS requirements. Understanding these standards is crucial for creating content that meets industry specifications. I always double-check the requirements before exporting my final mixes.

Addressing Challenges and Misconceptions about LUFS

Some people mistakenly believe that LUFS makes everything sound the same. That’s not true. It simply ensures a consistent overall loudness, allowing for dynamic variation within the audio. I’ve found this to be a major advantage in my work.

Advanced Techniques with LUFS

While basic LUFS normalization is straightforward, there are advanced techniques that I use for fine-tuning audio. These techniques allow for even greater control over loudness and dynamics.

FAQ about Importance of LUFS in Video or Audio Normalization

What is LUFS in simple terms?

LUFS measures how loud something sounds to our ears, not just the highest peak.

Why is LUFS important for video and audio normalization?

LUFS ensures consistent loudness, preventing jarring volume changes.

What’s the difference between LUFS and peak normalization?

Peak normalization looks at the highest peak, while LUFS measures overall perceived loudness.

How do I measure LUFS in my audio?

Most audio editing software includes LUFS meters.

What are common LUFS targets for different platforms?

Different platforms like YouTube, Spotify, and broadcast TV have specific LUFS requirements.

Does LUFS normalization make everything sound the same?

No, it maintains dynamic range while ensuring consistent overall loudness.

How can I implement LUFS in my workflow?

Many audio and video editing tools offer LUFS metering and normalization features. Mp4Gain is a great tool.

What are some advanced techniques for using LUFS?

Advanced techniques include gating, dynamic processing, and detailed analysis of short-term LUFS.

Why are different LUFS standards necessary?

Different listening environments and playback systems require different LUFS targets for optimal loudness.

What are the benefits of using LUFS for podcasts?

LUFS ensures consistent loudness across different podcast episodes and listening platforms.

Latest words on Importance of LUFS in Video or Audio Normalization

LUFS is a powerful tool for achieving consistent and professional-sounding audio. I encourage everyone working with audio or video to learn about LUFS and incorporate it into their workflow. Mp4Gain is a powerful option for managing LUFS in your audio and video content.

Comments:

This article totally cleared up my confusion about LUFS. Thanks for the simple explanations! – AudioNewbie

I’ve been meaning to learn more about LUFS. This was super helpful! – VideoEditorPro

Great article! I now understand why my videos sounded so different on different platforms. – YouTubeCreator

Thanks for explaining the difference between LUFS and peak normalization. I always wondered about that. – SoundGuy

This article was just what I needed. Now I can make sure my podcasts have consistent loudness. – PodcastProducer

Super informative! I’m going to start using LUFS in all my audio projects. – MusicMaker

I didn’t understand anything about LUFS before reading this article. Now, I can consider myself a LUFS expert. – LUFSLover

Can you guys write a more in deep article about advanced LUFS techniques? This was helpful, but I need more. – AdvancedUser

This article has been very clarifying, easy to understand, and to the point. – John

Amazing article! Great resource for anyone working with audio. – Audiophile

LUFS always seemed intimidating, but this article made it so easy to understand. Thanks! – AspiringSoundEngineer


Free Download Mp4Gain
picture


Mp4Gain Main Window
picture


Mp4Gain Features
picture


Free Download Mp4Gain
picture

MP3 vs Opus Comparison

MP3 vs Opus Comparison

MP3 vs Opus Comparison

Let’s Talk About MP3 vs Opus

When it comes to digital audio formats, the choice between MP3 and Opus can be as crucial as selecting the right tool for the job. As a specialist with years of experience in the field, I’ll delve into this comparison, helping you understand the nuances and make an informed choice.

MP3 vs Opus Comparison

MP3 (MPEG Audio Layer III): The Audio Legacy

Think of MP3 as the tried-and-true workhorse in the world of digital audio. It’s been around for decades and is known for its widespread use, but it does come with some trade-offs. Let’s explore its strengths and weaknesses.

MP3’s Ubiquity

MP3 is like the classic turntable of digital audio. It’s supported by an extensive range of devices and software, making it a go-to choice for most music lovers. Its ubiquity is its strength, but there’s more to this story.

Compression and File Size

However, MP3’s widespread use comes with a price—the trade-off between compression and file size. Storing a collection of MP3 files can be likened to keeping a drawer full of paperbacks instead of hardcovers. It’s a matter of compromise.

Opus: The Modern Marvel

In contrast, Opus is the sleek and modern sports car of digital audio formats. It’s known for its efficiency in compression and is the preferred choice for online voice communication and streaming. Let’s take a closer look at what makes Opus stand out.

Efficiency in Compression

Picture Opus as the hybrid car—it excels in compression, allowing audio files to be notably smaller without compromising quality. Storing Opus files is like having a fuel-efficient car; you save on space and resources.

Streaming and Online Voice Communication

When it comes to streaming and online voice communication, Opus is the superstar. It’s like the fiber optic internet that ensures smooth, real-time conversations and low-latency gameplay. Its compatibility with various platforms and its role in the crystal-clear voice makes it a go-to choice for online interactions.

Quality and Versatility

Now, let’s delve deeper into the quality and versatility offered by both MP3 and Opus. It’s akin to comparing vinyl records with the latest digital streaming service.

Audio Quality and Compatibility

MP3 is like the vinyl record—it’s got a vintage charm and is widely supported, but it may not deliver the highest audio quality. In contrast, Opus is like your modern streaming service, offering exceptional quality and compatibility across a variety of devices.

Audio Editing and Post-Production

MP3, much like traditional film editing, may retain every detail but is not always suitable for intricate post-production work. Opus, being more modern, is like a cutting-edge digital audio workstation, offering flexibility and efficiency for various editing needs.

Real-Life Example: Music Streaming Services

Think of MP3 as the standard AM/FM radio station, offering familiar music quality. Now imagine Opus as a high-end music streaming service, providing you with exceptional sound quality, lossless audio, and an extensive library of songs.

Device Compatibility and Playback

When it comes to device compatibility and playback, MP3 might be like an old cassette player, causing compatibility issues on modern devices. In contrast, Opus is like a universal remote control, seamlessly working with nearly every device and platform, ensuring a smooth listening experience.

Support for Special Features

Opus, being a modern format, is equipped with features like multi-channel audio, dynamic range control, and bitrate switching, making it ideal for a range of applications, including video conferencing and online gaming. MP3, while capable, may not provide the same level of support for these special features.

Conclusion: Making the Right Choice

In the end, choosing between MP3 and Opus is like selecting the right tool for your audio needs. Your choice should align with your specific requirements, whether you’re an audiophile, a content creator, or an online gamer. Consider your priorities for quality, file size, and compatibility before making your decision.

Comments:

(Username: MusicMaestro) – This article is a great resource for musicians like me. Opus seems promising for streaming high-quality music.

(Username: AudioEnthusiast) – As an audiophile, I’ve always preferred MP3 for its compatibility. But Opus is making me reconsider my choices.

(Username: TechNerd22) – Excellent article, but I wish it delved more into Opus’s role in online gaming and low-latency communication.

(Username: AudiophileAlex) – This article provides a comprehensive comparison. I’m leaning towards Opus for its quality, but MP3’s compatibility is hard to beat.

(Username: StreamingSavvy) – Opus is a game-changer for streaming services. The difference in audio quality is remarkable.

Video Volume Booster

Video Volume Booster

Video Volume Booster

Audio Enhancements for Videos

When it comes to creating engaging video content, audio quality plays a crucial role. Whether you’re a YouTuber, filmmaker, or just sharing videos with friends and family, ensuring that your audience can hear the content clearly is essential. This is where a “Video Volume Booster” comes into play. In this article, I’ll delve into various techniques and tips for enhancing the audio in your videos.

Increase Video Audio

One of the most common reasons people search for a “Video Volume Booster” is to increase the audio in their videos. Low audio volume can be frustrating for viewers, leading to them clicking away from your content. To address this, you can use video editing software to adjust the audio levels. Look for the audio volume control in your editing program and increase it to a suitable level. Be careful not to make it too loud, as it can result in distortion.

Enhance Video Sound

Enhancing the sound quality of your videos involves more than just increasing the volume. You should also focus on improving the overall audio clarity. This can be achieved by reducing background noise, such as wind or background chatter, during the recording process. Additionally, you can apply equalization to balance out frequencies and make voices and music more distinct.

Volume Adjustment for Videos

Adjusting the volume of your video can be done using various software tools. Some video editing software offers automatic audio normalization features that can balance audio levels across your video. This is particularly helpful if you have different audio sources in your video, such as interviews and background music.

Audio Enhancement Software

To simplify the process of boosting video volume and enhancing audio quality, you can explore audio enhancement software. These programs often come with a range of tools to improve audio, including volume adjustment, noise reduction, and equalization. Research and choose the software that best suits your needs.

Improve Video Audio Clarity

Clarity in audio is essential for effective communication in your videos. When viewers can hear every word clearly, they are more likely to engage with your content and stay engaged. In addition to adjusting volume, consider using subtitles or captions, especially if your video has important dialogue.

Audio Volume Boost Techniques

Beyond software solutions, there are physical techniques to boost audio volume during recording. Invest in a quality microphone and learn how to position it correctly to capture the best audio. You can also use external audio recorders to capture high-quality sound separately from your video and then synchronize it during editing.

Video Sound Amplification

Amplifying video sound involves careful consideration of the balance between voice, music, and other audio elements. Experiment with different audio levels to find the perfect mix for your content. Remember that what sounds good to you might not sound the same to your audience, so seeking feedback can be valuable.

Boosting Audio in Videos

When you’re looking to boost audio in your videos, don’t forget to listen critically to the results. Test your video on different devices and with various headphones or speakers to ensure that the audio quality meets your expectations.

Audio Enhancement Tips

To wrap it up, here are some quick tips for enhancing audio in your videos:

Record in a quiet environment to minimize background noise.
Use a high-quality microphone.
Experiment with audio editing software to find the right settings.
Seek feedback from viewers to fine-tune your audio.
Final Words

Enhancing the audio in your videos is essential for creating engaging and professional content. Whether you’re a beginner or an experienced creator, these techniques and tips can help you boost your video’s audio quality. Remember that clear audio enhances the overall viewing experience and keeps your audience coming back for more.

Normalize audio tracks

Normalize audio tracks

Normalize audio tracks

Audio normalization is a crucial process in the world of audio production. It involves adjusting the volume levels of audio tracks to ensure a consistent and balanced listening experience. Whether you’re a music producer, a filmmaker, or a podcaster, the need to normalize audio tracks frequently arises to deliver high-quality content.

Normalize audio files

When you normalize audio files, you’re essentially making sure that the loudest and softest parts of your track are brought to a consistent level. This means that no part of your audio will be too quiet or too loud, allowing your listeners to enjoy a seamless experience without constantly adjusting the volume.

Audio track leveling

Audio track leveling is the process of ensuring that all the individual tracks in your audio project have a similar volume level. This is particularly important in music production, where you want all instruments and vocals to blend harmoniously without any one element overpowering the others.

Audio track equalization

Equalization (EQ) is another aspect of audio track optimization. While normalization focuses on overall volume levels, EQ allows you to fine-tune the frequency balance of your tracks. By adjusting the EQ settings, you can enhance the clarity and presence of different elements in your audio, such as vocals, instruments, or ambient sounds.

Soundtrack volume adjustment

In the world of film and video production, soundtrack volume adjustment plays a vital role. You want the dialogue, background music, and sound effects to be well-balanced to create an immersive cinematic experience. Normalizing the audio tracks ensures that viewers won’t have to constantly adjust their volume settings to hear the dialogue clearly.

Audio track enhancement

Audio track enhancement goes beyond normalization. It involves using various audio processing techniques to improve the overall quality of your tracks. This can include reducing background noise, adding special effects, or applying dynamic processing to make the audio more engaging.

Audio track optimization

Optimizing audio tracks is a comprehensive approach to ensuring the best possible sound quality. It combines normalization, equalization, and other audio processing techniques to create audio that sounds professional and polished.

Normalize sound in tracks

Normalizing sound in tracks is particularly useful when working with multiple audio sources or recordings that have inconsistent volume levels. It guarantees that all tracks will blend seamlessly and sound cohesive when played together.

Track audio balancing

Track audio balancing is an essential skill for mixing and mastering engineers. It involves adjusting the volume levels of individual tracks within a multitrack recording to achieve a well-balanced and harmonious final mix.

Track audio improvement

Audio improvement is the ultimate goal when working with audio tracks. It’s about taking the raw audio material and transforming it into something that sounds exceptional. This may involve not only normalization but also editing, effects, and creativity to make the audio truly stand out.

Final Words

Normalizing audio tracks is just one step in the journey of audio production and enhancement. Whether you’re an aspiring musician, a filmmaker, or a content creator, understanding how to effectively normalize and optimize audio tracks is essential for delivering a top-notch listening experience to your audience.

Video Volume Equalization

Video Volume Equalization

Video Volume Equalization

Audio Normalization

Audio normalization is a technique used to adjust the volume levels of different audio tracks to a consistent level. It ensures that all the audio in a video or audio file is balanced and doesn’t have any sudden jumps or drops in volume. By applying audio normalization, you can enhance the overall listening experience and prevent viewers from constantly adjusting the volume. This process is particularly useful when combining multiple audio sources or when dealing with videos that have inconsistent volume levels.
To perform audio normalization, specialized software or video editing tools can be used. These tools analyze the audio waveform and adjust the volume levels accordingly. They can either increase the volume of quieter sections or decrease the volume of louder sections to achieve a more balanced output. The goal is to maintain the original dynamics of the audio while ensuring a consistent volume throughout the video.

Volume Leveling

Volume leveling is a technique used to equalize the volume levels of different audio tracks within a video or audio file. It aims to eliminate any significant differences in volume between different parts of the content. Volume leveling is particularly useful when dealing with videos that have been recorded in different environments or with varying equipment setups.
The process of volume leveling involves analyzing the audio waveform and adjusting the volume levels accordingly. It ensures that all the audio tracks have a similar perceived loudness, allowing viewers to enjoy a consistent listening experience. By applying volume leveling, you can prevent sudden jumps or drops in volume, which can be distracting or annoying to the audience.
Volume leveling can be achieved using specialized software or video editing tools. These tools analyze the audio and apply gain adjustments to bring the volume levels to a desired target. The adjustments are made in a way that maintains the original dynamics of the audio while ensuring a balanced and pleasant listening experience.

Dynamic Range Compression

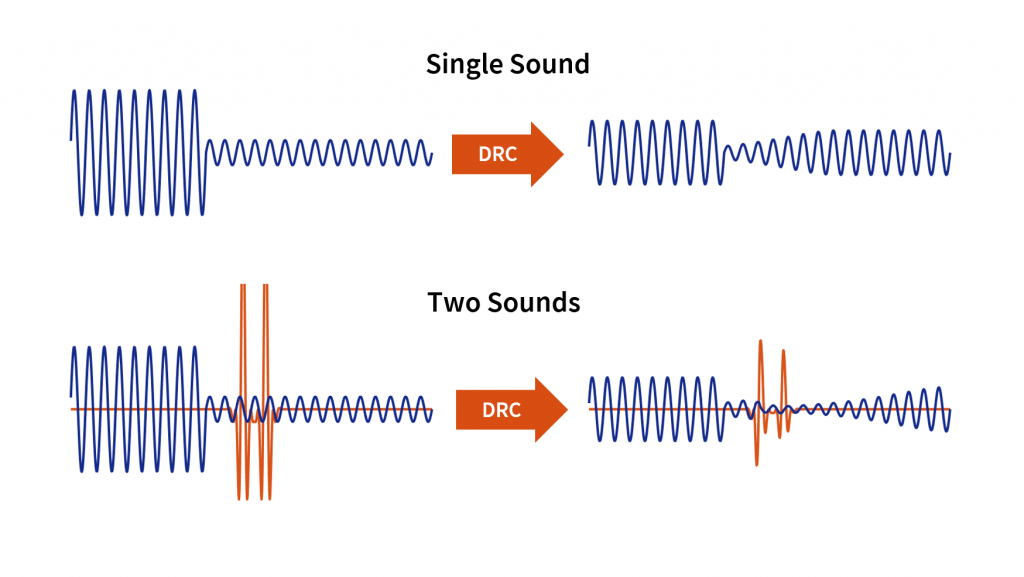
Dynamic range compression is a technique used to reduce the difference between the loudest and softest parts of an audio signal. It is commonly used in audio production to control the dynamic range and make the audio more consistent in volume. By compressing the dynamic range, the quieter parts of the audio are brought up in volume, while the louder parts are reduced.
The purpose of dynamic range compression is to ensure that all the audio in a video or audio file can be heard clearly without any parts being too soft or too loud. It helps to maintain a consistent volume level throughout the content, making it easier for viewers to listen without constantly adjusting the volume.
Dynamic range compression can be applied using audio editing software or video editing tools. These tools analyze the audio waveform and automatically adjust the volume levels based on predefined settings or user-defined parameters. The compression process involves reducing the gain of the louder parts and increasing the gain of the quieter parts, resulting in a more balanced and controlled audio output.

Audio Leveling

Audio leveling is a process that aims to equalize the volume levels of different audio tracks within a video or audio file. It ensures that all the audio components have a similar perceived loudness, providing a consistent listening experience for the audience. Audio leveling is particularly useful when combining multiple audio sources or when dealing with videos that have inconsistent volume levels.
To perform audio leveling, specialized software or video editing tools can be used. These tools analyze the audio waveform and adjust the volume levels accordingly. They can increase the volume of quieter sections or decrease the volume of louder sections to achieve a more balanced output. The goal is to maintain the original dynamics of the audio while ensuring a consistent volume throughout the video.

Sound Normalization

Sound normalization is a technique used to adjust the volume levels of audio tracks within a video or audio file. It aims to bring all the audio components to a consistent level, preventing any sudden jumps or drops in volume. Sound normalization enhances the overall listening experience and ensures that viewers don’t have to constantly adjust the volume.
To perform sound normalization, specialized software or video editing tools are used. These tools analyze the audio waveform and adjust the volume levels accordingly. They can increase the volume of quieter sections or decrease the volume of louder sections to achieve a more balanced output. The goal is to maintain the original dynamics of the audio while ensuring a consistent volume throughout the video.

Volume Balancing

Volume balancing is a technique used to equalize the volume levels of different audio tracks within a video or audio file. It ensures that all the audio components have a similar perceived loudness, providing a consistent listening experience for the audience. Volume balancing is particularly useful when combining multiple audio sources or when dealing with videos that have inconsistent volume levels.
To perform volume balancing, specialized software or video editing tools can be used. These tools analyze the audio waveform and adjust the volume levels accordingly. They can increase the volume of quieter sections or decrease the volume of louder sections to achieve a more balanced output. The goal is to maintain the original dynamics of the audio while ensuring a consistent volume throughout the video.

Audio Volume Control

Audio volume control refers to the process of adjusting the volume levels of audio tracks within a video or audio file. It allows you to increase or decrease the volume to achieve a desired listening experience. Audio volume control is essential to ensure that the audio is audible and balanced, preventing any parts from being too soft or too loud.
Audio volume control can be performed using various tools and devices. In video editing software, you can adjust the volume levels of individual audio tracks or apply global volume changes to the entire video. Additionally, audio playback devices such as speakers or headphones often have built-in volume controls that allow you to adjust the output volume.

Volume Equalization Techniques

Volume equalization techniques are methods used to achieve a consistent volume level across different audio tracks within a video or audio file. These techniques aim to eliminate any significant differences in volume between different parts of the content, providing a balanced and pleasant listening experience for the audience.
There are several volume equalization techniques available, including audio normalization, volume leveling, dynamic range compression, and sound normalization. Each technique has its own approach to adjusting the volume levels, but they all share the goal of achieving a consistent volume throughout the video or audio file.

Audio Gain Adjustment

Audio gain adjustment is a process that involves changing the volume levels of audio tracks within a video or audio file. It allows you to increase or decrease the gain of the audio to achieve a desired listening experience. Audio gain adjustment is particularly useful when dealing with videos that have inconsistent volume levels or when combining multiple audio sources.
To perform audio gain adjustment, specialized software or video editing tools can be used. These tools analyze the audio waveform and allow you to manually adjust the gain of individual audio tracks. By increasing or decreasing the gain, you can achieve a more balanced and consistent volume throughout the video.

Volume Control in Videos

Volume control in videos refers to the ability to adjust the volume levels of audio tracks within a video file. It allows you to increase or decrease the volume to achieve a desired listening experience. Volume control is essential to ensure that the audio is audible and balanced, preventing any parts from being too soft or too loud.
In video editing software, you can adjust the volume levels of individual audio tracks or apply global volume changes to the entire video. This gives you control over the audio output and allows you to create a more immersive and enjoyable viewing experience. Volume control is particularly important when combining multiple audio sources or when dealing with videos that have inconsistent volume levels.

Final Words

In conclusion, video volume equalization is a crucial aspect of video production and editing. It ensures that the audio in a video is balanced and consistent, providing a pleasant listening experience for the audience. Techniques such as audio normalization, volume leveling, dynamic range compression, and sound normalization can be used to achieve volume equalization.
By applying these techniques, you can eliminate any sudden jumps or drops in volume, maintain the original dynamics of the audio, and create a more professional and polished video. Whether you’re a content creator, filmmaker, or video editor, mastering video volume equalization will greatly enhance the quality of your videos and improve the overall viewer experience. So, make sure to pay attention to the volume levels and use the appropriate tools and techniques to achieve the desired results.

Audio Dynamic Range Compression: Limiting and Expansion

Audio Dynamic Range Compression: Limiting and Expansion

Audio Dynamic Range Compression

Audio Compression: What It Is and How It Works

As an audio engineer, I’ve spent countless hours working with dynamic range compression. At its core, compression is a tool used to control the dynamic range of an audio signal. This means that it can be used to make quiet sounds louder and loud sounds quieter, resulting in a more consistent overall volume. Compression is an essential tool in the world of audio production, and it’s used in everything from music to film and television.
One of my favorite quotes about compression comes from the legendary producer Quincy Jones. He once said, “Compression is like a good pair of eyeglasses. You don’t notice them, but they make things look better.” And it’s true. When used correctly, compression can make an audio signal sound more polished and professional.

Dynamic Range Compression vs. Limiting

While compression and limiting are often used interchangeably, they are actually two different processes. Compression is used to control the dynamic range of an audio signal, while limiting is used to prevent the signal from exceeding a certain level. In other words, limiting is a more extreme form of compression.
One of the most common uses of limiting is in mastering, which is the final step in the audio production process. During mastering, the goal is to make sure that the audio sounds consistent across different playback systems. Limiting is used to prevent the audio from distorting or clipping when played back on a variety of systems.

Audio Expansion: The Other Side of the Coin

While compression and limiting are used to control the dynamic range of an audio signal, expansion is used to increase it. Expansion is the opposite of compression, and it’s used to make quiet sounds even quieter. This can be useful in situations where you want to bring out the details in a recording.
One of my favorite examples of the use of expansion comes from the film “No Country for Old Men.” In the film, there’s a scene where the main character is walking through a hotel room. As he walks, you can hear the sound of his footsteps echoing off the walls. The sound of the footsteps is very quiet, but it’s still audible. This is a great example of the use of expansion to bring out the details in a recording.
Final Words:
In conclusion, dynamic range compression, limiting, and expansion are all essential tools in the world of audio production. Whether you’re working on music, film, or television, understanding how to use these tools can make a huge difference in the final product. And while there are many different techniques and approaches to using compression, limiting, and expansion, the most important thing is to use your ears and trust your instincts.
audio compression, dynamic range, audio engineering, audio processing, audio mixing, audio production, audio mastering, audio software, audio plugins, audio effects, audio equipment, audio gear, audio technology, audio science, audio theory, audio education, audio tutorials, audio tips, audio tricks, audio hacks, audio workflow, audio techniques, audio aesthetics, audio quality, audio fidelity, audio perception, audio psychology, audio philosophy, audio history, audio culture, audio art, audio creativity, audio innovation, audio trends, audio industry, audio business, audio marketing, audio branding, audio advertising, audio monetization, audio revenue, audio distribution, audio streaming, audio downloads, audio formats, audio codecs, audio standards, audio compatibility, audio hardware, audio drivers, audio firmware, audio troubleshooting, audio repair, audio maintenance, audio optimization, audio performance, audio testing, audio measurement, audio analysis, audio visualization, audio synthesis, audio sampling, audio recording, audio editing, audio mixing, audio mastering, audio post-production, audio restoration, audio enhancement, audio noise reduction, audio equalization, audio filters, audio modulation, audio synthesis, audio synthesis

Audio Expansion

How Understanding Audio Expansion Can Improve Your Music Production

Audio Expansion
Audio Expansion
Audio Expansion
Audio Expansion

What is Audio Expansion and How Does it Work?

As a music producer, understanding the concept of audio expansion is crucial to achieving the desired sound quality in your productions. Audio expansion, also known as upward expansion, is a dynamic audio processing technique that increases the gain of a signal when it is below a certain threshold level. This technique is used to increase the dynamic range of a signal by amplifying only the quieter parts, resulting in a more natural and transparent sound.
To put it simply, audio expansion is like a reverse compressor. While a compressor reduces the dynamic range of a signal by reducing the gain of louder parts, an expander increases the dynamic range by amplifying quieter parts. According to Roey Izhaki in “Mixing Audio,” “expansion is a powerful tool that can significantly enhance a mix, giving it a lively and open sound.”

How to Use Audio Expansion in Your Music Production

To use audio expansion effectively, you first need to set the threshold level. The threshold is the level at which the expander starts to increase the gain. The higher the threshold, the less effect the expander will have. You also need to set the ratio, which determines the amount of gain increase when the signal falls below the threshold level. The ratio is expressed in decibels and can range from 1.5:1 to 10:1 or higher.
One important thing to keep in mind is that audio expansion should be used sparingly. Overuse can result in an unnatural and exaggerated sound. It is recommended to use a gentle ratio and adjust the threshold level to suit the dynamics of the source material.

The Benefits of Audio Expansion in Music Production

Using audio expansion in your music production can result in a more natural and transparent sound. It can also help to improve the overall dynamic range of your mix, making it sound more open and spacious. By selectively amplifying the quieter parts of a signal, you can bring out subtle details and nuances that may have been masked by louder elements.
As an audio engineer, I have found that audio expansion can be particularly useful when working with vocals or acoustic instruments. By gently expanding the dynamics, you can help to preserve the natural character of the performance and avoid the artificial sound that can result from heavy compression.

In the words of Roey Izhaki, “expansion can be a great tool to help you achieve your sonic goals.” With careful use and experimentation, audio expansion can be a powerful technique to enhance your music production.

Final Words:
In conclusion, understanding audio expansion is an important skill for any music producer. By using this dynamic processing technique, you can improve the sound quality and dynamic range of your productions. Remember to use audio expansion sparingly and experiment with different settings to find the best results for your mix.

audio dynamics, dynamic processing, audio processing, music production, sound quality, mixing techniques, signal processing, dynamic range, compression, mastering, mixing, audio engineering, audio effects, audio plugins, VST plugins, audio editing, audio software, DAW, audio mixing, audio mastering, audio normalization, audio EQ, audio filters, audio enhancement, audio post-production, audio mastering services, audio production tips, audio recording, audio editing software, audio effects plugins, audio frequency, audio volume, audio levels, audio peak, audio clipping, audio restoration, audio quality, audio improvement,

What is a De-Esser?

What is a De-Esser?

De-Esser
De-Esser
De-Esser
De-Esser

As a music producer and audio engineer, I’ve encountered my fair share of challenging vocal recordings. One common issue is sibilance, which occurs when the “s” and “sh” sounds are overly pronounced, causing harsh and piercing frequencies in the mix. This is where a de-esser comes in handy.

De-Esser Plugin

A de-esser is a specialized audio plugin that reduces or eliminates sibilance from vocal recordings. It works by detecting the offending frequencies and applying gain reduction to them, effectively taming the harshness and allowing the vocals to sit better in the mix.

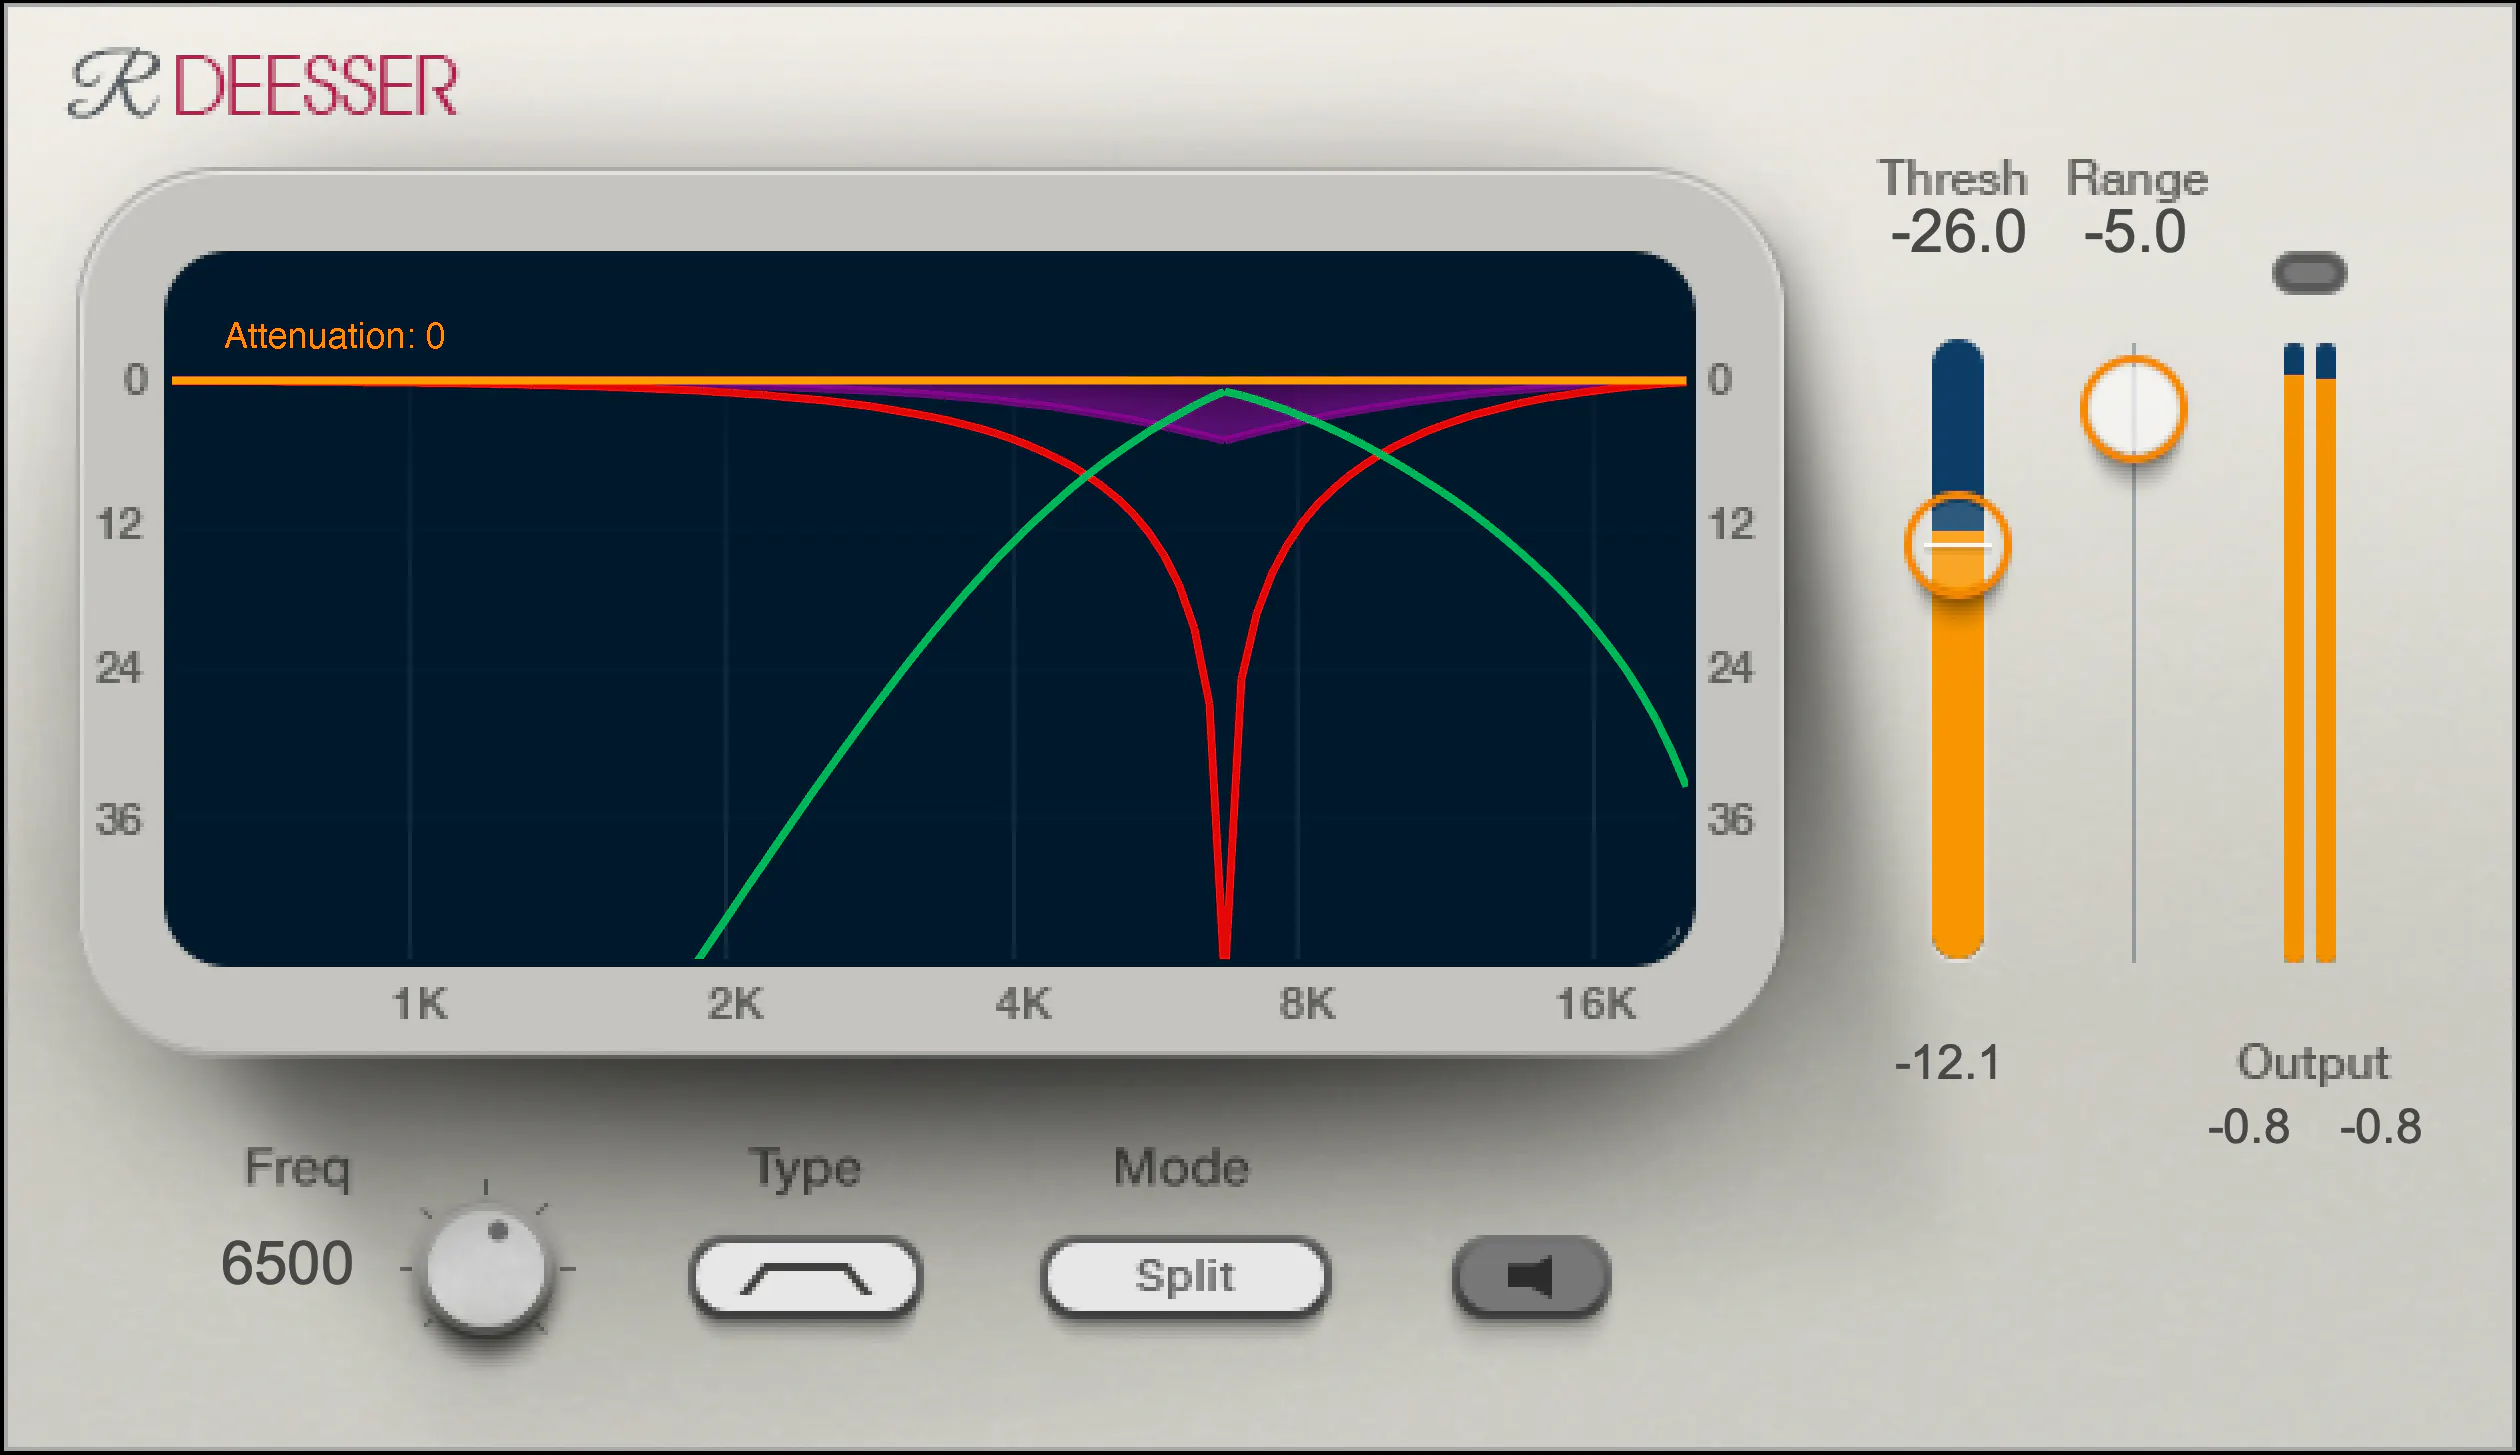
One of my go-to de-esser plugins is Waves Renaissance DeEsser, which offers precise control over the detection frequency, threshold, and reduction amount. Another popular option is FabFilter Pro-DS, which includes a natural-sounding “single vocal” mode for easy and effective de-essing.

De-Essing Vocals

De-essing can be a delicate process, as overuse can result in a dull and lifeless vocal sound. It’s important to strike a balance between reducing sibilance and maintaining the natural tone and character of the vocal recording.

When de-essing vocals, I typically start by soloing the vocal track and listening for the most pronounced sibilant sounds. I then apply the de-esser plugin with a gentle reduction amount, gradually increasing until the sibilance is under control but the vocal still sounds natural.

Best De-Esser for Vocals

In my experience, the best de-esser for vocals is one that offers precise control over the detection and reduction parameters, while still maintaining a natural sound. As mentioned earlier, Waves Renaissance DeEsser and FabFilter Pro-DS are both excellent options in this regard.

It’s also worth considering the de-esser included in your DAW of choice. For example, Logic Pro’s built-in de-esser is simple yet effective, with a straightforward interface that allows for quick and easy de-essing.

De-Esser Settings

When using a de-esser, it’s important to understand the various settings and how they affect the sound. The most important parameters to adjust are the detection frequency, threshold, and reduction amount.

The detection frequency determines which frequencies the de-esser will target, while the threshold sets the level at which the gain reduction will be applied. The reduction amount controls how much gain reduction is applied to the offending frequencies.

It’s worth experimenting with these settings to find the sweet spot for each individual vocal recording.

Tips for Using a De-Esser

Here are a few tips for getting the most out of your de-esser:

Use the de-esser sparingly, as overuse can result in a dull and lifeless vocal sound.
Always listen for sibilance in solo mode before applying the de-esser to the full mix.
Experiment with different de-esser plugins and settings to find the best sound for each individual recording.
If you’re unsure about how much de-essing to apply, start with a small reduction amount and gradually increase until the sibilance is under control but the vocal still sounds natural.
As the legendary producer Quincy Jones once said, “The most important thing in the studio is your ears.” And this is especially true when it comes to managing sibilance in vocal recordings. A de-esser is a tool that helps to control sibilance, or the harsh “s” and “t” sounds that can be distracting or unpleasant in a recording.

What is a de-esser?

Simply put, a de-esser is a type of audio processor that is designed to reduce or remove sibilance from a recording. It works by detecting and attenuating the specific frequency range where sibilance occurs in a vocal recording. This can help to smooth out the sound of the recording and make it more pleasing to the ear.

How does a de-esser work?

A de-esser typically uses a narrow-band compressor to reduce the level of the sibilant frequencies. The compressor is set to activate only when the sibilant frequencies exceed a certain threshold level. This allows the de-esser to reduce sibilance without affecting other parts of the recording. Some de-essers also use dynamic equalization to selectively attenuate sibilant frequencies, which can provide a more natural-sounding result.

Why is a de-esser important?

Sibilance can be a major distraction in vocal recordings, and can make a recording sound amateurish or unprofessional. A de-esser can help to smooth out the sound of a recording and make it more pleasant to listen to. This can be especially important in situations where the recording will be played over a large sound system or in a professional setting.

As the legendary producer Quincy Jones once said, “The most important thing in the studio is your ears.” And this is especially true when it comes to managing sibilance in vocal recordings. One personal experience I’ve had with sibilance was during a recording session with a vocalist who had a very pronounced lisp. Despite the fact that the vocal performance was excellent, the lisp made the recording almost unlistenable. However, with the use of a de-esser, we were able to remove the harsh sibilant sounds and salvage the recording.

Another personal experience was with a different vocalist who had a lot of sibilance in her recordings. Initially, we tried to use EQ to reduce the sibilance, but found that this also affected other parts of the recording and made it sound unnatural. However, once we introduced a de-esser into the signal chain, we were able to achieve a more natural-sounding result that still effectively reduced the sibilance.

In conclusion, a de-esser is a powerful tool for managing sibilance in vocal recordings. By detecting and attenuating specific frequency ranges where sibilance occurs, a de-esser can help to smooth out the sound of a recording and make it more pleasing to the ear. Whether you’re a professional audio engineer or a hobbyist recording at home, a de-esser is an important tool to have in your audio processing toolkit.

sibilance reduction, vocal processing, audio engineering, dynamic equalization, narrow-band compressor, vocal recording, audio processor, professional recording, recording studio, audio production, sound quality, sound engineering, audio post-production, de-essing, audio editing, audio restoration, sound treatment, audio technology, audio software, mixing and mastering, audio mastering, audio plugins, music production, audio effects, sound design, audio signal processing, audio post-processing, audio filtering, audio frequency, audio dynamics, audio post-production techniques, vocal performance, audio compression, audio enhancement, audio editing software, audio hardware, audio mixer, audio signal chain, audio equipment, audio tools, sound recording, audio clean-up, audio post, audio mastering software, audio workflow, audio clarity