As a seasoned specialist in the realm of digital audio, my experience allows me to delve into the current state of MP3 in 2024. In a world dominated by streaming services and evolving technologies, MP3, once a revolutionary format, continues to play a significant role in our musical journey.
The Evolution of MP3
Reflecting on the evolution of MP3, it’s crucial to acknowledge its transformative impact on how we consume music. From the early days of file sharing on Napster to the rise of legal digital platforms like iTunes, MP3 laid the foundation for a digital music revolution that changed the music industry’s landscape.
MP3’s ability to compress audio files without significant quality loss made it a preferred format for music enthusiasts worldwide. This compression technology allowed users to store vast music libraries on their devices, paving the way for the era of portable music players and iPods.
Key Advancements in MP3 Technology
Enhancements in audio compression algorithms
Compatibility with a wide range of devices
Integration of ID3 tags for metadata
These advancements ensured that MP3 remained a versatile and widely adopted format, despite the emergence of newer technologies.
The Impact of Streaming on MP3
With the dominance of streaming services like Spotify and Apple Music, the landscape has shifted. MP3, once synonymous with music ownership, now coexists with the convenience of streaming. The ease of access to vast music libraries on demand has redefined how we experience music, posing new challenges for the traditional concept of music ownership.
Challenges and Opportunities for MP3
Competition with lossless audio formats
Adaptation to changing consumer preferences
Integration with emerging technologies
MP3 faces both challenges and opportunities in this streaming-centric era. While audiophiles may gravitate towards high-fidelity formats, MP3 remains a practical choice for those prioritizing storage space and accessibility.
The Future of MP3: Innovations and Possibilities
Looking ahead, MP3 is not merely a relic of the past but a format poised for innovations. Artificial intelligence is influencing music creation, and the integration of AI-driven enhancements in MP3 encoding can offer an even more optimized listening experience.
AI in MP3: Personalized Listening
Customized audio profiles based on user preferences
Adaptive compression for varying playback scenarios
Dynamic equalization for individual hearing preferences
By embracing AI, MP3 could redefine personalization, ensuring that users experience music tailored to their unique preferences in any listening environment.
MP3 in 2024: A Continued Legacy
As I conclude this exploration of MP3 in 2024, it’s evident that while streaming dominates, MP3 maintains its relevance. Whether you’re a casual listener or an audiophile, the legacy of MP3 endures, adapting to technological shifts and embracing innovations that promise an enriched audio experience.
Latest Words on MP3
As the digital audio landscape evolves, keeping an eye on MP3’s trajectory is essential. Its enduring legacy, coupled with potential advancements, positions MP3 as a format that transcends time, catering to the diverse needs of music enthusiasts worldwide.
Comments:
Great insights into the future of MP3! Excited to see how AI will enhance my listening experience. – MusicLover23
Informative article, but I wish there was more on the challenges MP3 faces with emerging technologies. – TechEnthusiast
MP3 may be old, but it’s a reliable format. Looking forward to more advancements. – AudioNerd
Not convinced MP3 can compete with lossless formats. More data needed! – CuriousListener
Kudos to the author for shedding light on MP3’s evolution. Nostalgia hits hard! – RetroMusicFan
Could use more details on how AI will impact MP3 encoding. Fascinating stuff! – TechGeek
MP3 has been a constant companion. Excited to explore its future possibilities! – EverydayListener
As a seasoned specialist in audio engineering, I delve into the fascinating realm of audio equalization—a crucial aspect of sound shaping that often mystifies many. The top Google results merely scratch the surface, and today, I aim to provide you with a comprehensive guide that not only clarifies the fundamentals but also goes beyond the conventional wisdom.
Understanding the Basics
Let’s start with the basics. Audio equalization, commonly known as EQ, is the process of adjusting the balance between different frequency components of an audio signal. Picture it as a chef refining the flavors in a dish; in audio, we’re refining the sonic spectrum. The key frequencies—bass, midrange, and treble—act as the ingredients in our sonic recipe.
The Frequency Spectrum
**Bass:** Think of it as the foundation, like the deep notes of a booming drum.
**Midrange:** This is where most vocals and instruments thrive, akin to the heart of a melody.
**Treble:** Imagine the sparkle of cymbals or the crispness of high-pitched strings.
By grasping this analogy, you’re well on your way to mastering the art of audio equalization.
Let’s Talk about EQ Techniques
Now that we’ve laid the groundwork, let’s explore some advanced equalization techniques that the typical Google results might not delve into.
Dynamic Equalization
Dynamic equalization adapts to the audio signal in real-time, responding dynamically to changes in volume or frequency content. It’s like having an intelligent assistant adjusting the levels on the fly, ensuring a consistent and polished sound experience, much like a live concert adapts to the energy of the crowd.
Linear Phase EQ
Linear Phase EQ is like a surgeon’s precision knife. Unlike traditional EQ, it minimizes phase shifts, preserving the integrity of the original audio waveform. Think of it as a high-definition TV for your ears, offering pristine clarity without distortion.
The Art of Parametric EQ
Parametric EQ empowers you with surgical precision, allowing you to pinpoint and adjust specific frequencies. Imagine it as an artist’s palette, where each knob represents a color on the sonic canvas. This technique provides unparalleled control, letting you sculpt the audio landscape to perfection.
Let’s Talk about Room Acoustics
Now, let’s step into the real world—your living room. Room acoustics play a pivotal role in how you perceive sound. Just as a well-designed theater enhances the movie-watching experience, optimizing your room’s acoustics ensures that the audio equalization efforts shine.
Bass Traps and Diffusers
Ever noticed booming bass or echoes in your room? Bass traps and diffusers are like interior decorators for sound. Bass traps absorb excess low frequencies, while diffusers scatter sound waves, creating a balanced acoustic environment akin to a concert hall.
The Future of Audio Equalization
As we conclude our journey into the science of audio equalization, it’s essential to peek into the future. Emerging technologies, such as AI-driven EQ algorithms, promise even more personalized and immersive audio experiences. Just as your smartphone adapts to your preferences, future audio systems may tailor the sonic landscape to your unique tastes.
Latest Words on Audio Equalization
As the digital landscape evolves, so does the science of audio equalization. Staying updated on the latest advancements ensures that your audio setup remains at the forefront of sonic excellence. Remember, the journey to audio perfection is ongoing, and with each new discovery, we uncover more layers of the intricate tapestry that is sound.
Comments:
This article really opened my eyes to the art behind audio equalization. I never thought of it like adjusting flavors in a dish, but it makes so much sense now. Kudos!
Could you provide more examples of dynamic equalization in real-life scenarios? I’m intrigued by the concept and would love to understand it better.
Great read! The analogies used here make complex concepts easy to grasp. I’d love to see more articles breaking down technical topics in this way.
This article left me wanting more details on linear phase EQ. Are there any specific situations where it outshines traditional EQ, and how do I apply it in my own projects?
As a musician, I appreciate the room acoustics section. It’s often overlooked, but it makes a massive difference. Would love to see more tips on optimizing home studios for better sound!
Thanks for shedding light on the future of audio equalization. Exciting times ahead! Can’t wait to see how AI-driven EQ will revolutionize our listening experiences.
I’m a newbie in audio, and this article was a fantastic starting point. It’s written in a way that even beginners like me can understand. Looking forward to exploring more!
Impressive insights! The comparisons to real-life situations really make the concepts stick. Keep up the excellent work!
Are there any specific brands or tools you recommend for implementing dynamic equalization? I’d love to experiment with it in my home setup.
Bravo! This article not only educated me but also sparked my curiosity. Looking forward to more articles from this source!
Could you dive deeper into the science behind room acoustics? I’m fascinated by how the physical space affects sound, and I want to optimize my studio further.
This article made me appreciate the intricacies of audio engineering. It’s like a backstage pass to the world of sound manipulation. More, please!
Any tips for someone just starting with audio production? This article provided a solid foundation, and I’m hungry for more knowledge!
Audio equalization filters are like the control knobs on a sound system, allowing you to fine-tune and shape the audio output to your liking. Imagine them as the equalizer settings on your music player or car stereo. These filters work by adjusting the intensity of different frequency ranges within an audio signal. It’s akin to adjusting the bass, midrange, and treble levels on your home stereo system to achieve the perfect sound balance.
For instance, if you’re listening to music and the bass is overwhelming, you can use equalization filters to reduce the bass frequencies and create a more balanced and enjoyable listening experience. Conversely, if you want to emphasize the vocals in a podcast, you can boost the midrange frequencies to make the voice clearer.
Audio equalization filters are essential tools in the world of sound engineering and music production. They allow professionals to shape and enhance audio quality in recordings, live performances, and various audio applications.
Importance of Audio Equalization
As a seasoned audio engineer, I can attest to the critical role that audio equalization plays in creating high-quality audio content. It’s like being a chef who uses different seasonings to bring out the flavors in a dish. Properly applied equalization enhances the sonic characteristics of audio, making it sound cleaner, more balanced, and more appealing to the ears.
Consider a live concert scenario where you have a mix of instruments and vocals. Without proper equalization, the sound may become muddied and unclear. By using equalization filters, you can isolate and emphasize specific frequencies, making the guitar sound crisp, the vocals shine, and the drums punchy.
Audio equalization is not limited to music alone; it extends to podcasts, films, gaming, and even phone calls. Imagine watching a movie where the dialogue is drowned out by background noise. Skilled audio engineers use equalization to reduce unwanted noise and ensure that the dialogue is clear and intelligible.
Types of Audio Equalization Filters
Audio equalization filters come in various types, each designed for specific purposes. Think of them as different brushes for an artist, each suited for a particular style of painting. Here are some common types of equalization filters:
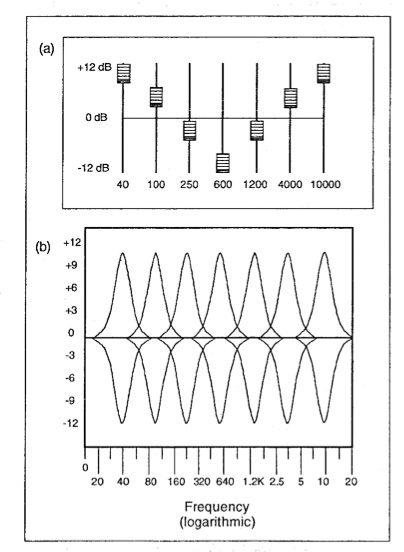
Graphic Equalizers: These are like multi-colored paint palettes, allowing you to adjust a set of fixed frequency bands. They are user-friendly and often found on consumer audio devices.
Parametric Equalizers: Parametric equalizers are like precision tools for audio professionals. They allow you to adjust not only the frequency bands but also the bandwidth (Q) and gain with great precision.
Shelving Equalizers: Imagine these as specialized brushes for broad strokes. Shelving equalizers are used to boost or cut all frequencies above or below a certain point, useful for adjusting bass or treble.
Notch Filters: These are like erasers for unwanted sounds. Notch filters target and eliminate specific frequencies, ideal for removing unwanted hums, buzzes, or feedback.
High-Pass and Low-Pass Filters: High-pass filters allow high frequencies to pass while attenuating low frequencies, while low-pass filters do the opposite. They are like sieves that filter out unwanted elements in audio.
Understanding when and how to use these different types of equalization filters is crucial for achieving the desired audio quality in various scenarios, from music production to live sound reinforcement.
Common Questions About Audio Equalization Filters
When it comes to audio equalization filters, many questions arise, much like curious minds seeking answers. Let’s address some common queries:
1. What’s the best equalization setting for music?
Equalization settings depend on personal preferences and the audio source. There’s no one-size-fits-all answer. Experiment and adjust to suit your taste.
2. Can equalization fix poor-quality recordings?
While equalization can improve audio quality to some extent, it can’t completely salvage a poorly recorded source. Quality in, quality out still applies.
3. Are expensive equalizer plugins better than free ones?
Not necessarily. The effectiveness of an equalizer depends on its features and your skill in using it. Free plugins can be excellent if used correctly.
Mastering Audio Equalization Techniques
Mastering audio equalization is like becoming a skilled painter, capable of creating stunning visuals on a canvas. To excel in this art, you need to practice, experiment, and learn from experience. Start with simple adjustments and gradually delve into more complex equalization techniques.
Consider the analogy of a chef crafting a signature dish. Just as a chef refines their recipe through trial and error, audio engineers refine their equalization techniques by actively listening, experimenting with different filters, and paying attention to detail.
Remember that context matters. Equalization for a rock concert differs from equalization for a classical orchestra recording. It’s crucial to understand the specific requirements of each audio project and tailor your equalization accordingly.
Advanced Applications of Equalization Filters
Advanced applications of equalization filters are like pushing the boundaries of artistic expression. As you become more proficient, you can use equalization creatively. Imagine being a sculptor who can carve intricate details into their work.
For instance, you can use equalization to create unique sound effects in films, simulate vintage audio characteristics, or shape the sonic identity of a musical genre. It’s akin to an artist using various brush strokes and techniques to evoke different emotions in their paintings.
Additionally, advanced equalization techniques involve dynamic equalization, where the filter settings change in real-time based on the audio input. This dynamic approach is like choreographing a dance, where the moves adapt to the music’s rhythm and intensity.
In conclusion, audio equalization filters are powerful tools in the hands of skilled audio professionals. They enable us to shape sound, enhance quality, and create captivating auditory experiences across a wide range of media and applications. Much like artists refining their craft, mastering the art of audio equalization takes time and dedication, but the results are music to the ears.
As a music producer and audio engineer, I’ve encountered my fair share of challenging vocal recordings. One common issue is sibilance, which occurs when the “s” and “sh” sounds are overly pronounced, causing harsh and piercing frequencies in the mix. This is where a de-esser comes in handy.
De-Esser Plugin
A de-esser is a specialized audio plugin that reduces or eliminates sibilance from vocal recordings. It works by detecting the offending frequencies and applying gain reduction to them, effectively taming the harshness and allowing the vocals to sit better in the mix.
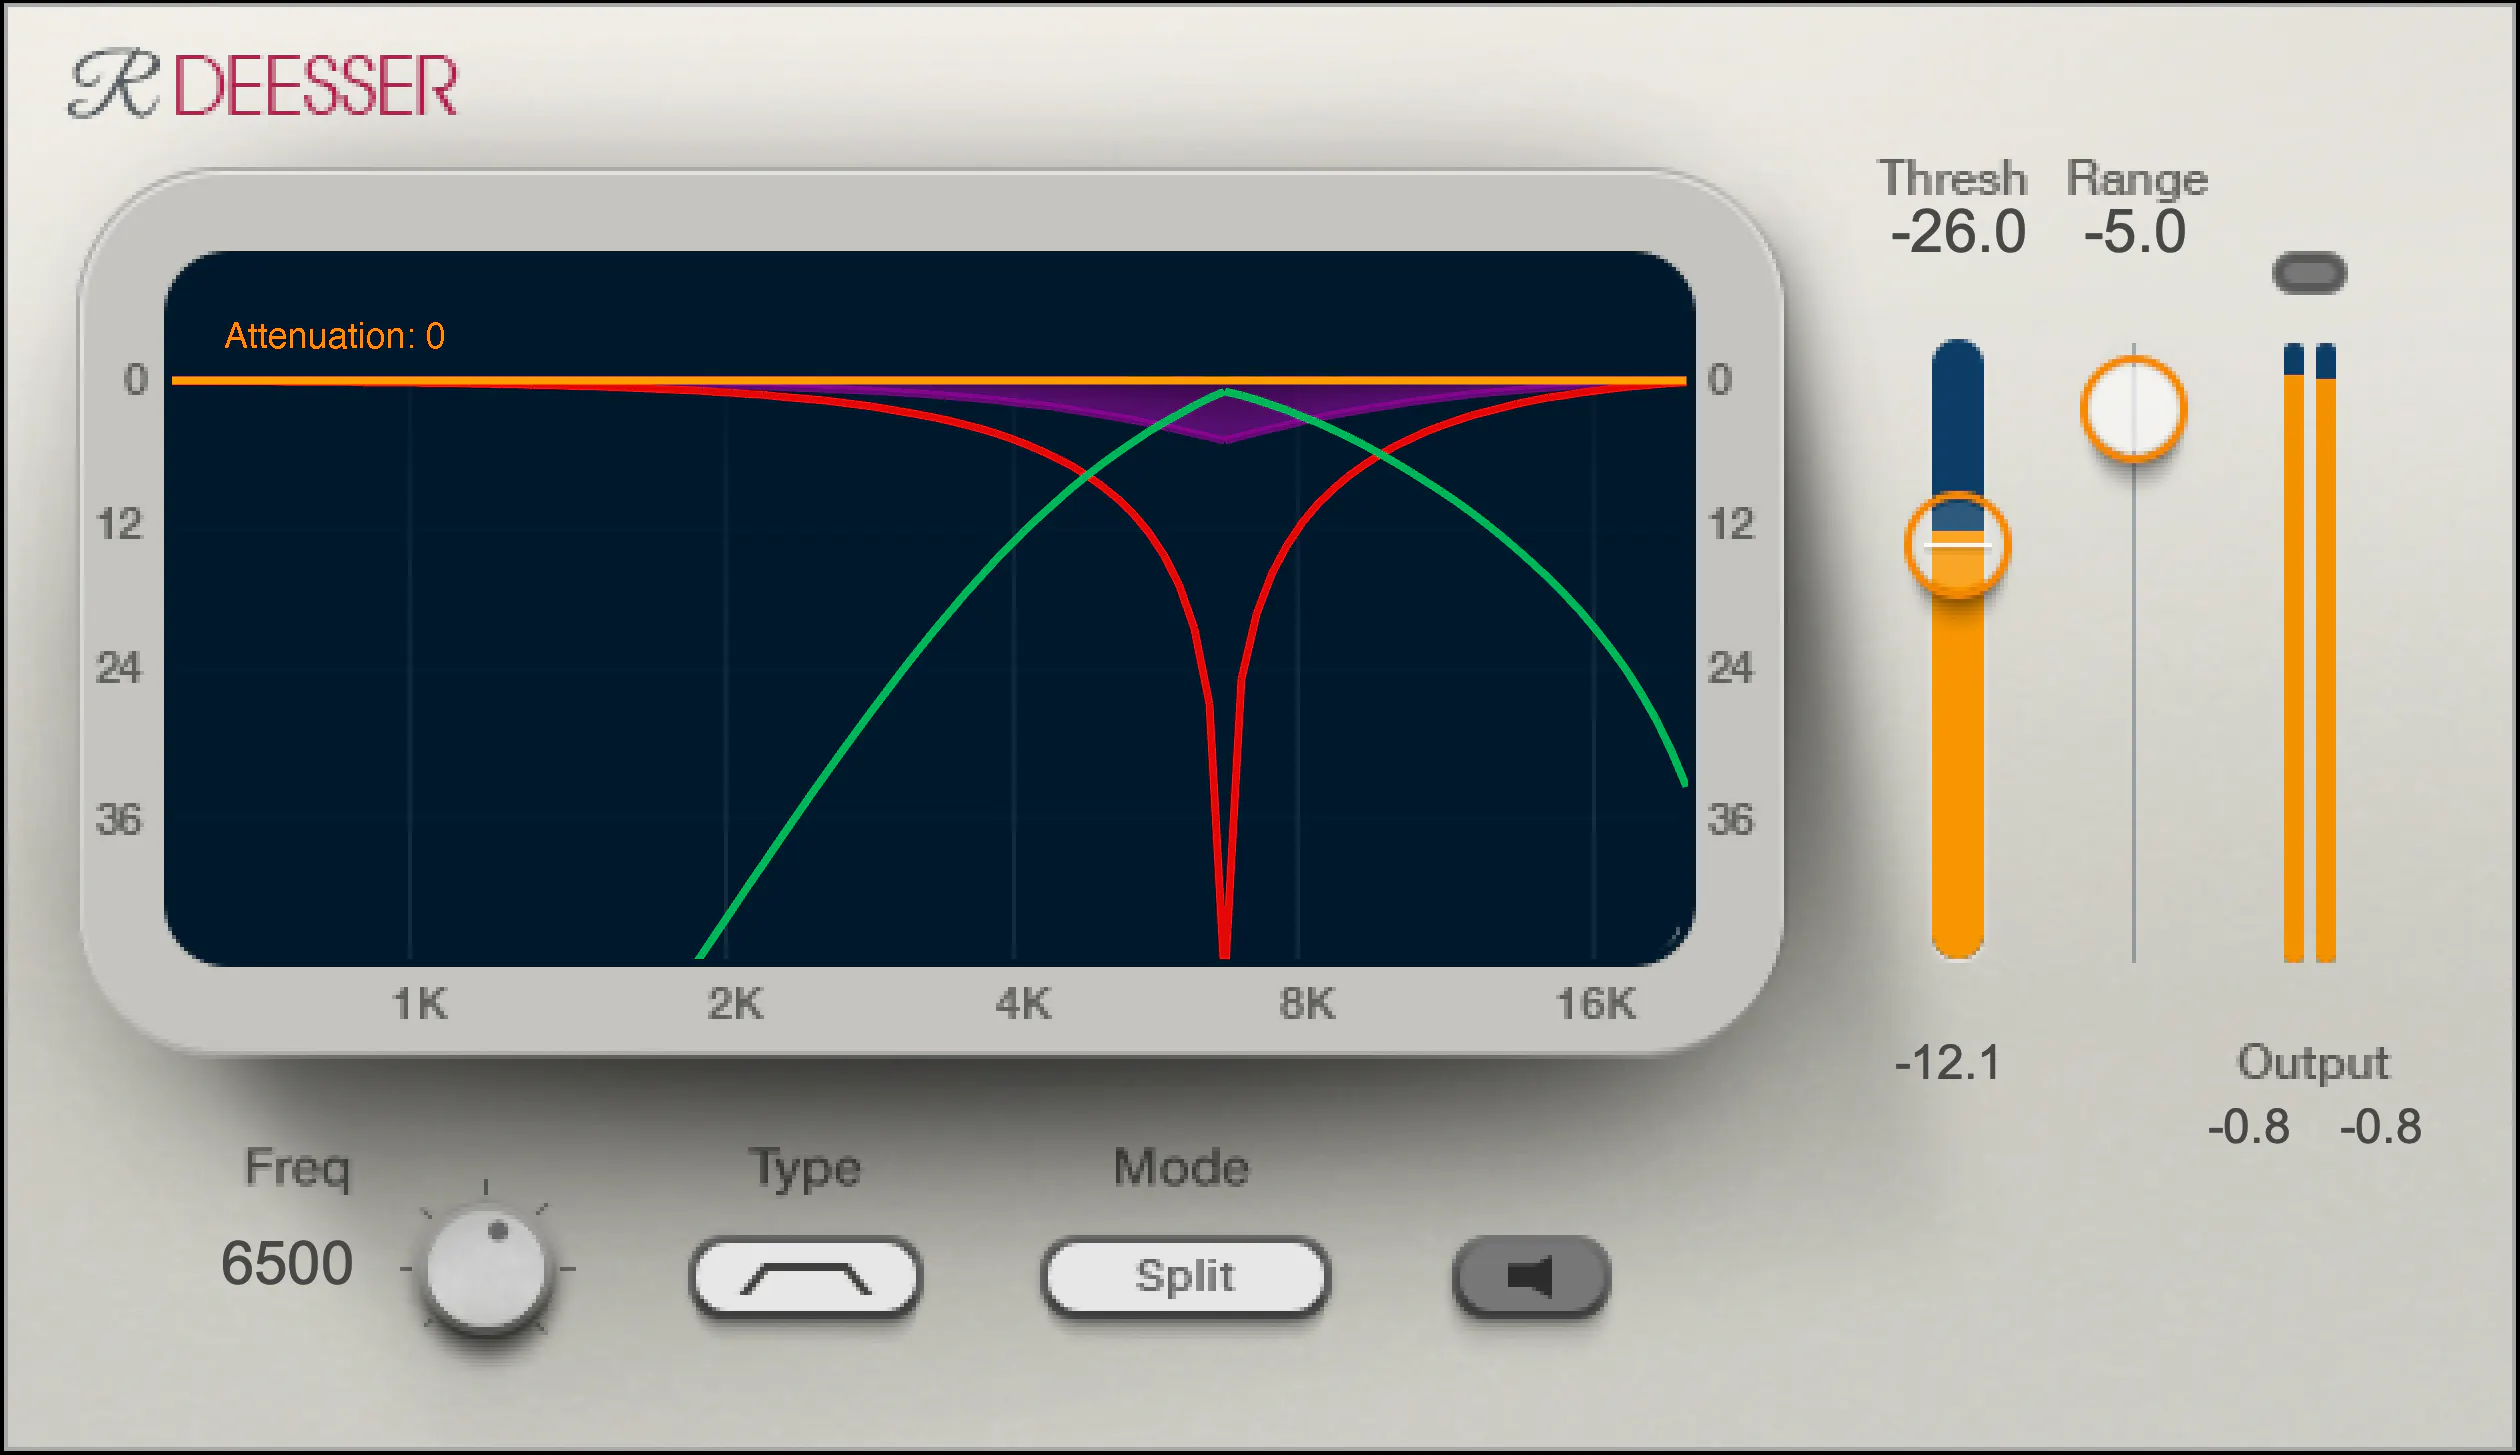
One of my go-to de-esser plugins is Waves Renaissance DeEsser, which offers precise control over the detection frequency, threshold, and reduction amount. Another popular option is FabFilter Pro-DS, which includes a natural-sounding “single vocal” mode for easy and effective de-essing.
De-Essing Vocals
De-essing can be a delicate process, as overuse can result in a dull and lifeless vocal sound. It’s important to strike a balance between reducing sibilance and maintaining the natural tone and character of the vocal recording.
When de-essing vocals, I typically start by soloing the vocal track and listening for the most pronounced sibilant sounds. I then apply the de-esser plugin with a gentle reduction amount, gradually increasing until the sibilance is under control but the vocal still sounds natural.
Best De-Esser for Vocals
In my experience, the best de-esser for vocals is one that offers precise control over the detection and reduction parameters, while still maintaining a natural sound. As mentioned earlier, Waves Renaissance DeEsser and FabFilter Pro-DS are both excellent options in this regard.
It’s also worth considering the de-esser included in your DAW of choice. For example, Logic Pro’s built-in de-esser is simple yet effective, with a straightforward interface that allows for quick and easy de-essing.
De-Esser Settings
When using a de-esser, it’s important to understand the various settings and how they affect the sound. The most important parameters to adjust are the detection frequency, threshold, and reduction amount.
The detection frequency determines which frequencies the de-esser will target, while the threshold sets the level at which the gain reduction will be applied. The reduction amount controls how much gain reduction is applied to the offending frequencies.
It’s worth experimenting with these settings to find the sweet spot for each individual vocal recording.
Tips for Using a De-Esser
Here are a few tips for getting the most out of your de-esser:
Use the de-esser sparingly, as overuse can result in a dull and lifeless vocal sound.
Always listen for sibilance in solo mode before applying the de-esser to the full mix.
Experiment with different de-esser plugins and settings to find the best sound for each individual recording.
If you’re unsure about how much de-essing to apply, start with a small reduction amount and gradually increase until the sibilance is under control but the vocal still sounds natural.
As the legendary producer Quincy Jones once said, “The most important thing in the studio is your ears.” And this is especially true when it comes to managing sibilance in vocal recordings. A de-esser is a tool that helps to control sibilance, or the harsh “s” and “t” sounds that can be distracting or unpleasant in a recording.
What is a de-esser?
Simply put, a de-esser is a type of audio processor that is designed to reduce or remove sibilance from a recording. It works by detecting and attenuating the specific frequency range where sibilance occurs in a vocal recording. This can help to smooth out the sound of the recording and make it more pleasing to the ear.
How does a de-esser work?
A de-esser typically uses a narrow-band compressor to reduce the level of the sibilant frequencies. The compressor is set to activate only when the sibilant frequencies exceed a certain threshold level. This allows the de-esser to reduce sibilance without affecting other parts of the recording. Some de-essers also use dynamic equalization to selectively attenuate sibilant frequencies, which can provide a more natural-sounding result.
Why is a de-esser important?
Sibilance can be a major distraction in vocal recordings, and can make a recording sound amateurish or unprofessional. A de-esser can help to smooth out the sound of a recording and make it more pleasant to listen to. This can be especially important in situations where the recording will be played over a large sound system or in a professional setting.
As the legendary producer Quincy Jones once said, “The most important thing in the studio is your ears.” And this is especially true when it comes to managing sibilance in vocal recordings. One personal experience I’ve had with sibilance was during a recording session with a vocalist who had a very pronounced lisp. Despite the fact that the vocal performance was excellent, the lisp made the recording almost unlistenable. However, with the use of a de-esser, we were able to remove the harsh sibilant sounds and salvage the recording.
Another personal experience was with a different vocalist who had a lot of sibilance in her recordings. Initially, we tried to use EQ to reduce the sibilance, but found that this also affected other parts of the recording and made it sound unnatural. However, once we introduced a de-esser into the signal chain, we were able to achieve a more natural-sounding result that still effectively reduced the sibilance.
In conclusion, a de-esser is a powerful tool for managing sibilance in vocal recordings. By detecting and attenuating specific frequency ranges where sibilance occurs, a de-esser can help to smooth out the sound of a recording and make it more pleasing to the ear. Whether you’re a professional audio engineer or a hobbyist recording at home, a de-esser is an important tool to have in your audio processing toolkit.
How to Improve MP3 Sound Quality with EQ and Effects
mp3 equalization
Introduction
mp3 equalization
When it comes to listening to music, sound quality matters. However, not all MP3 files are created equal, and sometimes additional processing is necessary to make them sound their best. One way to achieve better sound quality is by using EQ and effects to adjust the audio signal. In this article, we’ll take a look at how EQ and effects can be used to improve the sound quality of MP3 files, providing tips and techniques for achieving better audio quality.
Understanding EQ and Effects
EQ, or equalization, is a way to adjust the balance of different frequency components in an audio signal. It can be used to make certain frequencies more or less prominent, depending on the desired sound. Effects, on the other hand, are a way to alter the audio signal in other ways, such as adding reverb, delay, or distortion. EQ and effects can be used in combination to shape the overall sound of an MP3 file.
The Best EQ and Effects for Improving MP3 Sound Quality
When it comes to improving MP3 sound quality with EQ and effects, there are a variety of tools to choose from. Some of the most commonly used EQ and effects for MP3 files include:
Graphic EQ: A graphic equalizer allows you to adjust the levels of different frequency bands using sliders. This is a good option for making broad adjustments to the overall sound of an MP3 file.
Parametric EQ: A parametric equalizer is a more precise way to adjust the frequency balance of an audio signal. It allows you to adjust the center frequency, bandwidth, and gain of each individual band.
Reverb: Reverb is an effect that adds a sense of space to an audio signal. It can be used to make an MP3 file sound more like it was recorded in a large room or hall, for example.
Delay: Delay is an effect that repeats the audio signal after a set amount of time. It can be used to create a sense of depth and space in an MP3 file.
Compression: Compression is an effect that reduces the dynamic range of an audio signal. It can be used to make the quiet parts of an MP3 file louder and the loud parts quieter, resulting in a more consistent overall volume.
How to Use EQ and Effects to Improve MP3 Sound Quality
Improving the sound quality of an MP3 file with EQ and effects involves a bit of trial and error. Here are some general steps to follow:
Start with a flat EQ: Set all the EQ bands to the same level (usually 0 dB) to begin with.
Identify problem areas: Listen to the MP3 file and identify any frequency ranges that sound unbalanced or overly prominent.
Adjust EQ settings: Use the EQ to adjust the levels of the problem frequency ranges until they sound more balanced and natural.
Add effects: Once you’re happy with the overall EQ balance, add effects like reverb or delay to enhance the sound of the MP3 file.
Listen and adjust: Listen to the MP3 file with EQ and effects applied and make further adjustments as necessary until you’re happy with the sound.
Step 3: Applying Effects
Once you’ve used EQ to correct any frequency imbalances in the track, you can start to apply effects to enhance the overall sound quality. There are a variety of effects you can use to achieve different results. Here are a few examples:
Reverb: Adds a sense of space and depth to the track.
Delay: Creates echoes, which can add a sense of movement and dynamics.
Chorus: Creates a sense of width and thickness by doubling the sound.
Flanger: Similar to chorus, but with a more pronounced, swirling effect.
Keep in mind that the key to using effects effectively is to use them sparingly. Too much reverb or delay, for example, can make the track sound muddy and indistinct. A good rule of thumb is to use just enough effect to achieve the desired result, but not so much that it detracts from the clarity of the track.
Step 4: Using Mp4Gain
While using EQ and effects can go a long way in improving the sound quality of your MP3 files, there are limits to what you can achieve through manual adjustments. This is where software tools like Mp4Gain can be especially useful.
Mp4Gain is a powerful tool that allows you to normalize and equalize your MP3 files automatically. It uses sophisticated algorithms to analyze the tracks and adjust the volume and EQ to optimize the sound quality.
Using Mp4Gain is a straightforward process. Simply open the application and drag and drop the MP3 files you want to adjust into the interface. The software will automatically analyze the files and adjust the volume and EQ to achieve the best possible sound quality.
Conclusion
Improving the sound quality of your MP3 files may seem like a daunting task, but with the right tools and techniques, it is entirely achievable. By using EQ to balance out the frequency spectrum, applying effects to enhance the sound, and using a tool like Mp4Gain to automate the process, you can achieve professional-level sound quality from your MP3 files.
Remember to always use these techniques in moderation and make sure to listen to the track at different stages of the process to ensure you’re not overdoing it. With some practice and experimentation, you can create MP3 files that sound just as good as their lossless counterparts.




Comments:
Great insights into the future of MP3! Excited to see how AI will enhance my listening experience. – MusicLover23
Informative article, but I wish there was more on the challenges MP3 faces with emerging technologies. – TechEnthusiast
MP3 may be old, but it’s a reliable format. Looking forward to more advancements. – AudioNerd
Not convinced MP3 can compete with lossless formats. More data needed! – CuriousListener
Kudos to the author for shedding light on MP3’s evolution. Nostalgia hits hard! – RetroMusicFan
Could use more details on how AI will impact MP3 encoding. Fascinating stuff! – TechGeek
MP3 has been a constant companion. Excited to explore its future possibilities! – EverydayListener
Interesting read! AI-driven MP3 sounds promising. – FutureTechExplorer
Would love to hear more about user experiences with MP3 in the comments section. – InquisitiveReader
Author did a great job highlighting the challenges and opportunities for MP3. – MusicEnthusiast