How to make MP4 audio volume consistent


Free Download Mp4Gain
picture

How to make MP4 audio volume consistent

How to make MP4 audio volume consistent

Let’s talk about achieving uniform audio in MP4s. As someone who works with audio daily, I understand the frustration of inconsistent sound levels. Inconsistent audio can disrupt the viewing experience. This comprehensive guide provides solutions for balanced sound in your MP4 files. I’ll share professional insights and practical tips, making even complex concepts accessible to everyone.

The Importance of Balanced Audio in MP4s

Consistent sound enhances the viewing experience significantly. Imagine watching a movie where whispers are barely audible, and explosions make you jump. Unbalanced audio is distracting. Consistent volume creates a more immersive and enjoyable experience. It also demonstrates professionalism and improves accessibility for viewers with hearing impairments.

Understanding the Fundamentals of Audio Leveling

Leveling audio involves adjusting sound levels to achieve a consistent target loudness. It’s like fine-tuning a musical instrument to achieve a more harmonious sound. Peak normalization maximizes loudness without clipping, while loudness normalization targets perceived loudness. Both methods aim to create a more uniform and pleasant listening experience.

Practical Steps for Consistent MP4 Audio

Achieving balanced sound involves a few key steps. I’ll outline them here, providing clear examples to guide you. Each step contributes to a polished final product. These actionable steps yield professional results.

  • Analyze Existing Audio: Begin by assessing the current loudness range. I often use visualization tools to see the peaks and valleys in the waveform, identifying areas needing adjustment. It’s like examining a map before starting a journey.
  • Adjust Levels Carefully: Utilize audio editing tools to carefully raise quiet passages and lower overly loud ones. Avoid clipping, which introduces distortion. It’s similar to adjusting the seasoning in a dish for optimal flavor.
  • Monitor and Refine: Use loudness meters and your ears to monitor the results. Listen on different devices, like headphones and speakers, to ensure consistent playback across platforms. This final check is like taste-testing a recipe before serving it.

Ensuring Seamless Audio Transitions

Abrupt volume changes can be jarring. Smooth transitions are essential for maintaining viewer engagement. Gradual fades and crossfades prevent jarring shifts between scenes or audio segments. Properly implemented transitions maintain a consistent and professional feel. This creates seamlessness in the audio experience.

Advanced Techniques for Consistent Audio

More advanced methods, beyond basic leveling, can help you to achieve a uniform feel and optimize the sound across various platforms:

  • Dynamic Range Compression: Gently reduces the difference between the loudest and quietest parts of the audio, creating a more even overall volume. This is similar to using a compressor in music production to smooth out the dynamics of an instrument.
  • Equalization (EQ): Adjusts the balance of different frequencies in the audio, helping to clarify dialogue or reduce harshness. It’s like fine-tuning the tone controls on a stereo system to customize the sound.

Optimizing Your Workflow

Optimizing the process saves a great deal of time, specifically when managing numerous MP4s. The techniques I’ve perfected over the years are designed to help you build efficiency in your process and deliver top results. Streamlining ensures consistently high quality output.

  • Create Presets or Templates: Once you’ve established settings that work well, save them as presets or templates. This saves time when working on similar projects. It’s like having a pre-made recipe for your favorite dish.
  • Batch Processing: Many tools offer batch processing capabilities, allowing you to apply your adjustments to multiple files simultaneously. This streamlines the process significantly, especially when working with large volumes of media. Think of it like cooking multiple dishes in the oven at once.

Troubleshooting Common Issues

Even with the best planning, sometimes issues arise when dealing with audio. In my experience, most issues can be identified and resolved quickly. These solutions tackle those common headaches.

  • Audio Too Quiet: If the audio is consistently too low, check the input gain during recording or increase the amplification during editing. It’s like turning up the microphone volume before a speech.
  • Audio Too Loud/Distorted: Conversely, if the audio is too loud, it can cause distortion or clipping. Reduce the gain or apply compression to manage peaks. It’s like lowering the volume on a speaker to prevent crackling.
  • Inconsistent Levels Within a File: If certain sections are louder than others, carefully adjust those sections individually using automation or gain adjustments. This targeted approach is like fine-tuning individual instruments in a musical mix.

Understanding the Role of Codecs

The codec used to encode your sound heavily impacts resulting storage and final perceived tones. Different codecs operate using varied methods. Each has unique characteristics. Codec selection is a key factor in sonic fidelity.

  • AAC (Advanced Audio Coding): The most common codec used with MP4s. AAC offers a good balance between file size and sound quality, making it suitable for a wide range of applications. I often recommend this codec for its versatility.
  • Other Audio Codecs: Alternatives such as MP3 or Apple Lossless exist, each with its trade-offs in terms of quality and file dimensions. Selecting one codec over another comes down to making a balanced decision that meets specific project requirements.

Latest words on How to make MP4 audio volume consistent

Consistent MP4 audio enhances the listening experience. Following these tips and techniques you can improve your content. Balanced sound not only sounds more professional. But it also makes your videos more accessible. Consistent audio demonstrates attention to detail, setting your productions apart. While tools like MP4Gain can help streamline the process, a deep understanding of these principles is essential for achieving truly professional results.

FAQ about How to make MP4 audio volume consistent

Why do my MP4 videos have inconsistent audio levels?

Uneven volume within MP4s can stem from various factors: source material discrepancies, incorrect recording levels, or issues during editing or processing. Identifying the root cause helps apply the proper solution.

What are some indicators of inconsistent volume?

Frequent manual volume changes during playback, dialogue that’s hard to hear in some scenes, or overly loud music or sound effects. These indicate normalization steps are needed.

How does normalization improve my videos?

Normalized volume creates a more professional product by eliminating jarring shifts in loudness. It enhances viewer engagement and improves accessibility, especially for those with hearing sensitivities.

What are common techniques for leveling sound?

Peak normalization boosts the loudest part of the audio without introducing distortion. Loudness normalization aims for a consistent perceived volume. These are the most often used options.

How can I make smooth transitions between scenes?

Gradual fades and crossfades prevent jarring changes. This smoothing process contributes significantly to a polished, professional feel.

What are some advanced audio editing techniques?

Dynamic range compression smooths out the loudness variations within your audio. Equalization adjusts tonal balance, impacting dialogue clarity, and music quality.

What if my MP4 audio is too quiet?

Increase the gain during editing, being careful to avoid clipping. If possible, re-record the audio at a higher input level to capture a stronger signal from the start.

What should I do if the audio is too loud or distorted?

Reduce the gain during editing or apply compression to control peaks and avoid clipping, which introduces distortion. These measures create more manageable sound.

How can I ensure consistent loudness across multiple MP4 files?

Use batch processing features in sound tools. Batch processing applies your preferred normalization settings to multiple files at once. This creates uniformity across a large batch.

How does the audio codec affect file size and quality?

Different codecs have varying compression ratios and quality characteristics. AAC offers a balance between file size and audio fidelity. Lossless codecs like FLAC provide perfect sonic replication but result in larger files. Codec choice is a crucial aspect.

Comments:

Wow, this is a really helpful article! I’ve been struggling with uneven audio in my videos, and this gives me a much better understanding of how to fix it. Thanks!

Great explanation of audio normalization. I didn’t realize there were different types, like peak and loudness normalization. That makes total sense. Thanks for clarifying.

The tip about listening on different devices is spot on. I usually just check my audio on my computer speakers, but now I see why it’s important to test on headphones and other devices too.

I’m glad you mentioned accessibility. It’s something I’ve been trying to be more mindful of in my videos. Consistent audio levels are definitely a big part of that. Cheers.

This is super detailed, maybe a little *too* detailed. I just want a simple way to make my videos sound better. Is there a quick and easy method you can recommend?

Batch processing is a lifesaver! I edit a lot of videos, and the thought of manually adjusting audio levels for each one was daunting. Thanks for the tip!

I still don’t get the whole “codec” thing. Can you explain that in simpler terms? Like, what codec should I be using for my MP4 videos?

This was a game-changer for my video editing workflow. Thanks for the practical advice and clear explanations!

Great article, really comprehensive! Just a suggestion – could you add a section on how to normalize audio in different video editing software programs? That would be very helpful.

This article needs more cowbell! Just kidding. Seriously though, great job. Thanks for the informative read.


Free Download Mp4Gain
picture


Mp4Gain Main Window
picture


Mp4Gain Features
picture


Free Download Mp4Gain
picture

The Effect of Multi-Channel Encoding on WMA Audio Files

The Effect of Multi-Channel Encoding on WMA Audio Files

The Effect of Multi-Channel Encoding on WMA Audio Files

Let’s talk about the effect of multi-channel encoding on WMA audio files

When we discuss the effect of multi-channel encoding on WMA audio files, we’re exploring how using multiple audio channels transforms your listening experience. As someone who’s worked extensively with audio formats, I can tell you that this isn’t just about making the sound louder. It’s about creating a more immersive and realistic soundscape, mimicking how we hear sounds in real life. Think of it like watching a movie, with the sound coming from all around you instead of just from the front. The way sound is encoded can change drastically the experience. I’ve personally witnessed how multi-channel encoding turns a simple audio file into an engaging and enveloping sonic experience, especially when it comes to music or movies.

Understanding Multi-Channel Audio

Multi-channel audio goes far beyond simple stereo and opens up a whole new world of sound. My experience with different types of audio tells me that the number of audio channels impacts your overall experience with a recording. Stereo audio, which is commonly used, has two channels, one for the left ear and one for the right ear. This gives us a sense of left and right placement. Multi-channel audio, however, uses more than two channels, enabling sound to come from different directions creating a 3D-like sound field. It’s like being surrounded by a band while you’re in the middle of the concert hall, rather than just hearing it from two points. This greatly affects how we perceive sound, and how realistic it feels.

Common Multi-Channel Configurations

  • 5.1 Surround Sound: Includes five channels (left, center, right, left surround, right surround) and one subwoofer channel for low-frequency effects.
  • 7.1 Surround Sound: Adds two additional surround channels (left rear and right rear) to the 5.1 setup, enhancing the envelopment even more.
  • Dolby Atmos and DTS:X: Object-based audio, which allows sound to be placed anywhere in the sound field, not just specific channels.

WMA Codec and Multi-Channel Encoding

The WMA (Windows Media Audio) codec has its own unique way of handling multi-channel audio. In my experience, WMA is very capable of handling multi-channel sound, particularly versions like WMA Pro. WMA Pro supports high-resolution audio and multiple channels, allowing for high-fidelity surround sound. This means the codec can efficiently compress multi-channel audio without losing too much quality, which is crucial for delivering an immersive experience. It is important to say that not all WMA files are created equal. Some may be encoded with simple stereo or even mono sound, which does not use the capabilities of this codec. The codec capabilities can be used to create a much richer and detailed sound.

Key Features of WMA in Multi-Channel Encoding

  • Support for multiple channels, including 5.1 and 7.1 surround sound, providing a wide soundstage.
  • Efficient compression algorithms, reducing file sizes while preserving good sound quality.
  • WMA Pro supports lossless compression as well, an option for the best quality available.

The Impact of Bitrate on Multi-Channel WMA Files

Bitrate, usually measured in kilobits per second (kbps), is an important factor in multi-channel WMA files. In my experience with audio, the higher the bitrate, the more data is stored for each audio channel, resulting in a higher quality sound. When dealing with multi-channel audio, a higher bitrate becomes even more critical because you need to store much more information compared to simple stereo. Lower bitrates can lead to audio compression artifacts, such as a loss of clarity and detail, especially in complex soundscapes with many instruments or sounds. Think about having a bucket full of sand. If you have a small bucket you can only take a little sand at a time. A large bucket will allow you to have more sand at once, and the same happens with bitrates.

Recommended Bitrates for Multi-Channel WMA

  • 384 kbps to 512 kbps: Considered good for 5.1 surround sound, providing a good balance between quality and file size.
  • 512 kbps and above: Recommended for 7.1 surround sound or for when the best audio quality is required.
  • Lower bitrates: Only to be used when file size is a priority, and the quality is not very important.

Spatial Accuracy and Multi-Channel Encoding

Spatial accuracy is a very important characteristic in multi-channel audio files. The placement of sounds in the soundstage directly impacts the realism and immersiveness of the audio. Multi-channel encoding, when done correctly, can create a very precise sound field, allowing you to pinpoint where sounds are coming from. This is particularly important in movies and games, where the position of sounds can greatly improve the overall experience. It’s like having the sounds happening all around you. Good multi-channel encoding makes this possible, and a poor one will make the experience less immersive and more artificial.

How Spatial Accuracy is Achieved

  • Precise Channel Placement: Each channel is responsible for a specific part of the soundstage, and accurate positioning of each sound is essential.
  • Panning and Mixing: These techniques make sounds move between channels to create the perception of motion.
  • Object-Based Audio: This lets sounds be placed at any position, offering a very detailed sound field.

Multi-Channel WMA for Home Theaters and Gaming

Multi-channel WMA is very useful in home theater systems, which are very common nowadays. In my personal experience, the most common use for multi-channel WMA files is for home theaters and gaming because it allows for a truly immersive experience. With proper encoding and speaker setups, multi-channel audio from WMA files can make you feel like you’re right in the middle of the action. It enhances the emotion of movies, the excitement of games, and the sound of music. I have many times experienced this effect when listening to music in a multi channel setup, and it can be very impressive. The way the sound moves from different speakers makes the experience much more realistic.

Advantages in Home Theaters and Gaming

  • Enhanced immersion: Multi-channel audio surrounds the listener, making the experience more engaging.
  • Directional sound: Sounds can be placed precisely, making the experience much more realistic.
  • Better emotion: Movies and games become more emotional and exciting.

Potential Issues with Multi-Channel Encoding

Multi-channel encoding can be complex, and issues can arise if done improperly. I’ve personally seen how bad multi-channel encoding can ruin an experience. Common problems include incorrect channel mapping, where sounds appear in the wrong place, and also inconsistencies in loudness between channels, causing some sounds to be louder than others. Bad encoding can also lead to compression artifacts, where the sound is distorted or muffled. It is important that all parameters are correct during the encoding process to avoid these issues.

Common Multi-Channel Encoding Problems

  • Incorrect Channel Mapping: Where sounds are played in the wrong speakers.
  • Volume Imbalances: When one channel is much louder than others.
  • Compression Artifacts: Distorted and muffled sounds due to bad encoding.

Optimizing Multi-Channel WMA Files

Optimizing multi-channel WMA files is about making sure that all the parameters are correct. In my experience, starting with the highest quality audio source is the most important thing to do, so the result has the best possible quality. Encoding at an appropriate bitrate, according to the number of channels, and selecting the correct channel mapping also helps. Always use good monitoring speakers or headphones to check the quality, as a regular pair of speakers wont give you an accurate representation of the sound. I would suggest you also do testing with different configurations and different files to see if something can be improved for your particular setup and requirements.

Steps to Optimize Multi-Channel WMA Files

  • Start with the highest quality audio source.
  • Use an appropriate bitrate for your system.
  • Verify the correct channel mapping.
  • Check the sound using good quality speakers or headphones.
  • Do some tests to see if everything is correct.

Latest words on the effect of multi-channel encoding on WMA files

Multi-channel encoding has a very significant impact on WMA audio files, transforming a simple audio file into an immersive experience. In my experience, it’s not just about adding more speakers, but about how the sound is created, where the sound comes from and how it makes the experience feel more realistic. Understanding the different factors, like bitrates, channels, and codecs, helps you optimize your audio files for the best possible sound. If you have low-quality files that you want to improve, an appropriate software like Mp4Gain can help you to enhance your files.

What is multi-channel audio, and how does it differ from stereo?

Multi-channel audio uses more than two audio channels, offering a three-dimensional sound experience, while stereo uses only two channels (left and right). Multi-channel audio allows sounds to be positioned in different parts of the soundstage, making the experience more immersive.

How does the WMA codec handle multi-channel audio encoding?

The WMA (Windows Media Audio) codec, especially WMA Pro, is capable of handling multi-channel audio with good compression efficiency. It supports various multi-channel configurations, including 5.1 and 7.1 surround sound, providing a good balance between file size and quality.

What is the importance of bitrate when encoding multi-channel WMA files?

Bitrate directly affects the quality of multi-channel WMA files. Higher bitrates preserve more audio data, resulting in better sound quality, particularly in complex soundscapes. Lower bitrates may lead to a loss of clarity and detail, so an appropriate bitrate should be selected depending on the intended quality.

What is spatial accuracy in the context of multi-channel WMA files?

Spatial accuracy refers to how precisely sounds are placed in the soundstage. Good multi-channel encoding makes sounds to be placed exactly where they need to be. This accurate placement creates a more realistic and immersive experience, particularly in movies, music and games.

How are multi-channel WMA files used in home theaters and gaming?

Multi-channel WMA files are excellent for home theaters and gaming because they provide an immersive experience with sounds surrounding the listener. With proper speaker setups, this configuration makes games, music and movies more realistic and engaging.

What are some common problems with multi-channel encoding of WMA files?

Some common problems include incorrect channel mapping, where sounds are played from the wrong speakers, volume imbalances between channels, or compression artifacts that can distort the sound. These are caused by incorrect parameter settings when encoding the audio.

How can I optimize my multi-channel WMA files for the best sound quality?

To optimize multi-channel WMA files, always start with the highest quality audio source, use a proper bitrate according to your channel configuration, and make sure that all the speakers are correctly mapped. Always verify your sound with good headphones and speakers. Also, do tests to see if you can get better results adjusting some settings.

Are there any specific bitrate recommendations for 5.1 and 7.1 surround sound in WMA files?

For 5.1 surround sound, using a bitrate between 384 kbps to 512 kbps is generally recommended. For 7.1 surround sound, you should choose a bitrate of 512 kbps or higher for the best sound quality. Remember that lower bitrates should only be used when file size is a top priority.

Can multi-channel encoding cause any issues with playback on different devices?

Some older or less capable devices might have problems with multi-channel audio playback. Some devices may downmix the audio to stereo, losing the benefits of the multi-channel encoding. It’s important to verify that your playback device supports the type of encoding being used to enjoy the full immersive experience.

What are some key differences between WMA and other audio codecs when using multi-channel audio?

WMA is known for its good compression efficiency and is very capable of handling multi-channel sound, especially WMA Pro. Other codecs, like AAC, also have good capabilities for multi-channel audio, but they differ in the way they handle compression. The choice of codec will depend on many factors, such as compatibility, desired quality, and file size requirements.

Comments:

This article really helped me understand what all those numbers mean when I see a file with 5.1 or 7.1, now I know this are related to the audio channels, thanks!

User: AudioNewbie

I never really understood what multi-channel was about, this article did a great job of explaining it simply and without too much tech talk, now I know why my sound system has so many speakers. Good article!

User: HomeTheaterGuy

This was super useful, I’ve been having some issues with my multi channel files sound quality and now I have a better understanding on what is going on, and how to fix it. Thanks for all the info.

User: GamerDude

I am a total noob in audio, and this article was very easy to understand, you make complex things seem very simple. If you could elaborate more about how the different codecs like AAC compare to WMA would be nice.

User: AudiophileBeginner

I like the way you explained how important the bitrate is, especially for multichannel audio, I always though that the more channels, the better. Now I know that the bitrate also plays a big role. Thanks, great article.

User: MultiChannelUser

I been searching the web for a while to find good info about WMA and multichannel, this article covered all my questions and more, it was a good read, thank you for the effort.

User: AudioGeek

I have used Mp4Gain a lot, and its my go to software for when I have audio quality issues. I agree that its very important to pay attention to the channels. Thanks for all the information.

User: AudioExpert

MP4 Audio Quality

MP4 Audio Quality

MP4 Audio Quality

Let’s talk about MP4 audio quality

When we discuss MP4 audio quality, we’re really diving into a world of choices that impact what you hear. As someone who’s worked with audio for years, I can tell you that it’s not just about whether the sound is loud or soft. It’s about clarity, richness, and how well the sound represents the original recording. Think of it like this: a perfectly cooked meal can be ruined with a bad presentation, just like fantastic audio can be lost with poor encoding. I’ve seen firsthand how different audio codecs and settings can completely change the way we perceive sound from music to podcasts, to even simple voice recordings. It is important to choose the right settings to avoid any audible losses or distortions.

Understanding Audio Codecs in MP4 Files

Audio codecs are the secret language that our computers use to compress and decompress sound. I’ve spent countless hours comparing them, and it is amazing how different they are. They significantly impact MP4 audio quality. In the world of MP4, you’ll most often run into AAC (Advanced Audio Coding), which I consider the most common and broadly compatible choice, providing a good balance between quality and file size. But there are other options, like MP3 and even less-common ones. You can imagine it like choosing a type of container for your liquid: you can have a large, high-quality bottle that protects the water, or a smaller, less-secure one that might not keep the water fresh. The type of codec is your choice of bottle for your audio, and it will determine its quality when using an MP4 file.

AAC (Advanced Audio Coding)

  • Often considered a superior replacement for MP3.
  • Offers better sound quality at similar bitrates or same sound quality at a lower bitrate, making it space-efficient.
  • Widely supported across different platforms.

MP3

  • Older codec, but still widely compatible with all types of devices.
  • Generally has slightly lower audio quality than AAC at the same bitrate.
  • Very popular because of its legacy support.

Bitrate: The Key to MP4 Audio Quality

Bitrate, often measured in kilobits per second (kbps), is a crucial factor when we’re talking about mp4 audio quality. In my experience, it directly dictates how much detail is preserved in the audio file. A higher bitrate means more data is being stored per second. Think of bitrate as the number of colors in a painting. More colors (higher bitrate) means more detail, which makes the painting look more vibrant and realistic, and the same happens with audio. On the other hand, a lower bitrate means less detail, which can lead to audio sounding muddy or distorted, like a blurry or pixelated painting. When I work with audio files, I always start by making sure I choose an appropriate bitrate so that all the subtle nuances are present in the final output.

Common Bitrates and Their Use

  • 128 kbps: Often used for low-quality audio like podcasts or low-quality streaming, good for small file sizes.
  • 192 kbps: Considered a decent quality for general listening on most devices, offering a good compromise between size and quality.
  • 256 kbps: This is what I would consider a good starting point for high-quality audio, useful for most music on streaming.
  • 320 kbps or higher: Provides very high-quality sound, nearly indistinguishable from the original source for most people, this is what I strive for when quality is a must.

Sample Rate and Its Impact on MP4 Audio Quality

The sample rate, usually expressed in Hertz (Hz) or Kilohertz (kHz), is another important concept that affects MP4 audio quality. I can tell you from personal experience that this rate determines how often the sound is sampled per second. It is like taking pictures of a moving object. A faster frame rate will capture the movement smoother, and the same happens with audio. Higher sample rates, like 44.1 kHz or 48 kHz, result in audio that captures the higher frequencies better, leading to a richer and more detailed sound. This is especially noticeable in music with many high-frequency instruments or sounds. Lower sample rates can cause loss of high-frequency content, making the audio sound dull or muffled. This parameter is very important to be taken in consideration because It affects the overall clarity and fidelity of the audio, so I always check and choose the correct one for every project.

Common Sample Rates

  • 44.1 kHz: Standard for audio CDs and most digital music files.
  • 48 kHz: Commonly used for videos and digital audio workstations.
  • Higher sample rates (e.g., 96 kHz, 192 kHz): These are used for professional audio production and archiving, it captures the audio as close to real life as possible.

Audio Channels: Stereo vs. Mono

The number of audio channels also plays a role in the perception of audio quality. I’ve had a lot of fun experimenting with audio channels over the years. Stereo, which we hear most often in music, is what gives us a sense of directionality and depth, using two separate channels, one for the left ear and the other for the right ear. It creates a more immersive and realistic experience. Mono, on the other hand, uses only one audio channel, so sound feels flat and without dimension. Imagine watching a movie with a huge screen, and then compare that to a small screen. The huge screen gives you a sense of immersion, and stereo is just the same in audio. The choice depends on the use case. For music, you should always use stereo, while a podcast may work well enough in mono.

When to Use Which

  • Stereo: Ideal for music and videos where spatial depth is desired, creating a more natural experience.
  • Mono: Suitable for voice recordings, podcasts, or situations where file size is more important than dimensionality.

The Impact of Compression on MP4 Audio Quality

As a specialist in the area, I know very well that compression is a necessary evil. In order to get smaller files, you need to compress the audio in some way. Compression makes file sizes smaller, which means they are easier to share and download. But, if it’s done improperly, it can lead to a degradation in audio quality. Think of it like squeezing a sponge; If you squeeze it too hard, you could damage the sponge. This also can happen to audio data. Lossy compression methods, like MP3 and AAC, reduce file size by discarding some audio information, sometimes impacting the quality. The goal is to compress the audio enough to have a small file size without noticing any loss of quality.

Types of Compression

  • Lossy compression: Reduces file size by discarding audio information, like MP3 and AAC.
  • Lossless compression: Keeps all the audio data but still reduces file sizes, like FLAC. However, this type of compression is not commonly used in MP4 files, because they are focused on multimedia content.

Practical Tips to Maximize MP4 Audio Quality

Over the years, I have learned some tricks that can help you get the best audio quality from MP4 files. The most important thing to keep in mind is to always use the highest quality audio file that you can afford, if the quality is not important, then you can go for a smaller file. Always try to start with the best audio quality. When you are encoding, select a high enough bitrate, the higher the better if your devices can play it. Always listen to your audio files with good headphones or speakers to really understand if there is any audio issues. It’s always a good idea to test your settings with several files to check if there is something you can improve to increase quality. It’s like cooking: you need to try different ingredients and cooking methods to find your signature dish.

Tips for Good Audio

  • Always start with the highest-quality audio source.
  • Choose a high enough bitrate (at least 256 kbps for music).
  • Use AAC codec when possible because it can offer better quality than MP3 for the same bitrate.
  • Make sure you choose the correct sample rate (44.1 kHz or 48 kHz are the most common ones).
  • Use stereo for music, unless you have a specific reason not to.
  • Test and listen carefully to the final result and make adjustments if needed.

Latest words on MP4 Audio Quality

MP4 audio quality is a complex topic. From my experience, I’ve found that understanding the elements, such as codecs, bitrate, sample rate and audio channels, it’s critical to getting the best audio quality from the files we use every day. Paying attention to these details will help you get the best sound possible from your MP4 files, improving your experience whether you are listening to music, watching movies or listening to a podcast. If you ever have to deal with low audio quality, using an appropriate app like Mp4Gain is the solution to improve the overall quality.

What is the AAC audio codec and why is it commonly used in MP4 files?

The Advanced Audio Coding (AAC) codec is a popular audio compression standard that is known for its high sound quality at relatively low bitrates, making it an excellent choice for MP4 files. AAC is often preferred over MP3 due to its improved compression algorithms, which can result in smaller file sizes without a significant loss of sound quality.

How does bitrate affect MP4 audio quality?

Bitrate is a key factor that directly influences the sound quality in MP4 audio. A higher bitrate means more data is stored per second, preserving more detail and resulting in better audio quality, with a sound that is closer to the original recording. Lower bitrates can lead to audio compression, resulting in a muddier or distorted sound. Choosing an appropriate bitrate is crucial for balancing file size with optimal audio quality.

What is the role of sample rate in MP4 audio encoding?

The sample rate determines how many times per second the audio is sampled, effectively capturing the sound. Higher sample rates, such as 44.1 kHz or 48 kHz, are better at capturing higher frequencies, providing a richer and more detailed sound. Lower sample rates may lead to loss of some audio details, often resulting in a duller or less dynamic sound. This rate is an important aspect when thinking about overall quality.

What is the difference between stereo and mono audio channels in MP4 files?

Stereo audio uses two channels, providing a sense of width, depth and direction to the sound, very useful for music and movies. Mono audio uses a single channel, making the sound feel flat, without dimension and is suitable for situations where spatial depth is not essential like podcasts. The selection between stereo or mono depends on the intended application and if the spatial information is important or not.

How does audio compression impact the overall quality of MP4 audio?

Audio compression reduces file size by either removing some data (lossy compression) or by using algorithms to store data more efficiently (lossless compression). Lossy compression, commonly used in MP4 files, discards audio information, impacting quality depending on the compression level. Lossless compression, although preserving data, is not common in MP4 files. The goal is to find a balance between compression and sound quality.

What are some practical ways to enhance MP4 audio quality?

To enhance MP4 audio quality, use the highest-quality source possible, encode audio at high bitrates (at least 256 kbps for music), use AAC codec over MP3 when possible, and choose an appropriate sample rate. Also, listen to the audio using good headphones or speakers to identify any issues, and use stereo for music where spatial depth is key. Making adjustments to these parameters is very important.

Why might my MP4 audio sound muffled or distorted?

Muffled or distorted MP4 audio can result from several factors, such as low bitrates, incorrect sample rates, or excessive audio compression. It could also be caused by poor recording equipment or editing. The type of codec also plays a role; older codecs might not be as good at preserving quality, and using low quality audio as a source will result in poor quality even after encoding. Ensuring all encoding parameters are correct is important to prevent this problem.

What is the ideal audio bitrate for high-quality music in MP4 format?

For high-quality music in MP4 format, it is best to use a bitrate of 256 kbps or higher. This bitrate will offer a high level of detail and fidelity without resulting in very large file sizes. While higher bitrates may offer a slightly better sound quality, the difference is often not noticeable. Using a bitrate lower than 256 kbps may result in a perceptible quality loss.

Is it possible to improve the audio quality of an existing low-quality MP4 file?

While it is not possible to fully restore information that has been lost, it is possible to enhance the audio quality to some extent. Using audio editing software can help you to adjust some audio parameters. Software like MP4Gain are useful to adjust the audio in some ways to improve the perceived quality. However, if the original audio has been heavily compressed, there may be only a little that can be improved.

How can I choose the right audio settings when encoding my MP4 files for optimal sound quality?

When encoding MP4 files for optimal sound quality, consider starting with high-quality source, and always select AAC as the audio codec if possible for better quality compared to MP3. Choose the bitrate according to your needs (256 kbps is a good starting point) and a sample rate of 44.1 or 48 kHz. Use stereo for music. After encoding, listen to the audio on different devices to make sure that the quality meets your expectations. Adjust settings as needed.

Comments:

This article helped me a lot, I was having problems with some of my music files sounding bad, now I understand that I need to use a higher bitrate, thanks!

User: MusicLover

I never knew that there were so many parameters that affected audio quality! I always just grabbed whatever mp4 and thought it was all the same, now I know I have to look at the bitrate, the codec, etc, amazing info, good job!

User: TechNoob

This was super useful. It really breaks down the tech stuff so it’s easy to understand. I’m gonna try changing the audio settings on my next video project. Thanks a lot, this has helped me greatly!

User: VideoGuy87

I wish you had more info about advanced topics, like how to properly compress my audio without loosing too much information, but still, this article was helpful and easy to follow, keep up the good work.

User: ProAudio

Wow, I learned a lot about MP4 audio quality, I did not know that bitrate and sample rate were so important. Gonna try using a higher bitrate for my music collection, I hope the size wont be a problem.

User: AudioFan

This article was a great read and really explained all the stuff behind audio encoding, it was really easy to understand, thank you. I never knew why some of my files sounded so bad. Now I know how to fix this. Thank you!

User: HappyListener

I been using Mp4Gain for years now, I am glad to see it mention here, its my go to solution when I need to improve the audio quality. But thanks for all the in deep info on the article, its a great read.

User: AudioMaster

Perceptual Entropy and Its Role in MP3 Quality

Perceptual Entropy and Its Role in MP3 Quality

Perceptual Entropy and Its Role in MP3 Quality

Let’s talk about perceptual entropy and MP3 quality

Perceptual entropy is a concept that holds the key to understanding why MP3 files sound the way they do. As someone with years of experience delving into audio compression technologies, I find it fascinating how perceptual entropy helps achieve a balance between sound quality and file size. Imagine trying to pack your favorite songs into a suitcase for a trip. You want to carry everything, but you only have so much space. Perceptual entropy works like a smart packer, deciding what to keep and what to leave behind so that the audio remains clear and enjoyable.

MP3 encoding relies heavily on perceptual entropy to decide which parts of a song are important for listeners and which parts can be discarded without a noticeable loss in quality. This selective process mimics how our ears perceive sound, allowing MP3s to maintain their characteristic compact size while still sounding great.

Understanding perceptual entropy

Perceptual entropy measures the complexity of a sound signal as perceived by the human ear. It’s not just about raw data; it’s about how we experience that data. Think about how a crowded room might sound to you: you focus on the conversation in front of you, tuning out other noises. Perceptual entropy in MP3s works similarly, focusing on the most critical sounds and ignoring the less important ones.

This approach is rooted in psychoacoustics, the study of how humans perceive sound. By understanding what our ears prioritize, audio compression algorithms can remove parts of the audio that are less significant. This keeps the file size small without noticeably impacting quality.

How perceptual entropy shapes MP3 encoding

The MP3 format uses perceptual entropy to decide what to compress and what to keep. For example, if two frequencies are played together and one is much louder, the quieter frequency might be masked and therefore omitted. This process allows the MP3 format to save space while preserving the overall listening experience.

Perceptual entropy also influences bitrate selection. Lower bitrates mean more aggressive compression, which can lead to noticeable artifacts in complex audio like symphonies or live recordings. Higher bitrates, on the other hand, preserve more details, which is crucial for audiophiles or professional applications.

Real-life examples of perceptual entropy

When I explain perceptual entropy to friends, I like to use the example of a photograph. Imagine shrinking a high-resolution image to fit on your phone screen. You don’t need every pixel from the original because the screen can’t display all that detail. Similarly, MP3 encoding removes audio details that you won’t miss in typical listening environments, like on a car stereo or earbuds.

Another example is streaming services. They often use perceptual entropy to optimize files for quick loading and minimal buffering while maintaining acceptable sound quality. This is why you can stream music on your phone without consuming massive amounts of data.

The role of psychoacoustics in MP3 quality

Psychoacoustics plays a vital role in how perceptual entropy is applied. Our ears are more sensitive to certain frequencies, like those in the midrange where voices and most instruments lie. High and low frequencies, though still important, are less perceptible in some contexts and can be compressed more aggressively.

This understanding allows MP3 encoders to allocate more bits to the parts of the audio signal that matter most. For example, in a rock song, the vocals and guitar might receive higher priority than the subtle nuances of the cymbals.

Challenges with perceptual entropy

While perceptual entropy is highly effective, it’s not perfect. Some listeners with trained ears or high-quality audio equipment may notice compression artifacts, such as a loss of clarity in the highs or a “swirling” effect in the background. This is especially true at lower bitrates.

Additionally, not all audio is equally suited to MP3 compression. Complex, dynamic music like orchestral pieces may lose more fidelity compared to simpler tracks like podcasts or pop songs. Understanding these limitations is crucial for achieving the best balance between file size and quality.

Improving MP3 quality through perceptual entropy

To improve MP3 quality, you need to make thoughtful choices about bitrates and encoding settings. For casual listening, a bitrate of 128 kbps might be sufficient. However, for critical applications, higher bitrates like 320 kbps are recommended. This allows the encoder to preserve more audio detail, minimizing the perceptual loss caused by entropy.

It’s also worth experimenting with different encoders. Not all MP3 encoders handle perceptual entropy the same way, and some are better at preserving specific audio qualities. Choosing the right tools can make a significant difference in the final output.

Perceptual entropy in other audio formats

MP3 isn’t the only format that uses perceptual entropy. Other codecs like AAC and Ogg Vorbis also rely on similar principles. However, these formats often offer better efficiency, meaning they can deliver similar or better quality at lower bitrates.

For example, AAC is widely used in streaming services because it offers a more refined approach to perceptual entropy. This allows platforms to deliver high-quality audio while conserving bandwidth, enhancing the user experience.

Latest words on perceptual entropy and MP3 quality

Perceptual entropy is a cornerstone of MP3 technology, making it possible to enjoy high-quality music in a compact format. By understanding how it works, we can make informed decisions about encoding settings and achieve the best balance between quality and file size.

If you’re looking to optimize your MP3 files, consider tools like Mp4Gain, which can help you fine-tune settings for better results. With the right approach, you can ensure your audio files sound their best, no matter the playback device.

FAQ about perceptual entropy and its role in MP3 quality

What is perceptual entropy?

Perceptual entropy measures the complexity of a sound signal as perceived by the human ear, helping to optimize audio compression.

How does perceptual entropy impact MP3 quality?

It determines which parts of the audio can be compressed without noticeable loss, balancing quality and file size.

Comments:

Wow, this article really helped me understand MP3 quality better. I didn’t know about perceptual entropy before!

I always wondered why some MP3s sound better than others. Now it makes sense—thanks for the info!

Stereo Coding Efficiency in MP3

Stereo Coding Efficiency in MP3

Stereo Coding Efficiency in MP3

Let’s talk about Stereo Coding Efficiency in MP3

Stereo coding efficiency in MP3 files is one of the most critical elements in achieving high audio quality with reduced file sizes. Essentially, stereo coding helps manage how each channel of sound—the left and right—is processed, which can directly impact both clarity and compression. MP3 files utilize various stereo coding techniques to ensure a balance between sound quality and file size. As someone who’s spent years in audio processing, I can tell you, understanding stereo coding efficiency isn’t just about technical details but about practical decisions that affect every listener’s experience.

Understanding the Basics of Stereo Sound in MP3

Stereo sound relies on two channels, typically the left and right, to create a spatial audio experience. This separation can enhance the perception of depth, direction, and clarity in sound, especially in music where instrument placement adds to the listener’s experience. In MP3 files, stereo coding is employed to make the best use of this dual-channel setup without making the file unnecessarily large. Think of stereo coding like a camera that can either capture the entire scene in fine detail or just the essential elements, depending on your needs.

Key Techniques in Stereo Coding

Mid/Side (M/S) Stereo Coding

Mid/Side (M/S) coding is a fundamental technique in MP3 encoding. It separates the “mid” (center) sound, where most of the audio information is concentrated, from the “side” (stereo) information. This allows the MP3 encoder to compress the file by focusing on the areas where the listener’s ear is most sensitive to detail. This approach is like focusing on the main character in a story rather than every background element, which means that while the core experience is preserved, file size can be reduced.

Intensity Stereo Coding

Intensity stereo coding is another technique where higher frequencies are compressed by combining them in the two channels. The idea is that at higher frequencies, the human ear is less sensitive to precise directionality, so combining them won’t greatly impact the perceived stereo effect. This method prioritizes the musical “essence” of high-pitched sounds without keeping every small detail separate, like simplifying a photo by focusing on its contrast rather than every small color difference.

Joint Stereo Coding

Joint stereo coding is essentially a combination of M/S and intensity stereo techniques. This method dynamically adjusts the encoding strategy based on the content of each frame, meaning that it adapts to what best suits each part of the audio track. Joint stereo achieves an impressive balance between audio quality and file size, making it the most popular option for most MP3 encodings. Imagine watching a movie where some scenes are in high definition, while others use only basic details; joint stereo ensures that each part of the song gets what it needs.

The Role of Psychoacoustic Models in MP3 Stereo Coding

Psychoacoustic models play a vital role in MP3 encoding, determining which sounds are most perceptible to the human ear and which can be safely ignored. For stereo coding, psychoacoustic models are like editors who decide which parts of a story are essential. In MP3, these models allow the encoder to strip away less noticeable elements while preserving audio quality, especially when balancing the two stereo channels. This is crucial because these models help manage file size without compromising the immersive stereo effect.

Advantages of Efficient Stereo Coding

Improved Audio Quality

Efficient stereo coding ensures that the two channels work harmoniously, preserving the intended depth and spatial effects in the music. Quality stereo coding means listeners can enjoy richer and more defined soundscapes. With efficient coding, it feels as though each sound element occupies its rightful place, much like each instrument in a live concert.

Smaller File Sizes

One of the primary reasons stereo coding efficiency matters is to maintain audio quality while reducing file size. Efficiently encoded MP3 files use less storage, making it easier to save music on devices with limited space. Think of it like packing a suitcase: stereo coding ensures that everything you need fits neatly without excess baggage.

Optimized Streaming Experience

When MP3 files are encoded efficiently, they require less bandwidth to stream. This means listeners get a smoother experience without interruptions. Stereo coding efficiency is especially beneficial for streaming services, where even a few kilobytes of difference per file can add up to significant data savings across millions of streams.

How Stereo Coding Efficiency Impacts Bitrate

Bitrate determines the amount of data encoded per second in an MP3 file, impacting both quality and file size. Higher bitrates often mean better sound quality, but efficient stereo coding can achieve quality sound at lower bitrates. It’s like balancing a recipe—using the right techniques means you can use fewer ingredients without sacrificing flavor. Efficient coding allows for the preservation of sound quality without inflating the file’s bitrate.

Challenges in Achieving Optimal Stereo Coding Efficiency

Balancing Quality and File Size

Finding the right balance between quality and file size in MP3 encoding is always a challenge. Too much compression can make the stereo sound muddy, while too little means larger files. Achieving efficiency is about knowing when and where to make sacrifices in the sound data. Like editing a photo, the key is removing noise without erasing essential details.

Compatibility with Different Devices

Not all devices decode stereo-coded MP3s the same way, which can lead to variations in audio quality across different systems. This variation in playback can affect the perceived efficiency of stereo coding, as it may sound pristine on one device and lacking on another. It’s a bit like watching a film on a high-definition TV versus a standard one—the details may vary based on the device.

Best Practices for Optimizing Stereo Coding in MP3 Files

Choose the Right Bitrate

Selecting an optimal bitrate is essential for stereo coding efficiency. Lower bitrates may save space but can reduce stereo quality. For most music tracks, 128 kbps is the baseline, but higher bitrates like 192 or 256 kbps offer better stereo depth.

Use a High-Quality Encoder

Not all MP3 encoders handle stereo coding the same way. Some encoders apply more advanced stereo techniques than others, leading to higher quality audio even at lower bitrates. A reliable encoder is essential for maximizing stereo coding efficiency.

Test with Different Devices

Play your MP3 file on various devices to ensure the stereo effect remains consistent. Testing across platforms allows you to identify if the stereo coding is optimized, helping you avoid surprises when your audience listens on different setups.

Latest Words on Stereo Coding Efficiency in MP3

Stereo coding efficiency plays a crucial role in maintaining both sound quality and compact file sizes for MP3s. From joint stereo to M/S coding, each technique offers a way to manage stereo sound in a space-saving, quality-preserving way. Through efficient stereo coding, we can enjoy music with rich, immersive audio even at reduced file sizes, making it perfect for personal collections and streaming. For those seeking the best balance, MP4Gain is a tool that allows users to refine their MP3s for optimal playback across all devices.4


Stereo Coding Efficiency in MP3 – Frequently Asked Questions (FAQ)

What is stereo coding efficiency in MP3?

Stereo coding efficiency in MP3 refers to how effectively stereo audio data is compressed without losing sound quality. By optimizing stereo coding, MP3 files can reduce file size while maintaining high sound fidelity, making them ideal for digital storage and streaming.

How does joint stereo improve MP3 efficiency?

Joint stereo coding enhances MP3 efficiency by merging similar audio data from both channels, reducing redundant information. This allows for a smaller file size while maintaining a stereo effect, optimizing both storage and playback quality.

What is the difference between joint stereo and mid/side stereo in MP3?

Joint stereo combines left and right channels by only encoding their differences, while mid/side stereo separates a “mid” (center) and “side” signal. Both methods improve compression efficiency but are applied differently depending on the audio characteristics and desired fidelity.

Does stereo coding affect MP3 audio quality?

Yes, stereo coding impacts audio quality by balancing file size and fidelity. Effective stereo coding techniques like joint or mid/side stereo allow MP3s to remain compact while preserving the stereo field and minimizing sound artifacts for a quality listening experience.

Why is stereo coding efficiency important for MP3 files?

Stereo coding efficiency is crucial because it optimizes audio data storage, making MP3s smaller without significantly reducing quality. This efficiency benefits streaming, downloading, and storage by minimizing bandwidth use while keeping audio clarity intact.

How does psychoacoustic modeling relate to stereo coding in MP3?

Psychoacoustic modeling helps stereo coding by identifying audio elements that are less perceptible to human hearing. By encoding only essential sounds, it minimizes file size and maximizes coding efficiency while maintaining the listener’s perception of quality.

Which stereo coding technique is best for high-quality MP3 files?

For high-quality MP3s, joint stereo is generally preferred as it balances efficiency with sound fidelity, especially at lower bitrates. Mid/side stereo can also work well depending on the complexity of the stereo field and audio content.

Can I adjust stereo coding settings when creating MP3 files?

Yes, many MP3 encoders offer adjustable stereo coding settings. Users can select between joint stereo, mid/side stereo, or simple stereo to find the best balance between file size and sound quality according to their needs.

How does stereo coding affect MP3 file size?

Efficient stereo coding reduces MP3 file size by eliminating redundant or imperceptible audio data. Techniques like joint stereo and mid/side stereo help achieve a compact file while keeping stereo sound, making storage and streaming more efficient.

Is stereo coding efficiency relevant for other audio formats?

Yes, stereo coding efficiency applies to various compressed audio formats beyond MP3. Formats like AAC and OGG also use stereo coding techniques to enhance audio quality and reduce file sizes for an efficient balance in digital audio.

Comments:

Been looking for an article that explains stereo coding this clearly. This really helped me understand how MP3 files work, thanks!

I had no idea about the different types of stereo coding until now. Really makes me appreciate how much work goes into making MP3s sound good!

Great article! But I’d love to know more about joint stereo and how it compares to newer technologies.

Awesome breakdown! I always wondered why some MP3s sound better than others even at the same bitrate.

This article was super informative. Just wish it had more info on what software to use for encoding MP3s properly.

Finally, an article that explains MP3 stereo coding in simple terms. I actually understand it now!

Very helpful, but it would be great to have a comparison between stereo coding in MP3 and other audio formats.

As a music producer, I found this really insightful. Stereo coding isn’t talked about enough when it comes to audio quality.

Thanks for the breakdown on M/S and joint stereo. This has made me rethink my encoding settings for sure.

Great article, but I think a few more examples of how stereo coding affects playback on devices would be useful.

Just

wanted to say thank you for making this so clear. Wish I had found this sooner!

Not totally sure I understand everything here, but this definitely cleared up a lot for me about MP3 quality.

Good info here. Would like to see more on how stereo coding impacts things like headphone vs. speaker playback.

This is by far the best explanation of stereo coding I’ve seen. Makes me think about audio quality in a whole new way.

Dynamic Range Compression in MP3

Dynamic Range Compression in MP3

Dynamic Range Compression in MP3

Let’s talk about Dynamic Range Compression in MP3

Dynamic range compression (DRC) in MP3s isn’t a simple volume boost. It’s an advanced method of reducing the difference between the loudest and quietest parts of a track, allowing for a consistent, punchy listening experience. In my work with audio files, I’ve seen how compression can make a track sound more powerful on small speakers or in noisy environments. When used well, DRC can bring life to a song; when overused, it can squish out all dynamics. Let’s dive deep into how DRC works in MP3s, why it’s used, and the effect it has on music quality.

Understanding Dynamic Range in Digital Audio

Dynamic range is simply the difference between the loudest and softest parts of a recording. A great example is listening to an orchestra: the delicate notes barely above silence, followed by a booming crescendo, exemplify natural dynamic range. In digital audio, especially with MP3s, the goal of DRC is often to maintain this range while balancing the sound levels for consistent quality across various playback systems.

How MP3 Compression Affects Dynamic Range

MP3 compression, unlike dynamic range compression, focuses on reducing file size by removing inaudible frequencies. But as file size decreases, there’s a risk of lost detail, especially in the softer parts of a track. When we add DRC on top of this, the MP3 format can end up emphasizing certain sounds while masking others, which could impact the overall balance of the recording.

Why Dynamic Range Compression is Important in MP3s

Using DRC in MP3s isn’t about destroying music dynamics; it’s a way to ensure tracks sound good everywhere. I’ve worked with artists who found that without DRC, some nuances are lost when listening in a car or on earbuds. With controlled compression, songs feel fuller and less jarring, especially for casual listeners who might not catch subtle audio changes.

The Process of Applying Dynamic Range Compression in MP3s

Applying DRC to an MP3 is like adjusting the pressure on a soda bottle to get just the right fizz. Too much, and it overwhelms the listener; too little, and the track sounds flat. Engineers carefully adjust the threshold, ratio, and release time of compression, keeping the sound full without over-compressing the track. Here’s how each step works:

  • Setting the Threshold

    The threshold sets the volume point where compression kicks in. Think of it as a volume limiter—anything above this point is reduced, ensuring that louder sounds don’t overpower softer ones.

  • Determining the Ratio

    Ratio controls how much compression is applied above the threshold. Higher ratios (like 4:1) heavily compress louder sounds, while lower ones (like 2:1) add subtle control, keeping the music’s natural feel intact.

  • Adjusting Attack and Release

    Attack controls how quickly compression engages, and release controls how soon it stops. Fast attack times capture sudden loud sounds, while slower releases allow the audio to breathe, preserving some dynamics.

Benefits of Dynamic Range Compression in MP3

DRC in MP3s has significant benefits for everyday listening. For one, compressed tracks can help save on battery life by reducing the need for constant volume adjustments. Compressed MP3s can also be more enjoyable on mobile devices, as they maintain volume consistency without requiring constant attention from listeners.

Challenges and Drawbacks of Overusing Dynamic Range Compression

Overuse of DRC can lead to what’s called the “Loudness War,” where every sound is equally loud, resulting in what some describe as “listener fatigue.” I’ve encountered this in many tracks that have been compressed repeatedly; they lose depth, leaving the listener with a flat sound. Over-compression risks washing out the music’s original emotion and can turn an intense song into background noise.

Technical Aspects of Dynamic Range Compression in MP3 Encoding

During MP3 encoding, DRC is applied through a lossy algorithm designed to reduce the dynamic range without noticeable loss in audio quality. Engineers face a balancing act: keeping the dynamic range intact without bloating file size. The right codec can make all the difference. In my experience, codecs tuned for music, like LAME, can handle DRC well, balancing audio quality and compression.

Comparing Dynamic Range Compression in MP3 with Other Formats

While MP3 is popular, lossless formats like FLAC can preserve the full dynamic range better. I often tell musicians that for archiving and high-quality listening, FLAC or WAV is ideal, as these formats capture all audio details. MP3, on the other hand, is optimized for casual listening and smaller file sizes, and with DRC, it can still deliver a balanced, enjoyable sound experience.

How to Optimize Dynamic Range Compression for MP3 Files

When I’m working on MP3 files, I find that light compression generally works best. Overdoing it can ruin a track, but slight compression can balance the sound and make it more versatile across devices. Here’s what I recommend:

  • Start with a Low Threshold

    Keep it just below the loudest peaks to ensure softer sounds aren’t impacted.

  • Use a Moderate Ratio

    I suggest starting at 2:1 and adjusting until the desired level of control is achieved.

  • Check the Output on Multiple Devices

    Playing the MP3 on different speakers helps you hear how the compression translates, preventing surprises when the song hits smaller devices.

Latest Words on Dynamic Range Compression in MP3

Dynamic range compression in MP3 is a powerful tool when used wisely, balancing dynamic nuances with the practical need for volume consistency. In my experience, getting it right takes patience and trial, but it can elevate listening across various platforms. If you’re looking to enhance your MP3 files, Mp4Gain offers an effective solution for handling dynamic range compression with precision.

Comments:

I didn’t realize how much DRC impacted sound on different devices. This explains a lot, thanks!

This was super helpful! I’m still confused about setting the ratio, though. Any tips for beginners?

Great breakdown! I think a lot of music today would sound better if they used less compression.

Love the examples with volume and fizzing soda – really makes it clear what’s going on!

Wish I’d known about this sooner, I always wondered why some songs sound weird on my earbuds.

What a fantastic article! Clear and to the point, especially about the impact on MP3 quality.

This is exactly what I needed! I work with music production and this helped me explain DRC to a client.

So interesting! Can you do a follow-up explaining how to fix over-compressed MP3 files?

MP3 compression is such a tricky topic, this article breaks it down so well, really appreciate it.

Love how you used real-life examples to explain the compression. Makes it easier to understand.

Would like more info on codecs and how to pick the right one for different audio projects!

This article cleared up a lot of questions I had. I see why DRC can be good and bad!

Fascinating stuff! I always wondered why music sounded so different in headphones vs speakers.

Audio Expansion

How Understanding Audio Expansion Can Improve Your Music Production

Audio Expansion
Audio Expansion
Audio Expansion
Audio Expansion

What is Audio Expansion and How Does it Work?

As a music producer, understanding the concept of audio expansion is crucial to achieving the desired sound quality in your productions. Audio expansion, also known as upward expansion, is a dynamic audio processing technique that increases the gain of a signal when it is below a certain threshold level. This technique is used to increase the dynamic range of a signal by amplifying only the quieter parts, resulting in a more natural and transparent sound.
To put it simply, audio expansion is like a reverse compressor. While a compressor reduces the dynamic range of a signal by reducing the gain of louder parts, an expander increases the dynamic range by amplifying quieter parts. According to Roey Izhaki in “Mixing Audio,” “expansion is a powerful tool that can significantly enhance a mix, giving it a lively and open sound.”

How to Use Audio Expansion in Your Music Production

To use audio expansion effectively, you first need to set the threshold level. The threshold is the level at which the expander starts to increase the gain. The higher the threshold, the less effect the expander will have. You also need to set the ratio, which determines the amount of gain increase when the signal falls below the threshold level. The ratio is expressed in decibels and can range from 1.5:1 to 10:1 or higher.
One important thing to keep in mind is that audio expansion should be used sparingly. Overuse can result in an unnatural and exaggerated sound. It is recommended to use a gentle ratio and adjust the threshold level to suit the dynamics of the source material.

The Benefits of Audio Expansion in Music Production

Using audio expansion in your music production can result in a more natural and transparent sound. It can also help to improve the overall dynamic range of your mix, making it sound more open and spacious. By selectively amplifying the quieter parts of a signal, you can bring out subtle details and nuances that may have been masked by louder elements.
As an audio engineer, I have found that audio expansion can be particularly useful when working with vocals or acoustic instruments. By gently expanding the dynamics, you can help to preserve the natural character of the performance and avoid the artificial sound that can result from heavy compression.

In the words of Roey Izhaki, “expansion can be a great tool to help you achieve your sonic goals.” With careful use and experimentation, audio expansion can be a powerful technique to enhance your music production.

Final Words:
In conclusion, understanding audio expansion is an important skill for any music producer. By using this dynamic processing technique, you can improve the sound quality and dynamic range of your productions. Remember to use audio expansion sparingly and experiment with different settings to find the best results for your mix.

audio dynamics, dynamic processing, audio processing, music production, sound quality, mixing techniques, signal processing, dynamic range, compression, mastering, mixing, audio engineering, audio effects, audio plugins, VST plugins, audio editing, audio software, DAW, audio mixing, audio mastering, audio normalization, audio EQ, audio filters, audio enhancement, audio post-production, audio mastering services, audio production tips, audio recording, audio editing software, audio effects plugins, audio frequency, audio volume, audio levels, audio peak, audio clipping, audio restoration, audio quality, audio improvement,

What is a De-Esser?

What is a De-Esser?

De-Esser
De-Esser
De-Esser
De-Esser

As a music producer and audio engineer, I’ve encountered my fair share of challenging vocal recordings. One common issue is sibilance, which occurs when the “s” and “sh” sounds are overly pronounced, causing harsh and piercing frequencies in the mix. This is where a de-esser comes in handy.

De-Esser Plugin

A de-esser is a specialized audio plugin that reduces or eliminates sibilance from vocal recordings. It works by detecting the offending frequencies and applying gain reduction to them, effectively taming the harshness and allowing the vocals to sit better in the mix.

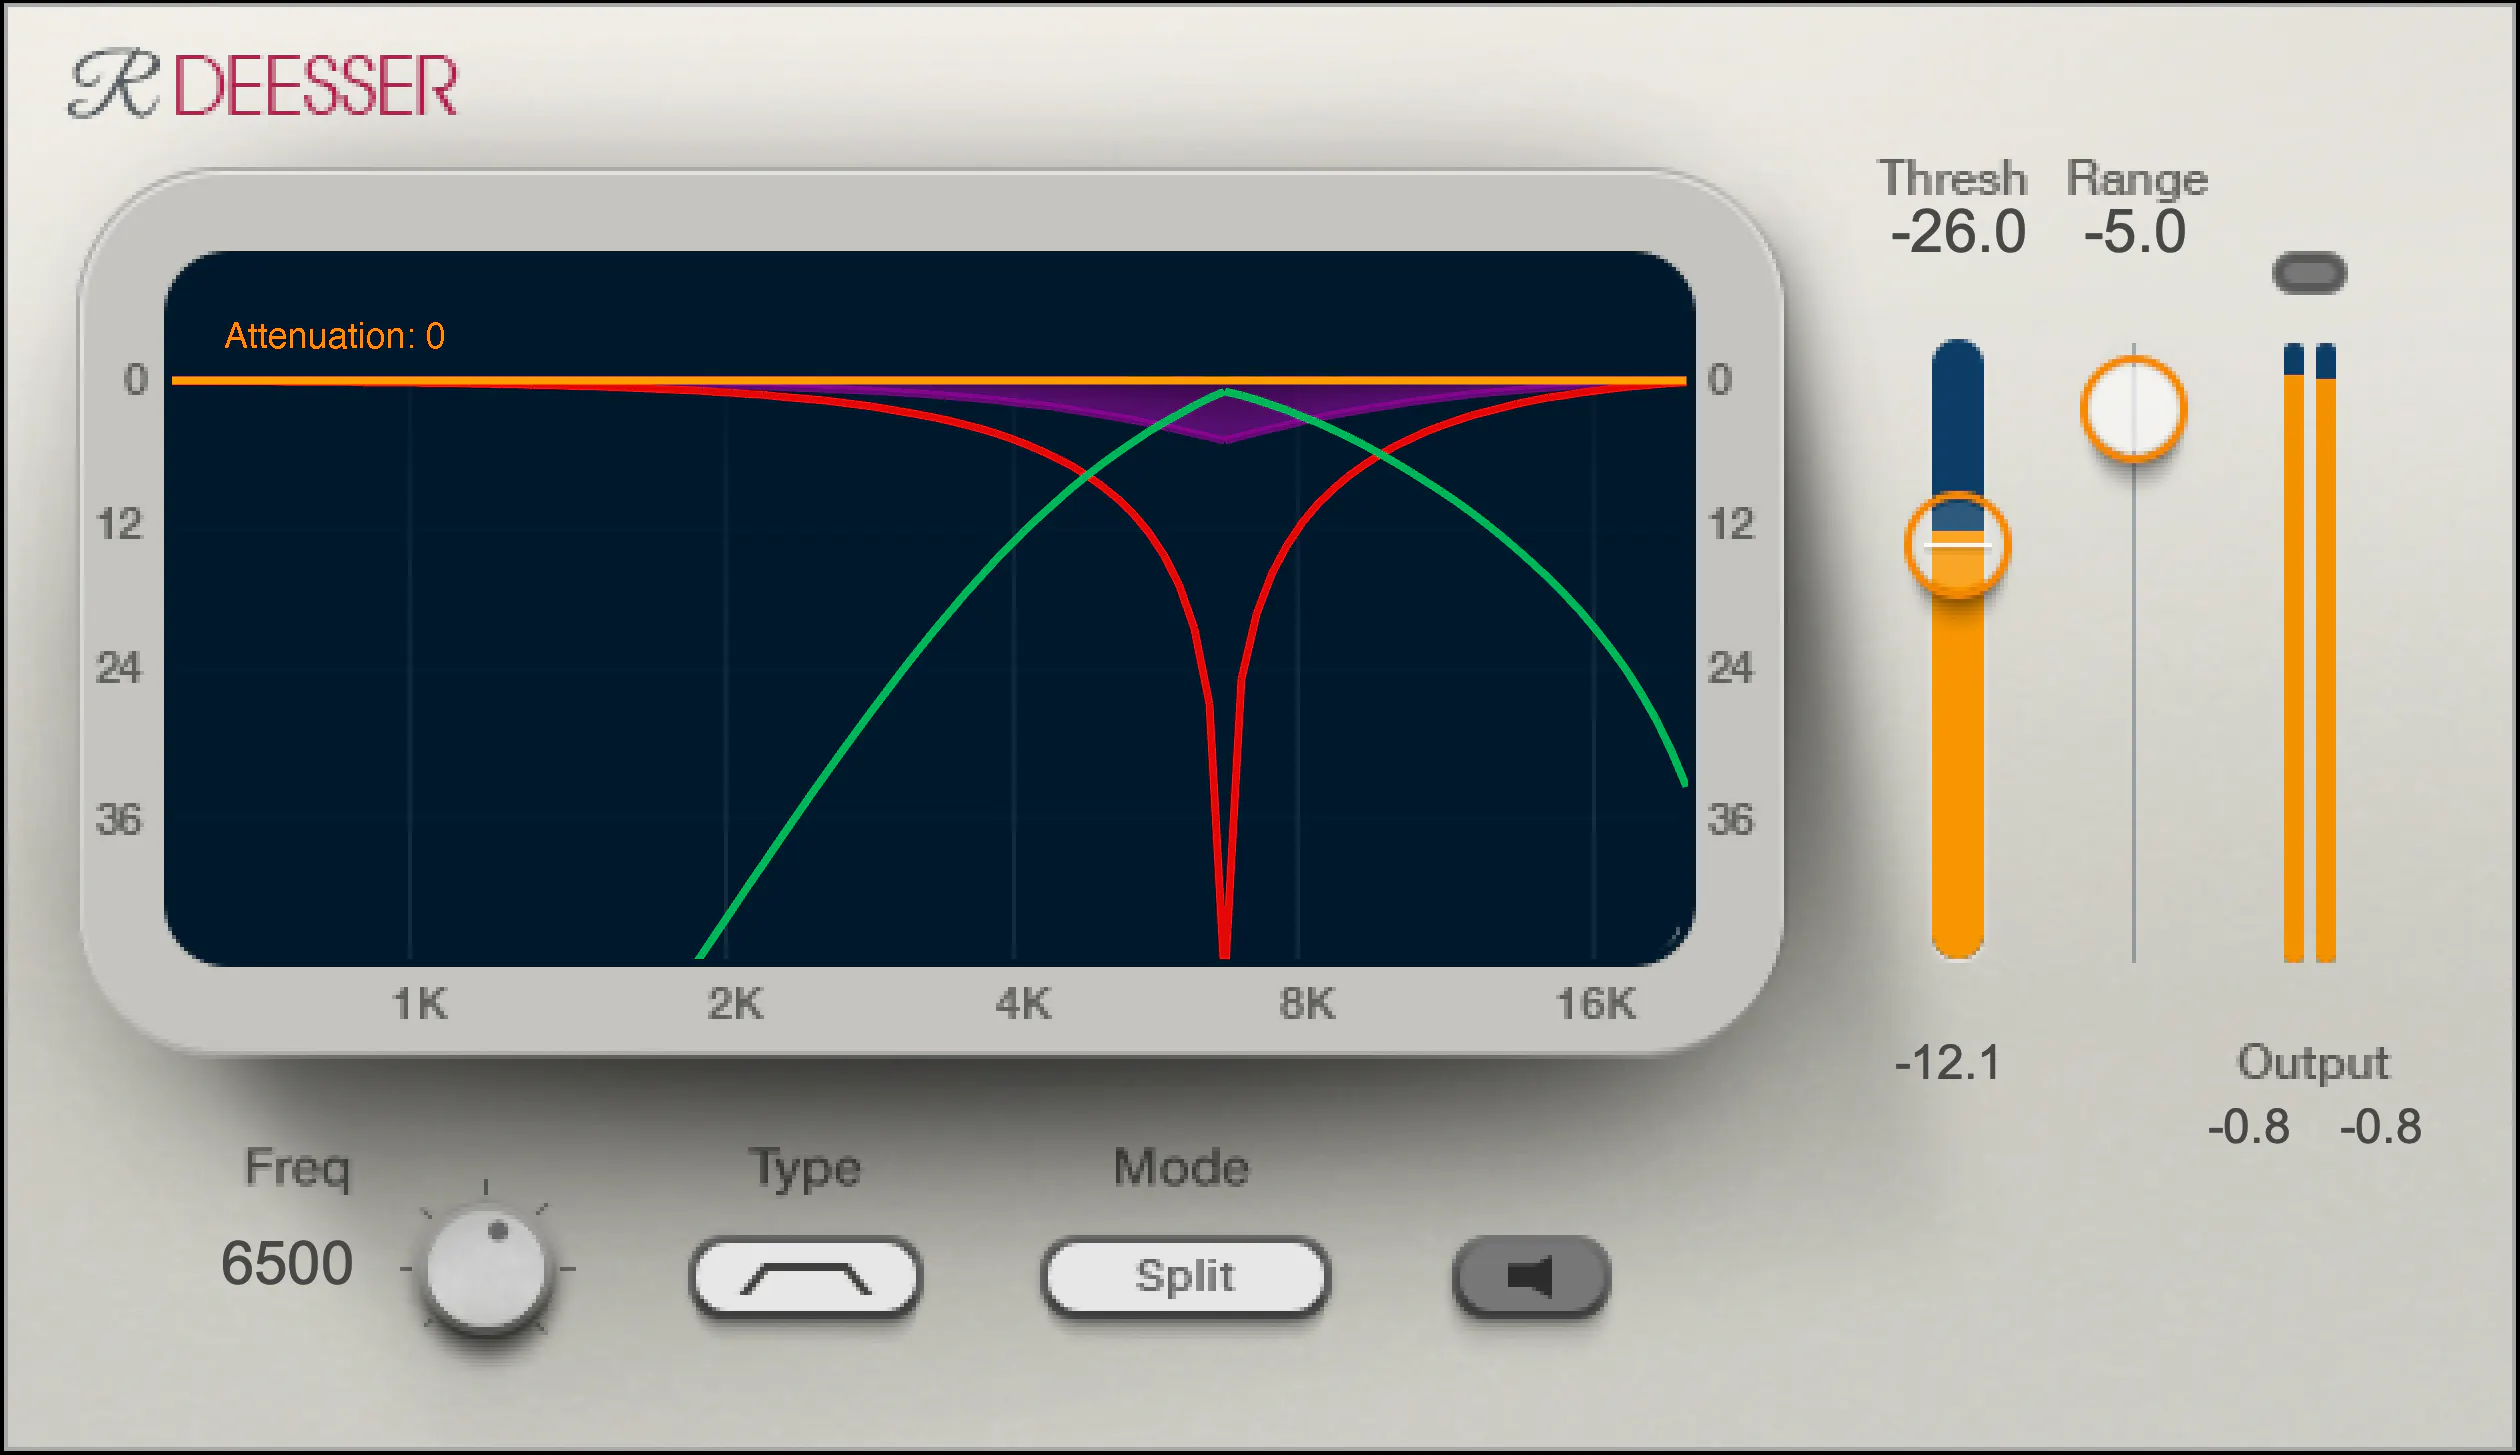
One of my go-to de-esser plugins is Waves Renaissance DeEsser, which offers precise control over the detection frequency, threshold, and reduction amount. Another popular option is FabFilter Pro-DS, which includes a natural-sounding “single vocal” mode for easy and effective de-essing.

De-Essing Vocals

De-essing can be a delicate process, as overuse can result in a dull and lifeless vocal sound. It’s important to strike a balance between reducing sibilance and maintaining the natural tone and character of the vocal recording.

When de-essing vocals, I typically start by soloing the vocal track and listening for the most pronounced sibilant sounds. I then apply the de-esser plugin with a gentle reduction amount, gradually increasing until the sibilance is under control but the vocal still sounds natural.

Best De-Esser for Vocals

In my experience, the best de-esser for vocals is one that offers precise control over the detection and reduction parameters, while still maintaining a natural sound. As mentioned earlier, Waves Renaissance DeEsser and FabFilter Pro-DS are both excellent options in this regard.

It’s also worth considering the de-esser included in your DAW of choice. For example, Logic Pro’s built-in de-esser is simple yet effective, with a straightforward interface that allows for quick and easy de-essing.

De-Esser Settings

When using a de-esser, it’s important to understand the various settings and how they affect the sound. The most important parameters to adjust are the detection frequency, threshold, and reduction amount.

The detection frequency determines which frequencies the de-esser will target, while the threshold sets the level at which the gain reduction will be applied. The reduction amount controls how much gain reduction is applied to the offending frequencies.

It’s worth experimenting with these settings to find the sweet spot for each individual vocal recording.

Tips for Using a De-Esser

Here are a few tips for getting the most out of your de-esser:

Use the de-esser sparingly, as overuse can result in a dull and lifeless vocal sound.
Always listen for sibilance in solo mode before applying the de-esser to the full mix.
Experiment with different de-esser plugins and settings to find the best sound for each individual recording.
If you’re unsure about how much de-essing to apply, start with a small reduction amount and gradually increase until the sibilance is under control but the vocal still sounds natural.
As the legendary producer Quincy Jones once said, “The most important thing in the studio is your ears.” And this is especially true when it comes to managing sibilance in vocal recordings. A de-esser is a tool that helps to control sibilance, or the harsh “s” and “t” sounds that can be distracting or unpleasant in a recording.

What is a de-esser?

Simply put, a de-esser is a type of audio processor that is designed to reduce or remove sibilance from a recording. It works by detecting and attenuating the specific frequency range where sibilance occurs in a vocal recording. This can help to smooth out the sound of the recording and make it more pleasing to the ear.

How does a de-esser work?

A de-esser typically uses a narrow-band compressor to reduce the level of the sibilant frequencies. The compressor is set to activate only when the sibilant frequencies exceed a certain threshold level. This allows the de-esser to reduce sibilance without affecting other parts of the recording. Some de-essers also use dynamic equalization to selectively attenuate sibilant frequencies, which can provide a more natural-sounding result.

Why is a de-esser important?

Sibilance can be a major distraction in vocal recordings, and can make a recording sound amateurish or unprofessional. A de-esser can help to smooth out the sound of a recording and make it more pleasant to listen to. This can be especially important in situations where the recording will be played over a large sound system or in a professional setting.

As the legendary producer Quincy Jones once said, “The most important thing in the studio is your ears.” And this is especially true when it comes to managing sibilance in vocal recordings. One personal experience I’ve had with sibilance was during a recording session with a vocalist who had a very pronounced lisp. Despite the fact that the vocal performance was excellent, the lisp made the recording almost unlistenable. However, with the use of a de-esser, we were able to remove the harsh sibilant sounds and salvage the recording.

Another personal experience was with a different vocalist who had a lot of sibilance in her recordings. Initially, we tried to use EQ to reduce the sibilance, but found that this also affected other parts of the recording and made it sound unnatural. However, once we introduced a de-esser into the signal chain, we were able to achieve a more natural-sounding result that still effectively reduced the sibilance.

In conclusion, a de-esser is a powerful tool for managing sibilance in vocal recordings. By detecting and attenuating specific frequency ranges where sibilance occurs, a de-esser can help to smooth out the sound of a recording and make it more pleasing to the ear. Whether you’re a professional audio engineer or a hobbyist recording at home, a de-esser is an important tool to have in your audio processing toolkit.

sibilance reduction, vocal processing, audio engineering, dynamic equalization, narrow-band compressor, vocal recording, audio processor, professional recording, recording studio, audio production, sound quality, sound engineering, audio post-production, de-essing, audio editing, audio restoration, sound treatment, audio technology, audio software, mixing and mastering, audio mastering, audio plugins, music production, audio effects, sound design, audio signal processing, audio post-processing, audio filtering, audio frequency, audio dynamics, audio post-production techniques, vocal performance, audio compression, audio enhancement, audio editing software, audio hardware, audio mixer, audio signal chain, audio equipment, audio tools, sound recording, audio clean-up, audio post, audio mastering software, audio workflow, audio clarity

What is a signal-to-noise ratio in audio?

What is a signal-to-noise ratio in audio?

signal-to-noise ratio audio

Understanding the Basics of Audio Quality

As an audio engineer, I have come across many questions about audio quality, and one of the most common ones is “What is a signal-to-noise ratio in audio?” In simple terms, the signal-to-noise ratio (SNR) is the difference between the desired audio signal and the background noise. A high SNR means that the desired signal is much stronger than the noise, resulting in better audio quality.
When it comes to audio quality, there are many factors to consider, such as audio processing, normalization, compression, dynamics, and distortion. Each of these factors can affect the SNR and, therefore, the overall audio quality. For example, audio normalization can help to increase the SNR by adjusting the volume levels of the audio signal, while audio compression can reduce the dynamic range of the audio signal, resulting in a more consistent SNR.

The Importance of Audio Normalization

As someone who has worked with audio for many years, I can attest to the importance of audio normalization. Normalization is the process of adjusting the volume levels of an audio signal to a standard level, which can help to improve the SNR and overall audio quality.
One of the benefits of audio normalization is that it can help to prevent distortion in the audio signal. When an audio signal is too loud, it can cause distortion, which can be heard as a buzzing or crackling sound. By normalizing the audio signal, you can ensure that it is at a safe and consistent volume level, which can help to prevent distortion and improve the overall audio quality.

The Role of Audio Compression in Audio Quality

Audio compression is another important factor to consider when it comes to audio quality. Compression is the process of reducing the dynamic range of an audio signal, which can help to make it sound more consistent and balanced.
One of the benefits of audio compression is that it can help to improve the SNR by reducing the background noise in the audio signal. However, it is important to use compression carefully, as too much compression can result in a loss of detail and dynamics in the audio signal. As with all aspects of audio engineering, finding the right balance is key to achieving the best possible audio quality.
Final Words:
In conclusion, understanding the basics of audio quality is essential for anyone working with audio. Whether you are an audio engineer, musician, or just someone who enjoys listening to music, knowing about factors such as SNR, normalization, compression, dynamics, and distortion can help you to achieve the best possible audio quality. And if you are looking for a solution to improve your audio quality, consider using mp4gain, a powerful and easy-to-use audio normalizer and converter that can help you to achieve consistent and high-quality audio.

audio quality, signal-to-noise ratio, audio engineering, audio processing, audio normalization, audio compression, audio dynamics, audio distortion, audio editing, audio software, audio plugins, audio effects, audio mixing, audio mastering, audio recording, audio equipment, audio cables, audio interfaces, audio monitors, audio speakers, audio headphones, audio formats, mp3, mp4, wav, flac, aac, ogg, audio bitrate, audio frequency, audio spectrum, audio waveform, audio visualization, audio analysis, audio restoration, audio repair, audio enhancement, audio improvement, audio tips, audio tricks, audio tutorials, audio guides, audio blogs, audio forums, audio community, audio enthusiasts, audio professionals, music production, sound design, sound effects, soundtracks, soundscapes, sound libraries, sound samples, soundfonts, sound packs, sound kits, sound engineering, sound recording, sound mixing, sound mastering, sound equipment, sound cables, sound interfaces, sound monitors, sound speakers, sound headphones, sound formats, sound bitrate, sound frequency, sound spectrum, sound waveform, sound visualization, sound analysis, sound restoration, sound repair, sound enhancement, sound improvement, sound tips, sound tricks, sound tutorials, sound guides, sound blogs, sound forums, sound community, sound enthusiasts, sound professionals.

How can I prevent aliasing and harmonic distortion in audio?

How can I prevent aliasing and harmonic distortion in audio?

Digital Audio Aliasing


Digital Audio Aliasing


Introduction

As a music enthusiast, I have always been concerned about the quality of audio recordings. Two common problems that affect audio quality are aliasing and harmonic distortion. Aliasing occurs when the sampling rate of an audio signal is insufficient, causing high-frequency signals to be incorrectly represented as lower frequencies. On the other hand, harmonic distortion occurs when the amplitude of a signal is altered due to the presence of harmonics. In this article, we will discuss ways to prevent these issues and improve audio quality.

What is aliasing and how to prevent it?

Aliasing is a common problem in digital audio, but it can be prevented by increasing the sampling rate of the audio signal. As a general rule, the sampling rate should be at least twice the highest frequency in the audio signal. For example, if the highest frequency in the audio signal is 20 kHz, the sampling rate should be at least 40 kHz. By increasing the sampling rate, we can ensure that high-frequency signals are accurately represented in the digital audio signal.

My personal experience

When I first started recording music, I noticed that my recordings had a lot of high-frequency noise. After doing some research, I realized that this was due to aliasing. I increased the sampling rate of my recordings, and the high-frequency noise disappeared. Since then, I have made it a point to always use a high sampling rate when recording audio.

What is harmonic distortion and how to reduce it?

Harmonic distortion occurs when a signal is altered due to the presence of harmonics. This can be caused by nonlinearities in the audio system, such as distortion in amplifiers or speakers. One way to reduce harmonic distortion is to use a high-quality audio system with low distortion. Additionally, using equalization can help reduce distortion in certain frequency ranges.

Quote from a book

As the audio engineer Bob Katz says in his book “Mastering Audio”: “Reducing distortion is one of the most important tasks of an audio engineer. Distortion masks the details in a mix and reduces the perceived loudness of the audio signal.”

Improving audio quality

In addition to preventing aliasing and reducing harmonic distortion, there are other ways to improve audio quality. One way is to use a high-quality audio codec when encoding audio files. Another way is to use a high-quality audio player or amplifier when listening to audio.

My personal opinion

In my experience, using a high-quality audio system can make a big difference in the overall quality of the audio. When I upgraded my audio system, I noticed that the sound was much clearer and more detailed.

Conclusion

Preventing aliasing and reducing harmonic distortion are important steps in improving the quality of audio recordings. By using a high sampling rate, a high-quality audio system, and equalization, we can ensure that our audio recordings are clear and free from distortion.

Final words

In conclusion, improving audio quality requires attention to detail and a commitment to using high-quality equipment and techniques. While there are many factors that can affect audio quality, preventing aliasing and reducing harmonic distortion are two important steps that can make a big difference.


aliasing, harmonic distortion, audio quality, digital audio, sampling rate, Nyquist frequency, low-pass filter, anti-aliasing filter, analog-to-digital converter, digital-to-analog converter, audio processing, audio effects, audio recording, audio mastering, audio production, audio engineering, sound engineering, sound design, sound quality, audio equipment, audio plugins, audio software, audio hardware, audio interface, audio cables, audio mixer, audio compressor, audio limiter, audio equalizer, audio amplifier, audio signal processing, audio normalization, audio compression, audio dynamics, audio frequency, audio spectrum, audio analysis, audio measurement, audio test, audio troubleshooting, audio repair, audio restoration, audio format, audio file, audio codec, audio bit depth, audio resolution, audio latency, audio delay, audio latency compensation, audio synchronization, audio phase, audio distortion, audio artifacts, audio clipping, audio saturation, audio noise, audio hum, audio buzz, audio hiss, audio pops, audio crackles, audio dropouts, audio glitches, audio issues, audio problems, audio solutions, audio tips, audio tricks, audio tutorials, audio guides, audio lessons, audio courses, audio books, audio blogs, audio forums, audio community, music production, music recording, music mixing, music mastering, music engineering, music theory, music composition, music arrangement, music performance, music education.