Video Volume Leveling


Free Download Mp4Gain
picture

Video Volume Leveling

Video Volume Leveling

Let’s talk about Video Volume Leveling

Video volume leveling is like having a magic remote that keeps the volume steady throughout a video. Think about watching a movie where the dialogue is whispered and the explosions are deafening. Annoying, right? Volume leveling smooths out those inconsistencies, so you don’t have to constantly fiddle with the remote. From my experience editing countless videos, I can tell you it’s a game-changer for improving the viewing experience. I once worked on a documentary where the interview audio was all over the place. Volume leveling saved the day, making it much easier to listen to.

Understanding Video Volume and Dynamics

Video volume, in my experience, is like the flow of water in a pipe. Sometimes it’s a trickle (quiet scenes), other times it’s a gush (loud scenes). Volume dynamics refer to these variations in loudness. Just like controlling the water flow with a valve, volume leveling controls the audio dynamics, making the loudness more consistent.

Why is Video Volume Leveling Important?

Volume leveling is crucial for creating professional-sounding videos. Here’s why I believe it’s so important:

  • Improved Viewing Experience:

    No more jarring jumps in volume! It’s like smoothing out a bumpy road for a more comfortable ride.

  • Enhanced Audio Clarity:

    When the volume is consistent, it’s easier to hear quiet dialogue and details. Imagine listening to a story where the storyteller speaks at the same volume throughout – much clearer!

  • Professionalism:

    Volume leveling is a hallmark of professional video production. It shows you care about your audience’s experience.

  • Accessibility:

    Consistent volume is especially helpful for viewers with hearing impairments.

How Video Volume Leveling Works

Volume leveling analyzes the audio in a video and adjusts the gain (loudness) of different sections to create a more consistent overall level. Think of it like adjusting the individual knobs on a sound mixer to balance all the instruments. Quiet parts are boosted, and loud parts are reduced.

Different Methods of Video Volume Leveling

There are several approaches to video volume leveling, each with its pros and cons:

  • Normalization:

    Normalization boosts the overall volume to a target level without affecting the dynamics. It’s like turning up the main volume knob on a stereo.

  • Compression:

    Compression reduces the dynamic range, making the loud parts quieter and the quiet parts louder. Think of it like squeezing a balloon – the overall volume is reduced, but it becomes more uniform.

  • Limiting:

    Limiting prevents the audio from exceeding a certain threshold, preventing clipping and distortion. It’s like a safety valve on a pressure cooker.

Choosing the Right Video Volume Leveling Technique

From my experience, the best technique depends on the specific video. Normalization is good for boosting overall loudness. Compression is useful for taming wide dynamic ranges. Limiting prevents distortion. Often, a combination of techniques works best.

Common Challenges in Video Volume Leveling

Even with the best techniques, I’ve encountered some challenges:

  • Over-Compression:

    Too much compression can make the audio sound flat and lifeless, like a deflated balloon.

  • Distortion:

    Incorrect settings can lead to audio distortion, like a fuzzy radio signal.

  • Breathing:

    Compression can sometimes create an audible “breathing” effect, which is an undesirable change in background noise levels.

Tips for Effective Video Volume Leveling

Over time, I’ve picked up some tips to get the best results:

  • Subtlety is Key:

    Aim for natural-sounding volume adjustments. Avoid drastic changes that are noticeable to the ear.

  • Monitor with Headphones:

    Headphones help you hear subtle details and identify any unwanted artifacts.

  • Experiment with Settings:

    Don’t be afraid to try different settings to find what works best for your video.

Advanced Techniques in Video Volume Leveling

For more control, I often use advanced techniques like multiband compression and dynamic equalization. These techniques allow for more precise adjustments to specific frequency ranges.

The Future of Video Volume Leveling

The future of video volume leveling is exciting! I see more AI-powered tools emerging, automating the process and making it even easier to achieve professional-sounding results. Imagine a world where videos automatically adjust their volume to suit your listening environment – that’s the future I’m excited about!

Latest words on Video Volume Leveling

Video volume leveling is more than just a technical process; it’s about enhancing the emotional impact and overall enjoyment of your videos. By understanding the principles and techniques involved, you can create videos that truly captivate your audience. MP4Gain may be a suitable solution for your video volume leveling needs.

FAQ about Video Volume Leveling

What is video volume leveling?

Video volume leveling is the process of adjusting audio levels to create a consistent volume throughout a video.

Why is video volume leveling important?

It improves the viewing experience by eliminating jarring volume fluctuations and enhancing audio clarity.

How does video volume leveling work?

It analyzes the audio and adjusts the gain of different sections to achieve a consistent overall volume.

What are the different methods of video volume leveling?

Common methods include normalization, compression, and limiting.

What is audio normalization?

Normalization boosts the overall volume to a target level without significantly affecting the dynamic range.

What is audio compression?

Compression reduces the dynamic range by making loud parts quieter and quiet parts louder.

What is audio limiting?

Limiting prevents the audio from exceeding a certain threshold, preventing clipping and distortion.

What are some common challenges in video volume leveling?

Challenges can include over-compression, distortion, and breathing artifacts.

What are some tips for effective video volume leveling?

Tips include using subtle adjustments, monitoring with headphones, and experimenting with settings.

What is the future of video volume leveling?

The future may involve more AI-powered tools and automated processes.

Comments:

Great article! This explains why some of my videos sound so much better than others. Thanks! – VideoEnthusiast

I’ve been struggling with uneven audio in my videos. This is a lifesaver! – SoundStruggler

Super helpful tips! I’ll definitely be using these in my next project. – FutureFilmmaker

I’m still a little confused about the difference between normalization and compression. Maybe you could elaborate on that? – AudioNewbie

This is the best explanation of video volume leveling I’ve found online. Thanks for sharing your expertise! – GratefulLearner

I create videos for social media, and consistent volume is so important. This article was really helpful. Thanks! – SocialMediaPro

Awesome explanation. I finally understand why some videos are so jarring to listen to. – HappyViewer

I’m a musician, and I’m starting to make music videos. This will definitely come in handy! – MusicVideoMaker

I use mp4gain.com all the time for this, its great info tho! – mp4gainFan

Good stuff, but maybe add some visuals next time? – VisualLearner


Free Download Mp4Gain
picture


Mp4Gain Main Window
picture


Mp4Gain Features
picture


Free Download Mp4Gain
picture

Sound Leveling

Sound Leveling

Sound Leveling

Let’s talk about Sound Leveling

Sound leveling is like having a perfect balance on a seesaw. In my years working with audio, I’ve seen firsthand how jarring uneven audio can be. Think about listening to a music album where one song is whisper-quiet and the next blasts your eardrums. That’s where sound leveling comes in. It creates a consistent listening experience, so you don’t have to constantly fiddle with the volume. Sound leveling smooths out the sonic rollercoaster, making everything a pleasant and predictable ride.

Why Sound Leveling Matters

Sound leveling is crucial for a smooth and enjoyable listening experience. It’s the difference between a bumpy dirt road and a freshly paved highway for your ears. I’ve used it to create professional-sounding podcasts, even out audio in home movies, and make music compilations flow seamlessly.

How Sound Leveling Works

Sound leveling analyzes audio and adjusts the volume to achieve a consistent target loudness. Think of it as a sculptor chipping away at a block of stone (the audio) to create a smooth, even surface (consistent volume).

Peak Normalization

Peak normalization adjusts the audio so the loudest peak reaches a target level. It’s like trimming the tallest branches of a tree to make it a uniform height.

Loudness Normalization

Loudness normalization considers the perceived loudness of the audio, not just the peaks. This method takes into account how our ears perceive sound, resulting in a more natural and balanced result. I find this particularly useful for dialogue-heavy content, ensuring voices are always clear.

Different Sound Leveling Techniques

There are several ways to achieve sound leveling, each with its advantages and disadvantages. Over the years, I’ve experimented with various methods, and each has its place depending on the type of audio.

ReplayGain

ReplayGain is a standard that embeds metadata in audio files to inform players how to adjust the volume. It’s like attaching instructions to a piece of furniture for easy assembly.

Normalization

Normalization is a process that adjusts the overall gain of an audio file. It’s similar to adjusting the brightness of a photo to achieve a consistent look.

Compression

Compression reduces the dynamic range, making quieter parts louder and louder parts quieter. Think of it as squeezing a sponge – the overall size changes, but the shape becomes more uniform.

Sound Leveling in Different Media

Sound leveling plays a vital role in various media, from music and movies to podcasts and broadcasts. I’ve worked on projects across these mediums, and consistent sound levels are always key.

Music

Sound leveling ensures consistent volume across tracks on an album.

Movies and TV

It balances dialogue, music, and sound effects for a cohesive experience.

Podcasts and Broadcasts

Sound leveling creates a professional and engaging listening experience.

Benefits of Sound Leveling

Sound leveling offers numerous benefits, from a more enjoyable listening experience to increased accessibility and professional-sounding results. I’ve seen it transform messy audio projects into polished, professional pieces.

Consistent Volume

No more sudden jumps in volume or quiet passages.

Improved Clarity

Dialogue and other important sounds become more distinct.

Enhanced Accessibility

Sound leveling can make audio easier to understand for people with hearing impairments.

Common Sound Leveling Mistakes

While sound leveling is a powerful tool, there are some common pitfalls to avoid. I’ve learned these through experience, and avoiding them can significantly improve your results.

Over-Compression

Over-compressing audio can make it sound flat and lifeless. It’s like over-mixing a cake batter – it loses its texture and becomes dense.

Ignoring Perceived Loudness

Focusing solely on peak levels can result in an unnatural and unbalanced sound.

Incorrect Target Levels

Choosing the wrong target level can lead to either too quiet or too loud audio.

FAQ about Sound Leveling

What is sound leveling used for?

Sound leveling creates consistent volume across audio tracks or within a single track, preventing jarring volume fluctuations.

How does sound leveling work?

It analyzes audio loudness and adjusts quieter sections up or louder sections down to achieve a uniform volume.

What’s the difference between peak and loudness normalization?

Peak normalization adjusts to the highest peak, while loudness normalization adjusts to the perceived loudness, which is often more natural.

Why is sound leveling important for podcasts?

It ensures a professional and consistent listening experience, preventing listeners from constantly adjusting their volume.

How can I sound level my music collection?

Many audio editing programs and dedicated tools can analyze and adjust the volume of your music library.

What are the benefits of audio leveling?

Benefits include consistent volume, improved clarity, enhanced accessibility, and a more professional sound.

Can sound leveling damage my audio?

Sound leveling itself doesn’t damage audio, but over-compression can lead to a flat and lifeless sound.

What is ReplayGain?

ReplayGain is a standard that embeds metadata in audio files, telling compatible players how to adjust playback volume for consistent loudness.

How do I choose the right target loudness level?

The ideal target loudness depends on the intended playback medium and listening environment. Research recommended levels for different platforms.

Is sound leveling the same as volume boosting?

Not exactly. While boosting increases overall volume, sound leveling aims for a consistent volume across a track or album, sometimes lowering peaks and raising valleys.

Latest words on Sound Leveling

Sound leveling has become an indispensable tool in my audio work. It brings a level of polish and professionalism that is hard to achieve otherwise. From creating smooth-sounding podcasts to mastering music, the benefits are immense. Remember to focus on perceived loudness and avoid over-compression for the best results. Mp4Gain can be a valuable asset for effective sound leveling.

Comments:

This article is a lifesaver! I’ve been struggling with uneven volume in my podcasts, and now I finally understand how to fix it. Thanks! – PodcastPete

Great explanation of sound leveling! I used to think all songs were supposed to be at the same volume, but now I get the nuances. – MusicManMike

Super helpful article! I’m going to try using ReplayGain on my music library. – AudiophileAlice

I make video tutorials, and this article gave me some great tips on how to balance my audio. – VideoVikki

Thanks for explaining the different sound leveling techniques. I’m going to experiment and see what works best for me. – SoundExplorerSteve

This article cleared up so many of my questions about sound leveling. I’m definitely going to recommend this to my fellow audio enthusiasts. – AudioGuruAmy

I’ve been using compression for sound leveling, but I think I’ve been overdoing it. Thanks for the tips on avoiding over-compression. – MixingMasterMatt

Wow, I never knew sound leveling was so important. I’m definitely going to start paying more attention to it in my audio projects. – SoundNewbieNancy

This was a fantastic read! Sound leveling is something I’ve always struggled with, but this article made it so much clearer. – LevelingLarry

Great job explaining how sound leveling works in different media. I learned a lot! – MediaMavenMary

How to make MP4 audio volume consistent

How to make MP4 audio volume consistent

How to make MP4 audio volume consistent

Let’s talk about achieving uniform audio in MP4s. As someone who works with audio daily, I understand the frustration of inconsistent sound levels. Inconsistent audio can disrupt the viewing experience. This comprehensive guide provides solutions for balanced sound in your MP4 files. I’ll share professional insights and practical tips, making even complex concepts accessible to everyone.

The Importance of Balanced Audio in MP4s

Consistent sound enhances the viewing experience significantly. Imagine watching a movie where whispers are barely audible, and explosions make you jump. Unbalanced audio is distracting. Consistent volume creates a more immersive and enjoyable experience. It also demonstrates professionalism and improves accessibility for viewers with hearing impairments.

Understanding the Fundamentals of Audio Leveling

Leveling audio involves adjusting sound levels to achieve a consistent target loudness. It’s like fine-tuning a musical instrument to achieve a more harmonious sound. Peak normalization maximizes loudness without clipping, while loudness normalization targets perceived loudness. Both methods aim to create a more uniform and pleasant listening experience.

Practical Steps for Consistent MP4 Audio

Achieving balanced sound involves a few key steps. I’ll outline them here, providing clear examples to guide you. Each step contributes to a polished final product. These actionable steps yield professional results.

  • Analyze Existing Audio: Begin by assessing the current loudness range. I often use visualization tools to see the peaks and valleys in the waveform, identifying areas needing adjustment. It’s like examining a map before starting a journey.
  • Adjust Levels Carefully: Utilize audio editing tools to carefully raise quiet passages and lower overly loud ones. Avoid clipping, which introduces distortion. It’s similar to adjusting the seasoning in a dish for optimal flavor.
  • Monitor and Refine: Use loudness meters and your ears to monitor the results. Listen on different devices, like headphones and speakers, to ensure consistent playback across platforms. This final check is like taste-testing a recipe before serving it.

Ensuring Seamless Audio Transitions

Abrupt volume changes can be jarring. Smooth transitions are essential for maintaining viewer engagement. Gradual fades and crossfades prevent jarring shifts between scenes or audio segments. Properly implemented transitions maintain a consistent and professional feel. This creates seamlessness in the audio experience.

Advanced Techniques for Consistent Audio

More advanced methods, beyond basic leveling, can help you to achieve a uniform feel and optimize the sound across various platforms:

  • Dynamic Range Compression: Gently reduces the difference between the loudest and quietest parts of the audio, creating a more even overall volume. This is similar to using a compressor in music production to smooth out the dynamics of an instrument.
  • Equalization (EQ): Adjusts the balance of different frequencies in the audio, helping to clarify dialogue or reduce harshness. It’s like fine-tuning the tone controls on a stereo system to customize the sound.

Optimizing Your Workflow

Optimizing the process saves a great deal of time, specifically when managing numerous MP4s. The techniques I’ve perfected over the years are designed to help you build efficiency in your process and deliver top results. Streamlining ensures consistently high quality output.

  • Create Presets or Templates: Once you’ve established settings that work well, save them as presets or templates. This saves time when working on similar projects. It’s like having a pre-made recipe for your favorite dish.
  • Batch Processing: Many tools offer batch processing capabilities, allowing you to apply your adjustments to multiple files simultaneously. This streamlines the process significantly, especially when working with large volumes of media. Think of it like cooking multiple dishes in the oven at once.

Troubleshooting Common Issues

Even with the best planning, sometimes issues arise when dealing with audio. In my experience, most issues can be identified and resolved quickly. These solutions tackle those common headaches.

  • Audio Too Quiet: If the audio is consistently too low, check the input gain during recording or increase the amplification during editing. It’s like turning up the microphone volume before a speech.
  • Audio Too Loud/Distorted: Conversely, if the audio is too loud, it can cause distortion or clipping. Reduce the gain or apply compression to manage peaks. It’s like lowering the volume on a speaker to prevent crackling.
  • Inconsistent Levels Within a File: If certain sections are louder than others, carefully adjust those sections individually using automation or gain adjustments. This targeted approach is like fine-tuning individual instruments in a musical mix.

Understanding the Role of Codecs

The codec used to encode your sound heavily impacts resulting storage and final perceived tones. Different codecs operate using varied methods. Each has unique characteristics. Codec selection is a key factor in sonic fidelity.

  • AAC (Advanced Audio Coding): The most common codec used with MP4s. AAC offers a good balance between file size and sound quality, making it suitable for a wide range of applications. I often recommend this codec for its versatility.
  • Other Audio Codecs: Alternatives such as MP3 or Apple Lossless exist, each with its trade-offs in terms of quality and file dimensions. Selecting one codec over another comes down to making a balanced decision that meets specific project requirements.

Latest words on How to make MP4 audio volume consistent

Consistent MP4 audio enhances the listening experience. Following these tips and techniques you can improve your content. Balanced sound not only sounds more professional. But it also makes your videos more accessible. Consistent audio demonstrates attention to detail, setting your productions apart. While tools like MP4Gain can help streamline the process, a deep understanding of these principles is essential for achieving truly professional results.

FAQ about How to make MP4 audio volume consistent

Why do my MP4 videos have inconsistent audio levels?

Uneven volume within MP4s can stem from various factors: source material discrepancies, incorrect recording levels, or issues during editing or processing. Identifying the root cause helps apply the proper solution.

What are some indicators of inconsistent volume?

Frequent manual volume changes during playback, dialogue that’s hard to hear in some scenes, or overly loud music or sound effects. These indicate normalization steps are needed.

How does normalization improve my videos?

Normalized volume creates a more professional product by eliminating jarring shifts in loudness. It enhances viewer engagement and improves accessibility, especially for those with hearing sensitivities.

What are common techniques for leveling sound?

Peak normalization boosts the loudest part of the audio without introducing distortion. Loudness normalization aims for a consistent perceived volume. These are the most often used options.

How can I make smooth transitions between scenes?

Gradual fades and crossfades prevent jarring changes. This smoothing process contributes significantly to a polished, professional feel.

What are some advanced audio editing techniques?

Dynamic range compression smooths out the loudness variations within your audio. Equalization adjusts tonal balance, impacting dialogue clarity, and music quality.

What if my MP4 audio is too quiet?

Increase the gain during editing, being careful to avoid clipping. If possible, re-record the audio at a higher input level to capture a stronger signal from the start.

What should I do if the audio is too loud or distorted?

Reduce the gain during editing or apply compression to control peaks and avoid clipping, which introduces distortion. These measures create more manageable sound.

How can I ensure consistent loudness across multiple MP4 files?

Use batch processing features in sound tools. Batch processing applies your preferred normalization settings to multiple files at once. This creates uniformity across a large batch.

How does the audio codec affect file size and quality?

Different codecs have varying compression ratios and quality characteristics. AAC offers a balance between file size and audio fidelity. Lossless codecs like FLAC provide perfect sonic replication but result in larger files. Codec choice is a crucial aspect.

Comments:

Wow, this is a really helpful article! I’ve been struggling with uneven audio in my videos, and this gives me a much better understanding of how to fix it. Thanks!

Great explanation of audio normalization. I didn’t realize there were different types, like peak and loudness normalization. That makes total sense. Thanks for clarifying.

The tip about listening on different devices is spot on. I usually just check my audio on my computer speakers, but now I see why it’s important to test on headphones and other devices too.

I’m glad you mentioned accessibility. It’s something I’ve been trying to be more mindful of in my videos. Consistent audio levels are definitely a big part of that. Cheers.

This is super detailed, maybe a little *too* detailed. I just want a simple way to make my videos sound better. Is there a quick and easy method you can recommend?

Batch processing is a lifesaver! I edit a lot of videos, and the thought of manually adjusting audio levels for each one was daunting. Thanks for the tip!

I still don’t get the whole “codec” thing. Can you explain that in simpler terms? Like, what codec should I be using for my MP4 videos?

This was a game-changer for my video editing workflow. Thanks for the practical advice and clear explanations!

Great article, really comprehensive! Just a suggestion – could you add a section on how to normalize audio in different video editing software programs? That would be very helpful.

This article needs more cowbell! Just kidding. Seriously though, great job. Thanks for the informative read.

What is a signal-to-noise ratio in audio?

What is a signal-to-noise ratio in audio?

signal-to-noise ratio audio

Understanding the Basics of Audio Quality

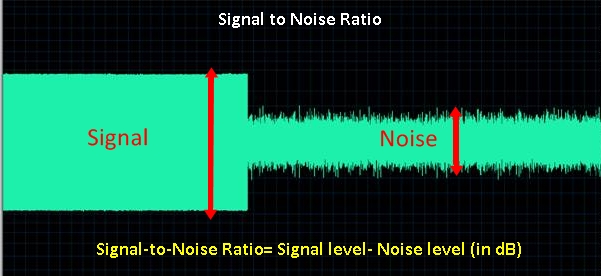
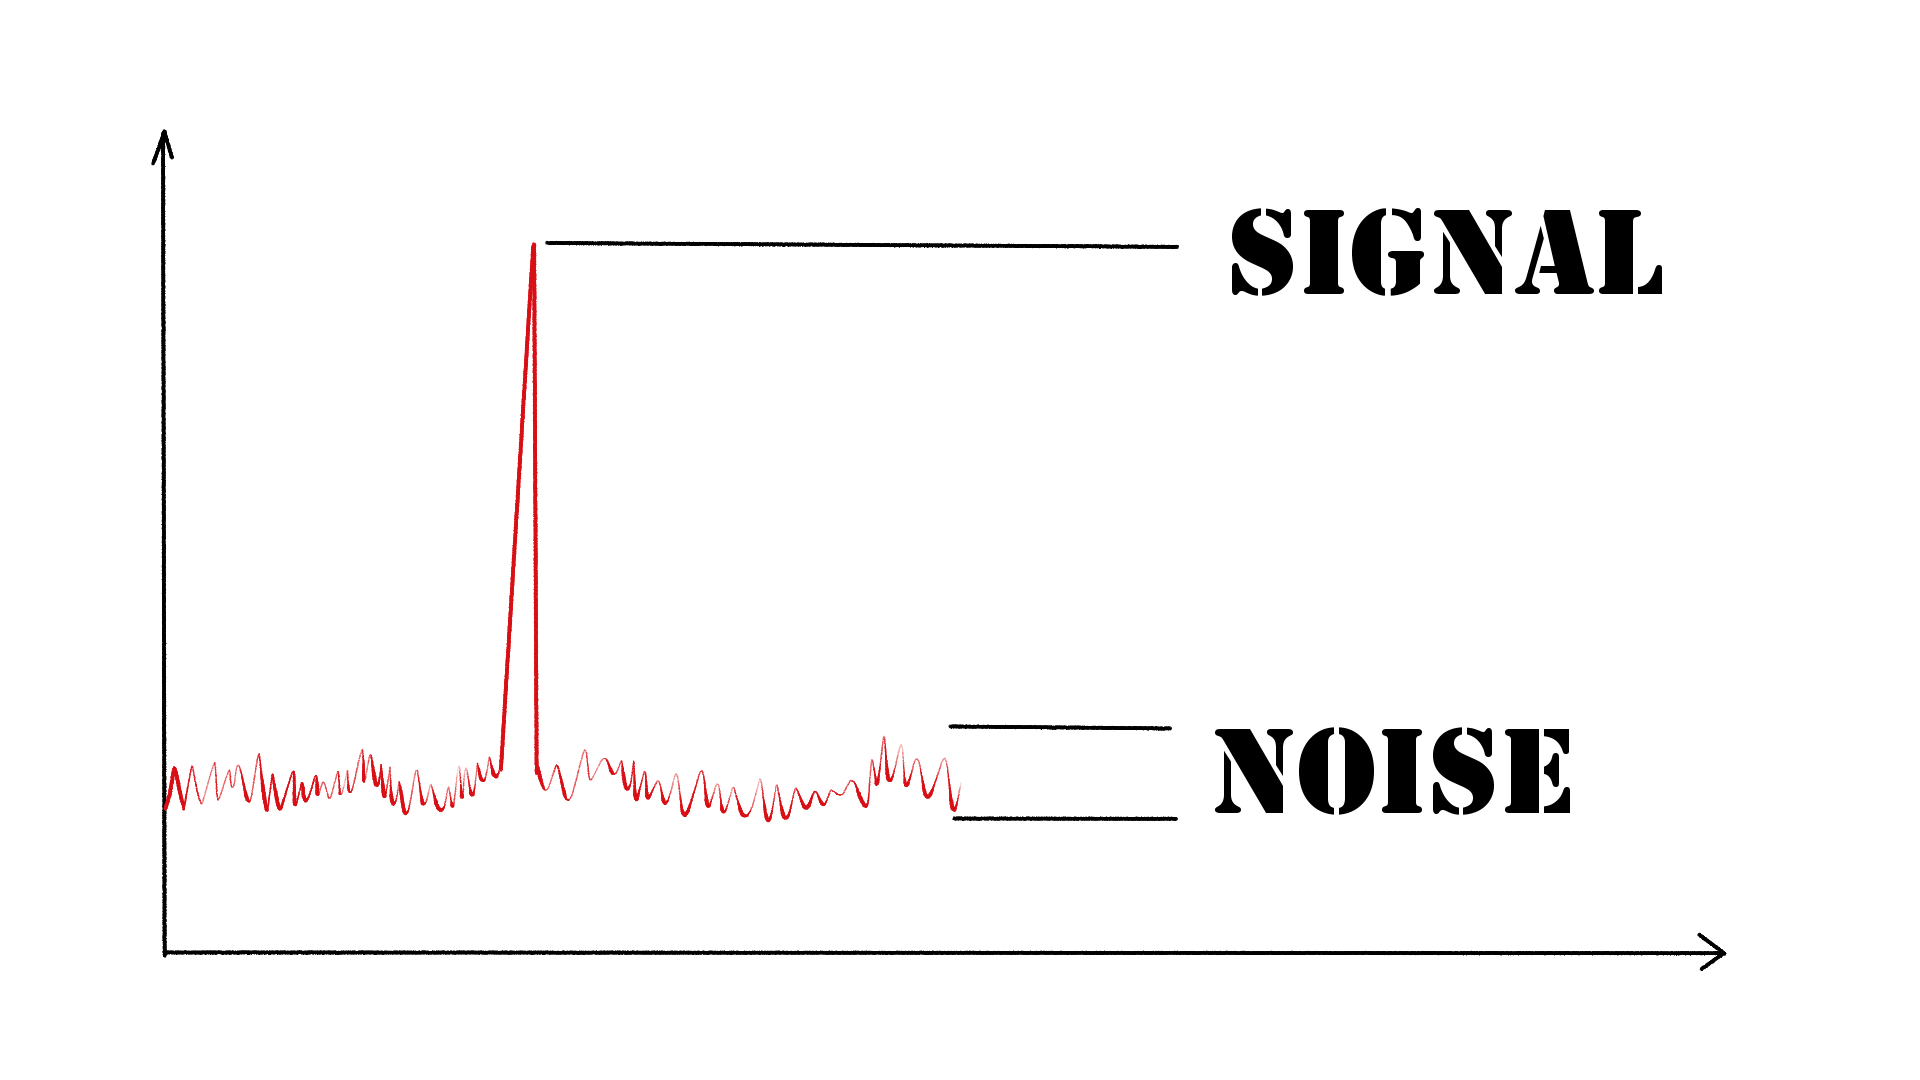
As an audio engineer, I have come across many questions about audio quality, and one of the most common ones is “What is a signal-to-noise ratio in audio?” In simple terms, the signal-to-noise ratio (SNR) is the difference between the desired audio signal and the background noise. A high SNR means that the desired signal is much stronger than the noise, resulting in better audio quality.
When it comes to audio quality, there are many factors to consider, such as audio processing, normalization, compression, dynamics, and distortion. Each of these factors can affect the SNR and, therefore, the overall audio quality. For example, audio normalization can help to increase the SNR by adjusting the volume levels of the audio signal, while audio compression can reduce the dynamic range of the audio signal, resulting in a more consistent SNR.

The Importance of Audio Normalization

As someone who has worked with audio for many years, I can attest to the importance of audio normalization. Normalization is the process of adjusting the volume levels of an audio signal to a standard level, which can help to improve the SNR and overall audio quality.
One of the benefits of audio normalization is that it can help to prevent distortion in the audio signal. When an audio signal is too loud, it can cause distortion, which can be heard as a buzzing or crackling sound. By normalizing the audio signal, you can ensure that it is at a safe and consistent volume level, which can help to prevent distortion and improve the overall audio quality.

The Role of Audio Compression in Audio Quality

Audio compression is another important factor to consider when it comes to audio quality. Compression is the process of reducing the dynamic range of an audio signal, which can help to make it sound more consistent and balanced.
One of the benefits of audio compression is that it can help to improve the SNR by reducing the background noise in the audio signal. However, it is important to use compression carefully, as too much compression can result in a loss of detail and dynamics in the audio signal. As with all aspects of audio engineering, finding the right balance is key to achieving the best possible audio quality.
Final Words:
In conclusion, understanding the basics of audio quality is essential for anyone working with audio. Whether you are an audio engineer, musician, or just someone who enjoys listening to music, knowing about factors such as SNR, normalization, compression, dynamics, and distortion can help you to achieve the best possible audio quality. And if you are looking for a solution to improve your audio quality, consider using mp4gain, a powerful and easy-to-use audio normalizer and converter that can help you to achieve consistent and high-quality audio.

audio quality, signal-to-noise ratio, audio engineering, audio processing, audio normalization, audio compression, audio dynamics, audio distortion, audio editing, audio software, audio plugins, audio effects, audio mixing, audio mastering, audio recording, audio equipment, audio cables, audio interfaces, audio monitors, audio speakers, audio headphones, audio formats, mp3, mp4, wav, flac, aac, ogg, audio bitrate, audio frequency, audio spectrum, audio waveform, audio visualization, audio analysis, audio restoration, audio repair, audio enhancement, audio improvement, audio tips, audio tricks, audio tutorials, audio guides, audio blogs, audio forums, audio community, audio enthusiasts, audio professionals, music production, sound design, sound effects, soundtracks, soundscapes, sound libraries, sound samples, soundfonts, sound packs, sound kits, sound engineering, sound recording, sound mixing, sound mastering, sound equipment, sound cables, sound interfaces, sound monitors, sound speakers, sound headphones, sound formats, sound bitrate, sound frequency, sound spectrum, sound waveform, sound visualization, sound analysis, sound restoration, sound repair, sound enhancement, sound improvement, sound tips, sound tricks, sound tutorials, sound guides, sound blogs, sound forums, sound community, sound enthusiasts, sound professionals.