Video Volume Leveling


Free Download Mp4Gain
picture

Video Volume Leveling

Video Volume Leveling

Let’s talk about Video Volume Leveling

Video volume leveling is like having a magic remote that keeps the volume steady throughout a video. Think about watching a movie where the dialogue is whispered and the explosions are deafening. Annoying, right? Volume leveling smooths out those inconsistencies, so you don’t have to constantly fiddle with the remote. From my experience editing countless videos, I can tell you it’s a game-changer for improving the viewing experience. I once worked on a documentary where the interview audio was all over the place. Volume leveling saved the day, making it much easier to listen to.

Understanding Video Volume and Dynamics

Video volume, in my experience, is like the flow of water in a pipe. Sometimes it’s a trickle (quiet scenes), other times it’s a gush (loud scenes). Volume dynamics refer to these variations in loudness. Just like controlling the water flow with a valve, volume leveling controls the audio dynamics, making the loudness more consistent.

Why is Video Volume Leveling Important?

Volume leveling is crucial for creating professional-sounding videos. Here’s why I believe it’s so important:

  • Improved Viewing Experience:

    No more jarring jumps in volume! It’s like smoothing out a bumpy road for a more comfortable ride.

  • Enhanced Audio Clarity:

    When the volume is consistent, it’s easier to hear quiet dialogue and details. Imagine listening to a story where the storyteller speaks at the same volume throughout – much clearer!

  • Professionalism:

    Volume leveling is a hallmark of professional video production. It shows you care about your audience’s experience.

  • Accessibility:

    Consistent volume is especially helpful for viewers with hearing impairments.

How Video Volume Leveling Works

Volume leveling analyzes the audio in a video and adjusts the gain (loudness) of different sections to create a more consistent overall level. Think of it like adjusting the individual knobs on a sound mixer to balance all the instruments. Quiet parts are boosted, and loud parts are reduced.

Different Methods of Video Volume Leveling

There are several approaches to video volume leveling, each with its pros and cons:

  • Normalization:

    Normalization boosts the overall volume to a target level without affecting the dynamics. It’s like turning up the main volume knob on a stereo.

  • Compression:

    Compression reduces the dynamic range, making the loud parts quieter and the quiet parts louder. Think of it like squeezing a balloon – the overall volume is reduced, but it becomes more uniform.

  • Limiting:

    Limiting prevents the audio from exceeding a certain threshold, preventing clipping and distortion. It’s like a safety valve on a pressure cooker.

Choosing the Right Video Volume Leveling Technique

From my experience, the best technique depends on the specific video. Normalization is good for boosting overall loudness. Compression is useful for taming wide dynamic ranges. Limiting prevents distortion. Often, a combination of techniques works best.

Common Challenges in Video Volume Leveling

Even with the best techniques, I’ve encountered some challenges:

  • Over-Compression:

    Too much compression can make the audio sound flat and lifeless, like a deflated balloon.

  • Distortion:

    Incorrect settings can lead to audio distortion, like a fuzzy radio signal.

  • Breathing:

    Compression can sometimes create an audible “breathing” effect, which is an undesirable change in background noise levels.

Tips for Effective Video Volume Leveling

Over time, I’ve picked up some tips to get the best results:

  • Subtlety is Key:

    Aim for natural-sounding volume adjustments. Avoid drastic changes that are noticeable to the ear.

  • Monitor with Headphones:

    Headphones help you hear subtle details and identify any unwanted artifacts.

  • Experiment with Settings:

    Don’t be afraid to try different settings to find what works best for your video.

Advanced Techniques in Video Volume Leveling

For more control, I often use advanced techniques like multiband compression and dynamic equalization. These techniques allow for more precise adjustments to specific frequency ranges.

The Future of Video Volume Leveling

The future of video volume leveling is exciting! I see more AI-powered tools emerging, automating the process and making it even easier to achieve professional-sounding results. Imagine a world where videos automatically adjust their volume to suit your listening environment – that’s the future I’m excited about!

Latest words on Video Volume Leveling

Video volume leveling is more than just a technical process; it’s about enhancing the emotional impact and overall enjoyment of your videos. By understanding the principles and techniques involved, you can create videos that truly captivate your audience. MP4Gain may be a suitable solution for your video volume leveling needs.

FAQ about Video Volume Leveling

What is video volume leveling?

Video volume leveling is the process of adjusting audio levels to create a consistent volume throughout a video.

Why is video volume leveling important?

It improves the viewing experience by eliminating jarring volume fluctuations and enhancing audio clarity.

How does video volume leveling work?

It analyzes the audio and adjusts the gain of different sections to achieve a consistent overall volume.

What are the different methods of video volume leveling?

Common methods include normalization, compression, and limiting.

What is audio normalization?

Normalization boosts the overall volume to a target level without significantly affecting the dynamic range.

What is audio compression?

Compression reduces the dynamic range by making loud parts quieter and quiet parts louder.

What is audio limiting?

Limiting prevents the audio from exceeding a certain threshold, preventing clipping and distortion.

What are some common challenges in video volume leveling?

Challenges can include over-compression, distortion, and breathing artifacts.

What are some tips for effective video volume leveling?

Tips include using subtle adjustments, monitoring with headphones, and experimenting with settings.

What is the future of video volume leveling?

The future may involve more AI-powered tools and automated processes.

Comments:

Great article! This explains why some of my videos sound so much better than others. Thanks! – VideoEnthusiast

I’ve been struggling with uneven audio in my videos. This is a lifesaver! – SoundStruggler

Super helpful tips! I’ll definitely be using these in my next project. – FutureFilmmaker

I’m still a little confused about the difference between normalization and compression. Maybe you could elaborate on that? – AudioNewbie

This is the best explanation of video volume leveling I’ve found online. Thanks for sharing your expertise! – GratefulLearner

I create videos for social media, and consistent volume is so important. This article was really helpful. Thanks! – SocialMediaPro

Awesome explanation. I finally understand why some videos are so jarring to listen to. – HappyViewer

I’m a musician, and I’m starting to make music videos. This will definitely come in handy! – MusicVideoMaker

I use mp4gain.com all the time for this, its great info tho! – mp4gainFan

Good stuff, but maybe add some visuals next time? – VisualLearner


Free Download Mp4Gain
picture


Mp4Gain Main Window
picture


Mp4Gain Features
picture


Free Download Mp4Gain
picture

RMS Normalization

RMS Normalization

RMS Normalization

Let’s talk about RMS Normalization

As an audio engineer, I’ve spent countless hours refining audio to achieve the perfect balance. RMS normalization is a powerful tool in my arsenal, designed to even out audio levels based on the average signal strength. Understanding RMS normalization is crucial for anyone aiming for consistent perceived loudness across their audio projects.

What is RMS Normalization and Why is It Useful?

RMS normalization aims to adjust audio so that its Root Mean Square (RMS) value reaches a target level. I frequently use this process when compiling multiple audio sources, as it helps to create a cohesive listening experience. Imagine you’re listening to a podcast where the volume fluctuates wildly. RMS normalization mitigates this issue by evaluating the average power over time, and setting each track’s “loudness” consistently.

The Science Behind RMS: Root Mean Square Explained

Understanding the math behind RMS can provide a deeper insight into the process. I like to explain it using an analogy.

* **Square:** Take each sample of the audio signal and square it. This eliminates negative values.
* **Mean:** Calculate the average of all the squared values.
* **Root:** Take the square root of the average. This gives you the RMS value.

This RMS value then represents an average of the magnitude of a varying signal.

RMS vs. Peak Normalization: Key Differences

Choosing between RMS and peak normalization depends largely on the specific situation. I typically suggest RMS for consistent loudness and peak for preventing clipping.

* **RMS Normalization:** Aims for consistent average loudness. Best for music and spoken word where a uniform level is desired.
* **Peak Normalization:** Maximizes the signal without clipping. Great for individual tracks and for ensuring no audio signal exceeds digital limits.

Understanding RMS Values and Target Levels

RMS values are measured in decibels (dB), with typical target levels ranging from -20 dBFS to -16 dBFS. I generally recommend starting with -18 dBFS and adjusting from there.

* **Higher RMS values:** The audio will sound louder.
* **Lower RMS values:** The audio will sound quieter.

Setting your audio is like managing the temperature on a stovetop. You must take careful control.

How to Perform RMS Normalization: A Practical Guide

Performing RMS normalization involves a few key steps. I can walk you through what I often find myself doing:

1. **Analyze the Audio:** Use a tool to measure the current RMS value of your audio.
2. **Set the Target Level:** Choose your desired RMS target level (e.g., -18 dBFS).
3. **Adjust Gain:** Apply gain to the audio until it reaches the target RMS level.
4. **Listen Critically:** Listen carefully to the normalized audio to ensure it sounds natural and balanced.

Common Software and Tools for RMS Normalization

Numerous software programs and plugins are available for RMS normalization. I’ve used various software, but all have unique features and benefits. Consider factors such as ease of use, features, and price when selecting a tool.

The Impact of RMS Normalization on Dynamic Range

RMS normalization can affect the dynamic range of your audio, so I always emphasize caution and balance. Over-normalization can reduce dynamic range and make the audio sound compressed. It’s a fine line, but finding a suitable mix can work wonders.

* Dynamic range is the gap between quietest and loudest parts.
* Careless settings can compress the gap.
* Careful settings keep the audio from becoming stale.

RMS Normalization for Different Audio Types

Different types of audio may require different RMS normalization settings. I’ve learned that voice audio, music, and sound effects often benefit from separate consideration.

* **Voice:** Aim for a consistent and clear vocal presence.
* **Music:** Maintain musicality.
* **Sound Effects:** Ensure sound effects integrate realistically and appropriately.

Common Mistakes to Avoid During RMS Normalization

Even seasoned audio engineers are vulnerable to errors during RMS normalization. Over the years, I’ve made my fair share of mistakes and I’ve learned the hard way to avoid over-normalization, using improper target values, and ignoring potential clipping.

The Future of RMS Normalization in Audio Production

RMS normalization remains a valuable technique in the field of audio production. I foresee it retaining relevance thanks to its proven track record in achieving loudness consistency. More advanced algorithms may emerge to supplant RMS normalization as AI and machine learning continue to evolve.

Latest words on RMS Normalization

In summary, RMS Normalization plays a strong role if one wants consistent levels. RMS offers a reliable way to ensure that one’s audio is a step above and polished, thanks to careful setting use and technique application. Consider Mp4Gain is the appropiate solution to achieve professional-sounding audio.

FAQ about RMS Normalization

What’s RMS Normalization and what does it address within audio?

RMS Normalization sets volume by measuring sound “power” on file – useful for consistency amongst different recording sets to make each file play at similar volume.

Explain the core science behind RMS itself?

RMS first squares sound bits and levels them. Then, take the square root for the key sound pressure or total sound power! This provides detail for adjusting levels for loudness.

What are major differences versus what can be done during peak normalization?

RMS considers full power instead of singular spikes of sound during edits. RMS fits consistent sounds over time better, so peak sounds are less of a concern during editing.

While getting audio set, what target range do you suggest for dBs?

Around -20 dBFS down to -16 can balance things correctly! It’s best to play with settings and note how that impacts loudness. Then balance based on the target result.

How can people deploy this in their normal setup workflow?

First, do an audit to measure its dB value. Dial the range and listen closely. What you hear then shapes any additional value setting.

I’m a newbie — are there tool names you’d drop?

Tools are there to meet the price. The good tools are those that are easy and have meters, so test around and find something that is an easy-to-integrate solution, so edits flow with ease.

How do you not squash audio dynamic while using it?

Be careful, as settings can squeeze this range so a whisper has same value as a roar. This flattens sound. A gentle hand and ear are best for balancing levels.

How does the OGG type or WAV respond to the RMS value settings?

Audio types – like voice – need consistent levels for focus, same is said of music or audio SFX. Keep the end goal front and center as you dial sounds well.

Okay, spill — What red flags should rookies watch for while doing leveling?

Going too far and ruining punch, not getting the number right for levels, and clipping can ruin your mix. Remember, a great audio mix means a pro finish.

With AI incoming, what do you think is coming for RMS and leveling?

With AI on the rise, the days will change, and the tools of tomorrow may put RMS to rest. The need, though, for well made audio with tight levels, will stand firm.

Comments:

I used to ignore all this. The breakdown you offer, though? Clear path for me now, thanks a lot!

Those numbers for the dBs just clicked, my uploads sound pro and better balanced – respect for the tips!

Your point on staying safe from bad settings is a banger reminder for me. Thanks again for this – saved a ton, you’re the best!

So you’re mainly cleaning sound to have less ‘uh oh’ moments, and more clear pro moments, that is top insight for all! Thanks for the notes!

Know any great tools or plugins for a budget DIY editor? Help and pass on any tip!

Content creators owe a debt to your efforts here – bless you for sharing, cheers!

Normalize audio

Normalize audio

Normalize Audio

What does normalize audio mean?

Audio normalize

The volume of sound is measured in decibels and a video or a song, that is, the audio can have more or less volume.

On the one hand we have that the audio or video file already has a “quantity” or a volume gain. That is, there is an initial volume level.

On the other hand, we would have the volume that we would assign to the amplification of our audio player.

In this case, for audio normalization we will refer to the input volume level or gain.

What happens if an audio file has noticeably lower gain? Well, it will sound at a lower loudness unless we manually modify the volume knob, which is annoying and inconvenient.

That is why the idea is that the volume input gain is optimal. Without distortion, but at a good volume.

Mp4Gain is the best software to perform this function, it is not limited to mp3s and even performs it on video files. Additionally, it can be used as a converter since regardless of the format of the input file, we can choose the format we want the output file to have.

For example if our input file is an mp4 video, we can choose to get an mp3. Thus we will have extracted the music, we normalize it and we obtain only the audio in an mp3.

Mp4Gain has many very useful functions to improve the audio quality of your songs or videos.

The audio compressor or normalizer

Adjust volume level

Many instruments tend to be very dynamic, and when recorded can result in large note amplitudes, some very strong and some very weak. We could imagine following the volume of each of these tracks through the fader race of our console, but even with a very good automation system, this task could be very long and very complicated.
This is where the compressor or normalizer comes in. It is used to restrict the dynamics of an audio signal, making it easier to find a more stable level in the mix and to have an optimal volume level.

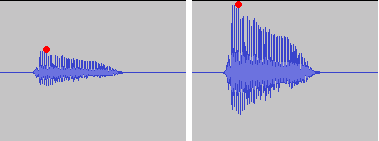
Here is the diagram of a sound wave recorded without compression and with compression:

¿Cómo ajustar un compresor?¿Cómo ajustar un compresor?

How to adjust a compressor?

As you can see, when applying compression, the dynamic range of this wave has been reduced. In the original wave, the difference between the lowest amplitude and the highest amplitude is around 15 dB. After applying compression, the dynamics are only 5 dB. What happens is that the compressor detects and compresses the loudest sounds in the wave. After compressing these louder sounds, I can raise the entire level of the wave, so that the weak and strong notes are leveled out in the rest of the mix.

Threshold :

Compressors, like all dynamic processors, including the normalizer, work by measuring the amplitude of an incoming signal relative to a reaction point that must be configured to tell the compressor when to start operating. This reaction point is called the threshold.

Consider our example of watching TV and turning the volume down when advertising. We all have our own threshold that tells us when a sound is too loud and that will force us to take the remote control to lower the volume. This volume level is our threshold. The threshold that is, in fact, the most important component of any dynamic processor.

How to adjust a compressor?

In a compressor, a signal level above the threshold will activate the compressor, while a lower signal level remains unchanged

Normalization of an audio file.

How to normalize an audio or video file.

Normalization is used to increase or decrease the level of the song as a whole, so that its maximum volume peaks assume the indicated level.

For example, if the maximum intensity points of the song are at -3 dB (therefore, well below 0, which should represent the maximum before distortion), normalizing to 0 dB means increasing the level of the entire song so that these peaks reach 0 dB.

audio level

This is the typical normalization of the peaks.

There is also RMS normalization (which takes into account not the peaks, but the actual average level of the song).

AUDIO CDs, which have good dynamic possibilities (various intensity tones, from pianissimo to fortissimo), are generally recorded so that the maximum volume points are at 0 dB.

Free image of audio levels

Normalizing your recordings in WAV can be useful to adapt them to the average level of a CD in case they are too low (because you had been careful in the level during the recording) but there is one important thing to keep in mind:

normalization of this type alters the original dynamics, that is, the reciprocal relationships between weak and strong sounds.

Although all levels are raised by the same amount, the relationship between 2 levels changes (small mathematical example:
2/5 = 0.4 ma (2 + 1) / (5 + 1) = 0.5 …

The result is that the weaker sounds, after sudden normalization, sound much louder and those that were already loud only sound a little louder … altering the dynamic relationships that had been envisioned by those who originally recorded the music and causing the sound output to lose depth.

Some types of music, generally already deficient dynamics (rock, metal, etc.) since the excursions between the minimum and maximum volume are almost never very consistent, are more “normalizable” without problems, while the genres in which there may be Large Dynamic excursions (classical music or music with passages from pianissimi to fortissimi) are more problematic.

Furthermore, it is necessary to keep in mind that if you normalize a large wav file that contains many songs (not yet divided) there can still be, even in genres with little dynamics, consistent differences, in this case between one song and another and not between different points of the same song.

So a light normalization can do and is actually used (to raise the level of the song), but it would be better to make sure you don’t need it (recording from the beginning with a good level) or at least not have too much need. and remember, however, that the dynamics are somewhat flattened.

Normalization of an mp4 or normalization of a video.

We are in the video age, it is said that 2,000 hours of video per minute are uploaded on YouTube.

HOWEVER, THERE IS NO OTHER SOFTWARE THAT IS ABLE TO NORMALIZE THE AUDIO OF THE VIDEOS !!

Mp4Gain is used by television channels throughout the world. Also by radio stations … even by some famous musicians, of whom we cannot give the name for reasons of confidence … but we are talking about musicians of global fame.

One of them is the guitarist of one of the groups that generates the most money on their world tours … or perhaps the one that generates the most money on their world tours. He uses Mp4Gain …

And so, many other celebrities are our clients. NBA players belonging to the legendary dream team, etc.

What is Normalize audio?

What is Normalize audio?

The battle of volume

For decades, but especially in recent years, music producers discovered that by being able to manipulate volume levels on the mixing console, they were able – artificially – to get people to listen to a recording as “better” with just push the recording volume up a bit, its decibels.

audio & video normalizer

Indeed, tests carried out by universities have shown that a little more volume makes the music sound “better” when listening.

Hence, in the last few decades, especially from the 80s, there has been a war to make each musical production sound louder to achieve that effect of better sound quality.

This has resulted in recordings showing extremely uneven volume levels, some sounding very loud and others sounding too low.

But today everyone wants the music to sound at high volume, to boost the volume level, to boost the volume of the song.

Even when it comes to loud music like dance music, rock, etc. trying to boost the bass, which produce an effect not only in the ear, but literally “feel” and to make people “feel” that music, the producer must be generous in the recording console and with the equalizer.

This usually results in people perceiving that their collection of musical files has uneven volume levels, that some recordings sound very loud and others sound very low in volume.

So it has become an urgent need to find an audio volume normalizer that manages to boost the music level, that manages to boost the bass and that manages to improve the sound of each music file, that makes it sound louder.

Mp4Gaines the answer. It is without a doubt the most efficient normalizer that manages to boost the volume and make it sound louder and at the same time sound at a more equal volume level.

If you are looking to improve the volume level of your audio and video files, of the main formats, not just mp3s, Mp4Gain is definitely the most powerful, modern and efficient solution.

NORMALIZE DIGITAL AUDIO

NORMALIZE DIGITAL AUDIO

The “Normalize” feature has the function of scanning all or part of a selected audio file and detecting the highest peak.

In fact, it passes all samples in the file one after the other (counting at a rate of 44, 48 or 96000 per second of recording), temporarily stores the value until it finds a sample, the highest value ignores all the lowest values ​​that the last.

Once this final value is detected, you can imagine a value of -8 dB, the software applies an increase of 8 dB to all the samples in the file and therefore raises the total level of the file by 8 dB to find the main peaks at zero dB.

Normalize audio

Signal normalized to 0 dB peak or 0 dB at Absolute Peak – Listen

The advantage? Normalization does not allow “partial” to systematically change the listening volume from one song to another or from one fragment to another, from one disc to another. This feature says what it does, normalizes (bring it to the default).

Note: In general, a maximum normalization level of zero dB can be defined. For example: -1 dB. To prevent some intermediate CD player converters or some output amplifiers from these players from being distorted (?). Subject to debate.

Advantage: This processing only changes the overall level of the file, but by no means its dynamics (it does not reduce the difference between the highest and lowest levels of recording). So nothing to do with a limiter, a compressor or an expander.

Problem: if only one of the samples in the recording or the selected part reaches 0 dB (either positive or negative), even if all the others are -20 dB or less, the system will consider that the file does not need to be changed and then normalization will still be strictly ineffective, which is kind of silly, right?

Original signal with 0dB peak – Listen

Therefore, before normalizing the recording or marking, make sure that some isolated peaks do not deceive the system and, if necessary, remove or reduce them with the “volume” function or another (select the peak, reduce or redraw with the pencil tool) .

Also, remember to select your file in parts to apply appropriate “volume” or “normalization” levels for the sounds to be normalized.

Danger 2 (Return): It is good when the software allows it not to normalize certain recordings or fragments of recordings to zero dB.

For example: Record steps on the lawn whose average level is -35 dB and less, which is perfectly correct. If you “normalize” it to ZERO, you end up with an outrageous sound that will sound like anything but footsteps on the grass.

Mistrust: Some software offers various options for “normalization”: either in “RMS” or “Peak”. The two processes must be clearly differentiated.

RMS: It has nothing more to do with it. In fact, the software will apply a compression algorithm to the processed file. For SF, it will have 3 other predefined values, but you can choose any other value.

Peak: The software performs a “normalization” according to the technique described above. Therefore, there is no change in the recording dynamics.

Normalize the volume of an mp3

For several decades, with the appearance of MP3, it has become a customary practice that people accumulate a large number of music files, mainly in MP3 format.
Some people get to accumulate thousands of songs in the MP3 format. which are easily transported with a pendrive using any other device, to be able to listen to them anywhere, and at any time.


This is very comfortable because one does not need to load any hard disk and much less large numbers of CDs or cassettes.
but it has the disadvantage here when mixing the songs that comes from very different recordings, times, etc. It occurs very frequently in volume level differences.
It is a typical problem today, want to Play favorite songs meets the fact that some sound much louder than others. And this eventually becomes a problem.

for this the volume normalizers have been created. The volume means all the songs have a volume as optimized as possible every possible level that each of them can play.
Volume normalizers have also existed for decades, and their algorithms to achieve amazing results. today download Mp4 Gain and check results no other software can offer. Russian other options How to change the pitch of a song Without altering its speed on the contrary modify the speed without affecting the Pitch. You can also equalize it and perform various functions that will be very useful.

Increase Mp4 Volume


Increase Mp4 Volume

Until recently it was very difficult or impossible to find software that normalize the volume of video in mp4 format.

Options existed almost exclusively to normalize audio files, basically MP3 format.

But think normalize the volume of video files, it was almost a dream, elusive.

Mp4Gain is the ideal answer to this need. If you necesiuta normalize the volume of a Mp4, he found the right program.

But it is not only there, there are many other video formats that can be normalized by the Mp4Gain and even many audio formats. In resuymen, almost all important and known audio and / or video formats, they can be normalized by the Mp4Gain, which is a very modern program (and very inexpensive, only $ 40 with upgrades for life!) And extremely efficient.

Mp3 Normalizer – Mp3 Increase Volume

With the quality of devices that we have today, is no longer sufficient normalization method offered by the audio normalizing a decade ago.

Once I considered sufficient to make a simple scan looking for the volume peaks, to amplify ALL that song by the same ratio. That is, if the peak volume was by 305 below the limit possible, then the entire song simply by 30 percent was amplified. True, it was ingenious, but very innocent and inefficient.

Seeking then calculate the loudness of the entire song and compare it with all the tracks that formed a CD. ID3 tag type is generated (which are not at all standard, that is, most players today olos ignore) and it was like automatically turn the volume knob.

Today we come to the time where you can perform complex and sophisticated frequency sweeps (practically isolating each instrument) in each frame, in order to modify differently the various sound within a song or video.
Not everything is amplified at the same ratio, every sound is treated separately, to achieve the proper normalization in 2016.