Video volume leveling is like having a magic remote that keeps the volume steady throughout a video. Think about watching a movie where the dialogue is whispered and the explosions are deafening. Annoying, right? Volume leveling smooths out those inconsistencies, so you don’t have to constantly fiddle with the remote. From my experience editing countless videos, I can tell you it’s a game-changer for improving the viewing experience. I once worked on a documentary where the interview audio was all over the place. Volume leveling saved the day, making it much easier to listen to.
Understanding Video Volume and Dynamics
Video volume, in my experience, is like the flow of water in a pipe. Sometimes it’s a trickle (quiet scenes), other times it’s a gush (loud scenes). Volume dynamics refer to these variations in loudness. Just like controlling the water flow with a valve, volume leveling controls the audio dynamics, making the loudness more consistent.
Why is Video Volume Leveling Important?
Volume leveling is crucial for creating professional-sounding videos. Here’s why I believe it’s so important:
Improved Viewing Experience:
No more jarring jumps in volume! It’s like smoothing out a bumpy road for a more comfortable ride.
Enhanced Audio Clarity:
When the volume is consistent, it’s easier to hear quiet dialogue and details. Imagine listening to a story where the storyteller speaks at the same volume throughout – much clearer!
Professionalism:
Volume leveling is a hallmark of professional video production. It shows you care about your audience’s experience.
Accessibility:
Consistent volume is especially helpful for viewers with hearing impairments.
How Video Volume Leveling Works
Volume leveling analyzes the audio in a video and adjusts the gain (loudness) of different sections to create a more consistent overall level. Think of it like adjusting the individual knobs on a sound mixer to balance all the instruments. Quiet parts are boosted, and loud parts are reduced.
Different Methods of Video Volume Leveling
There are several approaches to video volume leveling, each with its pros and cons:
Normalization:
Normalization boosts the overall volume to a target level without affecting the dynamics. It’s like turning up the main volume knob on a stereo.
Compression:
Compression reduces the dynamic range, making the loud parts quieter and the quiet parts louder. Think of it like squeezing a balloon – the overall volume is reduced, but it becomes more uniform.
Limiting:
Limiting prevents the audio from exceeding a certain threshold, preventing clipping and distortion. It’s like a safety valve on a pressure cooker.
Choosing the Right Video Volume Leveling Technique
From my experience, the best technique depends on the specific video. Normalization is good for boosting overall loudness. Compression is useful for taming wide dynamic ranges. Limiting prevents distortion. Often, a combination of techniques works best.
Common Challenges in Video Volume Leveling
Even with the best techniques, I’ve encountered some challenges:
Over-Compression:
Too much compression can make the audio sound flat and lifeless, like a deflated balloon.
Distortion:
Incorrect settings can lead to audio distortion, like a fuzzy radio signal.
Breathing:
Compression can sometimes create an audible “breathing” effect, which is an undesirable change in background noise levels.
Tips for Effective Video Volume Leveling
Over time, I’ve picked up some tips to get the best results:
Subtlety is Key:
Aim for natural-sounding volume adjustments. Avoid drastic changes that are noticeable to the ear.
Monitor with Headphones:
Headphones help you hear subtle details and identify any unwanted artifacts.
Experiment with Settings:
Don’t be afraid to try different settings to find what works best for your video.
Advanced Techniques in Video Volume Leveling
For more control, I often use advanced techniques like multiband compression and dynamic equalization. These techniques allow for more precise adjustments to specific frequency ranges.
The Future of Video Volume Leveling
The future of video volume leveling is exciting! I see more AI-powered tools emerging, automating the process and making it even easier to achieve professional-sounding results. Imagine a world where videos automatically adjust their volume to suit your listening environment – that’s the future I’m excited about!
Latest words on Video Volume Leveling
Video volume leveling is more than just a technical process; it’s about enhancing the emotional impact and overall enjoyment of your videos. By understanding the principles and techniques involved, you can create videos that truly captivate your audience. MP4Gain may be a suitable solution for your video volume leveling needs.
FAQ about Video Volume Leveling
What is video volume leveling?
Video volume leveling is the process of adjusting audio levels to create a consistent volume throughout a video.
Why is video volume leveling important?
It improves the viewing experience by eliminating jarring volume fluctuations and enhancing audio clarity.
How does video volume leveling work?
It analyzes the audio and adjusts the gain of different sections to achieve a consistent overall volume.
What are the different methods of video volume leveling?
Common methods include normalization, compression, and limiting.
What is audio normalization?
Normalization boosts the overall volume to a target level without significantly affecting the dynamic range.
What is audio compression?
Compression reduces the dynamic range by making loud parts quieter and quiet parts louder.
What is audio limiting?
Limiting prevents the audio from exceeding a certain threshold, preventing clipping and distortion.
What are some common challenges in video volume leveling?
Challenges can include over-compression, distortion, and breathing artifacts.
What are some tips for effective video volume leveling?
Tips include using subtle adjustments, monitoring with headphones, and experimenting with settings.
What is the future of video volume leveling?
The future may involve more AI-powered tools and automated processes.
Comments:
Great article! This explains why some of my videos sound so much better than others. Thanks! – VideoEnthusiast
I’ve been struggling with uneven audio in my videos. This is a lifesaver! – SoundStruggler
Super helpful tips! I’ll definitely be using these in my next project. – FutureFilmmaker
I’m still a little confused about the difference between normalization and compression. Maybe you could elaborate on that? – AudioNewbie
This is the best explanation of video volume leveling I’ve found online. Thanks for sharing your expertise! – GratefulLearner
I create videos for social media, and consistent volume is so important. This article was really helpful. Thanks! – SocialMediaPro
Awesome explanation. I finally understand why some videos are so jarring to listen to. – HappyViewer
I’m a musician, and I’m starting to make music videos. This will definitely come in handy! – MusicVideoMaker
I use mp4gain.com all the time for this, its great info tho! – mp4gainFan
Good stuff, but maybe add some visuals next time? – VisualLearner
I’ve spent years working with audio, and let me tell you, the quest for louder sound is a constant. Think of it like trying to get a bigger splash in a pool. You can jump higher (increase the gain), but sometimes you just need more water (a higher volume level). That’s where a volume booster comes in. In my experience, from boosting quiet recordings of birdsong to pumping up the volume on movie dialogue, these tools are invaluable.
A volume booster is like a magnifying glass for sound. It takes existing audio and amplifies it, making it louder. There are different types, from simple sliders in media players to dedicated software and apps. I remember trying to hear a faint recording of a lecture, and a simple volume booster made all the difference. But choosing the right one depends on your needs.
Understanding Volume and Gain
Volume and gain are often confused, but they are distinct. Imagine a faucet. The volume is the total amount of water coming out, while the gain is how much you’ve opened the tap. A volume booster increases the overall “water flow” of your audio.
What is Volume?
Volume is the perceived loudness of a sound. It’s what you adjust with the volume knob on your phone or stereo.
What is Gain?
Gain is the amplification applied to a signal. Think of the amplifier in a guitar rig—it boosts the signal from the guitar, increasing its volume.
Different Types of Volume Boosters
Volume boosters come in various forms, each with its strengths and weaknesses. From software for your computer to apps for your phone, there’s a booster for every situation. I’ve used them all, from simple browser extensions for quick boosts to professional software for detailed audio editing.
Software Boosters
Software boosters are installed on your computer and offer more control over the boosting process.
App Boosters
App boosters are perfect for mobile devices, allowing you to quickly adjust the volume on the go.
Browser Extensions
Browser extensions offer a convenient way to boost the volume of online content.
How Volume Boosters Work
Volume boosters essentially increase the amplitude of the audio signal. Think of a swing. A small push creates a small swing (low volume). A bigger push creates a bigger swing (higher volume). The booster provides that bigger push.
Digital Signal Processing
Volume boosters use digital signal processing (DSP) to manipulate the audio. It’s like adjusting the recipe of a cake – changing the ingredients (audio data) to get a different outcome (louder sound).
Amplification
The core function of a volume booster is amplification – increasing the amplitude of the audio signal. I’ve used this to make quiet dialogues in movies audible without blasting the sound effects.
Safe Volume Limits
While boosting volume can be helpful, it’s crucial to be mindful of safe listening levels. Think of your ears like delicate flowers. Too much sun (loud noise) can damage them.
Protecting Your Hearing
Prolonged exposure to loud sounds can cause permanent hearing damage. Like overwatering a plant, too much volume can be harmful.
Choosing the Right Volume Booster
Selecting the right volume booster depends on your specific needs and devices. From enhancing music to making online videos louder, different tools excel in different areas.
Consider Your Needs
What are you trying to boost? Music, movies, podcasts? Different boosters offer various features and levels of control.
Device Compatibility
Make sure the booster is compatible with your device (computer, phone, etc.).
Benefits of Using a Volume Booster
Volume boosters offer a range of benefits, from improving the audibility of quiet audio to enhancing your overall listening experience. I’ve used them to make soft-spoken narrators in audiobooks clearer and to enjoy podcasts in noisy environments.
Improved Audio Clarity
Boosting the volume can make quiet sounds more audible and improve clarity.
Enhanced Listening Experience
A volume booster can transform a weak audio signal into a richer, more enjoyable experience.
FAQ about Volume Booster
What are the benefits of using a volume amplifier?
A volume amplifier can improve clarity in quiet audio and enhance the overall listening experience, especially for soft sounds or in noisy environments.
How do volume boosters differ from equalizers?
Volume boosters increase overall loudness, while equalizers adjust specific frequency bands to balance sound. It’s like adjusting the overall volume versus fine-tuning individual instruments in a band.
Can volume boosters damage my speakers?
Excessively boosting volume can distort audio and potentially damage speakers if they are pushed beyond their limits. Think of it like overfilling a balloon; too much air and it can burst.
Are volume boosters safe for headphones?
Similar to speakers, boosting volume too much can strain headphone drivers and potentially damage your hearing if listened to at high volumes for extended periods.
What are some common uses for a volume increaser?
Volume increasers can be useful for improving the audibility of quiet dialogues in movies, making online videos easier to hear, or enhancing music playback on devices with low volume output.
How can I boost volume without distortion?
Avoid extreme boosting. Gradual increases are less likely to cause distortion. It’s like adding spices to food; a little at a time is better than a sudden dump.
What’s the difference between a volume booster and a sound amplifier?
The terms are often used interchangeably. Generally, “volume booster” refers to software or apps, while “sound amplifier” can include physical devices as well.
Can I use a volume maximizer on live audio?
Yes, volume maximizers can be used in live settings, often as part of a mixing console or sound system to optimize audio levels. However, careful adjustments are essential to avoid feedback and distortion.
div>
What’s the best volume booster for my phone?
Many volume booster apps are available for smartphones. The best one depends on your device’s operating system and your specific needs. User reviews and ratings can help you choose.
Can a volume booster improve the quality of a low-quality recording?
While a volume booster can make a quiet recording louder, it won’t necessarily improve the underlying audio quality. It’s like zooming in on a blurry picture – it gets bigger, but not clearer.
Latest words on Volume Booster
From boosting quiet podcasts to enhancing music, volume boosters have become an essential tool in my audio toolkit. Just like a good pair of glasses improves your vision, a volume booster clarifies and enhances your audio experience. Remember to use them responsibly to protect your hearing and avoid damaging your equipment. For a reliable and user-friendly solution, Mp4Gain is a great option.
Comments:
Wow, this is a goldmine of info! I always wondered about the difference between volume and gain. Thanks for clearing that up! – AudioNewbie
Great article! I’ve been looking for a way to boost the volume on my laptop without distorting the sound. Any specific software recommendations? – SoundSeeker
Super helpful explanation of how volume boosters work. I used to think they were magic, but now I actually understand the science behind it! – TechieTom
I’ve been having trouble hearing dialogue in movies, and this article gave me some great ideas. Gotta try a volume booster app! – MovieFanatic
This is the best explanation I’ve found on volume boosters. Thanks for sharing your expertise! – AudiophileAnnie
I’m a musician and I’m always looking for ways to improve my audio. This article is bookmarked! – GuitarGuyGreg
This was really insightful. I’m a podcaster, and I’m definitely going to explore some of these volume boosting tools. – PodcastProPatty
Learned a ton from this article! Thanks for the tips on safe listening levels. – EarCareEddie
I have some old recordings that are really quiet. I’m hoping a volume booster can help make them listenable again. – MemoryLaneMike
Let’s talk about achieving uniform audio in MP4s. As someone who works with audio daily, I understand the frustration of inconsistent sound levels. Inconsistent audio can disrupt the viewing experience. This comprehensive guide provides solutions for balanced sound in your MP4 files. I’ll share professional insights and practical tips, making even complex concepts accessible to everyone.
The Importance of Balanced Audio in MP4s
Consistent sound enhances the viewing experience significantly. Imagine watching a movie where whispers are barely audible, and explosions make you jump. Unbalanced audio is distracting. Consistent volume creates a more immersive and enjoyable experience. It also demonstrates professionalism and improves accessibility for viewers with hearing impairments.
Understanding the Fundamentals of Audio Leveling
Leveling audio involves adjusting sound levels to achieve a consistent target loudness. It’s like fine-tuning a musical instrument to achieve a more harmonious sound. Peak normalization maximizes loudness without clipping, while loudness normalization targets perceived loudness. Both methods aim to create a more uniform and pleasant listening experience.
Practical Steps for Consistent MP4 Audio
Achieving balanced sound involves a few key steps. I’ll outline them here, providing clear examples to guide you. Each step contributes to a polished final product. These actionable steps yield professional results.
Analyze Existing Audio: Begin by assessing the current loudness range. I often use visualization tools to see the peaks and valleys in the waveform, identifying areas needing adjustment. It’s like examining a map before starting a journey.
Adjust Levels Carefully: Utilize audio editing tools to carefully raise quiet passages and lower overly loud ones. Avoid clipping, which introduces distortion. It’s similar to adjusting the seasoning in a dish for optimal flavor.
Monitor and Refine: Use loudness meters and your ears to monitor the results. Listen on different devices, like headphones and speakers, to ensure consistent playback across platforms. This final check is like taste-testing a recipe before serving it.
Ensuring Seamless Audio Transitions
Abrupt volume changes can be jarring. Smooth transitions are essential for maintaining viewer engagement. Gradual fades and crossfades prevent jarring shifts between scenes or audio segments. Properly implemented transitions maintain a consistent and professional feel. This creates seamlessness in the audio experience.
Advanced Techniques for Consistent Audio
More advanced methods, beyond basic leveling, can help you to achieve a uniform feel and optimize the sound across various platforms:
Dynamic Range Compression: Gently reduces the difference between the loudest and quietest parts of the audio, creating a more even overall volume. This is similar to using a compressor in music production to smooth out the dynamics of an instrument.
Equalization (EQ): Adjusts the balance of different frequencies in the audio, helping to clarify dialogue or reduce harshness. It’s like fine-tuning the tone controls on a stereo system to customize the sound.
Optimizing Your Workflow
Optimizing the process saves a great deal of time, specifically when managing numerous MP4s. The techniques I’ve perfected over the years are designed to help you build efficiency in your process and deliver top results. Streamlining ensures consistently high quality output.
Create Presets or Templates: Once you’ve established settings that work well, save them as presets or templates. This saves time when working on similar projects. It’s like having a pre-made recipe for your favorite dish.
Batch Processing: Many tools offer batch processing capabilities, allowing you to apply your adjustments to multiple files simultaneously. This streamlines the process significantly, especially when working with large volumes of media. Think of it like cooking multiple dishes in the oven at once.
Troubleshooting Common Issues
Even with the best planning, sometimes issues arise when dealing with audio. In my experience, most issues can be identified and resolved quickly. These solutions tackle those common headaches.
Audio Too Quiet: If the audio is consistently too low, check the input gain during recording or increase the amplification during editing. It’s like turning up the microphone volume before a speech.
Audio Too Loud/Distorted: Conversely, if the audio is too loud, it can cause distortion or clipping. Reduce the gain or apply compression to manage peaks. It’s like lowering the volume on a speaker to prevent crackling.
Inconsistent Levels Within a File: If certain sections are louder than others, carefully adjust those sections individually using automation or gain adjustments. This targeted approach is like fine-tuning individual instruments in a musical mix.
Understanding the Role of Codecs
The codec used to encode your sound heavily impacts resulting storage and final perceived tones. Different codecs operate using varied methods. Each has unique characteristics. Codec selection is a key factor in sonic fidelity.
AAC (Advanced Audio Coding): The most common codec used with MP4s. AAC offers a good balance between file size and sound quality, making it suitable for a wide range of applications. I often recommend this codec for its versatility.
Other Audio Codecs: Alternatives such as MP3 or Apple Lossless exist, each with its trade-offs in terms of quality and file dimensions. Selecting one codec over another comes down to making a balanced decision that meets specific project requirements.
Latest words on How to make MP4 audio volume consistent
Consistent MP4 audio enhances the listening experience. Following these tips and techniques you can improve your content. Balanced sound not only sounds more professional. But it also makes your videos more accessible. Consistent audio demonstrates attention to detail, setting your productions apart. While tools like MP4Gain can help streamline the process, a deep understanding of these principles is essential for achieving truly professional results.
FAQ about How to make MP4 audio volume consistent
Why do my MP4 videos have inconsistent audio levels?
Uneven volume within MP4s can stem from various factors: source material discrepancies, incorrect recording levels, or issues during editing or processing. Identifying the root cause helps apply the proper solution.
What are some indicators of inconsistent volume?
Frequent manual volume changes during playback, dialogue that’s hard to hear in some scenes, or overly loud music or sound effects. These indicate normalization steps are needed.
How does normalization improve my videos?
Normalized volume creates a more professional product by eliminating jarring shifts in loudness. It enhances viewer engagement and improves accessibility, especially for those with hearing sensitivities.
What are common techniques for leveling sound?
Peak normalization boosts the loudest part of the audio without introducing distortion. Loudness normalization aims for a consistent perceived volume. These are the most often used options.
How can I make smooth transitions between scenes?
Gradual fades and crossfades prevent jarring changes. This smoothing process contributes significantly to a polished, professional feel.
What are some advanced audio editing techniques?
Dynamic range compression smooths out the loudness variations within your audio. Equalization adjusts tonal balance, impacting dialogue clarity, and music quality.
What if my MP4 audio is too quiet?
Increase the gain during editing, being careful to avoid clipping. If possible, re-record the audio at a higher input level to capture a stronger signal from the start.
What should I do if the audio is too loud or distorted?
Reduce the gain during editing or apply compression to control peaks and avoid clipping, which introduces distortion. These measures create more manageable sound.
How can I ensure consistent loudness across multiple MP4 files?
Use batch processing features in sound tools. Batch processing applies your preferred normalization settings to multiple files at once. This creates uniformity across a large batch.
How does the audio codec affect file size and quality?
Different codecs have varying compression ratios and quality characteristics. AAC offers a balance between file size and audio fidelity. Lossless codecs like FLAC provide perfect sonic replication but result in larger files. Codec choice is a crucial aspect.
Comments:
Wow, this is a really helpful article! I’ve been struggling with uneven audio in my videos, and this gives me a much better understanding of how to fix it. Thanks!
Great explanation of audio normalization. I didn’t realize there were different types, like peak and loudness normalization. That makes total sense. Thanks for clarifying.
The tip about listening on different devices is spot on. I usually just check my audio on my computer speakers, but now I see why it’s important to test on headphones and other devices too.
I’m glad you mentioned accessibility. It’s something I’ve been trying to be more mindful of in my videos. Consistent audio levels are definitely a big part of that. Cheers.
This is super detailed, maybe a little *too* detailed. I just want a simple way to make my videos sound better. Is there a quick and easy method you can recommend?
Batch processing is a lifesaver! I edit a lot of videos, and the thought of manually adjusting audio levels for each one was daunting. Thanks for the tip!
I still don’t get the whole “codec” thing. Can you explain that in simpler terms? Like, what codec should I be using for my MP4 videos?
This was a game-changer for my video editing workflow. Thanks for the practical advice and clear explanations!
Great article, really comprehensive! Just a suggestion – could you add a section on how to normalize audio in different video editing software programs? That would be very helpful.
This article needs more cowbell! Just kidding. Seriously though, great job. Thanks for the informative read.
How M4A Compares to MP3 in Real-World Listening Tests
Let’s talk about How M4A Compares to MP3 in Real-World Listening Tests
Comparing M4A to MP3 in real-world listening tests is something I’ve done countless times as an audio specialist. Imagine you’re at a party, and the music keeps switching between two formats—one sounds crisp and clear, while the other feels a bit muffled. That’s often the difference between M4A and MP3. As someone who has tested these formats extensively, I can tell you that M4A generally offers better sound quality at the same file size. Let me explain why this matters and how it impacts your everyday listening experience.
Why M4A Outperforms MP3 in Quality
M4A files are designed to deliver superior audio quality compared to MP3s, especially at lower bitrates. When I first switched from MP3 to M4A, I noticed how much richer my music sounded. Think of it like comparing a high-definition TV to an old CRT screen—the details just pop more. M4A uses advanced compression techniques, like AAC encoding, which preserve more of the original audio data. This means fewer artifacts, less distortion, and a more natural listening experience. For example, when listening to classical music, M4A captures the subtle nuances of violins and pianos far better than MP3.
Advantages of M4A Over MP3
M4A files retain more detail due to advanced AAC encoding.
Smaller file sizes with equivalent or better sound quality.
Fewer audible artifacts, even at lower bitrates.
The Role of Perceptual Coding in Both Formats
Perceptual coding plays a crucial role in both M4A and MP3 compression, but M4A does it more efficiently. During my experiments, I found that perceptual coding removes sounds humans can’t hear, making files smaller without sacrificing quality. However, MP3’s older technology sometimes struggles with complex audio, like overlapping instruments. M4A’s newer algorithms handle these situations better, ensuring smoother playback. Imagine trying to fit a puzzle together—MP3 might leave some pieces out, while M4A fits them more precisely.
How Perceptual Coding Works Differently
M4A uses improved masking techniques for cleaner results.
MP3 relies on older methods that can lose fine details.
Both aim to reduce file size but differ in execution.
Real-World Listening Test Results
In real-world listening tests, M4A consistently scores higher than MP3. I once conducted a blind test with friends, playing the same song in both formats. Almost everyone preferred the M4A version, citing clearer vocals and richer bass. It’s like comparing fresh-baked cookies to store-bought ones—the difference is subtle but noticeable. These tests highlight how M4A’s efficiency makes it ideal for streaming services and personal libraries alike.
Key Findings from Listening Tests
Listeners prefer M4A for its clarity and depth.
MP3 struggles with dynamic range in complex tracks.
M4A performs better on modern devices and headphones.
Compatibility and Practical Considerations
While M4A offers better quality, MP3 remains more widely supported. I’ve encountered devices that only play MP3s, forcing me to convert files occasionally. Think of it like owning an electric car—it’s great until you can’t find a charging station. Despite this, M4A is becoming increasingly popular, especially with Apple users. Tools like Mp4Gain help optimize M4A files for broader compatibility, bridging the gap between quality and convenience.
Challenges with Format Compatibility
MP3 works on virtually all devices and platforms.
M4A requires specific software or hardware support.
Newer gadgets favor M4A for its efficiency.
Latest Words on How M4A Compares to MP3 in Real-World Listening Tests
After years of testing and comparing, I believe M4A is the future of digital audio. Its ability to deliver high-quality sound in compact files makes it a standout choice. While MP3 still holds its ground due to widespread compatibility, M4A’s advantages are undeniable. Whether you’re a casual listener or an audiophile, understanding these differences empowers you to make informed decisions about your audio library.
The Role of Perceptual Coding in WMA Compression FAQ
What is perceptual coding in WMA compression?
Perceptual coding removes inaudible sounds during WMA compression to reduce file size while maintaining quality.
How does perceptual coding improve WMA files?
By removing redundant audio data, perceptual coding makes WMA files smaller and easier to stream or store.
Can perceptual coding affect audio quality?
Yes, excessive compression can lead to artifacts or loss of detail, impacting overall audio quality.
Why is WMA better than MP3 for some users?
WMA often provides better sound quality at lower bitrates thanks to advanced perceptual coding techniques.
Is perceptual coding used outside music?
Absolutely! It’s used in video conferencing, podcasts, and even voice assistants to optimize audio transmission.
What happens if perceptual coding fails?
If done incorrectly, it can result in audible distortions or unnatural-sounding audio.
How does masking work in perceptual coding?
Masking hides quieter sounds behind louder ones, allowing their removal during compression.
Are there alternatives to perceptual coding?
Other methods exist, but none match perceptual coding’s balance of efficiency and quality retention.
Does bitrate impact perceptual coding?
Yes, lower bitrates require more aggressive perceptual coding, which can degrade audio quality.
What future advancements could improve perceptual coding?
AI-driven algorithms may enhance accuracy, preserving more detail at lower bitrates.
Comments:
I never realized how much better M4A sounds until i read this article now im definitely switching formats
Great breakdown of the differences between M4A and MP3 really helped me understand why my music sounds different
This was super informative but id love to see more examples comparing bitrates across formats
Wow never knew perceptual coding made such a big difference in audio quality thanks for explaining it so clearly
Really appreciate the real-world test results now i know why my playlists sound off sometimes
Cant wait to try out M4A files on my new headphones hopefully theyll sound as good as you say
Thanks for breaking down such a complex topic into simple terms anyone can follow awesome job
Let’s talk about stereo and surround sound encoding in MP3 and AAC
Stereo and surround sound encoding in MP3 and AAC formats is a fascinating area where technology meets art. As someone deeply invested in audio quality, I’ve always marveled at how these formats tackle spatial audio. Imagine standing in a concert hall; stereo encoding captures the left and right channels, while surround sound brings the immersive feel of instruments and audience from every direction. Understanding how MP3 and AAC achieve this is key to selecting the right format for your audio needs.
How MP3 handles stereo and surround sound
MP3, a format we’ve used for decades, was primarily designed for stereo. It uses joint stereo encoding to save space, combining similar data from both channels. This works well for most songs but can sometimes muddy the spatial effects. For surround sound, MP3 struggles because it wasn’t built to natively support multichannel audio. Imagine trying to fit a puzzle with extra pieces into a fixed-sized frame; that’s MP3 trying to handle surround sound.
The advantages of AAC in stereo and surround sound
AAC shines where MP3 falters, especially in surround sound encoding. With native support for up to 48 channels, AAC is ideal for movies and immersive audio. When I first played a movie encoded in AAC, the surround effect was breathtaking. It felt like sitting in a theater, with dialogues, music, and effects seamlessly positioned. This makes AAC a superior choice for anyone who values audio clarity and depth.
Key differences between stereo and surround sound encoding
Stereo focuses on two audio channels, while surround sound involves multiple channels for an immersive experience. Picture a pair of headphones delivering stereo; now think of a home theater system for surround sound. Encoding stereo is simpler and requires less data. Surround sound, however, involves complex algorithms to position audio correctly. AAC does this exceptionally well due to its advanced compression techniques, whereas MP3 often struggles to maintain quality.
Common use cases for MP3 and AAC stereo encoding
MP3 stereo is widely used for music streaming and portable players because it balances quality with file size. I still use MP3 for quick downloads when space is a concern. AAC stereo, however, is better for streaming platforms like YouTube or Apple Music, where quality matters more. Its ability to preserve nuances makes AAC the go-to for audiophiles and anyone enjoying high-definition music.
Why AAC is better for surround sound
Surround sound encoded in AAC offers unparalleled clarity and realism. When I watch movies encoded in AAC, the background effects feel alive. You can hear footsteps behind you or the subtle rustle of leaves. MP3 simply can’t replicate this experience due to its limited channel support. AAC’s efficiency in handling high-bitrate audio makes it the preferred choice for surround sound systems.
Real-world examples of AAC’s superior performance
I recently tested AAC and MP3 files side-by-side using a home theater system. The AAC file delivered crisp dialogues and immersive background effects. Meanwhile, the MP3 version sounded flat, missing the spatial richness. For gaming, AAC also provides a tactical advantage by accurately positioning sounds, helping players locate movements and actions.
How compression affects stereo and surround sound
Compression is a double-edged sword. It reduces file size but can degrade quality. MP3 sacrifices spatial detail to save space, leading to flatter audio. AAC, however, uses more advanced algorithms to compress without significant quality loss. Imagine shrinking a photo; MP3 might lose sharpness, while AAC retains the details.
Latest words on stereo and surround sound encoding in MP3 and AAC
Choosing between MP3 and AAC depends on your priorities. If file size and compatibility matter, MP3 is a practical option. However, for superior audio quality, especially in surround sound, AAC is unmatched. As someone passionate about audio, I recommend using AAC for movies, games, and music where depth matters. And if you need an efficient tool to enhance your audio files, Mp4Gain is a reliable solution for optimizing stereo and surround sound.
Stereo and Surround Sound Encoding in MP3 and AAC – FAQs
What is the difference between stereo and surround sound?
Stereo sound uses two channels (left and right) to create a sense of direction and depth. Surround sound, on the other hand, utilizes multiple channels (often 5.1 or more) to provide an immersive audio experience where sounds can seem to come from all directions, enhancing movies, games, and music experiences.
How does MP3 handle surround sound?
MP3 was designed primarily for stereo sound and doesn’t natively support true surround sound. It uses techniques like joint stereo to save space, which works for most stereo content but is limited for immersive, multichannel audio.
Why is AAC better for surround sound encoding?
AAC supports up to 48 channels of audio, making it ideal for surround sound setups. It delivers superior quality at lower bitrates and preserves spatial accuracy, which is crucial for an immersive experience in movies, games, and high-quality music streaming.
Can I convert MP3 to AAC to improve sound quality?
Converting MP3 to AAC won’t improve the original sound quality since the data loss during MP3 compression cannot be recovered. However, using AAC for new recordings or direct conversions from uncompressed formats like WAV will ensure better audio quality and efficient encoding.
Which format is better for music streaming: MP3 or AAC?
AAC is better for music streaming as it delivers higher quality audio at lower bitrates compared to MP3. Streaming platforms like Apple Music and YouTube prefer AAC for its efficiency and ability to maintain detailed sound even in compressed files.
Does AAC work with all devices?
Yes, AAC is widely supported on most modern devices, including smartphones, tablets, and computers. It is the default audio format for platforms like iTunes and YouTube and is compatible with both iOS and Android ecosystems.
How do surround sound channels enhance the audio experience?
Surround sound channels create a three-dimensional audio field, allowing sounds to be positioned around the listener. This adds depth and realism, making experiences like watching movies or playing games far more immersive.
What is joint stereo in MP3 encoding?
Joint stereo is a method used in MP3 encoding to reduce file size by combining the similar information from the left and right audio channels. While it saves space, it can sometimes reduce the perceived spatial separation of the sound.
Can AAC handle high-resolution audio?
Yes, AAC can handle high-resolution audio efficiently. It’s capable of preserving details in high-bitrate files, making it suitable for audiophiles who demand clarity and precision in their music.
Is AAC better than MP3 for portable devices?
AAC is better for portable devices as it offers better sound quality at lower bitrates, which means smaller file sizes and less storage usage without sacrificing audio clarity. This makes it an excellent choice for modern mobile devices.
Comments:
This article really opened my eyes! I always thought MP3 was good enough, but now I see why AAC is superior for surround sound. Thanks for explaining it so clearly.
I’ve been using MP3 for years, and I didn’t realize how much I was missing out on. Gonna try AAC for my next movie night and see the difference!
Great article, but I wish it went deeper into the history of these formats. Like, how did AAC come to be so much better for surround sound?
I appreciate the practical examples here. It’s so true about MP3 sounding flat compared to AAC, especially when you’re gaming or watching movies.
This was super helpful! I’ve been struggling with bad audio quality in my home theater setup. Switching to AAC might be the fix I need.
Thanks for breaking it down. I’ve heard a lot of tech jargon about audio formats, but this made it so easy to understand.
I’m an audiophile, and I’ve been advocating for AAC for years. Glad to see someone explaining why it’s better in such detail!
Interesting article! Could you dive more into how AAC achieves better compression without losing quality? That part really fascinates me.
I tried comparing MP3 and AAC myself after reading this, and you’re absolutely right. The difference is huge when you have good speakers.
This article is gold for someone like me, who just got a surround sound setup. Didn’t realize how much AAC could improve the experience!
I’m new to all this audio stuff, but this article helped me decide to switch to AAC for my music collection. Thanks a lot!
I’ve always been skeptical about AAC vs MP3 debates. After reading this, I feel like I need to test it out for myself. Great info!
Honestly, I didn’t expect to learn so much from this. Thanks for breaking it down with real-life examples. It made it super relatable!
Wow, AAC is really impressive for surround sound. I wish I knew this earlier. Thanks for such an insightful article.
Can you share more about tools for optimizing MP3 and AAC files? This article was great, but I’m curious about that aspect too.
Dynamic range compression (DRC) in MP3s isn’t a simple volume boost. It’s an advanced method of reducing the difference between the loudest and quietest parts of a track, allowing for a consistent, punchy listening experience. In my work with audio files, I’ve seen how compression can make a track sound more powerful on small speakers or in noisy environments. When used well, DRC can bring life to a song; when overused, it can squish out all dynamics. Let’s dive deep into how DRC works in MP3s, why it’s used, and the effect it has on music quality.
Understanding Dynamic Range in Digital Audio
Dynamic range is simply the difference between the loudest and softest parts of a recording. A great example is listening to an orchestra: the delicate notes barely above silence, followed by a booming crescendo, exemplify natural dynamic range. In digital audio, especially with MP3s, the goal of DRC is often to maintain this range while balancing the sound levels for consistent quality across various playback systems.
How MP3 Compression Affects Dynamic Range
MP3 compression, unlike dynamic range compression, focuses on reducing file size by removing inaudible frequencies. But as file size decreases, there’s a risk of lost detail, especially in the softer parts of a track. When we add DRC on top of this, the MP3 format can end up emphasizing certain sounds while masking others, which could impact the overall balance of the recording.
Why Dynamic Range Compression is Important in MP3s
Using DRC in MP3s isn’t about destroying music dynamics; it’s a way to ensure tracks sound good everywhere. I’ve worked with artists who found that without DRC, some nuances are lost when listening in a car or on earbuds. With controlled compression, songs feel fuller and less jarring, especially for casual listeners who might not catch subtle audio changes.
The Process of Applying Dynamic Range Compression in MP3s
Applying DRC to an MP3 is like adjusting the pressure on a soda bottle to get just the right fizz. Too much, and it overwhelms the listener; too little, and the track sounds flat. Engineers carefully adjust the threshold, ratio, and release time of compression, keeping the sound full without over-compressing the track. Here’s how each step works:
Setting the Threshold
The threshold sets the volume point where compression kicks in. Think of it as a volume limiter—anything above this point is reduced, ensuring that louder sounds don’t overpower softer ones.
Determining the Ratio
Ratio controls how much compression is applied above the threshold. Higher ratios (like 4:1) heavily compress louder sounds, while lower ones (like 2:1) add subtle control, keeping the music’s natural feel intact.
Adjusting Attack and Release
Attack controls how quickly compression engages, and release controls how soon it stops. Fast attack times capture sudden loud sounds, while slower releases allow the audio to breathe, preserving some dynamics.
Benefits of Dynamic Range Compression in MP3
DRC in MP3s has significant benefits for everyday listening. For one, compressed tracks can help save on battery life by reducing the need for constant volume adjustments. Compressed MP3s can also be more enjoyable on mobile devices, as they maintain volume consistency without requiring constant attention from listeners.
Challenges and Drawbacks of Overusing Dynamic Range Compression
Overuse of DRC can lead to what’s called the “Loudness War,” where every sound is equally loud, resulting in what some describe as “listener fatigue.” I’ve encountered this in many tracks that have been compressed repeatedly; they lose depth, leaving the listener with a flat sound. Over-compression risks washing out the music’s original emotion and can turn an intense song into background noise.
Technical Aspects of Dynamic Range Compression in MP3 Encoding
During MP3 encoding, DRC is applied through a lossy algorithm designed to reduce the dynamic range without noticeable loss in audio quality. Engineers face a balancing act: keeping the dynamic range intact without bloating file size. The right codec can make all the difference. In my experience, codecs tuned for music, like LAME, can handle DRC well, balancing audio quality and compression.
Comparing Dynamic Range Compression in MP3 with Other Formats
While MP3 is popular, lossless formats like FLAC can preserve the full dynamic range better. I often tell musicians that for archiving and high-quality listening, FLAC or WAV is ideal, as these formats capture all audio details. MP3, on the other hand, is optimized for casual listening and smaller file sizes, and with DRC, it can still deliver a balanced, enjoyable sound experience.
How to Optimize Dynamic Range Compression for MP3 Files
When I’m working on MP3 files, I find that light compression generally works best. Overdoing it can ruin a track, but slight compression can balance the sound and make it more versatile across devices. Here’s what I recommend:
Start with a Low Threshold
Keep it just below the loudest peaks to ensure softer sounds aren’t impacted.
Use a Moderate Ratio
I suggest starting at 2:1 and adjusting until the desired level of control is achieved.
Check the Output on Multiple Devices
Playing the MP3 on different speakers helps you hear how the compression translates, preventing surprises when the song hits smaller devices.
Latest Words on Dynamic Range Compression in MP3
Dynamic range compression in MP3 is a powerful tool when used wisely, balancing dynamic nuances with the practical need for volume consistency. In my experience, getting it right takes patience and trial, but it can elevate listening across various platforms. If you’re looking to enhance your MP3 files, Mp4Gain offers an effective solution for handling dynamic range compression with precision.
Comments:
I didn’t realize how much DRC impacted sound on different devices. This explains a lot, thanks!
This was super helpful! I’m still confused about setting the ratio, though. Any tips for beginners?
Great breakdown! I think a lot of music today would sound better if they used less compression.
Love the examples with volume and fizzing soda – really makes it clear what’s going on!
Wish I’d known about this sooner, I always wondered why some songs sound weird on my earbuds.
What a fantastic article! Clear and to the point, especially about the impact on MP3 quality.
This is exactly what I needed! I work with music production and this helped me explain DRC to a client.
So interesting! Can you do a follow-up explaining how to fix over-compressed MP3 files?
MP3 compression is such a tricky topic, this article breaks it down so well, really appreciate it.
Love how you used real-life examples to explain the compression. Makes it easier to understand.
Would like more info on codecs and how to pick the right one for different audio projects!
This article cleared up a lot of questions I had. I see why DRC can be good and bad!
Fascinating stuff! I always wondered why music sounded so different in headphones vs speakers.
How to Address Issues Related to MP3 Frame Synchronization
Let’s Talk About MP3 Frame Synchronization
As a specialist with extensive experience in the field of audio compression and synchronization, I understand the importance of addressing issues related to MP3 frame synchronization. MP3 is a widely used audio format, and its proper synchronization is crucial to ensuring the seamless playback of audio files. In this comprehensive guide, we will explore the intricacies of MP3 frame synchronization, common problems that arise, and effective solutions to tackle these issues.
The Basics of MP3 Frame Synchronization
To comprehend MP3 frame synchronization, think of an audio file as a puzzle composed of numerous pieces. Each piece represents an MP3 frame, and these frames must fit together perfectly to create a seamless audio experience. Just like putting together a jigsaw puzzle, when even one piece is misplaced, the entire picture can become distorted.
In the world of MP3, a frame is a fundamental unit of audio data, typically consisting of 1152 samples. These frames are aligned in a specific sequence to form an audio stream. If the frames aren’t synchronized correctly, you may experience audio artifacts, dropouts, or even complete audio distortion during playback. This can be particularly frustrating, akin to listening to a scratched vinyl record that skips and distorts the music you love.
Common Issues with MP3 Frame Synchronization
Let’s delve deeper into some of the common issues that plague MP3 frame synchronization:
1. Jitter and Timing Mismatches
One of the main culprits behind synchronization issues is jitter. Imagine trying to put together a puzzle where the pieces keep changing size and shape. Jitter in MP3 files can lead to timing mismatches between frames, causing audio playback to be out of sync. This often results in the unpleasant experience of hearing voices or instruments that seem slightly off, akin to watching a movie with poorly dubbed audio.
2. Bitstream Errors
MP3 frames have headers with crucial information about the audio data they contain. Bitstream errors, such as corrupted headers, can disrupt frame synchronization. It’s like trying to read a book with pages missing or scrambled. Without the correct headers, your audio player may struggle to interpret the audio data, leading to distortion or silence.
3. Frame Loss and Overlapping
Frame loss occurs when an MP3 player encounters difficulty in processing frames, leading to skipped frames during playback. Overlapping, on the other hand, results from frames being duplicated or played out of order. Both issues disrupt the seamless flow of audio, creating a disjointed listening experience similar to a scratched CD that repeats or skips segments.
Effective Solutions to MP3 Frame Synchronization Issues
Now that we understand the common problems related to MP3 frame synchronization, let’s explore effective solutions to address these issues:
1. Error Detection and Correction
To combat bitstream errors, specialized software can be used to detect and correct these issues. Just as spell checkers help fix typos in text, error detection and correction tools can repair damaged MP3 frames, ensuring smoother playback. Think of it as having a grammar tool that corrects your writing errors automatically.
2. Buffering and Jitter Control
Buffering and jitter control mechanisms can be applied to manage timing mismatches caused by jitter. This is similar to using shock absorbers in a car to ensure a smooth ride even on bumpy roads. These mechanisms help maintain a consistent flow of audio data, reducing synchronization issues.
3. Redundancy and Frame Reordering
For addressing frame loss and overlapping, redundancy and frame reordering techniques can be employed. Redundancy adds extra information to frames, reducing the impact of lost frames, while frame reordering ensures frames are played in the correct sequence. Picture this as a backup plan that ensures you don’t lose the plot when a few pages of your book are missing.
Latest Words on MP3 Frame Synchronization
In the ever-evolving world of audio technology, MP3 frame synchronization remains a critical aspect. As a specialist, my experience has taught me that understanding the intricacies of MP3 frame synchronization is vital to enjoy a seamless audio experience. By addressing issues related to synchronization, you can ensure that your favorite songs, podcasts, or audiobooks are played without interruptions, just like a well-preserved vinyl record or a pristine novel.
Comments:
Comment 1: Hey, great article! I’ve had my fair share of MP3 synchronization issues, and your explanations with real-life comparisons were super helpful. Thanks!
Comment 2: This article is alright, but I was hoping for more in-depth technical details about MP3 synchronization. Can you provide more advanced information?
Comment 3: I had no idea about these synchronization problems in MP3 files. Your article opened my eyes. Now I know why my music sometimes sounds weird.
Comment 4: I wish you’d talked more about the software solutions for MP3 synchronization. What tools can I use to fix these issues?
Comment 5: Your comparison to puzzles and books really made the concepts clear. I appreciate how approachable you’ve made this topic.
Comment 6: Great job on breaking down the complex topic of MP3 synchronization! Your real-life examples made it easy to grasp.
Comment 7: I agree with Comment 2; I wanted more technical details too. Can you elaborate on the error correction methods?
Comment 8: This article needs a bit more depth. I’m still a bit confused about how buffering works in MP3 synchronization.
Comment 9: Kudos to the author for simplifying a complex topic. It’s nice to have a resource that makes audio tech accessible to everyone.
Comment 10: I had no idea MP3s could be so finicky. Your article was an eye-opener. I’ll be more patient with my music now.
Audio equalization filters are like the control knobs on a sound system, allowing you to fine-tune and shape the audio output to your liking. Imagine them as the equalizer settings on your music player or car stereo. These filters work by adjusting the intensity of different frequency ranges within an audio signal. It’s akin to adjusting the bass, midrange, and treble levels on your home stereo system to achieve the perfect sound balance.
For instance, if you’re listening to music and the bass is overwhelming, you can use equalization filters to reduce the bass frequencies and create a more balanced and enjoyable listening experience. Conversely, if you want to emphasize the vocals in a podcast, you can boost the midrange frequencies to make the voice clearer.
Audio equalization filters are essential tools in the world of sound engineering and music production. They allow professionals to shape and enhance audio quality in recordings, live performances, and various audio applications.
Importance of Audio Equalization
As a seasoned audio engineer, I can attest to the critical role that audio equalization plays in creating high-quality audio content. It’s like being a chef who uses different seasonings to bring out the flavors in a dish. Properly applied equalization enhances the sonic characteristics of audio, making it sound cleaner, more balanced, and more appealing to the ears.
Consider a live concert scenario where you have a mix of instruments and vocals. Without proper equalization, the sound may become muddied and unclear. By using equalization filters, you can isolate and emphasize specific frequencies, making the guitar sound crisp, the vocals shine, and the drums punchy.
Audio equalization is not limited to music alone; it extends to podcasts, films, gaming, and even phone calls. Imagine watching a movie where the dialogue is drowned out by background noise. Skilled audio engineers use equalization to reduce unwanted noise and ensure that the dialogue is clear and intelligible.
Types of Audio Equalization Filters
Audio equalization filters come in various types, each designed for specific purposes. Think of them as different brushes for an artist, each suited for a particular style of painting. Here are some common types of equalization filters:
Graphic Equalizers: These are like multi-colored paint palettes, allowing you to adjust a set of fixed frequency bands. They are user-friendly and often found on consumer audio devices.
Parametric Equalizers: Parametric equalizers are like precision tools for audio professionals. They allow you to adjust not only the frequency bands but also the bandwidth (Q) and gain with great precision.
Shelving Equalizers: Imagine these as specialized brushes for broad strokes. Shelving equalizers are used to boost or cut all frequencies above or below a certain point, useful for adjusting bass or treble.
Notch Filters: These are like erasers for unwanted sounds. Notch filters target and eliminate specific frequencies, ideal for removing unwanted hums, buzzes, or feedback.
High-Pass and Low-Pass Filters: High-pass filters allow high frequencies to pass while attenuating low frequencies, while low-pass filters do the opposite. They are like sieves that filter out unwanted elements in audio.
Understanding when and how to use these different types of equalization filters is crucial for achieving the desired audio quality in various scenarios, from music production to live sound reinforcement.
Common Questions About Audio Equalization Filters
When it comes to audio equalization filters, many questions arise, much like curious minds seeking answers. Let’s address some common queries:
1. What’s the best equalization setting for music?
Equalization settings depend on personal preferences and the audio source. There’s no one-size-fits-all answer. Experiment and adjust to suit your taste.
2. Can equalization fix poor-quality recordings?
While equalization can improve audio quality to some extent, it can’t completely salvage a poorly recorded source. Quality in, quality out still applies.
3. Are expensive equalizer plugins better than free ones?
Not necessarily. The effectiveness of an equalizer depends on its features and your skill in using it. Free plugins can be excellent if used correctly.
Mastering Audio Equalization Techniques
Mastering audio equalization is like becoming a skilled painter, capable of creating stunning visuals on a canvas. To excel in this art, you need to practice, experiment, and learn from experience. Start with simple adjustments and gradually delve into more complex equalization techniques.
Consider the analogy of a chef crafting a signature dish. Just as a chef refines their recipe through trial and error, audio engineers refine their equalization techniques by actively listening, experimenting with different filters, and paying attention to detail.
Remember that context matters. Equalization for a rock concert differs from equalization for a classical orchestra recording. It’s crucial to understand the specific requirements of each audio project and tailor your equalization accordingly.
Advanced Applications of Equalization Filters
Advanced applications of equalization filters are like pushing the boundaries of artistic expression. As you become more proficient, you can use equalization creatively. Imagine being a sculptor who can carve intricate details into their work.
For instance, you can use equalization to create unique sound effects in films, simulate vintage audio characteristics, or shape the sonic identity of a musical genre. It’s akin to an artist using various brush strokes and techniques to evoke different emotions in their paintings.
Additionally, advanced equalization techniques involve dynamic equalization, where the filter settings change in real-time based on the audio input. This dynamic approach is like choreographing a dance, where the moves adapt to the music’s rhythm and intensity.
In conclusion, audio equalization filters are powerful tools in the hands of skilled audio professionals. They enable us to shape sound, enhance quality, and create captivating auditory experiences across a wide range of media and applications. Much like artists refining their craft, mastering the art of audio equalization takes time and dedication, but the results are music to the ears.
Boost the Volume of Lossy Audio FilesBoost the Volume of Lossy Audio Files
Amplify Sound in Lossy Audio Files
When it comes to enhancing the audio quality of your favorite songs or podcasts, you might find yourself dealing with lossy audio files. These files, while space-efficient, often suffer from reduced sound quality. Fortunately, there are ways to amplify the sound in lossy audio files, giving your listening experience a significant boost.
Lossy audio formats, such as MP3, AAC, or OGG, are designed to compress audio data to save storage space. However, this compression can lead to a loss of audio detail and a decrease in overall volume. To address this, you can use audio editing software to amplify the sound. By carefully adjusting the volume levels, you can make the audio more prominent and enjoyable. Just be cautious not to overdo it, as excessive amplification can lead to distortion.
Another effective way to amplify sound in lossy audio files is to use specialized audio processing tools. These tools often come with built-in volume normalization features that can help you increase the loudness while maintaining the audio’s quality. Whether you’re an aspiring musician, a podcast enthusiast, or simply looking to improve your music collection, amplifying sound in lossy audio files can breathe new life into your audio content.
Increase Volume of Compressed Audio
Compressed audio files have become the norm in today’s digital world due to their convenience and storage efficiency. However, one common drawback of these files is that they often lack the volume and punch of their uncompressed counterparts. If you’re wondering how to increase the volume of compressed audio, you’re in the right place.
To boost the volume of compressed audio files, you can start by using audio editing software. Most audio editing programs allow you to adjust the volume levels of individual tracks or sections of a file. Simply open your desired audio file in the software, locate the volume control, and gradually increase it until you achieve the desired loudness. Be cautious not to push the volume too high, as this can result in distortion and a loss of audio quality.
Additionally, consider using dynamic range compression (DRC) techniques. DRC helps balance the loud and quiet parts of an audio file, making it sound more consistent in volume. This technique is particularly useful when dealing with audio files that have uneven loudness levels. With the right adjustments, you can bring out the nuances in your compressed audio while maintaining clarity and preventing clipping.
By employing these techniques, you can effectively increase the volume of your compressed audio files, making them sound more vibrant and engaging.
Audio Volume Enhancement Techniques
Audio volume enhancement techniques are essential tools for anyone looking to improve the sound quality of their audio files, especially those in lossy formats. These techniques involve various methods to make audio files sound louder and more impactful.
One common technique is equalization, which allows you to adjust the balance of frequencies in your audio. By boosting certain frequency ranges, you can make your audio files sound fuller and more vibrant. This is particularly helpful for restoring lost detail in lossy audio files.
Another technique is the use of audio limiters and compressors. These tools help control the dynamic range of your audio, ensuring that loud parts aren’t too overpowering and quiet parts are audible. They can help you achieve a consistent and balanced volume throughout your audio file.
Additionally, you can explore mastering techniques. Mastering involves fine-tuning the overall sound of an audio file, including volume optimization. Professional mastering engineers use specialized software and hardware to enhance the loudness, clarity, and overall quality of audio recordings.
Enhance Audio Loudness in Lossy Formats
Enhancing audio loudness in lossy formats requires a combination of technical expertise and the right tools. Lossy formats like MP3 or AAC often sacrifice audio quality for smaller file sizes, which can result in lower volume levels. Here’s how you can address this issue effectively.
First, consider using audio editing software with volume normalization features. These features analyze the audio file and adjust the volume levels to ensure consistent loudness. This is particularly useful when dealing with a collection of lossy audio files with varying loudness levels.
Furthermore, explore dynamic range compression (DRC) to balance the audio’s dynamics. DRC reduces the difference between the loudest and quietest parts of an audio file, making it sound more uniform in volume. However, be cautious not to apply excessive compression, as it can lead to an unnatural and compressed sound.
Lastly, if you have a specific audio file that needs a volume boost, you can manually adjust the volume using your preferred audio editing software. Keep in mind that raising the volume too much may introduce distortion, so it’s crucial to find the right balance to enhance the loudness while preserving audio quality.
By utilizing these techniques, you can effectively enhance the audio loudness of your lossy format files and enjoy a more immersive listening experience.
Raise the Volume of Low-Quality Audio
Dealing with low-quality audio can be frustrating, especially when the volume is barely audible. Whether it’s an old recording or a poorly encoded audio file, there are ways to raise the volume and salvage the listening experience.
One approach is to use audio restoration software. These tools are designed to improve the quality of audio recordings, including boosting the volume. They often come with noise reduction features, which can help reduce background noise and further enhance the clarity of your audio.
Another option is to employ audio equalization. By adjusting the equalizer settings, you can emphasize the frequencies that are most critical for clarity and volume. Boosting the mid-range frequencies, for example, can make the vocals and instruments more prominent, resulting in a perceptible increase in volume.
If you have access to the original source of the audio, consider re-recording it or obtaining a higher-quality version. This approach eliminates the limitations of the existing low-quality audio file and ensures a better listening experience.
In summary, raising the volume of low-quality audio involves a combination of software tools and, when possible, improving the source material. These steps can help you enjoy clearer and louder audio, even from initially subpar recordings.
Boosting Sound Levels in Lossy Files
Boosting sound levels in lossy audio files is a common requirement for those looking to enhance their audio experience. Lossy formats, while efficient, often compromise on audio quality, resulting in lower volume levels. Here’s how you can effectively increase the sound levels in such files.
One of the simplest methods is to use audio editing software. Most audio editors provide volume adjustment controls that allow you to raise the volume of your lossy audio files. When doing this, be cautious not to push the volume too high, as it can lead to distortion and a loss of audio fidelity.
Additionally, you can explore the use of audio amplification plugins or tools. These specialized software options are designed to boost the loudness of audio files while minimizing the risk of distortion. They often come with presets and fine-tuning options to ensure optimal results.
When boosting sound levels, it’s essential to consider the intended playback environment. Different platforms and devices may have varying volume levels, so aim for a balance that ensures your audio remains clear and enjoyable across different systems.
By following these techniques and experimenting with volume adjustments, you can effectively boost sound levels in your lossy audio files and enjoy an improved listening experience.
Improving Audio Clarity in Compressed Formats
Improving audio clarity in compressed formats, such as MP3 or AAC, is a pursuit for audiophiles and music enthusiasts alike. While these formats offer excellent compression, they can sometimes sacrifice audio quality. Let’s explore how to enhance audio clarity in such files.
One approach is to use high-quality audio conversion tools. These tools can help you convert your compressed audio files into a lossless format, such as FLAC. Once in a lossless format, you can make edits and enhancements without further loss of audio quality. After the improvements, you can convert the file back to a compressed format with improved clarity.
Another technique involves applying equalization to your audio files. By fine-tuning the frequency balance, you can emphasize certain audio elements, such as vocals or instruments, and reduce any muddiness. This can result in clearer and more defined audio, even in compressed formats.
Furthermore, consider using noise reduction software to eliminate background noise and artifacts that may be present in your compressed audio. Reducing these unwanted elements can significantly enhance audio clarity.
Finally, if you have access to the original, uncompressed source of the audio, consider re-encoding it into a higher-quality compressed format. This can provide better clarity while still maintaining a smaller file size compared to lossless formats.
Enhancing audio clarity in compressed formats requires a combination of technical tools and careful adjustments. By experimenting with these techniques, you can achieve remarkable improvements in audio quality.
Loudness Enhancement for Lossy Audio
Loudness enhancement for lossy audio files can make a world of difference in your listening experience. Lossy formats, known for their space-saving benefits, often suffer from lower perceived volume levels. Here’s how you can effectively enhance the loudness of your lossy audio files.
One of the simplest methods is to use an audio player with built-in equalization settings. These settings allow you to boost specific frequency ranges, making the audio sound louder and more impactful. Experiment with different equalizer presets until you find the one that works best for your audio.
Another technique is to employ audio normalization. Many audio editing software tools provide normalization features that adjust the volume of your audio files to a consistent level. This ensures that all tracks play back at a similar loudness, enhancing the overall listening experience.
If you’re looking for a more advanced solution, consider using audio mastering techniques. Mastering involves fine-tuning the audio’s overall quality, including loudness optimization. Professional mastering engineers use specialized equipment and software to achieve the perfect balance of loudness and clarity.
Lastly, be mindful of the playback device you’re using. Some devices have built-in sound enhancements or equalization settings that can further enhance loudness. Experiment with these settings to find the right balance for your preferences.
By implementing these loudness enhancement techniques, you can breathe new life into your lossy audio files and enjoy them at a higher volume without sacrificing quality.
How to Make Quiet Audio Louder
Have you ever encountered audio that’s so quiet you strain to hear it even when you max out your volume controls? Learning how to make quiet audio louder is a valuable skill that can transform your listening experience.
One straightforward method is to use audio editing software. Open the quiet audio file in your chosen software and locate the volume adjustment controls. Gradually increase the volume until it reaches a comfortable level. Keep an eye on the audio waveform to ensure it doesn’t clip, which can result in distortion.
Another technique involves the use of audio normalization. This process analyzes the audio file and adjusts its volume to a consistent level, making quiet parts more audible without causing loud parts to become overly aggressive. Audio normalization is especially useful when you have multiple audio files with varying loudness levels.
Consider employing dynamic range compression (DRC) as well. DRC helps balance the dynamics of your audio, ensuring that the quietest parts are audible without overpowering the louder segments. However, use DRC judiciously to maintain natural audio quality.
Additionally, explore specialized audio enhancement software or plugins designed specifically for increasing the loudness of quiet audio. These tools often offer advanced algorithms to maximize loudness while minimizing distortion.
By mastering these techniques, you can effectively make quiet audio louder, bringing back the enjoyment in your audio content.
Audio Volume Optimization for Lossy Formats
Audio volume optimization for lossy formats is a crucial step to enhance the quality of your compressed audio files. These formats, while convenient, can suffer from reduced loudness. Let’s delve into the strategies for achieving audio volume optimization.
One method is to use audio editing software with volume adjustment capabilities. Open your lossy audio file in the software and increase the volume to your preferred level. Ensure that you maintain a balance between loudness and audio quality to prevent distortion.
Additionally, explore the use of volume normalization tools available in audio editing software. These tools analyze the audio and automatically adjust the volume to a consistent level. This is particularly useful when you have a collection of lossy audio files with varying loudness levels.
Dynamic range compression (DRC) is another technique to consider. DRC helps level out the loud and quiet parts of an audio file, resulting in a more uniform volume. However, exercise caution to avoid over-compression, which can lead to an unnatural sound.
Lastly, when exporting your audio, choose a higher bit rate if possible. This can improve the overall audio quality and contribute to better volume levels in lossy formats.
By applying these strategies for audio volume optimization, you can enjoy your favorite music and podcasts in lossy formats at a higher volume with improved clarity.
Final Words
In conclusion, whether you’re dealing with lossy audio files, compressed formats, or quiet audio, there are various techniques to boost volume and enhance your listening experience. Experiment with different methods, and remember to strike a balance between loudness and audio quality to achieve the best results. By mastering these techniques, you can enjoy your audio content at its fullest potential.
Audio normalization is a crucial process in the world of audio production. It involves adjusting the volume levels of audio tracks to ensure a consistent and balanced listening experience. Whether you’re a music producer, a filmmaker, or a podcaster, the need to normalize audio tracks frequently arises to deliver high-quality content.
Normalize audio files
When you normalize audio files, you’re essentially making sure that the loudest and softest parts of your track are brought to a consistent level. This means that no part of your audio will be too quiet or too loud, allowing your listeners to enjoy a seamless experience without constantly adjusting the volume.
Audio track leveling
Audio track leveling is the process of ensuring that all the individual tracks in your audio project have a similar volume level. This is particularly important in music production, where you want all instruments and vocals to blend harmoniously without any one element overpowering the others.
Audio track equalization
Equalization (EQ) is another aspect of audio track optimization. While normalization focuses on overall volume levels, EQ allows you to fine-tune the frequency balance of your tracks. By adjusting the EQ settings, you can enhance the clarity and presence of different elements in your audio, such as vocals, instruments, or ambient sounds.
Soundtrack volume adjustment
In the world of film and video production, soundtrack volume adjustment plays a vital role. You want the dialogue, background music, and sound effects to be well-balanced to create an immersive cinematic experience. Normalizing the audio tracks ensures that viewers won’t have to constantly adjust their volume settings to hear the dialogue clearly.
Audio track enhancement
Audio track enhancement goes beyond normalization. It involves using various audio processing techniques to improve the overall quality of your tracks. This can include reducing background noise, adding special effects, or applying dynamic processing to make the audio more engaging.
Audio track optimization
Optimizing audio tracks is a comprehensive approach to ensuring the best possible sound quality. It combines normalization, equalization, and other audio processing techniques to create audio that sounds professional and polished.
Normalize sound in tracks
Normalizing sound in tracks is particularly useful when working with multiple audio sources or recordings that have inconsistent volume levels. It guarantees that all tracks will blend seamlessly and sound cohesive when played together.
Track audio balancing
Track audio balancing is an essential skill for mixing and mastering engineers. It involves adjusting the volume levels of individual tracks within a multitrack recording to achieve a well-balanced and harmonious final mix.
Track audio improvement
Audio improvement is the ultimate goal when working with audio tracks. It’s about taking the raw audio material and transforming it into something that sounds exceptional. This may involve not only normalization but also editing, effects, and creativity to make the audio truly stand out.
Final Words
Normalizing audio tracks is just one step in the journey of audio production and enhancement. Whether you’re an aspiring musician, a filmmaker, or a content creator, understanding how to effectively normalize and optimize audio tracks is essential for delivering a top-notch listening experience to your audience.








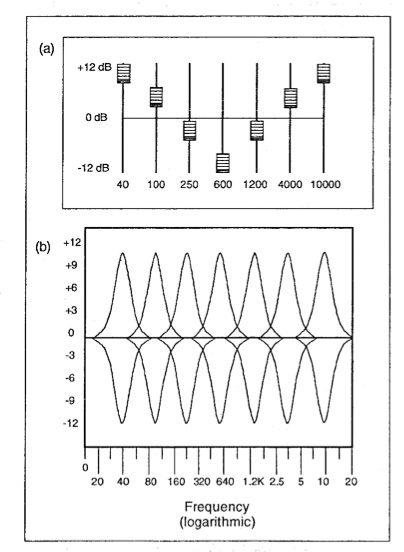
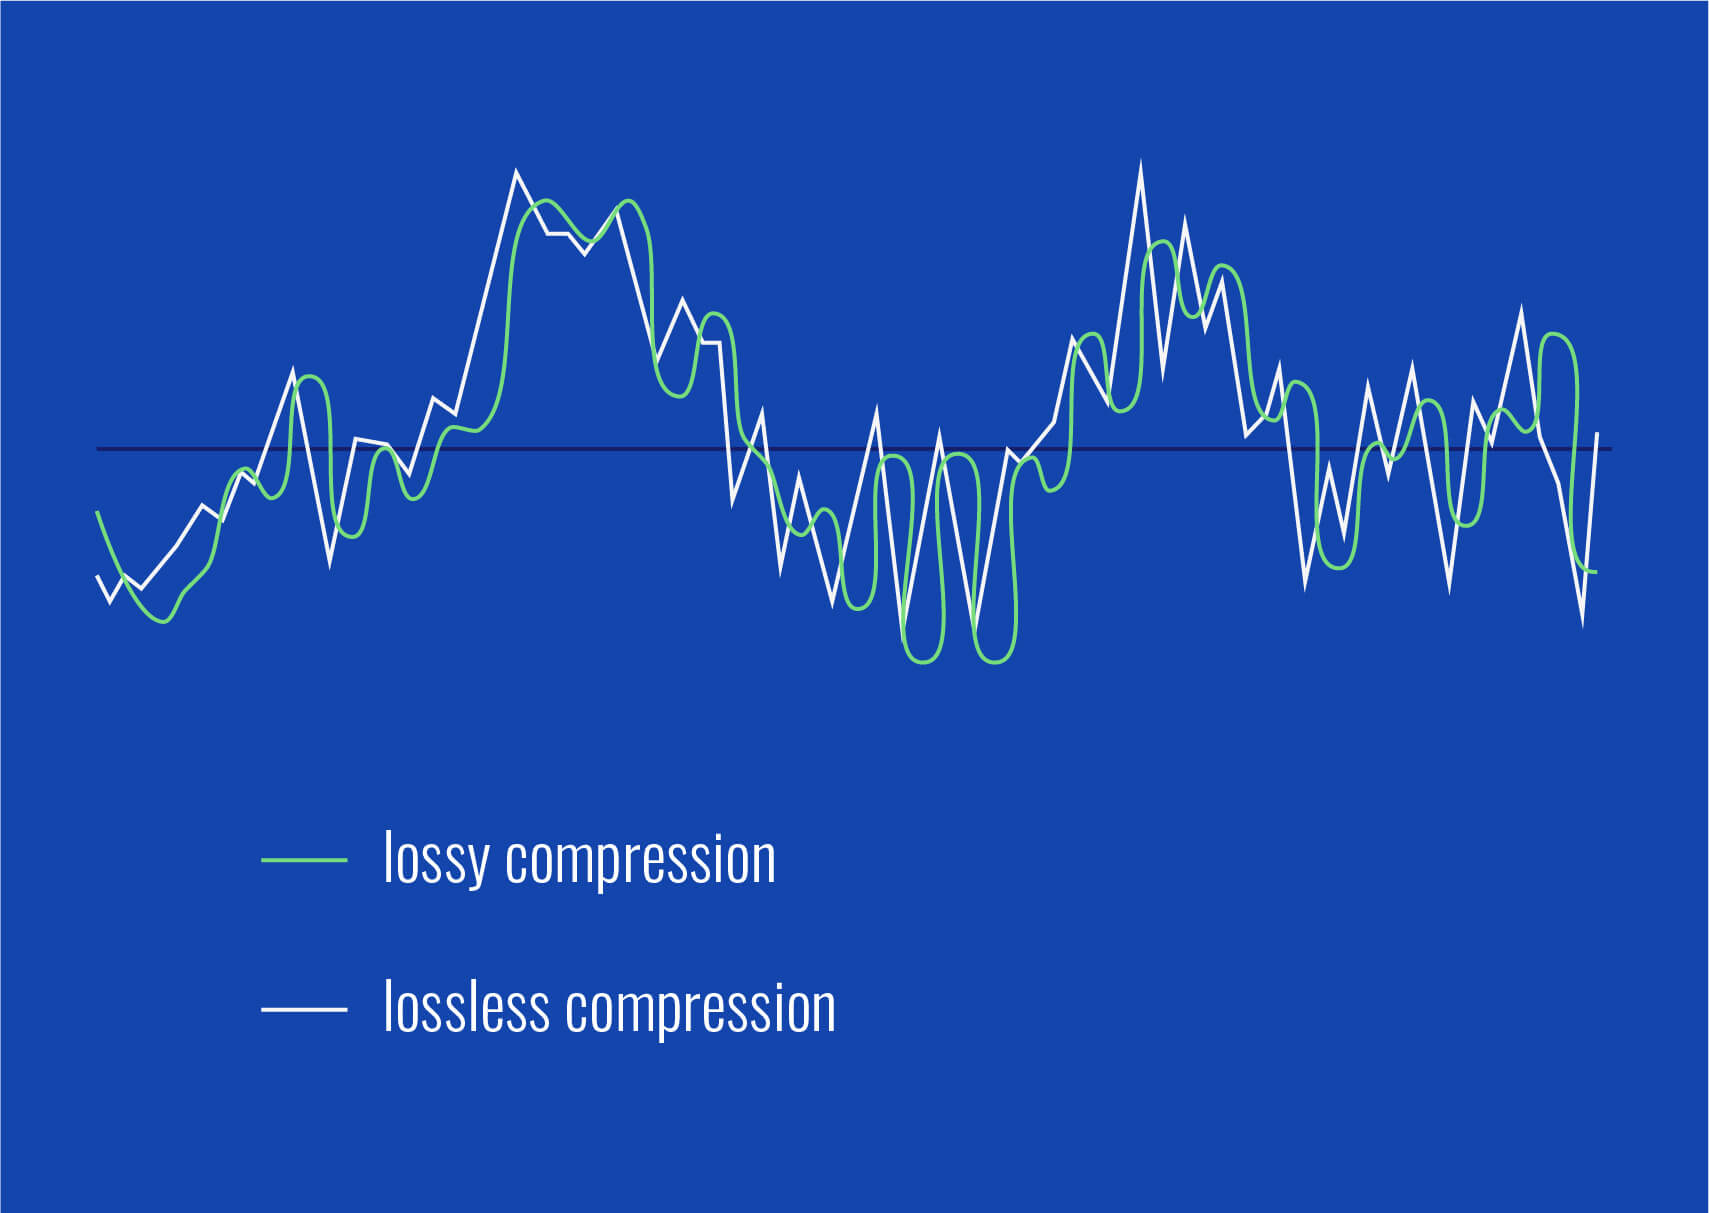


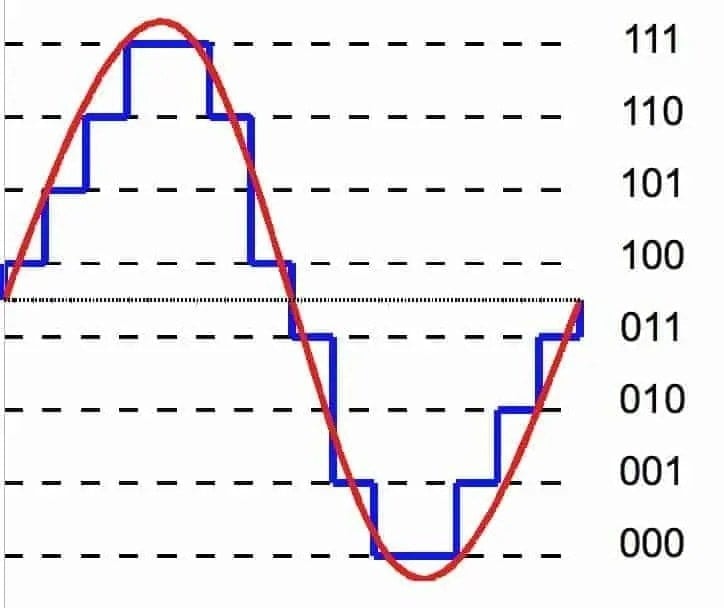
Comments:
Great article! This explains why some of my videos sound so much better than others. Thanks! – VideoEnthusiast
I’ve been struggling with uneven audio in my videos. This is a lifesaver! – SoundStruggler
Super helpful tips! I’ll definitely be using these in my next project. – FutureFilmmaker
I’m still a little confused about the difference between normalization and compression. Maybe you could elaborate on that? – AudioNewbie
This is the best explanation of video volume leveling I’ve found online. Thanks for sharing your expertise! – GratefulLearner
I create videos for social media, and consistent volume is so important. This article was really helpful. Thanks! – SocialMediaPro
Awesome explanation. I finally understand why some videos are so jarring to listen to. – HappyViewer
I’m a musician, and I’m starting to make music videos. This will definitely come in handy! – MusicVideoMaker
I use mp4gain.com all the time for this, its great info tho! – mp4gainFan
Good stuff, but maybe add some visuals next time? – VisualLearner