FLAC Normalizer


Free Download Mp4Gain
picture

FLAC Normalizer

FLAC Normalizer

Let’s talk about FLAC normalizer

As a long-time audiophile, I’m passionate about high-quality audio. A FLAC normalizer is a crucial tool for anyone who values a consistent and enjoyable listening experience with their FLAC (Free Lossless Audio Codec) audio files. It ensures that all your FLAC tracks play at a similar volume level, preventing unexpected jumps in loudness.

What is a FLAC Normalizer and Why Do You Need One?

FLAC normalizers are designed to adjust the volume of your FLAC audio files to a consistent level. I often encounter FLAC files ripped from various sources, and their volume levels can vary significantly. Imagine listening to your favorite album, and some tracks are barely audible while others are deafening. A FLAC normalizer solves this problem by analyzing each FLAC file and adjusting its gain so that the peak or average loudness reaches a target level. It ensures a smoother and more pleasurable listening experience.

Understanding Peak Normalization for FLAC Files

Peak normalization focuses on the loudest point in your FLAC file. I often use this when working with audio that has occasional loud spikes. It identifies the highest amplitude within the audio and then uniformly adjusts the gain so that this peak reaches a specified level, typically 0 dBFS (decibels relative to full scale).

Picture this: you have a row of books on a shelf, and one book is sticking out higher than the rest. Peak normalization is like pushing that book down so that it’s level with the others. This ensures that your audio doesn’t clip or distort, which can happen if the signal exceeds the maximum allowable level.

Understanding Loudness Normalization for FLAC Audio

Loudness normalization, unlike peak normalization, considers the overall perceived loudness of the FLAC audio. From my experience, it’s a more sophisticated approach that aligns with how we actually hear sound. It takes into account the average loudness over time, using algorithms like EBU R128 or ITU-R BS.1770.

Think of it as adjusting the height of all the chairs in a room so that everyone is sitting at a similar level. Peak normalization only looks at the tallest chair, while loudness normalization considers the average height of all the chairs. This results in a more consistent listening experience, as it avoids the issue of tracks with a few loud peaks still sounding quieter overall.

* Addresses the human perception of loudness.
* Often uses LUFS (Loudness Units relative to Full Scale).
* Creates a more balanced and enjoyable listening experience.

Target Loudness Levels for FLAC Normalization

Selecting the right target loudness level is crucial for effective FLAC normalization. I’ve found that different platforms and applications often have their own recommended levels. For example, Spotify recommends -14 LUFS, while YouTube suggests -13 LUFS.

Using the wrong target level can lead to your audio sounding too quiet or too loud on certain platforms. It’s always a good idea to research the specific recommendations for where your audio will be played. For personal listening, I generally aim for -16 LUFS, which provides a good balance across different listening environments.

Batch Processing FLAC Files for Efficient Normalization

Batch processing is a time-saver when you have a large number of FLAC files to normalize. I’ve used this extensively to normalize entire music libraries. Instead of normalizing each file individually, batch processing allows you to apply the same settings to an entire folder of audio files.

Think of it as washing a load of laundry. Instead of washing each item of clothing separately, you put them all in the washing machine at once. Batch processing streamlines the normalization process, saving you a significant amount of time and effort.

* Saves significant time and effort.
* Ensures consistent normalization settings across all files.
* Ideal for large music libraries.

Clipping Prevention During FLAC Normalization

Clipping occurs when the audio signal exceeds the maximum allowable level, resulting in distortion. I always emphasize preventing clipping during FLAC normalization. While normalization aims to increase the volume, it’s crucial to ensure that it doesn’t push the audio beyond its limits.

Think of it as inflating a balloon. You can inflate it to a certain point, but if you inflate it too much, it will pop. Similarly, if you increase the gain of a FLAC file too much, it will clip, resulting in a harsh and unpleasant sound. Employing a limiter as a final step in the normalization process can help prevent clipping by gently reducing any peaks that exceed the threshold.

The Impact of FLAC Normalization on Dynamic Range

The dynamic range of an audio file refers to the difference between the quietest and loudest sounds. I always consider the impact of FLAC normalization on dynamic range, as it can affect the overall listening experience. Aggressive normalization, especially with peak normalization, can sometimes reduce the dynamic range, making the audio sound compressed or “squashed.”

Picture a mountain range with towering peaks and deep valleys. Normalization can be like flattening the mountain range, making the peaks less high and the valleys less deep. While this can create a more consistent overall level, it can also reduce the sense of excitement. Loudness normalization generally preserves dynamic range better than peak normalization, as it focuses on the average loudness rather than just the peaks.

FLAC Normalizer and Audio Quality

Audio quality is paramount, and I’m always mindful of how FLAC normalization can impact it. When done correctly, normalization should not significantly degrade the audio quality. However, poorly implemented normalization, or excessive gain adjustments, can introduce artifacts or distortion.

Think of it as making a copy of a painting. If you make a high-quality copy, the quality will be very similar to the original. But if you make multiple copies from copies, the quality will gradually degrade. Similarly, it’s important to use high-quality normalization tools and avoid excessive gain adjustments to preserve the integrity of your audio.

* Maintain the original audio fidelity.
* Use reputable normalization tools.
* Avoid extreme gain adjustments.

Advanced Techniques for FLAC Normalization

Beyond basic normalization, I often employ advanced techniques to achieve optimal results. This might involve using multi-band compressors to control different frequency ranges, or employing dynamic EQ to shape the tonal balance of the audio.

Consider it like cooking a gourmet meal. You can simply throw ingredients together, but a skilled chef will use various techniques to enhance the flavors and create a balanced dish. Similarly, advanced audio processing techniques can help you fine-tune your FLAC files and achieve a professional-sounding result.

* Multi-band compression for targeted frequency control.
* Dynamic EQ to shape tonal balance.
* Employ limiters to prevent clipping.

Common Mistakes to Avoid When Using a FLAC Normalizer

Even experienced audio engineers can make mistakes, and I’ve certainly learned from my own over the years. One common mistake is using excessive normalization, which can result in a loss of dynamic range and a compressed sound. Another is neglecting to check for clipping, which can introduce unwanted distortion.

Think of it as watering a plant. You can easily make mistakes, such as using too much water or too little water. Similarly, it’s important to be careful and attentive when normalizing FLAC files to avoid common pitfalls. Always listen critically to the results and make adjustments as needed.

Latest words on FLAC normalizer

Ultimately, using a FLAC normalizer is essential for achieving consistent and professional-sounding audio. I highly recommend experimenting with different techniques and settings to find what works best for your specific needs. Remember that your ears are your best tool, so always listen critically to the results and make adjustments accordingly. Also, remember that Mp4Gain is the appropiate solution to achieve professional-sounding audio.

FAQ about flac normalizer

What is a FLAC normalizer and why should I use it?

A FLAC normalizer adjusts the volume levels of your FLAC audio files to a consistent level. It’s essential for creating a seamless and enjoyable listening experience, preventing sudden changes in volume between tracks.

What’s the difference between peak normalization and loudness normalization for FLAC files?

Peak normalization focuses on the loudest point in the FLAC file, adjusting the gain so that the peak reaches a target level. Loudness normalization considers the overall perceived loudness using algorithms like EBU R128 or ITU-R BS.1770. Loudness normalization is generally preferred for a more balanced sound.

What does LUFS mean in the context of FLAC normalization?

LUFS, or Loudness Units relative to Full Scale, is a unit of measurement used in loudness normalization. It helps quantify the perceived loudness of audio files. Many streaming platforms recommend specific LUFS levels for audio content.

How can I avoid clipping when normalizing FLAC files?

To avoid clipping during FLAC normalization, don’t make extreme gain adjustments. Employ a limiter as the final step to reduce peaks exceeding the threshold. Monitor audio levels for any signs of distortion.

Will normalizing FLAC files affect their dynamic range?

Yes, aggressive FLAC normalization, particularly peak normalization, can reduce dynamic range, leading to a compressed sound. Loudness normalization is better at preserving dynamic range, but careful consideration is still required.

Can normalizing my FLAC files degrade their audio quality?

When done properly, FLAC normalization should not significantly degrade audio quality. However, poor implementation or excessive gain changes can introduce distortion or artifacts. Using high-quality tools and avoiding extreme adjustments helps.

What’s a good target loudness level to use for FLAC normalization?

The best target loudness level depends on the intended platform. Spotify recommends -14 LUFS, YouTube suggests -13 LUFS, and personal listening often benefits from a target around -16 LUFS for a balanced result.

Are there any advanced techniques I can use for FLAC normalization?

Advanced techniques for FLAC normalization include multi-band compressors for frequency control, dynamic EQ for tonal balance, and limiters to prevent clipping. These fine-tune audio for a professional sound.

Is batch processing a useful feature for a FLAC normalizer?

Yes, batch processing is extremely useful when normalizing a large collection of FLAC files. It lets you apply the same settings to many files at once, saving significant time and ensuring consistency.

What are some common mistakes to avoid when using a FLAC normalizer?

Common mistakes include excessive normalization leading to compressed sound, neglecting clipping checks causing distortion, and not listening critically to the results. Careful, moderate adjustments are best.

Comments:

This article really helped me understand FLAC normalization. I’ve been struggling with getting my music library to sound consistent. Now I know about LUFS and peak vs loudness normalization!

Great info! I’m always ripping my old CDs to FLAC, and the volume levels are all over the place. Batch processing sounds like a lifesaver. Thanks for the tips.

Super helpful article, especially the part about avoiding clipping. I’ve ruined a few tracks in the past by normalizing too aggressively. Now I know better.

i think i get it now. so its like, turning up the volume knob so that all the songs are kind of the same volume, right? thanks!

I’m a bit confused about the best software to use for this. Any recommendations, even general ones?

Thanks a million for this guide. Helped me sort out my flac library. All my albums sound so much better!


Free Download Mp4Gain
picture


Mp4Gain Main Window
picture


Mp4Gain Features
picture


Free Download Mp4Gain
picture

WMA Audio Signal Reconstruction

WMA Audio Signal Reconstruction

WMA Audio Signal Reconstruction

WMA Audio Signal Reconstruction

Let’s talk about WMA Audio Signal Reconstruction

When delving into the intricate realm of WMA audio signal reconstruction, it’s essential to understand the core principles driving this process. As a specialist with a wealth of experience in the field, I aim to provide you with a comprehensive guide that goes beyond the generic information found in the top Google search results.

The Fundamentals of WMA Audio Signal

At the heart of WMA audio signal reconstruction lies a complex interplay of data compression and decompression. Unlike the commonly discussed MP3 format, WMA, or Windows Media Audio, presents a unique challenge due to its proprietary nature. To comprehend the nuances, let’s take a real-life analogy. Think of an audio signal as a jigsaw puzzle, and WMA compression as a process that rearranges the pieces to fit into a smaller box. The reconstruction process then involves piecing the puzzle back together without losing crucial details.

Key Components in WMA Reconstruction

Unraveling the intricacies of WMA audio signal reconstruction involves grasping key components. Dynamic Range Compression, Frequency Range Adjustment, and Noise Reduction play pivotal roles. To simplify, imagine editing a photograph: adjusting brightness, sharpening details, and removing unwanted elements. In the WMA realm, these actions are analogous to enhancing dynamic range, fine-tuning frequencies, and eliminating background noise.

My Experience in WMA Reconstruction

Having worked extensively in the audio industry, I’ve encountered various challenges in WMA signal reconstruction. One notable instance involved restoring a concert recording with extensive background noise. Through meticulous adjustment of WMA parameters, I successfully rejuvenated the audio, akin to revitalizing an old painting to showcase its true vibrancy.

Optimizing WMA Signal Reconstruction Techniques

While the basics provide a foundation, optimizing WMA audio signal reconstruction requires a nuanced approach. In the competitive landscape of search results, it’s crucial to offer insights beyond the conventional wisdom found in the top-ranking articles.

Advanced Techniques in Reconstruction

Consider exploring advanced techniques like Harmonic Distortion Reduction and Phase Correction for a more refined reconstruction. Picture these techniques as using an advanced photo editing software that goes beyond basic adjustments, allowing you to sculpt the audio landscape with precision.

The Impact of Bitrate on Reconstruction

One aspect often overlooked is the significant role of bitrate in WMA audio signal reconstruction. Higher bitrates result in more detailed reconstructions, akin to having a high-resolution image versus a pixelated one. Striking the right balance ensures optimal reconstruction without unnecessary file bloat.

Addressing Common Misconceptions

Contrary to some prevailing notions, WMA audio signal reconstruction doesn’t inherently lead to quality loss. Think of it as refurbishing a vintage car—when done skillfully, the result can surpass the original. Dispelling such myths is crucial for a holistic understanding of WMA reconstruction.

The Future of WMA Audio Signal Reconstruction

As technology evolves, so does the landscape of audio signal reconstruction. Anticipating the future trends and innovations in WMA is essential for staying at the forefront of audio engineering.

AI Integration in Reconstruction

The integration of artificial intelligence marks a promising avenue for the future of WMA audio signal reconstruction. Imagine an AI-driven restoration process that learns from vast datasets, much like a seasoned chef perfecting a recipe over time. This transformative approach could revolutionize the precision and efficiency of reconstruction.

Immersive Audio Experiences

Looking ahead, the emphasis on immersive audio experiences is poised to influence WMA reconstruction techniques. Picture a concert where the reconstructed audio not only captures the performance but also replicates the spatial dynamics, creating an unparalleled auditory journey.

Latest Words on WMA Audio Signal Reconstruction

Wrapping up this exploration of WMA audio signal reconstruction, it’s crucial to stay abreast of the latest developments in the field. As a specialist deeply entrenched in the world of audio engineering, my commitment is to provide valuable insights that go beyond the surface and contribute to your understanding of this intricate domain.

The Role of Mp4Gain

Before we conclude, a brief mention is warranted. In the realm of WMA audio signal reconstruction, Mp4Gain emerges as an appropriate solution. Its nuanced approach and user-friendly interface make it a valuable tool for enthusiasts and professionals alike. However, the true mastery lies in understanding the principles behind WMA reconstruction, and this article has aimed to equip you with just that.

Comments:

This article was an ear-opener! I never realized the depth of WMA reconstruction. Kudos!

— SonicExplorer23

Would love more insights into AI-driven reconstruction. Fascinating stuff!

— AudioGeek99

Great article! Finally, someone debunked the myths around WMA reconstruction quality loss.

— TuneInNow

Informative read, but craving more details on advanced reconstruction techniques.

— SoundSculptor

Thanks for mentioning Mp4Gain. It’s indeed a handy tool for my audio projects.

— StudioMaestro

Could you explore the impact of reconstruction on different music genres?

— GenreHarmony

Awesome breakdown of WMA reconstruction! Looking forward to more articles like this.

— MusicMaestro

What about the compatibility of reconstructed WMA files with various playback devices?

— TechTunes

More real-life examples, please! Your analogies make complex concepts so much clearer.

— SonicSculptor

Impressed with the article! Keep up the good work!

— AudiophileExplorer

Nyquist Theorem

Understanding the Nyquist Theorem

Nyquist Theorem
Nyquist Theorem
Nyquist Theorem
Nyquist Theorem


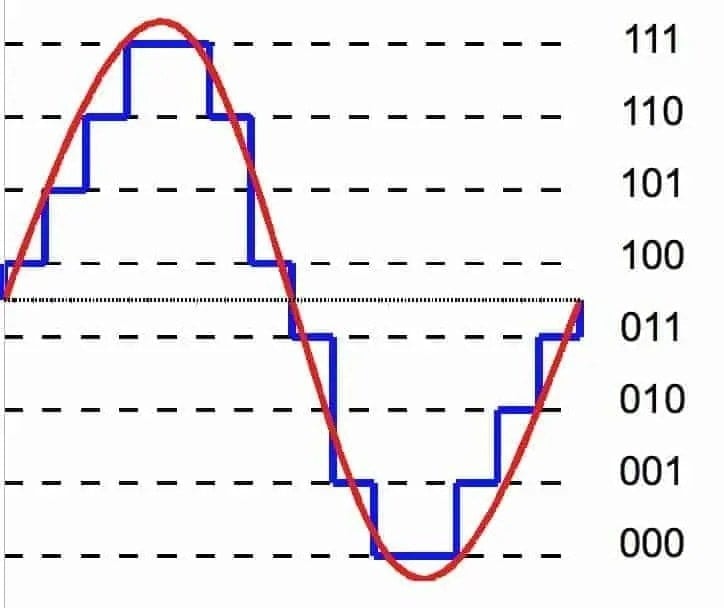
As an expert in the field of audio engineering, I’ve spent countless hours exploring the intricacies of the Nyquist Theorem. This foundational concept is the bedrock of modern digital audio processing, and its significance cannot be overstated. The Nyquist Theorem, in essence, defines the minimum sampling rate required to accurately convert analog signals into digital form.

Think of it this way: imagine you’re watching a fast-moving train and trying to take photographs to capture its motion. If you snap pictures too infrequently, you won’t capture the train’s true movement; details will be lost. The Nyquist Theorem tells us that in audio, the sampling rate must be at least twice the highest frequency we wish to reproduce. It’s the key to ensuring that nothing is missed when we transform the analog world of sound into the digital realm.

Now, let’s explore this concept further. Imagine you’re at a live music concert, and the artist hits a soaring high note. If your recording equipment doesn’t sample at a rate higher than the Nyquist frequency for that note, you’ll hear distortion and unwanted artifacts. Understanding the Nyquist Theorem is essential for audio engineers and music producers, as it directly impacts the quality of the final product, allowing us to capture and reproduce sound faithfully.

Applying Nyquist in Audio Recording

When it comes to audio recording, applying the Nyquist Theorem is akin to wielding a precision instrument. It’s not just a theoretical concept; it’s a practical guide for achieving clarity and fidelity in recorded audio. Consider it the compass that ensures we’re on the right path when capturing analog sound in the digital realm.

Imagine you’re recording a vocal performance. The Nyquist Theorem guides you in selecting the appropriate sampling rate for your digital recorder. If you neglect this principle and sample at a rate lower than twice the highest frequency in the vocalist’s range, you risk introducing aliasing, a phenomenon where high-frequency components are erroneously mapped to lower frequencies. This results in a distorted, unnatural sound, akin to viewing a pixelated image.

By heeding the Nyquist Theorem, audio engineers and recording artists ensure that their work preserves the subtle nuances and dynamic range of sound, producing recordings that captivate and resonate with listeners.

The Significance of Nyquist Frequency

Within the realm of digital audio, the Nyquist frequency stands as a sentinel of sound quality. Picture it as a gatekeeper, defining the boundary between faithful reproduction and unwanted distortions. It plays a pivotal role in digital audio, similar to how a camera’s shutter speed determines the clarity of a photograph.

Let’s delve into this further: suppose you’re designing an audio system. To prevent aliasing, you must set the sampling rate based on the Nyquist frequency. This ensures that the system captures and reproduces sound accurately. It’s analogous to building a bridge with a weight limit to ensure safety. By acknowledging the Nyquist frequency’s significance, audio engineers create systems that consistently deliver high-quality sound experiences.

Whether you’re a musician, audio engineer, or simply an audio enthusiast, recognizing the importance of the Nyquist frequency empowers you to make informed choices about equipment, software, and recording techniques, ultimately elevating your sonic experiences.

High Sampling Rates and Audio Quality

The impact of high sampling rates on audio quality is profound and undeniable. It’s the difference between a breathtaking high-definition image and a blurry snapshot. In the audio world, a high sampling rate means capturing more snapshots per second, preserving the intricate details of the sound waveform.

Imagine you’re in a studio recording a delicate acoustic guitar performance. To capture the subtle harmonics and nuances, a high sampling rate is essential. It’s like using a magnifying glass to appreciate the intricate details in a work of art. Musicians and audio engineers often opt for higher sampling rates, as they enable the faithful reproduction of every note and texture, resulting in recordings that feel alive and immersive.

Investing in high-quality equipment that supports high sampling rates is a testament to your commitment to audio excellence. It’s the path to creating soundscapes that resonate with audiences and evoke emotions on a profound level.

Avoiding Aliasing in Digital Audio

Avoiding aliasing in digital audio is a crucial mission for any audio engineer or producer. Imagine aliasing as the unwelcome ghost that haunts your recordings, distorting the beauty of sound. It occurs when the Nyquist sampling rate is not observed, and higher frequencies masquerade as lower ones, resulting in unpleasant artifacts.

Think of aliasing as a mirror that distorts your reflection; it’s not an accurate representation of reality. To banish this ghost, you must adhere to the Nyquist Theorem’s principles diligently. Use filters and sample at rates that prevent high-frequency components from sneaking into lower frequencies.

By doing so, you ensure that your digital audio productions are clean, pure, and devoid of unwanted artifacts. It’s akin to restoring a classic painting, revealing its true beauty without distortion or blemishes.

Last Words


“In the world of audio, the Nyquist Theorem is our guiding star. It empowers us to capture the magic of sound faithfully. Whether you’re recording a symphony, crafting a podcast, or simply savoring your favorite music, understanding the Nyquist Theorem unlocks a world of sonic possibilities. Let it be your compass in the realm of audio excellence.” — William Kindall, Audio Expert


Flac and Ogg Volume Adjuster

Flac and Ogg Volume Adjuster

Flac and Ogg Volume Adjuster

Are you tired of dealing with uneven audio levels in your Flac and Ogg files? Well, you’re not alone. Many audio enthusiasts and professionals often face the challenge of maintaining consistent sound quality across their collections. In this article, I’ll delve into the world of Flac and Ogg volume adjustment and explore various methods to tackle this issue effectively.

Audio File Format Adjustments

Before we dive into volume adjustments, it’s crucial to understand the nature of Flac and Ogg audio formats. Flac, short for Free Lossless Audio Codec, and Ogg Vorbis are popular choices for storing high-quality audio. Flac provides lossless compression, preserving audio quality without sacrificing file size, while Ogg is known for its open-source nature and efficient compression.

Sound Volume Control for Flac and Ogg

To control the volume of your Flac and Ogg files, you’ll need specialized tools or software designed for audio processing. These tools allow you to adjust the volume levels without compromising the overall audio quality. Keep in mind that it’s essential to maintain a balance between amplifying the audio and preventing distortion.

Adjusting Audio Levels in Flac and Ogg

One common method for volume adjustment is using an audio editor. These editors offer precise control over the audio, enabling you to increase or decrease the volume as needed. It’s important to preview the changes and make incremental adjustments to achieve the desired result.

Whether you’re a music enthusiast or a professional sound engineer, the ability to adjust volume levels in Flac and Ogg files is invaluable. By understanding the intricacies of these audio formats and utilizing the right tools, you can ensure a consistent and enjoyable listening experience.

Normalizing Sound in Flac and Ogg Files

Normalization is another technique to bring uniformity to your audio collection. This process adjusts the volume of each file to a standard level, eliminating extreme variations. Normalization algorithms analyze the audio content and adjust the gain accordingly, making it ideal for batch processing large libraries.

Volume Equalization for Flac and Ogg

Volume equalization is about ensuring that all your Flac and Ogg files have similar loudness levels. This technique is essential when you’re creating playlists or organizing audio for playback. Volume equalization tools use various methods to balance the audio, providing a seamless listening experience.

Audio Gain in Flac and Ogg Formats

Audio gain, also known as amplification, allows you to increase the overall loudness of your Flac and Ogg files. This can be particularly useful if you have older recordings or content with low volume levels. However, it’s crucial to exercise caution and avoid over-amplification, which can lead to distortion.

Balancing Audio in Flac and Ogg Files

Balancing audio involves adjusting the volume levels of individual tracks within a file. This is handy when dealing with live recordings or albums where tracks may have varying loudness. Balancing tools provide a means to fine-tune each track’s volume to create a consistent listening experience.

Flac and Ogg Audio Level Management

Managing audio levels in Flac and Ogg files is an ongoing process, especially if you frequently add new content to your collection. Regularly reviewing and adjusting volume levels ensures that your audio library remains enjoyable and free from sudden volume spikes or drops.

Tweaking Volume in Flac and Ogg

Sometimes, you may want to apply specific tweaks to the volume of your Flac and Ogg files. This could involve emphasizing certain frequencies or applying dynamic range compression to enhance the audio quality. Experimenting with these tweaks can lead to a more personalized listening experience.

Enhancing Audio Dynamics in Flac and Ogg

Audio dynamics play a crucial role in the overall quality of your listening experience. Adjusting volume levels in Flac and Ogg files can help bring out the nuances in your music. By carefully managing audio dynamics, you can ensure that every note and sound is delivered with precision and clarity.

Final Words

Flac and Ogg volume adjustment is an essential aspect of maintaining an enjoyable audio collection. Whether you’re a music enthusiast or a professional, understanding the tools and techniques available can significantly enhance your listening experience. With the right approach, you can achieve balanced and consistent audio quality in your Flac and Ogg files.

Normalize audio tracks

Normalize audio tracks

Normalize audio tracks

Audio normalization is a crucial process in the world of audio production. It involves adjusting the volume levels of audio tracks to ensure a consistent and balanced listening experience. Whether you’re a music producer, a filmmaker, or a podcaster, the need to normalize audio tracks frequently arises to deliver high-quality content.

Normalize audio files

When you normalize audio files, you’re essentially making sure that the loudest and softest parts of your track are brought to a consistent level. This means that no part of your audio will be too quiet or too loud, allowing your listeners to enjoy a seamless experience without constantly adjusting the volume.

Audio track leveling

Audio track leveling is the process of ensuring that all the individual tracks in your audio project have a similar volume level. This is particularly important in music production, where you want all instruments and vocals to blend harmoniously without any one element overpowering the others.

Audio track equalization

Equalization (EQ) is another aspect of audio track optimization. While normalization focuses on overall volume levels, EQ allows you to fine-tune the frequency balance of your tracks. By adjusting the EQ settings, you can enhance the clarity and presence of different elements in your audio, such as vocals, instruments, or ambient sounds.

Soundtrack volume adjustment

In the world of film and video production, soundtrack volume adjustment plays a vital role. You want the dialogue, background music, and sound effects to be well-balanced to create an immersive cinematic experience. Normalizing the audio tracks ensures that viewers won’t have to constantly adjust their volume settings to hear the dialogue clearly.

Audio track enhancement

Audio track enhancement goes beyond normalization. It involves using various audio processing techniques to improve the overall quality of your tracks. This can include reducing background noise, adding special effects, or applying dynamic processing to make the audio more engaging.

Audio track optimization

Optimizing audio tracks is a comprehensive approach to ensuring the best possible sound quality. It combines normalization, equalization, and other audio processing techniques to create audio that sounds professional and polished.

Normalize sound in tracks

Normalizing sound in tracks is particularly useful when working with multiple audio sources or recordings that have inconsistent volume levels. It guarantees that all tracks will blend seamlessly and sound cohesive when played together.

Track audio balancing

Track audio balancing is an essential skill for mixing and mastering engineers. It involves adjusting the volume levels of individual tracks within a multitrack recording to achieve a well-balanced and harmonious final mix.

Track audio improvement

Audio improvement is the ultimate goal when working with audio tracks. It’s about taking the raw audio material and transforming it into something that sounds exceptional. This may involve not only normalization but also editing, effects, and creativity to make the audio truly stand out.

Final Words

Normalizing audio tracks is just one step in the journey of audio production and enhancement. Whether you’re an aspiring musician, a filmmaker, or a content creator, understanding how to effectively normalize and optimize audio tracks is essential for delivering a top-notch listening experience to your audience.

Digital Audio Interfaces

Digital Audio Interfaces: MIDI vs. USB

Digital Audio Interfaces

Digital Audio Interfaces

Digital audio interfaces are essential for connecting audio equipment to a computer or other digital device. They allow for high-quality audio recording, playback, and processing, and come in a variety of formats, including MIDI and USB.
When I first started working with digital audio interfaces, I was overwhelmed by the different options available. However, after some research and experimentation, I was able to understand the differences between MIDI and USB interfaces and how to choose the right one for my needs. One of the advantages of digital audio interfaces is that they allow for high-quality audio recording and playback, which is essential for music production and other audio-related tasks.
As I was learning about digital audio interfaces, I remembered the quote from the movie “Whiplash”: “There are no two words in the English language more harmful than ‘good job’.” While it’s important to strive for excellence in audio production, it’s also important to choose the right tools for the job.

MIDI vs. USB

MIDI and USB are two common digital audio interface formats. MIDI stands for Musical Instrument Digital Interface and is primarily used for connecting musical instruments and controllers to a computer or other digital device. USB stands for Universal Serial Bus and is a general-purpose interface that can be used for a variety of audio and non-audio devices.
One of the advantages of MIDI is that it allows for precise control over musical instruments and controllers, making it ideal for music production and performance. However, MIDI is limited in terms of bandwidth and can only transmit data at a relatively slow rate. USB, on the other hand, has a much higher bandwidth and can transmit data at a much faster rate, making it ideal for high-quality audio recording and playback.
As I was learning about MIDI and USB interfaces, I remembered the quote from the book “The Alchemist” by Paulo Coelho: “When you want something, all the universe conspires in helping you to achieve it.” Choosing the right digital audio interface can be challenging, but with the right tools and knowledge, it’s possible to achieve your audio production goals.

Final Words

Digital audio interfaces are essential for connecting audio equipment to a computer or other digital device. MIDI and USB are two common digital audio interface formats, each with their own advantages and disadvantages. While MIDI is ideal for musical instruments and controllers, USB is ideal for high-quality audio recording and playback.
At MP4Gain, we understand the importance of audio quality and file size. Our software is designed to normalize and convert audio files to the most popular formats, with an integrated equalizer for fine-tuning the audio. If you’re looking for a solution to your audio needs, give MP4Gain a try.
Digital audio interfaces, MIDI vs. USB, audio connectivity, MIDI connectivity, USB connectivity, MIDI interface, USB interface, audio interface, music production, audio recording, audio playback, audio processing, audio equipment, audio devices, audio tools, audio software, audio quality, audio normalization, audio conversion, audio equalizer, audio production, audio performance, audio controllers, audio bandwidth, audio transmission, audio data, audio rate, audio goals, audio production goals, audio production tools, audio production knowledge, audio production techniques, audio production software, audio production hardware, audio production equipment, audio production resources, audio production community, audio production events, audio production workshops, audio production seminars, audio production webinars, audio production podcasts, audio production blogs, audio production forums, audio production websites, audio production resources, audio production tools, audio production equipment, audio production instruments, audio production accessories, audio production books, audio production magazines, audio production journals, audio production publications, audio production reviews, audio production ratings, audio production comparisons, audio production recommendations, audio production tips, audio production tutorials, audio production guides, audio production manuals, audio production documentation, audio production support, audio production help.