Audio Equalization Filters


Free Download Mp4Gain
picture

Audio Equalization Filters

Audio Equalization Filters

Audio Equalization Filters Explained

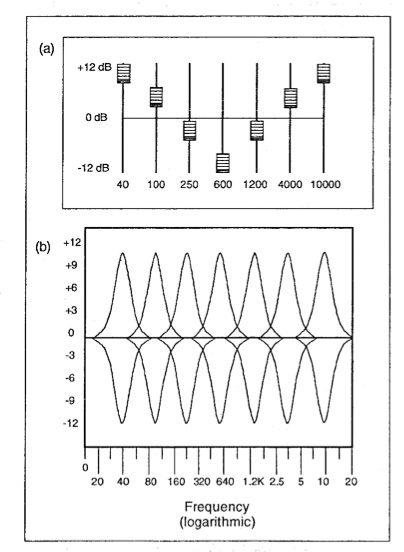
Audio equalization filters are like the control knobs on a sound system, allowing you to fine-tune and shape the audio output to your liking. Imagine them as the equalizer settings on your music player or car stereo. These filters work by adjusting the intensity of different frequency ranges within an audio signal. It’s akin to adjusting the bass, midrange, and treble levels on your home stereo system to achieve the perfect sound balance.

For instance, if you’re listening to music and the bass is overwhelming, you can use equalization filters to reduce the bass frequencies and create a more balanced and enjoyable listening experience. Conversely, if you want to emphasize the vocals in a podcast, you can boost the midrange frequencies to make the voice clearer.

Audio equalization filters are essential tools in the world of sound engineering and music production. They allow professionals to shape and enhance audio quality in recordings, live performances, and various audio applications.

Importance of Audio Equalization

As a seasoned audio engineer, I can attest to the critical role that audio equalization plays in creating high-quality audio content. It’s like being a chef who uses different seasonings to bring out the flavors in a dish. Properly applied equalization enhances the sonic characteristics of audio, making it sound cleaner, more balanced, and more appealing to the ears.

Consider a live concert scenario where you have a mix of instruments and vocals. Without proper equalization, the sound may become muddied and unclear. By using equalization filters, you can isolate and emphasize specific frequencies, making the guitar sound crisp, the vocals shine, and the drums punchy.

Audio equalization is not limited to music alone; it extends to podcasts, films, gaming, and even phone calls. Imagine watching a movie where the dialogue is drowned out by background noise. Skilled audio engineers use equalization to reduce unwanted noise and ensure that the dialogue is clear and intelligible.

Types of Audio Equalization Filters

Audio equalization filters come in various types, each designed for specific purposes. Think of them as different brushes for an artist, each suited for a particular style of painting. Here are some common types of equalization filters:

Graphic Equalizers: These are like multi-colored paint palettes, allowing you to adjust a set of fixed frequency bands. They are user-friendly and often found on consumer audio devices.

Parametric Equalizers: Parametric equalizers are like precision tools for audio professionals. They allow you to adjust not only the frequency bands but also the bandwidth (Q) and gain with great precision.

Shelving Equalizers: Imagine these as specialized brushes for broad strokes. Shelving equalizers are used to boost or cut all frequencies above or below a certain point, useful for adjusting bass or treble.

Notch Filters: These are like erasers for unwanted sounds. Notch filters target and eliminate specific frequencies, ideal for removing unwanted hums, buzzes, or feedback.

High-Pass and Low-Pass Filters: High-pass filters allow high frequencies to pass while attenuating low frequencies, while low-pass filters do the opposite. They are like sieves that filter out unwanted elements in audio.

Understanding when and how to use these different types of equalization filters is crucial for achieving the desired audio quality in various scenarios, from music production to live sound reinforcement.

Common Questions About Audio Equalization Filters

When it comes to audio equalization filters, many questions arise, much like curious minds seeking answers. Let’s address some common queries:

1. What’s the best equalization setting for music?

Equalization settings depend on personal preferences and the audio source. There’s no one-size-fits-all answer. Experiment and adjust to suit your taste.
2. Can equalization fix poor-quality recordings?

While equalization can improve audio quality to some extent, it can’t completely salvage a poorly recorded source. Quality in, quality out still applies.
3. Are expensive equalizer plugins better than free ones?

Not necessarily. The effectiveness of an equalizer depends on its features and your skill in using it. Free plugins can be excellent if used correctly.

Mastering Audio Equalization Techniques

Mastering audio equalization is like becoming a skilled painter, capable of creating stunning visuals on a canvas. To excel in this art, you need to practice, experiment, and learn from experience. Start with simple adjustments and gradually delve into more complex equalization techniques.

Consider the analogy of a chef crafting a signature dish. Just as a chef refines their recipe through trial and error, audio engineers refine their equalization techniques by actively listening, experimenting with different filters, and paying attention to detail.

Remember that context matters. Equalization for a rock concert differs from equalization for a classical orchestra recording. It’s crucial to understand the specific requirements of each audio project and tailor your equalization accordingly.

Advanced Applications of Equalization Filters

Advanced applications of equalization filters are like pushing the boundaries of artistic expression. As you become more proficient, you can use equalization creatively. Imagine being a sculptor who can carve intricate details into their work.

For instance, you can use equalization to create unique sound effects in films, simulate vintage audio characteristics, or shape the sonic identity of a musical genre. It’s akin to an artist using various brush strokes and techniques to evoke different emotions in their paintings.

Additionally, advanced equalization techniques involve dynamic equalization, where the filter settings change in real-time based on the audio input. This dynamic approach is like choreographing a dance, where the moves adapt to the music’s rhythm and intensity.

In conclusion, audio equalization filters are powerful tools in the hands of skilled audio professionals. They enable us to shape sound, enhance quality, and create captivating auditory experiences across a wide range of media and applications. Much like artists refining their craft, mastering the art of audio equalization takes time and dedication, but the results are music to the ears.


Free Download Mp4Gain
picture


Mp4Gain Main Window
picture


Mp4Gain Features
picture


Free Download Mp4Gain
picture

Flac and Ogg Volume Adjuster

Flac and Ogg Volume Adjuster

Flac and Ogg Volume Adjuster

Are you tired of dealing with uneven audio levels in your Flac and Ogg files? Well, you’re not alone. Many audio enthusiasts and professionals often face the challenge of maintaining consistent sound quality across their collections. In this article, I’ll delve into the world of Flac and Ogg volume adjustment and explore various methods to tackle this issue effectively.

Audio File Format Adjustments

Before we dive into volume adjustments, it’s crucial to understand the nature of Flac and Ogg audio formats. Flac, short for Free Lossless Audio Codec, and Ogg Vorbis are popular choices for storing high-quality audio. Flac provides lossless compression, preserving audio quality without sacrificing file size, while Ogg is known for its open-source nature and efficient compression.

Sound Volume Control for Flac and Ogg

To control the volume of your Flac and Ogg files, you’ll need specialized tools or software designed for audio processing. These tools allow you to adjust the volume levels without compromising the overall audio quality. Keep in mind that it’s essential to maintain a balance between amplifying the audio and preventing distortion.

Adjusting Audio Levels in Flac and Ogg

One common method for volume adjustment is using an audio editor. These editors offer precise control over the audio, enabling you to increase or decrease the volume as needed. It’s important to preview the changes and make incremental adjustments to achieve the desired result.

Whether you’re a music enthusiast or a professional sound engineer, the ability to adjust volume levels in Flac and Ogg files is invaluable. By understanding the intricacies of these audio formats and utilizing the right tools, you can ensure a consistent and enjoyable listening experience.

Normalizing Sound in Flac and Ogg Files

Normalization is another technique to bring uniformity to your audio collection. This process adjusts the volume of each file to a standard level, eliminating extreme variations. Normalization algorithms analyze the audio content and adjust the gain accordingly, making it ideal for batch processing large libraries.

Volume Equalization for Flac and Ogg

Volume equalization is about ensuring that all your Flac and Ogg files have similar loudness levels. This technique is essential when you’re creating playlists or organizing audio for playback. Volume equalization tools use various methods to balance the audio, providing a seamless listening experience.

Audio Gain in Flac and Ogg Formats

Audio gain, also known as amplification, allows you to increase the overall loudness of your Flac and Ogg files. This can be particularly useful if you have older recordings or content with low volume levels. However, it’s crucial to exercise caution and avoid over-amplification, which can lead to distortion.

Balancing Audio in Flac and Ogg Files

Balancing audio involves adjusting the volume levels of individual tracks within a file. This is handy when dealing with live recordings or albums where tracks may have varying loudness. Balancing tools provide a means to fine-tune each track’s volume to create a consistent listening experience.

Flac and Ogg Audio Level Management

Managing audio levels in Flac and Ogg files is an ongoing process, especially if you frequently add new content to your collection. Regularly reviewing and adjusting volume levels ensures that your audio library remains enjoyable and free from sudden volume spikes or drops.

Tweaking Volume in Flac and Ogg

Sometimes, you may want to apply specific tweaks to the volume of your Flac and Ogg files. This could involve emphasizing certain frequencies or applying dynamic range compression to enhance the audio quality. Experimenting with these tweaks can lead to a more personalized listening experience.

Enhancing Audio Dynamics in Flac and Ogg

Audio dynamics play a crucial role in the overall quality of your listening experience. Adjusting volume levels in Flac and Ogg files can help bring out the nuances in your music. By carefully managing audio dynamics, you can ensure that every note and sound is delivered with precision and clarity.

Final Words

Flac and Ogg volume adjustment is an essential aspect of maintaining an enjoyable audio collection. Whether you’re a music enthusiast or a professional, understanding the tools and techniques available can significantly enhance your listening experience. With the right approach, you can achieve balanced and consistent audio quality in your Flac and Ogg files.

Dynamic Range in Audio

Understanding Dynamic Range in Audio

Dynamic Range in Audio

What is Dynamic Range in Audio?

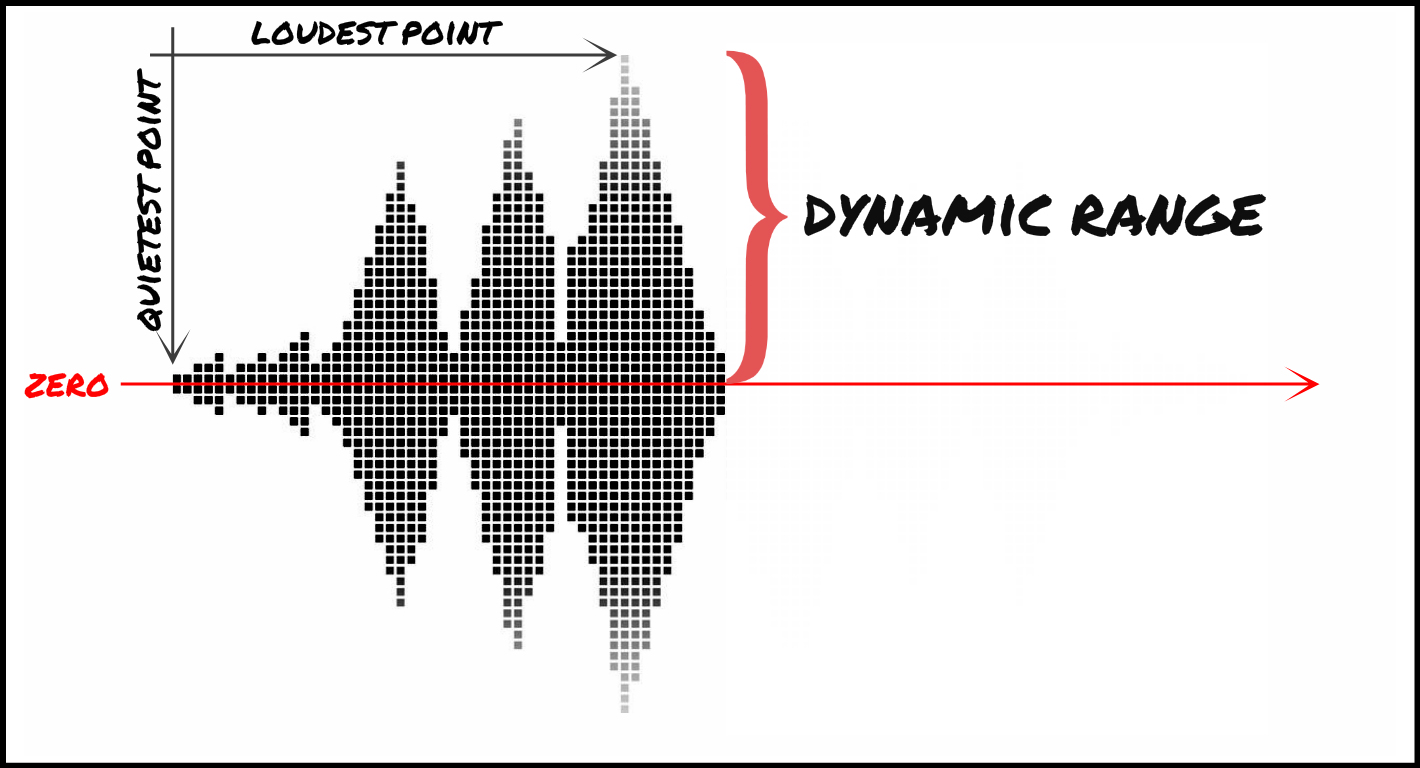
Dynamic range refers to the difference between the loudest and quietest parts of an audio signal. It is an important aspect of sound engineering that determines the quality of sound produced. As an audio engineer, I have come across numerous situations where the dynamic range of a recording was too wide or too narrow, making it difficult to produce a high-quality mix.

In the book “The Mixing Engineer’s Handbook” by Bobby Owsinski, he states: “The dynamic range is what gives a recording its emotional impact. Too much and it becomes tiresome, too little and it becomes boring.” This perfectly illustrates the importance of understanding and mastering dynamic range in audio.

When working with audio, it is important to use tools such as compressors, limiters, and expanders to manage the dynamic range. These tools can help reduce the difference between the loudest and quietest parts of a recording, resulting in a more balanced sound.

How does Dynamic Range Compression work?

Dynamic Range Compression (DRC) is a technique used in audio engineering to reduce the dynamic range of a recording. This is achieved by reducing the volume of the loudest parts of the recording while leaving the quieter parts unchanged.

DRC is commonly used in music production to create a consistent volume level throughout a song. It is also used in broadcasting to ensure that the volume of advertisements is consistent with the volume of the program being aired.

In the movie “Whiplash,” the character Terence Fletcher, played by J.K. Simmons, says, “There are no two words in the English language more harmful than ‘good job’.” While this quote is not related to audio engineering, it perfectly illustrates the idea behind dynamic range compression. By reducing the difference between the loudest and quietest parts of a recording, we create a more consistent and balanced sound.

Why is Understanding Dynamic Range important?

Understanding dynamic range is important for anyone working with audio. It allows us to create high-quality recordings that are both pleasing to the ear and emotionally impactful.

As a personal anecdote, I once recorded a live concert where the dynamic range was too wide. The quiet parts of the recording were barely audible, while the loud parts were painfully loud. After mastering the recording and reducing the dynamic range, the final product was much more enjoyable to listen to.

In conclusion, dynamic range is a crucial aspect of sound engineering that should not be overlooked. By understanding how it works and using the right tools, we can create recordings that are both balanced and emotionally impactful.

Final Words

When it comes to audio engineering, mastering dynamic range is key to creating high-quality recordings. By using tools such as compressors and limiters, we can reduce the difference between the loudest and quietest parts of a recording, resulting in a more balanced sound. As an audio engineer, I have seen firsthand the importance of mastering dynamic range, and I urge anyone working with audio to take the time to understand it fully.