How to make MP4 audio volume consistent


Free Download Mp4Gain
picture

How to make MP4 audio volume consistent

How to make MP4 audio volume consistent

Let’s talk about achieving uniform audio in MP4s. As someone who works with audio daily, I understand the frustration of inconsistent sound levels. Inconsistent audio can disrupt the viewing experience. This comprehensive guide provides solutions for balanced sound in your MP4 files. I’ll share professional insights and practical tips, making even complex concepts accessible to everyone.

The Importance of Balanced Audio in MP4s

Consistent sound enhances the viewing experience significantly. Imagine watching a movie where whispers are barely audible, and explosions make you jump. Unbalanced audio is distracting. Consistent volume creates a more immersive and enjoyable experience. It also demonstrates professionalism and improves accessibility for viewers with hearing impairments.

Understanding the Fundamentals of Audio Leveling

Leveling audio involves adjusting sound levels to achieve a consistent target loudness. It’s like fine-tuning a musical instrument to achieve a more harmonious sound. Peak normalization maximizes loudness without clipping, while loudness normalization targets perceived loudness. Both methods aim to create a more uniform and pleasant listening experience.

Practical Steps for Consistent MP4 Audio

Achieving balanced sound involves a few key steps. I’ll outline them here, providing clear examples to guide you. Each step contributes to a polished final product. These actionable steps yield professional results.

  • Analyze Existing Audio: Begin by assessing the current loudness range. I often use visualization tools to see the peaks and valleys in the waveform, identifying areas needing adjustment. It’s like examining a map before starting a journey.
  • Adjust Levels Carefully: Utilize audio editing tools to carefully raise quiet passages and lower overly loud ones. Avoid clipping, which introduces distortion. It’s similar to adjusting the seasoning in a dish for optimal flavor.
  • Monitor and Refine: Use loudness meters and your ears to monitor the results. Listen on different devices, like headphones and speakers, to ensure consistent playback across platforms. This final check is like taste-testing a recipe before serving it.

Ensuring Seamless Audio Transitions

Abrupt volume changes can be jarring. Smooth transitions are essential for maintaining viewer engagement. Gradual fades and crossfades prevent jarring shifts between scenes or audio segments. Properly implemented transitions maintain a consistent and professional feel. This creates seamlessness in the audio experience.

Advanced Techniques for Consistent Audio

More advanced methods, beyond basic leveling, can help you to achieve a uniform feel and optimize the sound across various platforms:

  • Dynamic Range Compression: Gently reduces the difference between the loudest and quietest parts of the audio, creating a more even overall volume. This is similar to using a compressor in music production to smooth out the dynamics of an instrument.
  • Equalization (EQ): Adjusts the balance of different frequencies in the audio, helping to clarify dialogue or reduce harshness. It’s like fine-tuning the tone controls on a stereo system to customize the sound.

Optimizing Your Workflow

Optimizing the process saves a great deal of time, specifically when managing numerous MP4s. The techniques I’ve perfected over the years are designed to help you build efficiency in your process and deliver top results. Streamlining ensures consistently high quality output.

  • Create Presets or Templates: Once you’ve established settings that work well, save them as presets or templates. This saves time when working on similar projects. It’s like having a pre-made recipe for your favorite dish.
  • Batch Processing: Many tools offer batch processing capabilities, allowing you to apply your adjustments to multiple files simultaneously. This streamlines the process significantly, especially when working with large volumes of media. Think of it like cooking multiple dishes in the oven at once.

Troubleshooting Common Issues

Even with the best planning, sometimes issues arise when dealing with audio. In my experience, most issues can be identified and resolved quickly. These solutions tackle those common headaches.

  • Audio Too Quiet: If the audio is consistently too low, check the input gain during recording or increase the amplification during editing. It’s like turning up the microphone volume before a speech.
  • Audio Too Loud/Distorted: Conversely, if the audio is too loud, it can cause distortion or clipping. Reduce the gain or apply compression to manage peaks. It’s like lowering the volume on a speaker to prevent crackling.
  • Inconsistent Levels Within a File: If certain sections are louder than others, carefully adjust those sections individually using automation or gain adjustments. This targeted approach is like fine-tuning individual instruments in a musical mix.

Understanding the Role of Codecs

The codec used to encode your sound heavily impacts resulting storage and final perceived tones. Different codecs operate using varied methods. Each has unique characteristics. Codec selection is a key factor in sonic fidelity.

  • AAC (Advanced Audio Coding): The most common codec used with MP4s. AAC offers a good balance between file size and sound quality, making it suitable for a wide range of applications. I often recommend this codec for its versatility.
  • Other Audio Codecs: Alternatives such as MP3 or Apple Lossless exist, each with its trade-offs in terms of quality and file dimensions. Selecting one codec over another comes down to making a balanced decision that meets specific project requirements.

Latest words on How to make MP4 audio volume consistent

Consistent MP4 audio enhances the listening experience. Following these tips and techniques you can improve your content. Balanced sound not only sounds more professional. But it also makes your videos more accessible. Consistent audio demonstrates attention to detail, setting your productions apart. While tools like MP4Gain can help streamline the process, a deep understanding of these principles is essential for achieving truly professional results.

FAQ about How to make MP4 audio volume consistent

Why do my MP4 videos have inconsistent audio levels?

Uneven volume within MP4s can stem from various factors: source material discrepancies, incorrect recording levels, or issues during editing or processing. Identifying the root cause helps apply the proper solution.

What are some indicators of inconsistent volume?

Frequent manual volume changes during playback, dialogue that’s hard to hear in some scenes, or overly loud music or sound effects. These indicate normalization steps are needed.

How does normalization improve my videos?

Normalized volume creates a more professional product by eliminating jarring shifts in loudness. It enhances viewer engagement and improves accessibility, especially for those with hearing sensitivities.

What are common techniques for leveling sound?

Peak normalization boosts the loudest part of the audio without introducing distortion. Loudness normalization aims for a consistent perceived volume. These are the most often used options.

How can I make smooth transitions between scenes?

Gradual fades and crossfades prevent jarring changes. This smoothing process contributes significantly to a polished, professional feel.

What are some advanced audio editing techniques?

Dynamic range compression smooths out the loudness variations within your audio. Equalization adjusts tonal balance, impacting dialogue clarity, and music quality.

What if my MP4 audio is too quiet?

Increase the gain during editing, being careful to avoid clipping. If possible, re-record the audio at a higher input level to capture a stronger signal from the start.

What should I do if the audio is too loud or distorted?

Reduce the gain during editing or apply compression to control peaks and avoid clipping, which introduces distortion. These measures create more manageable sound.

How can I ensure consistent loudness across multiple MP4 files?

Use batch processing features in sound tools. Batch processing applies your preferred normalization settings to multiple files at once. This creates uniformity across a large batch.

How does the audio codec affect file size and quality?

Different codecs have varying compression ratios and quality characteristics. AAC offers a balance between file size and audio fidelity. Lossless codecs like FLAC provide perfect sonic replication but result in larger files. Codec choice is a crucial aspect.

Comments:

Wow, this is a really helpful article! I’ve been struggling with uneven audio in my videos, and this gives me a much better understanding of how to fix it. Thanks!

Great explanation of audio normalization. I didn’t realize there were different types, like peak and loudness normalization. That makes total sense. Thanks for clarifying.

The tip about listening on different devices is spot on. I usually just check my audio on my computer speakers, but now I see why it’s important to test on headphones and other devices too.

I’m glad you mentioned accessibility. It’s something I’ve been trying to be more mindful of in my videos. Consistent audio levels are definitely a big part of that. Cheers.

This is super detailed, maybe a little *too* detailed. I just want a simple way to make my videos sound better. Is there a quick and easy method you can recommend?

Batch processing is a lifesaver! I edit a lot of videos, and the thought of manually adjusting audio levels for each one was daunting. Thanks for the tip!

I still don’t get the whole “codec” thing. Can you explain that in simpler terms? Like, what codec should I be using for my MP4 videos?

This was a game-changer for my video editing workflow. Thanks for the practical advice and clear explanations!

Great article, really comprehensive! Just a suggestion – could you add a section on how to normalize audio in different video editing software programs? That would be very helpful.

This article needs more cowbell! Just kidding. Seriously though, great job. Thanks for the informative read.


Free Download Mp4Gain
picture


Mp4Gain Main Window
picture


Mp4Gain Features
picture


Free Download Mp4Gain
picture

Audio Equalization Filters

Audio Equalization Filters

Audio Equalization Filters

Audio Equalization Filters Explained

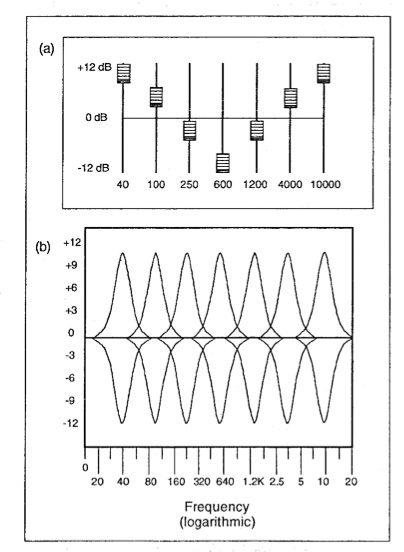
Audio equalization filters are like the control knobs on a sound system, allowing you to fine-tune and shape the audio output to your liking. Imagine them as the equalizer settings on your music player or car stereo. These filters work by adjusting the intensity of different frequency ranges within an audio signal. It’s akin to adjusting the bass, midrange, and treble levels on your home stereo system to achieve the perfect sound balance.

For instance, if you’re listening to music and the bass is overwhelming, you can use equalization filters to reduce the bass frequencies and create a more balanced and enjoyable listening experience. Conversely, if you want to emphasize the vocals in a podcast, you can boost the midrange frequencies to make the voice clearer.

Audio equalization filters are essential tools in the world of sound engineering and music production. They allow professionals to shape and enhance audio quality in recordings, live performances, and various audio applications.

Importance of Audio Equalization

As a seasoned audio engineer, I can attest to the critical role that audio equalization plays in creating high-quality audio content. It’s like being a chef who uses different seasonings to bring out the flavors in a dish. Properly applied equalization enhances the sonic characteristics of audio, making it sound cleaner, more balanced, and more appealing to the ears.

Consider a live concert scenario where you have a mix of instruments and vocals. Without proper equalization, the sound may become muddied and unclear. By using equalization filters, you can isolate and emphasize specific frequencies, making the guitar sound crisp, the vocals shine, and the drums punchy.

Audio equalization is not limited to music alone; it extends to podcasts, films, gaming, and even phone calls. Imagine watching a movie where the dialogue is drowned out by background noise. Skilled audio engineers use equalization to reduce unwanted noise and ensure that the dialogue is clear and intelligible.

Types of Audio Equalization Filters

Audio equalization filters come in various types, each designed for specific purposes. Think of them as different brushes for an artist, each suited for a particular style of painting. Here are some common types of equalization filters:

Graphic Equalizers: These are like multi-colored paint palettes, allowing you to adjust a set of fixed frequency bands. They are user-friendly and often found on consumer audio devices.

Parametric Equalizers: Parametric equalizers are like precision tools for audio professionals. They allow you to adjust not only the frequency bands but also the bandwidth (Q) and gain with great precision.

Shelving Equalizers: Imagine these as specialized brushes for broad strokes. Shelving equalizers are used to boost or cut all frequencies above or below a certain point, useful for adjusting bass or treble.

Notch Filters: These are like erasers for unwanted sounds. Notch filters target and eliminate specific frequencies, ideal for removing unwanted hums, buzzes, or feedback.

High-Pass and Low-Pass Filters: High-pass filters allow high frequencies to pass while attenuating low frequencies, while low-pass filters do the opposite. They are like sieves that filter out unwanted elements in audio.

Understanding when and how to use these different types of equalization filters is crucial for achieving the desired audio quality in various scenarios, from music production to live sound reinforcement.

Common Questions About Audio Equalization Filters

When it comes to audio equalization filters, many questions arise, much like curious minds seeking answers. Let’s address some common queries:

1. What’s the best equalization setting for music?

Equalization settings depend on personal preferences and the audio source. There’s no one-size-fits-all answer. Experiment and adjust to suit your taste.
2. Can equalization fix poor-quality recordings?

While equalization can improve audio quality to some extent, it can’t completely salvage a poorly recorded source. Quality in, quality out still applies.
3. Are expensive equalizer plugins better than free ones?

Not necessarily. The effectiveness of an equalizer depends on its features and your skill in using it. Free plugins can be excellent if used correctly.

Mastering Audio Equalization Techniques

Mastering audio equalization is like becoming a skilled painter, capable of creating stunning visuals on a canvas. To excel in this art, you need to practice, experiment, and learn from experience. Start with simple adjustments and gradually delve into more complex equalization techniques.

Consider the analogy of a chef crafting a signature dish. Just as a chef refines their recipe through trial and error, audio engineers refine their equalization techniques by actively listening, experimenting with different filters, and paying attention to detail.

Remember that context matters. Equalization for a rock concert differs from equalization for a classical orchestra recording. It’s crucial to understand the specific requirements of each audio project and tailor your equalization accordingly.

Advanced Applications of Equalization Filters

Advanced applications of equalization filters are like pushing the boundaries of artistic expression. As you become more proficient, you can use equalization creatively. Imagine being a sculptor who can carve intricate details into their work.

For instance, you can use equalization to create unique sound effects in films, simulate vintage audio characteristics, or shape the sonic identity of a musical genre. It’s akin to an artist using various brush strokes and techniques to evoke different emotions in their paintings.

Additionally, advanced equalization techniques involve dynamic equalization, where the filter settings change in real-time based on the audio input. This dynamic approach is like choreographing a dance, where the moves adapt to the music’s rhythm and intensity.

In conclusion, audio equalization filters are powerful tools in the hands of skilled audio professionals. They enable us to shape sound, enhance quality, and create captivating auditory experiences across a wide range of media and applications. Much like artists refining their craft, mastering the art of audio equalization takes time and dedication, but the results are music to the ears.

What is digital audio and video?

What is digital audio and video?

Digital Audio and Video

Digital audio and video are types of data that we can store on a computer or other electronic device. They are made up of a series of numbers that represent the sound or image we want to save. This means that instead of using physical materials like film or tape to record sound or video, we can use a computer to store and manipulate digital versions of that data.

Digital Audio and Video

How is sound digitized?

Sound is a type of wave that travels through the air. When we want to digitize sound, we need to find a way to measure that wave and turn it into a series of numbers. We do this by using a device called a microphone, which converts sound waves into electrical signals that can be processed by a computer.

Here’s an example: imagine you’re at a concert and you want to record a song using your phone. You turn on the voice memo app and hold your phone up to the speakers. The microphone in your phone converts the sound waves from the speakers into electrical signals that are then turned into a digital audio file that you can listen to later.

How are multiple sounds combined into a single file?

When we record sound using a microphone, we’re not just capturing one sound at a time. We’re also picking up any other sounds that might be happening in the background, like people talking or the sound of a car driving by. So how do we store all of these different sounds in a single file?

The answer is that each sound is given its own “channel” in the digital audio file. Imagine that you have a stereo system with two speakers – one on the left and one on the right. When you record a song using your phone, the sound that’s coming out of the left speaker is saved in one channel of the audio file, while the sound that’s coming out of the right speaker is saved in another channel.

How are different instruments and voices saved in a single channel?

So now we know how to store multiple sounds in a digital audio file using different channels. But what if we want to save a song that has lots of different instruments and voices playing at the same time? How can we separate out all of those different sounds and make sure they’re saved correctly in the file?

The answer is that each sound is given its own “frequency” in the digital audio file. Think of it like a rainbow: just like how a rainbow has lots of different colors, sound has lots of different frequencies. When we record a song, we’re capturing all of those different frequencies at the same time.

So let’s say we’re recording a song that has a guitar, a bass, a drum set, and a singer. Each of those instruments and the singer’s voice has a different set of frequencies that make up its sound. The guitar might have a lot of high frequencies, while the bass might have a lot of low frequencies. When we record the song, we capture all of those frequencies at the same time and save them in the digital audio file.

How are timbres saved in a digital audio file?

The “timbre” of a sound refers to its unique quality or tone. For example, if you hear a trumpet and a violin playing the same note, you can still tell the difference between the two because they have different timbres. So how do we save the timbre of each instrument or voice in a digital audio file?

To save the timbre of each sound, we use a process called “sampling”. Sampling involves taking tiny snapshots of the sound wave at regular intervals and saving those snapshots as numbers in the digital audio file. The more snapshots we take, the more accurately we can capture the unique timbre of each sound.

Here’s an example: let’s say we’re recording a piano playing a single note. We take 44,100 snapshots of the sound wave per second and save each snapshot as a number in the digital audio file. When we play back the file, the computer reads those numbers and uses them to recreate the sound of the piano note. Because we took so many snapshots per second, we’re able to capture all of the nuances of the piano’s timbre and make it sound like a real piano.

How are noises and other sounds saved in a digital audio file?

When we record sound using a microphone, we’re not just capturing the sounds we want to hear – we’re also capturing any background noise that might be happening. This can include things like people talking, cars driving by, or birds chirping. So how do we deal with all of that extra noise when we save the sound as a digital file?

One way to deal with background noise is to use a process called “noise reduction”. This involves analyzing the digital audio file and looking for parts of the sound that are consistent over time – like the sound of a fan running or the hum of a fluorescent light. The computer can then remove those consistent sounds from the file, leaving behind just the sounds we want to hear.

Another way to deal with background noise is to use a process called “EQ” (short for “equalization”). EQ allows us to boost or cut certain frequencies in the sound to make it sound better. For example, if there’s a lot of low-frequency rumble in a recording, we can use EQ to cut out some of those frequencies and make the sound clearer.

What is digital video?

Digital video is similar to digital audio, but instead of capturing sound waves, we’re capturing images. When we record a video, we’re capturing a series of still images (or frames) at regular intervals and saving them as a digital file.

How are videos saved in digital format?

To save a video in digital format, we need to capture a series of still images (or frames) and save them as a digital file. We do this using a device called a camera, which captures light from the scene we’re filming and turns it into an electrical signal that can be processed by a computer.

Here’s an example: imagine you’re filming a video of your dog playing in the park. You hold up your phone and hit the record button. The camera in your phone captures a series of still images (or frames) of your dog playing and saves them as a digital video file that you can watch later.

How are multiple images combined into a single video file?

When we capture a video, we’re capturing a series of still images (or frames) at regular intervals. To create a smooth video, we need to combine all of those frames into a single file. This is done using a process called “video compression”.

Video compression works by looking for parts of the image that are similar from frame to frame and only saving the parts that are different. For example, if you’re filming a video of a person sitting in a chair, the background behind them might not change much from frame to frame, so the computer can save that part of the image just once and only save the parts that are changing (like the person’s movements).

By only saving the parts of the image that are changing, we’re able to save space and create smaller video files that are easier to store and share. However, too much compression can make the video look blurry or pixelated. So, it’s important to find a balance between file size and video quality when compressing videos.

How do we add sound to a digital video file?

To add sound to a digital video file, we use a process called “audio syncing”. Audio syncing involves combining the digital audio file (which we learned about earlier) with the digital video file so that the sound matches up with the images.

Here’s an example: let’s say you’re filming a concert and you want to create a video of one of the songs. You record the video using your camera and the audio using a separate recording device. When you go to edit the video, you import both the digital audio file and the digital video file into your editing software. Then, you use audio syncing to line up the audio with the video so that the sound matches up with the images.

Conclusion

In conclusion, digital audio and video are complex subjects, but they can be explained in a way that a 6-year-old can understand. Digital audio involves converting sound waves into numbers that can be saved in a digital file. We use sampling to capture the unique timbre of each sound, and we use noise reduction and EQ to deal with background noise. Digital video involves capturing a series of still images (or frames) and saving them as a digital file. We use video compression to combine those frames into a single file and audio syncing to add sound to the video. By understanding these concepts, we can appreciate the technology behind the digital media that we enjoy every day.