Bit Depth in Audio

Bit Depth in Audio

Bit Depth in Audio
Bit Depth in Audio
Bit Depth in Audio
Bit Depth in Audio

Audio Bit Depth Explained

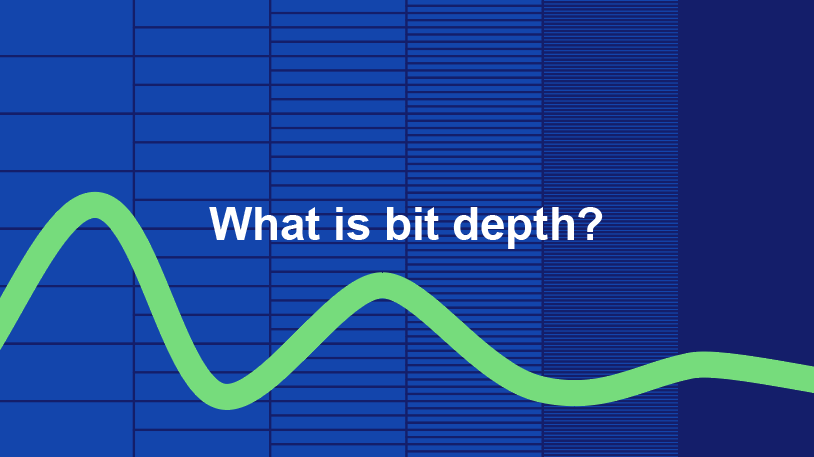
Audio bit depth refers to the number of bits used to represent the amplitude of an audio signal at each sample point. In simpler terms, it determines the dynamic range of digital audio. A higher bit depth allows for a more detailed representation of sound, capturing subtle nuances and minimizing quantization noise.
Imagine bit depth as a measurement of how finely audio is divided into individual steps. For instance, a 16-bit audio recording has 65,536 possible amplitude levels, while a 24-bit recording offers a staggering 16,777,216 levels. This increased granularity results in smoother, more accurate sound reproduction.

Understanding Bit Depth in Audio

To grasp the significance of bit depth, consider it as the shades of color in a painting. A higher bit depth provides a broader palette of colors, allowing for a more accurate depiction of the original image. Similarly, in audio, a greater bit depth captures a wider range of volume levels, preserving the subtleties of a musical performance or the nuances of a voice.
In practical terms, when you listen to music or a podcast, a higher bit depth ensures that you can hear the softest whispers and the loudest drum hits without distortion or loss of detail. It’s like having a more precise lens to view the sonic landscape.

Audio Resolution and Bit Depth

Bit depth and audio resolution are closely linked. Audio resolution refers to the level of detail and accuracy in an audio recording. Bit depth plays a pivotal role in determining this resolution. Think of it as the difference between watching a video in standard definition versus high definition. A higher bit depth offers a more lifelike and faithful representation of sound.
When recording or listening to music, you’ll often encounter terms like “16-bit” or “24-bit.” These numbers indicate the bit depth of the audio, with 24-bit audio being the gold standard for high-quality recordings. It’s akin to having a sharper, more detailed image in photography.

Now, let’s explore more facets of bit depth in audio.

Importance of Bit Depth in Sound

Bit depth is paramount in the world of sound because it directly impacts audio fidelity and the ability to reproduce music or voice accurately. It ensures that every subtle nuance, from the softest piano notes to the powerful guitar riffs, is faithfully captured and played back with precision.
Consider this: when recording a classical piano performance, the pianist’s delicate touch on the keys is as vital as the thunderous crescendos. A higher bit depth preserves the intricate dynamics, making you feel as if you are sitting in the concert hall, immersed in the music.

Bit depth is the foundation of audio quality, and understanding its role can help you appreciate the importance of using higher bit depths in audio production and playback.

How Bit Depth Affects Audio Quality

The impact of bit depth on audio quality is akin to the role of paint quality in a masterpiece. Just as a skilled artist requires high-quality pigments for a vivid painting, audio engineers rely on a greater bit depth for lifelike and rich audio recordings.
A lower bit depth might result in noticeable “stepping” or quantization noise, especially in quiet passages of a recording. This noise can be distracting and diminish the overall listening experience. On the other hand, a higher bit depth provides a smooth, natural curve to the audio waveform, minimizing these artifacts and delivering pristine sound.

Consider your favorite music track—the artist’s emotions, the resonance of instruments, and the atmosphere of the recording venue. All these subtleties are better preserved and conveyed through higher bit depth, elevating your listening experience to a new level.

Bit Depth in Digital Audio

In the digital realm, bit depth plays a pivotal role in the accuracy of audio representation. Think of it as pixels in a high-resolution photograph; more pixels mean finer details. Similarly, a higher bit depth translates to a more accurate depiction of sound.
In applications like digital audio workstations (DAWs) and music players, you often have the option to choose between different bit depths for your audio projects. Opting for a higher bit depth can lead to more professional-sounding results, particularly in the realms of music production, film scoring, and sound design.

Bit Depth vs. Sample Rate

While bit depth and sample rate are both critical aspects of digital audio, they serve different purposes. Bit depth determines the accuracy of amplitude representation, while sample rate governs how often the audio waveform is sampled per second.
Picture bit depth as the color depth in a photograph and sample rate as the frames per second in a video. A higher bit depth allows for greater tonal accuracy, while a higher sample rate captures more audio snapshots per second, preserving high-frequency content.

In many scenarios, a balanced approach between bit depth and sample rate is essential to achieve optimal audio quality. The synergy between these two factors ensures that audio recordings faithfully capture the richness and subtleties of the original source.

Bit Depth in Music Production

For music producers, bit depth is a critical consideration when working on audio projects. It influences the quality of sound recordings and the ability to manipulate audio during the production process.
When mixing and mastering music, a higher bit depth provides ample headroom for processing audio without introducing artifacts or degrading quality. This allows producers to apply effects, equalization, and compression with greater precision.

Additionally, when releasing music, opting for a higher bit depth ensures that your audience experiences the full depth and nuance of your compositions, whether they’re listening through high-end headphones or a powerful sound system.

16-Bit vs. 24-Bit Audio

The choice between 16-bit and 24-bit audio often arises when considering audio quality and storage requirements. A 16-bit audio file occupies less space compared to a 24-bit file, but it also has limitations in capturing subtle audio details.
16-bit audio is akin to a compact camera with limited resolution, suitable for casual snapshots. In contrast, 24-bit audio offers the quality of a professional DSLR camera, capturing a broader dynamic range and preserving the finer nuances of sound.

When deciding between the two, it’s essential to consider the specific use case. For audiophiles, professional audio production, and high-end sound systems, 24-bit audio is the preferred choice for its ability to deliver an immersive and faithful listening experience.

Bit Depth for Audio Recording

In the realm of audio recording, selecting the appropriate bit depth is a pivotal decision. It directly affects the quality and flexibility of the recorded material, whether you’re tracking vocals, instruments, or ambient sounds.
Recording at a higher bit depth, such as 24-bit, provides audio engineers with a safety net during the recording process. It allows them to capture a wide dynamic range without the risk of clipping or distortion. This is particularly valuable when dealing with unpredictable elements in live recordings or capturing the subtleties of acoustic instruments.

In essence, bit depth choice during audio recording is like choosing the canvas size for a painting. A larger canvas provides more room for creativity and detail, and a higher bit depth offers greater sonic canvas for audio professionals.

Final Words

In the realm of audio, bit depth serves as the bedrock of quality and fidelity. It determines how faithfully sound is captured, preserved, and reproduced. Understanding the importance of bit depth allows you to appreciate the nuances in your favorite music, the clarity in podcasts, and the immersive soundscapes in movies.
Whether you’re an aspiring musician, an audio engineer, or simply a passionate listener, recognizing the role of bit depth in audio enriches your experience. It’s the difference between seeing the world in black and white and experiencing it in full color.

So, the next time you enjoy your favorite song or immerse yourself in a cinematic adventure, remember that bit depth is the silent hero behind the scenes, ensuring that every sonic detail reaches your ears with precision and clarity.

M4A vs FLAC

M4A vs FLAC

M4A vs FLAC
M4A vs FLAC
M4A vs FLAC
M4A vs FLAC

Differences between M4A and FLAC

M4A and FLAC are both audio file formats, but they are quite distinct in their characteristics. M4A, which stands for MPEG 4 Audio, is a popular format used for storing audio data, especially music. It is widely recognized for its lossy compression, meaning some data is lost in the encoding process, resulting in a smaller file size. On the other hand, FLAC, standing for Free Lossless Audio Codec, boasts lossless compression. No data is discarded, maintaining the original audio quality.

“Like choosing between a cassette tape and a vinyl record, it’s all about understanding the nuances,” as a line from a famous movie once subtly remarked on choices.

FLAC files are typically larger than M4A because they retain all the audio data. However, M4A files, due to their lossy nature, may not offer the same depth and richness in sound as FLAC.

Which is better: M4A or FLAC?

Defining which format is “better” depends largely on the user’s needs. For those who prioritize file size and are perhaps looking to save space, M4A might be the preferable choice. Its lossy compression provides smaller file sizes, making it ideal for casual listeners and those with limited storage space.

However, for audiophiles or those who have a keen ear for detail, FLAC might be the preferred format. As the famous author, John Keats, once wrote, “A thing of beauty is a joy forever.” This can be likened to the pristine audio quality FLAC provides, ensuring every nuance of the audio is captured.

Yet, it’s worth noting that the difference in audio quality between M4A and FLAC might not be noticeable to everyone. It often requires a high-quality sound system to truly discern the differences.

What are the advantages of M4A over FLAC?

M4A does come with certain advantages. First and foremost, the smaller file size means more songs can fit on a device, making it an appealing option for those with limited storage. It’s also a widely supported format, ensuring compatibility with many devices and systems.

“Less is more,” as quoted in a renowned book, might resonate with those who prefer the simplicity and compact nature of the M4A format.

Additionally, M4A files tend to process faster due to their size. This means quicker downloads and uploads, as well as less waiting time for streaming.

How does FLAC’s quality compare to M4A?

FLAC’s quality is, objectively speaking, superior to M4A. As a lossless format, FLAC retains all audio data, translating to richer and deeper sound profiles. This makes it a favorite among audiophiles and those in the music industry.

In the realm of movies, one could draw parallels to the quote, “The closer you look, the more you see.” With FLAC, the closer you listen, the more you hear.

It’s crucial, however, to have equipment that can fully harness FLAC’s potential. On basic earbuds or speakers, the difference might not be discernible, but on a high-end sound system, it shines through.

Final Words

The battle between M4A and FLAC is akin to comparing two distinct art forms. Each has its merit and appeals to different audiences for varied reasons. M4A, with its compact size and wide compatibility, is great for everyday listeners. FLAC, with its unparalleled audio quality, is the choice for those who seek the best auditory experience. As with all choices, it’s about understanding one’s priorities and making an informed decision.

What is digital audio and video?

What is digital audio and video?

Digital Audio and Video

Digital audio and video are types of data that we can store on a computer or other electronic device. They are made up of a series of numbers that represent the sound or image we want to save. This means that instead of using physical materials like film or tape to record sound or video, we can use a computer to store and manipulate digital versions of that data.

Digital Audio and Video

How is sound digitized?

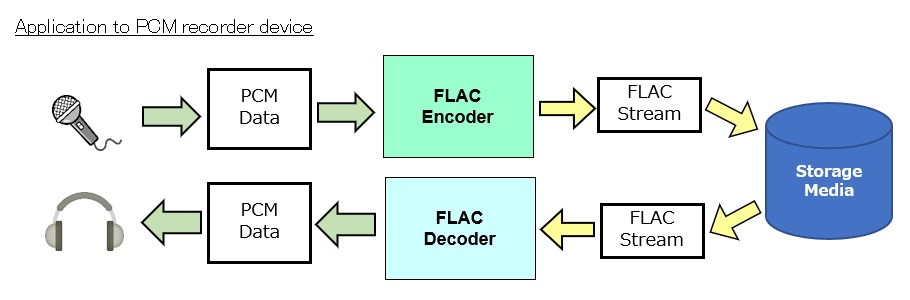
Sound is a type of wave that travels through the air. When we want to digitize sound, we need to find a way to measure that wave and turn it into a series of numbers. We do this by using a device called a microphone, which converts sound waves into electrical signals that can be processed by a computer.

Here’s an example: imagine you’re at a concert and you want to record a song using your phone. You turn on the voice memo app and hold your phone up to the speakers. The microphone in your phone converts the sound waves from the speakers into electrical signals that are then turned into a digital audio file that you can listen to later.

How are multiple sounds combined into a single file?

When we record sound using a microphone, we’re not just capturing one sound at a time. We’re also picking up any other sounds that might be happening in the background, like people talking or the sound of a car driving by. So how do we store all of these different sounds in a single file?

The answer is that each sound is given its own “channel” in the digital audio file. Imagine that you have a stereo system with two speakers – one on the left and one on the right. When you record a song using your phone, the sound that’s coming out of the left speaker is saved in one channel of the audio file, while the sound that’s coming out of the right speaker is saved in another channel.

How are different instruments and voices saved in a single channel?

So now we know how to store multiple sounds in a digital audio file using different channels. But what if we want to save a song that has lots of different instruments and voices playing at the same time? How can we separate out all of those different sounds and make sure they’re saved correctly in the file?

The answer is that each sound is given its own “frequency” in the digital audio file. Think of it like a rainbow: just like how a rainbow has lots of different colors, sound has lots of different frequencies. When we record a song, we’re capturing all of those different frequencies at the same time.

So let’s say we’re recording a song that has a guitar, a bass, a drum set, and a singer. Each of those instruments and the singer’s voice has a different set of frequencies that make up its sound. The guitar might have a lot of high frequencies, while the bass might have a lot of low frequencies. When we record the song, we capture all of those frequencies at the same time and save them in the digital audio file.

How are timbres saved in a digital audio file?

The “timbre” of a sound refers to its unique quality or tone. For example, if you hear a trumpet and a violin playing the same note, you can still tell the difference between the two because they have different timbres. So how do we save the timbre of each instrument or voice in a digital audio file?

To save the timbre of each sound, we use a process called “sampling”. Sampling involves taking tiny snapshots of the sound wave at regular intervals and saving those snapshots as numbers in the digital audio file. The more snapshots we take, the more accurately we can capture the unique timbre of each sound.

Here’s an example: let’s say we’re recording a piano playing a single note. We take 44,100 snapshots of the sound wave per second and save each snapshot as a number in the digital audio file. When we play back the file, the computer reads those numbers and uses them to recreate the sound of the piano note. Because we took so many snapshots per second, we’re able to capture all of the nuances of the piano’s timbre and make it sound like a real piano.

How are noises and other sounds saved in a digital audio file?

When we record sound using a microphone, we’re not just capturing the sounds we want to hear – we’re also capturing any background noise that might be happening. This can include things like people talking, cars driving by, or birds chirping. So how do we deal with all of that extra noise when we save the sound as a digital file?

One way to deal with background noise is to use a process called “noise reduction”. This involves analyzing the digital audio file and looking for parts of the sound that are consistent over time – like the sound of a fan running or the hum of a fluorescent light. The computer can then remove those consistent sounds from the file, leaving behind just the sounds we want to hear.

Another way to deal with background noise is to use a process called “EQ” (short for “equalization”). EQ allows us to boost or cut certain frequencies in the sound to make it sound better. For example, if there’s a lot of low-frequency rumble in a recording, we can use EQ to cut out some of those frequencies and make the sound clearer.

What is digital video?

Digital video is similar to digital audio, but instead of capturing sound waves, we’re capturing images. When we record a video, we’re capturing a series of still images (or frames) at regular intervals and saving them as a digital file.

How are videos saved in digital format?

To save a video in digital format, we need to capture a series of still images (or frames) and save them as a digital file. We do this using a device called a camera, which captures light from the scene we’re filming and turns it into an electrical signal that can be processed by a computer.

Here’s an example: imagine you’re filming a video of your dog playing in the park. You hold up your phone and hit the record button. The camera in your phone captures a series of still images (or frames) of your dog playing and saves them as a digital video file that you can watch later.

How are multiple images combined into a single video file?

When we capture a video, we’re capturing a series of still images (or frames) at regular intervals. To create a smooth video, we need to combine all of those frames into a single file. This is done using a process called “video compression”.

Video compression works by looking for parts of the image that are similar from frame to frame and only saving the parts that are different. For example, if you’re filming a video of a person sitting in a chair, the background behind them might not change much from frame to frame, so the computer can save that part of the image just once and only save the parts that are changing (like the person’s movements).

By only saving the parts of the image that are changing, we’re able to save space and create smaller video files that are easier to store and share. However, too much compression can make the video look blurry or pixelated. So, it’s important to find a balance between file size and video quality when compressing videos.

How do we add sound to a digital video file?

To add sound to a digital video file, we use a process called “audio syncing”. Audio syncing involves combining the digital audio file (which we learned about earlier) with the digital video file so that the sound matches up with the images.

Here’s an example: let’s say you’re filming a concert and you want to create a video of one of the songs. You record the video using your camera and the audio using a separate recording device. When you go to edit the video, you import both the digital audio file and the digital video file into your editing software. Then, you use audio syncing to line up the audio with the video so that the sound matches up with the images.

Conclusion

In conclusion, digital audio and video are complex subjects, but they can be explained in a way that a 6-year-old can understand. Digital audio involves converting sound waves into numbers that can be saved in a digital file. We use sampling to capture the unique timbre of each sound, and we use noise reduction and EQ to deal with background noise. Digital video involves capturing a series of still images (or frames) and saving them as a digital file. We use video compression to combine those frames into a single file and audio syncing to add sound to the video. By understanding these concepts, we can appreciate the technology behind the digital media that we enjoy every day.