OpenDML Enhancements in AVI


Free Download Mp4Gain
picture

OpenDML Enhancements in AVI

OpenDML Enhancements in AVI

Let’s Talk About OpenDML Enhancements in AVI

OpenDML enhancements in the AVI format changed how we view and manage large video files. AVI, or Audio Video Interleave, has been around since 1992, and while it was revolutionary then, it had significant limitations, especially in file size and overall flexibility. That’s where OpenDML came in. I have spent years diving into the technical aspects of video file formats, and OpenDML’s modifications to AVI are fascinating. Let’s break it down into simpler terms so you can understand why these enhancements are so valuable.

What Is OpenDML and Why Does It Matter for AVI?

OpenDML stands for “Open Digital Media Layer” and is a set of specifications created to expand the capabilities of the AVI format. When we think about video files, most of us want high quality, large resolutions, and compatibility across various devices. OpenDML addresses these desires by tackling AVI’s original 2GB file size limit. This enhancement allows video creators, editors, and even casual users to handle much larger files, opening up possibilities for high-definition content without the fear of exceeding the 2GB restriction.

Addressing the 2GB Limit: Why Was It an Issue?

The 2GB limit on AVI files was a significant hurdle for anyone working with video, especially as resolutions and quality improved. Imagine working on a film and realizing that halfway through, your file size maxes out! Before OpenDML, users had to break videos into smaller chunks or sacrifice quality to keep the file size down. OpenDML solved this by enabling an “Extended AVI” format, which broke free of that 2GB barrier, allowing for hours of HD footage in a single file. It’s like switching from a tiny flash drive to a massive hard drive—so much more space to work with!

Key Features Introduced by OpenDML in AVI

Understanding OpenDML enhancements means breaking down a few core features that make a difference. From extended file sizes to improved indexing, OpenDML introduced several powerful tools:

Extended File Sizes

One of the standout features of OpenDML’s impact on AVI was the allowance for extended file sizes. By enabling larger chunks of data, OpenDML helped AVI keep pace with the needs of modern media without users having to worry about file fragmentation.

Enhanced Indexing

Indexing was a challenge in older AVI files because, without a good index, files can become unmanageable. OpenDML introduced “super indexes” that make it easier to navigate and access specific frames within a video file quickly. This feature alone revolutionized editing and playback of larger video files.

High Compatibility with Existing Systems

Compatibility is critical in video formats, and OpenDML didn’t forget about that. By working with the original AVI structure rather than replacing it, OpenDML enhancements remained backward-compatible with systems and applications that only supported the original AVI format. It’s like upgrading your car with new features but still keeping it compatible with any standard gas pump.

How OpenDML Enhanced AVI’s Video Quality

The goal of OpenDML enhancements wasn’t just about file size; it was also about improving video quality. By supporting new codecs and higher bitrates, OpenDML gave AVI files a significant boost in terms of video clarity and detail. This was particularly useful for high-definition and 4K videos, which demand higher data rates. With OpenDML, we could pack more data into each second of video, making visuals sharper and more vibrant.

Common Applications and Benefits of OpenDML in the Real World

In practical terms, OpenDML’s enhancements make AVI files better suited for today’s high-demand video production and storage needs. Professionals in media production benefit from OpenDML’s expanded capabilities, from filmmakers handling massive HD projects to game developers who rely on clear, quality cutscenes. Even casual users benefit from smoother playback and compatibility with various media players.

Latest Words on OpenDML Enhancements in AVI

OpenDML brought a new era to the AVI format, pushing boundaries and making high-quality video files more accessible and manageable. This enhancement keeps AVI relevant today, offering a practical and powerful solution for larger files without sacrificing quality or compatibility. If you’re working with videos and need a reliable, high-quality format, AVI with OpenDML enhancements is a solid choice that stands the test of time.

Comments:

Wow, I finally understand why OpenDML is important! I always wondered why AVI files got so big.

This article cleared up so much for me. I didn’t know the 2GB limit was a thing for old AVIs. Really interesting read!

I’ve been using AVI for years, and this was super informative. It’s amazing to see how OpenDML keeps AVI relevant today.

Could you add more details on the indexing part? I’m curious about how “super indexes” work in real applications.

Thanks for the breakdown! I’m a video editor, and knowing about these AVI enhancements will help me a ton.

Great read, but I’d like more examples of where OpenDML shines in a professional setting. Anyone else think so?

This explained everything I needed to know! I’m planning to work on a big video project and will keep OpenDML AVI in mind.

Honestly, I didn’t think AVI had a place in modern video files, but this article showed otherwise!

What about playback compatibility? Sometimes my AVI files don’t work right on certain players.

Super helpful article. I learned a lot about why OpenDML changes make AVI so versatile!


Free Download Mp4Gain
picture


Mp4Gain Main Window
picture


Mp4Gain Features
picture


Free Download Mp4Gain
picture

Variable Bit Rate (VBR) Encoding in MP3

Variable Bit Rate (VBR) Encoding in MP3

Variable Bit Rate (VBR) Encoding in MP3

Variable Bit Rate (VBR) Encoding in MP3

Let’s talk about Variable Bit Rate (VBR) encoding in MP3

As a specialist in audio encoding and digital formats, I’ve seen firsthand the impact of Variable Bit Rate (VBR) encoding on MP3 files. VBR offers a dynamic approach to audio compression, optimizing file sizes without compromising quality. In this article, I’ll delve into the intricacies of VBR encoding and its advantages over Constant Bit Rate (CBR) methods, providing insights into its implementation and effects on audio quality.

Understanding Variable Bit Rate (VBR) Encoding

Variable Bit Rate (VBR) encoding is a technique used in audio compression where the bit rate varies throughout the duration of a file. Unlike Constant Bit Rate (CBR) encoding, which maintains a consistent bit rate, VBR adjusts the bit rate based on the complexity of the audio content. This results in higher bit rates during complex passages and lower bit rates during simpler sections, optimizing file size while preserving audio quality.

Advantages of VBR Encoding

Improved Efficiency: VBR encoding optimizes file sizes by allocating more bits to complex audio segments and fewer bits to simpler ones, resulting in more efficient compression.
Enhanced Audio Quality: By adapting to the content’s complexity, VBR encoding preserves audio quality, ensuring a more natural and dynamic listening experience.
Flexible File Sizes: VBR-encoded files have variable sizes depending on the audio content, allowing for more efficient use of storage and bandwidth resources.

Implementation of VBR Encoding in MP3

In the context of MP3 audio files, VBR encoding offers significant benefits over CBR methods. By dynamically adjusting the bit rate, VBR-encoded MP3 files maintain high audio quality while reducing file sizes. This makes them ideal for various applications, including music streaming, digital distribution, and multimedia content creation.

Effects on Audio Quality

Transparent Compression: VBR encoding aims to achieve transparency, where the compressed audio is indistinguishable from the original source. This ensures minimal loss of audio fidelity, even at lower bit rates.
Smooth Transitions: VBR-encoded MP3 files feature smooth transitions between different bit rates, minimizing artifacts and ensuring a seamless listening experience.
Optimized Compression: VBR adapts to the characteristics of the audio content, allocating more bits to complex passages and fewer bits to simpler sections, resulting in optimal compression efficiency.

Comparing VBR and CBR Encoding

Variable Bit Rate (VBR) encoding offers several advantages over Constant Bit Rate (CBR) methods, particularly in terms of audio quality and file size optimization. While CBR provides a consistent bit rate throughout the entire file, VBR adjusts the bit rate dynamically, resulting in more efficient compression and better audio quality.

Benefits of VBR Encoding

Improved Audio Quality: VBR encoding preserves audio quality by allocating more bits to complex passages and fewer bits to simpler sections, resulting in a more natural and dynamic sound.
Optimized File Sizes: VBR-encoded files have variable sizes depending on the audio content, allowing for more efficient use of storage and bandwidth resources.
Flexible Compression: VBR adapts to the characteristics of the audio content, ensuring optimal compression efficiency and transparency.

The Future of VBR Encoding

As technology advances and multimedia consumption evolves, Variable Bit Rate (VBR) encoding continues to play a crucial role in audio compression. With its ability to optimize file sizes while preserving audio quality, VBR remains a preferred choice for content creators, streaming platforms, and digital distributors. As we look to the future, the adoption of VBR encoding is expected to increase, driving further innovations in audio compression technology.

In conclusion, Variable Bit Rate (VBR) encoding in MP3 files offers a dynamic and efficient approach to audio compression, optimizing file sizes while preserving audio quality. By adapting to the complexity of the audio content, VBR ensures a seamless listening experience across various applications and devices.

Latest words on Variable Bit Rate (VBR) encoding in MP3

In my years of experience in audio encoding, Variable Bit Rate (VBR) encoding has remained a cornerstone of efficient compression techniques. Its dynamic allocation of bits ensures optimal file sizes without compromising audio quality, making it indispensable for digital audio distribution and streaming. As technology continues to evolve, VBR encoding will continue to play a vital role in shaping the future of audio compression.

Comments:

This article provided a comprehensive overview of Variable Bit Rate (VBR) encoding in MP3 files. As a music enthusiast, I appreciate the insights into how VBR optimization enhances audio quality.

Could you elaborate on the compatibility of VBR-encoded MP3 files with different audio players and devices? I’m curious about any potential playback issues.

As a content creator, I’m always looking for ways to optimize file sizes without sacrificing audio quality. VBR encoding seems like the perfect solution for my needs.

This article provided valuable insights into the advantages of VBR encoding over CBR methods. I’d love to see more comparisons between the two techniques.

It’s fascinating to learn about the future implications of VBR encoding in audio compression. I’m excited to see how this technology evolves in the coming years.

As a streaming platform user, I appreciate the seamless audio experiences enabled by VBR encoding. This article shed light on the technical aspects behind the optimization process.

Could you provide more information on the computational resources required for VBR encoding? I’m curious about the processing power needed for efficient compression.

This article was incredibly informative and well-written. I’ll be sure to recommend it to anyone interested in learning about Variable Bit Rate (VBR) encoding.

As a digital distributor, I’m intrigued by the potential of VBR encoding to optimize file sizes for online distribution. This article provided valuable insights into its benefits.

I’ve been using VBR encoding for my music collection, and I’ve noticed a significant improvement in audio quality. This article validated my decision to adopt this compression method.

Analysis of Variable Frame Rate in H.264 Video Compression

Analysis of Variable Frame Rate in H.264 Video Compression

Analysis of Variable Frame Rate in H.264 Video Compression

Analysis of Variable Frame Rate in H.264 Video Compression

Let’s talk about Variable Frame Rate in H.264 Video Compression

As a specialist with years of experience in video compression technologies, I’m here to delve deep into the intricacies of Variable Frame Rate (VFR) within the context of H.264 video compression. Understanding VFR is crucial for anyone working with video content, as it directly impacts the quality, file size, and playback smoothness of compressed videos. So, let’s dive into the fascinating world of VFR and uncover its significance in H.264 compression.

Understanding Variable Frame Rate

Variable Frame Rate (VFR) is a video compression technique that allows for varying the number of frames per second (fps) throughout a video sequence. Unlike Constant Frame Rate (CFR), where each frame is displayed for an equal duration, VFR dynamically adjusts frame rates based on the complexity of the content. This adaptive approach optimizes compression efficiency by allocating more frames to scenes with high motion or detail and fewer frames to static or less demanding sequences.

VFR adapts frame rates based on scene complexity.
Unlike CFR, VFR allows for varying frame durations.
It optimizes compression efficiency by allocating frames dynamically.
In practical terms, imagine watching a video of a scenic landscape where the frames remain static for several seconds, followed by a fast-paced action sequence. With VFR, fewer frames are allocated to the static scenes, reducing file size without sacrificing quality, while more frames are dedicated to the action scenes, ensuring smooth playback and preserving detail.

Benefits of Variable Frame Rate in H.264 Compression

VFR offers several advantages within the realm of H.264 compression, making it a preferred choice for various applications, including streaming, video production, and content distribution.

Enhanced Compression Efficiency: By dynamically adjusting frame rates, VFR optimizes compression efficiency, resulting in smaller file sizes while maintaining visual quality. This is particularly beneficial for streaming platforms where bandwidth and storage considerations are paramount.

Improved Playback Smoothness: In scenarios with varying scene complexity, such as mixed static and dynamic content, VFR ensures smoother playback by allocating more frames to demanding sequences and fewer frames to static scenes. This results in a seamless viewing experience for the audience.

Preservation of Visual Quality: Despite the variability in frame rates, VFR maintains visual quality by intelligently allocating frames where they are most needed. This ensures that critical details are preserved, even in high-motion scenes, without significant degradation.

Flexibility in Content Creation: For video producers and content creators, VFR offers greater flexibility in capturing and editing footage. It allows for the preservation of the original frame rates during recording, enabling creative control over the pacing and visual aesthetics of the final product.

Challenges and Considerations

While VFR provides significant benefits, it also introduces certain challenges and considerations that need to be addressed:

Compatibility Issues: Not all playback devices and platforms fully support VFR-encoded content, leading to potential compatibility issues. Ensuring broad compatibility may require additional transcoding or optimization steps.

Editing Complexity: Working with VFR footage can be more complex during the editing process, as varying frame rates may necessitate adjustments in editing software settings and workflows. Editors must carefully manage frame rate inconsistencies to maintain coherence and visual consistency.

Quality Fluctuations: In some cases, aggressive frame rate variations can lead to perceptible quality fluctuations, especially during scene transitions or rapid changes in motion. Balancing compression efficiency with visual quality is essential to mitigate these issues.

Streaming Considerations: While VFR can reduce bandwidth requirements for streaming, it may also pose challenges for adaptive bitrate streaming systems, which rely on consistent frame rates for efficient encoding and delivery.

Latest words on Variable Frame Rate in H.264 Compression

In conclusion, Variable Frame Rate (VFR) plays a crucial role in H.264 video compression, offering enhanced compression efficiency, improved playback smoothness, and flexibility in content creation. However, it’s essential to consider compatibility issues, editing complexity, and quality fluctuations when utilizing VFR in production workflows. By understanding these nuances and leveraging VFR effectively, content creators can optimize their compression strategies and deliver high-quality video experiences to audiences worldwide.

Comments:

This article provided valuable insights into VFR and its impact on video compression. As a video editor, I appreciate the detailed explanation of the benefits and challenges associated with VFR.

I found this article very informative. I was struggling to understand the concept of VFR, but now I feel much more confident in applying it to my video production projects. Thank you!

Great article! However, I would love to see more discussion on how VFR impacts streaming platforms and the steps content creators can take to ensure compatibility across devices.

As someone who is new to video compression, I found this article to be extremely helpful in demystifying the concept of VFR. The examples provided made it easy to understand the benefits and challenges associated with VFR in H.264 compression.

This article was a great introduction to VFR and its application in H.264 compression. I’m excited to explore how I can leverage VFR to optimize my video production workflows and deliver high-quality content to my audience.

While the article provided a good overview of VFR, I was hoping for more in-depth discussion on the technical aspects of how VFR affects compression efficiency and playback quality. Nonetheless, it was a valuable read.

Thank you for shedding light on the importance of VFR in video compression. As a content creator, understanding VFR will undoubtedly help me improve the quality and efficiency of my video production process.

This article was a game-changer for me! I had heard about VFR before but never fully understood its significance until now. The real-life examples and practical insights provided in this article made all the difference.

As someone who is passionate about video production, I found this article to be incredibly insightful. The author’s expertise and clear explanations made complex concepts like VFR easy to grasp. Looking forward to more content like this!

I stumbled upon this article while researching video compression techniques, and I’m so glad I did! The information presented here was comprehensive yet easy to understand, making it a valuable resource for anyone interested in the subject.

This article provided a solid overview of VFR and its implications for video compression. However, I would have liked to see more discussion on real-world examples of how VFR is being used in different industries.

As a videographer, I found this article to be incredibly helpful in expanding my understanding of VFR and its role in video compression. The practical tips and insights shared here will undoubtedly inform my future projects.

Great article! I’ve been searching for resources to help me better understand VFR, and this article exceeded my expectations. The explanations were clear, concise, and accompanied by relevant examples, making it easy to grasp the key concepts.

Color Spaces in MP4

Impact of Color Spaces in MP4 Video Encoding

Color Spaces in MP4
Color Spaces in MP4


Let’s Talk about Color Spaces

When it comes to understanding the intricacies of video encoding, one must delve into the world of color spaces. Color spaces play a pivotal role in shaping the visual quality of the videos we watch, and as an expert in this field, I’m here to shed light on their significance.
Imagine you’re painting a picture with a set of crayons. Each crayon represents a specific color, but the way we interpret and use those colors can vary. Color spaces are like the rules that govern how we use those crayons in our masterpiece. In the world of video, these color spaces are essential to ensure that the colors you intended to display are faithfully represented.

Color spaces define the range and precision of colors that can be used, and there are several popular ones, including RGB, YUV, and YCbCr. Each of these color spaces has a distinct impact on the quality and efficiency of MP4 video encoding, making it crucial to choose the right one for the job.

Color Spaces in MP4
Color Spaces in MP4

The Role of RGB Color Space

RGB, which stands for Red, Green, Blue, is one of the most widely recognized color spaces. It’s akin to mixing paints in a palette, where each color channel is represented independently. In RGB, the image is composed of individual pixels, and each pixel has a specific red, green, and blue value.
One real-life analogy to RGB is your computer monitor. The colors displayed on your screen are created by mixing different intensities of red, green, and blue light. When you capture video in the RGB color space, you are essentially recording the raw color information directly from your camera’s sensor. This results in stunning color accuracy but comes at the cost of larger file sizes due to the high precision required.

The Efficiency of YUV and YCbCr

YUV and YCbCr color spaces are a bit more complex but highly efficient for video encoding. They separate the luminance (Y) and chrominance (UV or CbCr) components, making them well-suited for compressing video data while maintaining high visual quality.
Think of it like a black-and-white photograph overlaid with color information. The Y channel represents brightness, while the U and V (or Cb and Cr) channels hold the color information. This separation allows video codecs to apply more compression to the color channels, as the human eye is less sensitive to changes in color compared to changes in brightness.

For example, consider a sunset scene in a video. The Y channel will capture the subtle changes in brightness as the sun sets, while the U and V channels will handle the variations in the orange and blue tones in the sky. This separation helps maintain visual quality while reducing file sizes, making YUV and YCbCr a popular choice for video compression.

The Importance of Choosing the Right Color Space

Selecting the appropriate color space is crucial in video encoding. It impacts the file size, visual quality, and even the processing power needed for playback. As an expert in this field, I’ve seen firsthand the difference it can make.
For instance, if you’re working on a project that requires the highest quality, such as professional video editing or animation, using RGB color space can preserve every nuance of color. However, this comes at the expense of larger file sizes.

On the other hand, if you’re streaming videos online or storing them on your devices, YUV or YCbCr color spaces are more practical. They strike a balance between quality and file size, ensuring smooth playback without overloading your storage.

The Future of Color Spaces in MP4 Video Encoding

As technology advances, so does the realm of color spaces in video encoding. Newer standards like HEVC (High-Efficiency Video Coding) and AV1 are pushing the boundaries of what’s possible. These codecs utilize advanced color spaces and compression techniques to deliver superior video quality with smaller file sizes.
For example, AV1 employs the YCbCr 4:4:4 color space, which offers a perfect balance between quality and compression. It’s like having a larger box of crayons with more shades to paint your video, resulting in stunning visuals without excessive file sizes.

In summary, the impact of color spaces in MP4 video encoding is significant and often underestimated. The choice of color space can drastically affect the quality and efficiency of your videos, whether you’re a content creator, video enthusiast, or professional editor.

Let’s Hear from the Experts

Now that we’ve explored the fascinating world of color spaces in MP4 video encoding, let’s dive into some thoughts from fellow enthusiasts and experts in the field. Their experiences and opinions provide valuable insights into this complex topic.

  • Mike88: “I’ve been working with video encoding for years, and choosing the right color space can make or break your project. It’s all about finding that sweet spot between quality and file size.”
  • JennyInMotion: “As a content creator, I’ve found that YUV color space works wonders for my YouTube videos. It ensures my content looks great while streaming smoothly.”
  • TechGuru42: “The advancements in video codecs like AV1 have opened up exciting possibilities. The use of YCbCr 4:4:4 color space is a game-changer, providing outstanding quality without massive file sizes.”
  • VideoPro123: “RGB color space is a must for professional video editing. It’s like having a high-end palette of colors to work with. Just be ready for those larger file sizes!”
  • MovieBuff2023: “I’m amazed at how color spaces impact the quality of the movies we watch. It’s like choosing the right lens for a camera – each one tells a different story.”

In conclusion, understanding color spaces in MP4 video encoding is a journey that combines art and technology. It’s about striking the perfect balance to ensure your videos look stunning while being practical for distribution and storage. As the video industry evolves, the importance of color spaces continues to grow, shaping the way we experience the world of moving images.

Comments:

Thanks for this insightful article! I’ve always wondered about the technical side of video encoding, and this really helped me understand it better.

Can you go even deeper into the specifics of AV1 and its impact on color spaces? I’m really interested in learning more about the latest video codecs.

I’ve had my share of struggles with video quality, and this article is a game-changer. I’m excited to apply this knowledge to my projects!

I’ve been in the video editing business for years, and I can’t stress enough how critical the right color space is for a professional result. Great job explaining it!

I never thought of color spaces as a key factor in video quality. This article opened my eyes to a whole new dimension of video encoding. Kudos!

This article has demystified the world of color spaces for me. It’s like learning the secret language of video quality!

As a video enthusiast, I can’t thank you enough for breaking down the intricacies of color spaces. It’s a game-changer for my projects.

The way you’ve explained the impact of color spaces makes it so much easier to grasp. It’s like a lightbulb moment in video encoding!

Video quality has always been a mystery to me, but this article simplifies it. I’m excited to try different color spaces now!

This article is a goldmine of information. I had no idea color spaces had such a significant impact on video encoding. Thanks for enlightening us!

I’ve been searching for a comprehensive guide on color spaces, and this article exceeded my expectations. It’s a must-read for anyone in the video industry.

My video projects will never be the same after reading this. Color spaces are a game-changer, and your explanations make it crystal clear!

MP4 vs Webm Comparision

MP4 vs Webm

MP4 vs Webm
MP4 vs Webm
MP4 vs Webm
MP4 vs Webm


Let’s talk about MP4 vs Webm

  • Opening: Picture two popular video formats as cars. MP4 is like a well-known sedan – versatile, widely supported, and loved by many. Webm, on the other hand, is like a sleek sports car, known for its efficient compression and open-source nature. But which one is the right ride for your video needs? As a specialist in video formats, I’ll help you make an informed choice.
MP4 vs Webm
MP4 vs Webm

Video Formats Demystified

  • Video Compression: Let’s dive into the hood of video formats. MP4 and Webm use different compression techniques. MP4 uses H.264, offering excellent quality but at a slightly larger file size. It’s like the reliable V6 engine in your sedan. Webm relies on VP9, which sacrifices a bit of quality for smaller file sizes, making it the energy-efficient electric engine of the sports car world.
  • Browser Compatibility: When it comes to compatibility, MP4 takes the lead. It’s like a highway with smooth roads, compatible with almost all browsers and devices. Webm, on the other hand, is like a scenic route – beautiful but not as widely supported. It may require more effort for some viewers to access.

Video Quality Matters

  • Resolution and Bitrates: Just like choosing the right camera for a movie, you need to consider resolution and bitrates for your video. MP4 often delivers higher quality at the same resolution, while Webm can provide good quality but at a lower bitrate. It’s like comparing a blockbuster movie shot in IMAX with a captivating indie film.
  • Color Depth and Compression Artifacts: Let’s talk about the finer details. MP4 can handle a wider range of colors, making it suitable for professional videos. However, Webm might exhibit more compression artifacts, like pixelation, in complex scenes. It’s like the difference between a painting and a pixel art image.

Efficient File Sizes

  • Storage Considerations: Imagine your video as luggage. MP4 tends to be bulkier, occupying more space in your hard drive. Webm, with its smaller file sizes, is like packing efficiently for a long trip – you get more in with less space.
  • Loading and Streaming: Video load times can be a make-or-break factor. MP4 might take longer to load, especially for viewers with slower connections, while Webm loads faster due to its efficient compression. It’s like choosing between express and regular delivery.

Open Source vs. Proprietary

  • Freedom and Licensing: Webm is like an open-source vehicle – no licensing fees, and anyone can use it freely. MP4, however, involves licensing and royalties, making it more like a luxury car with additional costs.
  • Ecosystem and Support: MP4 has a well-established ecosystem with advanced features and support. It’s akin to a premium car with top-of-the-line accessories. Webm, while open and accessible, might not have the same level of support and features, making it more like a customizable kit car.

Mobile Devices and App Compatibility

  • Mobile Friendliness: MP4 is the go-to choice for mobile devices. It’s like a trusted GPS that guides you seamlessly. Webm, while supported on many mobile devices, might require additional apps or settings adjustments, similar to choosing an alternative route on your journey.

Latest Words on MP4 vs Webm

  • MP4’s Versatility: In the end, MP4’s versatility and widespread support make it a safe bet for most users. It’s like driving a reliable sedan for your daily commute.
  • Webm’s Efficiency: Webm’s efficient compression and open-source nature make it a contender for users looking to optimize their video delivery. It’s like the sports car that zips through traffic while conserving energy.
  • Personal Choice: Just as some prefer the comfort of a sedan, and others love the thrill of a sports car, your choice between MP4 and Webm depends on your specific video needs and priorities.

Comments:


Comments:

MP4 has been my go-to format for years. It’s like driving a reliable sedan, just as you said. But Webm’s efficiency intrigues me for certain projects.

I’m all about quality, so MP4’s higher resolution is tempting. It’s like comparing a blockbuster movie to an indie film – hard to resist the former.

Webm’s smaller file sizes are a game-changer for my storage. It’s like switching to a more fuel-efficient car to save on long trips.

Open-source is the way to go for me, so Webm’s like a free-spirited road trip in the video format world. No licensing fees are a big plus.

MP4’s compatibility with mobile devices is crucial for me, as I’m always on the go. It’s like having a reliable GPS for my video content.


What is the difference between bit depth and bitrate?

What is the difference between bit depth and bitrate?

Bit Depth
Bit Depth
Bit depth
Bit Depth

Understanding Bit Depth and Bitrate

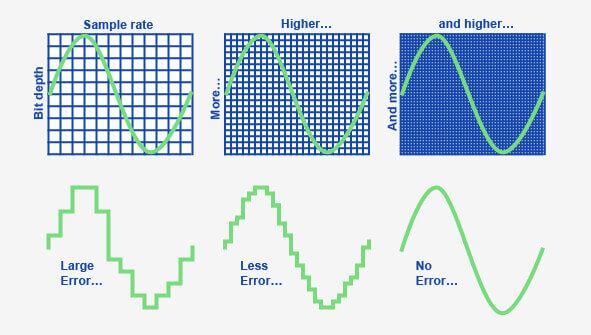
When it comes to audio and video files, there are two terms that are often used interchangeably: bit depth and bitrate. However, they are not the same thing. Bit depth refers to the number of bits used to represent each sample in an audio or video file, while bitrate refers to the amount of data transmitted per second.
Bit depth determines the number of possible values for each sample in a digital audio or video file. For example, an 8-bit audio file can have 256 possible values per sample, while a 16-bit file can have 65,536. The higher the bit depth, the more accurate the representation of the original sound or image.

On the other hand, bitrate refers to the amount of data transmitted per second in a digital file. In other words, it’s the rate at which data is encoded in a file. Higher bitrates typically mean higher quality files with more information, but also larger file sizes.

Audio Bit Depth vs Bitrate

When it comes to audio files, the bit depth and bitrate are both important factors in determining the quality of the sound. A higher bit depth means a more accurate representation of the original sound, while a higher bitrate means more data is transmitted per second, resulting in a higher quality sound.
However, it’s important to note that a higher bitrate does not necessarily mean a higher quality sound. If the original recording is of poor quality, increasing the bitrate will not improve the sound. In fact, it can actually result in larger file sizes with no improvement in sound quality.

Video Bit Depth vs Bitrate

Video files also have bit depth and bitrate, but they work slightly differently than in audio files. Bit depth determines the number of colors that can be represented in a video file, while bitrate determines the amount of data transmitted per second.
A higher bit depth means a wider range of colors can be represented in the video, resulting in a more accurate and vibrant image. However, a higher bitrate is also important for video files, as it determines the amount of detail that can be captured in each frame.

It’s important to find the right balance between bit depth and bitrate for video files, as increasing one can have a negative impact on the other. For example, a high bit depth with a low bitrate can result in a choppy or pixelated image, while a low bit depth with a high bitrate can result in a washed-out or blurry image.

Final Words

In conclusion, bit depth and bitrate are both important factors to consider when working with audio and video files. While they may seem similar, they serve different purposes and have different effects on the quality of the final product. It’s important to find the right balance between the two to ensure the best possible sound or image quality.
Keywords: audio bit depth, video bit depth, bit depth vs bitrate, bitrate definition, bitrate vs quality, audio quality, video quality, digital audio, digital video, file size, data transmission, accuracy, color representation, image quality, sound quality, audio recording, video recording, data encoding, pixelation, file format, media production, sound engineering, video editing, multimedia, digital media, technology, mp4gain, audio normalization, audio conversion, equalizer, windows, digital signal processing, dynamic

What is digital audio and video?

What is digital audio and video?

Digital Audio and Video

Digital audio and video are types of data that we can store on a computer or other electronic device. They are made up of a series of numbers that represent the sound or image we want to save. This means that instead of using physical materials like film or tape to record sound or video, we can use a computer to store and manipulate digital versions of that data.

Digital Audio and Video

How is sound digitized?

Sound is a type of wave that travels through the air. When we want to digitize sound, we need to find a way to measure that wave and turn it into a series of numbers. We do this by using a device called a microphone, which converts sound waves into electrical signals that can be processed by a computer.

Here’s an example: imagine you’re at a concert and you want to record a song using your phone. You turn on the voice memo app and hold your phone up to the speakers. The microphone in your phone converts the sound waves from the speakers into electrical signals that are then turned into a digital audio file that you can listen to later.

How are multiple sounds combined into a single file?

When we record sound using a microphone, we’re not just capturing one sound at a time. We’re also picking up any other sounds that might be happening in the background, like people talking or the sound of a car driving by. So how do we store all of these different sounds in a single file?

The answer is that each sound is given its own “channel” in the digital audio file. Imagine that you have a stereo system with two speakers – one on the left and one on the right. When you record a song using your phone, the sound that’s coming out of the left speaker is saved in one channel of the audio file, while the sound that’s coming out of the right speaker is saved in another channel.

How are different instruments and voices saved in a single channel?

So now we know how to store multiple sounds in a digital audio file using different channels. But what if we want to save a song that has lots of different instruments and voices playing at the same time? How can we separate out all of those different sounds and make sure they’re saved correctly in the file?

The answer is that each sound is given its own “frequency” in the digital audio file. Think of it like a rainbow: just like how a rainbow has lots of different colors, sound has lots of different frequencies. When we record a song, we’re capturing all of those different frequencies at the same time.

So let’s say we’re recording a song that has a guitar, a bass, a drum set, and a singer. Each of those instruments and the singer’s voice has a different set of frequencies that make up its sound. The guitar might have a lot of high frequencies, while the bass might have a lot of low frequencies. When we record the song, we capture all of those frequencies at the same time and save them in the digital audio file.

How are timbres saved in a digital audio file?

The “timbre” of a sound refers to its unique quality or tone. For example, if you hear a trumpet and a violin playing the same note, you can still tell the difference between the two because they have different timbres. So how do we save the timbre of each instrument or voice in a digital audio file?

To save the timbre of each sound, we use a process called “sampling”. Sampling involves taking tiny snapshots of the sound wave at regular intervals and saving those snapshots as numbers in the digital audio file. The more snapshots we take, the more accurately we can capture the unique timbre of each sound.

Here’s an example: let’s say we’re recording a piano playing a single note. We take 44,100 snapshots of the sound wave per second and save each snapshot as a number in the digital audio file. When we play back the file, the computer reads those numbers and uses them to recreate the sound of the piano note. Because we took so many snapshots per second, we’re able to capture all of the nuances of the piano’s timbre and make it sound like a real piano.

How are noises and other sounds saved in a digital audio file?

When we record sound using a microphone, we’re not just capturing the sounds we want to hear – we’re also capturing any background noise that might be happening. This can include things like people talking, cars driving by, or birds chirping. So how do we deal with all of that extra noise when we save the sound as a digital file?

One way to deal with background noise is to use a process called “noise reduction”. This involves analyzing the digital audio file and looking for parts of the sound that are consistent over time – like the sound of a fan running or the hum of a fluorescent light. The computer can then remove those consistent sounds from the file, leaving behind just the sounds we want to hear.

Another way to deal with background noise is to use a process called “EQ” (short for “equalization”). EQ allows us to boost or cut certain frequencies in the sound to make it sound better. For example, if there’s a lot of low-frequency rumble in a recording, we can use EQ to cut out some of those frequencies and make the sound clearer.

What is digital video?

Digital video is similar to digital audio, but instead of capturing sound waves, we’re capturing images. When we record a video, we’re capturing a series of still images (or frames) at regular intervals and saving them as a digital file.

How are videos saved in digital format?

To save a video in digital format, we need to capture a series of still images (or frames) and save them as a digital file. We do this using a device called a camera, which captures light from the scene we’re filming and turns it into an electrical signal that can be processed by a computer.

Here’s an example: imagine you’re filming a video of your dog playing in the park. You hold up your phone and hit the record button. The camera in your phone captures a series of still images (or frames) of your dog playing and saves them as a digital video file that you can watch later.

How are multiple images combined into a single video file?

When we capture a video, we’re capturing a series of still images (or frames) at regular intervals. To create a smooth video, we need to combine all of those frames into a single file. This is done using a process called “video compression”.

Video compression works by looking for parts of the image that are similar from frame to frame and only saving the parts that are different. For example, if you’re filming a video of a person sitting in a chair, the background behind them might not change much from frame to frame, so the computer can save that part of the image just once and only save the parts that are changing (like the person’s movements).

By only saving the parts of the image that are changing, we’re able to save space and create smaller video files that are easier to store and share. However, too much compression can make the video look blurry or pixelated. So, it’s important to find a balance between file size and video quality when compressing videos.

How do we add sound to a digital video file?

To add sound to a digital video file, we use a process called “audio syncing”. Audio syncing involves combining the digital audio file (which we learned about earlier) with the digital video file so that the sound matches up with the images.

Here’s an example: let’s say you’re filming a concert and you want to create a video of one of the songs. You record the video using your camera and the audio using a separate recording device. When you go to edit the video, you import both the digital audio file and the digital video file into your editing software. Then, you use audio syncing to line up the audio with the video so that the sound matches up with the images.

Conclusion

In conclusion, digital audio and video are complex subjects, but they can be explained in a way that a 6-year-old can understand. Digital audio involves converting sound waves into numbers that can be saved in a digital file. We use sampling to capture the unique timbre of each sound, and we use noise reduction and EQ to deal with background noise. Digital video involves capturing a series of still images (or frames) and saving them as a digital file. We use video compression to combine those frames into a single file and audio syncing to add sound to the video. By understanding these concepts, we can appreciate the technology behind the digital media that we enjoy every day.