Error Detection and Correction in AAC Audio Encoding


Free Download Mp4Gain
picture

Error Detection and Correction in AAC Audio Encoding

Error Detection and Correction in AAC Audio Encoding

Error Detection and Correction in AAC Audio Encoding

Exploring the Importance of Error Detection and Correction

As an authority in audio encoding technologies, delving into the intricate mechanisms of error detection and correction in AAC (Advanced Audio Coding) encoding is paramount. AAC stands as a cornerstone in modern audio compression, offering exceptional sound quality and efficiency. However, even the most advanced encoding algorithms are susceptible to errors that can degrade audio quality. Hence, understanding how error detection and correction mechanisms function within AAC encoding is crucial for ensuring pristine audio reproduction across various platforms and devices.

Understanding AAC Audio Encoding

AAC, a successor to the popular MP3 format, revolutionized audio compression with its ability to deliver superior sound quality at lower bitrates. Utilizing sophisticated algorithms such as psychoacoustic modeling and transform coding, AAC achieves remarkable compression efficiency without significant loss of audio fidelity. This makes it the preferred choice for a wide range of applications, including digital music streaming, video conferencing, and multimedia content distribution.

Psychoacoustic Modeling and Transform Coding

Psychoacoustic Modeling: AAC analyzes the human auditory system’s characteristics to identify sounds that are perceptually irrelevant. By discarding such information, AAC minimizes data redundancy without compromising perceived audio quality.

Transform Coding: AAC employs mathematical transformations, such as the Modified Discrete Cosine Transform (MDCT), to convert audio signals into frequency-domain representations. This enables efficient compression by removing redundant information and quantizing the remaining data for storage or transmission.

The Role of Error Detection and Correction

In the realm of AAC encoding, error detection and correction mechanisms serve as safeguards against data corruption during transmission or storage. These mechanisms aim to identify erroneous bits or packets and either rectify them or mitigate their impact on audio playback. By ensuring data integrity, error detection and correction techniques contribute to a seamless and immersive audio experience for listeners.

Types of Errors in AAC Encoding

Bit Errors: Occur when individual bits within an AAC stream are altered or lost due to transmission errors or storage degradation.
Packet Loss: Refers to the loss of entire AAC packets during transmission, typically caused by network congestion or packet collisions.
Interference: External electromagnetic interference or signal degradation can introduce errors into the AAC audio stream, affecting playback quality.

Error Detection Techniques

Cyclic Redundancy Check (CRC)

CRC is a widely used error detection technique in AAC encoding, where a checksum is calculated for each data packet. Upon receiving the packet, the checksum is recalculated, and any discrepancies indicate data corruption. While CRC can detect errors, it lacks the capability to correct them.

Parity Checking

Parity checking involves adding an additional parity bit to each byte of data, ensuring that the total number of set bits (either 0 or 1) is always even or odd. Discrepancies in parity indicate errors, allowing for their detection. However, parity checking is limited in its ability to correct errors.

Forward Error Correction (FEC)

FEC techniques, such as Reed-Solomon codes, introduce redundant information into the AAC stream, enabling the receiver to reconstruct missing or erroneous data. By leveraging redundancy, FEC can correct errors without the need for retransmission, making it particularly effective in error-prone environments.

Error Correction Strategies

Interpolation

Interpolation involves estimating missing or erroneous audio samples based on neighboring samples. While interpolation can mitigate minor errors, it may introduce artifacts or distortions in the audio signal, impacting overall quality.

Concealment

Concealment techniques aim to mask errors by replacing corrupted audio segments with synthesized or redundant data. Advanced concealment algorithms analyze surrounding audio frames to generate seamless replacements, minimizing perceptible artifacts.

Retransmission

In cases of severe packet loss or data corruption, retransmission protocols can request the retransmission of lost AAC packets from the sender. While effective, retransmission mechanisms may introduce latency and overhead, particularly in real-time streaming applications.

Enhancing AAC Error Resilience

As AAC continues to evolve, advancements in error resilience techniques play a vital role in enhancing audio quality and reliability. By combining robust error detection mechanisms with adaptive error correction strategies, AAC encoding can withstand varying transmission conditions and deliver unparalleled audio fidelity.

Latest words on Error Detection and Correction in AAC Audio Encoding

In conclusion, error detection and correction are integral components of AAC audio encoding, ensuring data integrity and preserving audio quality in diverse playback scenarios. By leveraging sophisticated error detection techniques such as CRC, parity checking, and FEC, alongside adaptive error correction strategies like interpolation, concealment, and retransmission, AAC encoding can deliver a seamless and immersive audio experience for listeners worldwide.

Comments:

This article provided a comprehensive overview of error detection and correction in AAC audio encoding. As an audio engineer, I found the insights into FEC and interpolation particularly valuable for optimizing audio quality.

Great article! However, I would have liked to see more discussion on real-world applications of error correction strategies in AAC encoding, especially in the context of streaming platforms and mobile devices.

As someone new to AAC encoding, I found this article incredibly informative. The explanations were clear, and the examples provided made complex concepts easy to understand. Looking forward to more content like this!

This article highlighted the importance of error detection and correction in ensuring audio quality in AAC encoding. The discussion on CRC, parity checking, and FEC techniques was insightful and helped deepen my understanding of the topic.

While the article provided a solid overview of error detection and correction in AAC encoding, I was hoping for more insights into emerging technologies and trends shaping the future of audio compression. Nonetheless, it was a valuable read.

As an avid music enthusiast, I appreciate articles like this that shed light on the intricate processes behind audio encoding. The explanations were thorough, and the examples provided helped illustrate key concepts effectively.

Thank you for this informative article! I’ve always been curious about how error detection and correction work in AAC encoding, and this article provided the clarity I was seeking. Keep up the great work!

This article was a great introduction to error detection and correction in AAC encoding. As a software developer working with audio applications, I found the insights into FEC and retransmission protocols particularly valuable for optimizing error resilience.

While I enjoyed reading this article, I wish there was more discussion on the trade-offs associated with different error correction strategies in AAC encoding. Nonetheless, it provided a solid foundation for understanding the topic.


Free Download Mp4Gain
picture


Mp4Gain Main Window
picture


Mp4Gain Features
picture


Free Download Mp4Gain
picture

Audio Quantization Error

Audio Quantization Error

Audio Quantization Error

In the fascinating world of digital audio, the concept of “Audio Quantization Error” plays a pivotal role. Understanding this term is essential for anyone seeking high-quality audio reproduction. Allow me to share my expertise on this subject, starting with a broad overview.

Demystifying Audio Quantization Error

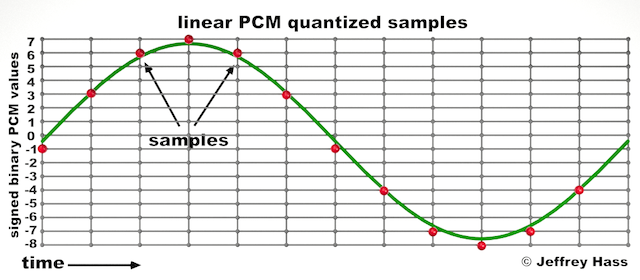
Audio quantization error is a fundamental aspect of digital audio processing. When analog sound waves are converted into digital signals, they undergo quantization. This means that the continuous analog signal is sampled and approximated in discrete steps. These steps are represented by binary values, typically in the form of bits (e.g., 16-bit, 24-bit). Now, what’s crucial to grasp here is that these discrete steps can lead to imperfections in audio reproduction.

Quantization error, often referred to as “quantization noise,” occurs when the actual analog signal deviates from the approximated digital representation. Imagine you have a beautiful painting, and you’re asked to replicate it using only a limited set of colors. The more restricted your color palette, the less accurate your reproduction will be. In the same way, the fewer bits you use for audio quantization, the more pronounced the quantization error becomes.

Quantization Levels and the Impact on Sound Quality

The number of quantization levels (related to bit depth) directly affects the precision of audio representation. For instance, a 16-bit audio recording has 65,536 possible levels, while a 24-bit recording provides a staggering 16,777,216 levels. This increased bit depth allows for a much finer representation of the original analog signal. Hence, a higher bit depth results in a reduction of quantization error, leading to superior sound quality.

To illustrate this, consider a grayscale image with only two colors: black and white. This is akin to an extremely low bit depth in audio, where the audio signal is either “on” or “off.” Now, imagine a high-resolution image with millions of colors, similar to the detail you get in a 24-bit audio recording. The difference in quality is apparent.

The Role of Dithering in Minimizing Quantization Error

One might wonder if there’s a way to mitigate quantization error in low-bit-depth audio recordings. Enter “dithering.” Dithering is a technique that introduces low-level noise to the audio signal, effectively spreading out the quantization error across a broader spectrum. Think of it as adding a sprinkle of fine grains of sand to a painting to blend the colors. This subtle noise masks the harshness of quantization error and makes it less noticeable to the human ear.

Now, as we’ve explored the fundamentals of audio quantization error, let’s delve into the questions that often arise:

How Does Quantization Error Affect Music Production?

In the realm of music production, quantization error can be a significant concern, particularly for professionals aiming to achieve top-tier sound quality. When producing music, especially in genres where subtle nuances are crucial, such as classical or jazz, quantization errors become more perceptible. To maintain audio fidelity, a higher bit depth is preferred during recording and production, ensuring minimal quantization noise.

Is There an Ideal Bit Depth for Audio Recording?

The ideal bit depth for audio recording is a subject of debate among audio enthusiasts. While 24-bit recording is commonly favored for its excellent dynamic range and low quantization error, it’s worth noting that the final audio format for most consumer applications, like CDs or streaming, is often 16-bit. The choice of bit depth should be based on the specific requirements of the project, keeping in mind the trade-off between audio quality and file size.

Can Quantization Error be Completely Eliminated?

Regrettably, quantization error cannot be entirely eliminated, as it’s an inherent part of the digital audio conversion process. However, it can be minimized to the point where it’s imperceptible to the human ear. Through techniques like dithering and the use of higher bit depths, the impact of quantization error can be significantly reduced, allowing for exceptional audio quality.

Last Words about Audio Quantization Error

In the ever-evolving world of audio technology, understanding audio quantization error is a fundamental step towards achieving superior sound quality. As an expert in the field, I’ve shared insights, experiences, and technical knowledge to demystify this concept. Remember, the bit depth you choose in audio recording significantly influences the extent of quantization error, and techniques like dithering play a pivotal role in mitigating its effects. The quest for pristine audio quality is an ongoing journey, but armed with this knowledge, you’re better equipped to make informed decisions in your audio endeavors.

Audio Routing

Understanding Audio Routing: Navigating the Sonic Highway

Audio Routing
Audio Routing
Audio Routing
Audio Routing

Audio routing is the invisible highway that allows sound to flow seamlessly from one source to another. It’s the backbone of our modern audio experience, whether we’re listening to music on our headphones, watching a movie, or attending a live concert. In this article, we’ll explore the intricacies of audio routing, diving deep into the technical aspects while keeping things relatable with real-life examples.

Demystifying Audio Routing: The Basics

At its core, audio routing is about directing audio signals from their source to their destination. Think of it as the GPS for sound, guiding it through various paths and devices to reach our ears. This process involves numerous components, including mixers, cables, software, and hardware, all working together harmoniously.

One of the fundamental concepts in audio routing is the “signal chain.” Just like a relay race, audio signals pass through a sequence of devices, each contributing its unique flavor or function. For instance, in a home audio setup, your music might start with a streaming service on your smartphone. From there, it travels through Bluetooth or a wired connection to your speakers or headphones, possibly passing through an amplifier or equalizer along the way. Each step in this chain can shape the sound, adjusting volume, tone, or effects.

Answering Your Curiosities

Now, let’s address some of the common questions people have about audio routing:

How Does Audio Routing Impact Sound Quality?

The impact of audio routing on sound quality is substantial. Imagine you’re at a concert, and the sound system isn’t properly routed. The result? Muffled vocals, distorted instruments, and a less-than-enjoyable experience. On the other hand, precise routing ensures that sound retains its clarity and fidelity as it travels from source to destination.

To put it in everyday terms, think of audio routing as a relay race. If each runner (audio device) passes the baton (sound signal) smoothly, the final sprint (your ears) benefits from the efficiency.

What Are the Key Components of an Audio Routing System?

Audio routing systems can be complex, comprising various components. These include mixers, audio interfaces, digital audio workstations (DAWs), and even physical cables. Mixers act as traffic controllers, directing audio to the right destination, while DAWs provide digital pathways for editing and manipulation.

Picture it like a traffic network in a city. Mixers are the traffic lights, cables are the roads, and DAWs are the control center that can reroute traffic or apply special effects.

Is Audio Routing Only Important in Professional Settings?

While audio routing is crucial in professional studios and live performances, it’s equally significant in everyday scenarios. Consider your home entertainment setup. If your TV’s audio isn’t correctly routed to your soundbar or speakers, you miss out on the immersive experience of your favorite movie or video game.

Think of audio routing as the delivery route for a pizza. Even if you’re not a professional pizza chef, ensuring the right route ensures the pizza arrives hot and delicious.

Audio Signal Routing Techniques: A Deep Dive

Delving into advanced audio signal routing techniques, we uncover methods like parallel processing, sidechain compression, and audio bussing. These techniques offer precision and creativity in shaping soundscapes.

To illustrate, think of audio bussing as a split highway. You can send specific sounds down different lanes, processing them uniquely before merging them back into the main road.

Audio Routing in Home Theater Systems

Home theater enthusiasts often seek guidance on optimizing audio routing for the best cinematic experience. Topics may include setting up surround sound, calibrating audio systems, and integrating streaming devices.

Imagine your home theater as a cinema complex. Proper audio routing ensures each seat in your living room gets the full blockbuster experience.

Audio Routing in Virtual Reality (VR) Environments

VR audio takes immersion to the next level. Here, audio routing is crucial for creating realistic 3D soundscapes, tracking head movements, and ensuring sound matches the visual experience.

Picture wearing VR goggles in a virtual forest. Audio routing directs bird songs to your left when you turn your head, enhancing the illusion of a real forest.

Last Words

Audio routing is the unsung hero of our audio experiences, working tirelessly behind the scenes to deliver clear and captivating sound. Whether you’re a music producer, a home theater enthusiast, or simply someone who enjoys quality audio, understanding the nuances of audio routing can elevate your sonic journey. So, the next time you enjoy your favorite tunes or immerse yourself in a movie, remember the intricate web of audio routing that makes it all possible.

What is digital audio and video?

What is digital audio and video?

Digital Audio and Video

Digital audio and video are types of data that we can store on a computer or other electronic device. They are made up of a series of numbers that represent the sound or image we want to save. This means that instead of using physical materials like film or tape to record sound or video, we can use a computer to store and manipulate digital versions of that data.

Digital Audio and Video

How is sound digitized?

Sound is a type of wave that travels through the air. When we want to digitize sound, we need to find a way to measure that wave and turn it into a series of numbers. We do this by using a device called a microphone, which converts sound waves into electrical signals that can be processed by a computer.

Here’s an example: imagine you’re at a concert and you want to record a song using your phone. You turn on the voice memo app and hold your phone up to the speakers. The microphone in your phone converts the sound waves from the speakers into electrical signals that are then turned into a digital audio file that you can listen to later.

How are multiple sounds combined into a single file?

When we record sound using a microphone, we’re not just capturing one sound at a time. We’re also picking up any other sounds that might be happening in the background, like people talking or the sound of a car driving by. So how do we store all of these different sounds in a single file?

The answer is that each sound is given its own “channel” in the digital audio file. Imagine that you have a stereo system with two speakers – one on the left and one on the right. When you record a song using your phone, the sound that’s coming out of the left speaker is saved in one channel of the audio file, while the sound that’s coming out of the right speaker is saved in another channel.

How are different instruments and voices saved in a single channel?

So now we know how to store multiple sounds in a digital audio file using different channels. But what if we want to save a song that has lots of different instruments and voices playing at the same time? How can we separate out all of those different sounds and make sure they’re saved correctly in the file?

The answer is that each sound is given its own “frequency” in the digital audio file. Think of it like a rainbow: just like how a rainbow has lots of different colors, sound has lots of different frequencies. When we record a song, we’re capturing all of those different frequencies at the same time.

So let’s say we’re recording a song that has a guitar, a bass, a drum set, and a singer. Each of those instruments and the singer’s voice has a different set of frequencies that make up its sound. The guitar might have a lot of high frequencies, while the bass might have a lot of low frequencies. When we record the song, we capture all of those frequencies at the same time and save them in the digital audio file.

How are timbres saved in a digital audio file?

The “timbre” of a sound refers to its unique quality or tone. For example, if you hear a trumpet and a violin playing the same note, you can still tell the difference between the two because they have different timbres. So how do we save the timbre of each instrument or voice in a digital audio file?

To save the timbre of each sound, we use a process called “sampling”. Sampling involves taking tiny snapshots of the sound wave at regular intervals and saving those snapshots as numbers in the digital audio file. The more snapshots we take, the more accurately we can capture the unique timbre of each sound.

Here’s an example: let’s say we’re recording a piano playing a single note. We take 44,100 snapshots of the sound wave per second and save each snapshot as a number in the digital audio file. When we play back the file, the computer reads those numbers and uses them to recreate the sound of the piano note. Because we took so many snapshots per second, we’re able to capture all of the nuances of the piano’s timbre and make it sound like a real piano.

How are noises and other sounds saved in a digital audio file?

When we record sound using a microphone, we’re not just capturing the sounds we want to hear – we’re also capturing any background noise that might be happening. This can include things like people talking, cars driving by, or birds chirping. So how do we deal with all of that extra noise when we save the sound as a digital file?

One way to deal with background noise is to use a process called “noise reduction”. This involves analyzing the digital audio file and looking for parts of the sound that are consistent over time – like the sound of a fan running or the hum of a fluorescent light. The computer can then remove those consistent sounds from the file, leaving behind just the sounds we want to hear.

Another way to deal with background noise is to use a process called “EQ” (short for “equalization”). EQ allows us to boost or cut certain frequencies in the sound to make it sound better. For example, if there’s a lot of low-frequency rumble in a recording, we can use EQ to cut out some of those frequencies and make the sound clearer.

What is digital video?

Digital video is similar to digital audio, but instead of capturing sound waves, we’re capturing images. When we record a video, we’re capturing a series of still images (or frames) at regular intervals and saving them as a digital file.

How are videos saved in digital format?

To save a video in digital format, we need to capture a series of still images (or frames) and save them as a digital file. We do this using a device called a camera, which captures light from the scene we’re filming and turns it into an electrical signal that can be processed by a computer.

Here’s an example: imagine you’re filming a video of your dog playing in the park. You hold up your phone and hit the record button. The camera in your phone captures a series of still images (or frames) of your dog playing and saves them as a digital video file that you can watch later.

How are multiple images combined into a single video file?

When we capture a video, we’re capturing a series of still images (or frames) at regular intervals. To create a smooth video, we need to combine all of those frames into a single file. This is done using a process called “video compression”.

Video compression works by looking for parts of the image that are similar from frame to frame and only saving the parts that are different. For example, if you’re filming a video of a person sitting in a chair, the background behind them might not change much from frame to frame, so the computer can save that part of the image just once and only save the parts that are changing (like the person’s movements).

By only saving the parts of the image that are changing, we’re able to save space and create smaller video files that are easier to store and share. However, too much compression can make the video look blurry or pixelated. So, it’s important to find a balance between file size and video quality when compressing videos.

How do we add sound to a digital video file?

To add sound to a digital video file, we use a process called “audio syncing”. Audio syncing involves combining the digital audio file (which we learned about earlier) with the digital video file so that the sound matches up with the images.

Here’s an example: let’s say you’re filming a concert and you want to create a video of one of the songs. You record the video using your camera and the audio using a separate recording device. When you go to edit the video, you import both the digital audio file and the digital video file into your editing software. Then, you use audio syncing to line up the audio with the video so that the sound matches up with the images.

Conclusion

In conclusion, digital audio and video are complex subjects, but they can be explained in a way that a 6-year-old can understand. Digital audio involves converting sound waves into numbers that can be saved in a digital file. We use sampling to capture the unique timbre of each sound, and we use noise reduction and EQ to deal with background noise. Digital video involves capturing a series of still images (or frames) and saving them as a digital file. We use video compression to combine those frames into a single file and audio syncing to add sound to the video. By understanding these concepts, we can appreciate the technology behind the digital media that we enjoy every day.