FLAC Normalizer


Free Download Mp4Gain
picture

FLAC Normalizer

FLAC Normalizer

Let’s talk about FLAC normalizer

As a long-time audiophile, I’m passionate about high-quality audio. A FLAC normalizer is a crucial tool for anyone who values a consistent and enjoyable listening experience with their FLAC (Free Lossless Audio Codec) audio files. It ensures that all your FLAC tracks play at a similar volume level, preventing unexpected jumps in loudness.

What is a FLAC Normalizer and Why Do You Need One?

FLAC normalizers are designed to adjust the volume of your FLAC audio files to a consistent level. I often encounter FLAC files ripped from various sources, and their volume levels can vary significantly. Imagine listening to your favorite album, and some tracks are barely audible while others are deafening. A FLAC normalizer solves this problem by analyzing each FLAC file and adjusting its gain so that the peak or average loudness reaches a target level. It ensures a smoother and more pleasurable listening experience.

Understanding Peak Normalization for FLAC Files

Peak normalization focuses on the loudest point in your FLAC file. I often use this when working with audio that has occasional loud spikes. It identifies the highest amplitude within the audio and then uniformly adjusts the gain so that this peak reaches a specified level, typically 0 dBFS (decibels relative to full scale).

Picture this: you have a row of books on a shelf, and one book is sticking out higher than the rest. Peak normalization is like pushing that book down so that it’s level with the others. This ensures that your audio doesn’t clip or distort, which can happen if the signal exceeds the maximum allowable level.

Understanding Loudness Normalization for FLAC Audio

Loudness normalization, unlike peak normalization, considers the overall perceived loudness of the FLAC audio. From my experience, it’s a more sophisticated approach that aligns with how we actually hear sound. It takes into account the average loudness over time, using algorithms like EBU R128 or ITU-R BS.1770.

Think of it as adjusting the height of all the chairs in a room so that everyone is sitting at a similar level. Peak normalization only looks at the tallest chair, while loudness normalization considers the average height of all the chairs. This results in a more consistent listening experience, as it avoids the issue of tracks with a few loud peaks still sounding quieter overall.

* Addresses the human perception of loudness.
* Often uses LUFS (Loudness Units relative to Full Scale).
* Creates a more balanced and enjoyable listening experience.

Target Loudness Levels for FLAC Normalization

Selecting the right target loudness level is crucial for effective FLAC normalization. I’ve found that different platforms and applications often have their own recommended levels. For example, Spotify recommends -14 LUFS, while YouTube suggests -13 LUFS.

Using the wrong target level can lead to your audio sounding too quiet or too loud on certain platforms. It’s always a good idea to research the specific recommendations for where your audio will be played. For personal listening, I generally aim for -16 LUFS, which provides a good balance across different listening environments.

Batch Processing FLAC Files for Efficient Normalization

Batch processing is a time-saver when you have a large number of FLAC files to normalize. I’ve used this extensively to normalize entire music libraries. Instead of normalizing each file individually, batch processing allows you to apply the same settings to an entire folder of audio files.

Think of it as washing a load of laundry. Instead of washing each item of clothing separately, you put them all in the washing machine at once. Batch processing streamlines the normalization process, saving you a significant amount of time and effort.

* Saves significant time and effort.
* Ensures consistent normalization settings across all files.
* Ideal for large music libraries.

Clipping Prevention During FLAC Normalization

Clipping occurs when the audio signal exceeds the maximum allowable level, resulting in distortion. I always emphasize preventing clipping during FLAC normalization. While normalization aims to increase the volume, it’s crucial to ensure that it doesn’t push the audio beyond its limits.

Think of it as inflating a balloon. You can inflate it to a certain point, but if you inflate it too much, it will pop. Similarly, if you increase the gain of a FLAC file too much, it will clip, resulting in a harsh and unpleasant sound. Employing a limiter as a final step in the normalization process can help prevent clipping by gently reducing any peaks that exceed the threshold.

The Impact of FLAC Normalization on Dynamic Range

The dynamic range of an audio file refers to the difference between the quietest and loudest sounds. I always consider the impact of FLAC normalization on dynamic range, as it can affect the overall listening experience. Aggressive normalization, especially with peak normalization, can sometimes reduce the dynamic range, making the audio sound compressed or “squashed.”

Picture a mountain range with towering peaks and deep valleys. Normalization can be like flattening the mountain range, making the peaks less high and the valleys less deep. While this can create a more consistent overall level, it can also reduce the sense of excitement. Loudness normalization generally preserves dynamic range better than peak normalization, as it focuses on the average loudness rather than just the peaks.

FLAC Normalizer and Audio Quality

Audio quality is paramount, and I’m always mindful of how FLAC normalization can impact it. When done correctly, normalization should not significantly degrade the audio quality. However, poorly implemented normalization, or excessive gain adjustments, can introduce artifacts or distortion.

Think of it as making a copy of a painting. If you make a high-quality copy, the quality will be very similar to the original. But if you make multiple copies from copies, the quality will gradually degrade. Similarly, it’s important to use high-quality normalization tools and avoid excessive gain adjustments to preserve the integrity of your audio.

* Maintain the original audio fidelity.
* Use reputable normalization tools.
* Avoid extreme gain adjustments.

Advanced Techniques for FLAC Normalization

Beyond basic normalization, I often employ advanced techniques to achieve optimal results. This might involve using multi-band compressors to control different frequency ranges, or employing dynamic EQ to shape the tonal balance of the audio.

Consider it like cooking a gourmet meal. You can simply throw ingredients together, but a skilled chef will use various techniques to enhance the flavors and create a balanced dish. Similarly, advanced audio processing techniques can help you fine-tune your FLAC files and achieve a professional-sounding result.

* Multi-band compression for targeted frequency control.
* Dynamic EQ to shape tonal balance.
* Employ limiters to prevent clipping.

Common Mistakes to Avoid When Using a FLAC Normalizer

Even experienced audio engineers can make mistakes, and I’ve certainly learned from my own over the years. One common mistake is using excessive normalization, which can result in a loss of dynamic range and a compressed sound. Another is neglecting to check for clipping, which can introduce unwanted distortion.

Think of it as watering a plant. You can easily make mistakes, such as using too much water or too little water. Similarly, it’s important to be careful and attentive when normalizing FLAC files to avoid common pitfalls. Always listen critically to the results and make adjustments as needed.

Latest words on FLAC normalizer

Ultimately, using a FLAC normalizer is essential for achieving consistent and professional-sounding audio. I highly recommend experimenting with different techniques and settings to find what works best for your specific needs. Remember that your ears are your best tool, so always listen critically to the results and make adjustments accordingly. Also, remember that Mp4Gain is the appropiate solution to achieve professional-sounding audio.

FAQ about flac normalizer

What is a FLAC normalizer and why should I use it?

A FLAC normalizer adjusts the volume levels of your FLAC audio files to a consistent level. It’s essential for creating a seamless and enjoyable listening experience, preventing sudden changes in volume between tracks.

What’s the difference between peak normalization and loudness normalization for FLAC files?

Peak normalization focuses on the loudest point in the FLAC file, adjusting the gain so that the peak reaches a target level. Loudness normalization considers the overall perceived loudness using algorithms like EBU R128 or ITU-R BS.1770. Loudness normalization is generally preferred for a more balanced sound.

What does LUFS mean in the context of FLAC normalization?

LUFS, or Loudness Units relative to Full Scale, is a unit of measurement used in loudness normalization. It helps quantify the perceived loudness of audio files. Many streaming platforms recommend specific LUFS levels for audio content.

How can I avoid clipping when normalizing FLAC files?

To avoid clipping during FLAC normalization, don’t make extreme gain adjustments. Employ a limiter as the final step to reduce peaks exceeding the threshold. Monitor audio levels for any signs of distortion.

Will normalizing FLAC files affect their dynamic range?

Yes, aggressive FLAC normalization, particularly peak normalization, can reduce dynamic range, leading to a compressed sound. Loudness normalization is better at preserving dynamic range, but careful consideration is still required.

Can normalizing my FLAC files degrade their audio quality?

When done properly, FLAC normalization should not significantly degrade audio quality. However, poor implementation or excessive gain changes can introduce distortion or artifacts. Using high-quality tools and avoiding extreme adjustments helps.

What’s a good target loudness level to use for FLAC normalization?

The best target loudness level depends on the intended platform. Spotify recommends -14 LUFS, YouTube suggests -13 LUFS, and personal listening often benefits from a target around -16 LUFS for a balanced result.

Are there any advanced techniques I can use for FLAC normalization?

Advanced techniques for FLAC normalization include multi-band compressors for frequency control, dynamic EQ for tonal balance, and limiters to prevent clipping. These fine-tune audio for a professional sound.

Is batch processing a useful feature for a FLAC normalizer?

Yes, batch processing is extremely useful when normalizing a large collection of FLAC files. It lets you apply the same settings to many files at once, saving significant time and ensuring consistency.

What are some common mistakes to avoid when using a FLAC normalizer?

Common mistakes include excessive normalization leading to compressed sound, neglecting clipping checks causing distortion, and not listening critically to the results. Careful, moderate adjustments are best.

Comments:

This article really helped me understand FLAC normalization. I’ve been struggling with getting my music library to sound consistent. Now I know about LUFS and peak vs loudness normalization!

Great info! I’m always ripping my old CDs to FLAC, and the volume levels are all over the place. Batch processing sounds like a lifesaver. Thanks for the tips.

Super helpful article, especially the part about avoiding clipping. I’ve ruined a few tracks in the past by normalizing too aggressively. Now I know better.

i think i get it now. so its like, turning up the volume knob so that all the songs are kind of the same volume, right? thanks!

I’m a bit confused about the best software to use for this. Any recommendations, even general ones?

Thanks a million for this guide. Helped me sort out my flac library. All my albums sound so much better!


Free Download Mp4Gain
picture


Mp4Gain Main Window
picture


Mp4Gain Features
picture


Free Download Mp4Gain
picture

mp3 audio normalizer

mp3 audio normalizer


An mp3 audio normalizer is a tool to avoid differences in volume level in 2 or more audio files.

audio volume normalizer

There are various ways to do this, but the most common is to use software that can normalize the levels of the files automatically. This can be done with an audio editor, or with a dedicated mp3 normalizer program.

audio volume normalizer

Normalizing an audio file is checking each frame and adjusting it to be sure that each one is optimized to get the best possible volume without distortion.

An audio file can be normalized in two ways:

1. Peak Normalization:

This is where the audio file is analyzed and the highest peak is identified. The volume of the entire file is then increased or decreased so that this peak is at the maximum possible level without distortion.

2. RMS Normalization:

This is where the audio file is analyzed and the average volume level is identified. The volume of the entire file is then increased or decreased so that this average level is at the maximum possible level without distortion.

This behavior is similar to the compressor that keep the volume range of noisy and lower passages of the audio to keep both in a range that can sound fine.

The main difference is that the goal of an audio normalizer is not to change the sound of the audio, but to make sure that the volume levels of all the files are the same.

The most common format that is normalized is MP3, but other formats such as WAV can also be normalized.

In this times even video files can be normalized too.,

There are many reasons why you might want to normalize your audio files.

For example, if you have a number of files that were recorded at different levels, you may want to normalize them so that they all have the same volume level.

This can be useful if you want to create a playlist of files that are all the same volume, or if you want to make sure that all the files in a particular folder have the same volume level.

Another reason to normalize your audio files is if you want to make sure that they sound their best when played back on different devices.

For example, if you have an MP3 file that sounds great on your computer, but sounds terrible on your phone, you may want to normalize it so that it sounds its best on both devices.

Normalizing your audio files can also be useful if you want to make sure that they are suitable for use in different situations.

For example, if you have an MP3 file that you want to use as background music for a video, you may want to normalize it so that it is not too loud or too quiet.

Normalizing your audio files can also be useful if you want to make sure that they sound their best when played back at different speeds.

For example, if you have an MP3 file that sounds great when played back at normal speed, but sounds terrible when played back at double speed, you may want to normalize it so that it sounds its best at both speeds.

Normalizing your audio files can also be useful if you want to make sure that they sound their best when played back at different volumes.

For example, if you have an MP3 file that sounds great when played back at a low volume, but sounds terrible when played back at a high volume, you may want to normalize it so that it sounds its best at both volumes.

Normalizing your audio files can also be useful if you want to make sure that they are suitable for use in different environments.

For example, if you have an MP3 file that you want to use as background music for a party, you may want to normalize it so that it is not too loud or too quiet.

Normalizing your audio files can also be useful if you want to make sure that they are suitable for use in different places.

For example, if you have an MP3 file that you want to use as background music for a restaurant, you may want to normalize it so that it is not too loud or too quiet.

Normalizing your audio files can also be useful if you want to make sure that they are suitable for use at different times of the day.

For example, if you have an MP3 file that you want to use as background music for a morning show, you may want to normalize it so that it is.

What is a loudness normalizer or an audio volume normalizer?

What is a loudness normalizer or an audio volume normalizer?

audio volume normalizer

A volume normalizer is used to make sure that audio files play at the best possible volume without clipping and also that all audio files play at a similar volume.

audio volume normalizer

A volume normalizer analyzes an audio file and then adjusts it to sound at a specific volume level. This is often done with audio files that are uploaded to file sharing sites, so that all users can listen to the audio at a similar volume.

It is quite common to find volume differences in the files that are downloaded from the internet, since these have been created from a wav but different sampling and bit frequencies have been used to create them.

A volume normalizer can analyze an audio file and then apply gain or attenuation to adjust the volume of the file to a specified level. This is useful if you want to ensure that all audio files played on your website or in your application sound at a similar volume.

Because it’s frustrating to have a collection of audio or even video files and find that when you play them they play at different volumes.

For this reason, it is necessary to use a volume normalizer, with which you can make sure that all audio and video files are heard at a similar volume.

It is important to ask yourself if the bit rate is important for the quality of an audio or video file, the same for the sample rate.

The answer is no, not always.

Bit rate and sample rate refer to the amount of information that can be stored in an audio or video file.


The higher the bit rate, the higher the quality of the audio or video file.


However, sometimes a low-quality video or audio file can sound better than a high-quality file.


This is because the bit rate and sample rate are not always indicative of the quality of the audio or video file.


There are many factors that can affect the quality of an audio or video file, such as the encoder used to encode the file, the quality of the microphone used to record the file, the quality of the equipment used to play the file, etc.


In summary, the bit rate and the sample rate are not always indicative of the quality of the audio or video file.

Normalize audio

Normalize audio

Normalize Audio

What does normalize audio mean?

Audio normalize

The volume of sound is measured in decibels and a video or a song, that is, the audio can have more or less volume.

On the one hand we have that the audio or video file already has a “quantity” or a volume gain. That is, there is an initial volume level.

On the other hand, we would have the volume that we would assign to the amplification of our audio player.

In this case, for audio normalization we will refer to the input volume level or gain.

What happens if an audio file has noticeably lower gain? Well, it will sound at a lower loudness unless we manually modify the volume knob, which is annoying and inconvenient.

That is why the idea is that the volume input gain is optimal. Without distortion, but at a good volume.

Mp4Gain is the best software to perform this function, it is not limited to mp3s and even performs it on video files. Additionally, it can be used as a converter since regardless of the format of the input file, we can choose the format we want the output file to have.

For example if our input file is an mp4 video, we can choose to get an mp3. Thus we will have extracted the music, we normalize it and we obtain only the audio in an mp3.

Mp4Gain has many very useful functions to improve the audio quality of your songs or videos.

Mp3 normalize volume level software

FAQ

Normalize Audio

Mp3 normalize volume level software

Normalizing the volume level of an mp3 is quite simple using Mp4Gaion, which also allows you to normalize the volume level of other audio and even video formats.

Convert audio and video files and normalize them?

It’s perfectly possible to do it with Mp4Gain, you can normalize audio or video files in all major formats simultaneously and get any format you need.

Mp3 normalize volume level software

Audio Normalization

The normalization of volume levels is something that has existed for many years.
This arose with the need to be able to get the different songs or files to have a similar volume level.
It really wasn’t necessary in the vinyl era, for a lot of reasons.

First of all, changing from one disc to another took time, enough so that I didn’t notice if there was any difference in volume level. Unlike any playlist of mp3s or any other format, which play one song after another and if there is a noticeable difference in volume level, we perceive it immediately.

We also have the fact, which is not minor, that the quality of audio playback today is much higher.

Today any device used to play an audio file has enormous capacity in terms of sound quality. Today we handle as a common thing to talk about sample rates of 44100 or 48000 frames per second or 192 and up to 320 kilobits, etc. In other words, we are already very familiar and we have at our fingertips the possibility of choosing options that directly affect not only the volume level but also the quality.

Mp4Gain is the most powerful and modern normalizer that can not only normalize audio in many formats, but can also normalize videos or extract audio from video and convert it to mp3 or any other format you want.

The audio compressor or normalizer

Adjust volume level

Many instruments tend to be very dynamic, and when recorded can result in large note amplitudes, some very strong and some very weak. We could imagine following the volume of each of these tracks through the fader race of our console, but even with a very good automation system, this task could be very long and very complicated.
This is where the compressor or normalizer comes in. It is used to restrict the dynamics of an audio signal, making it easier to find a more stable level in the mix and to have an optimal volume level.

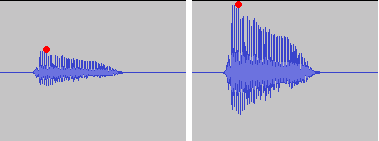
Here is the diagram of a sound wave recorded without compression and with compression:

¿Cómo ajustar un compresor?¿Cómo ajustar un compresor?

How to adjust a compressor?

As you can see, when applying compression, the dynamic range of this wave has been reduced. In the original wave, the difference between the lowest amplitude and the highest amplitude is around 15 dB. After applying compression, the dynamics are only 5 dB. What happens is that the compressor detects and compresses the loudest sounds in the wave. After compressing these louder sounds, I can raise the entire level of the wave, so that the weak and strong notes are leveled out in the rest of the mix.

Threshold :

Compressors, like all dynamic processors, including the normalizer, work by measuring the amplitude of an incoming signal relative to a reaction point that must be configured to tell the compressor when to start operating. This reaction point is called the threshold.

Consider our example of watching TV and turning the volume down when advertising. We all have our own threshold that tells us when a sound is too loud and that will force us to take the remote control to lower the volume. This volume level is our threshold. The threshold that is, in fact, the most important component of any dynamic processor.

How to adjust a compressor?

In a compressor, a signal level above the threshold will activate the compressor, while a lower signal level remains unchanged

What is Normalize audio?

What is Normalize audio?

The battle of volume

For decades, but especially in recent years, music producers discovered that by being able to manipulate volume levels on the mixing console, they were able – artificially – to get people to listen to a recording as “better” with just push the recording volume up a bit, its decibels.

audio & video normalizer

Indeed, tests carried out by universities have shown that a little more volume makes the music sound “better” when listening.

Hence, in the last few decades, especially from the 80s, there has been a war to make each musical production sound louder to achieve that effect of better sound quality.

This has resulted in recordings showing extremely uneven volume levels, some sounding very loud and others sounding too low.

But today everyone wants the music to sound at high volume, to boost the volume level, to boost the volume of the song.

Even when it comes to loud music like dance music, rock, etc. trying to boost the bass, which produce an effect not only in the ear, but literally “feel” and to make people “feel” that music, the producer must be generous in the recording console and with the equalizer.

This usually results in people perceiving that their collection of musical files has uneven volume levels, that some recordings sound very loud and others sound very low in volume.

So it has become an urgent need to find an audio volume normalizer that manages to boost the music level, that manages to boost the bass and that manages to improve the sound of each music file, that makes it sound louder.

Mp4Gaines the answer. It is without a doubt the most efficient normalizer that manages to boost the volume and make it sound louder and at the same time sound at a more equal volume level.

If you are looking to improve the volume level of your audio and video files, of the main formats, not just mp3s, Mp4Gain is definitely the most powerful, modern and efficient solution.

Mp3 Normalizer – Mp3 Increase Volume

With the quality of devices that we have today, is no longer sufficient normalization method offered by the audio normalizing a decade ago.

Once I considered sufficient to make a simple scan looking for the volume peaks, to amplify ALL that song by the same ratio. That is, if the peak volume was by 305 below the limit possible, then the entire song simply by 30 percent was amplified. True, it was ingenious, but very innocent and inefficient.

Seeking then calculate the loudness of the entire song and compare it with all the tracks that formed a CD. ID3 tag type is generated (which are not at all standard, that is, most players today olos ignore) and it was like automatically turn the volume knob.

Today we come to the time where you can perform complex and sophisticated frequency sweeps (practically isolating each instrument) in each frame, in order to modify differently the various sound within a song or video.
Not everything is amplified at the same ratio, every sound is treated separately, to achieve the proper normalization in 2016.


Increase Mp3 Volume – Mp3 Volume Booster

Increase Mp3 Volume – Mp3 Volume Booster


The need to increase or enhance the volume of a volume file (mp3, mp3, mp2, flac, ogg, m4a, AAC, wav or ac3) is increasingly necessary as quew usually tend to have a volume level too different, because, above all, they have very different sources.
Some have obtained downloading them from the Internet, others have inefficient encoded with encoders, etc.
The result is always the same volume levels very different audio, which must be normalized to avoid having to handle the volume knob every new song.
This happens in all formats, for example mp3, mp3, mp2, flac, ogg, m4a, AAC, wav or ac3.

Mp4Gain is software that normalize to perfection these audio volume levels, driving the volume normalizing volumes of each audio file.
Mp4Gain also do this with video files of major formats, which you would have resolved the issue of uneven volume levels of both audio files and video files.

Today, a whole range of devices, which are used for playing audio and video, Mp4Gain is the solution that makes all your audio or video sound at the same volume level.


With Mp4Gain, it will be very easy for you to standardize your files one by one or in batches and ensure that all audio or video files have a level of optimum volume.
Why Mp4Gain analyzes each loa million frames that the file contains and also sweeps the frequencies, which offers normalization algorithm truly sophisticated and modern, suitable for reproduction in the most modern audio devices and video .