Audio Normalization Techniques: Peak vs. Loudness


Free Download Mp4Gain
picture

Audio Normalization Techniques: Peak vs. Loudness

Audio Normalization Techniques

As an audio optimization expert, I’m often asked about the best techniques for normalizing audio levels. In this article, I will explore two popular approaches: peak normalization and loudness normalization. These techniques, peak vs. loudness normalization, have their own unique advantages and considerations. Let’s dive in and uncover the secrets of achieving balanced and consistent audio!

Peak Normalization: Unleashing the Power of Dynamics

When it comes to peak normalization, it’s all about preserving the dynamics of your audio. Imagine a breathtaking symphony where the crescendos and diminuendos transport you to a different realm. With peak normalization, you ensure that the highest peaks of your audio reach their full potential without clipping or distortion. It’s like giving your audio the freedom to express itself with intensity and impact.

Loudness Normalization: The Harmony of Consistency

Now, let’s turn our attention to the world of loudness normalization. Have you ever experienced the frustration of constantly adjusting the volume while switching between songs or TV shows? Loudness normalization comes to the rescue! By analyzing the perceived loudness of your audio, it ensures a consistent listening experience across different tracks. Say goodbye to sudden volume jumps and immerse yourself in a harmonious soundscape.

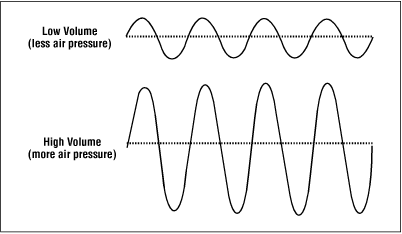
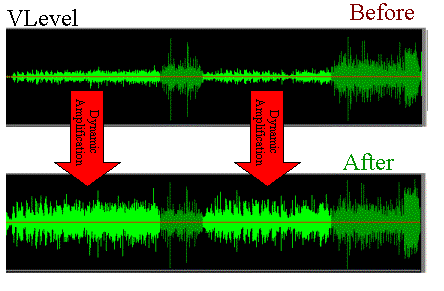
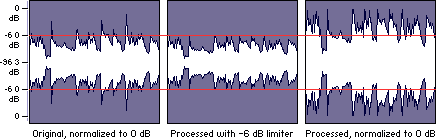
Dynamic Range: The Dance of Soft and Loud

In the realm of audio normalization, we encounter the concept of dynamic range. Dynamic range represents the difference between the softest and loudest parts of an audio signal. Peak normalization respects the natural dynamic range, allowing the delicate whispers and thunderous roars to coexist in perfect balance. On the other hand, loudness normalization aims to reduce the dynamic range, providing a more even playing field for all elements of your audio.

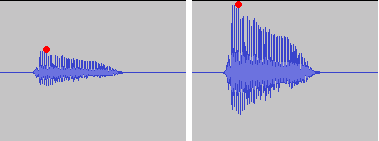
Audio Clipping: Taming the Wild Peaks

Audio clipping is a notorious villain that can ruin your audio experience. Picture this: a sudden burst of sound that distorts and crackles, disrupting your enjoyment. Peak normalization acts as the hero in this story, taming those wild peaks and ensuring that your audio stays within safe limits. With peak normalization, your audio remains clean and free from the dreaded clipping monster.

LUFS: The Measure of Perceived Loudness

In the realm of loudness normalization, we encounter the term LUFS, which stands for Loudness Units Full Scale. LUFS provides a standardized measure of the perceived loudness of your audio. Loudness normalization algorithms analyze the integrated LUFS value and adjust the overall volume to match a specific target level. It’s like having a universal translator that ensures consistent loudness across different tracks and platforms.

Listening Environment: From Living Rooms to Concert Halls

Let’s talk about the listening environment and its impact on audio normalization. Every space has its unique characteristics, from the cozy intimacy of a living room to the grandeur of a concert hall. Loudness normalization takes into account these variations, delivering a consistent listening experience regardless of the environment. So whether you’re enjoying your favorite tunes at home or attending a live performance, the magic of normalization will make every moment memorable.

Personal Preference: Customizing Your Audio Journey

We all have our individual tastes and preferences when it comes to audio. Some crave the raw power of peak normalization, while others seek the comfort of consistent loudness through loudness normalization. The beauty of audio normalization techniques is that they allow you to customize your audio journey according to your personal taste. It’s like having a tailor-made suit that perfectly fits your unique style.

Metadata and Replay Gain: Enhancing the User Experience

Metadata and Replay Gain are powerful allies in the realm of audio normalization. Metadata provides valuable information about your audio, guiding normalization algorithms to make the right adjustments. Replay Gain takes it a step further by applying metadata tags to your audio files, ensuring consistent playback volume across different tracks. Together, they create a seamless and enhanced user experience, elevating your audio enjoyment to new heights.

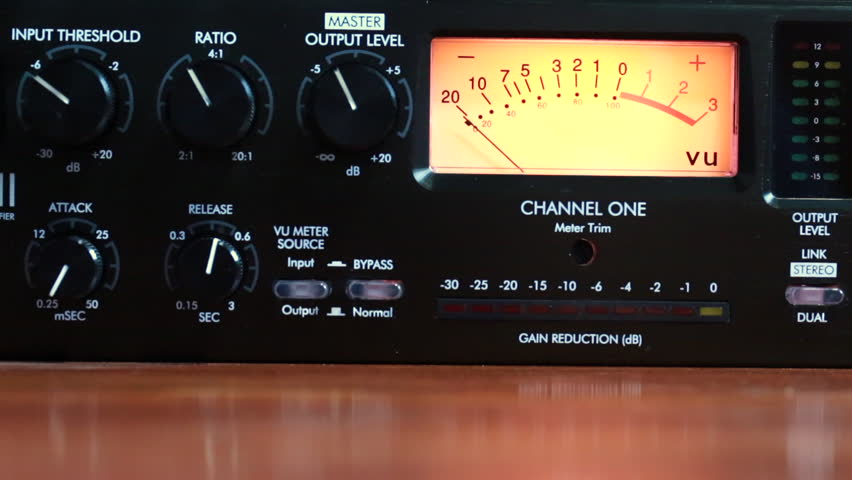
Compression: Controlling the Sonic Landscape

Dynamic audio content, such as movies or live performances, often presents challenges for normalization. This is where compression enters the scene. Compression techniques allow you to shape the sonic landscape, reducing the dynamic range while maintaining audio quality. It’s like having a skilled conductor who ensures that every instrument is heard clearly, regardless of its volume.

Audio Editing and Mastering: Polishing the Gems

Lastly, let’s not forget the crucial role of audio editing and mastering in the pursuit of sonic perfection. Audio professionals meticulously fine-tune various parameters during the editing and mastering process. Audio normalization techniques become valuable tools in their arsenal, ensuring that the final product shines with balanced and consistent audio. It’s like adding the final touch of brilliance to your audio gems.

In conclusion, the choice between peak normalization and loudness normalization depends on your desired audio outcome. Whether you embrace the dynamic range or seek consistent loudness, these techniques empower you to create an audio experience that resonates with your vision. So go forth, unleash the power of normalization, and let your audio journey be a harmonious symphony of sound!


Free Download Mp4Gain
picture


Mp4Gain Main Window
picture


Mp4Gain Features
picture


Free Download Mp4Gain
picture

Digital Audio Noise Reduction Methods

Digital Audio Noise Reduction Methods

Audio Noise Reduction

Noise Reduction Techniques

As an audio engineer, I have dealt with various types of noise in digital audio recordings. Noise can be introduced during the recording process or can be present in the source material. In either case, noise reduction techniques can be used to remove unwanted noise from the audio signal. One of the most common noise reduction techniques is spectral subtraction. This technique involves analyzing the frequency spectrum of the audio signal and removing the noise components. Another technique is noise gating, which involves setting a threshold level below which the noise is suppressed. However, noise gating can result in unwanted artifacts in the audio signal. In my experience, a combination of these techniques can be used to achieve the best results.

Audio Restoration

Audio restoration is the process of removing unwanted noise and restoring the audio signal to its original quality. This process can be time-consuming and requires specialized software and expertise. One of the leading companies in audio restoration is CEDAR Audio. They have developed advanced algorithms that can recognize noise in the presence of a wanted signal and create a dynamic noise profile. This allows for more accurate noise reduction without affecting the desired audio. In my experience, audio restoration is a valuable tool for preserving historical recordings and improving the quality of damaged audio.

Noise Reduction Algorithms

Noise reduction algorithms are the backbone of noise reduction software. These algorithms analyze the audio signal and selectively remove noise frequencies that are not part of the desired sound. There are many different noise reduction algorithms available, each with its own strengths and weaknesses. Some algorithms are better suited for removing specific types of noise, such as hum or hiss. In my experience, the best noise reduction algorithms are those that allow for manual adjustments. This allows for more precise control over the noise reduction process and can result in better-sounding audio.
Final Words:
Digital audio noise reduction methods are essential for achieving high-quality audio recordings. Whether you are dealing with noise in the recording process or in the source material, there are many techniques and tools available to help you remove unwanted noise. By using a combination of noise reduction techniques and algorithms, you can achieve the best results and create professional-sounding recordings.
Keywords: Audio Noise Reduction, Digital Audio Restoration, Noise Reduction Software, Dynamic Noise Reduction, Noise Reduction Algorithms, Noise Reduction Techniques, Audio Signal Processing, Audio Noise Reduction Hacks, Audio Noise Reduction Tips, Audio Noise Reduction Tools, Audio Noise Reduction Plugins, Audio Noise Reduction Filters,

Audio Noise Reduction Algorithms: Understanding the Science Behind Clear Sound

Audio Noise Reduction Algorithms: Understanding the Science Behind Clear Sound

Audio Noise Reduction

Audio noise is a common issue that plagues most audio recordings. Noise refers to any unwanted sound that is picked up during recording, such as hissing, humming, or static. This unwanted sound can be distracting and reduce the quality of the audio. Fortunately, audio noise reduction algorithms can help eliminate these noises, resulting in clear and high-quality audio recordings.

Audio Noise Reduction

The Basics of Audio Noise Reduction Algorithms

Audio noise reduction algorithms are used to filter out noise from audio recordings. These algorithms analyze the audio signal and separate the noise from the desired audio. Once the noise is separated, the algorithm can reduce or eliminate it from the recording. There are two main types of audio noise reduction algorithms:

  • Spectral Subtraction: This algorithm works by analyzing the frequency spectrum of the audio signal. It then estimates the noise spectrum and subtracts it from the audio signal, resulting in a cleaner sound.
  • Adaptive Filtering: This algorithm works by modeling the noise signal and filtering it out of the audio signal.

Both of these algorithms can be effective in reducing noise from audio recordings, but each has its strengths and weaknesses depending on the type of noise present and the characteristics of the audio signal.

How Audio Noise Reduction Algorithms Work

Audio noise reduction algorithms work by analyzing the audio signal and separating the noise from the desired audio. This process involves several steps:

Step 1: Noise Estimation

The first step in the audio noise reduction process is to estimate the noise. This is done by analyzing a portion of the audio signal that is known to be noise-only. This can be a portion of the audio that was recorded with no desired audio present or a silent section of the audio. Once the noise is estimated, the algorithm can use this information to separate the noise from the desired audio.

Step 2: Filtering

Once the noise has been estimated, the algorithm can begin to filter it out of the audio signal. This is done by applying a filter to the audio signal that will reduce or eliminate the noise. The type of filter used will depend on the algorithm being used and the characteristics of the audio signal.

Step 3: Signal Reconstruction

After the noise has been filtered out of the audio signal, the algorithm will reconstruct the audio signal to ensure that it is of high quality and free of artifacts. This is done by applying a process called signal reconstruction, which involves smoothing out any irregularities in the audio signal and ensuring that the signal is continuous.

Factors That Affect Audio Noise Reduction

There are several factors that can affect the effectiveness of audio noise reduction algorithms:

    • Noise Type: The type of noise present in the audio signal can affect the effectiveness of the algorithm. Some types of noise are easier to filter out than others.
    • Signal-to-Noise Ratio: The signal-to-noise ratio (SNR) is the ratio of the desired audio to the noise in the audio signal. A low SNR can make it more difficult for the algorithm to separate the noise from the desired audio.
    • Audio Signal Characteristics: The characteristics of the audio signal, such as its frequency range and amplitude, can also affect the effectiveness of noise reduction algorithms.

Types of Noise Reduction Algorithms

There are several types of noise reduction algorithms available, each with its own strengths and weaknesses. Some of the most commonly used algorithms include:

      • Single-Channel Noise Reduction: This type of algorithm is designed to reduce noise in a single audio channel, such as a single microphone recording. It can be effective in reducing constant background noise but may not be as effective in reducing more complex noise patterns.
      • Multi-Channel Noise Reduction: Multi-channel noise reduction algorithms can be used to reduce noise in multiple audio channels, such as in a stereo recording. These algorithms can be more effective than single-channel algorithms in reducing complex noise patterns.
      • Adaptive Filter: Adaptive filter algorithms can be effective in reducing noise that is relatively consistent over time, such as electrical hum. These algorithms analyze the audio signal and create a filter that is customized to reduce the specific noise pattern.
      • Spectral Subtraction: Spectral subtraction algorithms work by analyzing the frequency spectrum of the audio signal and subtracting the noise frequency components. This algorithm can be effective in reducing steady-state noise but may introduce artifacts in the audio signal.
      • Wiener Filter: The Wiener filter is a statistical algorithm that can be used to reduce noise in audio signals. This algorithm analyzes the statistical properties of the audio signal and the noise and creates a filter that can effectively reduce the noise.

Challenges in Noise Reduction

While noise reduction algorithms can be effective in reducing unwanted noise in audio signals, there are several challenges that must be considered:

      • Noise Types: Different types of noise require different noise reduction algorithms. For example, reducing background hiss requires a different algorithm than reducing electrical hum.
      • Signal-to-Noise Ratio: The signal-to-noise ratio (SNR) is the ratio of the desired audio signal to the unwanted noise. A low SNR can make it difficult for noise reduction algorithms to effectively reduce the noise without affecting the desired audio signal.
      • Artifacts: Noise reduction algorithms can introduce artifacts into the audio signal, such as distortion or a “muffling” effect. These artifacts can negatively affect the quality of the audio signal.
      • Computational Complexity: Some noise reduction algorithms require significant computational resources, which can make real-time noise reduction difficult.

Conclusion

Audio noise reduction algorithms are an essential tool for improving the quality of audio recordings. By analyzing the characteristics of the audio signal and the noise, these algorithms can effectively reduce unwanted noise and improve the clarity of the desired audio signal. However, the effectiveness of these algorithms depends on several factors, including the type of noise, the signal-to-noise ratio, and the computational complexity of the algorithm. By understanding the strengths and limitations of different noise reduction algorithms, audio professionals can select the most appropriate algorithm for their specific needs and achieve the best possible results.

Understanding Audio Normalization

Understanding Audio Normalization

Audio Normalization
Audio Normalization

Audio normalization is the process of adjusting the loudness of an audio recording to a standard level. The goal is to ensure that all audio files have a consistent volume, making them easier to listen to and preventing ear fatigue. In this article, we will explore the different types of audio normalization and how they work.

Audio Normalization
Audio Normalization

Peak Normalization

Peak normalization is the process of adjusting the peak amplitude of an audio recording to a certain level. The peak amplitude is the highest point in the audio signal, and it is measured in decibels (dB). The goal of peak normalization is to ensure that all audio files have the same peak amplitude, making them easier to listen to and preventing ear fatigue.

Peak normalization is typically used for digital audio files, such as MP3 and WAV files. These files are usually stored in a digital format that allows for easy manipulation of the audio data. However, peak normalization can also be applied to analog audio recordings, such as cassette tapes or vinyl records.

RMS Normalization

RMS normalization is the process of adjusting the root mean square (RMS) level of an audio recording to a certain level. The RMS level is a measure of the average power of an audio signal, and it is measured in decibels (dB). The goal of RMS normalization is to ensure that all audio files have the same RMS level, making them easier to listen to and preventing ear fatigue.

RMS normalization is typically used for digital audio files, such as MP3 and WAV files. However, it can also be applied to analog audio recordings, such as cassette tapes or vinyl records.

RMS normalization is often considered to be a more accurate method of normalizing audio than peak normalization because it takes into account the average power of the audio signal, rather than just the peak amplitude.

Loudness Normalization

Loudness normalization is the process of adjusting the loudness of an audio recording to a certain level. The loudness of an audio recording is measured in loudness units (LU). The goal of loudness normalization is to ensure that all audio files have the same loudness, making them easier to listen to and preventing ear fatigue.

Loudness normalization is typically used for broadcast audio, such as television and radio. Loudness normalization is required by many countries to ensure that the audio levels of all broadcast programs are consistent, making them easier to listen to and preventing ear fatigue.

Loudness normalization is often considered to be a more accurate method of normalizing audio than peak or RMS normalization because it takes into account the perceived loudness of the audio signal, rather than just the peak amplitude or RMS level.

Conclusion

Normalizing audio is an important process for ensuring that all audio files have a consistent volume, making them easier to listen to and preventing ear fatigue. There are several different types of audio normalization, including peak normalization, RMS normalization, and loudness normalization. Each method has its own advantages and disadvantages and is best suited for different types of audio.

When it comes to audio normalization, one solution that stands out is Mp4Gain. It is a software that allows you to normalize your audio files in a quick and efficient way. It can be used to normalize a single audio file or multiple files at once. It also supports a wide range of audio file formats, including MP3, WAV, and more. Furthermore, Mp4Gain is user-friendly and easy to navigate, making it a great option for both professional and casual users.

In conclusion, audio normalization is a crucial process for ensuring that all audio files have a consistent volume, making them easier to listen to and preventing ear fatigue. There are several different types of audio normalization, including peak normalization, RMS normalization, and loudness normalization. Each method has its own advantages and disadvantages and is best suited for different types of audio. Mp4Gain is a powerful and easy-to-use software that can help you normalize your audio files quickly and efficiently.

Mp3 normalize volume level software

FAQ

Normalize Audio

Mp3 normalize volume level software

Normalizing the volume level of an mp3 is quite simple using Mp4Gaion, which also allows you to normalize the volume level of other audio and even video formats.

Convert audio and video files and normalize them?

It’s perfectly possible to do it with Mp4Gain, you can normalize audio or video files in all major formats simultaneously and get any format you need.

Mp3 normalize volume level software

Audio Normalization

The normalization of volume levels is something that has existed for many years.
This arose with the need to be able to get the different songs or files to have a similar volume level.
It really wasn’t necessary in the vinyl era, for a lot of reasons.

First of all, changing from one disc to another took time, enough so that I didn’t notice if there was any difference in volume level. Unlike any playlist of mp3s or any other format, which play one song after another and if there is a noticeable difference in volume level, we perceive it immediately.

We also have the fact, which is not minor, that the quality of audio playback today is much higher.

Today any device used to play an audio file has enormous capacity in terms of sound quality. Today we handle as a common thing to talk about sample rates of 44100 or 48000 frames per second or 192 and up to 320 kilobits, etc. In other words, we are already very familiar and we have at our fingertips the possibility of choosing options that directly affect not only the volume level but also the quality.

Mp4Gain is the most powerful and modern normalizer that can not only normalize audio in many formats, but can also normalize videos or extract audio from video and convert it to mp3 or any other format you want.

Loudness Normalization: Why is it necessary to Normalize the loudness of an audio or a video?

Loudness Normalization: Why is it necessary to Normalize the loudness of an audio or a video?

Loudness

The war of volume or loudness war.

Already in the 1940s and in later decades, in the middle of the vinyl record era, a volume war was experienced.

The goal was to make a song sound louder on the radio, louder than other songs and louder than advertising.

Sure, the limitations of vinyl didn’t allow the ability to indiscriminately increase volume to be possible.

Loudness normalization

But with the advent of CDs and digital music it was possible to push the loudness of a song to the max. The situation is that the digitization of the audio allowed it to be manipulated quite precisely, achieving dynamic normalizations that actually ended the dynamics of the music and then played all the time at maximum volume.

By the 90s, groups like Red Hot Chilli Peppersm and their album Californication took this war of loudness to levels rarely seen.

But why did they do that?

Some research on human hearing showed that people did not find that a song sounded better if it had louder loudness.

Every artist, every producer, and every hardware manufacturer has figured out a way to make their production sound louder, louder.

Digitally many limiters and compressors pointed in that direction and made a lot of music sound almost to the point of distortion.

Each one wanted their music to stand out, among other things for being louder and having a greater sound, a higher volume level.

If to this recipe we add the appearance of the mp3 and a great variety of encoders, and also that ordinary people did not understand the effect that the bit rate could produce, then many mp3s with different qualities were generated.

The possibility of sharing these mp3s filled people with mp3s that each had very different sounds. Both for its production and for its coding.

Then a new need appeared: normalize the music to avoid these disparities in loudness, in the volume of the songs.

The holy grail of normalization had to be found.

Many ideas were found, many experiments. The situation matured and certain products like Mp3Doctor and Mp4Gain matured to the point where they actually managed to find the solution: a dynamic standardization that will work well with today’s advanced player equipment.

Then Mp4Gain made the leap, achieving that even videos could not be normalized.

Audio could already be normalized in its main formats (mp34, aac, ogg, floac, etc) with Mp3Doctor, but Mp4Gain added the possibility of these dynamic normalization to video in its main formats (mp4, 3gp, flv, avi, etc. )

Audio normalization for beginners

What’s more annoying when listening to music is that you have to manipulate the volume control for every song that plays. If you have a computer, a tool allows you to uniformize the atmosphere from track to track while the songs are playing. This is called normalization. Three main means are used to achieve this result more or less effectively.

Audio normalization

Normalization through detection of maximum volume

The player or audio processing software analyzes the sound of the track and detects the highest amplitude. If it is less than the maximum gain value that is imposed, the signal is automatically boosted by the number of decibels required to reach and reach this value in all samples on the track. If the highest amplitude is equal to or greater than the maximum gain value, nothing is done.

Normalization

This method has only one advantage: the avoidance of saturation. However, the drawbacks are many.

This form of normalization cannot be applied in real time, as it is assumed that the maximum signal value is known in advance, which is hardly the case with live audio sources (playback or recording). Also, this type of normalization turns out to be totally ineffective when the overall sound of the song is low, but interrupted by small ridges that can be parasitic. When these peaks reach or exceed the maximum gain value, nothing happens and the overall sound is always reduced, especially if these peaks last only a few fractions of a second.

Normalization in detecting maximum volume is almost never used by reading software. Many audio processing software or even audio CD burning offers this option, such as Audacity and Nero.

Normalization by medium volume detection

Here, the player or audio processing software analyzes the sound of the track and does not detect the highest amplitude, but the average amplitude of the signal. Thus, the volume of the song will automatically increase or decrease by the number of decibels required to reach the imposed value, as appropriate.

Also known as RMS, this method has the advantage that the sound is fairly accurately balanced from one song to another, even if there are sharp peaks in the volume.

However, normal normalization of volume detection, like the previous method, cannot be applied in real time and is ipso facto unsuitable for live audio sources. In addition, saturation can occur if the imposed value to be achieved is not sufficient. It is recommended to use normalization values ​​small enough to avoid this problem as much as possible.

Many reading software programs use this normalization mode, but they all work better or worse than the others. .

Sound compression / modern normalization

The mp4gain audio processing  software performs the audio signal analysis, analysis that will lead to increase or decrease the volume of certain areas of the signal according to a complete set of fairly complex parameters inherent in the signal itself. Ultimately, the loud sounds will be attenuated, the weak sounds will improve when multiple presets are reached.

This is the best normalization method if the sound processing values ​​are well established, in which case the sound volume becomes very constant and without saturation, regardless of the source and signal type, in real time or No

However, this type of normalization requires some processing power from the processor. Although the results achieved are much more professional and the only ones that really achieve what the 2020 ear is looking for. Mp4Gain has the most efficient response to normalize audio, either from audio files of the most popular formats or from video files, including the most commonly used formats.

Audio Level normalization

The audio levels of the material produced in a radio station
In general, in radio they do not tend to stay within standardized levels for their audio editions (spots), it is not necessary to know much about levels, since an audio processor compresses and limits everything on air.

Radio Studio Compressor

The console operator does not understand anything about dynamic range, something that has no practical use in the air. And this is how many radios work with adjustments that “work” in the air by trial and error, and not always with the most demanding criteria. successful.

Dynamic range compression

Level normalization

In radio, an editor does not know or manage any level convention, so it could be said that level normalization is not widely used. However, a good professional practice would be that all the material generated by a station “sounds” at the same level. Not to the air, because to the air if it is transmitted normalized or compressed and limited, but inside the station. And for this, there are two ways:

The material is processed “by ear” by comparison.
An RMS value is defined and all publishers normalize their mixes to that average level.

Regarding the first point, differences of up to +/- 2 dB will be absolutely acceptable. But a very common vice is to overcompress the edits, or sometimes the voices, seeking to hear the compact and aggressive sound of the FM on studio monitoring. That sound should be determined on-air by the streaming processor, not the publisher. Editors generally abuse processes like Normalize RMS (Sound Forge) and “maximizers”; Wave Hammer (Sound Forge / Vegas) Ultramaximizer and L1 (Waves). Ideally, how much to “squeeze” the dynamics of the edited material should be a function of the type of processor the radio has. At this point it is possible to clarify a fairly common confusion: STANDARDIZATION has nothing to do with making an audio sound “strong” or “powerful”. Using normalization for that purpose is a beginner’s mistake.

The second option is the most accurate way of working -although this precision is not necessary- normalizing all the editions to a given RMS value. This does not impact the sound in the air but it does the internal prolixity of the station. RMS is not an accurate measurement of loudness or “volume”, but for what you need in radio it is enough.

The streaming audio processor knows nothing about the level of the audio file. The processor receives an audio level from the console and works accordingly. What affects the behavior of the processor is the dynamics of the material, if it has dynamics or is super-compressed / limited.

Normal working values

The level at which operator-editors generate material has two well-defined extremes to avoid: very high levels of compression / cliping and excessively low material (less than 24 dB RMS). When we talk about level, we must be clear about the differences between peak level and average level.

PEAK level

Regarding the peak level, the logical maximum limit is digital cliping. Needless to say, a cliping mix is ​​unacceptable.
It is advisable that the maximum peak level is not 0 dBfs, as this will generate overshoot cliping in the D / A converters and especially if the compressed material (MP3) is exported.
An appropriate value for the material on a radio is maximum peak – 1dBfs (the recommendation if using mp3 compression is -3 dBfs). But this does not mean that it should be -1 dB. If no peak reaches the established maximum it is not a problem as long as the material complies with the appropriate working level. The peak level does not matter, but in general the signal will always reach the maximum peak level.

Listening level (RMS)

The “listening level” or mix level is determined by the RMS or “average” value of the material. This is true even if the publisher has never measured the RMS value of their audios. In general the radio editor “compresses”, “maximizes” or -conception error by- “normalizes” your edits “so that they sound”. And in that “so that they sound”, it is taking the cuts to a certain value.

The question that arises is what should that value be? How much should the final mix “squeeze”? The final value should not be a value that generates excessive compression, as this is the task of the transmission processor. How to compress is a topic of discussion for another article, since it is fine spinning and the radios in general do not take into account these aspects. In general lines we will say:

If the radio has a simple analog processor, type M31 or Solidyne 362, they will perform better with material that has a more compact sound (more compression).
If the station has a high-end digital processor, and especially if it works with a highly processed sound in the air, it is not recommended or necessary to excessively maximize the material generated by the station, because these audio equipment respond better when the material is origin is not over compressed.


But what if the file level is very low? It depends. Depending on the PC-Console connection, the operator typically has at least 15 dB of gain range for level correction from the PC. In turn, if the level is low with the fader on, the AGC of the processor has between 10 and 20 dB more correction to compensate the level in the air. But if the file were generated too low, it could fall outside the operator / processor correction range and go low on air.

GENERAL AND ELEMENTARY CONCLUSIONS:

Different materials generated in the radio must sound at the same level, either by ear or measured RMS.
It should not be overcompressed, much less cliping.
The peak level should not exceed -1 dB.
It should not be too low as it may fall outside the processor’s AGC / operator correction ranges.

Put in values:

RMS values ​​between -16 to -13 dB RMS are acceptable.
Values ​​between -13 and -10 dB RMS generally indicate strong compression.
Values ​​less than -10 dB RMS indicate excessive compression, not recommended as it generates a very loud but “muffled” sound that cannot be “improved” by the air processor.

Audio normalization explained

Audio normalization – Audio normalization

Audio normalization is the application of a constant amount of amplification of a sound recording to bring the amplitude of a target level (standard). Because the same amount of gain over the entire recording, the signal-to-noise ratio and relative dynamics are unchanged.

Two basic types of audio normalization exist. Peak normalization adjusts the recording based on the highest signal level present in the recording. Loudness normalization adjusts the recording based on perceived loudness.

Normalization differs from dynamics compression, which applies varying levels of gain across a recording to fit the level within a minimum and maximum range. Normalization adjusts the gain with a constant value over the entire recording.

Normalization is one of the functions usually provided by a digital audio workstation.

Peak normalization

One type of normalization is peak normalization, where the gain is changed to bring the highest PCM sample value or analog signal peak to a certain level – usually 0 dBFS the loudest level allowed in a digital system.

Peak normalization

Since it only goes to the highest level, only peak normalization does not take into account the apparent loudness of the content. As such, peak normalization is commonly used to change the volume so as to ensure optimal use of the available dynamic range during the mastering phase of a digital recording. In combination with compression / restriction, however, peak normalization becomes a feature that can provide a volume advantage over off-peak normalized material. This feature of digital recording systems, compression and limiting followed by peak normalization, sets contemporary trends in program loudness.

Loudness normalization

Another type of normalization is based on a measurement of loudness, where the gain is changed to bring the average amplitude to a target level. This average can be a simple measurement of average power, such as the RMS value, or it can be a measure of human perceived loudness, such as that offered by ReplayGain, Soundcheck and EBU R128.

Loudness Normalization

For example, YouTube reference level -14 LUFS, so if a program analyzed at -10 LUFS, YouTube will decrease the level 4 dB to the reference of -14 LUFS.

Loudness normalization was made in different volume combat when listening to different music in a series. Before loudness normalization, one song in a playlist would be quieter than the rest, so the end listener would have to put a volume knob to adjust the playback volume.

Depending on the dynamic range of the content and the target level, loudness normalization may result in peaks that exceed the storage medium. Software offering such normalization usually offers the option of using dynamic range compression to avoid clipping when this happens. In this situation, signal-to-noise ratio and relative dynamics changed.

Volume normalization, an explanation

Audio Normalization: Make Your Audio & Video Consistently Loud

Audio normalization is a process in which the amplitude (volume) of an audio recording is increased or decreased in a constant relationship over time, so that the maximum amplitude or the maximum effective value or the perceived volume (volume) reaches a predetermined level, the standard. If the signal has multiple tracks, they all undergo the same correction.

Normalize Audio

Example: normalization of peaks to -3 dB:
A collection of digital recordings is made with a peak modulation standard of -3dB FS.
A new stereo recording is measured. The highest maximum level is -5.5 dB FS on the left track, -5.7 dB FS on the right track.
Normalization consists of applying a constant gain of 5.5 – 3 = 2.5 dB.
Standardization requires two passes. The first determines the maximum level, the second applies the correction to the entire recording.

Audio Normalization

Maximum normalization changes the level, but not the dynamics of the sound.
Volume normalization or perception of loudness often includes compression that changes the dynamics of sound.

Peak normalization

Peak normalization applies a constant gain to a recording to bring the highest peak to a target level, 89% professional audio (-1 dBFS true peak (True Peak)).

The sound dynamics of the recording are more or less preserved, except that maintaining a low distortion level after multiplication of all samples may involve the application of a known quantization error decorrelation noise. under the name redithering (tingling of the least significant bit) 2, which slightly increases the background noise level.

Volume normalization

The purpose of volume normalization is to bring all sound elements in a collection to the same sound volume level, so you can hear them without having to adjust the volume. In fact, the normalization of the maximum level in no way guarantees a homogeneity of the perceived sound volume (Loudness).

A simple approach to volume normalization, which is provided by various software programs, is to normalize the RMS value of the integrated signal within a few tenths of a second. The most advanced machines use extensive algorithms for more accurate evaluation of the perceived noise level. The European Broadcasting Union published a recommendation 1 in 2011, which provides a relatively simple method for this evaluation.

If the standard is not low enough, volume normalization involves compression for recordings whose sound dynamics would be higher than implied when setting the standard from the maximum level. If not, the signal peaks would exceed the quantization limits.

In the simplest implementation, volume normalization collects volume data during the first pass, determines the gain or attenuation necessary for the maximum volume to reach the norm, and applies this correction to the second pass. If the elements of the collection have the same characteristics, from form factor to top factor and dynamics, as is the case with popular music collections or recorded speech, this approach produces satisfactory results.

Extensive implementations use a standard that includes not only the volume of the sound, but also the maximum maximum values ​​and dynamics of the sound. They collect loudness levels and maximum values