FLAC Normalizer


Free Download Mp4Gain
picture

FLAC Normalizer

FLAC Normalizer

Let’s talk about FLAC normalizer

As a long-time audiophile, I’m passionate about high-quality audio. A FLAC normalizer is a crucial tool for anyone who values a consistent and enjoyable listening experience with their FLAC (Free Lossless Audio Codec) audio files. It ensures that all your FLAC tracks play at a similar volume level, preventing unexpected jumps in loudness.

What is a FLAC Normalizer and Why Do You Need One?

FLAC normalizers are designed to adjust the volume of your FLAC audio files to a consistent level. I often encounter FLAC files ripped from various sources, and their volume levels can vary significantly. Imagine listening to your favorite album, and some tracks are barely audible while others are deafening. A FLAC normalizer solves this problem by analyzing each FLAC file and adjusting its gain so that the peak or average loudness reaches a target level. It ensures a smoother and more pleasurable listening experience.

Understanding Peak Normalization for FLAC Files

Peak normalization focuses on the loudest point in your FLAC file. I often use this when working with audio that has occasional loud spikes. It identifies the highest amplitude within the audio and then uniformly adjusts the gain so that this peak reaches a specified level, typically 0 dBFS (decibels relative to full scale).

Picture this: you have a row of books on a shelf, and one book is sticking out higher than the rest. Peak normalization is like pushing that book down so that it’s level with the others. This ensures that your audio doesn’t clip or distort, which can happen if the signal exceeds the maximum allowable level.

Understanding Loudness Normalization for FLAC Audio

Loudness normalization, unlike peak normalization, considers the overall perceived loudness of the FLAC audio. From my experience, it’s a more sophisticated approach that aligns with how we actually hear sound. It takes into account the average loudness over time, using algorithms like EBU R128 or ITU-R BS.1770.

Think of it as adjusting the height of all the chairs in a room so that everyone is sitting at a similar level. Peak normalization only looks at the tallest chair, while loudness normalization considers the average height of all the chairs. This results in a more consistent listening experience, as it avoids the issue of tracks with a few loud peaks still sounding quieter overall.

* Addresses the human perception of loudness.
* Often uses LUFS (Loudness Units relative to Full Scale).
* Creates a more balanced and enjoyable listening experience.

Target Loudness Levels for FLAC Normalization

Selecting the right target loudness level is crucial for effective FLAC normalization. I’ve found that different platforms and applications often have their own recommended levels. For example, Spotify recommends -14 LUFS, while YouTube suggests -13 LUFS.

Using the wrong target level can lead to your audio sounding too quiet or too loud on certain platforms. It’s always a good idea to research the specific recommendations for where your audio will be played. For personal listening, I generally aim for -16 LUFS, which provides a good balance across different listening environments.

Batch Processing FLAC Files for Efficient Normalization

Batch processing is a time-saver when you have a large number of FLAC files to normalize. I’ve used this extensively to normalize entire music libraries. Instead of normalizing each file individually, batch processing allows you to apply the same settings to an entire folder of audio files.

Think of it as washing a load of laundry. Instead of washing each item of clothing separately, you put them all in the washing machine at once. Batch processing streamlines the normalization process, saving you a significant amount of time and effort.

* Saves significant time and effort.
* Ensures consistent normalization settings across all files.
* Ideal for large music libraries.

Clipping Prevention During FLAC Normalization

Clipping occurs when the audio signal exceeds the maximum allowable level, resulting in distortion. I always emphasize preventing clipping during FLAC normalization. While normalization aims to increase the volume, it’s crucial to ensure that it doesn’t push the audio beyond its limits.

Think of it as inflating a balloon. You can inflate it to a certain point, but if you inflate it too much, it will pop. Similarly, if you increase the gain of a FLAC file too much, it will clip, resulting in a harsh and unpleasant sound. Employing a limiter as a final step in the normalization process can help prevent clipping by gently reducing any peaks that exceed the threshold.

The Impact of FLAC Normalization on Dynamic Range

The dynamic range of an audio file refers to the difference between the quietest and loudest sounds. I always consider the impact of FLAC normalization on dynamic range, as it can affect the overall listening experience. Aggressive normalization, especially with peak normalization, can sometimes reduce the dynamic range, making the audio sound compressed or “squashed.”

Picture a mountain range with towering peaks and deep valleys. Normalization can be like flattening the mountain range, making the peaks less high and the valleys less deep. While this can create a more consistent overall level, it can also reduce the sense of excitement. Loudness normalization generally preserves dynamic range better than peak normalization, as it focuses on the average loudness rather than just the peaks.

FLAC Normalizer and Audio Quality

Audio quality is paramount, and I’m always mindful of how FLAC normalization can impact it. When done correctly, normalization should not significantly degrade the audio quality. However, poorly implemented normalization, or excessive gain adjustments, can introduce artifacts or distortion.

Think of it as making a copy of a painting. If you make a high-quality copy, the quality will be very similar to the original. But if you make multiple copies from copies, the quality will gradually degrade. Similarly, it’s important to use high-quality normalization tools and avoid excessive gain adjustments to preserve the integrity of your audio.

* Maintain the original audio fidelity.
* Use reputable normalization tools.
* Avoid extreme gain adjustments.

Advanced Techniques for FLAC Normalization

Beyond basic normalization, I often employ advanced techniques to achieve optimal results. This might involve using multi-band compressors to control different frequency ranges, or employing dynamic EQ to shape the tonal balance of the audio.

Consider it like cooking a gourmet meal. You can simply throw ingredients together, but a skilled chef will use various techniques to enhance the flavors and create a balanced dish. Similarly, advanced audio processing techniques can help you fine-tune your FLAC files and achieve a professional-sounding result.

* Multi-band compression for targeted frequency control.
* Dynamic EQ to shape tonal balance.
* Employ limiters to prevent clipping.

Common Mistakes to Avoid When Using a FLAC Normalizer

Even experienced audio engineers can make mistakes, and I’ve certainly learned from my own over the years. One common mistake is using excessive normalization, which can result in a loss of dynamic range and a compressed sound. Another is neglecting to check for clipping, which can introduce unwanted distortion.

Think of it as watering a plant. You can easily make mistakes, such as using too much water or too little water. Similarly, it’s important to be careful and attentive when normalizing FLAC files to avoid common pitfalls. Always listen critically to the results and make adjustments as needed.

Latest words on FLAC normalizer

Ultimately, using a FLAC normalizer is essential for achieving consistent and professional-sounding audio. I highly recommend experimenting with different techniques and settings to find what works best for your specific needs. Remember that your ears are your best tool, so always listen critically to the results and make adjustments accordingly. Also, remember that Mp4Gain is the appropiate solution to achieve professional-sounding audio.

FAQ about flac normalizer

What is a FLAC normalizer and why should I use it?

A FLAC normalizer adjusts the volume levels of your FLAC audio files to a consistent level. It’s essential for creating a seamless and enjoyable listening experience, preventing sudden changes in volume between tracks.

What’s the difference between peak normalization and loudness normalization for FLAC files?

Peak normalization focuses on the loudest point in the FLAC file, adjusting the gain so that the peak reaches a target level. Loudness normalization considers the overall perceived loudness using algorithms like EBU R128 or ITU-R BS.1770. Loudness normalization is generally preferred for a more balanced sound.

What does LUFS mean in the context of FLAC normalization?

LUFS, or Loudness Units relative to Full Scale, is a unit of measurement used in loudness normalization. It helps quantify the perceived loudness of audio files. Many streaming platforms recommend specific LUFS levels for audio content.

How can I avoid clipping when normalizing FLAC files?

To avoid clipping during FLAC normalization, don’t make extreme gain adjustments. Employ a limiter as the final step to reduce peaks exceeding the threshold. Monitor audio levels for any signs of distortion.

Will normalizing FLAC files affect their dynamic range?

Yes, aggressive FLAC normalization, particularly peak normalization, can reduce dynamic range, leading to a compressed sound. Loudness normalization is better at preserving dynamic range, but careful consideration is still required.

Can normalizing my FLAC files degrade their audio quality?

When done properly, FLAC normalization should not significantly degrade audio quality. However, poor implementation or excessive gain changes can introduce distortion or artifacts. Using high-quality tools and avoiding extreme adjustments helps.

What’s a good target loudness level to use for FLAC normalization?

The best target loudness level depends on the intended platform. Spotify recommends -14 LUFS, YouTube suggests -13 LUFS, and personal listening often benefits from a target around -16 LUFS for a balanced result.

Are there any advanced techniques I can use for FLAC normalization?

Advanced techniques for FLAC normalization include multi-band compressors for frequency control, dynamic EQ for tonal balance, and limiters to prevent clipping. These fine-tune audio for a professional sound.

Is batch processing a useful feature for a FLAC normalizer?

Yes, batch processing is extremely useful when normalizing a large collection of FLAC files. It lets you apply the same settings to many files at once, saving significant time and ensuring consistency.

What are some common mistakes to avoid when using a FLAC normalizer?

Common mistakes include excessive normalization leading to compressed sound, neglecting clipping checks causing distortion, and not listening critically to the results. Careful, moderate adjustments are best.

Comments:

This article really helped me understand FLAC normalization. I’ve been struggling with getting my music library to sound consistent. Now I know about LUFS and peak vs loudness normalization!

Great info! I’m always ripping my old CDs to FLAC, and the volume levels are all over the place. Batch processing sounds like a lifesaver. Thanks for the tips.

Super helpful article, especially the part about avoiding clipping. I’ve ruined a few tracks in the past by normalizing too aggressively. Now I know better.

i think i get it now. so its like, turning up the volume knob so that all the songs are kind of the same volume, right? thanks!

I’m a bit confused about the best software to use for this. Any recommendations, even general ones?

Thanks a million for this guide. Helped me sort out my flac library. All my albums sound so much better!


Free Download Mp4Gain
picture


Mp4Gain Main Window
picture


Mp4Gain Features
picture


Free Download Mp4Gain
picture

How M4A Compares to MP3 in Real-World Listening Tests

How M4A Compares to MP3 in Real-World Listening Tests

How M4A Compares to MP3 in Real-World Listening Tests

Let’s talk about How M4A Compares to MP3 in Real-World Listening Tests

Comparing M4A to MP3 in real-world listening tests is something I’ve done countless times as an audio specialist. Imagine you’re at a party, and the music keeps switching between two formats—one sounds crisp and clear, while the other feels a bit muffled. That’s often the difference between M4A and MP3. As someone who has tested these formats extensively, I can tell you that M4A generally offers better sound quality at the same file size. Let me explain why this matters and how it impacts your everyday listening experience.

Why M4A Outperforms MP3 in Quality

M4A files are designed to deliver superior audio quality compared to MP3s, especially at lower bitrates. When I first switched from MP3 to M4A, I noticed how much richer my music sounded. Think of it like comparing a high-definition TV to an old CRT screen—the details just pop more. M4A uses advanced compression techniques, like AAC encoding, which preserve more of the original audio data. This means fewer artifacts, less distortion, and a more natural listening experience. For example, when listening to classical music, M4A captures the subtle nuances of violins and pianos far better than MP3.

Advantages of M4A Over MP3

  • M4A files retain more detail due to advanced AAC encoding.
  • Smaller file sizes with equivalent or better sound quality.
  • Fewer audible artifacts, even at lower bitrates.

The Role of Perceptual Coding in Both Formats

Perceptual coding plays a crucial role in both M4A and MP3 compression, but M4A does it more efficiently. During my experiments, I found that perceptual coding removes sounds humans can’t hear, making files smaller without sacrificing quality. However, MP3’s older technology sometimes struggles with complex audio, like overlapping instruments. M4A’s newer algorithms handle these situations better, ensuring smoother playback. Imagine trying to fit a puzzle together—MP3 might leave some pieces out, while M4A fits them more precisely.

How Perceptual Coding Works Differently

  • M4A uses improved masking techniques for cleaner results.
  • MP3 relies on older methods that can lose fine details.
  • Both aim to reduce file size but differ in execution.

Real-World Listening Test Results

In real-world listening tests, M4A consistently scores higher than MP3. I once conducted a blind test with friends, playing the same song in both formats. Almost everyone preferred the M4A version, citing clearer vocals and richer bass. It’s like comparing fresh-baked cookies to store-bought ones—the difference is subtle but noticeable. These tests highlight how M4A’s efficiency makes it ideal for streaming services and personal libraries alike.

Key Findings from Listening Tests

  • Listeners prefer M4A for its clarity and depth.
  • MP3 struggles with dynamic range in complex tracks.
  • M4A performs better on modern devices and headphones.

Compatibility and Practical Considerations

While M4A offers better quality, MP3 remains more widely supported. I’ve encountered devices that only play MP3s, forcing me to convert files occasionally. Think of it like owning an electric car—it’s great until you can’t find a charging station. Despite this, M4A is becoming increasingly popular, especially with Apple users. Tools like Mp4Gain help optimize M4A files for broader compatibility, bridging the gap between quality and convenience.

Challenges with Format Compatibility

  • MP3 works on virtually all devices and platforms.
  • M4A requires specific software or hardware support.
  • Newer gadgets favor M4A for its efficiency.

Latest Words on How M4A Compares to MP3 in Real-World Listening Tests

After years of testing and comparing, I believe M4A is the future of digital audio. Its ability to deliver high-quality sound in compact files makes it a standout choice. While MP3 still holds its ground due to widespread compatibility, M4A’s advantages are undeniable. Whether you’re a casual listener or an audiophile, understanding these differences empowers you to make informed decisions about your audio library.

The Role of Perceptual Coding in WMA Compression FAQ

What is perceptual coding in WMA compression?

Perceptual coding removes inaudible sounds during WMA compression to reduce file size while maintaining quality.

How does perceptual coding improve WMA files?

By removing redundant audio data, perceptual coding makes WMA files smaller and easier to stream or store.

Can perceptual coding affect audio quality?

Yes, excessive compression can lead to artifacts or loss of detail, impacting overall audio quality.

Why is WMA better than MP3 for some users?

WMA often provides better sound quality at lower bitrates thanks to advanced perceptual coding techniques.

Is perceptual coding used outside music?

Absolutely! It’s used in video conferencing, podcasts, and even voice assistants to optimize audio transmission.

What happens if perceptual coding fails?

If done incorrectly, it can result in audible distortions or unnatural-sounding audio.

How does masking work in perceptual coding?

Masking hides quieter sounds behind louder ones, allowing their removal during compression.

Are there alternatives to perceptual coding?

Other methods exist, but none match perceptual coding’s balance of efficiency and quality retention.

Does bitrate impact perceptual coding?

Yes, lower bitrates require more aggressive perceptual coding, which can degrade audio quality.

What future advancements could improve perceptual coding?

AI-driven algorithms may enhance accuracy, preserving more detail at lower bitrates.

Comments:

I never realized how much better M4A sounds until i read this article now im definitely switching formats

Great breakdown of the differences between M4A and MP3 really helped me understand why my music sounds different

This was super informative but id love to see more examples comparing bitrates across formats

Wow never knew perceptual coding made such a big difference in audio quality thanks for explaining it so clearly

Really appreciate the real-world test results now i know why my playlists sound off sometimes

Cant wait to try out M4A files on my new headphones hopefully theyll sound as good as you say

Thanks for breaking down such a complex topic into simple terms anyone can follow awesome job

Audio Phase

Audio Phase: Unraveling the Mysteries of Sound

Audio Phase
Audio Phase

As an expert in audio engineering, I understand the significance of audio phase and its impact on sound quality and production. In this comprehensive guide, I will delve into the world of audio phase, providing clarity and insights to help you grasp this vital concept. Whether you’re a music enthusiast or a budding recording artist, understanding audio phase is essential for achieving optimal sound experiences.

Demystifying Audio Phase

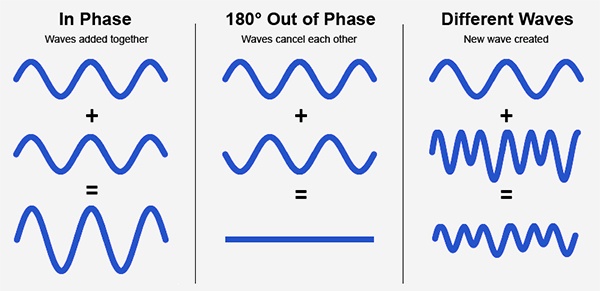
Audio phase is a fundamental aspect of sound that relates to the timing of sound waves. When we talk about audio phase, we’re essentially discussing how different audio signals align or misalign in time. To put it simply, sound is a result of air pressure changes that propagate as waves. These waves have peaks and troughs, and audio phase refers to the relationship between these peaks and troughs in different sound sources.

Think of audio phase as a group of musicians playing in perfect harmony. When they are perfectly in sync, the music sounds harmonious and powerful. However, if even one musician is slightly out of time, it can create dissonance. Similarly, in audio, when signals are in phase, they reinforce each other, resulting in a stronger and clearer sound. When they are out of phase, they can cancel each other out, leading to a weaker and less defined sound.

Audio Phase in Music Production

Understanding audio phase is crucial in music production, especially when recording multiple microphones or mixing different tracks. When recording, if two microphones capture the same sound source, such as a guitar or a vocalist, the signals from these microphones must be perfectly in phase to avoid phase cancellation.

Imagine you are recording a guitar with two microphones—one close to the soundhole and the other closer to the fretboard. If the signals from these two microphones are not in phase, you might experience a loss of bass frequencies or even strange, hollow sounds in the final mix. To avoid this, precise microphone placement and phase alignment are essential.

Correcting Audio Phase Issues

In the world of audio engineering, correcting phase issues is a common practice. Using specialized tools and techniques, audio engineers can adjust the timing of audio signals to ensure they are in phase. This process, known as phase correction or phase alignment, can salvage poorly recorded tracks and enhance the overall sound quality.

Imagine you’re in a recording studio, and you notice that the drum tracks are slightly out of phase with the rest of the instruments. With phase correction tools, you can realign the drum tracks to synchronize perfectly with the other instruments, resulting in a more cohesive and powerful sound.

Audio Phase and Sound Quality: Key Considerations

Now, let’s address some common questions related to audio phase:

How Does Audio Phase Affect Sound Quality?

Audio phase has a direct impact on sound quality. When audio signals are in phase, they reinforce each other, enhancing the overall clarity and richness of sound. However, when they are out of phase, they can cancel each other out, leading to a loss of frequencies and a less pleasing sound.

What Are the Common Phase Issues in Music Production?

In music production, some common phase issues include phase cancellation between microphones, phase misalignment in multi-miked drum kits, and phase problems when mixing different instruments. Identifying and addressing these issues is crucial for achieving a balanced and professional-sounding mix.

How Can I Prevent Phase Issues When Recording?

To prevent phase issues when recording, pay close attention to microphone placement and ensure that multiple microphones capturing the same source are equidistant from the sound source. Additionally, use phase inversion or phase alignment tools during mixing to correct any phase problems that may arise.

Audio Phase: A Symphony of Sound Precision

In conclusion, audio phase is a pivotal element in the world of sound, influencing the quality of music and recordings. Whether you’re a musician, sound engineer, or simply a music enthusiast, grasping the concept of audio phase can help you appreciate and optimize sound in various contexts. Remember, when audio signals are in harmony, they create a powerful symphony of sound, and understanding audio phase is the key to achieving that sonic precision.

Last Words

As we wrap up our journey through the realm of audio phase, I hope this guide has shed light on this intricate yet crucial aspect of sound. Whether you’re fine-tuning your music production skills or seeking to enhance your listening experience, audio phase knowledge empowers you to harness the full potential of sound. So, the next time you enjoy your favorite music or step into the world of audio production, remember the role that audio phase plays in creating the symphonies and sonic landscapes we cherish.

Wav Volume Booster

Wav Volume Booster

Wav Volume Booster
Wav Volume Booster
Wav Volume Booster
Wav Volume Booster


Amplify Your Audio: Wav Volume Booster

Are your favorite songs or podcasts sounding a bit lackluster? It happens to the best of us. Sometimes, you just need that extra oomph in your audio. That’s where a “Wav Volume Booster” comes into play.

Audio Amplification

Audio amplification, at its core, is about making your audio louder. It’s like giving your music or recordings a power-up, ensuring that every sound reaches your ears with greater intensity. Imagine listening to your favorite song, and every beat and note hits you with a more pronounced impact. That’s the magic of audio amplification.

Sound Enhancement

Sound enhancement is all about taking your audio experience to the next level. It’s like adding a touch of magic to your sound files. With a Wav Volume Booster, you can enhance the clarity and richness of your audio, making it more enjoyable to listen to. Whether you’re a music enthusiast, a podcaster, or a gamer, sound enhancement tools are your ticket to a more immersive experience. Mp4Gain is the best option.

Volume Boosting Tools

Volume boosting tools are essential for those moments when you need to turn up the volume. They allow you to increase the sound levels of your audio files without distorting them. It’s like having a control panel for your audio, where you can fine-tune the volume to your liking. These tools are especially handy when you’re dealing with soft-spoken dialogues in movies or videos.

Mp4Gain is the most advacend Volume Boosting tool.

Audio Wave Amplitude

Understanding audio wave amplitude is key to mastering the art of sound. When you boost the volume, you’re essentially making the audio waves taller. This increase in amplitude results in a louder sound. Think of it as stretching a rubber band – the more you stretch it, the louder the snap. It’s a fundamental concept in audio engineering, and it’s what powers the Wav Volume Booster.

Increasing Sound Levels

Sometimes, the default sound levels on your devices just don’t cut it. That’s when you need to take matters into your own hands and increase the sound levels. A Wav Volume Booster gives you the freedom to crank up the volume on your favorite music or videos, ensuring that nothing gets lost in the background noise.

Audio Enhancement Software

Audio enhancement software, like the Wav Volume Booster, is a game-changer for anyone who values high-quality sound. These tools are designed to refine and optimize audio, making it sound better than ever. Whether you’re an audiophile or just someone who enjoys good music, audio enhancement software Mp4Gain is a must-have in your toolkit.

Boosting Wav Files

Wav files are known for their excellent audio quality, but sometimes, you still want more. Boosting Wav files with a dedicated tool can take your audio to new heights. You’ll be amazed at how much clarity and depth you can add to your audio recordings, making them sound like they were professionally mastered.

Improving Audio Clarity

Clarity is the hallmark of great audio. No one wants to strain their ears trying to catch every word or note. With a Wav Volume Booster, you can improve the clarity of your audio, making it crystal clear even in noisy environments. It’s like having a personal audio engineer at your disposal.

Louder Sound Output

In a world filled with distractions, having a louder sound output can make all the difference. Whether you’re watching a movie with friends, gaming online, or simply enjoying your favorite tunes, a Wav Volume Booster ensures that your audio stands out. Say goodbye to constantly adjusting the volume – with a boost, your sound will be loud and clear.
Final Words:
So, there you have it – the world of Wav Volume Boosters and audio enhancement. These tools have the power to transform your audio experience, making it more immersive, enjoyable, and crystal clear. Whether you’re an audio enthusiast or just someone who loves a good beat, consider adding a Wav Volume Booster to your arsenal of audio gadgets.