The Effect of Multi-Channel Encoding on WMA Audio Files


Free Download Mp4Gain
picture

The Effect of Multi-Channel Encoding on WMA Audio Files
The Effect of Multi-Channel Encoding on WMA Audio Files

Let’s talk about the effect of multi-channel encoding on WMA audio files

When we discuss the effect of multi-channel encoding on WMA audio files, we’re exploring how using multiple audio channels transforms your listening experience. As someone who’s worked extensively with audio formats, I can tell you that this isn’t just about making the sound louder. It’s about creating a more immersive and realistic soundscape, mimicking how we hear sounds in real life. Think of it like watching a movie, with the sound coming from all around you instead of just from the front. The way sound is encoded can change drastically the experience. I’ve personally witnessed how multi-channel encoding turns a simple audio file into an engaging and enveloping sonic experience, especially when it comes to music or movies.

Understanding Multi-Channel Audio

Multi-channel audio goes far beyond simple stereo and opens up a whole new world of sound. My experience with different types of audio tells me that the number of audio channels impacts your overall experience with a recording. Stereo audio, which is commonly used, has two channels, one for the left ear and one for the right ear. This gives us a sense of left and right placement. Multi-channel audio, however, uses more than two channels, enabling sound to come from different directions creating a 3D-like sound field. It’s like being surrounded by a band while you’re in the middle of the concert hall, rather than just hearing it from two points. This greatly affects how we perceive sound, and how realistic it feels.

Common Multi-Channel Configurations

  • 5.1 Surround Sound: Includes five channels (left, center, right, left surround, right surround) and one subwoofer channel for low-frequency effects.
  • 7.1 Surround Sound: Adds two additional surround channels (left rear and right rear) to the 5.1 setup, enhancing the envelopment even more.
  • Dolby Atmos and DTS:X: Object-based audio, which allows sound to be placed anywhere in the sound field, not just specific channels.

WMA Codec and Multi-Channel Encoding

The WMA (Windows Media Audio) codec has its own unique way of handling multi-channel audio. In my experience, WMA is very capable of handling multi-channel sound, particularly versions like WMA Pro. WMA Pro supports high-resolution audio and multiple channels, allowing for high-fidelity surround sound. This means the codec can efficiently compress multi-channel audio without losing too much quality, which is crucial for delivering an immersive experience. It is important to say that not all WMA files are created equal. Some may be encoded with simple stereo or even mono sound, which does not use the capabilities of this codec. The codec capabilities can be used to create a much richer and detailed sound.

Key Features of WMA in Multi-Channel Encoding

  • Support for multiple channels, including 5.1 and 7.1 surround sound, providing a wide soundstage.
  • Efficient compression algorithms, reducing file sizes while preserving good sound quality.
  • WMA Pro supports lossless compression as well, an option for the best quality available.

The Impact of Bitrate on Multi-Channel WMA Files

Bitrate, usually measured in kilobits per second (kbps), is an important factor in multi-channel WMA files. In my experience with audio, the higher the bitrate, the more data is stored for each audio channel, resulting in a higher quality sound. When dealing with multi-channel audio, a higher bitrate becomes even more critical because you need to store much more information compared to simple stereo. Lower bitrates can lead to audio compression artifacts, such as a loss of clarity and detail, especially in complex soundscapes with many instruments or sounds. Think about having a bucket full of sand. If you have a small bucket you can only take a little sand at a time. A large bucket will allow you to have more sand at once, and the same happens with bitrates.

Recommended Bitrates for Multi-Channel WMA

  • 384 kbps to 512 kbps: Considered good for 5.1 surround sound, providing a good balance between quality and file size.
  • 512 kbps and above: Recommended for 7.1 surround sound or for when the best audio quality is required.
  • Lower bitrates: Only to be used when file size is a priority, and the quality is not very important.

Spatial Accuracy and Multi-Channel Encoding

Spatial accuracy is a very important characteristic in multi-channel audio files. The placement of sounds in the soundstage directly impacts the realism and immersiveness of the audio. Multi-channel encoding, when done correctly, can create a very precise sound field, allowing you to pinpoint where sounds are coming from. This is particularly important in movies and games, where the position of sounds can greatly improve the overall experience. It’s like having the sounds happening all around you. Good multi-channel encoding makes this possible, and a poor one will make the experience less immersive and more artificial.

How Spatial Accuracy is Achieved

  • Precise Channel Placement: Each channel is responsible for a specific part of the soundstage, and accurate positioning of each sound is essential.
  • Panning and Mixing: These techniques make sounds move between channels to create the perception of motion.
  • Object-Based Audio: This lets sounds be placed at any position, offering a very detailed sound field.

Multi-Channel WMA for Home Theaters and Gaming

Multi-channel WMA is very useful in home theater systems, which are very common nowadays. In my personal experience, the most common use for multi-channel WMA files is for home theaters and gaming because it allows for a truly immersive experience. With proper encoding and speaker setups, multi-channel audio from WMA files can make you feel like you’re right in the middle of the action. It enhances the emotion of movies, the excitement of games, and the sound of music. I have many times experienced this effect when listening to music in a multi channel setup, and it can be very impressive. The way the sound moves from different speakers makes the experience much more realistic.

Advantages in Home Theaters and Gaming

  • Enhanced immersion: Multi-channel audio surrounds the listener, making the experience more engaging.
  • Directional sound: Sounds can be placed precisely, making the experience much more realistic.
  • Better emotion: Movies and games become more emotional and exciting.

Potential Issues with Multi-Channel Encoding

Multi-channel encoding can be complex, and issues can arise if done improperly. I’ve personally seen how bad multi-channel encoding can ruin an experience. Common problems include incorrect channel mapping, where sounds appear in the wrong place, and also inconsistencies in loudness between channels, causing some sounds to be louder than others. Bad encoding can also lead to compression artifacts, where the sound is distorted or muffled. It is important that all parameters are correct during the encoding process to avoid these issues.

Common Multi-Channel Encoding Problems

  • Incorrect Channel Mapping: Where sounds are played in the wrong speakers.
  • Volume Imbalances: When one channel is much louder than others.
  • Compression Artifacts: Distorted and muffled sounds due to bad encoding.

Optimizing Multi-Channel WMA Files

Optimizing multi-channel WMA files is about making sure that all the parameters are correct. In my experience, starting with the highest quality audio source is the most important thing to do, so the result has the best possible quality. Encoding at an appropriate bitrate, according to the number of channels, and selecting the correct channel mapping also helps. Always use good monitoring speakers or headphones to check the quality, as a regular pair of speakers wont give you an accurate representation of the sound. I would suggest you also do testing with different configurations and different files to see if something can be improved for your particular setup and requirements.

Steps to Optimize Multi-Channel WMA Files

  • Start with the highest quality audio source.
  • Use an appropriate bitrate for your system.
  • Verify the correct channel mapping.
  • Check the sound using good quality speakers or headphones.
  • Do some tests to see if everything is correct.

Latest words on the effect of multi-channel encoding on WMA files

Multi-channel encoding has a very significant impact on WMA audio files, transforming a simple audio file into an immersive experience. In my experience, it’s not just about adding more speakers, but about how the sound is created, where the sound comes from and how it makes the experience feel more realistic. Understanding the different factors, like bitrates, channels, and codecs, helps you optimize your audio files for the best possible sound. If you have low-quality files that you want to improve, an appropriate software like Mp4Gain can help you to enhance your files.

What is multi-channel audio, and how does it differ from stereo?

Multi-channel audio uses more than two audio channels, offering a three-dimensional sound experience, while stereo uses only two channels (left and right). Multi-channel audio allows sounds to be positioned in different parts of the soundstage, making the experience more immersive.

How does the WMA codec handle multi-channel audio encoding?

The WMA (Windows Media Audio) codec, especially WMA Pro, is capable of handling multi-channel audio with good compression efficiency. It supports various multi-channel configurations, including 5.1 and 7.1 surround sound, providing a good balance between file size and quality.

What is the importance of bitrate when encoding multi-channel WMA files?

Bitrate directly affects the quality of multi-channel WMA files. Higher bitrates preserve more audio data, resulting in better sound quality, particularly in complex soundscapes. Lower bitrates may lead to a loss of clarity and detail, so an appropriate bitrate should be selected depending on the intended quality.

What is spatial accuracy in the context of multi-channel WMA files?

Spatial accuracy refers to how precisely sounds are placed in the soundstage. Good multi-channel encoding makes sounds to be placed exactly where they need to be. This accurate placement creates a more realistic and immersive experience, particularly in movies, music and games.

How are multi-channel WMA files used in home theaters and gaming?

Multi-channel WMA files are excellent for home theaters and gaming because they provide an immersive experience with sounds surrounding the listener. With proper speaker setups, this configuration makes games, music and movies more realistic and engaging.

What are some common problems with multi-channel encoding of WMA files?

Some common problems include incorrect channel mapping, where sounds are played from the wrong speakers, volume imbalances between channels, or compression artifacts that can distort the sound. These are caused by incorrect parameter settings when encoding the audio.

How can I optimize my multi-channel WMA files for the best sound quality?

To optimize multi-channel WMA files, always start with the highest quality audio source, use a proper bitrate according to your channel configuration, and make sure that all the speakers are correctly mapped. Always verify your sound with good headphones and speakers. Also, do tests to see if you can get better results adjusting some settings.

Are there any specific bitrate recommendations for 5.1 and 7.1 surround sound in WMA files?

For 5.1 surround sound, using a bitrate between 384 kbps to 512 kbps is generally recommended. For 7.1 surround sound, you should choose a bitrate of 512 kbps or higher for the best sound quality. Remember that lower bitrates should only be used when file size is a top priority.

Can multi-channel encoding cause any issues with playback on different devices?

Some older or less capable devices might have problems with multi-channel audio playback. Some devices may downmix the audio to stereo, losing the benefits of the multi-channel encoding. It’s important to verify that your playback device supports the type of encoding being used to enjoy the full immersive experience.

What are some key differences between WMA and other audio codecs when using multi-channel audio?

WMA is known for its good compression efficiency and is very capable of handling multi-channel sound, especially WMA Pro. Other codecs, like AAC, also have good capabilities for multi-channel audio, but they differ in the way they handle compression. The choice of codec will depend on many factors, such as compatibility, desired quality, and file size requirements.

Comments:

This article really helped me understand what all those numbers mean when I see a file with 5.1 or 7.1, now I know this are related to the audio channels, thanks!

User: AudioNewbie

I never really understood what multi-channel was about, this article did a great job of explaining it simply and without too much tech talk, now I know why my sound system has so many speakers. Good article!

User: HomeTheaterGuy

This was super useful, I’ve been having some issues with my multi channel files sound quality and now I have a better understanding on what is going on, and how to fix it. Thanks for all the info.

User: GamerDude

I am a total noob in audio, and this article was very easy to understand, you make complex things seem very simple. If you could elaborate more about how the different codecs like AAC compare to WMA would be nice.

User: AudiophileBeginner

I like the way you explained how important the bitrate is, especially for multichannel audio, I always though that the more channels, the better. Now I know that the bitrate also plays a big role. Thanks, great article.

User: MultiChannelUser

I been searching the web for a while to find good info about WMA and multichannel, this article covered all my questions and more, it was a good read, thank you for the effort.

User: AudioGeek

I have used Mp4Gain a lot, and its my go to software for when I have audio quality issues. I agree that its very important to pay attention to the channels. Thanks for all the information.

User: AudioExpert


Free Download Mp4Gain
picture


Mp4Gain Main Window
picture


Mp4Gain Features
picture


Free Download Mp4Gain
picture

MP4 Audio Quality

MP4 Audio Quality

MP4 Audio Quality

Let’s talk about MP4 audio quality

When we discuss MP4 audio quality, we’re really diving into a world of choices that impact what you hear. As someone who’s worked with audio for years, I can tell you that it’s not just about whether the sound is loud or soft. It’s about clarity, richness, and how well the sound represents the original recording. Think of it like this: a perfectly cooked meal can be ruined with a bad presentation, just like fantastic audio can be lost with poor encoding. I’ve seen firsthand how different audio codecs and settings can completely change the way we perceive sound from music to podcasts, to even simple voice recordings. It is important to choose the right settings to avoid any audible losses or distortions.

Understanding Audio Codecs in MP4 Files

Audio codecs are the secret language that our computers use to compress and decompress sound. I’ve spent countless hours comparing them, and it is amazing how different they are. They significantly impact MP4 audio quality. In the world of MP4, you’ll most often run into AAC (Advanced Audio Coding), which I consider the most common and broadly compatible choice, providing a good balance between quality and file size. But there are other options, like MP3 and even less-common ones. You can imagine it like choosing a type of container for your liquid: you can have a large, high-quality bottle that protects the water, or a smaller, less-secure one that might not keep the water fresh. The type of codec is your choice of bottle for your audio, and it will determine its quality when using an MP4 file.

AAC (Advanced Audio Coding)

  • Often considered a superior replacement for MP3.
  • Offers better sound quality at similar bitrates or same sound quality at a lower bitrate, making it space-efficient.
  • Widely supported across different platforms.

MP3

  • Older codec, but still widely compatible with all types of devices.
  • Generally has slightly lower audio quality than AAC at the same bitrate.
  • Very popular because of its legacy support.

Bitrate: The Key to MP4 Audio Quality

Bitrate, often measured in kilobits per second (kbps), is a crucial factor when we’re talking about mp4 audio quality. In my experience, it directly dictates how much detail is preserved in the audio file. A higher bitrate means more data is being stored per second. Think of bitrate as the number of colors in a painting. More colors (higher bitrate) means more detail, which makes the painting look more vibrant and realistic, and the same happens with audio. On the other hand, a lower bitrate means less detail, which can lead to audio sounding muddy or distorted, like a blurry or pixelated painting. When I work with audio files, I always start by making sure I choose an appropriate bitrate so that all the subtle nuances are present in the final output.

Common Bitrates and Their Use

  • 128 kbps: Often used for low-quality audio like podcasts or low-quality streaming, good for small file sizes.
  • 192 kbps: Considered a decent quality for general listening on most devices, offering a good compromise between size and quality.
  • 256 kbps: This is what I would consider a good starting point for high-quality audio, useful for most music on streaming.
  • 320 kbps or higher: Provides very high-quality sound, nearly indistinguishable from the original source for most people, this is what I strive for when quality is a must.

Sample Rate and Its Impact on MP4 Audio Quality

The sample rate, usually expressed in Hertz (Hz) or Kilohertz (kHz), is another important concept that affects MP4 audio quality. I can tell you from personal experience that this rate determines how often the sound is sampled per second. It is like taking pictures of a moving object. A faster frame rate will capture the movement smoother, and the same happens with audio. Higher sample rates, like 44.1 kHz or 48 kHz, result in audio that captures the higher frequencies better, leading to a richer and more detailed sound. This is especially noticeable in music with many high-frequency instruments or sounds. Lower sample rates can cause loss of high-frequency content, making the audio sound dull or muffled. This parameter is very important to be taken in consideration because It affects the overall clarity and fidelity of the audio, so I always check and choose the correct one for every project.

Common Sample Rates

  • 44.1 kHz: Standard for audio CDs and most digital music files.
  • 48 kHz: Commonly used for videos and digital audio workstations.
  • Higher sample rates (e.g., 96 kHz, 192 kHz): These are used for professional audio production and archiving, it captures the audio as close to real life as possible.

Audio Channels: Stereo vs. Mono

The number of audio channels also plays a role in the perception of audio quality. I’ve had a lot of fun experimenting with audio channels over the years. Stereo, which we hear most often in music, is what gives us a sense of directionality and depth, using two separate channels, one for the left ear and the other for the right ear. It creates a more immersive and realistic experience. Mono, on the other hand, uses only one audio channel, so sound feels flat and without dimension. Imagine watching a movie with a huge screen, and then compare that to a small screen. The huge screen gives you a sense of immersion, and stereo is just the same in audio. The choice depends on the use case. For music, you should always use stereo, while a podcast may work well enough in mono.

When to Use Which

  • Stereo: Ideal for music and videos where spatial depth is desired, creating a more natural experience.
  • Mono: Suitable for voice recordings, podcasts, or situations where file size is more important than dimensionality.

The Impact of Compression on MP4 Audio Quality

As a specialist in the area, I know very well that compression is a necessary evil. In order to get smaller files, you need to compress the audio in some way. Compression makes file sizes smaller, which means they are easier to share and download. But, if it’s done improperly, it can lead to a degradation in audio quality. Think of it like squeezing a sponge; If you squeeze it too hard, you could damage the sponge. This also can happen to audio data. Lossy compression methods, like MP3 and AAC, reduce file size by discarding some audio information, sometimes impacting the quality. The goal is to compress the audio enough to have a small file size without noticing any loss of quality.

Types of Compression

  • Lossy compression: Reduces file size by discarding audio information, like MP3 and AAC.
  • Lossless compression: Keeps all the audio data but still reduces file sizes, like FLAC. However, this type of compression is not commonly used in MP4 files, because they are focused on multimedia content.

Practical Tips to Maximize MP4 Audio Quality

Over the years, I have learned some tricks that can help you get the best audio quality from MP4 files. The most important thing to keep in mind is to always use the highest quality audio file that you can afford, if the quality is not important, then you can go for a smaller file. Always try to start with the best audio quality. When you are encoding, select a high enough bitrate, the higher the better if your devices can play it. Always listen to your audio files with good headphones or speakers to really understand if there is any audio issues. It’s always a good idea to test your settings with several files to check if there is something you can improve to increase quality. It’s like cooking: you need to try different ingredients and cooking methods to find your signature dish.

Tips for Good Audio

  • Always start with the highest-quality audio source.
  • Choose a high enough bitrate (at least 256 kbps for music).
  • Use AAC codec when possible because it can offer better quality than MP3 for the same bitrate.
  • Make sure you choose the correct sample rate (44.1 kHz or 48 kHz are the most common ones).
  • Use stereo for music, unless you have a specific reason not to.
  • Test and listen carefully to the final result and make adjustments if needed.

Latest words on MP4 Audio Quality

MP4 audio quality is a complex topic. From my experience, I’ve found that understanding the elements, such as codecs, bitrate, sample rate and audio channels, it’s critical to getting the best audio quality from the files we use every day. Paying attention to these details will help you get the best sound possible from your MP4 files, improving your experience whether you are listening to music, watching movies or listening to a podcast. If you ever have to deal with low audio quality, using an appropriate app like Mp4Gain is the solution to improve the overall quality.

What is the AAC audio codec and why is it commonly used in MP4 files?

The Advanced Audio Coding (AAC) codec is a popular audio compression standard that is known for its high sound quality at relatively low bitrates, making it an excellent choice for MP4 files. AAC is often preferred over MP3 due to its improved compression algorithms, which can result in smaller file sizes without a significant loss of sound quality.

How does bitrate affect MP4 audio quality?

Bitrate is a key factor that directly influences the sound quality in MP4 audio. A higher bitrate means more data is stored per second, preserving more detail and resulting in better audio quality, with a sound that is closer to the original recording. Lower bitrates can lead to audio compression, resulting in a muddier or distorted sound. Choosing an appropriate bitrate is crucial for balancing file size with optimal audio quality.

What is the role of sample rate in MP4 audio encoding?

The sample rate determines how many times per second the audio is sampled, effectively capturing the sound. Higher sample rates, such as 44.1 kHz or 48 kHz, are better at capturing higher frequencies, providing a richer and more detailed sound. Lower sample rates may lead to loss of some audio details, often resulting in a duller or less dynamic sound. This rate is an important aspect when thinking about overall quality.

What is the difference between stereo and mono audio channels in MP4 files?

Stereo audio uses two channels, providing a sense of width, depth and direction to the sound, very useful for music and movies. Mono audio uses a single channel, making the sound feel flat, without dimension and is suitable for situations where spatial depth is not essential like podcasts. The selection between stereo or mono depends on the intended application and if the spatial information is important or not.

How does audio compression impact the overall quality of MP4 audio?

Audio compression reduces file size by either removing some data (lossy compression) or by using algorithms to store data more efficiently (lossless compression). Lossy compression, commonly used in MP4 files, discards audio information, impacting quality depending on the compression level. Lossless compression, although preserving data, is not common in MP4 files. The goal is to find a balance between compression and sound quality.

What are some practical ways to enhance MP4 audio quality?

To enhance MP4 audio quality, use the highest-quality source possible, encode audio at high bitrates (at least 256 kbps for music), use AAC codec over MP3 when possible, and choose an appropriate sample rate. Also, listen to the audio using good headphones or speakers to identify any issues, and use stereo for music where spatial depth is key. Making adjustments to these parameters is very important.

Why might my MP4 audio sound muffled or distorted?

Muffled or distorted MP4 audio can result from several factors, such as low bitrates, incorrect sample rates, or excessive audio compression. It could also be caused by poor recording equipment or editing. The type of codec also plays a role; older codecs might not be as good at preserving quality, and using low quality audio as a source will result in poor quality even after encoding. Ensuring all encoding parameters are correct is important to prevent this problem.

What is the ideal audio bitrate for high-quality music in MP4 format?

For high-quality music in MP4 format, it is best to use a bitrate of 256 kbps or higher. This bitrate will offer a high level of detail and fidelity without resulting in very large file sizes. While higher bitrates may offer a slightly better sound quality, the difference is often not noticeable. Using a bitrate lower than 256 kbps may result in a perceptible quality loss.

Is it possible to improve the audio quality of an existing low-quality MP4 file?

While it is not possible to fully restore information that has been lost, it is possible to enhance the audio quality to some extent. Using audio editing software can help you to adjust some audio parameters. Software like MP4Gain are useful to adjust the audio in some ways to improve the perceived quality. However, if the original audio has been heavily compressed, there may be only a little that can be improved.

How can I choose the right audio settings when encoding my MP4 files for optimal sound quality?

When encoding MP4 files for optimal sound quality, consider starting with high-quality source, and always select AAC as the audio codec if possible for better quality compared to MP3. Choose the bitrate according to your needs (256 kbps is a good starting point) and a sample rate of 44.1 or 48 kHz. Use stereo for music. After encoding, listen to the audio on different devices to make sure that the quality meets your expectations. Adjust settings as needed.

Comments:

This article helped me a lot, I was having problems with some of my music files sounding bad, now I understand that I need to use a higher bitrate, thanks!

User: MusicLover

I never knew that there were so many parameters that affected audio quality! I always just grabbed whatever mp4 and thought it was all the same, now I know I have to look at the bitrate, the codec, etc, amazing info, good job!

User: TechNoob

This was super useful. It really breaks down the tech stuff so it’s easy to understand. I’m gonna try changing the audio settings on my next video project. Thanks a lot, this has helped me greatly!

User: VideoGuy87

I wish you had more info about advanced topics, like how to properly compress my audio without loosing too much information, but still, this article was helpful and easy to follow, keep up the good work.

User: ProAudio

Wow, I learned a lot about MP4 audio quality, I did not know that bitrate and sample rate were so important. Gonna try using a higher bitrate for my music collection, I hope the size wont be a problem.

User: AudioFan

This article was a great read and really explained all the stuff behind audio encoding, it was really easy to understand, thank you. I never knew why some of my files sounded so bad. Now I know how to fix this. Thank you!

User: HappyListener

I been using Mp4Gain for years now, I am glad to see it mention here, its my go to solution when I need to improve the audio quality. But thanks for all the in deep info on the article, its a great read.

User: AudioMaster

Video Volume Booster

Video Volume Booster

Video Volume Booster

Audio Enhancements for Videos

When it comes to creating engaging video content, audio quality plays a crucial role. Whether you’re a YouTuber, filmmaker, or just sharing videos with friends and family, ensuring that your audience can hear the content clearly is essential. This is where a “Video Volume Booster” comes into play. In this article, I’ll delve into various techniques and tips for enhancing the audio in your videos.

Increase Video Audio

One of the most common reasons people search for a “Video Volume Booster” is to increase the audio in their videos. Low audio volume can be frustrating for viewers, leading to them clicking away from your content. To address this, you can use video editing software to adjust the audio levels. Look for the audio volume control in your editing program and increase it to a suitable level. Be careful not to make it too loud, as it can result in distortion.

Enhance Video Sound

Enhancing the sound quality of your videos involves more than just increasing the volume. You should also focus on improving the overall audio clarity. This can be achieved by reducing background noise, such as wind or background chatter, during the recording process. Additionally, you can apply equalization to balance out frequencies and make voices and music more distinct.

Volume Adjustment for Videos

Adjusting the volume of your video can be done using various software tools. Some video editing software offers automatic audio normalization features that can balance audio levels across your video. This is particularly helpful if you have different audio sources in your video, such as interviews and background music.

Audio Enhancement Software

To simplify the process of boosting video volume and enhancing audio quality, you can explore audio enhancement software. These programs often come with a range of tools to improve audio, including volume adjustment, noise reduction, and equalization. Research and choose the software that best suits your needs.

Improve Video Audio Clarity

Clarity in audio is essential for effective communication in your videos. When viewers can hear every word clearly, they are more likely to engage with your content and stay engaged. In addition to adjusting volume, consider using subtitles or captions, especially if your video has important dialogue.

Audio Volume Boost Techniques

Beyond software solutions, there are physical techniques to boost audio volume during recording. Invest in a quality microphone and learn how to position it correctly to capture the best audio. You can also use external audio recorders to capture high-quality sound separately from your video and then synchronize it during editing.

Video Sound Amplification

Amplifying video sound involves careful consideration of the balance between voice, music, and other audio elements. Experiment with different audio levels to find the perfect mix for your content. Remember that what sounds good to you might not sound the same to your audience, so seeking feedback can be valuable.

Boosting Audio in Videos

When you’re looking to boost audio in your videos, don’t forget to listen critically to the results. Test your video on different devices and with various headphones or speakers to ensure that the audio quality meets your expectations.

Audio Enhancement Tips

To wrap it up, here are some quick tips for enhancing audio in your videos:

Record in a quiet environment to minimize background noise.
Use a high-quality microphone.
Experiment with audio editing software to find the right settings.
Seek feedback from viewers to fine-tune your audio.
Final Words

Enhancing the audio in your videos is essential for creating engaging and professional content. Whether you’re a beginner or an experienced creator, these techniques and tips can help you boost your video’s audio quality. Remember that clear audio enhances the overall viewing experience and keeps your audience coming back for more.

Normalize audio tracks

Normalize audio tracks

Normalize audio tracks

Audio normalization is a crucial process in the world of audio production. It involves adjusting the volume levels of audio tracks to ensure a consistent and balanced listening experience. Whether you’re a music producer, a filmmaker, or a podcaster, the need to normalize audio tracks frequently arises to deliver high-quality content.

Normalize audio files

When you normalize audio files, you’re essentially making sure that the loudest and softest parts of your track are brought to a consistent level. This means that no part of your audio will be too quiet or too loud, allowing your listeners to enjoy a seamless experience without constantly adjusting the volume.

Audio track leveling

Audio track leveling is the process of ensuring that all the individual tracks in your audio project have a similar volume level. This is particularly important in music production, where you want all instruments and vocals to blend harmoniously without any one element overpowering the others.

Audio track equalization

Equalization (EQ) is another aspect of audio track optimization. While normalization focuses on overall volume levels, EQ allows you to fine-tune the frequency balance of your tracks. By adjusting the EQ settings, you can enhance the clarity and presence of different elements in your audio, such as vocals, instruments, or ambient sounds.

Soundtrack volume adjustment

In the world of film and video production, soundtrack volume adjustment plays a vital role. You want the dialogue, background music, and sound effects to be well-balanced to create an immersive cinematic experience. Normalizing the audio tracks ensures that viewers won’t have to constantly adjust their volume settings to hear the dialogue clearly.

Audio track enhancement

Audio track enhancement goes beyond normalization. It involves using various audio processing techniques to improve the overall quality of your tracks. This can include reducing background noise, adding special effects, or applying dynamic processing to make the audio more engaging.

Audio track optimization

Optimizing audio tracks is a comprehensive approach to ensuring the best possible sound quality. It combines normalization, equalization, and other audio processing techniques to create audio that sounds professional and polished.

Normalize sound in tracks

Normalizing sound in tracks is particularly useful when working with multiple audio sources or recordings that have inconsistent volume levels. It guarantees that all tracks will blend seamlessly and sound cohesive when played together.

Track audio balancing

Track audio balancing is an essential skill for mixing and mastering engineers. It involves adjusting the volume levels of individual tracks within a multitrack recording to achieve a well-balanced and harmonious final mix.

Track audio improvement

Audio improvement is the ultimate goal when working with audio tracks. It’s about taking the raw audio material and transforming it into something that sounds exceptional. This may involve not only normalization but also editing, effects, and creativity to make the audio truly stand out.

Final Words

Normalizing audio tracks is just one step in the journey of audio production and enhancement. Whether you’re an aspiring musician, a filmmaker, or a content creator, understanding how to effectively normalize and optimize audio tracks is essential for delivering a top-notch listening experience to your audience.

What is a De-Esser?

What is a De-Esser?

De-Esser
De-Esser
De-Esser
De-Esser

As a music producer and audio engineer, I’ve encountered my fair share of challenging vocal recordings. One common issue is sibilance, which occurs when the “s” and “sh” sounds are overly pronounced, causing harsh and piercing frequencies in the mix. This is where a de-esser comes in handy.

De-Esser Plugin

A de-esser is a specialized audio plugin that reduces or eliminates sibilance from vocal recordings. It works by detecting the offending frequencies and applying gain reduction to them, effectively taming the harshness and allowing the vocals to sit better in the mix.

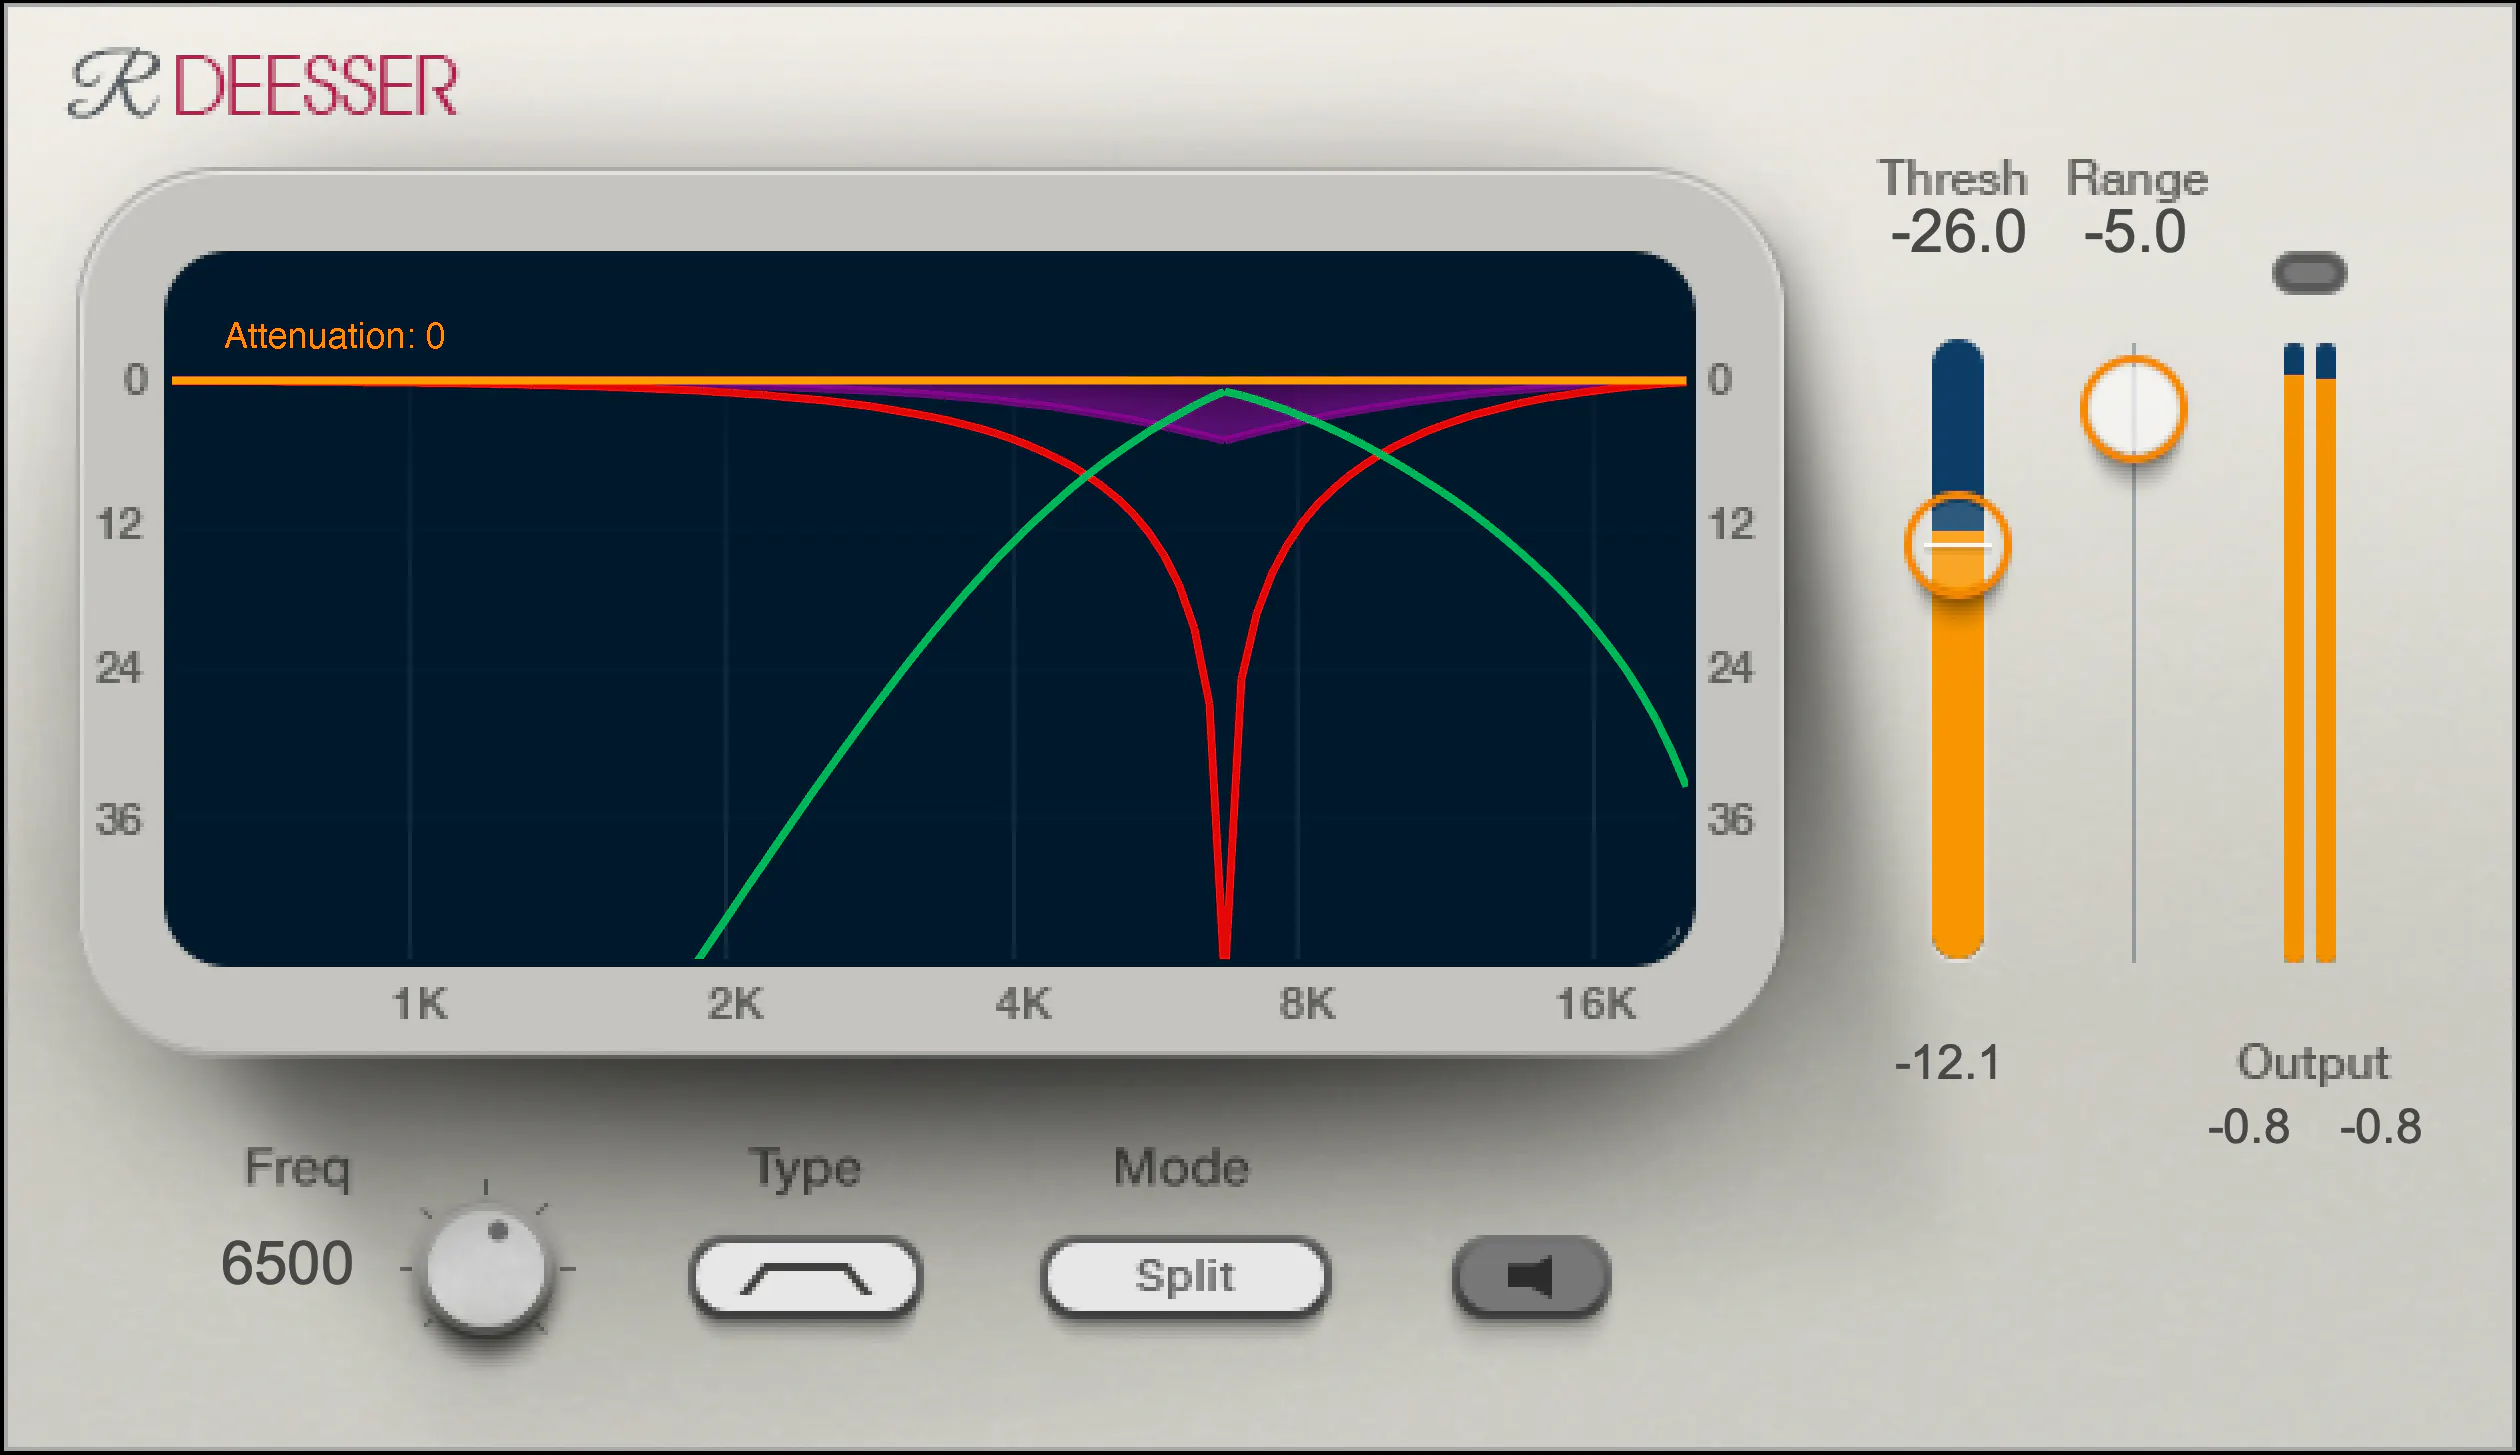
One of my go-to de-esser plugins is Waves Renaissance DeEsser, which offers precise control over the detection frequency, threshold, and reduction amount. Another popular option is FabFilter Pro-DS, which includes a natural-sounding “single vocal” mode for easy and effective de-essing.

De-Essing Vocals

De-essing can be a delicate process, as overuse can result in a dull and lifeless vocal sound. It’s important to strike a balance between reducing sibilance and maintaining the natural tone and character of the vocal recording.

When de-essing vocals, I typically start by soloing the vocal track and listening for the most pronounced sibilant sounds. I then apply the de-esser plugin with a gentle reduction amount, gradually increasing until the sibilance is under control but the vocal still sounds natural.

Best De-Esser for Vocals

In my experience, the best de-esser for vocals is one that offers precise control over the detection and reduction parameters, while still maintaining a natural sound. As mentioned earlier, Waves Renaissance DeEsser and FabFilter Pro-DS are both excellent options in this regard.

It’s also worth considering the de-esser included in your DAW of choice. For example, Logic Pro’s built-in de-esser is simple yet effective, with a straightforward interface that allows for quick and easy de-essing.

De-Esser Settings

When using a de-esser, it’s important to understand the various settings and how they affect the sound. The most important parameters to adjust are the detection frequency, threshold, and reduction amount.

The detection frequency determines which frequencies the de-esser will target, while the threshold sets the level at which the gain reduction will be applied. The reduction amount controls how much gain reduction is applied to the offending frequencies.

It’s worth experimenting with these settings to find the sweet spot for each individual vocal recording.

Tips for Using a De-Esser

Here are a few tips for getting the most out of your de-esser:

Use the de-esser sparingly, as overuse can result in a dull and lifeless vocal sound.
Always listen for sibilance in solo mode before applying the de-esser to the full mix.
Experiment with different de-esser plugins and settings to find the best sound for each individual recording.
If you’re unsure about how much de-essing to apply, start with a small reduction amount and gradually increase until the sibilance is under control but the vocal still sounds natural.
As the legendary producer Quincy Jones once said, “The most important thing in the studio is your ears.” And this is especially true when it comes to managing sibilance in vocal recordings. A de-esser is a tool that helps to control sibilance, or the harsh “s” and “t” sounds that can be distracting or unpleasant in a recording.

What is a de-esser?

Simply put, a de-esser is a type of audio processor that is designed to reduce or remove sibilance from a recording. It works by detecting and attenuating the specific frequency range where sibilance occurs in a vocal recording. This can help to smooth out the sound of the recording and make it more pleasing to the ear.

How does a de-esser work?

A de-esser typically uses a narrow-band compressor to reduce the level of the sibilant frequencies. The compressor is set to activate only when the sibilant frequencies exceed a certain threshold level. This allows the de-esser to reduce sibilance without affecting other parts of the recording. Some de-essers also use dynamic equalization to selectively attenuate sibilant frequencies, which can provide a more natural-sounding result.

Why is a de-esser important?

Sibilance can be a major distraction in vocal recordings, and can make a recording sound amateurish or unprofessional. A de-esser can help to smooth out the sound of a recording and make it more pleasant to listen to. This can be especially important in situations where the recording will be played over a large sound system or in a professional setting.

As the legendary producer Quincy Jones once said, “The most important thing in the studio is your ears.” And this is especially true when it comes to managing sibilance in vocal recordings. One personal experience I’ve had with sibilance was during a recording session with a vocalist who had a very pronounced lisp. Despite the fact that the vocal performance was excellent, the lisp made the recording almost unlistenable. However, with the use of a de-esser, we were able to remove the harsh sibilant sounds and salvage the recording.

Another personal experience was with a different vocalist who had a lot of sibilance in her recordings. Initially, we tried to use EQ to reduce the sibilance, but found that this also affected other parts of the recording and made it sound unnatural. However, once we introduced a de-esser into the signal chain, we were able to achieve a more natural-sounding result that still effectively reduced the sibilance.

In conclusion, a de-esser is a powerful tool for managing sibilance in vocal recordings. By detecting and attenuating specific frequency ranges where sibilance occurs, a de-esser can help to smooth out the sound of a recording and make it more pleasing to the ear. Whether you’re a professional audio engineer or a hobbyist recording at home, a de-esser is an important tool to have in your audio processing toolkit.

sibilance reduction, vocal processing, audio engineering, dynamic equalization, narrow-band compressor, vocal recording, audio processor, professional recording, recording studio, audio production, sound quality, sound engineering, audio post-production, de-essing, audio editing, audio restoration, sound treatment, audio technology, audio software, mixing and mastering, audio mastering, audio plugins, music production, audio effects, sound design, audio signal processing, audio post-processing, audio filtering, audio frequency, audio dynamics, audio post-production techniques, vocal performance, audio compression, audio enhancement, audio editing software, audio hardware, audio mixer, audio signal chain, audio equipment, audio tools, sound recording, audio clean-up, audio post, audio mastering software, audio workflow, audio clarity

AUDIO PROCESSING DEVICES

AUDIO PROCESSING DEVICES.

Processing Device

There is a strong belief among common people that sound processing devices can improve the quality of a professional sound reproduction system. This is true … However, this thesis should not be extrapolated to the quality of the sound that this system reproduces.

Processing Devices

When using any sound processing device, its quality, in principle, can only deteriorate. The fact is that they do not solve the problem of the sound itself at all, but allow sound engineers and sound engineers to level the harshness of the performance of vocalists and musicians, eliminate inaccuracies in the sound of musical instruments, compensate defects caused by the wrong choice of equipment and its location, and also reduce the impact on reproduction. the acoustic properties of the premises. But if, for example, a vocalist has a good command of his voice and knows how to use a microphone, then he does not need a compressor.

Initially, the processes associated with the special distortion of the reproduced signal were used only in commercial sound systems, such as telephones, radio or public address systems. They have now found wide application in music and are used to make an instrument or voice unusual or unnatural. This is done primarily to surprise the audience and increase the impact of listening to the piece.

From a scientific point of view, any audio device (a microphone, a power amplifier, or a speaker system) is also a sound processing device. Firstly, they are not ideal and change the amplitude and phase of the signals, secondly, these changes occur in different ways at different frequencies, and thirdly, non-linear distortions in them lead to the appearance of new components spectral in them. By the way, the first sound processing device was the Leslie loudspeaker, which was used in conjunction with the Hammond electric organ in the 1930s and 1940s and gave it a “growl” sound.

Parameters and classification of audio processing devices.
Sound work can be done in both digital and analog formats, or even without electroacoustic conversion. In this sense, it is necessary to decide: what is meant by sound processing device?

Therefore, we will consider software and hardware that works with audio frequency electrical signals (both in analog and digital form) in real time. Before qualitatively evaluating each of the methods of working with them, it is necessary to understand how and for what purpose the processing of audio signals is carried out.

All audio processing devices can be quite conditionally divided into 3 groups:

1.-devices that do not add additional components to the signal (audio processing units);
2.-devices that add additional components to the signal (sound effects);
3.-devices that synthesize new signals based on the characteristics of the original signal (vocoders).

AUDIO PROCESSING UNITS
These include delay blocks, equalizers, crossovers, and compressors.

The need for delay units appeared in the 40s of the 20th century, when stereo sound began to be used in the cinema. As you know, a person perceives sound as a set of signals that reach each of the ears. By analyzing the delay of the sound wave reaching each ear, our brain can easily determine the location of the sound source.

Using a delay unit, used, for example, on one of the channels, it is possible to simulate a change in the position of the sound source relative to the listener. Of course, in the formation of spatial effects, the listener voluntarily participates in the sound image. In general, sound delay is a natural phenomenon associated with the fact that the speed of propagation of a sound wave is relatively low. Surely everyone is familiar with the echo effect that occurs when a wave reflects off an obstacle and passes its return path. The difference between the effect made with the help of the delay unit is that the “reflected” signal is no different from the original. Under real conditions, the spectrum of the signal during reflection changes significantly, since its various components are reflected differently from obstacles.

An example of sound propagation in a room
Currently, delay units are widely used in audio processors. They are used to equalize the sound field in large and complex rooms, in conference rooms, as well as to create sound effects such as echo, delay, reverb, etc.