Mp4 Increase Volume


Free Download Mp4Gain
picture

Mp4 Increase Volume

Mp4 Increase Volume

Let’s talk about Mp4 Increase Volume

As a long-time audio and video specialist, I’ve often been asked about boosting the sound in MP4 files. Achieving the perfect audio level in your videos is paramount to a great viewing experience. I know what it’s like to struggle with a movie where you can barely hear the dialogue, then get blasted by the music in the next scene! This article will tell you how to bring those quiet MP4s up to par and understand why some videos seem quieter than others. I’ll share my experiences and expert tips so you can have videos with clear and consistent sound.

Understanding Volume and Audio Levels

For effective volume adjustment, the primary concepts to understand are decibels (dB) and normalization. I’ve found that many volume issues stem from a misunderstanding of these concepts.

* Decibels (dB) express sound intensity. A higher decibel level means louder sound.
* Normalization adjusts volume to a consistent target level. It prevents sudden shifts in loudness.

These two ideas form the base of volume modification of mp4.

Common Reasons for Low Volume

Dealing with low volume, as I often do, requires getting to the root of the problem. Typically, several factors contribute to why your MP4 might sound too quiet.

* Poor recording levels: During initial filming, it may occur that the audio equipment isn’t set up properly. This results in a quiet capture.
* Incorrect mixing: When content creators use mixing methods or tools of low quality, the final volume output might not be optimal.
* Codec compression: Using codecs to reduce the size of a video file for storage, could make it quieter..
* Different audio standards: For instance, a video created for theatrical release may have a wider dynamic range. This means soft sounds are very soft, and loud sounds are very loud. This is a common effect.
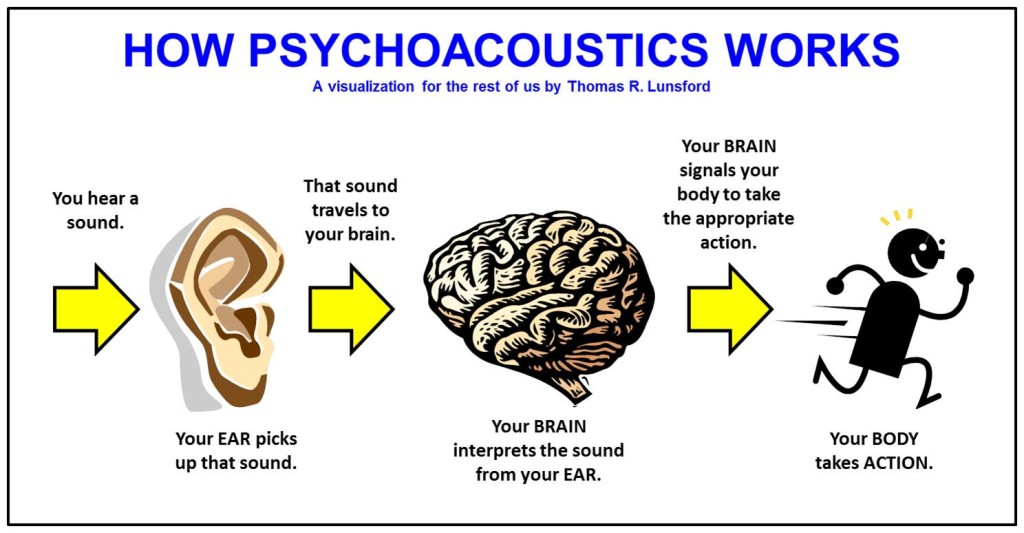
* Perceived Loudness: Perceived Loudness or psychoacoustics refers to a person’s subjective perception of the sound pressure of a MP4 file. Sometimes this perceived loudness is not reflected in the dB value.
* Bitrate: As with most video and audio compression formats, the amount of bits the file has allocated to encode the information plays a huge role in quality and volume.

Strategies to Effectively Boost Mp4 Volume

As someone deeply entrenched in audio mastering, the process of increasing volume without creating unwanted distortion is essential. There is more involved than simply turning the knob on your system’s player.

* Normalization: Use normalization to bring the audio’s peak to a standard level (e.g., -1dBFS). I find that normalizing a MP4 file provides uniformity across an album.
* Compression: Compressing makes the quite bits louder, as it reduces dynamic range. Be careful using this technique, as it reduces the range and can ruin nuances.
* Limiting: Imposing a limit helps to prevent digital clipping. The limit will protect your audio from distorting the track.

Avoiding Common Pitfalls While Increasing Volume

It’s easy to fall into traps, as I’ve experienced with clients who chase maximum volume at all costs.

* Clipping: It occurs when the audio signal exceeds the maximum level. The top of the sine wave becomes flattened, introducing unpleasant distortion.
* Distortion: Overdoing compression and limiting is dangerous, leading to the loss of dynamics and clarity. I’ve heard videos where everything seems loud, but nothing is clear.
* Exceeding Safe Levels: I usually recommend keeping peak levels below -1dBFS to avoid inter-sample peaks. Leaving a little headroom protects your sound.
* Over normalization: It can result in high-quality MP4 files. High-quality MP4 files are less prone to data loss and sound better, with high detail and more volume.

Tools and techniques for Audio Enhancement

Over my years in audio and video production, I’ve tried just about every volume enhancing method under the sun.

* Audio editing software: Using dedicated software is the ideal path. With editing software, you can normalize, compress, adjust the EQ, and control the volume.
* Online video editor: These editors may provide a quick fix for videos you intend to share immediately, but these may decrease their quality due to being designed for speed over quality.

Maximizing Audio Fidelity During Volume Increase

Volume boosting requires knowing how the video is being handled to preserve the original quality. We need a good approach to produce excellent audio fidelity while increasing volume.

* Source Quality: Be wary of increasing audio or using editing software to artificially boost audio in low quality video. Using the source file instead of a lower quality MP4 gives you much more audio and quality fidelity.
* Experimenting and testing: There are no quick solutions, nor can numbers be given as rules of thumb for every situation. When increasing your mp4’s volume, experiment with different settings to get what you are looking for.
* Constant bit rate or variable bit rate: CBR vs VBR is also an important factor in audio fidelity. Use constant when precise rates are needed; variable is better when you need a smaller file.
* File conversion: Converting an MP4 to a higher-quality format doesn’t improve existing low volume. If you can, remix from the source track and work your way up.
* Sample Rate: If you start with a good file, make sure to keep a good sample rate to avoid resampling artefacts from your audio work. Keep in mind how much audio loss sample rate changes may entail.

Preserving Dynamic Range

For dynamic range control during volume adjustment, keep the crest factor in mind. I’ve found that many of my projects benefit from subtle control that helps provide impact without over-compression.

* The crest factor is the ratio between a signal’s peak and its average RMS level.
* A crest factor of 6dB or higher often indicates good dynamic range. A lower one, indicates overly compressed audio.
* A high crest factor, in a good recording, means more dynamic range. Aim for the correct level on the quieter sounds in the recording and then work up from there.

Advanced Tips for Specific Audio Issues

As experts know, not all volume issues are the same. Some require specific steps. After working on countless projects, here’s what I recommend:

* Dialogue Clarity: For dialogue issues, use EQ to bring out the frequencies at which human voices operate. To clarify it even more, you can adjust the EQ on the instruments playing to give it a boost.
* Mixing audio from different Sources: The main thing here is consistency. Make sure the different levels are similar. There are handy techniques like compressing the audio file to limit its dynamic range or normalization.
* Dealing with background Noise: For background noise, try noise reduction tools or high-pass filters. I find that it helps to clean up those MP4s without losing what you care about.

Impact of Mp4 Increase Volume on Different Devices

It’s important to understand the variability that volume can have across different playback systems.

* Headphones can produce sound at a different level compared to studio monitors. A video mixed for earphones will sound very different on studio monitors.
* A professional soundcard setup connected to a hifi equipment will sound very different from a built-in audio chip, and will handle the dynamic range very differently.
* High-end audio systems can handle greater dynamic range, which makes the sound more natural while sounding great, while lower end and equipment compress it to be more listenable, which reduces quality.

If you’re struggling to balance volume, consider MP4Gain. It may be what you’re looking for to easily enhance your file.

Latest words on Mp4 Increase Volume

The importance of mastering how to improve loudness in MP4s to create an immersive audiovisual experience cannot be stressed enough, as I’ve often preached. By understanding the importance of normalization and the potential pitfalls, such as clipping and distortion, I’ve helped countless content creators improve their video quality. By experimenting and using the best methods and tools, every MP4 file you produce can offer the greatest possible sound quality, regardless of where it is being watched.

FAQ about Mp4 Increase Volume

Why do some MP4s sound quieter than others, what cause the MP4 volume differences?

The Mp4 volume file differences come from a variety of reasons including recording conditions, different audio mixing, compression artefacts and the difference in audio standards. These issues often lead to fluctuations in the audio’s perceived loudness and overall quality of playback.

What are the key differences between normalization and compression to reach an Mp4 increase volume?

With normalization, the audio is lifted to a certain level and then reduced, evening everything out while compression narrows the dynamic range. However, normalization does not alter dynamics.

Why does over compression degrades audio quality during the Mp4 increase volume?

Over compression distorts the sounds because it reduces the dynamic variety, diminishing quality by making quiet sounds louder and loud sounds softer. With too much compression, the track has less expressive potential and a less natural quality.

Is it better to increase Mp4 volume or convert to other formats?

Increasing volume in the original format allows you to control the changes without losing quality. Conversion should be avoided because it further loss of sound from repeated conversions.

In what cases I should use an EQ setting while improving an Mp4 volume?

You could use an EQ setting if you need some specific elements to be more noticeable, perhaps making bass or voices more sharp. It helps reduce or highlight frequencies. It can greatly improve clarity of sound and can help you improve sound frequencies in order to achieve your goals.

How can the right sample rate improve a Mp4 increase volume?

Making sure you have the right sample rate at the encoding ensures that high frequencies are accurately reproduced and there is no sonic artifacts.

What should I do to prevent data breakpoint errors in high quality Mp4 files?

To properly avoid problems when reaching data break points when creating MP4 files of high quality, you have to make sure that your software and device have the proper codecs. In some situations, to avoid data breaks it may be also useful to verify the Mp4 file and check for consistency problems.

How do you control the amount of compression and side effects for a well balanced Mp4 increase volume file?

Carefully compress, while listening on different devices, being wary of too much compression. To make sure the sound is optimal across the whole frequency range, it may be useful to use multi-band compression.

What happens if you select more decibels (dB) than the track can actually reach to increase Mp4 volume?

In those situations, if the decibels requested are more than the track can achieve, it will distort the sound. If the limit is passed, the sine waves representing your MP4 volume track becomes clipped at the top and bottom, causing an effect that is referred to as clipping, where the loudest parts are reduced and it sounds as if the file has noise artifacts.

How can I best maximize my video’s audio quality and avoid distortion when aiming for a Mp4 increase volume file?

The audio quality is maximized when using the proper EQ and tools for a good audio sound and clarity. By using normalization to reach the file’s optimal level without distortion, you can make sure the sound quality is as best as possible with the given file to achieve the volume level you desire.

Comments:

This article helps to solve some problems I had to improve my video collection thanks to these insights, I don’t have any more movies that sound way too low compared to others.

-Sarah_L

I can’t thanks you enough. I was tired of movies sounding weird when I got to the music part because of the huge change in db! Very valuable information.

-JackReacher

I had a question: What would you recommend for a file who has a perfect setting BUT my audio device is not high-end and has very low volume. If the audio already is good but my soundcard does not play loud enought

-LowEndUser

Very in deep information thank you i try all of that to have a better music for my ears i hope it is enough

-MusicIsLife

Amazing advice! Thank you for all your shared wisdom. This is so valuable!

-Mike052

There is an issue on my side, and I was hoping maybe you can help, as a professional in this field, the mp4 are great with a very good sound, as well as it comes from official releases, but my headset are not enought and sounds come low… Is there any tip you can give for my specific situation? Thank you!

-HelpNeeded


Free Download Mp4Gain
picture


Mp4Gain Main Window
picture


Mp4Gain Features
picture


Free Download Mp4Gain
picture

MP4 Audio Quality

MP4 Audio Quality

MP4 Audio Quality

Let’s talk about MP4 audio quality

When we discuss MP4 audio quality, we’re really diving into a world of choices that impact what you hear. As someone who’s worked with audio for years, I can tell you that it’s not just about whether the sound is loud or soft. It’s about clarity, richness, and how well the sound represents the original recording. Think of it like this: a perfectly cooked meal can be ruined with a bad presentation, just like fantastic audio can be lost with poor encoding. I’ve seen firsthand how different audio codecs and settings can completely change the way we perceive sound from music to podcasts, to even simple voice recordings. It is important to choose the right settings to avoid any audible losses or distortions.

Understanding Audio Codecs in MP4 Files

Audio codecs are the secret language that our computers use to compress and decompress sound. I’ve spent countless hours comparing them, and it is amazing how different they are. They significantly impact MP4 audio quality. In the world of MP4, you’ll most often run into AAC (Advanced Audio Coding), which I consider the most common and broadly compatible choice, providing a good balance between quality and file size. But there are other options, like MP3 and even less-common ones. You can imagine it like choosing a type of container for your liquid: you can have a large, high-quality bottle that protects the water, or a smaller, less-secure one that might not keep the water fresh. The type of codec is your choice of bottle for your audio, and it will determine its quality when using an MP4 file.

AAC (Advanced Audio Coding)

  • Often considered a superior replacement for MP3.
  • Offers better sound quality at similar bitrates or same sound quality at a lower bitrate, making it space-efficient.
  • Widely supported across different platforms.

MP3

  • Older codec, but still widely compatible with all types of devices.
  • Generally has slightly lower audio quality than AAC at the same bitrate.
  • Very popular because of its legacy support.

Bitrate: The Key to MP4 Audio Quality

Bitrate, often measured in kilobits per second (kbps), is a crucial factor when we’re talking about mp4 audio quality. In my experience, it directly dictates how much detail is preserved in the audio file. A higher bitrate means more data is being stored per second. Think of bitrate as the number of colors in a painting. More colors (higher bitrate) means more detail, which makes the painting look more vibrant and realistic, and the same happens with audio. On the other hand, a lower bitrate means less detail, which can lead to audio sounding muddy or distorted, like a blurry or pixelated painting. When I work with audio files, I always start by making sure I choose an appropriate bitrate so that all the subtle nuances are present in the final output.

Common Bitrates and Their Use

  • 128 kbps: Often used for low-quality audio like podcasts or low-quality streaming, good for small file sizes.
  • 192 kbps: Considered a decent quality for general listening on most devices, offering a good compromise between size and quality.
  • 256 kbps: This is what I would consider a good starting point for high-quality audio, useful for most music on streaming.
  • 320 kbps or higher: Provides very high-quality sound, nearly indistinguishable from the original source for most people, this is what I strive for when quality is a must.

Sample Rate and Its Impact on MP4 Audio Quality

The sample rate, usually expressed in Hertz (Hz) or Kilohertz (kHz), is another important concept that affects MP4 audio quality. I can tell you from personal experience that this rate determines how often the sound is sampled per second. It is like taking pictures of a moving object. A faster frame rate will capture the movement smoother, and the same happens with audio. Higher sample rates, like 44.1 kHz or 48 kHz, result in audio that captures the higher frequencies better, leading to a richer and more detailed sound. This is especially noticeable in music with many high-frequency instruments or sounds. Lower sample rates can cause loss of high-frequency content, making the audio sound dull or muffled. This parameter is very important to be taken in consideration because It affects the overall clarity and fidelity of the audio, so I always check and choose the correct one for every project.

Common Sample Rates

  • 44.1 kHz: Standard for audio CDs and most digital music files.
  • 48 kHz: Commonly used for videos and digital audio workstations.
  • Higher sample rates (e.g., 96 kHz, 192 kHz): These are used for professional audio production and archiving, it captures the audio as close to real life as possible.

Audio Channels: Stereo vs. Mono

The number of audio channels also plays a role in the perception of audio quality. I’ve had a lot of fun experimenting with audio channels over the years. Stereo, which we hear most often in music, is what gives us a sense of directionality and depth, using two separate channels, one for the left ear and the other for the right ear. It creates a more immersive and realistic experience. Mono, on the other hand, uses only one audio channel, so sound feels flat and without dimension. Imagine watching a movie with a huge screen, and then compare that to a small screen. The huge screen gives you a sense of immersion, and stereo is just the same in audio. The choice depends on the use case. For music, you should always use stereo, while a podcast may work well enough in mono.

When to Use Which

  • Stereo: Ideal for music and videos where spatial depth is desired, creating a more natural experience.
  • Mono: Suitable for voice recordings, podcasts, or situations where file size is more important than dimensionality.

The Impact of Compression on MP4 Audio Quality

As a specialist in the area, I know very well that compression is a necessary evil. In order to get smaller files, you need to compress the audio in some way. Compression makes file sizes smaller, which means they are easier to share and download. But, if it’s done improperly, it can lead to a degradation in audio quality. Think of it like squeezing a sponge; If you squeeze it too hard, you could damage the sponge. This also can happen to audio data. Lossy compression methods, like MP3 and AAC, reduce file size by discarding some audio information, sometimes impacting the quality. The goal is to compress the audio enough to have a small file size without noticing any loss of quality.

Types of Compression

  • Lossy compression: Reduces file size by discarding audio information, like MP3 and AAC.
  • Lossless compression: Keeps all the audio data but still reduces file sizes, like FLAC. However, this type of compression is not commonly used in MP4 files, because they are focused on multimedia content.

Practical Tips to Maximize MP4 Audio Quality

Over the years, I have learned some tricks that can help you get the best audio quality from MP4 files. The most important thing to keep in mind is to always use the highest quality audio file that you can afford, if the quality is not important, then you can go for a smaller file. Always try to start with the best audio quality. When you are encoding, select a high enough bitrate, the higher the better if your devices can play it. Always listen to your audio files with good headphones or speakers to really understand if there is any audio issues. It’s always a good idea to test your settings with several files to check if there is something you can improve to increase quality. It’s like cooking: you need to try different ingredients and cooking methods to find your signature dish.

Tips for Good Audio

  • Always start with the highest-quality audio source.
  • Choose a high enough bitrate (at least 256 kbps for music).
  • Use AAC codec when possible because it can offer better quality than MP3 for the same bitrate.
  • Make sure you choose the correct sample rate (44.1 kHz or 48 kHz are the most common ones).
  • Use stereo for music, unless you have a specific reason not to.
  • Test and listen carefully to the final result and make adjustments if needed.

Latest words on MP4 Audio Quality

MP4 audio quality is a complex topic. From my experience, I’ve found that understanding the elements, such as codecs, bitrate, sample rate and audio channels, it’s critical to getting the best audio quality from the files we use every day. Paying attention to these details will help you get the best sound possible from your MP4 files, improving your experience whether you are listening to music, watching movies or listening to a podcast. If you ever have to deal with low audio quality, using an appropriate app like Mp4Gain is the solution to improve the overall quality.

What is the AAC audio codec and why is it commonly used in MP4 files?

The Advanced Audio Coding (AAC) codec is a popular audio compression standard that is known for its high sound quality at relatively low bitrates, making it an excellent choice for MP4 files. AAC is often preferred over MP3 due to its improved compression algorithms, which can result in smaller file sizes without a significant loss of sound quality.

How does bitrate affect MP4 audio quality?

Bitrate is a key factor that directly influences the sound quality in MP4 audio. A higher bitrate means more data is stored per second, preserving more detail and resulting in better audio quality, with a sound that is closer to the original recording. Lower bitrates can lead to audio compression, resulting in a muddier or distorted sound. Choosing an appropriate bitrate is crucial for balancing file size with optimal audio quality.

What is the role of sample rate in MP4 audio encoding?

The sample rate determines how many times per second the audio is sampled, effectively capturing the sound. Higher sample rates, such as 44.1 kHz or 48 kHz, are better at capturing higher frequencies, providing a richer and more detailed sound. Lower sample rates may lead to loss of some audio details, often resulting in a duller or less dynamic sound. This rate is an important aspect when thinking about overall quality.

What is the difference between stereo and mono audio channels in MP4 files?

Stereo audio uses two channels, providing a sense of width, depth and direction to the sound, very useful for music and movies. Mono audio uses a single channel, making the sound feel flat, without dimension and is suitable for situations where spatial depth is not essential like podcasts. The selection between stereo or mono depends on the intended application and if the spatial information is important or not.

How does audio compression impact the overall quality of MP4 audio?

Audio compression reduces file size by either removing some data (lossy compression) or by using algorithms to store data more efficiently (lossless compression). Lossy compression, commonly used in MP4 files, discards audio information, impacting quality depending on the compression level. Lossless compression, although preserving data, is not common in MP4 files. The goal is to find a balance between compression and sound quality.

What are some practical ways to enhance MP4 audio quality?

To enhance MP4 audio quality, use the highest-quality source possible, encode audio at high bitrates (at least 256 kbps for music), use AAC codec over MP3 when possible, and choose an appropriate sample rate. Also, listen to the audio using good headphones or speakers to identify any issues, and use stereo for music where spatial depth is key. Making adjustments to these parameters is very important.

Why might my MP4 audio sound muffled or distorted?

Muffled or distorted MP4 audio can result from several factors, such as low bitrates, incorrect sample rates, or excessive audio compression. It could also be caused by poor recording equipment or editing. The type of codec also plays a role; older codecs might not be as good at preserving quality, and using low quality audio as a source will result in poor quality even after encoding. Ensuring all encoding parameters are correct is important to prevent this problem.

What is the ideal audio bitrate for high-quality music in MP4 format?

For high-quality music in MP4 format, it is best to use a bitrate of 256 kbps or higher. This bitrate will offer a high level of detail and fidelity without resulting in very large file sizes. While higher bitrates may offer a slightly better sound quality, the difference is often not noticeable. Using a bitrate lower than 256 kbps may result in a perceptible quality loss.

Is it possible to improve the audio quality of an existing low-quality MP4 file?

While it is not possible to fully restore information that has been lost, it is possible to enhance the audio quality to some extent. Using audio editing software can help you to adjust some audio parameters. Software like MP4Gain are useful to adjust the audio in some ways to improve the perceived quality. However, if the original audio has been heavily compressed, there may be only a little that can be improved.

How can I choose the right audio settings when encoding my MP4 files for optimal sound quality?

When encoding MP4 files for optimal sound quality, consider starting with high-quality source, and always select AAC as the audio codec if possible for better quality compared to MP3. Choose the bitrate according to your needs (256 kbps is a good starting point) and a sample rate of 44.1 or 48 kHz. Use stereo for music. After encoding, listen to the audio on different devices to make sure that the quality meets your expectations. Adjust settings as needed.

Comments:

This article helped me a lot, I was having problems with some of my music files sounding bad, now I understand that I need to use a higher bitrate, thanks!

User: MusicLover

I never knew that there were so many parameters that affected audio quality! I always just grabbed whatever mp4 and thought it was all the same, now I know I have to look at the bitrate, the codec, etc, amazing info, good job!

User: TechNoob

This was super useful. It really breaks down the tech stuff so it’s easy to understand. I’m gonna try changing the audio settings on my next video project. Thanks a lot, this has helped me greatly!

User: VideoGuy87

I wish you had more info about advanced topics, like how to properly compress my audio without loosing too much information, but still, this article was helpful and easy to follow, keep up the good work.

User: ProAudio

Wow, I learned a lot about MP4 audio quality, I did not know that bitrate and sample rate were so important. Gonna try using a higher bitrate for my music collection, I hope the size wont be a problem.

User: AudioFan

This article was a great read and really explained all the stuff behind audio encoding, it was really easy to understand, thank you. I never knew why some of my files sounded so bad. Now I know how to fix this. Thank you!

User: HappyListener

I been using Mp4Gain for years now, I am glad to see it mention here, its my go to solution when I need to improve the audio quality. But thanks for all the in deep info on the article, its a great read.

User: AudioMaster

Scalable Coding in MP4 Audio Streams

Scalable Coding in MP4 Audio Streams

Let’s talk about scalable coding in MP4 audio streams

When we discuss scalable coding in MP4 audio streams, we’re diving into a fascinating way to handle audio data efficiently while maintaining quality. This technology allows us to adapt audio streams to various devices and network conditions, providing flexibility and efficiency. I’ve worked with these systems extensively, and it’s like packing a lunchbox with compartments—each one tailored for a different need.

Imagine streaming your favorite music on a road trip. As you drive through areas with varying internet speeds, scalable coding ensures the audio quality adjusts seamlessly, so you don’t experience interruptions. That adaptability is what makes this technology invaluable in modern multimedia delivery.

How does scalable coding enhance MP4 audio streams?

Scalable coding is all about flexibility. It divides an audio stream into multiple layers, each contributing to the overall quality.

  • The base layer provides essential audio information, ensuring playback even on low bandwidth.
  • Enhancement layers add more detail, creating a richer experience for users with better network conditions or devices.

Think of it as building a house. The foundation is sturdy and functional (the base layer), while the extra rooms and decorations (enhancement layers) make it luxurious. This layered approach lets providers cater to a broad audience without compromising usability or quality.

Why is scalable coding critical for MP4 formats?

MP4 is a versatile format used across various platforms, and scalable coding makes it even more powerful. When I first encountered this, I realized its potential for saving storage and optimizing streaming. For instance, a single MP4 file with scalable audio coding can serve multiple devices—smartphones, laptops, and TVs—without needing separate versions.

It’s like having one-size-fits-all clothing. Instead of maintaining multiple wardrobes, one adaptable set of clothes suits every occasion. This capability reduces storage needs for content providers and ensures smooth playback for users.

Technical components of scalable coding in MP4 audio

Breaking it down, scalable coding relies on several key components:

  • Hierarchical layers:

    Each audio layer builds upon the previous one, starting from the base.

  • Bitrate adaptability:

    The bitrate adjusts dynamically, optimizing playback quality based on network conditions.

  • Efficient encoding:

    Advanced algorithms ensure minimal data loss while maintaining quality.

I compare this to assembling a puzzle. Each piece (layer) fits perfectly, and as you add more pieces (bitrate and encoding), the picture becomes clearer. This intricate system ensures seamless delivery and high-quality output.

Applications of scalable coding in MP4 audio

From my experience, the practical uses of scalable coding are immense:

  • Streaming services:

    Platforms like Spotify and YouTube benefit greatly by delivering content to users with varying internet speeds.

  • Adaptive learning:

    Educational platforms use it for podcasts and audiobooks, ensuring accessibility across devices.

  • Virtual reality:

    High-quality immersive audio is crucial for VR, and scalable coding meets the demand efficiently.

These examples show the importance of scalable coding in everyday applications, making it a cornerstone of modern multimedia.

Advantages over traditional audio coding

Traditional audio coding methods fall short in adaptability and efficiency. Scalable coding surpasses these limitations:

  • It offers uninterrupted streaming even in fluctuating network conditions.
  • Storage and bandwidth requirements are reduced, benefiting both providers and users.
  • It supports a wide range of devices, enhancing accessibility.

Imagine watching a movie where the video quality dips but the sound remains crisp and clear. That’s scalable coding at work, ensuring the experience remains enjoyable.

Challenges in implementing scalable coding

Despite its benefits, implementing scalable coding has hurdles. From my perspective, the biggest challenge is the complexity of encoding and decoding processes. This requires advanced algorithms and significant computational power.

Additionally, ensuring compatibility with existing systems can be tricky. It’s like upgrading an old car with the latest technology—it’s not impossible, but it takes effort and expertise.

Future of scalable coding in MP4 audio streams

The future looks promising. With the rise of 5G and improved codecs, scalable coding will become even more efficient. I envision a world where high-quality audio is accessible to everyone, regardless of their device or network.

Imagine a live concert streamed in real-time with studio-quality sound, even for someone using a basic smartphone in a remote area. That’s the potential of scalable coding when combined with advancing technology.

Mp4Gain: The solution for audio optimization

For those looking to optimize MP4 audio streams, Mp4Gain offers an excellent solution. Its advanced features ensure balanced and high-quality playback, making it a go-to tool for audio enthusiasts and professionals alike.

What is scalable coding in MP4 audio streams?

Scalable coding in MP4 audio streams refers to a method of encoding audio into layers, allowing adaptation to various network conditions and devices. This ensures consistent playback quality.

How does scalable coding benefit streaming services?

Streaming services benefit by delivering adaptable audio quality based on user bandwidth, ensuring smooth playback and conserving resources.

Can scalable coding improve audio quality?

Yes, scalable coding enhances audio quality by using multiple layers to provide richer sound when network and device conditions allow.

What are the challenges of implementing scalable coding?

Challenges include the complexity of encoding/decoding processes and ensuring compatibility with existing audio systems.

Why is MP4 suitable for scalable coding?

MP4 supports layered audio encoding, making it ideal for delivering adaptable audio streams across multiple devices.

How does scalable coding handle low bandwidth?

It ensures playback by relying on the base audio layer, which provides essential information without requiring high bandwidth.

Is scalable coding used in virtual reality?

Yes, it’s widely used in VR to deliver high-quality immersive audio, adapting to the user’s system and network capabilities.

What are the key components of scalable coding?

Key components include hierarchical layers, bitrate adaptability, and efficient encoding algorithms.

Can scalable coding reduce storage requirements?

Yes, it reduces storage by enabling a single MP4 file to serve various quality levels, eliminating the need for multiple versions.

How is scalable coding evolving with 5G?

With 5G, scalable coding is becoming more efficient, supporting higher quality streams and real-time adaptability for modern applications.

Comments:

This article explained a lot of things I didn’t know about scalable coding. It makes so much sense now why my streaming apps don’t lag as much!

I wish you had gone into more detail about the algorithms behind scalable coding. The techy stuff fascinates me!

Wow, this is so informative. I never realized how much thought goes into streaming quality. Thanks for sharing!

It’s amazing how this technology adjusts based on internet speed. My kids always stream music, and now I understand why it works so well.

Honestly, I’m still confused about the layers part. Could you do another post focusing just on that? It would help a lot.

This really helped me understand why my phone uses less data for audio streaming compared to my laptop. Thanks for the insight!

I’ve been curious about MP4 scalability, and this broke it down perfectly. Kudos to whoever wrote this—it’s clear and detailed.

I didn’t know MP4 was so versatile! Thanks for explaining it in such an easy-to-understand way. Great job!

Very informative but could use more examples. Still, it’s the best explanation I’ve come across. Keep it up!

Audio Stream Multiplexing in MP4

Audio Stream Multiplexing in MP4

Audio Stream Multiplexing in MP4

Let’s talk about audio stream multiplexing in MP4

Audio stream multiplexing in MP4 is a fascinating and essential part of how we experience multimedia content today. As someone who has spent years understanding and working with multimedia formats, I can tell you that the process of combining multiple audio streams, along with video and subtitles, into a single MP4 file is like orchestrating a symphony. Each element plays a role, and everything must come together seamlessly for a perfect playback experience.

Imagine you’re watching a movie with multiple audio tracks, such as different languages or director commentaries. Without multiplexing, those tracks would be stored separately, making playback cumbersome. Multiplexing ensures these streams are synchronized and accessible in one file, offering convenience and flexibility.

How MP4 handles audio and video streams

MP4 is a container format designed to handle audio, video, and other data streams. It achieves this by using a structured system called tracks. Think of tracks as individual lanes in a highway, each carrying its unique data.

In my experience, one of MP4’s strengths is its ability to handle diverse codecs like AAC for audio and H.264 or H.265 for video. These codecs compress the data efficiently while maintaining quality, and MP4 ensures all streams are synchronized during playback. This synchronization is achieved through a process called interleaving, where small chunks of audio and video data are stored alternately.

Why audio stream multiplexing is crucial

The importance of multiplexing becomes evident when you consider its role in modern streaming platforms and video editing software. Without proper multiplexing, audio might lag behind the video, or vice versa, ruining the viewer’s experience.

For example, when creating content for platforms like YouTube or Netflix, ensuring smooth playback across devices is critical. Multiplexing helps maintain synchronization, even when network conditions are less than ideal.

Challenges in audio stream multiplexing

Working with audio stream multiplexing isn’t without its challenges. One issue I’ve encountered is handling variable bitrate (VBR) audio, where the amount of data used for audio changes over time. This can complicate synchronization because the timing information must be precise.

Another challenge is dealing with audio drift, which occurs when audio slowly goes out of sync with the video during long playback sessions. Multiplexing software must account for this by inserting synchronization points at regular intervals.

How audio codecs affect multiplexing

Audio codecs play a pivotal role in how streams are multiplexed. For instance, AAC (Advanced Audio Coding) is commonly used in MP4 because of its excellent balance between quality and compression. However, other codecs like MP3 or AC-3 may be used depending on the application.

I’ve found that understanding the characteristics of these codecs helps optimize the multiplexing process. For example, AAC has built-in error correction features, which can prevent glitches during playback even if minor errors occur during multiplexing.

Real-life applications of audio stream multiplexing

You encounter multiplexing daily, often without realizing it. Think about streaming a movie with multiple language options. The MP4 container stores all those audio tracks efficiently, allowing you to switch languages without interrupting playback.

I’ve also seen multiplexing used in video conferencing, where audio from multiple participants is combined with video streams in real time. This ensures a seamless experience, even when participants are in different locations.

Best practices for audio stream multiplexing

From my experience, successful multiplexing requires attention to detail. Here are some best practices:

  • Ensure all audio streams use compatible codecs to avoid playback issues.
  • Maintain proper synchronization by using timestamps for each data packet.
  • Minimize compression artifacts by choosing the right bitrate for each stream.
  • Test the final MP4 file across multiple devices to ensure compatibility.
  • Use reliable multiplexing software to handle complex projects efficiently.

Latest words on audio stream multiplexing in MP4

Audio stream multiplexing in MP4 is more than a technical process; it’s the backbone of how we consume multimedia content today. By understanding the intricacies of this technology, you can appreciate the effort that goes into delivering seamless audio and video experiences.

If you’re looking for a practical tool to handle audio and video synchronization, Mp4Gain offers a reliable solution for ensuring perfect multiplexing in your MP4 files.

FAQ about audio stream multiplexing in MP4

What is audio stream multiplexing in MP4?

Audio stream multiplexing in MP4 refers to combining multiple audio, video, and subtitle streams into a single file while maintaining synchronization for smooth playback.

Why is synchronization important in MP4?

Synchronization ensures that audio and video playback remains aligned, providing a seamless viewing experience, especially in movies or live events.

What codecs are commonly used in MP4?

Common codecs for MP4 include AAC for audio and H.264 or H.265 for video, known for their efficiency and quality.

How does interleaving work in MP4?

Interleaving alternates small chunks of audio and video data to ensure they remain synchronized during playback.

What challenges arise in multiplexing?

Challenges include handling variable bitrate audio and preventing audio drift during extended playback sessions.

Can MP4 files support multiple audio tracks?

Yes, MP4 files can support multiple audio tracks, enabling features like language options and commentary.

Why is MP4 preferred for multiplexing?

MP4 is preferred for its compatibility, efficient compression, and support for multiple streams, including audio, video, and subtitles.

What tools are used for multiplexing MP4 files?

Many tools are available for multiplexing MP4 files, but choosing reliable software ensures accurate synchronization and quality output.

Does multiplexing affect file size?

Multiplexing itself does not significantly affect file size, but the codecs and compression settings used can impact overall storage requirements.

How does multiplexing benefit streaming services?

Multiplexing ensures smooth synchronization of audio and video, even over varying network conditions, enhancing user experience.

Comments:

I found this article really informative! Never realized how much effort goes into syncing audio and video in MP4 files. Great job explaining it.

Very helpful article, but I wish it went deeper into how to handle specific codec issues. Still, I learned a lot!

This was exactly what I needed to understand why my audio was lagging behind the video in my recordings. Thanks for the detailed explanation!

Great insights here. I’ve been struggling with audio drift in long videos, and this clarified a lot of things for me.

Solid article! Could you maybe add a section on how to fix desync problems manually? That would make it perfect.

Very clear and detailed. I appreciate the real-life examples—it made understanding this topic much easier for a non-techie like me.

I liked the FAQs at the end! Multiplexing is such a confusing topic, but this article made it simpler.

Honestly, I wish I found this article earlier. My project was delayed because of sync problems. Thanks for the tips!

This is a goldmine of information. However, I’d love to see more practical tools or step-by-step guides for beginners.

MP4 louder

MP4 louder

mp4 louder
mp4 louder
mp4 louder
mp4 louder

How can I increase the volume of my MP4 file?

Raising the volume of an MP4 file can be essential for various reasons, such as when you’re playing it in a noisy environment or when the original recording was too soft. The sound embedded in an MP4 file is often in digital format. This means that the audio is represented by a series of numbers, and increasing the volume involves manipulating these numbers.

However, it’s essential to be cautious. Amplifying an audio signal can introduce distortion, especially if increased beyond the file’s original capacity. To avoid damaging the audio quality, it’s always advised to raise the volume gradually and test the output.

The concept is similar to adjusting the volume on a traditional radio, where turning the dial too high can lead to a crackling sound. The difference here is that once an MP4 file’s audio is distorted, the damage is permanent unless you have a backup of the original.


Try Mp4gain to adjust the volume of most audio and video formats.

“Our lives are defined by opportunities, even the ones we miss.” – The Curious Case of Benjamin Button

What methods are there to make an MP4 sound louder?

While there are many tools and software to amplify MP4 files, understanding the underlying methods can be insightful. One popular method is waveform amplification, where the audio’s waveform is visually represented and manually adjusted. This allows for precise control over which parts of the audio get amplified.

Another method involves compressing the audio dynamic range. This doesn’t mean file compression, but rather, it involves narrowing the gap between the loudest and softest parts of the audio. By doing this, the overall volume can be increased without peaking or distorting the loudest parts.

Finally, audio normalization is a process where the loudest peak of the audio is identified, and the whole track is amplified based on that peak. This ensures the loudest parts don’t clip or distort while maximizing volume.

“The things you own end up owning you.” – Fight Club

Are there manual ways to enhance the audio of an MP4?

Yes, aside from software solutions, there are manual methods to enhance MP4 audio. One can use hardware devices, such as amplifiers, to boost the sound. While these methods are external and don’t alter the MP4 file directly, they can be effective for playback on specific devices.

Another way is to use speaker enhancements. Some speakers come with built-in settings that allow users to adjust the treble, bass, and mid-tones. Manipulating these settings can sometimes produce a louder, clearer audio output when playing the MP4 file.

Lastly, for those who are tech-savvy, it’s possible to extract the audio from the MP4, process it separately using specialized equipment, and then merge it back. This method is intricate and might require some expertise but can yield high-quality results.

“The future belongs to those who believe in the beauty of their dreams.” – Eleanor Roosevelt

Can the loudness of an MP4 file be adjusted without affecting its quality?

Yes, Mp4Gain can do the job for you.

Final words

Increasing the loudness of an MP4 file is not just about amplifying the sound. It’s about understanding the technical aspects, ensuring the audio quality remains intact, and using the right methods for the right situations. Always remember to keep backups of your original files before making any modifications, as it’s easy to introduce unintended distortions.

Everything You Need to Know About Audio Quality

Everything You Need to Know About Audio Quality

Audio Quality
Audio Quality
Audio Quality
Audio Quality

Audio Quality Explained

As an audio enthusiast, I understand how crucial audio quality is for enjoying music or movies. In simple terms, audio quality refers to how good the sound is. But what makes a sound “good”? It’s a combination of factors like bit rate, sample rate, dynamic range, and compression.
In digital audio, bit rate refers to the number of bits of data that are processed per second. The higher the bit rate, the more information is transmitted, resulting in better sound quality. Sample rate, on the other hand, refers to the number of samples per second. A higher sample rate means more data is being captured, leading to a more accurate representation of sound.

When it comes to audio compression, there are two types: lossless and lossy. Lossless compression reduces file size without losing any audio quality, while lossy compression sacrifices some audio quality to achieve smaller file sizes.

“Audio quality is not just about the equipment you use, but also about how the audio is recorded and produced,” as Ken Pohlmann states in his book “Principles of Digital Audio”. It’s essential to consider the recording and mixing process to ensure high-quality audio output.

Analog vs Digital Audio

Analog audio refers to sound that is recorded and transmitted as an electrical signal. It’s been around for decades and is still used in some recording studios today. However, digital audio has taken over in recent years, as it’s more accurate and offers better sound quality.
Digital audio uses a binary code to represent sound, which is then converted back into an analog signal for playback. This process results in a more accurate representation of sound, and the digital format makes it easier to edit and manipulate audio.

As filmmaker George Lucas once said, “sound is 50% of the movie experience.” The switch from analog to digital audio has allowed for more immersive and realistic audio in movies and music.

Dynamic Range and Equalization

Dynamic range refers to the difference between the loudest and softest parts of an audio recording. It’s an essential aspect of audio quality, as a higher dynamic range means a more natural and realistic sound. However, too much dynamic range can cause distortion or clipping, so it’s crucial to find the right balance.
Equalization, or EQ, is the process of adjusting the balance between different frequencies in an audio recording. It’s used to enhance certain aspects of the sound, such as boosting the bass or adding clarity to the vocals. However, overuse of EQ can lead to unnatural or distorted audio.

As composer Hans Zimmer once said, “the music is never the problem, the music is the solution.” By understanding dynamic range and equalization, you can achieve the perfect sound for your music or movie.

Lossless vs Lossy Audio Compression

As mentioned earlier, lossless compression retains all the original audio quality while reducing file size. Lossy compression, on the other hand, sacrifices some audio quality to achieve smaller file sizes.
When it comes to music, many audiophiles prefer lossless formats like FLAC or ALAC, as they offer the best possible sound quality. However, these formats result in larger file sizes, which can be inconvenient for some users. Lossy formats like MP3 and AAC are more widely used, as they provide good sound quality while keeping file sizes small.

As filmmaker Quentin Tarantino once said, “When you’re watching a movie, you’re watching over the filmmaker’s shoulder.” The quality of the audio and video can greatly affect the overall viewing experience of a film. In this article, we’ll explore everything you need to know about audio quality, including bit rate, sample rate, and other related topics.

What is Audio Quality?

Audio quality refers to the overall fidelity, clarity, and richness of the sound in a recording. In other words, it’s how well the sound reproduces the original performance or source material. A high-quality audio recording will accurately capture the nuances of the original performance, while a low-quality recording will distort or lose some of these details.

Why is Audio Quality Important?

Audio quality is important because it directly affects the overall experience of listening to music or watching a film. Poor audio quality can distract from the content of the recording and make it difficult to understand what’s being said or played. In contrast, high-quality audio can make the recording more engaging and enjoyable to listen to.

As musician Brian Eno once said, “The quality of the sound is essential to the success of the music.” The same can be said for any audio recording, whether it’s a song, a podcast, or a movie soundtrack.

Understanding Bit Rate and Sample Rate

Two key factors that determine the quality of digital audio recordings are bit rate and sample rate. Bit rate refers to the amount of data used to represent each second of audio, while sample rate refers to the number of times per second that the audio is measured and recorded.

In general, higher bit rates and sample rates result in higher-quality audio recordings. For example, a CD-quality audio recording has a bit rate of 1,411 kbps and a sample rate of 44.1 kHz, while an MP3 file typically has a bit rate of 128 kbps and a sample rate of 44.1 kHz or lower.

Other Factors Affecting Audio Quality

In addition to bit rate and sample rate, there are other factors that can affect the quality of digital audio recordings. For example, the type of compression used can have a significant impact on the overall sound quality. Lossless compression algorithms, which preserve all of the original audio data, generally result in higher-quality recordings than lossy compression algorithms, which discard some of the original data to achieve higher levels of compression.

Other factors that can affect audio quality include the type of microphone or recording equipment used, the acoustics of the recording space, and the mixing and mastering process.

Conclusion: Why Audio Quality Matters

In conclusion, audio quality is a critical factor in any recording, whether it’s a song, a podcast, or a movie soundtrack. Understanding bit rate, sample rate, and other related topics can help you make informed decisions about how to record, edit, and distribute your audio content. By paying attention to audio quality, you can ensure that your recordings are engaging, enjoyable, and of the highest possible quality.

Why Audio Quality Matters: A Comprehensive Guide

Why Audio Quality Matters: A Comprehensive Guide

Audio Quality
Audio Quality

When it comes to creating video content, audio quality is often overlooked. Many content creators focus solely on the visuals and neglect the importance of high-quality audio. However, audio quality is just as important as video quality when it comes to creating engaging content. In this comprehensive guide, we’ll explore the importance of audio quality, the factors that affect it, and how to improve it to keep your viewers engaged and satisfied.

1. Defining Audio Quality

Before we dive into the specifics of audio quality, it’s important to define what we mean by “audio quality.” Audio quality refers to the clarity, richness, and overall sound of the audio content. This includes factors such as volume, tone, and background noise. The higher the quality of the audio, the more enjoyable the listening experience for the audience.

2. The Importance of Audio Quality

2.1 Improving User Experience

High-quality audio is crucial for a good user experience. Viewers are more likely to engage with video content that has clear and crisp audio. Poor audio quality can lead to frustration and disappointment, causing viewers to lose interest in the content.

For example, imagine watching a video with muffled or low-quality audio. You may struggle to understand what is being said, or you may become distracted by background noise. This can take away from the overall viewing experience and make it difficult to stay engaged with the content.

On the other hand, high-quality audio can enhance the viewing experience, making it more enjoyable and engaging. Clear and crisp audio can help to create a more immersive experience, drawing viewers into the content and keeping them engaged from beginning to end.

Long-tail keyword: “Why good audio is important in video content”

2.2 Impact on Perceived Video Quality

Audio quality also affects the perceived quality of the video content. If the audio quality is poor, viewers may assume that the overall video quality is also low. This can lead to negative perceptions of the content and discourage viewers from watching more videos from the same creator.

For example, imagine watching a high-quality video with poor audio. Even though the video quality may be excellent, the poor audio quality can make the content seem amateurish or low-budget. This can negatively impact the viewer’s perception of the content and the creator.

On the other hand, high-quality audio can enhance the perceived quality of the video content, making it seem more professional and engaging. When the audio quality matches the video quality, viewers are more likely to perceive the content as high-quality and engaging.

Long-tail keyword: “The effects of poor audio quality on viewer engagement”

2.3 Impact on Viewer Engagement

In addition to affecting the perceived quality of video content, audio quality can also have a significant impact on viewer engagement. When audio quality is poor, viewers may quickly lose interest and stop watching. This can result in lower audience retention, decreased watch time, and lower engagement rates.

Conversely, high-quality audio can help to keep viewers engaged and enhance the emotional impact of video content. Clear dialogue, well-balanced music and sound effects, and a lack of distracting background noise can all contribute to a more engaging and immersive experience for the viewer.

Studies have shown that high-quality audio can have a direct impact on viewer engagement and audience retention. For example, a study conducted by Dolby Laboratories found that viewers were more likely to remember and engage with content that featured high-quality audio. The study also found that viewers were more likely to share content that had good audio quality, indicating that high-quality audio can also have a positive impact on social sharing and virality.

2.4 Sound Design and Audio Quality

Sound design is an important aspect of audio quality in video content. It involves the use of music, sound effects, and other audio elements to enhance the emotional impact of video content and create a more immersive viewing experience. Effective sound design can help to establish the mood and tone of a video, convey important information, and create a sense of continuity between different scenes.

Music is a particularly important element of sound design, as it can evoke specific emotions and create a memorable experience for the viewer. For example, a fast-paced, upbeat soundtrack can create a sense of excitement and energy, while a slow, melancholy melody can convey a sense of sadness or reflection.

Sound effects are another important aspect of sound design, as they can help to create a more immersive and realistic viewing experience. For example, the sound of footsteps, doors opening and closing, and other ambient noises can help to create a sense of presence and realism in a video.

2.4.1 Music and Audio Quality

When it comes to music in video content, it’s important to use high-quality recordings that are well-mixed and balanced. Poorly-mixed music can be distracting and detract from the overall quality of the video, while well-mixed music can create a more immersive and engaging experience.

In addition to the quality of the recording, it’s also important to consider the musical style and genre. The music should complement the tone and mood of the video, and should be appropriate for the target audience. For example, a video aimed at children might feature bright, cheerful music, while a video aimed at adults might feature more mature or sophisticated music.

2.4.2 Sound Effects and Audio Quality

Like music, sound effects should be of high quality and well-mixed to ensure that they don’t detract from the overall quality of the video. When choosing sound effects, it’s important to consider their appropriateness for the scene and the emotional impact that they will have on the viewer.

For example, a video that features a dramatic car chase scene might use sound effects such as screeching tires, engine revving, and crashes to create a sense of excitement and danger. In contrast, a video that features a quiet, introspective moment might use sound effects such as birds chirping, leaves rustling, or a soft breeze to create a more peaceful and reflective atmosphere.

3. Conclusion

In conclusion, high-quality audio is a crucial element in producing engaging and impactful video content. Investing in the right equipment, such as a high-quality microphone, and optimizing the recording environment can greatly improve the overall audio quality.

Not only does good audio quality impact the perceived quality of the video, but it also plays a significant role in audience engagement and retention. Poor audio quality can result in viewer frustration and disinterest, ultimately impacting the success of the content.

By understanding the importance of audio quality and taking steps to optimize it, content creators can create a better experience for their viewers and increase the overall impact of their content. Additionally, sound design and music can further enhance the quality of the audio and create a more immersive and emotional experience for the audience.

It’s important to remember that good audio quality is not just important for video content, but it also plays a crucial role in other contexts such as in education, entertainment, and advertising. The use of audio has evolved over time, and platforms have adapted to the preferences of users.

Overall, by recognizing the impact of high-quality audio and taking steps to improve it, content creators can enhance the experience of their audience and increase the success of their content.

Note 1: Types of Microphones

There are several types of microphones that content creators can choose from to achieve high-quality audio. Understanding the differences between each type can help creators make an informed decision about which microphone is best for their needs:

1. Dynamic Microphones

Dynamic microphones are the most durable and versatile type of microphone. They are ideal for recording vocals and instruments with a high sound pressure level, such as drums and electric guitars. They are also less sensitive to background noise, making them a good choice for recording in noisy environments.

2. Condenser Microphones

Condenser microphones are known for their high sensitivity and clear sound quality. They are ideal for capturing the nuances of acoustic instruments and vocals, making them a popular choice for recording studios and podcasting. However, they are more delicate than dynamic microphones and require phantom power to operate, which may not be available on all recording devices.

3. Ribbon Microphones

Ribbon microphones are a specialized type of dynamic microphone that use a thin strip Hf metal suspended in a magnetic field to capture sound. They are known for their warm and natural sound quality, making them a popular choice for recording vocals and acoustic instruments, such as guitars and strings.

When choosing a microphone, it’s important to consider the specific needs of the recording environment and the type of content being produced. With the right microphone and proper techniques, creators can achieve high-quality audio that enhances the overall user experience.

How Noise Reduction Software Works

How Noise Reduction Software Works: Noise reduction software is a type of audio processing tool that analyzes an audio signal and removes unwanted noise or interference. It works by detecting patterns in the noise that are different from the patterns in the desired audio signal, and then subtracting those patterns from the overall signal.

One common approach is to use a technique called spectral subtraction, which works by taking a short-term Fourier transform of the audio signal to identify the frequency spectrum of the noise. The software can then create a filter that selectively removes those frequencies from the signal, leaving the desired audio intact.

Another approach is to use machine learning algorithms to train the software to recognize different types of noise and automatically remove them. This can be particularly effective for complex or variable noise sources, such as the sound of traffic or wind.

While noise reduction software can be effective, it’s important to note that it’s not a silver bullet. Some types of noise may be difficult or impossible to remove without degrading the quality of the desired audio signal.

Nota 3: Understanding Decibels

Understanding Decibels: Decibels are a unit of measurement that is used to express the intensity of a sound. The decibel scale is logarithmic, which means that a small change in decibel level represents a large change in actual sound intensity.

The threshold of human hearing is generally considered to be around 0 decibels, while the threshold of pain is around 120 decibels. Common sounds like conversation or music may be around 60-70 decibels, while a rock concert or chainsaw can easily exceed 100 decibels.

The reason for the logarithmic scale is that the human ear is not equally sensitive to all frequencies of sound. By using a logarithmic scale, we can better represent the way that the human ear perceives changes in sound intensity across different frequency ranges.

It’s important to be aware of the decibel levels in your environment, as exposure to loud sounds over time can cause permanent hearing damage. This is particularly important for people who work in loud environments, such as construction or music production.

The Quality of MP4 Audio

The Quality of MP4 Audio

The Quality of MP4 Audio

Videos are a fun way to share your memories and special moments. However, in order for your videos to sound good, it is important to pay attention to the quality of the audio. Have you ever listened to a video with poor and distorted audio? That’s no fun for anyone.

The Quality of MP4 Audio

In this article, we will explain in a simple and fun way how to make sure that the audio quality in your MP4 videos is the best.

What is MP4 audio?

MP4 audio is simply the sound you hear in an MP4 video. Like video, audio is compressed and saved as an MP4 file.

Audio Quality

Audio quality is measured in bits and samples. The higher the number of bits and samples, the better the audio quality. For example, an audio file with 128 bits and 44.1 samples per second will have better quality than an audio file with 64 bits and 22.05 samples per second.

Improving Audio Quality

There are several ways to improve the audio quality in your MP4 videos. One of the best is to use a program called Mp4Gain. This program allows you to adjust the audio quality in your MP4 videos to make them sound better.

Another way to improve the audio quality in your MP4 videos is to make sure you use a good microphone. A quality microphone will help you record crisp, clear audio in your videos.

Conclusion

In conclusion, to make sure that the audio quality in your MP4 videos is the best, it is important to pay attention to the audio quality and use a program like Mp4Gain. With these simple tips, your MP4 videos will sound better than ever.

Maximizing MP4 Quality: A Guide to Enhancing Your Video Experience

Maximizing MP4 Quality: A Guide to Enhancing Your Video Experience

Maximizing MP4 Quality


MP4 is a popular video format that is widely used for a variety of purposes, such as online streaming, video editing, and even gaming. However, not all MP4 videos are created equal – some may have poor resolution, low frame rate, or other issues that can affect the overall quality of the video. In this article, we will explore various methods for maximizing the quality of your MP4 videos, from encoding settings to post-processing techniques.

Maximizing MP4 Quality

Optimizing Encoding Settings

One of the most important factors that determine the quality of an MP4 video is the way it is encoded. Encoding settings can affect the resolution, frame rate, bit rate, and other parameters of the video, and can have a significant impact on the final output. Here are some tips for optimizing your encoding settings:

  • Use a high resolution: A higher resolution video will generally have more detail and clarity than a lower resolution video. A resolution of 1080p or 4K is considered to be high quality.
  • Use a high frame rate: A higher frame rate can make the video look smoother and more fluid. A frame rate of 30 or 60 frames per second is considered to be high quality.
  • Use a high bit rate: A higher bit rate can result in a better quality video, but it will also increase the file size. A bit rate of 5000 kbps or higher is considered to be high quality.

It is also important to note that different types of videos may require different encoding settings. For example, an action movie may require a higher frame rate than a documentary, while a nature video may require a higher resolution than a music video.

Using Post-Processing Techniques

Encoding settings are not the only factor that determine the quality of an MP4 video – post-processing techniques can also be used to enhance the video further. Here are some popular post-processing techniques that can be used to improve the quality of an MP4 video:

  • Sharpening: Sharpening can be used to increase the detail and clarity of the video by enhancing the edges and textures of the image.
  • Noise reduction: Noise reduction can be used to reduce the amount of grain and speckling that can appear in a video, especially in low light conditions.
  • Colour correction: Colour correction can be used to adjust the hue, saturation, and brightness of the video to make it look more natural or stylized.

It is important to note that post-processing techniques should be used in moderation, as too much processing can result in an over-processed video that looks artificial or unnatural.

Conclusion

In this article, we have explored various methods for maximizing the quality of your MP4 videos, from encoding settings to post-processing techniques. By optimizing your encoding settings and using post-processing techniques, you can enhance the overall quality of your videos and create a better viewing experience for your audience. Mp4Gain is the best solution for this