Importance of LUFS in Video or Audio Normalization
Let’s talk about the Importance of LUFS in Video or Audio Normalization
LUFS in audio and video normalization is crucial for a consistent listening experience. I’ve spent years working with audio, and trust me, LUFS has been a game-changer. Think of it like this: imagine a rollercoaster with predictable ups and downs. That’s what LUFS helps us achieve with sound. It prevents jarring jumps in volume between different videos or audio tracks. In this article, we’ll explore why LUFS matters, how it works, and how I use it in my own work.
Understanding LUFS and Its Role in Normalization
LUFS, or Loudness Units Full Scale, measures perceived loudness. I like to think of it as a more sophisticated volume knob. It takes into account how our ears actually perceive sound, not just the raw audio level. Normalization, then, uses LUFS to level out the overall loudness.
Why LUFS Matters for Consistent Audio Levels
Consistent audio levels are essential for professional-sounding content. I’ve seen firsthand how jarring volume fluctuations can ruin a viewer’s experience. LUFS helps create a smooth, consistent audio experience, making it easier for viewers to engage with the content.
Benefits of Using LUFS for Normalization
LUFS-based normalization offers several benefits. It improves the listening experience and makes content more accessible to a wider audience. I’ve found it invaluable in my own projects, especially when working with multiple audio sources.
Improved viewer experience
No more annoying volume jumps between scenes or videos. It’s a smoother ride for the ears.
Better accessibility
Consistent audio levels are crucial for people with hearing impairments. LUFS normalization makes content more inclusive.
Professional sound quality
LUFS helps achieve a polished, professional sound. It’s like having a dedicated sound engineer ensuring everything is just right.
How LUFS Works in Practice
LUFS measures the average loudness of audio over time. It’s like taking the temperature of a room, not just a single spot. This gives a more accurate representation of how we perceive loudness.
Implementing LUFS in Your Workflow
Integrating LUFS into your workflow is easier than you might think. Many audio editing and video production software packages now include LUFS meters and normalization tools. I use them all the time.
LUFS vs. Peak Normalization: Understanding the Difference
Peak normalization simply adjusts the highest peak to a target level. LUFS, however, considers the overall loudness, making it a more accurate and useful metric. Think of it as looking at the whole forest, not just the tallest tree.
Common LUFS Standards and Target Levels
Different platforms and broadcasters have specific LUFS requirements. Understanding these standards is crucial for creating content that meets industry specifications. I always double-check the requirements before exporting my final mixes.
Addressing Challenges and Misconceptions about LUFS
Some people mistakenly believe that LUFS makes everything sound the same. That’s not true. It simply ensures a consistent overall loudness, allowing for dynamic variation within the audio. I’ve found this to be a major advantage in my work.
Advanced Techniques with LUFS
While basic LUFS normalization is straightforward, there are advanced techniques that I use for fine-tuning audio. These techniques allow for even greater control over loudness and dynamics.
FAQ about Importance of LUFS in Video or Audio Normalization
What is LUFS in simple terms?
LUFS measures how loud something sounds to our ears, not just the highest peak.
Why is LUFS important for video and audio normalization?
What’s the difference between LUFS and peak normalization?
Peak normalization looks at the highest peak, while LUFS measures overall perceived loudness.
How do I measure LUFS in my audio?
Most audio editing software includes LUFS meters.
What are common LUFS targets for different platforms?
Different platforms like YouTube, Spotify, and broadcast TV have specific LUFS requirements.
Does LUFS normalization make everything sound the same?
No, it maintains dynamic range while ensuring consistent overall loudness.
How can I implement LUFS in my workflow?
Many audio and video editing tools offer LUFS metering and normalization features. Mp4Gain is a great tool.
What are some advanced techniques for using LUFS?
Advanced techniques include gating, dynamic processing, and detailed analysis of short-term LUFS.
Why are different LUFS standards necessary?
Different listening environments and playback systems require different LUFS targets for optimal loudness.
What are the benefits of using LUFS for podcasts?
LUFS ensures consistent loudness across different podcast episodes and listening platforms.
Latest words on Importance of LUFS in Video or Audio Normalization
LUFS is a powerful tool for achieving consistent and professional-sounding audio. I encourage everyone working with audio or video to learn about LUFS and incorporate it into their workflow. Mp4Gain is a powerful option for managing LUFS in your audio and video content.
Comments:
This article totally cleared up my confusion about LUFS. Thanks for the simple explanations! – AudioNewbie
I’ve been meaning to learn more about LUFS. This was super helpful! – VideoEditorPro
Great article! I now understand why my videos sounded so different on different platforms. – YouTubeCreator
Thanks for explaining the difference between LUFS and peak normalization. I always wondered about that. – SoundGuy
This article was just what I needed. Now I can make sure my podcasts have consistent loudness. – PodcastProducer
Super informative! I’m going to start using LUFS in all my audio projects. – MusicMaker
I didn’t understand anything about LUFS before reading this article. Now, I can consider myself a LUFS expert. – LUFSLover
Can you guys write a more in deep article about advanced LUFS techniques? This was helpful, but I need more. – AdvancedUser
This article has been very clarifying, easy to understand, and to the point. – John
Amazing article! Great resource for anyone working with audio. – Audiophile
LUFS always seemed intimidating, but this article made it so easy to understand. Thanks! – AspiringSoundEngineer
The Effect of Multi-Channel Encoding on WMA Audio Files
Let’s talk about the effect of multi-channel encoding on WMA audio files
When we discuss the effect of multi-channel encoding on WMA audio files, we’re exploring how using multiple audio channels transforms your listening experience. As someone who’s worked extensively with audio formats, I can tell you that this isn’t just about making the sound louder. It’s about creating a more immersive and realistic soundscape, mimicking how we hear sounds in real life. Think of it like watching a movie, with the sound coming from all around you instead of just from the front. The way sound is encoded can change drastically the experience. I’ve personally witnessed how multi-channel encoding turns a simple audio file into an engaging and enveloping sonic experience, especially when it comes to music or movies.
Understanding Multi-Channel Audio
Multi-channel audio goes far beyond simple stereo and opens up a whole new world of sound. My experience with different types of audio tells me that the number of audio channels impacts your overall experience with a recording. Stereo audio, which is commonly used, has two channels, one for the left ear and one for the right ear. This gives us a sense of left and right placement. Multi-channel audio, however, uses more than two channels, enabling sound to come from different directions creating a 3D-like sound field. It’s like being surrounded by a band while you’re in the middle of the concert hall, rather than just hearing it from two points. This greatly affects how we perceive sound, and how realistic it feels.
Common Multi-Channel Configurations
5.1 Surround Sound: Includes five channels (left, center, right, left surround, right surround) and one subwoofer channel for low-frequency effects.
7.1 Surround Sound: Adds two additional surround channels (left rear and right rear) to the 5.1 setup, enhancing the envelopment even more.
Dolby Atmos and DTS:X: Object-based audio, which allows sound to be placed anywhere in the sound field, not just specific channels.
WMA Codec and Multi-Channel Encoding
The WMA (Windows Media Audio) codec has its own unique way of handling multi-channel audio. In my experience, WMA is very capable of handling multi-channel sound, particularly versions like WMA Pro. WMA Pro supports high-resolution audio and multiple channels, allowing for high-fidelity surround sound. This means the codec can efficiently compress multi-channel audio without losing too much quality, which is crucial for delivering an immersive experience. It is important to say that not all WMA files are created equal. Some may be encoded with simple stereo or even mono sound, which does not use the capabilities of this codec. The codec capabilities can be used to create a much richer and detailed sound.
Key Features of WMA in Multi-Channel Encoding
Support for multiple channels, including 5.1 and 7.1 surround sound, providing a wide soundstage.
Efficient compression algorithms, reducing file sizes while preserving good sound quality.
WMA Pro supports lossless compression as well, an option for the best quality available.
The Impact of Bitrate on Multi-Channel WMA Files
Bitrate, usually measured in kilobits per second (kbps), is an important factor in multi-channel WMA files. In my experience with audio, the higher the bitrate, the more data is stored for each audio channel, resulting in a higher quality sound. When dealing with multi-channel audio, a higher bitrate becomes even more critical because you need to store much more information compared to simple stereo. Lower bitrates can lead to audio compression artifacts, such as a loss of clarity and detail, especially in complex soundscapes with many instruments or sounds. Think about having a bucket full of sand. If you have a small bucket you can only take a little sand at a time. A large bucket will allow you to have more sand at once, and the same happens with bitrates.
Recommended Bitrates for Multi-Channel WMA
384 kbps to 512 kbps: Considered good for 5.1 surround sound, providing a good balance between quality and file size.
512 kbps and above: Recommended for 7.1 surround sound or for when the best audio quality is required.
Lower bitrates: Only to be used when file size is a priority, and the quality is not very important.
Spatial Accuracy and Multi-Channel Encoding
Spatial accuracy is a very important characteristic in multi-channel audio files. The placement of sounds in the soundstage directly impacts the realism and immersiveness of the audio. Multi-channel encoding, when done correctly, can create a very precise sound field, allowing you to pinpoint where sounds are coming from. This is particularly important in movies and games, where the position of sounds can greatly improve the overall experience. It’s like having the sounds happening all around you. Good multi-channel encoding makes this possible, and a poor one will make the experience less immersive and more artificial.
How Spatial Accuracy is Achieved
Precise Channel Placement: Each channel is responsible for a specific part of the soundstage, and accurate positioning of each sound is essential.
Panning and Mixing: These techniques make sounds move between channels to create the perception of motion.
Object-Based Audio: This lets sounds be placed at any position, offering a very detailed sound field.
Multi-Channel WMA for Home Theaters and Gaming
Multi-channel WMA is very useful in home theater systems, which are very common nowadays. In my personal experience, the most common use for multi-channel WMA files is for home theaters and gaming because it allows for a truly immersive experience. With proper encoding and speaker setups, multi-channel audio from WMA files can make you feel like you’re right in the middle of the action. It enhances the emotion of movies, the excitement of games, and the sound of music. I have many times experienced this effect when listening to music in a multi channel setup, and it can be very impressive. The way the sound moves from different speakers makes the experience much more realistic.
Advantages in Home Theaters and Gaming
Enhanced immersion: Multi-channel audio surrounds the listener, making the experience more engaging.
Directional sound: Sounds can be placed precisely, making the experience much more realistic.
Better emotion: Movies and games become more emotional and exciting.
Potential Issues with Multi-Channel Encoding
Multi-channel encoding can be complex, and issues can arise if done improperly. I’ve personally seen how bad multi-channel encoding can ruin an experience. Common problems include incorrect channel mapping, where sounds appear in the wrong place, and also inconsistencies in loudness between channels, causing some sounds to be louder than others. Bad encoding can also lead to compression artifacts, where the sound is distorted or muffled. It is important that all parameters are correct during the encoding process to avoid these issues.
Common Multi-Channel Encoding Problems
Incorrect Channel Mapping: Where sounds are played in the wrong speakers.
Volume Imbalances: When one channel is much louder than others.
Compression Artifacts: Distorted and muffled sounds due to bad encoding.
Optimizing Multi-Channel WMA Files
Optimizing multi-channel WMA files is about making sure that all the parameters are correct. In my experience, starting with the highest quality audio source is the most important thing to do, so the result has the best possible quality. Encoding at an appropriate bitrate, according to the number of channels, and selecting the correct channel mapping also helps. Always use good monitoring speakers or headphones to check the quality, as a regular pair of speakers wont give you an accurate representation of the sound. I would suggest you also do testing with different configurations and different files to see if something can be improved for your particular setup and requirements.
Steps to Optimize Multi-Channel WMA Files
Start with the highest quality audio source.
Use an appropriate bitrate for your system.
Verify the correct channel mapping.
Check the sound using good quality speakers or headphones.
Do some tests to see if everything is correct.
Latest words on the effect of multi-channel encoding on WMA files
Multi-channel encoding has a very significant impact on WMA audio files, transforming a simple audio file into an immersive experience. In my experience, it’s not just about adding more speakers, but about how the sound is created, where the sound comes from and how it makes the experience feel more realistic. Understanding the different factors, like bitrates, channels, and codecs, helps you optimize your audio files for the best possible sound. If you have low-quality files that you want to improve, an appropriate software like Mp4Gain can help you to enhance your files.
What is multi-channel audio, and how does it differ from stereo?
Multi-channel audio uses more than two audio channels, offering a three-dimensional sound experience, while stereo uses only two channels (left and right). Multi-channel audio allows sounds to be positioned in different parts of the soundstage, making the experience more immersive.
How does the WMA codec handle multi-channel audio encoding?
The WMA (Windows Media Audio) codec, especially WMA Pro, is capable of handling multi-channel audio with good compression efficiency. It supports various multi-channel configurations, including 5.1 and 7.1 surround sound, providing a good balance between file size and quality.
What is the importance of bitrate when encoding multi-channel WMA files?
Bitrate directly affects the quality of multi-channel WMA files. Higher bitrates preserve more audio data, resulting in better sound quality, particularly in complex soundscapes. Lower bitrates may lead to a loss of clarity and detail, so an appropriate bitrate should be selected depending on the intended quality.
What is spatial accuracy in the context of multi-channel WMA files?
Spatial accuracy refers to how precisely sounds are placed in the soundstage. Good multi-channel encoding makes sounds to be placed exactly where they need to be. This accurate placement creates a more realistic and immersive experience, particularly in movies, music and games.
How are multi-channel WMA files used in home theaters and gaming?
Multi-channel WMA files are excellent for home theaters and gaming because they provide an immersive experience with sounds surrounding the listener. With proper speaker setups, this configuration makes games, music and movies more realistic and engaging.
What are some common problems with multi-channel encoding of WMA files?
Some common problems include incorrect channel mapping, where sounds are played from the wrong speakers, volume imbalances between channels, or compression artifacts that can distort the sound. These are caused by incorrect parameter settings when encoding the audio.
How can I optimize my multi-channel WMA files for the best sound quality?
To optimize multi-channel WMA files, always start with the highest quality audio source, use a proper bitrate according to your channel configuration, and make sure that all the speakers are correctly mapped. Always verify your sound with good headphones and speakers. Also, do tests to see if you can get better results adjusting some settings.
Are there any specific bitrate recommendations for 5.1 and 7.1 surround sound in WMA files?
For 5.1 surround sound, using a bitrate between 384 kbps to 512 kbps is generally recommended. For 7.1 surround sound, you should choose a bitrate of 512 kbps or higher for the best sound quality. Remember that lower bitrates should only be used when file size is a top priority.
Can multi-channel encoding cause any issues with playback on different devices?
Some older or less capable devices might have problems with multi-channel audio playback. Some devices may downmix the audio to stereo, losing the benefits of the multi-channel encoding. It’s important to verify that your playback device supports the type of encoding being used to enjoy the full immersive experience.
What are some key differences between WMA and other audio codecs when using multi-channel audio?
WMA is known for its good compression efficiency and is very capable of handling multi-channel sound, especially WMA Pro. Other codecs, like AAC, also have good capabilities for multi-channel audio, but they differ in the way they handle compression. The choice of codec will depend on many factors, such as compatibility, desired quality, and file size requirements.
Comments:
This article really helped me understand what all those numbers mean when I see a file with 5.1 or 7.1, now I know this are related to the audio channels, thanks!
User: AudioNewbie
I never really understood what multi-channel was about, this article did a great job of explaining it simply and without too much tech talk, now I know why my sound system has so many speakers. Good article!
User: HomeTheaterGuy
This was super useful, I’ve been having some issues with my multi channel files sound quality and now I have a better understanding on what is going on, and how to fix it. Thanks for all the info.
User: GamerDude
I am a total noob in audio, and this article was very easy to understand, you make complex things seem very simple. If you could elaborate more about how the different codecs like AAC compare to WMA would be nice.
User: AudiophileBeginner
I like the way you explained how important the bitrate is, especially for multichannel audio, I always though that the more channels, the better. Now I know that the bitrate also plays a big role. Thanks, great article.
User: MultiChannelUser
I been searching the web for a while to find good info about WMA and multichannel, this article covered all my questions and more, it was a good read, thank you for the effort.
User: AudioGeek
I have used Mp4Gain a lot, and its my go to software for when I have audio quality issues. I agree that its very important to pay attention to the channels. Thanks for all the information.
When we discuss MP4 audio quality, we’re really diving into a world of choices that impact what you hear. As someone who’s worked with audio for years, I can tell you that it’s not just about whether the sound is loud or soft. It’s about clarity, richness, and how well the sound represents the original recording. Think of it like this: a perfectly cooked meal can be ruined with a bad presentation, just like fantastic audio can be lost with poor encoding. I’ve seen firsthand how different audio codecs and settings can completely change the way we perceive sound from music to podcasts, to even simple voice recordings. It is important to choose the right settings to avoid any audible losses or distortions.
Understanding Audio Codecs in MP4 Files
Audio codecs are the secret language that our computers use to compress and decompress sound. I’ve spent countless hours comparing them, and it is amazing how different they are. They significantly impact MP4 audio quality. In the world of MP4, you’ll most often run into AAC (Advanced Audio Coding), which I consider the most common and broadly compatible choice, providing a good balance between quality and file size. But there are other options, like MP3 and even less-common ones. You can imagine it like choosing a type of container for your liquid: you can have a large, high-quality bottle that protects the water, or a smaller, less-secure one that might not keep the water fresh. The type of codec is your choice of bottle for your audio, and it will determine its quality when using an MP4 file.
AAC (Advanced Audio Coding)
Often considered a superior replacement for MP3.
Offers better sound quality at similar bitrates or same sound quality at a lower bitrate, making it space-efficient.
Widely supported across different platforms.
MP3
Older codec, but still widely compatible with all types of devices.
Generally has slightly lower audio quality than AAC at the same bitrate.
Very popular because of its legacy support.
Bitrate: The Key to MP4 Audio Quality
Bitrate, often measured in kilobits per second (kbps), is a crucial factor when we’re talking about mp4 audio quality. In my experience, it directly dictates how much detail is preserved in the audio file. A higher bitrate means more data is being stored per second. Think of bitrate as the number of colors in a painting. More colors (higher bitrate) means more detail, which makes the painting look more vibrant and realistic, and the same happens with audio. On the other hand, a lower bitrate means less detail, which can lead to audio sounding muddy or distorted, like a blurry or pixelated painting. When I work with audio files, I always start by making sure I choose an appropriate bitrate so that all the subtle nuances are present in the final output.
Common Bitrates and Their Use
128 kbps: Often used for low-quality audio like podcasts or low-quality streaming, good for small file sizes.
192 kbps: Considered a decent quality for general listening on most devices, offering a good compromise between size and quality.
256 kbps: This is what I would consider a good starting point for high-quality audio, useful for most music on streaming.
320 kbps or higher: Provides very high-quality sound, nearly indistinguishable from the original source for most people, this is what I strive for when quality is a must.
Sample Rate and Its Impact on MP4 Audio Quality
The sample rate, usually expressed in Hertz (Hz) or Kilohertz (kHz), is another important concept that affects MP4 audio quality. I can tell you from personal experience that this rate determines how often the sound is sampled per second. It is like taking pictures of a moving object. A faster frame rate will capture the movement smoother, and the same happens with audio. Higher sample rates, like 44.1 kHz or 48 kHz, result in audio that captures the higher frequencies better, leading to a richer and more detailed sound. This is especially noticeable in music with many high-frequency instruments or sounds. Lower sample rates can cause loss of high-frequency content, making the audio sound dull or muffled. This parameter is very important to be taken in consideration because It affects the overall clarity and fidelity of the audio, so I always check and choose the correct one for every project.
Common Sample Rates
44.1 kHz: Standard for audio CDs and most digital music files.
48 kHz: Commonly used for videos and digital audio workstations.
Higher sample rates (e.g., 96 kHz, 192 kHz): These are used for professional audio production and archiving, it captures the audio as close to real life as possible.
Audio Channels: Stereo vs. Mono
The number of audio channels also plays a role in the perception of audio quality. I’ve had a lot of fun experimenting with audio channels over the years. Stereo, which we hear most often in music, is what gives us a sense of directionality and depth, using two separate channels, one for the left ear and the other for the right ear. It creates a more immersive and realistic experience. Mono, on the other hand, uses only one audio channel, so sound feels flat and without dimension. Imagine watching a movie with a huge screen, and then compare that to a small screen. The huge screen gives you a sense of immersion, and stereo is just the same in audio. The choice depends on the use case. For music, you should always use stereo, while a podcast may work well enough in mono.
When to Use Which
Stereo: Ideal for music and videos where spatial depth is desired, creating a more natural experience.
Mono: Suitable for voice recordings, podcasts, or situations where file size is more important than dimensionality.
The Impact of Compression on MP4 Audio Quality
As a specialist in the area, I know very well that compression is a necessary evil. In order to get smaller files, you need to compress the audio in some way. Compression makes file sizes smaller, which means they are easier to share and download. But, if it’s done improperly, it can lead to a degradation in audio quality. Think of it like squeezing a sponge; If you squeeze it too hard, you could damage the sponge. This also can happen to audio data. Lossy compression methods, like MP3 and AAC, reduce file size by discarding some audio information, sometimes impacting the quality. The goal is to compress the audio enough to have a small file size without noticing any loss of quality.
Types of Compression
Lossy compression: Reduces file size by discarding audio information, like MP3 and AAC.
Lossless compression: Keeps all the audio data but still reduces file sizes, like FLAC. However, this type of compression is not commonly used in MP4 files, because they are focused on multimedia content.
Practical Tips to Maximize MP4 Audio Quality
Over the years, I have learned some tricks that can help you get the best audio quality from MP4 files. The most important thing to keep in mind is to always use the highest quality audio file that you can afford, if the quality is not important, then you can go for a smaller file. Always try to start with the best audio quality. When you are encoding, select a high enough bitrate, the higher the better if your devices can play it. Always listen to your audio files with good headphones or speakers to really understand if there is any audio issues. It’s always a good idea to test your settings with several files to check if there is something you can improve to increase quality. It’s like cooking: you need to try different ingredients and cooking methods to find your signature dish.
Tips for Good Audio
Always start with the highest-quality audio source.
Choose a high enough bitrate (at least 256 kbps for music).
Use AAC codec when possible because it can offer better quality than MP3 for the same bitrate.
Make sure you choose the correct sample rate (44.1 kHz or 48 kHz are the most common ones).
Use stereo for music, unless you have a specific reason not to.
Test and listen carefully to the final result and make adjustments if needed.
Latest words on MP4 Audio Quality
MP4 audio quality is a complex topic. From my experience, I’ve found that understanding the elements, such as codecs, bitrate, sample rate and audio channels, it’s critical to getting the best audio quality from the files we use every day. Paying attention to these details will help you get the best sound possible from your MP4 files, improving your experience whether you are listening to music, watching movies or listening to a podcast. If you ever have to deal with low audio quality, using an appropriate app like Mp4Gain is the solution to improve the overall quality.
What is the AAC audio codec and why is it commonly used in MP4 files?
The Advanced Audio Coding (AAC) codec is a popular audio compression standard that is known for its high sound quality at relatively low bitrates, making it an excellent choice for MP4 files. AAC is often preferred over MP3 due to its improved compression algorithms, which can result in smaller file sizes without a significant loss of sound quality.
How does bitrate affect MP4 audio quality?
Bitrate is a key factor that directly influences the sound quality in MP4 audio. A higher bitrate means more data is stored per second, preserving more detail and resulting in better audio quality, with a sound that is closer to the original recording. Lower bitrates can lead to audio compression, resulting in a muddier or distorted sound. Choosing an appropriate bitrate is crucial for balancing file size with optimal audio quality.
What is the role of sample rate in MP4 audio encoding?
The sample rate determines how many times per second the audio is sampled, effectively capturing the sound. Higher sample rates, such as 44.1 kHz or 48 kHz, are better at capturing higher frequencies, providing a richer and more detailed sound. Lower sample rates may lead to loss of some audio details, often resulting in a duller or less dynamic sound. This rate is an important aspect when thinking about overall quality.
What is the difference between stereo and mono audio channels in MP4 files?
Stereo audio uses two channels, providing a sense of width, depth and direction to the sound, very useful for music and movies. Mono audio uses a single channel, making the sound feel flat, without dimension and is suitable for situations where spatial depth is not essential like podcasts. The selection between stereo or mono depends on the intended application and if the spatial information is important or not.
How does audio compression impact the overall quality of MP4 audio?
Audio compression reduces file size by either removing some data (lossy compression) or by using algorithms to store data more efficiently (lossless compression). Lossy compression, commonly used in MP4 files, discards audio information, impacting quality depending on the compression level. Lossless compression, although preserving data, is not common in MP4 files. The goal is to find a balance between compression and sound quality.
What are some practical ways to enhance MP4 audio quality?
To enhance MP4 audio quality, use the highest-quality source possible, encode audio at high bitrates (at least 256 kbps for music), use AAC codec over MP3 when possible, and choose an appropriate sample rate. Also, listen to the audio using good headphones or speakers to identify any issues, and use stereo for music where spatial depth is key. Making adjustments to these parameters is very important.
Why might my MP4 audio sound muffled or distorted?
Muffled or distorted MP4 audio can result from several factors, such as low bitrates, incorrect sample rates, or excessive audio compression. It could also be caused by poor recording equipment or editing. The type of codec also plays a role; older codecs might not be as good at preserving quality, and using low quality audio as a source will result in poor quality even after encoding. Ensuring all encoding parameters are correct is important to prevent this problem.
What is the ideal audio bitrate for high-quality music in MP4 format?
For high-quality music in MP4 format, it is best to use a bitrate of 256 kbps or higher. This bitrate will offer a high level of detail and fidelity without resulting in very large file sizes. While higher bitrates may offer a slightly better sound quality, the difference is often not noticeable. Using a bitrate lower than 256 kbps may result in a perceptible quality loss.
Is it possible to improve the audio quality of an existing low-quality MP4 file?
While it is not possible to fully restore information that has been lost, it is possible to enhance the audio quality to some extent. Using audio editing software can help you to adjust some audio parameters. Software like MP4Gain are useful to adjust the audio in some ways to improve the perceived quality. However, if the original audio has been heavily compressed, there may be only a little that can be improved.
How can I choose the right audio settings when encoding my MP4 files for optimal sound quality?
When encoding MP4 files for optimal sound quality, consider starting with high-quality source, and always select AAC as the audio codec if possible for better quality compared to MP3. Choose the bitrate according to your needs (256 kbps is a good starting point) and a sample rate of 44.1 or 48 kHz. Use stereo for music. After encoding, listen to the audio on different devices to make sure that the quality meets your expectations. Adjust settings as needed.
Comments:
This article helped me a lot, I was having problems with some of my music files sounding bad, now I understand that I need to use a higher bitrate, thanks!
User: MusicLover
I never knew that there were so many parameters that affected audio quality! I always just grabbed whatever mp4 and thought it was all the same, now I know I have to look at the bitrate, the codec, etc, amazing info, good job!
User: TechNoob
This was super useful. It really breaks down the tech stuff so it’s easy to understand. I’m gonna try changing the audio settings on my next video project. Thanks a lot, this has helped me greatly!
User: VideoGuy87
I wish you had more info about advanced topics, like how to properly compress my audio without loosing too much information, but still, this article was helpful and easy to follow, keep up the good work.
User: ProAudio
Wow, I learned a lot about MP4 audio quality, I did not know that bitrate and sample rate were so important. Gonna try using a higher bitrate for my music collection, I hope the size wont be a problem.
User: AudioFan
This article was a great read and really explained all the stuff behind audio encoding, it was really easy to understand, thank you. I never knew why some of my files sounded so bad. Now I know how to fix this. Thank you!
User: HappyListener
I been using Mp4Gain for years now, I am glad to see it mention here, its my go to solution when I need to improve the audio quality. But thanks for all the in deep info on the article, its a great read.
Variable bitrate (VBR) encoding in M4A files is a game-changer for audio quality and file efficiency. I often find that when we’re talking about getting high-quality sound without oversized files, VBR encoding is the best solution. Unlike constant bitrate (CBR), which holds the data rate steady throughout a file, VBR dynamically adjusts. This flexibility means that audio can be compressed differently depending on the complexity of the sound at any given moment, resulting in great sound quality where it’s needed and data-saving where it’s not. Using real-life examples, think of it like a hose: VBR adjusts the “flow” depending on the music’s demands.
How VBR Encoding Differs from Constant Bitrate in M4A
One way I like to explain VBR versus CBR in M4A files is to imagine driving a car. With CBR, you’re holding a constant speed regardless of the road conditions, even if there’s traffic or clear roads. In contrast, VBR is like adjusting speed based on traffic; it slows down in complex audio sections and speeds up when it’s simpler. This approach can capture detailed, high-fidelity audio, while CBR might miss out on some of that nuance. VBR encoding allows M4A files to efficiently adapt the bitrate, creating an optimal balance between sound quality and file size.
VBR encoding in M4A doesn’t just save space; it also prioritizes sound quality. In my experience, this difference becomes clear with high-energy music like classical or electronic, where subtle audio dynamics are crucial. VBR lets the M4A file devote more data to complex passages, capturing every detail. So, if you’ve ever felt like your favorite tracks sounded “compressed” or “flat,” switching to VBR M4A can make a noticeable difference. It’s like upgrading your audio experience without increasing the file size.
Technical Aspects of VBR Encoding in M4A Files
The technical workings behind VBR can get complex, but let’s break it down simply. VBR in M4A adjusts data allocation based on the audio’s dynamic range. More data is used during complex parts, while simpler sections use less. This dynamic allocation means that an M4A file will rarely waste data on silence or simplicity. As a result, files retain clarity and depth without excessive data. Think of it as only paying for a full tank when you’re on a long road trip – it’s efficient and smart.
Benefits of Using VBR Encoding in M4A
Using VBR in M4A comes with several perks. From my experience, here are some top advantages:
Improved Sound Quality
VBR encodes audio based on complexity, leading to clear sound in all types of music.
Efficient File Size
VBR reduces data use where audio is simpler, making it storage-friendly without compromising quality.
Dynamic Audio Capture
Complex segments retain detail, while quieter parts save on data usage.
For those of us who care about quality and storage, VBR encoding in M4A hits the sweet spot between high-fidelity sound and efficient file size.
VBR Encoding vs. CBR Encoding in M4A
I often get asked why VBR is preferred over CBR in M4A files. It’s simple: VBR offers flexibility that CBR can’t match. While CBR might seem stable, it’s inefficient because it doesn’t adjust based on audio needs. In M4A files, VBR ensures that complex parts get more focus, unlike CBR, which applies the same rate to all parts. Imagine you’re in a bookstore where every book costs the same; with VBR, you pay only for the quality you want, which is why it’s so efficient.
Audio Compression in M4A with VBR
Audio compression in M4A VBR files is like packing a suitcase – you only take what’s needed. VBR helps prevent audio quality loss during compression, making the format excellent for those who prioritize quality over quantity. The difference in quality between compressed VBR and regular CBR audio can be surprising, especially in files with high dynamic range like orchestral pieces. With VBR, every aspect of a song can be heard without feeling over-compressed.
Optimizing File Size and Quality with VBR Encoding
One of my favorite things about VBR encoding is its ability to optimize both size and quality. We don’t always have space to spare on our devices, yet no one wants to compromise on sound. Using VBR in M4A files ensures that you don’t have to make that choice. You get a leaner file that sounds great without eating up unnecessary storage, making it ideal for large music libraries or mobile devices.
Limitations of VBR Encoding in M4A Files
While VBR encoding is effective, it’s not perfect. One challenge is that VBR encoding requires a bit more processing power during playback. This is rarely noticeable with modern devices but could pose a challenge on older hardware. Moreover, not every device or software supports VBR optimally, so there could be some compatibility issues. However, these limitations are minimal compared to the benefits of using VBR for high-quality M4A files.
Real-World Applications of VBR Encoding in M4A
When I’m traveling or out for a run, I often rely on M4A VBR files for music – I get quality without filling up my phone’s storage. For audiobooks or podcasts, VBR is equally efficient, as it doesn’t waste space on silence or long pauses. This application means you can carry more files without needing to sacrifice quality or storage. It’s a practical solution for those of us who enjoy high-quality audio on the go.
How VBR Encoding Adapts to Audio Complexity
VBR encoding’s ability to adjust bitrate based on audio complexity is a defining feature. Think of it like shading in a painting: the encoder decides where more detail is necessary. Quiet passages in M4A files don’t need as much data, while loud, complex segments get more. This flexibility provides a detailed sound that can capture nuances missed by other encoding methods. This is why, especially in music, VBR M4A files offer an experience that feels full and rich.
Latest Words on Variable Bitrate Encoding in M4A
When it comes to getting the best audio experience, Variable Bitrate Encoding in M4A is a top choice. It’s adaptable, offering excellent sound quality while managing file size. Unlike constant bitrate encoding, VBR doesn’t waste data on simple sections, which makes it efficient. For those looking for high-quality audio without massive files, M4A with VBR is a practical choice. And for those who want a powerful tool to optimize their audio experience, Mp4Gain can help you get the most out of your M4A files.
Comments:
Wow, this really helped me understand VBR better! I always thought one bitrate fit all, but now I get why adjusting makes a difference.
I tried switching to VBR on my M4A files, and I can already hear the improvement in sound quality, especially on complex tracks.
This article was really informative, but I wish there were more examples of VBR in real-life applications. Still, it was helpful!
Been using CBR all my life because I didn’t know there was a difference. Going to try VBR now, thanks!
I was so confused about bitrate settings before this. Now I’m excited to re-encode my music in VBR!
Never realized there was an option like VBR for M4A files. Makes so much sense to adjust bitrate based on the music. Thanks for this!
Great read! I think I’ll switch my whole library to M4A with VBR encoding to save on space. Thanks for the tips!
Wish there was more on the limitations of VBR – I think some older devices might struggle with it. But I’ll give it a go on my phone.
VBR encoding really makes the music sound better, like the difference between a regular camera and HD! Appreciate the detail here.
Always wondered if VBR was worth it over CBR. This article convinced me to make the switch. Loving the clarity in sound!
I like that you explain this in a simple way – makes it easier for non-tech folks like me to understand the value of VBR!
This article helped a lot, but I’d love
to know how VBR works with other formats, like MP3.
Been looking for a good VBR guide, and this hit the spot. Can’t wait to re-encode my favorite songs and hear the difference.
VBR sounds like the right choice for people who care about audio quality. Thanks for breaking down the technical side!
Volume Control for MP3 FilesVolume Control for MP3 Files
Let’s Talk About Volume Control for MP3 Files
As a specialist with extensive experience in audio technology, I’m here to provide you with a comprehensive guide to volume control for MP3 files. Whether you’re a music enthusiast, a content creator, or simply someone looking to optimize your MP3 audio, understanding how to control and adjust volume is crucial. I’ll delve deep into this topic, offering insights, tips, and techniques that go beyond the standard knowledge. Let’s explore this essential aspect of managing your audio files.
Volume Control for MP3 Files
Understanding the Basics of MP3 Files
Before we dive into volume control, let’s first understand the basics of MP3 files. MP3, short for MPEG-1 Audio Layer 3, is a widely used audio compression format. It’s known for its high-quality sound and small file size, making it ideal for various applications. MP3 files are commonly used for music, podcasts, audiobooks, and more. To adjust their volume effectively, it’s essential to grasp the underlying technology.
The Role of Bitrate in Audio Quality
One crucial aspect of MP3 files is the bitrate, which directly affects audio quality. Bitrate refers to the amount of data processed per unit of time, typically measured in kilobits per second (kbps). A higher bitrate results in better sound quality but larger file sizes, while a lower bitrate compromises quality but reduces file size. When adjusting volume, you should consider the original bitrate of your MP3 files, as altering it can impact sound clarity.
Volume Control Techniques
Now, let’s explore various volume control techniques that you can use to enhance your MP3 files. It’s not just about making audio louder or softer; it’s about achieving the perfect balance for your specific needs:
Equalization (EQ): Adjusting the balance between different frequency bands to enhance the overall sound quality. For example, boosting the bass for a booming effect or adjusting the treble for crisper vocals.
Normalization: Ensuring that the loudest parts of the audio are at an optimal level, preventing distortion or overly quiet sections.
Compression: Reducing the dynamic range of audio to make softer sounds louder and louder sounds softer, creating a more consistent volume throughout the file.
Choosing the Right Software for Volume Control
When it comes to adjusting the volume of your MP3 files, the choice of software is critical. While there are various software options available, not all are created equal. One of the most effective tools I recommend is MP4Gain. It offers a user-friendly interface and a range of features to fine-tune your audio to perfection. With MP4Gain, you can normalize, equalize, and adjust the volume of your MP3 files effortlessly.
MP3 Volume Control Best Practices
Here are some best practices to ensure that your volume adjustments are successful:
Backup Your Files: Before making any volume changes, always create backups of your original MP3 files to avoid irreversible alterations.
Test on Different Devices: Play your adjusted MP3 files on various devices to ensure they sound good everywhere, from headphones to car stereos.
Listen Cautiously: Pay close attention to the audio quality and make gradual adjustments to achieve the desired results.
Additional Tips and Tricks
Now, let’s take a deeper dive and explore some advanced tips and tricks for volume control that many articles miss:
Metadata Editing
Did you know that adjusting metadata can impact how your MP3 files are played back? By specifying volume-related metadata tags, you can control how media players handle your audio. For example, you can set the “replay gain” tag, which instructs media players to adjust the volume automatically.
Batch Processing
If you have a large collection of MP3 files, batch processing can save you a tremendous amount of time. Look for software that allows you to adjust the volume of multiple files simultaneously. This is incredibly handy for content creators and music libraries.
Presets for Different Genres
Creating volume presets for different music genres can be a game-changer. For instance, you can have separate settings for rock, classical, and hip-hop. This ensures that your audio always sounds its best, no matter the genre.
Latest Words on MP3 Volume Control
As we wrap up this comprehensive guide, it’s crucial to mention that the world of audio technology is continually evolving. New software and techniques for volume control are emerging, offering even more precise control over your MP3 files. Staying up to date with the latest advancements in this field will help you maintain the highest audio quality for your collection.
Comments:
Comment 1: I’ve been struggling with audio quality in my podcasts, and this article provided valuable insights. Thanks!
Comment 2: Can you share more details on how to set volume presets for different music genres? I’d love to learn more about this.
Comment 3: I’ve used MP4Gain, and it’s made a world of difference in my music library. Highly recommended!
Comment 4: This article has been a great help in understanding the technical aspects of MP3 volume control. I appreciate the expert insights.
Comment 5: I wish there was more information on how to edit metadata tags for volume control. Can you expand on this topic?
Comment 6: As a content creator, batch processing has been a time-saver for me. It’s fantastic to see this mentioned here.
Comment 7: I’ve been looking for an article like this for a long time. Thanks for sharing these expert tips on MP3 volume control.
Comment 8: I love how you’ve explained complex concepts in a simple and relatable way. This article is a gem for audio enthusiasts like me.
Comment 9: Can you recommend some alternatives to MP4Gain for volume control? I’d like to explore different options.
Comment 10: This article is a must-read for anyone dealing with audio files. It’s packed with practical advice and expert knowledge.
As a specialist in audio technology, I’m here to demystify a fascinating subject – FLAC Deflate Compression. If you’re an audio enthusiast or someone who values top-notch sound quality, this topic is right up your alley. We’ll dive into the details of what FLAC Deflate Compression is and why it’s significant in the world of digital audio.
II. The Basics of Lossless Audio Compression
Lossless Audio Compression
Before we get into the specifics of FLAC Deflate Compression, let’s clarify some fundamentals. When we talk about lossless audio compression, we mean a method that reduces file size without sacrificing audio quality. Audiophiles and music professionals adore this approach because it keeps the sound pristine.
Imagine you have a favorite book, and you want to make it more portable. Lossless compression is like a magic spell that shrinks the book into a smaller edition without losing any words or details.
III. What Is FLAC?
What Is FLAC?
Now, let’s meet our star, FLAC – the Free Lossless Audio Codec. It’s a popular choice in the world of lossless audio formats. FLAC has gained recognition for its open-source nature and exceptional compression capabilities.
Imagine FLAC as a wizard who can make your giant backpack of books fit into your pocket without tearing a single page. It does this by using different spells, one of which is Deflate Compression.
IV. The Science Behind Deflate Compression
So, what’s Deflate Compression? Picture this: you have a bag full of balloons. Each balloon represents a piece of data. The Deflate algorithm is like squeezing the balloons to remove the air, making them smaller. This is precisely what Deflate does to data – it removes redundancies and minimizes file size without losing any information.
Imagine you have a document with a lot of repeated words. Deflate is like a smart friend who tells you to write those words only once and refer to them when needed.
V. FLAC and Deflate: A Perfect Pair
Here’s where the magic happens. FLAC employs the Deflate algorithm to compress audio data. Think of it as a well-organized suitcase. Instead of haphazardly throwing clothes into your bag, you fold them neatly, saving space. Similarly, Deflate organizes data in a way that efficiently reduces the file size while keeping the audio quality intact.
VI. Compression Efficiency and File Size
Let’s put this into perspective. You have a backpack filled with your favorite toys. When you use Deflate Compression, it’s like arranging those toys neatly and compactly, allowing you to carry more toys without a bigger bag. In the digital realm, this means you can store more music on your device without consuming excessive storage space.
VII. FLAC Deflate Compression in Practice
Practicality is key, right? Suppose you’re looking to use FLAC with Deflate. It’s as user-friendly as organizing your wardrobe. There are various tools and software available to help you compress your audio files. Just a few clicks, and you can save precious space on your device while keeping your audio quality top-notch.
VIII. Achieving High-Quality Audio
For an audiophile, this is a dream come true. With FLAC and Deflate, you get to enjoy high-quality audio without compromise. It’s like having a gourmet chef preparing your favorite dish with the finest ingredients – the end result is simply exceptional.
IX. FLAC Deflate Compression vs. Other Formats
Let’s compare. FLAC with Deflate isn’t the only player in the lossless audio game. There are other formats like WAV and AIFF. These formats have their strengths, but they may not be as efficient in terms of file size reduction. It’s like comparing different car models – they all have unique features, but you choose the one that suits your needs best.
X. The Future of Lossless Compression
The world of audio compression is constantly evolving. With technology advancing at lightning speed, we can expect even more efficient methods for preserving audio quality while reducing file sizes. FLAC and Deflate will likely continue to play significant roles in this journey.
XI. Conclusion
In summary, FLAC Deflate Compression is a fantastic solution for those who want to savor the highest audio quality without compromising on storage space. It’s like having your cake and eating it too – maintaining quality while saving space. I encourage you to explore this incredible combination for your audio needs.
XII. Comments
Comments:
“I’ve been using FLAC with Deflate for a while now, and it’s a game-changer. I can store so much more music without losing quality!” – MusicMaestro
“This article makes the technical stuff sound so simple. Great job!” – TechSavvyUser
“I’m excited about the future of lossless compression. This article got me thinking about the possibilities.” – AudioEnthusiast
“Would love to see more details on the technical aspects of FLAC and Deflate. Otherwise, informative!” – CuriousListener
In today’s digital age, where music and audio are an integral part of our lives, it’s crucial to ensure that our MP3 files sound their best. Whether you’re a casual listener or an audiophile seeking perfection, this comprehensive guide is here to help you master the art of enhancing MP3 sound quality. I’m an audio expert, and I’ll take you on a journey through various techniques and strategies to elevate your MP3 listening experience.
The Importance of Quality MP3 Sound
Before we dive into the nitty-gritty details of improving MP3 sound, let’s first understand why it matters. MP3 is one of the most popular audio formats, known for its compatibility and convenience. However, the sound quality of MP3 files can vary widely, depending on factors like compression, source material, and encoding settings.
Factors Affecting MP3 Sound Quality
To achieve the best MP3 sound quality, you need to consider several key factors:
Bitrate
The bitrate determines the amount of data used to represent audio. Higher bitrates generally result in better sound quality but larger file sizes.
Compression
MP3 files are compressed to reduce their size. Understanding the balance between compression and quality is essential.
Source Material
The quality of the original audio source greatly influences the final MP3 sound. Starting with high-quality recordings is crucial.
Encoding Settings
Adjusting parameters during encoding, such as sample rate and stereo mode, can impact sound quality significantly.
Techniques for Enhancing MP3 Sound Quality
Now that we’ve established the importance of quality MP3 sound, let’s explore various techniques and strategies to enhance it. Whether you’re dealing with older low-bitrate MP3s or you want to optimize your new downloads, these methods will help you achieve the best possible sound.
1. Bitrate Selection
The choice of bitrate plays a fundamental role in MP3 sound quality. Higher bitrates, such as 320 kbps, preserve more audio details, resulting in clearer and more immersive sound. However, they also lead to larger file sizes, so you should strike a balance based on your storage capacity and listening preferences.
2. Source Material Enhancement
Improving MP3 sound quality starts with the source material. If you have control over the recording process, use high-quality microphones, eliminate background noise, and ensure proper mixing and mastering techniques are employed. Starting with a pristine source will yield better MP3s.
3. Proper Encoding Settings
When converting audio to MP3 format, it’s crucial to choose the right encoding settings. Opt for a higher sample rate (e.g., 44.1 kHz or 48 kHz) and stereo mode for richer sound. Experiment with different settings to find the sweet spot for your audio.
4. Noise Reduction
If your MP3s suffer from background noise or artifacts, consider using noise reduction software. This can help eliminate unwanted hisses, clicks, and pops, resulting in a cleaner listening experience.
5. Equalization (EQ)
Using an equalizer allows you to adjust the balance of frequencies in your MP3s. You can enhance bass, boost treble, or make other custom adjustments to tailor the sound to your preferences.
6. Volume Normalization
Normalization ensures consistent volume levels across your MP3 library. This prevents sudden volume jumps between tracks, providing a more enjoyable listening experience.
7. High-Quality Playback Devices
Investing in high-quality headphones or speakers can make a significant difference in how you perceive MP3 sound. Look for devices with accurate sound reproduction and comfortable fit for extended listening sessions.
8. Room Acoustics
If you primarily listen to MP3s in a room, consider optimizing the acoustics. Simple changes like adding acoustic panels or rearranging furniture can reduce reflections and enhance sound quality.
9. Lossless Formats
Consider archiving your favorite music in lossless formats like FLAC or WAV for the utmost audio fidelity. While these formats result in larger file sizes, they preserve audio quality without compression.
10. Regular Maintenance
Maintaining your MP3 library is essential. Periodically check for corrupted files, update metadata, and back up your collection to prevent data loss.
Final Words
Enhancing the sound quality of your MP3 files is a rewarding endeavor for any music lover. By understanding the factors influencing sound quality and employing the right techniques, you can elevate your MP3 listening experience to new heights. Whether you’re a casual listener or an audiophile, these strategies will help you make the most of your digital music collection. Remember, the quest for perfect sound is a journey, so enjoy every moment of it. Happy listening!
Digital Bit Depth in AudioDigital Bit Depth in Audio
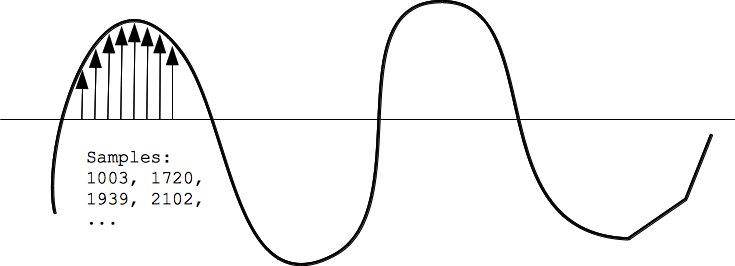
Digital bit depth in audio is a fundamental concept that impacts the quality and fidelity of digital sound. Bit depth, also known as audio resolution, refers to the number of bits used to represent the amplitude of an audio signal at a specific point in time. It essentially quantifies how finely audio samples are taken in the digital domain.
To put it simply, the bit depth determines the precision with which sound is captured and stored digitally. Common bit depths in digital audio are 16-bit, 24-bit, and 32-bit, with higher numbers providing greater precision.
Audio Bit Depth Explained
Understanding audio bit depth is essential for anyone seeking to grasp the intricacies of digital audio recording and playback. At its core, audio bit depth is a measure of how accurately an analog sound wave’s amplitude is captured and converted into a digital signal.
In practical terms, a higher bit depth signifies that the digital representation of an audio waveform closely mirrors the original analog signal, resulting in reduced quantization error or “noise.” Quantization error occurs when an analog value is approximated to the nearest digital value, and lower bit depths can make this error more noticeable, especially in quieter sections of audio.
Bit Depth and Audio Quality
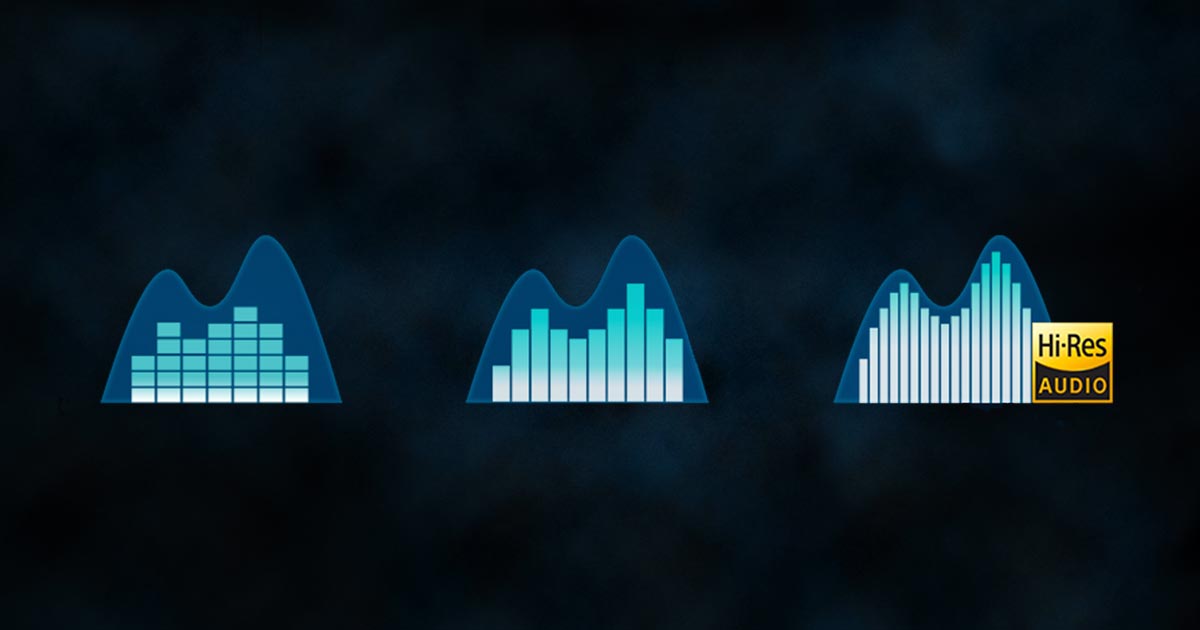
Bit depth plays a pivotal role in determining the quality and precision of digital audio. The relationship between bit depth and audio quality is akin to an artist’s palette of colors. A higher bit depth provides a broader spectrum of shades and nuances, making the digital representation of sound more faithful to the original analog source.
For example, a 16-bit system offers 65,536 discrete amplitude levels, whereas a 24-bit system provides an astonishing 16,777,216 levels. This heightened precision results in smoother and more detailed audio representation, particularly in the subtle and quiet passages of a recording.
Digital Audio Resolution
Digital audio resolution, closely linked to bit depth, is a critical factor in capturing and reproducing sound accurately. It refers to the level of detail and clarity in digital audio. The greater the bit depth, the higher the resolution, and the finer the nuances that can be captured.
In the realm of audio production, higher digital audio resolution means that the subtle nuances, such as the intricacies of a singer’s voice or the delicate harmonics of a musical instrument, are preserved with remarkable fidelity.
Bit Depth in Music Recording
In the world of music recording, selecting the appropriate bit depth is a crucial decision that profoundly affects the final audio quality. Musicians and producers carefully consider bit depth when recording to ensure that the nuances and dynamics of their performances are accurately captured.
In practice, 24-bit recording is a popular choice among music professionals. This bit depth provides an ideal balance between precision and file size, allowing for the capture of subtle details while minimizing the risk of bit-depth noise in quieter sections of the recording.
Audio Signal Precision
Audio signal precision, often measured by bit depth, is a key consideration in professional audio production. It relates to how faithfully an audio system can reproduce the original sound. The higher the bit depth, the greater the precision in representing the analog signal, resulting in cleaner and more accurate audio playback.
For audio engineers and producers, achieving optimal audio signal precision is paramount. It ensures that the music they create is heard as intended, with all the intricacies and subtleties faithfully reproduced.
Bit Depth in Analog-to-Digital Conversion
Understanding how bit depth influences analog-to-digital conversion is essential for maintaining audio fidelity. Analog-to-digital conversion is the process of transforming continuous analog signals into discrete digital values. Bit depth determines the number of discrete values that can represent the amplitude of the analog signal during this conversion.
In essence, higher bit depth means that the analog-to-digital conversion process captures more precise details from the analog signal. This is particularly critical when working with high-quality audio sources where preserving every nuance is paramount.
Sound Fidelity and Bit Depth
Sound fidelity, the faithfulness with which audio is reproduced, is intricately linked to bit depth. A higher bit depth generally results in better audio fidelity, as it allows for the accurate representation of both subtle nuances and powerful crescendos in music.
Consider classical music or jazz, where dynamics play a significant role. With a higher bit depth, the audio system can faithfully reproduce the full range of soft and loud passages, ensuring that the listener experiences the music as intended by the performers and composers.
Impact of Bit Depth on Audio Playback
The impact of bit depth on audio playback is a critical factor in delivering a high-quality listening experience. When you listen to digital audio, the bit depth of the source file significantly affects what you hear.
In simple terms, higher bit depth in the source audio file results in a more faithful and detailed listening experience. This becomes especially noticeable in acoustic instruments, where the subtle nuances of a violin’s bowing or a pianist’s touch can be lost in lower bit depth recordings.
How Does Bit Depth Affect the Quality of Digital Audio?
Exploring how bit depth affects the quality of digital audio is crucial for audiophiles and audio professionals alike. It’s the bit depth that determines how accurately the audio signal is captured and reproduced, ultimately influencing the overall audio quality.
A higher bit depth translates to a more faithful representation of the original sound, with fewer imperfections or noise introduced during the recording and playback processes. This improvement in audio quality is particularly noticeable in genres that require a wide dynamic range and high levels of detail.
What Is the Role of Bit Depth in Recording Music Digitally?
The role of bit depth in recording music digitally is a multifaceted aspect of audio production. When musicians and engineers step into the studio, they must make critical decisions about bit depth to ensure that their recordings capture the essence of the music.
Choosing the appropriate bit depth is a balancing act. While higher bit depths provide greater precision and fidelity, they also result in larger file sizes. Musicians often opt for 24-bit recordings as they strike a harmonious balance between capturing subtle details and managing storage requirements.
How Is Audio Fidelity Influenced by Digital Bit Depth?
Understanding how digital bit depth influences audio fidelity is key to achieving top-tier sound quality. Audio fidelity, often described as the faithfulness of audio reproduction to the original source, is a critical consideration for audio professionals and enthusiasts.
With a higher bit depth, audio fidelity is enhanced because the digital representation of the sound is more detailed and accurate. This is especially crucial in professional audio production, where maintaining the highest possible fidelity is paramount.
Can You Explain the Importance of Bit Depth in Analog-to-Digital Conversion for Audio?
Explaining the importance of bit depth in analog-to-digital conversion sheds light on the intricacies of audio processing. Analog-to-digital conversion is the bridge that allows analog sound to be translated into a digital format that can be manipulated and stored. Bit depth plays a pivotal role in this process.
Higher bit depths ensure that the analog-to-digital conversion process captures more fine-grained details from the original analog signal. This is essential for preserving the richness and subtleties of audio, whether it’s a soaring vocal performance, the resonance of a musical instrument, or the ambiance of a recording environment.
What Is the Relationship Between Bit Depth and Dynamic Range in Digital Audio?
The relationship between bit depth and dynamic range in digital audio is a crucial one to understand. Dynamic range refers to the difference between the softest and loudest sounds that an audio system can reproduce. Bit depth plays a pivotal role in defining this dynamic range.
Higher bit depths translate to a wider dynamic range, allowing for the faithful reproduction of both subtle nuances and powerful crescendos in music. This is essential for maintaining audio fidelity, especially in genres with a wide range of dynamics, such as classical music and jazz.
How Does Bit Depth Impact the Accuracy of Audio Playback?
The impact of bit depth on the accuracy of audio playback cannot be overstated. When you listen to music or any digital audio content, the bit depth of the source file has a profound influence on what you hear.
Higher bit depth in the source audio file means that the playback faithfully represents the original recording. It allows for the subtlest details and nuances to shine through, creating a more immersive and engaging listening experience. In essence, higher bit depth contributes to the accuracy and realism of audio playback.
Are There Industry Standards for Bit Depth in Digital Audio Recording?
In the world of professional audio recording, industry standards play a vital role in guiding the use of bit depth. While there’s flexibility in choosing bit depths based on specific requirements, certain standards are commonly followed.
For instance, most audio CDs use 16-bit resolution, which offers high-quality playback suitable for the majority of consumers. However, in the realm of studio recording and mastering, 24-bit and even 32-bit formats are commonly employed to ensure the highest level of fidelity.
What Are the Advantages of Using Higher Bit Depth in Audio Processing?
Using higher bit depth in audio processing offers several distinct advantages. These advantages extend to both recording and post-production stages, and they significantly impact the overall quality of audio content.
Enhanced Audio Fidelity
One of the primary advantages is enhanced audio fidelity. Higher bit depths provide more precision in capturing and reproducing audio, resulting in recordings that faithfully preserve the original sound. This is particularly important in professional music production and critical listening environments.
Greater Dynamic Range
Higher bit depths also grant a greater dynamic range, allowing for the faithful representation of a wide range of sound intensities. This is particularly beneficial in genres of music or audio content with stark differences in volume, as it ensures that both delicate subtleties and powerful peaks are accurately reproduced.
How Can I Optimize Bit Depth for Better Audio Resolution?
For those involved in audio production or seeking the best listening experience, optimizing bit depth is crucial. It’s not just about using the highest available bit depth but also considering the entire audio workflow and ensuring that bit depth aligns with specific needs.
Matching Bit Depth to Audio Source
When recording audio, it’s essential to match the bit depth to the dynamic range of the audio source. For instance, a live jazz performance with wide dynamic swings benefits from 24-bit recording, while a podcast with a more consistent volume may suffice with 16-bit. This approach minimizes bit-depth noise while preserving audio quality.
Post-Production Considerations
During post-production, maintaining a high bit depth throughout the editing and mixing process is advisable. Only when preparing the final distribution format, such as a CD or streaming file, should the audio be converted to a lower bit depth to match the destination format.
The Benefits of Greater Bit Depth in Digital Audio Systems
As technology advances, digital audio systems are offering higher bit depths as an option. But what are the practical advantages of embracing these extended bit depths?
Future-Proofing Audio
One significant advantage is future-proofing your audio recordings. With higher bit depths, your recordings are better equipped to stand the test of time. As playback systems and formats improve, your high-bit-depth recordings will continue to sound exceptional, ensuring that your music or audio content remains relevant for years to come.
Editing Flexibility
Greater bit depths also provide increased editing flexibility. Audio engineers can apply effects and processing without worrying as much about introducing quantization errors or compromising audio quality. This freedom allows for more creative experimentation during the mixing and mastering stages, ultimately leading to more polished and refined audio content.
In conclusion, digital bit depth is a critical factor in the world of audio, influencing both recording and playback quality. Understanding its importance, selecting the appropriate bit depth for various scenarios, and embracing higher bit depths when possible can lead to an audio experience that is richer, more immersive, and of the highest fidelity. Whether you’re a musician, audio engineer, or simply a music enthusiast, appreciating the role of bit depth can elevate your audio journey to new heights.
What do we talk about when we talk about audio quality?
We usually hear a lot about audio quality, vinyl, tapes, digital formats with loss and loss, high resolution formats, hi-fi players, analog and digital recording and mixing systems, microphones and preamps worth thousands of dollars, eighty channel mixing tables, diverse production techniques, mastering abroad, etc., etc. But is it clear what we consider as audio quality? We all have the same concept about what it should be? Beyond how we record, in what format and what device do we listen to, what do we look for?
Audio quality equals clarity?
It can be partially. This concept would affirm without doing it that the diffusion is bad when in reality in many cases, styles, songs, orchestrations, the diffusion is friendly. Moreover, it is necessary for a good development of the sound concept sought. The diffusion, reverberation, acoustic environment of a room can favor and in cases be indispensable for a good sound record.
Audio quality is equal to dynamic?
Perhaps, if we value the space and the feeling of almost being able to stand between the guitarist and drummer when listening to a record, understand the subtle arrangements of an acoustic guitar and then receive the power expression of the whole band together, in that case we would be defending the natural dynamics of music and its interpretation. The truth is that decades ago we are going in the opposite direction, not only in studio but also in live sound. The advent of digital tables and their dynamic processors, channel by channel, led the trend to compress everything. As the engineer Mario Brauer would say all musicians are increasingly on the edge of the sound stage looking for a space to be seen. Depth has been lost and we all accept to a lesser or greater extent that that’s fine. Although we complain loudly we usually go in that direction.
Audio quality equals expensive equipment and instruments?
Undoubtedly expensive equipment and instruments offer us quality in registration and mixing. But the history of music is full of great albums recorded with lower level equipment and instruments. It is clear then that the right instrument for a song is not determined by its value in the store.
Audio quality equals perfect acoustics?
Registering in a suitable acoustic environment favors us, it is welcome. In some styles or works it may be very necessary. But we could not say that it is decisive.
Audio quality is mastering in a prestigious studio?
Many artists make recordings and domestic mixes considering that by mastering in a large studio they will achieve a magical transformation in the sound result. Clearly this is a wrong concept. What is broken is difficult almost impossible to fix. It can be improved, enhance the good done in previous stages and correct some errors, homogenize and guarantee a good reproduction in most of the possible means, but we cannot claim a magical transformation. Most of the time this does not happen.
Audio quality is hi-fi format?
If we achieve a great record with careful production in all its stages, the ideal would be to reach the listeners in the best possible way. This includes digital or analog support, as well as the player. This is not always the case and mass dissemination through media such as YouTube, Spotify, or others will depress sound quality in order to reach more people. Also the reproduction with mobile devices and headphones of low cost.
I could continue to name factors and elements that influence our determination on the concept of audio quality but I think the idea is raised, I consider that audio quality in our time has more to do with balances, balance between these factors, elements and tools of production, achieve the best performance of our equipment, acoustic space and time, artistically determine which is the right instrument, preserve the timbral, tone and dynamics of the sounds captured in the most natural way we can, without ignoring stylistic variables.








Comments:
This article totally cleared up my confusion about LUFS. Thanks for the simple explanations! – AudioNewbie
I’ve been meaning to learn more about LUFS. This was super helpful! – VideoEditorPro
Great article! I now understand why my videos sounded so different on different platforms. – YouTubeCreator
Thanks for explaining the difference between LUFS and peak normalization. I always wondered about that. – SoundGuy
This article was just what I needed. Now I can make sure my podcasts have consistent loudness. – PodcastProducer
Super informative! I’m going to start using LUFS in all my audio projects. – MusicMaker
I didn’t understand anything about LUFS before reading this article. Now, I can consider myself a LUFS expert. – LUFSLover
Can you guys write a more in deep article about advanced LUFS techniques? This was helpful, but I need more. – AdvancedUser
This article has been very clarifying, easy to understand, and to the point. – John
Amazing article! Great resource for anyone working with audio. – Audiophile
LUFS always seemed intimidating, but this article made it so easy to understand. Thanks! – AspiringSoundEngineer