Compression Ratio and Audio Quality in MP3


Free Download Mp4Gain
picture

Exploring the Trade-off Between Compression Ratio and Audio Quality in MP3
Compression Ratio and Audio Quality

Let’s talk about MP3 compression

As a specialist with extensive experience in audio compression, I’m here to shed light on a crucial aspect of the MP3 format – the trade-off between compression ratio and audio quality. Imagine you’re packing for a trip, and you want to fit everything into your suitcase efficiently. This is a bit like what happens when you compress audio into an MP3 file. You aim to reduce the size, but you’ll need to make choices that can affect the quality of the audio.

The Basics of MP3 Compression

Compression Ratio and Audio Quality

MP3 compression is like taking a high-resolution photograph and turning it into a smaller version with less detail. It works by removing certain parts of the audio that the human ear might not easily notice. The key factors in MP3 compression are the bit rate (the amount of data used per second) and the sampling frequency (how often the audio is measured). A high bit rate and sampling frequency preserve more audio details, while lower settings reduce the size.

The Impact of Compression Ratio on Audio Quality

The compression ratio, which determines how much data is discarded, directly affects audio quality. To understand this, think of watching a YouTube video. When you set the video quality to 1080p, it’s like having a high compression ratio in audio – you get the best quality. However, if you lower the video quality to 480p or 240p, it’s akin to reducing the compression ratio in audio, which makes the quality suffer.

Factors Affecting Audio Quality in MP3 Compression

Several factors impact audio quality in MP3 compression. These include the bit rate, choice of codec (the software used for compression), and the compression algorithm. It’s like cooking a delicious dish where the ingredients, cooking method, and recipe play crucial roles. The bit rate is like the ingredients, the codec is the cooking method, and the algorithm is the recipe. All these factors determine the final audio quality.

The MP3 Compression Spectrum

The world of MP3 compression isn’t just black and white; it’s a spectrum. Different scenarios may require different levels of compression. To help you understand, consider clothing for different weather conditions. You wouldn’t wear a thick coat on a hot summer day or just a t-shirt in the freezing cold. Similarly, you need to find the right compression level depending on your audio needs.

Listening to the Difference: High vs. Low Compression

Now, let’s listen to the difference. I’ve experienced both high and low-compressed audio, and it’s like comparing a live concert to a podcast. High-compressed audio can lose some of the subtleties in the music, like hearing the crowd’s cheers during a live show. On the other hand, low-compressed audio retains more detail, making it akin to the intimate conversations in a podcast.

The Trade-off Dilemma: Size vs. Quality

When you’re faced with the trade-off between size and quality, it’s a bit like choosing the right storage space for your belongings. Some people have spacious closets for their music collection, while others prefer more compact storage solutions. The choice depends on your individual preferences and needs. There’s no one-size-fits-all answer.

Preserving Audio Quality: Best Practices

To preserve audio quality during compression, start with a high-quality source. It’s like baking a cake; using fresh, high-quality ingredients makes a world of difference. In the audio world, this means starting with a well-recorded audio file. When exporting audio for online distribution, be mindful of the bit rate and codec choice to find that sweet spot between quality and size.

MP3 vs. Other Audio Formats

Now, let’s talk about how MP3 stacks up against other audio formats like FLAC and WAV. Choosing the right format is crucial. It’s a bit like deciding between different types of fuel for your car. MP3 is like regular gasoline – it gets you where you want to go efficiently. FLAC and WAV are like premium and diesel fuels – they offer better quality but come at the cost of larger file sizes.

MP4Gain: The Appropriate Solution

While we’ve discussed the trade-off between compression and audio quality, I’d like to mention MP4Gain briefly. MP4Gain is a tool that can help you balance audio quality and file size. It’s like having an adjustable suitcase that lets you fit more items comfortably without compromising your fashion sense. MP4Gain can be a valuable solution for optimizing your audio files.

Latest Words on MP3 Compression

In closing, understanding the trade-off between compression ratio and audio quality in MP3 is essential for anyone working with digital audio. As a specialist, I hope this article has provided valuable insights. Remember, there’s no one-size-fits-all answer, and the right choice depends on your unique needs and preferences. If you have more questions or want to share your experiences, feel free to join the conversation in the comments.

Comments:

I’ve always wondered about the science behind MP3 compression. This article clarified things for me. Thanks!

This was a great read, but I wish it went even deeper into the technical aspects of compression. Can you provide more details?

MP4Gain has been a game-changer for me when working on my music. It strikes a great balance between quality and file size.

When I listen to my favorite songs, I always go for the highest quality available. It’s like enjoying a gourmet meal over fast food.

Great article! I learned a lot about MP3 compression. Now I can make informed decisions about my audio files.

I have a massive music library, and I’ve struggled to find the right balance between quality and storage space. This article provided some valuable insights.

This article is fantastic, but it leaves me wanting more. Can you dive deeper into the world of audio compression?

MP3 is like regular gasoline, and FLAC is like premium fuel. I guess I’ll choose based on the importance of the journey!

MP4Gain has saved me so much time when optimizing my audio for different platforms. It’s like having a magic wand for audio quality!

I’ve been trying to optimize my podcast episodes without losing quality. The struggle is real, but this article gave me some ideas.


Free Download Mp4Gain
picture


Mp4Gain Main Window
picture


Mp4Gain Features
picture


Free Download Mp4Gain
picture

Audio Notch Filter

Audio Notch Filter: Enhancing Sound Quality

Audio Notch Filter
Audio Notch Filter
Audio Notch Filter
Audio Notch Filter

Audio notch filters are indispensable tools in the world of audio engineering and signal processing. They play a crucial role in eliminating unwanted frequencies, enhancing sound quality, and ensuring crystal-clear audio reproduction. In this article, I will delve into the intricacies of audio notch filters, addressing common questions and shedding light on their applications and benefits.

The Power of Audio Notch Filters


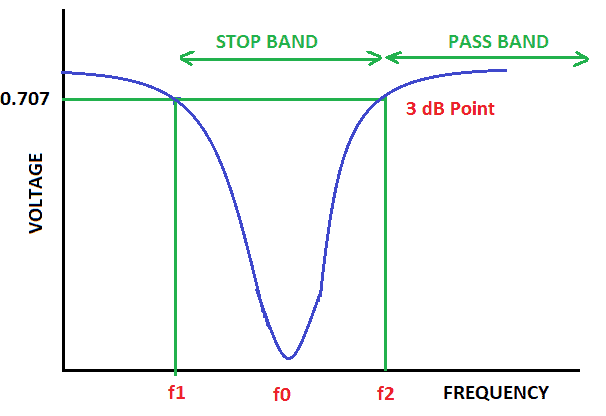
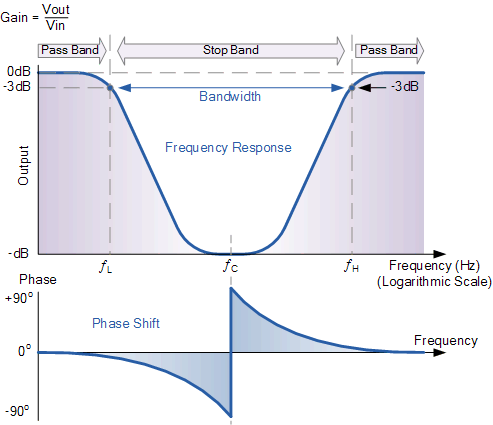
Audio notch filters, also known as band-stop or band-reject filters, are essential components in audio processing and equalization. They are designed to target and remove specific frequencies within an audio signal, effectively “notching out” unwanted noise or interference. Imagine a scenario where you’re recording a podcast, and there’s an annoying hum from nearby electronic equipment. An audio notch filter can surgically remove that hum, leaving your audio clean and crisp.

These filters work on the principle of destructive interference, which cancels out the unwanted frequencies, leaving the desired audio intact. This technology is akin to noise-canceling headphones, which use anti-phase signals to eliminate external sounds. Audio notch filters are the audio engineer’s equivalent, ensuring that only the intended sounds are heard.

Common Applications of Audio Notch Filters

Live Sound Reinforcement: In live concerts and events, audio notch filters are invaluable for tackling feedback issues. When a microphone picks up its own amplified sound, it can lead to screeching feedback. Notch filters can pinpoint and remove the feedback frequency, allowing for a smoother performance.

Recording Studios: When recording vocals or instruments, background noise or electronic interference can creep into the audio. Audio notch filters are used to isolate and remove these unwanted elements, resulting in pristine recordings.

Telecommunications: In telecommunication systems, audio notch filters are used to eliminate unwanted interference, ensuring clear and uninterrupted communication. For example, when you make a phone call and hear static or buzzing, notch filters can mitigate these disturbances.

Choosing the Right Audio Notch Filter

Selecting the appropriate audio notch filter for your specific needs is crucial. Filters come in various types, including analog and digital, and offer different notch widths and attenuation levels. Consider factors such as the frequency of the unwanted noise, the desired audio quality, and your budget when making a choice.

People Also Asked: Exploring Common Queries

How do audio notch filters work?
Audio notch filters operate by creating an inverse phase of the unwanted frequency, causing destructive interference. This cancels out the undesired sound, leaving the desired audio intact.

Can I use software-based audio notch filters?
Yes, there are software plugins and digital audio workstations (DAWs) that offer audio notch filter capabilities. These digital solutions are versatile and allow for precise control over filtering.

Are audio notch filters suitable for home audio setups?
Absolutely. Audio notch filters can improve the sound quality of home theater systems and audio setups by eliminating background noise, hums, or other unwanted frequencies.

Keywords with Identical Search Intent

Frequency Notch Filter
Noise Reduction in Audio
Band-Reject Filter
Audio Signal Processing

Enhancing Sound Quality with Audio Notch Filters

Audio notch filters, with their ability to surgically remove unwanted frequencies, are indispensable tools for audiophiles, recording engineers, and anyone seeking to elevate their audio experience. These filters act as sonic sculptors, allowing you to chisel away noise and interference, revealing the true beauty of your audio. Whether you’re in a live concert hall, a recording studio, or your living room, audio notch filters are the unsung heroes that ensure your ears receive only the purest, most harmonious sounds.

Last Words

In the world of audio, clarity is king, and audio notch filters are the knights in shining armor that protect that clarity. By understanding how these filters work and where they can be applied, you can take your audio experiences to new heights. So, whether you’re a musician striving for pristine recordings or an audiophile seeking audio nirvana, consider the power of audio notch filters in your quest for sonic perfection.

What is a De-Esser?

What is a De-Esser?

De-Esser
De-Esser
De-Esser
De-Esser

As a music producer and audio engineer, I’ve encountered my fair share of challenging vocal recordings. One common issue is sibilance, which occurs when the “s” and “sh” sounds are overly pronounced, causing harsh and piercing frequencies in the mix. This is where a de-esser comes in handy.

De-Esser Plugin

A de-esser is a specialized audio plugin that reduces or eliminates sibilance from vocal recordings. It works by detecting the offending frequencies and applying gain reduction to them, effectively taming the harshness and allowing the vocals to sit better in the mix.

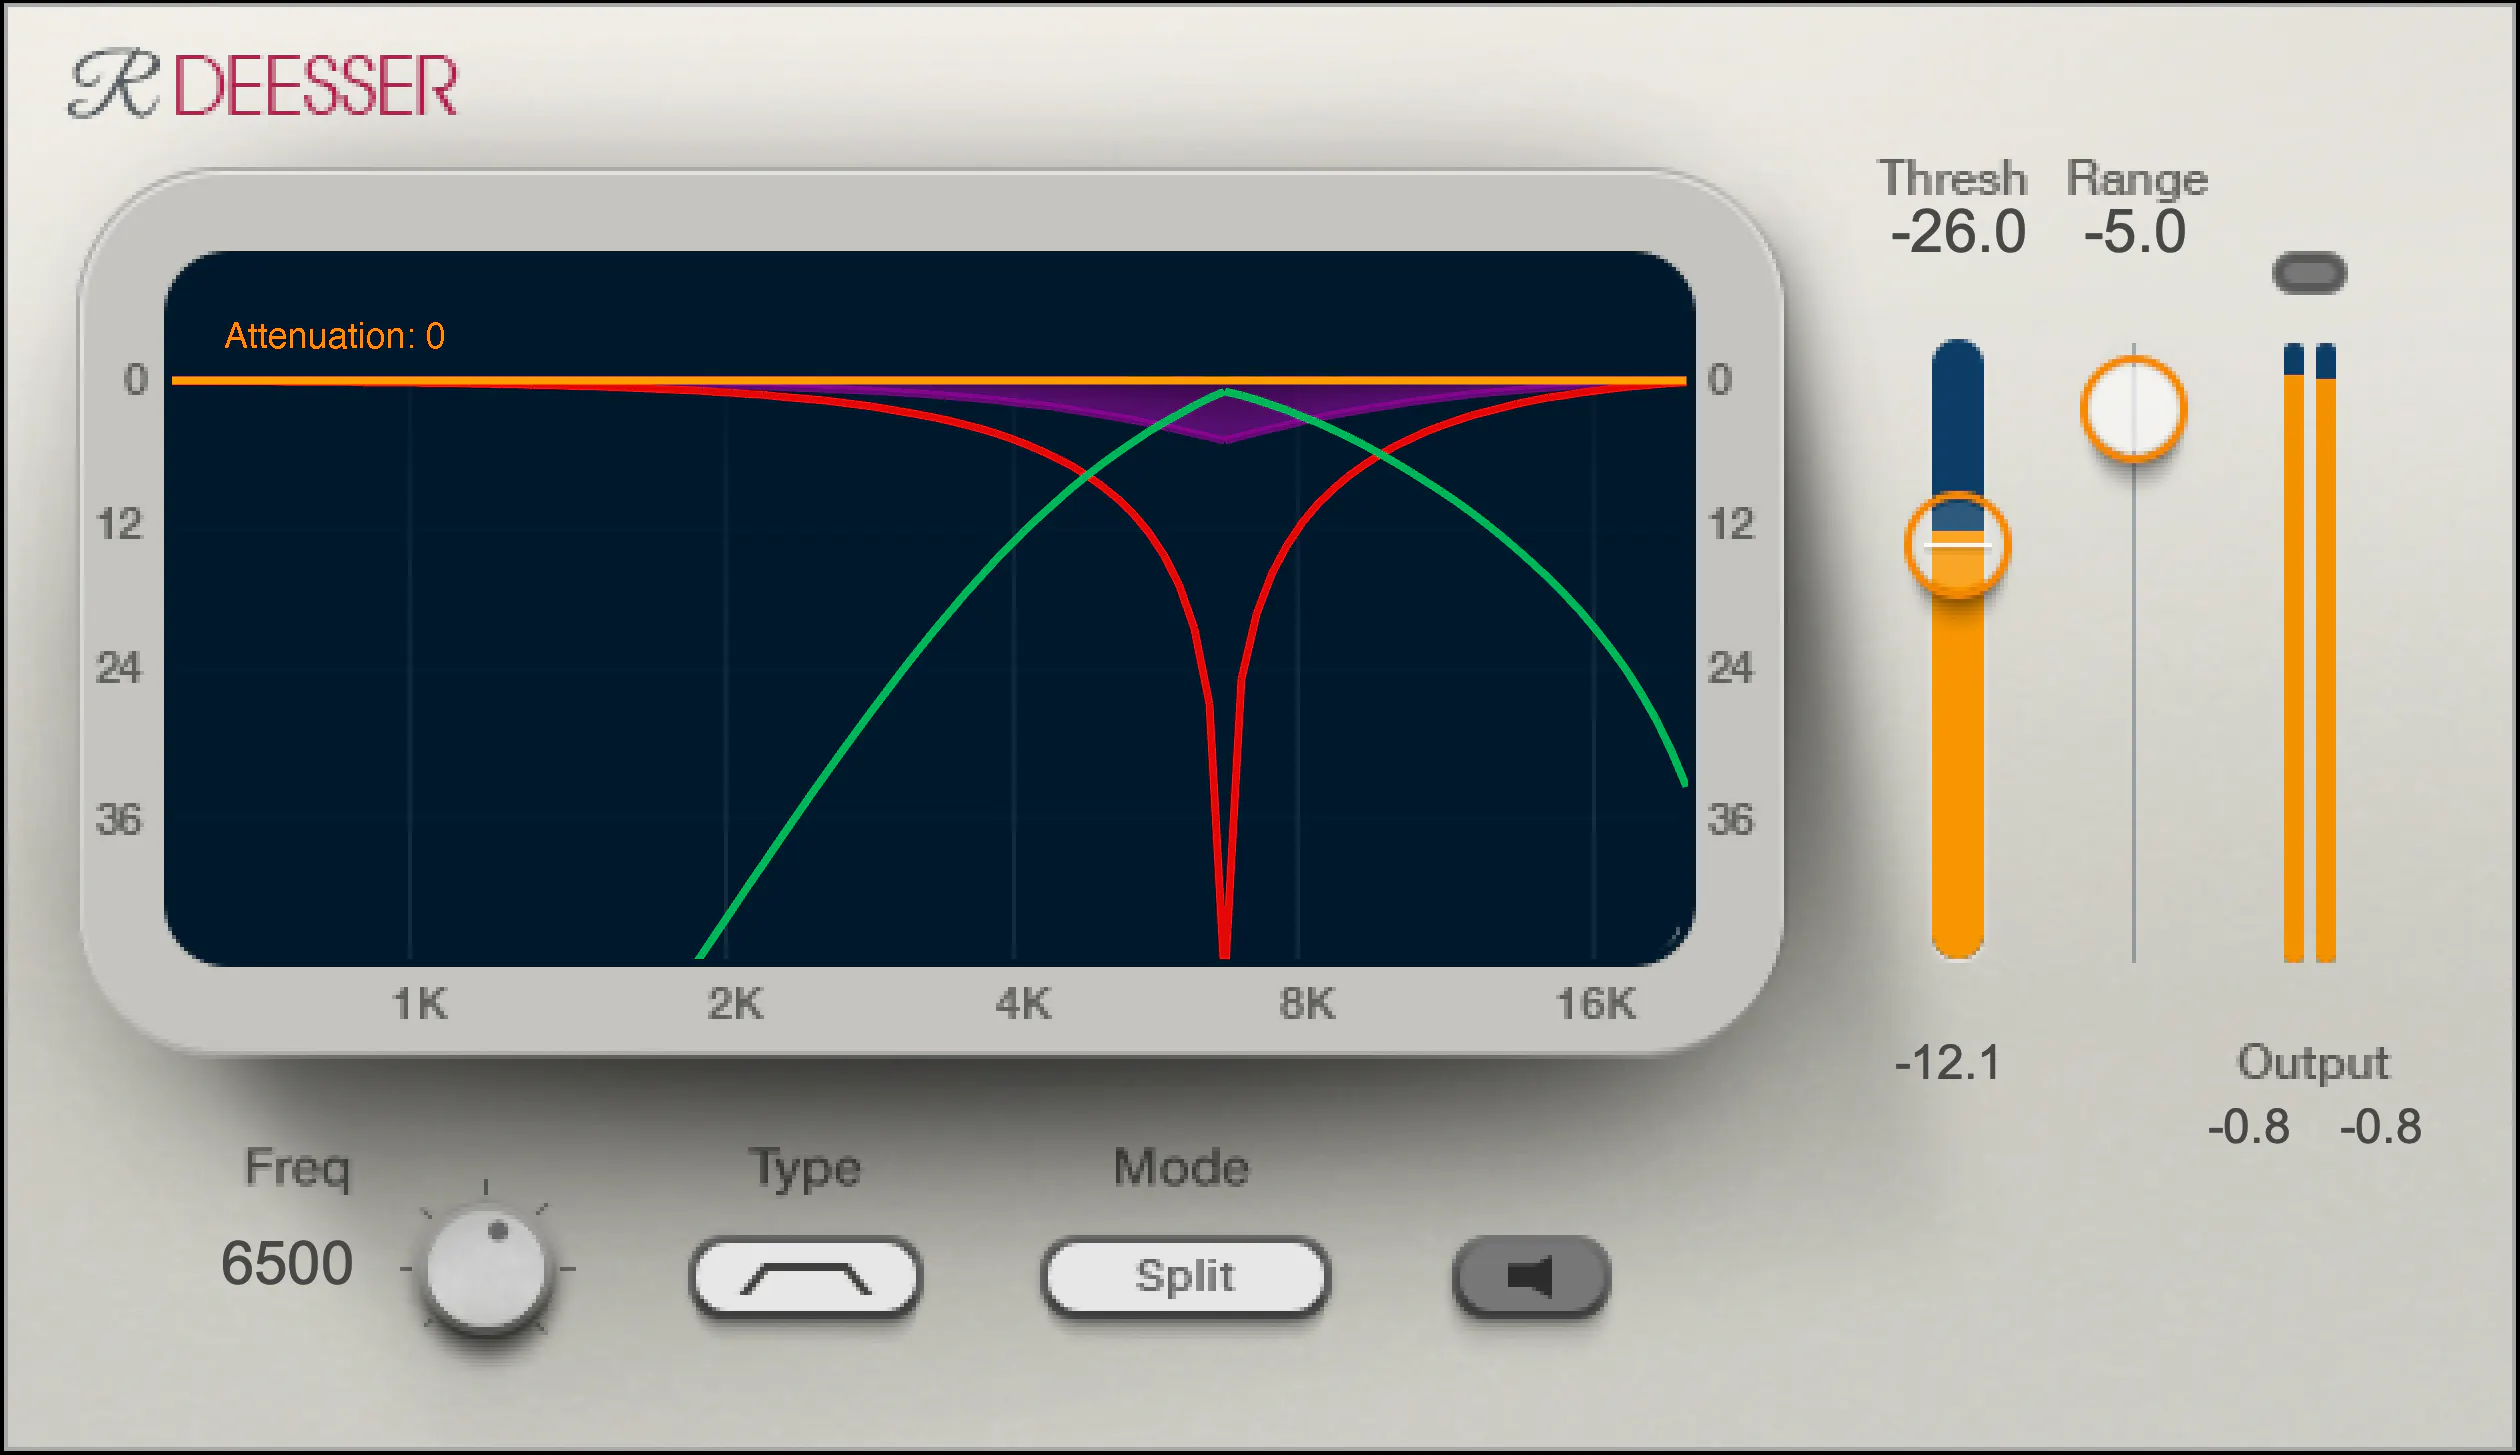
One of my go-to de-esser plugins is Waves Renaissance DeEsser, which offers precise control over the detection frequency, threshold, and reduction amount. Another popular option is FabFilter Pro-DS, which includes a natural-sounding “single vocal” mode for easy and effective de-essing.

De-Essing Vocals

De-essing can be a delicate process, as overuse can result in a dull and lifeless vocal sound. It’s important to strike a balance between reducing sibilance and maintaining the natural tone and character of the vocal recording.

When de-essing vocals, I typically start by soloing the vocal track and listening for the most pronounced sibilant sounds. I then apply the de-esser plugin with a gentle reduction amount, gradually increasing until the sibilance is under control but the vocal still sounds natural.

Best De-Esser for Vocals

In my experience, the best de-esser for vocals is one that offers precise control over the detection and reduction parameters, while still maintaining a natural sound. As mentioned earlier, Waves Renaissance DeEsser and FabFilter Pro-DS are both excellent options in this regard.

It’s also worth considering the de-esser included in your DAW of choice. For example, Logic Pro’s built-in de-esser is simple yet effective, with a straightforward interface that allows for quick and easy de-essing.

De-Esser Settings

When using a de-esser, it’s important to understand the various settings and how they affect the sound. The most important parameters to adjust are the detection frequency, threshold, and reduction amount.

The detection frequency determines which frequencies the de-esser will target, while the threshold sets the level at which the gain reduction will be applied. The reduction amount controls how much gain reduction is applied to the offending frequencies.

It’s worth experimenting with these settings to find the sweet spot for each individual vocal recording.

Tips for Using a De-Esser

Here are a few tips for getting the most out of your de-esser:

Use the de-esser sparingly, as overuse can result in a dull and lifeless vocal sound.
Always listen for sibilance in solo mode before applying the de-esser to the full mix.
Experiment with different de-esser plugins and settings to find the best sound for each individual recording.
If you’re unsure about how much de-essing to apply, start with a small reduction amount and gradually increase until the sibilance is under control but the vocal still sounds natural.
As the legendary producer Quincy Jones once said, “The most important thing in the studio is your ears.” And this is especially true when it comes to managing sibilance in vocal recordings. A de-esser is a tool that helps to control sibilance, or the harsh “s” and “t” sounds that can be distracting or unpleasant in a recording.

What is a de-esser?

Simply put, a de-esser is a type of audio processor that is designed to reduce or remove sibilance from a recording. It works by detecting and attenuating the specific frequency range where sibilance occurs in a vocal recording. This can help to smooth out the sound of the recording and make it more pleasing to the ear.

How does a de-esser work?

A de-esser typically uses a narrow-band compressor to reduce the level of the sibilant frequencies. The compressor is set to activate only when the sibilant frequencies exceed a certain threshold level. This allows the de-esser to reduce sibilance without affecting other parts of the recording. Some de-essers also use dynamic equalization to selectively attenuate sibilant frequencies, which can provide a more natural-sounding result.

Why is a de-esser important?

Sibilance can be a major distraction in vocal recordings, and can make a recording sound amateurish or unprofessional. A de-esser can help to smooth out the sound of a recording and make it more pleasant to listen to. This can be especially important in situations where the recording will be played over a large sound system or in a professional setting.

As the legendary producer Quincy Jones once said, “The most important thing in the studio is your ears.” And this is especially true when it comes to managing sibilance in vocal recordings. One personal experience I’ve had with sibilance was during a recording session with a vocalist who had a very pronounced lisp. Despite the fact that the vocal performance was excellent, the lisp made the recording almost unlistenable. However, with the use of a de-esser, we were able to remove the harsh sibilant sounds and salvage the recording.

Another personal experience was with a different vocalist who had a lot of sibilance in her recordings. Initially, we tried to use EQ to reduce the sibilance, but found that this also affected other parts of the recording and made it sound unnatural. However, once we introduced a de-esser into the signal chain, we were able to achieve a more natural-sounding result that still effectively reduced the sibilance.

In conclusion, a de-esser is a powerful tool for managing sibilance in vocal recordings. By detecting and attenuating specific frequency ranges where sibilance occurs, a de-esser can help to smooth out the sound of a recording and make it more pleasing to the ear. Whether you’re a professional audio engineer or a hobbyist recording at home, a de-esser is an important tool to have in your audio processing toolkit.

sibilance reduction, vocal processing, audio engineering, dynamic equalization, narrow-band compressor, vocal recording, audio processor, professional recording, recording studio, audio production, sound quality, sound engineering, audio post-production, de-essing, audio editing, audio restoration, sound treatment, audio technology, audio software, mixing and mastering, audio mastering, audio plugins, music production, audio effects, sound design, audio signal processing, audio post-processing, audio filtering, audio frequency, audio dynamics, audio post-production techniques, vocal performance, audio compression, audio enhancement, audio editing software, audio hardware, audio mixer, audio signal chain, audio equipment, audio tools, sound recording, audio clean-up, audio post, audio mastering software, audio workflow, audio clarity