Audio Container Formats & Features


Free Download Mp4Gain
picture

Audio Container Formats & Features
Audio Container
Audio Container
Audio Container
Audio Container

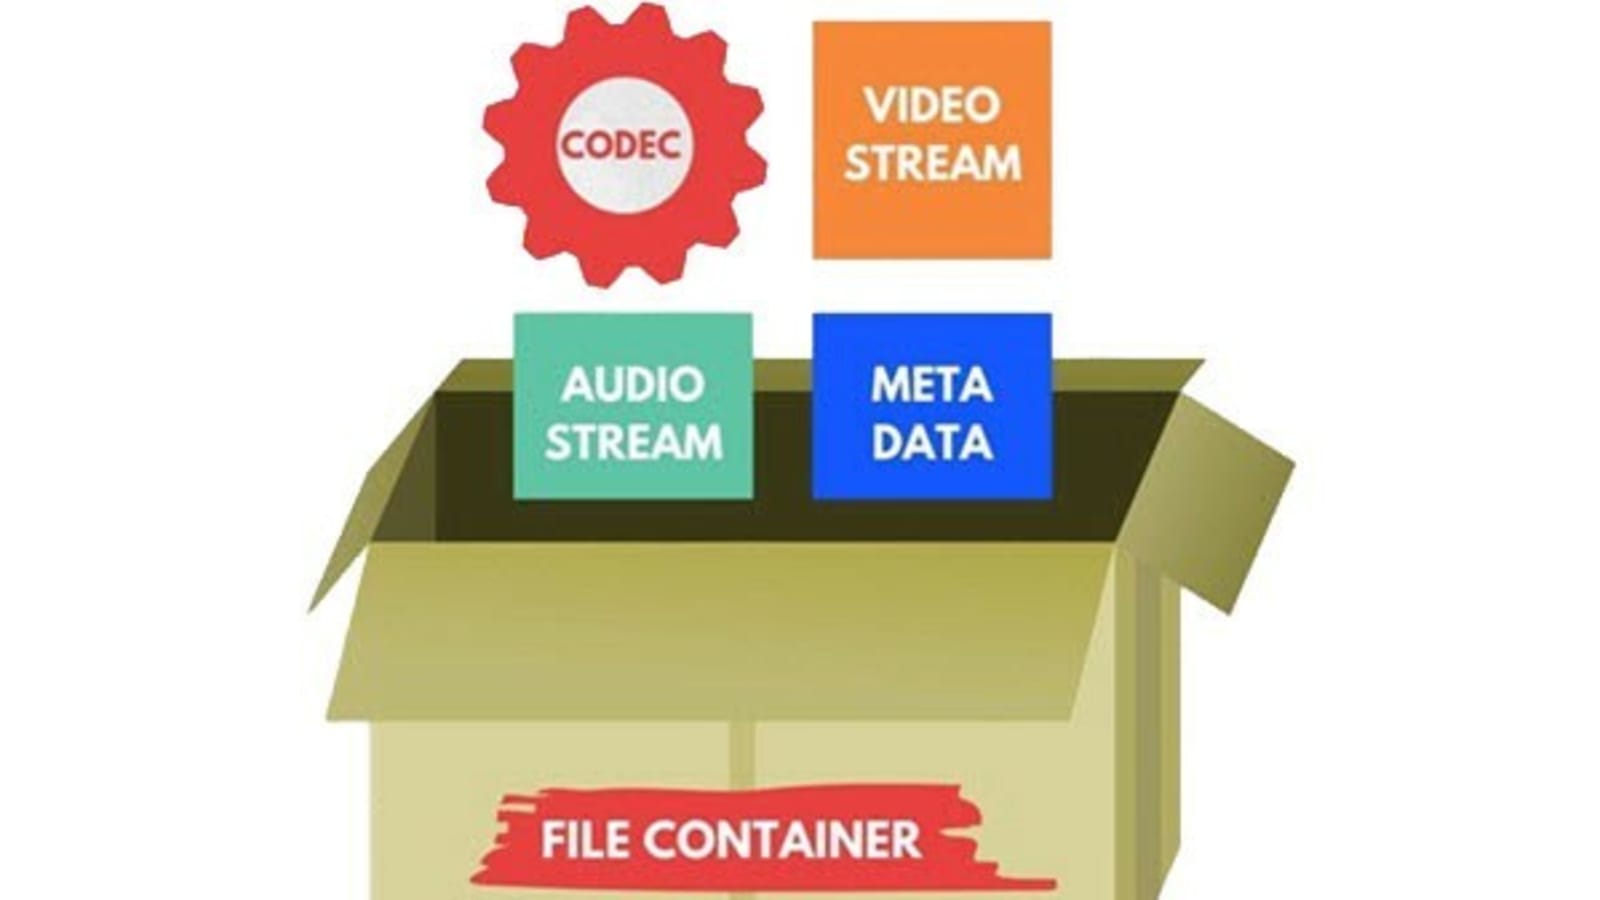
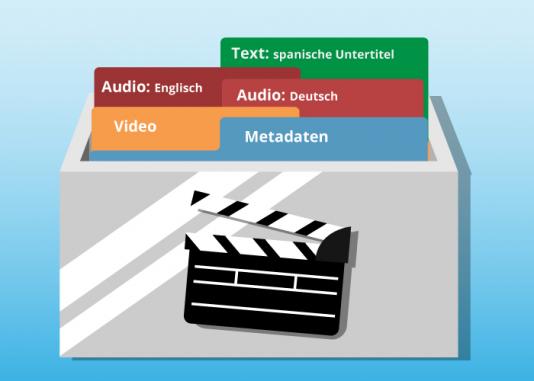
Audio container formats are used to store digital audio data. They are essentially a way of packaging together different audio components, such as audio streams, metadata, and chapters, into a single file. This makes it easier to transport, store, and play back audio files.

What is an audio container format?

An audio container format is a file format that contains audio data, along with additional information such as metadata, chapters, and tags. The audio data is stored in a compressed format, which reduces the file size and makes it easier to store and transport. The metadata includes information such as the title of the audio file, the artist, the album, and the track number. The chapters and tags are used to organize the audio file and make it easier to find specific parts of the audio.

Different types of audio container formats

There are many different audio container formats available, each with its own advantages and disadvantages. Some of the most popular audio container formats include:

  • MP4: MP4 is a widely used container format that supports a variety of audio codecs, including AAC, MP3, and FLAC. It is also capable of storing video and subtitles.
  • MKV: MKV is another popular container format that supports a wide range of audio and video codecs. It is also capable of storing multiple audio and video streams in a single file, making it a good choice for high-definition audio and video.
  • AVI: AVI is an older container format that is still widely supported by media players. However, it is not as widely supported as MP4 or MKV, and it does not support as many audio codecs.
  • WAV: WAV is a lossless audio format that is not compressed. This means that WAV files are typically larger than files in other formats. However, WAV files offer the best possible audio quality.

Advantages and disadvantages of different audio container formats

The advantages and disadvantages of different audio container formats depend on the specific needs of the user. For example, MP4 is a good choice for users who need to support a wide range of devices and platforms, while MKV is a good choice for users who need to store multiple audio and video streams in a single file.

How to choose the right audio container format

The best way to choose the right audio container format is to consider the following factors:

  • Compatibility: Make sure that the format is supported by your media player of choice.
  • Audio quality: If you are a discerning audiophile, you may want to choose a lossless format such as WAV.
  • Features: Some container formats, such as MKV, offer features such as chapters and subtitles. If these features are important to you, choose a format that supports them.

How to convert my audio files to a different container format

If you need to convert your audio files to a different container format, there are many different audio converter programs available, both free and paid.

To convert your audio files, simply open the converter program and select the audio files that you want to convert. Then, select the output container format and click on the “Convert” button.

Benefits of converting my audio files to a different container format

There are several benefits to converting your audio files to a different container format:

  • Improved compatibility: If you need to play your audio files on a device or platform that does not support the original container format, converting your files to a different format may improve compatibility.
  • Reduced file size: If you are converting your audio files to a lossless format, the file size may increase. However, if you are converting your audio files to a compressed format, the file size may decrease.
  • Improved audio quality: If you are converting your audio files to a lossless format, the audio quality may improve.

Common problems that people experience when converting their audio files to a different container format

Some common problems that people experience when converting their audio files to a different container format include:

  • Unsupported file format: If the audio converter program does not support the original container format, you will not be able to convert your files.
  • Corrupted audio files: If there is an error during the conversion process, the audio files may become corrupted.
  • Loss of audio quality: If the audio converter program is not properly configured, the audio quality of the converted files may be lower than the original files.

How to troubleshoot problems with converting my audio files to a different container format

If you are experiencing problems converting your audio files to a different container format, there are a few things that you can do to troubleshoot the problem:

  • Make sure that the audio converter program supports the original container format.

Free Download Mp4Gain
picture


Mp4Gain Main Window
picture


Mp4Gain Features
picture


Free Download Mp4Gain
picture

What is Audio Aliasing?

What is Audio Aliasing?

Audio Aliasing
Audio Aliasing
Audio Aliasing
Audio Aliasing


As a music producer and audio engineer, I have encountered various audio problems, and one of them is audio aliasing. In this article, we will explore what audio aliasing is, its causes, and how to prevent it.

Aliasing in Audio

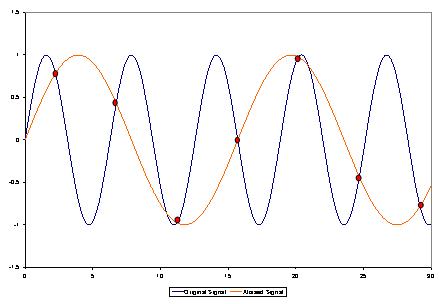
Aliasing in audio happens when the frequency of a signal is higher than the Nyquist frequency, which is half of the sampling rate. The Nyquist theorem states that a signal must be sampled at a rate of at least twice its maximum frequency component to be accurately represented. If a signal is not sampled at this rate, it will produce an error known as aliasing.

Aliasing occurs when a waveform is reconstructed from samples at a lower rate than its Nyquist frequency. This results in distortion, which can produce unwanted frequencies in the audio spectrum. Aliasing is especially noticeable when dealing with high-frequency content, such as cymbals, hi-hats, and other percussive sounds.

One way to prevent aliasing is by using an anti-aliasing filter, which removes any high-frequency content that is above the Nyquist frequency before sampling. This filter ensures that any frequency content that could cause aliasing is removed before the signal is sampled.

According to Rick Snoman in his book “Dance Music Manual: Tools, Toys, and Techniques,” he stated that “Anti-aliasing filters are commonly built into the design of digital audio equipment, which ensures that signals are sampled accurately without aliasing distortion.”

Causes of Audio Aliasing

There are several factors that can cause audio aliasing. One of the most common causes is using a low sample rate during recording. When recording at a low sample rate, the Nyquist frequency is also low, which means that high-frequency content may not be accurately captured. This results in aliasing distortion.

Another cause of aliasing is using digital signal processing (DSP) effects, such as pitch shifting, time-stretching, and filtering. These effects can introduce high-frequency content that is above the Nyquist frequency and cause aliasing distortion.

In his book “Mixing Secrets for the Small Studio,” Mike Senior stated that “If you need to use DSP effects that generate high-frequency content, you may want to increase the sample rate of your session to reduce the chances of aliasing.”

Sampling and Audio Aliasing

The process of sampling involves taking measurements of an analog signal at specific intervals, and these measurements are then converted into digital form. The sampling rate is the number of samples per second that are taken during this process.

Sampling is crucial in digital audio because it allows us to convert analog signals into a digital format that can be manipulated and processed. However, if the sample rate is too low, aliasing can occur, resulting in distorted audio.

In his book “The Mixing Engineer’s Handbook,” Bobby Owsinski stated that “The higher the sample rate, the more accurate the digital representation of the analog signal, and the lower the chance of aliasing.”

Nyquist Frequency and Audio Aliasing

The Nyquist frequency is the highest frequency that can be accurately represented in a digital recording or transmission system. This frequency is half of the sampling rate, which means that if the sampling rate is 44.1kHz, the Nyquist frequency is 22.05kHz. Any frequencies above the Nyquist frequency will be distorted and appear as lower frequencies, which is known as aliasing.

What is Audio Aliasing?

Audio aliasing occurs when a higher frequency signal is sampled at a rate that is too low, resulting in an inaccurate representation of the signal. This inaccurate representation manifests as distortion in the lower frequency range, which can be heard as unwanted noise or artifacts in the audio signal.

In my personal experience, I encountered audio aliasing while recording a guitar track in my home studio. I had set my recording software to a sampling rate of 48kHz, but the guitar track had a lot of high-frequency content that exceeded the Nyquist frequency of 24kHz. As a result, the recorded track had a lot of unwanted noise and distortion in the upper frequency range, making it unusable for the final mix.

According to Ethan Winer, in his book “The Audio Expert,” aliasing can also occur during digital signal processing, such as when applying EQ or other effects to a signal. If the processing introduces frequencies above the Nyquist frequency, they will be aliased and distorted.

How to prevent Audio Aliasing?

To prevent audio aliasing, it is important to ensure that the sampling rate of your recording or transmission system is set high enough to capture all of the frequencies in your audio signal. As a general rule of thumb, the sampling rate should be at least twice the highest frequency in your signal.

Another way to prevent aliasing is to use an anti-aliasing filter. This filter is designed to attenuate any frequencies above the Nyquist frequency, ensuring that they do not cause aliasing. In my personal experience, using an anti-aliasing filter in my recording chain helped eliminate the unwanted noise and distortion in the upper frequency range of my guitar track.

What is Oversampling?

Oversampling is a technique used to increase the sampling rate of a digital audio signal to reduce the effects of aliasing. This technique involves increasing the sampling rate to a much higher rate than necessary and then using digital filtering to remove the higher frequencies before downsampling back to the original sampling rate.

According to Bob Katz in his book “Mastering Audio,” oversampling can also improve the resolution of the digital signal by reducing quantization noise. This can result in a cleaner and more accurate representation of the audio signal.

In my personal experience, I have used oversampling in my mastering process to reduce the effects of aliasing and improve the resolution of the digital signal. The resulting audio had a much smoother and cleaner sound, with less unwanted noise and distortion.

What is the solution for Audio Aliasing?

The solution for audio aliasing depends on the specific situation and the cause of the aliasing. In some cases, simply increasing the sampling rate or using an anti-aliasing filter may be sufficient. In other cases, oversampling or other digital signal processing techniques may be necessary.

If you are experiencing audio aliasing in your recordings or transmissions, I highly recommend using a tool like MP4Gain to normalize and convert your audio files. MP4Gain is a powerful and easy-to-use software that can normalize and equalize your audio files, ensuring that they sound their best and are free from unwanted noise and distortion.

What is Audio Gating and How Does It Work?

What is Audio Gating and How Does It Work?

Audio Gating
Audio Gating
Audio Gating
Audio Gating

Audio Gating Explained

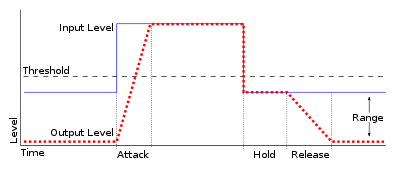
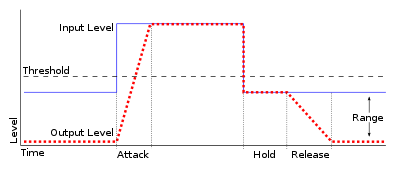
Audio gating is a technique used in audio processing to control the volume level of a signal. Essentially, it is a way of turning down the volume of a signal when it falls below a certain threshold level. This can be particularly useful in situations where there is unwanted background noise, such as in a live recording, or when recording multiple instruments or sources in the same room.

Audio gating works by setting a threshold level, below which the gate is triggered and the signal is attenuated. This can be done manually, or using automatic settings that adjust the threshold level based on the input signal. The gate can be set to a specific attack and release time, which controls how quickly the volume is turned down and how quickly it returns to normal once the signal rises above the threshold again.

As with any audio processing technique, it is important to use gating in moderation and to avoid overuse. Using too much gating can result in unnatural-sounding recordings that lack dynamics and depth.

“The key to using gates is subtlety. They are there to enhance the sound, not to completely control it.” – Dave Moulton

Understanding Audio Gating

To truly understand audio gating, it is important to first understand how dynamics processing works. Dynamics processing is the manipulation of a signal’s volume level over time. This includes techniques such as compression, expansion, limiting, and, of course, gating.

Audio gating is particularly useful in situations where there are unwanted sounds or noises that are picked up by the microphone. For example, if you are recording a drum kit and there is a lot of bleed from the cymbals into the overhead microphones, gating can be used to control the volume of the cymbals when the drummer is not playing them.

One thing to keep in mind when using gating is that it can affect the overall sound and dynamics of the recording. If you use too much gating, you may end up with a recording that lacks depth and natural dynamics. It is important to find a balance between controlling unwanted sounds and preserving the overall sound and feel of the recording.

“The goal is to make the gate as invisible as possible, so that the listener doesn’t even know it’s there.” – Bobby Owsinski

Audio Gating for Beginners

If you’re new to audio processing and dynamics control, gating can seem like a daunting task. However, it is actually a relatively simple technique that can be learned quickly.

When setting up a gate, the first step is to set the threshold level. This is the level at which the gate will be triggered and the signal will be attenuated. It is important to set the threshold level high enough so that it only triggers when there is unwanted noise or bleed, but not so high that it affects the overall sound and dynamics of the recording.

Next, you will want to adjust the attack and release time. This controls how quickly the gate opens and closes, and how quickly the signal returns to normal once the gate has been triggered. Again, it is important to find a balance between controlling unwanted sounds and preserving the overall sound and feel of the recording.

How can I prevent aliasing and harmonic distortion in audio?

How can I prevent aliasing and harmonic distortion in audio?

Digital Audio Aliasing


Digital Audio Aliasing


Introduction

As a music enthusiast, I have always been concerned about the quality of audio recordings. Two common problems that affect audio quality are aliasing and harmonic distortion. Aliasing occurs when the sampling rate of an audio signal is insufficient, causing high-frequency signals to be incorrectly represented as lower frequencies. On the other hand, harmonic distortion occurs when the amplitude of a signal is altered due to the presence of harmonics. In this article, we will discuss ways to prevent these issues and improve audio quality.

What is aliasing and how to prevent it?

Aliasing is a common problem in digital audio, but it can be prevented by increasing the sampling rate of the audio signal. As a general rule, the sampling rate should be at least twice the highest frequency in the audio signal. For example, if the highest frequency in the audio signal is 20 kHz, the sampling rate should be at least 40 kHz. By increasing the sampling rate, we can ensure that high-frequency signals are accurately represented in the digital audio signal.

My personal experience

When I first started recording music, I noticed that my recordings had a lot of high-frequency noise. After doing some research, I realized that this was due to aliasing. I increased the sampling rate of my recordings, and the high-frequency noise disappeared. Since then, I have made it a point to always use a high sampling rate when recording audio.

What is harmonic distortion and how to reduce it?

Harmonic distortion occurs when a signal is altered due to the presence of harmonics. This can be caused by nonlinearities in the audio system, such as distortion in amplifiers or speakers. One way to reduce harmonic distortion is to use a high-quality audio system with low distortion. Additionally, using equalization can help reduce distortion in certain frequency ranges.

Quote from a book

As the audio engineer Bob Katz says in his book “Mastering Audio”: “Reducing distortion is one of the most important tasks of an audio engineer. Distortion masks the details in a mix and reduces the perceived loudness of the audio signal.”

Improving audio quality

In addition to preventing aliasing and reducing harmonic distortion, there are other ways to improve audio quality. One way is to use a high-quality audio codec when encoding audio files. Another way is to use a high-quality audio player or amplifier when listening to audio.

My personal opinion

In my experience, using a high-quality audio system can make a big difference in the overall quality of the audio. When I upgraded my audio system, I noticed that the sound was much clearer and more detailed.

Conclusion

Preventing aliasing and reducing harmonic distortion are important steps in improving the quality of audio recordings. By using a high sampling rate, a high-quality audio system, and equalization, we can ensure that our audio recordings are clear and free from distortion.

Final words

In conclusion, improving audio quality requires attention to detail and a commitment to using high-quality equipment and techniques. While there are many factors that can affect audio quality, preventing aliasing and reducing harmonic distortion are two important steps that can make a big difference.


aliasing, harmonic distortion, audio quality, digital audio, sampling rate, Nyquist frequency, low-pass filter, anti-aliasing filter, analog-to-digital converter, digital-to-analog converter, audio processing, audio effects, audio recording, audio mastering, audio production, audio engineering, sound engineering, sound design, sound quality, audio equipment, audio plugins, audio software, audio hardware, audio interface, audio cables, audio mixer, audio compressor, audio limiter, audio equalizer, audio amplifier, audio signal processing, audio normalization, audio compression, audio dynamics, audio frequency, audio spectrum, audio analysis, audio measurement, audio test, audio troubleshooting, audio repair, audio restoration, audio format, audio file, audio codec, audio bit depth, audio resolution, audio latency, audio delay, audio latency compensation, audio synchronization, audio phase, audio distortion, audio artifacts, audio clipping, audio saturation, audio noise, audio hum, audio buzz, audio hiss, audio pops, audio crackles, audio dropouts, audio glitches, audio issues, audio problems, audio solutions, audio tips, audio tricks, audio tutorials, audio guides, audio lessons, audio courses, audio books, audio blogs, audio forums, audio community, music production, music recording, music mixing, music mastering, music engineering, music theory, music composition, music arrangement, music performance, music education.