The Difference Between a Compressor and a Limiter


Free Download Mp4Gain
picture

The Difference Between a Compressor and a Limiter

The Difference Between a Compressor and a Limiter)
The Difference Between a Compressor and a Limiter

Compressor and Limiter: What Are They?

As a music producer and audio engineer, I have had my fair share of using compressors and limiters. Both of these audio processing tools are used to control the dynamic range of audio, but they do so in different ways.

A compressor reduces the dynamic range of audio by decreasing the volume of loud parts and increasing the volume of quiet parts, creating a more even level of audio. On the other hand, a limiter sets a hard limit to the maximum volume of audio, preventing it from exceeding a certain threshold.

Experience:

I remember working on a song where the vocals were all over the place, and the dynamic range was too wide. The loud parts were too loud, and the quiet parts were too quiet. Adding a compressor to the vocal track helped me smooth out the levels and create a more consistent sound.

How Do They Work?

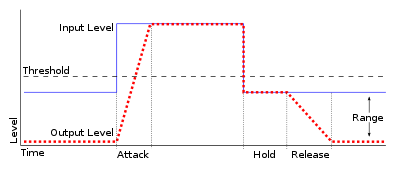
Compressors and limiters work by using a combination of threshold, ratio, attack, release, and gain settings.

The threshold determines at what level the compressor or limiter starts to activate. The ratio determines how much the audio is reduced or limited once the threshold is crossed. The attack setting determines how quickly the compressor or limiter reacts to changes in the audio, and the release setting determines how long it takes for the effect to stop after the audio drops below the threshold. Finally, the makeup gain setting determines how much to boost the level of the audio after compression or limiting.

What is the difference between a compressor and a limiter? This is a common question among audio enthusiasts and professionals. While both devices are used to control the dynamics of audio signals, they have some important differences.

Compression is used to reduce the dynamic range of audio signals. It works by decreasing the level of audio above a certain threshold. This is done by applying gain reduction to the audio signal when it exceeds the threshold. Compression is commonly used in music production to control the level of vocals and instruments, making them sit better in the mix.

A limiter, on the other hand, is a type of compressor that is designed to prevent audio levels from exceeding a certain threshold. It works by applying a fixed amount of gain reduction to the audio signal when it exceeds the threshold. This makes it useful for preventing distortion caused by audio levels that are too high.

When it comes to the settings of compressors and limiters, there are several parameters that can be adjusted. The threshold determines at what level the compressor or limiter starts to activate. The ratio determines how much the audio is reduced or limited once the threshold is crossed. The attack setting determines how quickly the compressor or limiter reacts to changes in the audio, and the release setting determines how long it takes for the effect to stop after the audio drops below the threshold. Finally, the makeup gain setting determines how much to boost the level of the audio after compression or limiting.

In my personal experience, I have found that using a limiter is often necessary when working with audio that has a wide dynamic range, such as live recordings. It helps to prevent distortion and keeps the audio levels under control. On the other hand, when working with more controlled recordings, such as in a studio environment, a compressor can be more useful for shaping the sound and controlling the levels of individual tracks.

As audio engineer Bob Katz puts it in his book “Mastering Audio: The Art and the Science”: “The compressor is a tool of transparency; it must not be heard. The limiter is a tool of protection; it must be heard only when it protects.” This quote highlights the different purposes of these two devices and how they are used in different contexts.

In conclusion, while compressors and limiters may seem similar at first glance, they serve different purposes and have different settings that can be adjusted to achieve different effects. Understanding the differences between these devices can help audio enthusiasts and professionals make informed decisions when working with audio.


Free Download Mp4Gain
picture


Mp4Gain Main Window
picture


Mp4Gain Features
picture


Free Download Mp4Gain
picture

What is Audio Gating and How Does It Work?

What is Audio Gating and How Does It Work?

Audio Gating
Audio Gating
Audio Gating
Audio Gating

Audio Gating Explained

Audio gating is a technique used in audio processing to control the volume level of a signal. Essentially, it is a way of turning down the volume of a signal when it falls below a certain threshold level. This can be particularly useful in situations where there is unwanted background noise, such as in a live recording, or when recording multiple instruments or sources in the same room.

Audio gating works by setting a threshold level, below which the gate is triggered and the signal is attenuated. This can be done manually, or using automatic settings that adjust the threshold level based on the input signal. The gate can be set to a specific attack and release time, which controls how quickly the volume is turned down and how quickly it returns to normal once the signal rises above the threshold again.

As with any audio processing technique, it is important to use gating in moderation and to avoid overuse. Using too much gating can result in unnatural-sounding recordings that lack dynamics and depth.

“The key to using gates is subtlety. They are there to enhance the sound, not to completely control it.” – Dave Moulton

Understanding Audio Gating

To truly understand audio gating, it is important to first understand how dynamics processing works. Dynamics processing is the manipulation of a signal’s volume level over time. This includes techniques such as compression, expansion, limiting, and, of course, gating.

Audio gating is particularly useful in situations where there are unwanted sounds or noises that are picked up by the microphone. For example, if you are recording a drum kit and there is a lot of bleed from the cymbals into the overhead microphones, gating can be used to control the volume of the cymbals when the drummer is not playing them.

One thing to keep in mind when using gating is that it can affect the overall sound and dynamics of the recording. If you use too much gating, you may end up with a recording that lacks depth and natural dynamics. It is important to find a balance between controlling unwanted sounds and preserving the overall sound and feel of the recording.

“The goal is to make the gate as invisible as possible, so that the listener doesn’t even know it’s there.” – Bobby Owsinski

Audio Gating for Beginners

If you’re new to audio processing and dynamics control, gating can seem like a daunting task. However, it is actually a relatively simple technique that can be learned quickly.

When setting up a gate, the first step is to set the threshold level. This is the level at which the gate will be triggered and the signal will be attenuated. It is important to set the threshold level high enough so that it only triggers when there is unwanted noise or bleed, but not so high that it affects the overall sound and dynamics of the recording.

Next, you will want to adjust the attack and release time. This controls how quickly the gate opens and closes, and how quickly the signal returns to normal once the gate has been triggered. Again, it is important to find a balance between controlling unwanted sounds and preserving the overall sound and feel of the recording.

Difference between compressor and limiter

As we saw in previous articles on the operation of the compressor, the latter acts as an automatic volume, or more accurately, decreases the volume from a certain threshold, which has the consequence of reducing the dynamic range of a signal, attenuating the loudest sounds, bringing them closer to the weakest sounds.

Compressor / Limiter

This makes the sound of an instrument more balanced and helps you maintain a stable level throughout a song, even if the musician varied their sound intensity during their performance.

The compressor:

A compressor uses the threshold setting to define the level from which compression will take place. Weaker signals or signals below this threshold will not be altered, while signals that exceed this threshold will simply decrease in volume.

The amount of signal attenuation depends on what is called the compression ratio or rate, which simply indicates the number of decibels that has been reduced compared to the input signal after crossing the threshold and, by the way, the number db to add to the output gain to have equal volume.

Difference between compressor and limiter

Without compression, a 1 dB increase in input is always equivalent to a 1 dB increase in output, but if you set a 4: 1 ratio, you will need a 4 dB increase in input level to get a gain of 1 dB at the output. The higher the ratio, the greater the degree of compression. A 1: 1 ratio means there is no compression. It is important to remember that the gain reduction only applies to signals that exceed the threshold. The weakest signals remain unchanged.

After the threshold and ratio, the other common compressor parameters are attack and release times, although some compressors do not provide these parameters. In other words, attack adjusts the compressor reaction time (how long it takes to reduce the gain) once the threshold is crossed, while the release time determines the time it takes for the gain to return to its original volume.

These controls must be carefully adjusted for different types of compressors to keep the compression effects transparent, although it is also possible to use more pronounced compression to create a particular effect. For example, setting very fast attack and release times causes an audible artifact known as the bulge effect, which can be used to give some dynamics or rhythm effects.

Difference between compressor and limiter
Some compressors only provide switchable fast / slow attack times, but the release time is generally adjustable. The only obvious exception concerns compressors that automatically adjust their release time according to the dynamics of the processed signal. Compressors with an “automatic” mode like the famous SSL are useful for sources whose dynamics vary during a song.

Since compression works by reducing the gain of strong signals, the compressor’s output is always weaker than its input. That’s why gain control is provided to bring the output to an appropriate level. Even if the output level is the same as the input level, the compressed signal will continue to appear stronger and stronger compared to the original signal, because even if the levels are the same, the average signal level (RMS) will increase and The weakest sounds that were originally below the threshold. Although the compressors only reduce the signals that exceed the threshold, the gain effect grants the role of the compressor as a device that increases the level of low sounds.

The limiter

The limiter works in exactly the same way as a compressor, except that it has an extremely high compression ratio (100: 1). This means that the peaks of a signal systematically stop at the threshold and cannot exceed it.

Difference between compressor and limiter

In many limiters (as in certain compressors), the threshold system is different from that described above. Rather than moving the threshold to match the input signal level and then using the output gain to find the original level, another approach is to define an output threshold and then vary the input gain to force it to reach the defined threshold or output level.

This allows the maximum maximum level to be set in advance, to limit and increase the average volume of a sound effectively in a single operation. This is the principle used during mastering treatment, for example, to obtain an RMS level without exceeding 0dbfs.

Limiters: Features and Applications.


The limiter is a dynamic processing tool similar to compression. It is known to mastering engineers and is useful for optimizing the overall volume of a song. But this tool can also be useful for mixing when performing certain tasks that its cousin, the compressor, cannot perform as easily.

Audio limiter

Limiter mode compressors and brick wall limiters

A limiter is a processing module that allows you to quickly apply a very high compression ratio. In theory, any compressor that achieves a high compression ratio (say more than 20: 1) can be considered a limiter. In addition, different compressors (LA-2A, Neve 33609, DBX 160 …) provide a selector or have a section that allows them to act as a limiter.

However, these compressors generally do not allow to know exactly the maximum output volume. This is where brickwall type limiters come in. Brickwall limiters allow you to set a volume that will never be exceeded. With their immediate attack, they set up a brick wall that audio can never get through. This important feature, of course, makes it possible to avoid clipping during mastering, but also makes the limiter extremely effective when treating tracks with strong, short tips.

limiter audio

The configuration

The limiter offers fewer settings than its cousin the compressor. First, there is the threshold that determines from which point the signal will be limited. This threshold can be determined by a setting that sets the threshold or can be reached by increasing the input level. Another parameter, called “ceeling” or “output level”, allows you to configure the maximum output volume. With digital audio, this ceiling is expressed in negative dB. Therefore, a ceiling of -0.2 dB indicates that the maximum volume will be 0.2 dB below the digital zero point. Very often it contains a release that, like the compressor, determines the speed at which, by limiting it, it will stop operating. Of course, one or more meters are added to show the input and output volume and the degree of reduction.

Since they are often placed at the end of the general output (master bus, main bus, or mix bus), the limiting plugins often include “wobbly” selectors that provide the ability to reduce the sampling depth (24, 20, 16, 12 and sometimes 8 bits) to correspond to the final medium. For example, we use 16 bits for a CD.