Audio Sample Sizes: 8-bit vs. 16-bit


Free Download Mp4Gain
picture

Audio Sample Sizes: 8-bit vs. 16-bit
Audio Sample Sizes: 8-bit vs. 16-bit

Is a 16-bit or 24-bit audio better? - Quora

What is the difference between 8-bit and 16-bit audio sample sizes?

When it comes to audio recording and production, the choice of sample size plays a crucial role in determining the quality and accuracy of the sound. The two most common sample sizes are 8-bit and 16-bit. While they may seem similar, they have significant differences that impact the fidelity and dynamic range of audio recordings. Let’s delve into the dissimilarities between 8-bit and 16-bit audio sample sizes.

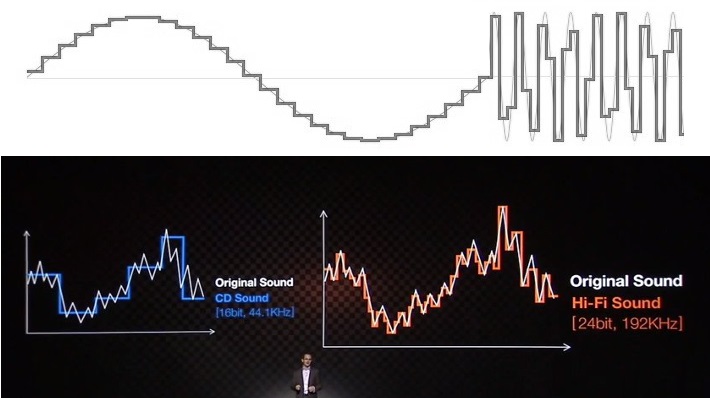
Starting with 8-bit audio, it represents a relatively lower resolution compared to 16-bit. With 8-bit sample size, the audio waveform is divided into 256 discrete levels, resulting in a limited dynamic range. This means that the audio can capture a narrower range of volume variations and may exhibit noticeable quantization noise in quiet or subtle passages. However, 8-bit audio can still be suitable for certain applications where the focus is on smaller file sizes or specific stylistic effects.

On the other hand, 16-bit audio offers a higher resolution and a greater dynamic range compared to 8-bit. With 16-bit sample size, the audio waveform is divided into 65,536 discrete levels, providing more precise representation of the original sound. This higher resolution allows for capturing a wider range of volume variations with greater accuracy, resulting in improved fidelity and reduced quantization noise. 16-bit audio is commonly used in professional music production, mastering, and high-quality audio recordings.

Advantages of 16-bit audio sample size

One significant advantage of using 16-bit audio sample size is the enhanced dynamic range it offers. The wider range of volume levels allows for more detailed and accurate representation of the original sound, resulting in higher fidelity recordings. This is particularly crucial in situations where capturing subtle nuances and preserving the dynamics of the audio is important, such as in music production or audio mastering.

Furthermore, 16-bit audio provides a greater signal-to-noise ratio compared to 8-bit audio. The increased resolution reduces quantization noise, resulting in cleaner recordings, especially in quiet or low-level passages. This allows for capturing more intricate details and ensuring a more natural and immersive audio experience.

Considerations for using 8-bit audio sample size

Although 8-bit audio may not offer the same level of fidelity and dynamic range as 16-bit audio, it can still be suitable for certain applications. One advantage of 8-bit audio is its smaller file size, which can be beneficial in situations where storage or bandwidth limitations exist. Additionally, the inherent quantization noise and limited dynamic range of 8-bit audio can be creatively used to achieve specific stylistic effects or emulate vintage sounds.

However, it is important to consider the intended purpose and context when deciding to use 8-bit audio. In scenarios where high fidelity and accurate reproduction of the sound are essential, such as professional music production or critical audio recordings, it is recommended to opt for 16-bit audio sample size for optimal results.

Final Words

The choice between 8-bit and 16-bit audio sample sizes significantly impacts the quality and fidelity of audio recordings. While 8-bit audio may have its applications, 16-bit audio offers a higher resolution, wider dynamic range, and improved accuracy. The increased precision and reduced quantization noise of 16-bit audio make it the preferred choice for professional


Free Download Mp4Gain
picture


Mp4Gain Main Window
picture


Mp4Gain Features
picture


Free Download Mp4Gain
picture

Audio Container Formats & Features

Audio Container Formats & Features

Audio Container
Audio Container
Audio Container
Audio Container

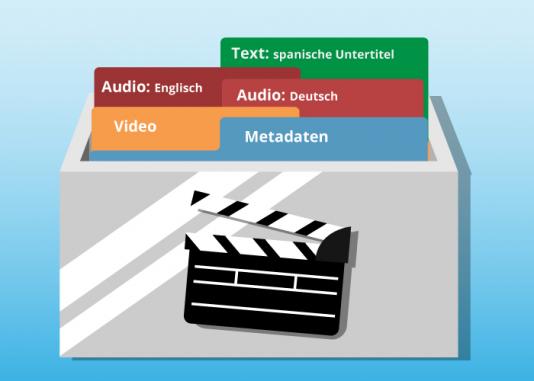
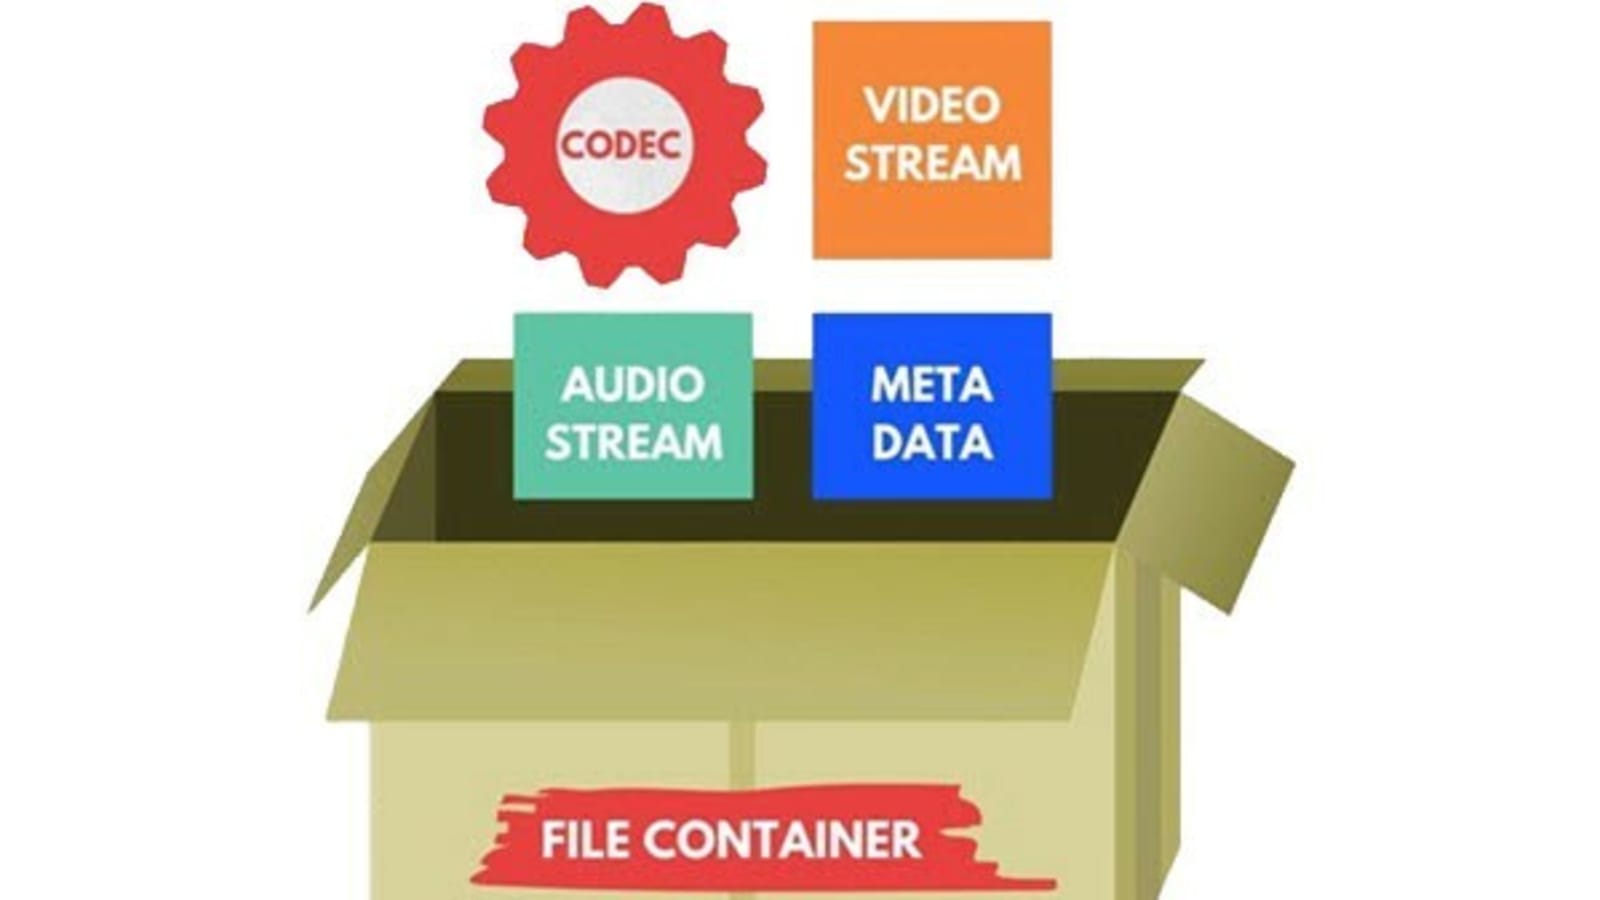
Audio container formats are used to store digital audio data. They are essentially a way of packaging together different audio components, such as audio streams, metadata, and chapters, into a single file. This makes it easier to transport, store, and play back audio files.

What is an audio container format?

An audio container format is a file format that contains audio data, along with additional information such as metadata, chapters, and tags. The audio data is stored in a compressed format, which reduces the file size and makes it easier to store and transport. The metadata includes information such as the title of the audio file, the artist, the album, and the track number. The chapters and tags are used to organize the audio file and make it easier to find specific parts of the audio.

Different types of audio container formats

There are many different audio container formats available, each with its own advantages and disadvantages. Some of the most popular audio container formats include:

  • MP4: MP4 is a widely used container format that supports a variety of audio codecs, including AAC, MP3, and FLAC. It is also capable of storing video and subtitles.
  • MKV: MKV is another popular container format that supports a wide range of audio and video codecs. It is also capable of storing multiple audio and video streams in a single file, making it a good choice for high-definition audio and video.
  • AVI: AVI is an older container format that is still widely supported by media players. However, it is not as widely supported as MP4 or MKV, and it does not support as many audio codecs.
  • WAV: WAV is a lossless audio format that is not compressed. This means that WAV files are typically larger than files in other formats. However, WAV files offer the best possible audio quality.

Advantages and disadvantages of different audio container formats

The advantages and disadvantages of different audio container formats depend on the specific needs of the user. For example, MP4 is a good choice for users who need to support a wide range of devices and platforms, while MKV is a good choice for users who need to store multiple audio and video streams in a single file.

How to choose the right audio container format

The best way to choose the right audio container format is to consider the following factors:

  • Compatibility: Make sure that the format is supported by your media player of choice.
  • Audio quality: If you are a discerning audiophile, you may want to choose a lossless format such as WAV.
  • Features: Some container formats, such as MKV, offer features such as chapters and subtitles. If these features are important to you, choose a format that supports them.

How to convert my audio files to a different container format

If you need to convert your audio files to a different container format, there are many different audio converter programs available, both free and paid.

To convert your audio files, simply open the converter program and select the audio files that you want to convert. Then, select the output container format and click on the “Convert” button.

Benefits of converting my audio files to a different container format

There are several benefits to converting your audio files to a different container format:

  • Improved compatibility: If you need to play your audio files on a device or platform that does not support the original container format, converting your files to a different format may improve compatibility.
  • Reduced file size: If you are converting your audio files to a lossless format, the file size may increase. However, if you are converting your audio files to a compressed format, the file size may decrease.
  • Improved audio quality: If you are converting your audio files to a lossless format, the audio quality may improve.

Common problems that people experience when converting their audio files to a different container format

Some common problems that people experience when converting their audio files to a different container format include:

  • Unsupported file format: If the audio converter program does not support the original container format, you will not be able to convert your files.
  • Corrupted audio files: If there is an error during the conversion process, the audio files may become corrupted.
  • Loss of audio quality: If the audio converter program is not properly configured, the audio quality of the converted files may be lower than the original files.

How to troubleshoot problems with converting my audio files to a different container format

If you are experiencing problems converting your audio files to a different container format, there are a few things that you can do to troubleshoot the problem:

  • Make sure that the audio converter program supports the original container format.

What is Audio Gating and How Does It Work?

What is Audio Gating and How Does It Work?

Audio Gating
Audio Gating
Audio Gating
Audio Gating

Audio Gating Explained

Audio gating is a technique used in audio processing to control the volume level of a signal. Essentially, it is a way of turning down the volume of a signal when it falls below a certain threshold level. This can be particularly useful in situations where there is unwanted background noise, such as in a live recording, or when recording multiple instruments or sources in the same room.

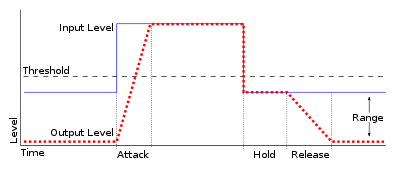
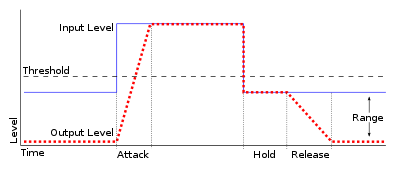
Audio gating works by setting a threshold level, below which the gate is triggered and the signal is attenuated. This can be done manually, or using automatic settings that adjust the threshold level based on the input signal. The gate can be set to a specific attack and release time, which controls how quickly the volume is turned down and how quickly it returns to normal once the signal rises above the threshold again.

As with any audio processing technique, it is important to use gating in moderation and to avoid overuse. Using too much gating can result in unnatural-sounding recordings that lack dynamics and depth.

“The key to using gates is subtlety. They are there to enhance the sound, not to completely control it.” – Dave Moulton

Understanding Audio Gating

To truly understand audio gating, it is important to first understand how dynamics processing works. Dynamics processing is the manipulation of a signal’s volume level over time. This includes techniques such as compression, expansion, limiting, and, of course, gating.

Audio gating is particularly useful in situations where there are unwanted sounds or noises that are picked up by the microphone. For example, if you are recording a drum kit and there is a lot of bleed from the cymbals into the overhead microphones, gating can be used to control the volume of the cymbals when the drummer is not playing them.

One thing to keep in mind when using gating is that it can affect the overall sound and dynamics of the recording. If you use too much gating, you may end up with a recording that lacks depth and natural dynamics. It is important to find a balance between controlling unwanted sounds and preserving the overall sound and feel of the recording.

“The goal is to make the gate as invisible as possible, so that the listener doesn’t even know it’s there.” – Bobby Owsinski

Audio Gating for Beginners

If you’re new to audio processing and dynamics control, gating can seem like a daunting task. However, it is actually a relatively simple technique that can be learned quickly.

When setting up a gate, the first step is to set the threshold level. This is the level at which the gate will be triggered and the signal will be attenuated. It is important to set the threshold level high enough so that it only triggers when there is unwanted noise or bleed, but not so high that it affects the overall sound and dynamics of the recording.

Next, you will want to adjust the attack and release time. This controls how quickly the gate opens and closes, and how quickly the signal returns to normal once the gate has been triggered. Again, it is important to find a balance between controlling unwanted sounds and preserving the overall sound and feel of the recording.