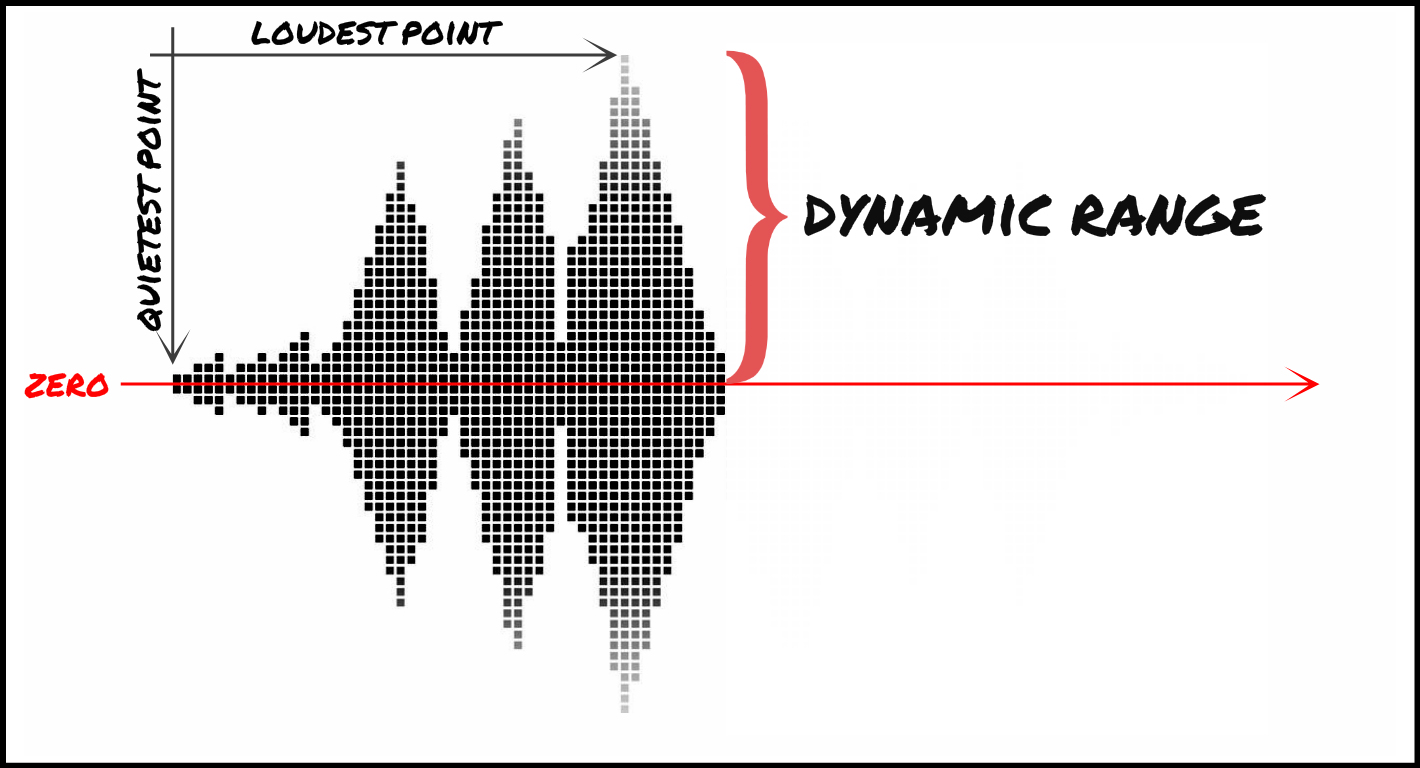
Dynamic range refers to the difference between the loudest and quietest parts of an audio signal. It is an important aspect of sound engineering that determines the quality of sound produced. As an audio engineer, I have come across numerous situations where the dynamic range of a recording was too wide or too narrow, making it difficult to produce a high-quality mix.
In the book “The Mixing Engineer’s Handbook” by Bobby Owsinski, he states: “The dynamic range is what gives a recording its emotional impact. Too much and it becomes tiresome, too little and it becomes boring.” This perfectly illustrates the importance of understanding and mastering dynamic range in audio.
When working with audio, it is important to use tools such as compressors, limiters, and expanders to manage the dynamic range. These tools can help reduce the difference between the loudest and quietest parts of a recording, resulting in a more balanced sound.
How does Dynamic Range Compression work?
Dynamic Range Compression (DRC) is a technique used in audio engineering to reduce the dynamic range of a recording. This is achieved by reducing the volume of the loudest parts of the recording while leaving the quieter parts unchanged.
DRC is commonly used in music production to create a consistent volume level throughout a song. It is also used in broadcasting to ensure that the volume of advertisements is consistent with the volume of the program being aired.
In the movie “Whiplash,” the character Terence Fletcher, played by J.K. Simmons, says, “There are no two words in the English language more harmful than ‘good job’.” While this quote is not related to audio engineering, it perfectly illustrates the idea behind dynamic range compression. By reducing the difference between the loudest and quietest parts of a recording, we create a more consistent and balanced sound.
Why is Understanding Dynamic Range important?
Understanding dynamic range is important for anyone working with audio. It allows us to create high-quality recordings that are both pleasing to the ear and emotionally impactful.
As a personal anecdote, I once recorded a live concert where the dynamic range was too wide. The quiet parts of the recording were barely audible, while the loud parts were painfully loud. After mastering the recording and reducing the dynamic range, the final product was much more enjoyable to listen to.
In conclusion, dynamic range is a crucial aspect of sound engineering that should not be overlooked. By understanding how it works and using the right tools, we can create recordings that are both balanced and emotionally impactful.
Final Words
When it comes to audio engineering, mastering dynamic range is key to creating high-quality recordings. By using tools such as compressors and limiters, we can reduce the difference between the loudest and quietest parts of a recording, resulting in a more balanced sound. As an audio engineer, I have seen firsthand the importance of mastering dynamic range, and I urge anyone working with audio to take the time to understand it fully.
What is the difference between bit depth and bitrate?
Bit DepthBit Depth
Understanding Bit Depth and Bitrate
When it comes to audio and video files, there are two terms that are often used interchangeably: bit depth and bitrate. However, they are not the same thing. Bit depth refers to the number of bits used to represent each sample in an audio or video file, while bitrate refers to the amount of data transmitted per second.
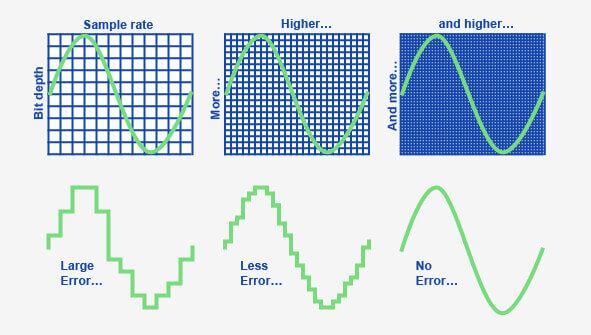
Bit depth determines the number of possible values for each sample in a digital audio or video file. For example, an 8-bit audio file can have 256 possible values per sample, while a 16-bit file can have 65,536. The higher the bit depth, the more accurate the representation of the original sound or image.
On the other hand, bitrate refers to the amount of data transmitted per second in a digital file. In other words, it’s the rate at which data is encoded in a file. Higher bitrates typically mean higher quality files with more information, but also larger file sizes.
Audio Bit Depth vs Bitrate
When it comes to audio files, the bit depth and bitrate are both important factors in determining the quality of the sound. A higher bit depth means a more accurate representation of the original sound, while a higher bitrate means more data is transmitted per second, resulting in a higher quality sound.
However, it’s important to note that a higher bitrate does not necessarily mean a higher quality sound. If the original recording is of poor quality, increasing the bitrate will not improve the sound. In fact, it can actually result in larger file sizes with no improvement in sound quality.
Video Bit Depth vs Bitrate
Video files also have bit depth and bitrate, but they work slightly differently than in audio files. Bit depth determines the number of colors that can be represented in a video file, while bitrate determines the amount of data transmitted per second.
A higher bit depth means a wider range of colors can be represented in the video, resulting in a more accurate and vibrant image. However, a higher bitrate is also important for video files, as it determines the amount of detail that can be captured in each frame.
It’s important to find the right balance between bit depth and bitrate for video files, as increasing one can have a negative impact on the other. For example, a high bit depth with a low bitrate can result in a choppy or pixelated image, while a low bit depth with a high bitrate can result in a washed-out or blurry image.
Final Words
In conclusion, bit depth and bitrate are both important factors to consider when working with audio and video files. While they may seem similar, they serve different purposes and have different effects on the quality of the final product. It’s important to find the right balance between the two to ensure the best possible sound or image quality.
Keywords: audio bit depth, video bit depth, bit depth vs bitrate, bitrate definition, bitrate vs quality, audio quality, video quality, digital audio, digital video, file size, data transmission, accuracy, color representation, image quality, sound quality, audio recording, video recording, data encoding, pixelation, file format, media production, sound engineering, video editing, multimedia, digital media, technology, mp4gain, audio normalization, audio conversion, equalizer, windows, digital signal processing, dynamic
MP3 vs MP4 Audio Quality: Understanding Digital Audio Formats
MP3 vs MP4MP3 vs MP4
What is MP3?
MP3 is a digital audio format that compresses audio files to make them smaller in size without significantly affecting the sound quality. MP3 stands for MPEG-1 Audio Layer 3 and is a type of lossy compression. This means that some audio data is lost during the compression process to reduce the file size. As a result, the audio quality of an MP3 file may not be as good as the original file.
For example, suppose you have a song that is 4 minutes long with a bitrate of 320 kbps. The uncompressed audio file may have a size of around 40 MB, but if you compress it into an MP3 file with a bitrate of 128 kbps, the file size may be reduced to around 3-4 MB. This makes it easier to store and share the audio file, but the audio quality may be affected by the compression process.
What is MP4?
MP4 is a digital multimedia container format that can store audio, video, and other types of data. MP4 uses various codecs, including AAC, to compress audio files while maintaining high quality. Unlike MP3, MP4 is a type of lossless compression, meaning that no audio data is lost during the compression process. As a result, the audio quality of an MP4 file is usually better than that of an MP3 file.
For example, if you compress the same 4-minute song with a bitrate of 128 kbps into an MP4 file, the file size may be larger, around 5-6 MB. However, the audio quality will be better than the MP3 file because no audio data was lost during the compression process.
How Does Audio Quality Compare between MP3 and MP4?
When it comes to audio quality, MP4 generally provides better quality than MP3. This is because MP4 uses a more advanced compression method that preserves more of the original audio data. MP4 can also support higher bitrates, which means that it can provide higher quality audio compared to MP3 at the same file size.
For example, imagine you have a song that is 4 minutes long and has a bitrate of 320 kbps. If you compress this song into an MP3 file with a bitrate of 128 kbps, the file size may be around 3-4 MB. However, if you compress the same song into an MP4 file with a bitrate of 128 kbps, the file size may be around 5-6 MB. Despite the larger file size, the MP4 file will likely sound better because it preserves more of the original audio data.
Another way to compare audio quality between MP3 and MP4 is by using a tool that can analyze the audio spectrum and display the differences between the two formats. For example, you can use a free online tool called “Sonic Visualizer” to compare the waveform and spectrogram of an MP3 file and an MP4 file. The spectrogram displays the frequency content of the audio over time, and you can see that the MP4 file has more high-frequency content and less distortion compared to the MP3 file.
Can Audio Quality be Improved?
Yes, audio quality can be improved for both MP3 and MP4 files using a variety of methods. One method is to increase the bitrate of the audio file during the compression process. This will result in a larger file size but will also improve the audio quality for the same reason – it is a type of lossless compression, meaning that no audio data is lost during the compression process. This is important for professionals in the music and audio industry who require high-quality audio files for their work.
Conclusion
In summary, MP3 and MP4 are both popular digital audio formats used for storing and sharing audio files. MP3 uses a type of lossy compression, while MP4 uses a type of lossless compression. This means that MP4 generally provides better audio quality compared to MP3, but at the cost of a larger file size. However, both formats can be improved through various methods such as increasing the bitrate or using a different codec. Ultimately, the choice of format depends on the specific needs and preferences of the user.
Digital audio and video are types of data that we can store on a computer or other electronic device. They are made up of a series of numbers that represent the sound or image we want to save. This means that instead of using physical materials like film or tape to record sound or video, we can use a computer to store and manipulate digital versions of that data.
Digital Audio and Video
How is sound digitized?
Sound is a type of wave that travels through the air. When we want to digitize sound, we need to find a way to measure that wave and turn it into a series of numbers. We do this by using a device called a microphone, which converts sound waves into electrical signals that can be processed by a computer.
Here’s an example: imagine you’re at a concert and you want to record a song using your phone. You turn on the voice memo app and hold your phone up to the speakers. The microphone in your phone converts the sound waves from the speakers into electrical signals that are then turned into a digital audio file that you can listen to later.
How are multiple sounds combined into a single file?
When we record sound using a microphone, we’re not just capturing one sound at a time. We’re also picking up any other sounds that might be happening in the background, like people talking or the sound of a car driving by. So how do we store all of these different sounds in a single file?
The answer is that each sound is given its own “channel” in the digital audio file. Imagine that you have a stereo system with two speakers – one on the left and one on the right. When you record a song using your phone, the sound that’s coming out of the left speaker is saved in one channel of the audio file, while the sound that’s coming out of the right speaker is saved in another channel.
How are different instruments and voices saved in a single channel?
So now we know how to store multiple sounds in a digital audio file using different channels. But what if we want to save a song that has lots of different instruments and voices playing at the same time? How can we separate out all of those different sounds and make sure they’re saved correctly in the file?
The answer is that each sound is given its own “frequency” in the digital audio file. Think of it like a rainbow: just like how a rainbow has lots of different colors, sound has lots of different frequencies. When we record a song, we’re capturing all of those different frequencies at the same time.
So let’s say we’re recording a song that has a guitar, a bass, a drum set, and a singer. Each of those instruments and the singer’s voice has a different set of frequencies that make up its sound. The guitar might have a lot of high frequencies, while the bass might have a lot of low frequencies. When we record the song, we capture all of those frequencies at the same time and save them in the digital audio file.
How are timbres saved in a digital audio file?
The “timbre” of a sound refers to its unique quality or tone. For example, if you hear a trumpet and a violin playing the same note, you can still tell the difference between the two because they have different timbres. So how do we save the timbre of each instrument or voice in a digital audio file?
To save the timbre of each sound, we use a process called “sampling”. Sampling involves taking tiny snapshots of the sound wave at regular intervals and saving those snapshots as numbers in the digital audio file. The more snapshots we take, the more accurately we can capture the unique timbre of each sound.
Here’s an example: let’s say we’re recording a piano playing a single note. We take 44,100 snapshots of the sound wave per second and save each snapshot as a number in the digital audio file. When we play back the file, the computer reads those numbers and uses them to recreate the sound of the piano note. Because we took so many snapshots per second, we’re able to capture all of the nuances of the piano’s timbre and make it sound like a real piano.
How are noises and other sounds saved in a digital audio file?
When we record sound using a microphone, we’re not just capturing the sounds we want to hear – we’re also capturing any background noise that might be happening. This can include things like people talking, cars driving by, or birds chirping. So how do we deal with all of that extra noise when we save the sound as a digital file?
One way to deal with background noise is to use a process called “noise reduction”. This involves analyzing the digital audio file and looking for parts of the sound that are consistent over time – like the sound of a fan running or the hum of a fluorescent light. The computer can then remove those consistent sounds from the file, leaving behind just the sounds we want to hear.
Another way to deal with background noise is to use a process called “EQ” (short for “equalization”). EQ allows us to boost or cut certain frequencies in the sound to make it sound better. For example, if there’s a lot of low-frequency rumble in a recording, we can use EQ to cut out some of those frequencies and make the sound clearer.
What is digital video?
Digital video is similar to digital audio, but instead of capturing sound waves, we’re capturing images. When we record a video, we’re capturing a series of still images (or frames) at regular intervals and saving them as a digital file.
How are videos saved in digital format?
To save a video in digital format, we need to capture a series of still images (or frames) and save them as a digital file. We do this using a device called a camera, which captures light from the scene we’re filming and turns it into an electrical signal that can be processed by a computer.
Here’s an example: imagine you’re filming a video of your dog playing in the park. You hold up your phone and hit the record button. The camera in your phone captures a series of still images (or frames) of your dog playing and saves them as a digital video file that you can watch later.
How are multiple images combined into a single video file?
When we capture a video, we’re capturing a series of still images (or frames) at regular intervals. To create a smooth video, we need to combine all of those frames into a single file. This is done using a process called “video compression”.
Video compression works by looking for parts of the image that are similar from frame to frame and only saving the parts that are different. For example, if you’re filming a video of a person sitting in a chair, the background behind them might not change much from frame to frame, so the computer can save that part of the image just once and only save the parts that are changing (like the person’s movements).
By only saving the parts of the image that are changing, we’re able to save space and create smaller video files that are easier to store and share. However, too much compression can make the video look blurry or pixelated. So, it’s important to find a balance between file size and video quality when compressing videos.
How do we add sound to a digital video file?
To add sound to a digital video file, we use a process called “audio syncing”. Audio syncing involves combining the digital audio file (which we learned about earlier) with the digital video file so that the sound matches up with the images.
Here’s an example: let’s say you’re filming a concert and you want to create a video of one of the songs. You record the video using your camera and the audio using a separate recording device. When you go to edit the video, you import both the digital audio file and the digital video file into your editing software. Then, you use audio syncing to line up the audio with the video so that the sound matches up with the images.
Conclusion
In conclusion, digital audio and video are complex subjects, but they can be explained in a way that a 6-year-old can understand. Digital audio involves converting sound waves into numbers that can be saved in a digital file. We use sampling to capture the unique timbre of each sound, and we use noise reduction and EQ to deal with background noise. Digital video involves capturing a series of still images (or frames) and saving them as a digital file. We use video compression to combine those frames into a single file and audio syncing to add sound to the video. By understanding these concepts, we can appreciate the technology behind the digital media that we enjoy every day.