Understanding Audio Routing: Navigating the Sonic Highway
Audio RoutingAudio Routing
Audio routing is the invisible highway that allows sound to flow seamlessly from one source to another. It’s the backbone of our modern audio experience, whether we’re listening to music on our headphones, watching a movie, or attending a live concert. In this article, we’ll explore the intricacies of audio routing, diving deep into the technical aspects while keeping things relatable with real-life examples.
Demystifying Audio Routing: The Basics
At its core, audio routing is about directing audio signals from their source to their destination. Think of it as the GPS for sound, guiding it through various paths and devices to reach our ears. This process involves numerous components, including mixers, cables, software, and hardware, all working together harmoniously.
One of the fundamental concepts in audio routing is the “signal chain.” Just like a relay race, audio signals pass through a sequence of devices, each contributing its unique flavor or function. For instance, in a home audio setup, your music might start with a streaming service on your smartphone. From there, it travels through Bluetooth or a wired connection to your speakers or headphones, possibly passing through an amplifier or equalizer along the way. Each step in this chain can shape the sound, adjusting volume, tone, or effects.
Answering Your Curiosities
Now, let’s address some of the common questions people have about audio routing:
How Does Audio Routing Impact Sound Quality?
The impact of audio routing on sound quality is substantial. Imagine you’re at a concert, and the sound system isn’t properly routed. The result? Muffled vocals, distorted instruments, and a less-than-enjoyable experience. On the other hand, precise routing ensures that sound retains its clarity and fidelity as it travels from source to destination.
To put it in everyday terms, think of audio routing as a relay race. If each runner (audio device) passes the baton (sound signal) smoothly, the final sprint (your ears) benefits from the efficiency.
What Are the Key Components of an Audio Routing System?
Audio routing systems can be complex, comprising various components. These include mixers, audio interfaces, digital audio workstations (DAWs), and even physical cables. Mixers act as traffic controllers, directing audio to the right destination, while DAWs provide digital pathways for editing and manipulation.
Picture it like a traffic network in a city. Mixers are the traffic lights, cables are the roads, and DAWs are the control center that can reroute traffic or apply special effects.
Is Audio Routing Only Important in Professional Settings?
While audio routing is crucial in professional studios and live performances, it’s equally significant in everyday scenarios. Consider your home entertainment setup. If your TV’s audio isn’t correctly routed to your soundbar or speakers, you miss out on the immersive experience of your favorite movie or video game.
Think of audio routing as the delivery route for a pizza. Even if you’re not a professional pizza chef, ensuring the right route ensures the pizza arrives hot and delicious.
Audio Signal Routing Techniques: A Deep Dive
Delving into advanced audio signal routing techniques, we uncover methods like parallel processing, sidechain compression, and audio bussing. These techniques offer precision and creativity in shaping soundscapes.
To illustrate, think of audio bussing as a split highway. You can send specific sounds down different lanes, processing them uniquely before merging them back into the main road.
Audio Routing in Home Theater Systems
Home theater enthusiasts often seek guidance on optimizing audio routing for the best cinematic experience. Topics may include setting up surround sound, calibrating audio systems, and integrating streaming devices.
Imagine your home theater as a cinema complex. Proper audio routing ensures each seat in your living room gets the full blockbuster experience.
Audio Routing in Virtual Reality (VR) Environments
VR audio takes immersion to the next level. Here, audio routing is crucial for creating realistic 3D soundscapes, tracking head movements, and ensuring sound matches the visual experience.
Picture wearing VR goggles in a virtual forest. Audio routing directs bird songs to your left when you turn your head, enhancing the illusion of a real forest.
Last Words
Audio routing is the unsung hero of our audio experiences, working tirelessly behind the scenes to deliver clear and captivating sound. Whether you’re a music producer, a home theater enthusiast, or simply someone who enjoys quality audio, understanding the nuances of audio routing can elevate your sonic journey. So, the next time you enjoy your favorite tunes or immerse yourself in a movie, remember the intricate web of audio routing that makes it all possible.
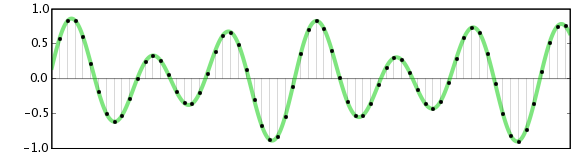
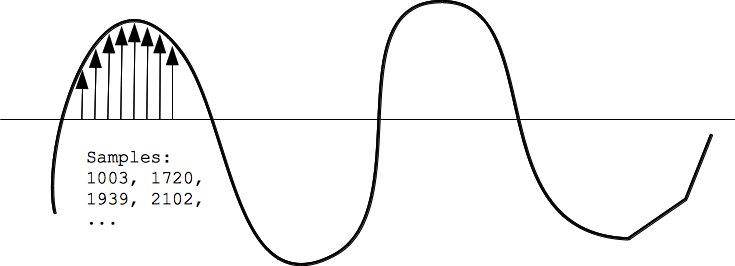
As an expert in the field of audio engineering, I’ve spent countless hours exploring the intricacies of the Nyquist Theorem. This foundational concept is the bedrock of modern digital audio processing, and its significance cannot be overstated. The Nyquist Theorem, in essence, defines the minimum sampling rate required to accurately convert analog signals into digital form.
Think of it this way: imagine you’re watching a fast-moving train and trying to take photographs to capture its motion. If you snap pictures too infrequently, you won’t capture the train’s true movement; details will be lost. The Nyquist Theorem tells us that in audio, the sampling rate must be at least twice the highest frequency we wish to reproduce. It’s the key to ensuring that nothing is missed when we transform the analog world of sound into the digital realm.
Now, let’s explore this concept further. Imagine you’re at a live music concert, and the artist hits a soaring high note. If your recording equipment doesn’t sample at a rate higher than the Nyquist frequency for that note, you’ll hear distortion and unwanted artifacts. Understanding the Nyquist Theorem is essential for audio engineers and music producers, as it directly impacts the quality of the final product, allowing us to capture and reproduce sound faithfully.
Applying Nyquist in Audio Recording
When it comes to audio recording, applying the Nyquist Theorem is akin to wielding a precision instrument. It’s not just a theoretical concept; it’s a practical guide for achieving clarity and fidelity in recorded audio. Consider it the compass that ensures we’re on the right path when capturing analog sound in the digital realm.
Imagine you’re recording a vocal performance. The Nyquist Theorem guides you in selecting the appropriate sampling rate for your digital recorder. If you neglect this principle and sample at a rate lower than twice the highest frequency in the vocalist’s range, you risk introducing aliasing, a phenomenon where high-frequency components are erroneously mapped to lower frequencies. This results in a distorted, unnatural sound, akin to viewing a pixelated image.
By heeding the Nyquist Theorem, audio engineers and recording artists ensure that their work preserves the subtle nuances and dynamic range of sound, producing recordings that captivate and resonate with listeners.
The Significance of Nyquist Frequency
Within the realm of digital audio, the Nyquist frequency stands as a sentinel of sound quality. Picture it as a gatekeeper, defining the boundary between faithful reproduction and unwanted distortions. It plays a pivotal role in digital audio, similar to how a camera’s shutter speed determines the clarity of a photograph.
Let’s delve into this further: suppose you’re designing an audio system. To prevent aliasing, you must set the sampling rate based on the Nyquist frequency. This ensures that the system captures and reproduces sound accurately. It’s analogous to building a bridge with a weight limit to ensure safety. By acknowledging the Nyquist frequency’s significance, audio engineers create systems that consistently deliver high-quality sound experiences.
Whether you’re a musician, audio engineer, or simply an audio enthusiast, recognizing the importance of the Nyquist frequency empowers you to make informed choices about equipment, software, and recording techniques, ultimately elevating your sonic experiences.
High Sampling Rates and Audio Quality
The impact of high sampling rates on audio quality is profound and undeniable. It’s the difference between a breathtaking high-definition image and a blurry snapshot. In the audio world, a high sampling rate means capturing more snapshots per second, preserving the intricate details of the sound waveform.
Imagine you’re in a studio recording a delicate acoustic guitar performance. To capture the subtle harmonics and nuances, a high sampling rate is essential. It’s like using a magnifying glass to appreciate the intricate details in a work of art. Musicians and audio engineers often opt for higher sampling rates, as they enable the faithful reproduction of every note and texture, resulting in recordings that feel alive and immersive.
Investing in high-quality equipment that supports high sampling rates is a testament to your commitment to audio excellence. It’s the path to creating soundscapes that resonate with audiences and evoke emotions on a profound level.
Avoiding Aliasing in Digital Audio
Avoiding aliasing in digital audio is a crucial mission for any audio engineer or producer. Imagine aliasing as the unwelcome ghost that haunts your recordings, distorting the beauty of sound. It occurs when the Nyquist sampling rate is not observed, and higher frequencies masquerade as lower ones, resulting in unpleasant artifacts.
Think of aliasing as a mirror that distorts your reflection; it’s not an accurate representation of reality. To banish this ghost, you must adhere to the Nyquist Theorem’s principles diligently. Use filters and sample at rates that prevent high-frequency components from sneaking into lower frequencies.
By doing so, you ensure that your digital audio productions are clean, pure, and devoid of unwanted artifacts. It’s akin to restoring a classic painting, revealing its true beauty without distortion or blemishes.
Last Words
“In the world of audio, the Nyquist Theorem is our guiding star. It empowers us to capture the magic of sound faithfully. Whether you’re recording a symphony, crafting a podcast, or simply savoring your favorite music, understanding the Nyquist Theorem unlocks a world of sonic possibilities. Let it be your compass in the realm of audio excellence.” — William Kindall, Audio Expert
In the world of audio, Audio Output Resolution is a crucial but often overlooked concept. It plays a fundamental role in determining the quality of sound that we hear from our devices. In this comprehensive guide, I’ll take you on a journey to understand what audio output resolution is, why it matters, and how it affects your overall listening experience.
Explaining Audio Output Resolution
Let’s begin by unraveling the term “Audio Output Resolution.” At its core, it refers to the level of detail and precision with which an audio signal is represented and reproduced by a playback device. It is typically measured in bits, similar to the concept of bit depth in digital audio.
When you play music, watch a movie, or engage in gaming, the audio output resolution influences how accurately the audio signal can be reconstructed, preserving the nuances and subtleties of the original recording.
How Does Audio Output Resolution Affect Sound Quality?
The impact of Audio Output Resolution on sound quality is significant. Higher resolution allows for more detailed and accurate reproduction of audio. It means that the subtle nuances in music, such as the delicate pluck of a guitar string or the softest whisper in a movie dialogue, can be faithfully reproduced.
Choosing the Right Audio Output Resolution
When it comes to choosing the right Audio Output Resolution for your needs, several factors come into play. Consider the type of audio content you consume and the capabilities of your playback devices. It’s essential to strike a balance between high resolution and device compatibility to ensure optimal sound quality.
Audio Output Resolution vs. Bit Depth
Audio Output Resolution is closely related to another important concept, which is bit depth. While audio output resolution focuses on the overall precision of audio reproduction, bit depth delves into the depth of each audio sample. Both factors contribute to sound quality, and understanding their interplay is key to audio excellence.
Audio Output Resolution and Sampling Rate
The sampling rate is another critical element tied to Audio Output Resolution. Together, they determine the accuracy of audio playback. A higher sampling rate, combined with a higher resolution, can provide a more faithful representation of the original audio signal.
Does Audio Output Resolution Impact File Size?
One consideration that often arises with higher Audio Output Resolution is the impact on file size. It’s true that audio files with greater resolution can be larger in size. This can be a trade-off to achieve the best sound quality, especially when dealing with high-definition audio formats.
Audio Output Resolution in High-Definition Audio
High-definition audio formats demand higher Audio Output Resolution to deliver the full audio experience. Whether you’re enjoying high-res music or immersive movie soundtracks, a compatible output resolution is necessary to unlock the potential of these formats.
Audio Output Resolution for Home Theater Systems
For home theater enthusiasts, Audio Output Resolution holds immense importance. It’s a key factor in recreating cinematic audio experiences at home. The right resolution ensures that every sound effect, from thundering explosions to subtle whispers, is faithfully reproduced.
The Role of Audio Output Resolution in Gaming
Gamers understand the significance of Audio Output Resolution all too well. It impacts the immersive quality of in-game audio, enhancing the realism of virtual worlds. Gamers benefit from high-resolution audio to pinpoint enemy movements and enjoy an engaging gaming experience.
Audio Output Resolution for Audiophiles
For audiophiles, the pursuit of audio perfection is a lifelong journey. Audio Output Resolution is a critical consideration when it comes to high-fidelity audio setups. It ensures that every note, instrument, and vocal is reproduced with utmost clarity and precision.
Benefits of Upgrading Audio Output Resolution
Finally, let’s explore the benefits of upgrading your Audio Output Resolution. Upgrading can lead to a more immersive, lifelike audio experience. Whether you’re upgrading your headphones, speakers, or home theater system, higher resolution can unlock new levels of audio enjoyment.
In today’s digital age, where music and audio are an integral part of our lives, it’s crucial to ensure that our MP3 files sound their best. Whether you’re a casual listener or an audiophile seeking perfection, this comprehensive guide is here to help you master the art of enhancing MP3 sound quality. I’m an audio expert, and I’ll take you on a journey through various techniques and strategies to elevate your MP3 listening experience.
The Importance of Quality MP3 Sound
Before we dive into the nitty-gritty details of improving MP3 sound, let’s first understand why it matters. MP3 is one of the most popular audio formats, known for its compatibility and convenience. However, the sound quality of MP3 files can vary widely, depending on factors like compression, source material, and encoding settings.
Factors Affecting MP3 Sound Quality
To achieve the best MP3 sound quality, you need to consider several key factors:
Bitrate
The bitrate determines the amount of data used to represent audio. Higher bitrates generally result in better sound quality but larger file sizes.
Compression
MP3 files are compressed to reduce their size. Understanding the balance between compression and quality is essential.
Source Material
The quality of the original audio source greatly influences the final MP3 sound. Starting with high-quality recordings is crucial.
Encoding Settings
Adjusting parameters during encoding, such as sample rate and stereo mode, can impact sound quality significantly.
Techniques for Enhancing MP3 Sound Quality
Now that we’ve established the importance of quality MP3 sound, let’s explore various techniques and strategies to enhance it. Whether you’re dealing with older low-bitrate MP3s or you want to optimize your new downloads, these methods will help you achieve the best possible sound.
1. Bitrate Selection
The choice of bitrate plays a fundamental role in MP3 sound quality. Higher bitrates, such as 320 kbps, preserve more audio details, resulting in clearer and more immersive sound. However, they also lead to larger file sizes, so you should strike a balance based on your storage capacity and listening preferences.
2. Source Material Enhancement
Improving MP3 sound quality starts with the source material. If you have control over the recording process, use high-quality microphones, eliminate background noise, and ensure proper mixing and mastering techniques are employed. Starting with a pristine source will yield better MP3s.
3. Proper Encoding Settings
When converting audio to MP3 format, it’s crucial to choose the right encoding settings. Opt for a higher sample rate (e.g., 44.1 kHz or 48 kHz) and stereo mode for richer sound. Experiment with different settings to find the sweet spot for your audio.
4. Noise Reduction
If your MP3s suffer from background noise or artifacts, consider using noise reduction software. This can help eliminate unwanted hisses, clicks, and pops, resulting in a cleaner listening experience.
5. Equalization (EQ)
Using an equalizer allows you to adjust the balance of frequencies in your MP3s. You can enhance bass, boost treble, or make other custom adjustments to tailor the sound to your preferences.
6. Volume Normalization
Normalization ensures consistent volume levels across your MP3 library. This prevents sudden volume jumps between tracks, providing a more enjoyable listening experience.
7. High-Quality Playback Devices
Investing in high-quality headphones or speakers can make a significant difference in how you perceive MP3 sound. Look for devices with accurate sound reproduction and comfortable fit for extended listening sessions.
8. Room Acoustics
If you primarily listen to MP3s in a room, consider optimizing the acoustics. Simple changes like adding acoustic panels or rearranging furniture can reduce reflections and enhance sound quality.
9. Lossless Formats
Consider archiving your favorite music in lossless formats like FLAC or WAV for the utmost audio fidelity. While these formats result in larger file sizes, they preserve audio quality without compression.
10. Regular Maintenance
Maintaining your MP3 library is essential. Periodically check for corrupted files, update metadata, and back up your collection to prevent data loss.
Final Words
Enhancing the sound quality of your MP3 files is a rewarding endeavor for any music lover. By understanding the factors influencing sound quality and employing the right techniques, you can elevate your MP3 listening experience to new heights. Whether you’re a casual listener or an audiophile, these strategies will help you make the most of your digital music collection. Remember, the quest for perfect sound is a journey, so enjoy every moment of it. Happy listening!
Digital Bit Depth in AudioDigital Bit Depth in Audio
Digital bit depth in audio is a fundamental concept that impacts the quality and fidelity of digital sound. Bit depth, also known as audio resolution, refers to the number of bits used to represent the amplitude of an audio signal at a specific point in time. It essentially quantifies how finely audio samples are taken in the digital domain.
To put it simply, the bit depth determines the precision with which sound is captured and stored digitally. Common bit depths in digital audio are 16-bit, 24-bit, and 32-bit, with higher numbers providing greater precision.
Audio Bit Depth Explained
Understanding audio bit depth is essential for anyone seeking to grasp the intricacies of digital audio recording and playback. At its core, audio bit depth is a measure of how accurately an analog sound wave’s amplitude is captured and converted into a digital signal.
In practical terms, a higher bit depth signifies that the digital representation of an audio waveform closely mirrors the original analog signal, resulting in reduced quantization error or “noise.” Quantization error occurs when an analog value is approximated to the nearest digital value, and lower bit depths can make this error more noticeable, especially in quieter sections of audio.
Bit Depth and Audio Quality
Bit depth plays a pivotal role in determining the quality and precision of digital audio. The relationship between bit depth and audio quality is akin to an artist’s palette of colors. A higher bit depth provides a broader spectrum of shades and nuances, making the digital representation of sound more faithful to the original analog source.
For example, a 16-bit system offers 65,536 discrete amplitude levels, whereas a 24-bit system provides an astonishing 16,777,216 levels. This heightened precision results in smoother and more detailed audio representation, particularly in the subtle and quiet passages of a recording.
Digital Audio Resolution
Digital audio resolution, closely linked to bit depth, is a critical factor in capturing and reproducing sound accurately. It refers to the level of detail and clarity in digital audio. The greater the bit depth, the higher the resolution, and the finer the nuances that can be captured.
In the realm of audio production, higher digital audio resolution means that the subtle nuances, such as the intricacies of a singer’s voice or the delicate harmonics of a musical instrument, are preserved with remarkable fidelity.
Bit Depth in Music Recording
In the world of music recording, selecting the appropriate bit depth is a crucial decision that profoundly affects the final audio quality. Musicians and producers carefully consider bit depth when recording to ensure that the nuances and dynamics of their performances are accurately captured.
In practice, 24-bit recording is a popular choice among music professionals. This bit depth provides an ideal balance between precision and file size, allowing for the capture of subtle details while minimizing the risk of bit-depth noise in quieter sections of the recording.
Audio Signal Precision
Audio signal precision, often measured by bit depth, is a key consideration in professional audio production. It relates to how faithfully an audio system can reproduce the original sound. The higher the bit depth, the greater the precision in representing the analog signal, resulting in cleaner and more accurate audio playback.
For audio engineers and producers, achieving optimal audio signal precision is paramount. It ensures that the music they create is heard as intended, with all the intricacies and subtleties faithfully reproduced.
Bit Depth in Analog-to-Digital Conversion
Understanding how bit depth influences analog-to-digital conversion is essential for maintaining audio fidelity. Analog-to-digital conversion is the process of transforming continuous analog signals into discrete digital values. Bit depth determines the number of discrete values that can represent the amplitude of the analog signal during this conversion.
In essence, higher bit depth means that the analog-to-digital conversion process captures more precise details from the analog signal. This is particularly critical when working with high-quality audio sources where preserving every nuance is paramount.
Sound Fidelity and Bit Depth
Sound fidelity, the faithfulness with which audio is reproduced, is intricately linked to bit depth. A higher bit depth generally results in better audio fidelity, as it allows for the accurate representation of both subtle nuances and powerful crescendos in music.
Consider classical music or jazz, where dynamics play a significant role. With a higher bit depth, the audio system can faithfully reproduce the full range of soft and loud passages, ensuring that the listener experiences the music as intended by the performers and composers.
Impact of Bit Depth on Audio Playback
The impact of bit depth on audio playback is a critical factor in delivering a high-quality listening experience. When you listen to digital audio, the bit depth of the source file significantly affects what you hear.
In simple terms, higher bit depth in the source audio file results in a more faithful and detailed listening experience. This becomes especially noticeable in acoustic instruments, where the subtle nuances of a violin’s bowing or a pianist’s touch can be lost in lower bit depth recordings.
How Does Bit Depth Affect the Quality of Digital Audio?
Exploring how bit depth affects the quality of digital audio is crucial for audiophiles and audio professionals alike. It’s the bit depth that determines how accurately the audio signal is captured and reproduced, ultimately influencing the overall audio quality.
A higher bit depth translates to a more faithful representation of the original sound, with fewer imperfections or noise introduced during the recording and playback processes. This improvement in audio quality is particularly noticeable in genres that require a wide dynamic range and high levels of detail.
What Is the Role of Bit Depth in Recording Music Digitally?
The role of bit depth in recording music digitally is a multifaceted aspect of audio production. When musicians and engineers step into the studio, they must make critical decisions about bit depth to ensure that their recordings capture the essence of the music.
Choosing the appropriate bit depth is a balancing act. While higher bit depths provide greater precision and fidelity, they also result in larger file sizes. Musicians often opt for 24-bit recordings as they strike a harmonious balance between capturing subtle details and managing storage requirements.
How Is Audio Fidelity Influenced by Digital Bit Depth?
Understanding how digital bit depth influences audio fidelity is key to achieving top-tier sound quality. Audio fidelity, often described as the faithfulness of audio reproduction to the original source, is a critical consideration for audio professionals and enthusiasts.
With a higher bit depth, audio fidelity is enhanced because the digital representation of the sound is more detailed and accurate. This is especially crucial in professional audio production, where maintaining the highest possible fidelity is paramount.
Can You Explain the Importance of Bit Depth in Analog-to-Digital Conversion for Audio?
Explaining the importance of bit depth in analog-to-digital conversion sheds light on the intricacies of audio processing. Analog-to-digital conversion is the bridge that allows analog sound to be translated into a digital format that can be manipulated and stored. Bit depth plays a pivotal role in this process.
Higher bit depths ensure that the analog-to-digital conversion process captures more fine-grained details from the original analog signal. This is essential for preserving the richness and subtleties of audio, whether it’s a soaring vocal performance, the resonance of a musical instrument, or the ambiance of a recording environment.
What Is the Relationship Between Bit Depth and Dynamic Range in Digital Audio?
The relationship between bit depth and dynamic range in digital audio is a crucial one to understand. Dynamic range refers to the difference between the softest and loudest sounds that an audio system can reproduce. Bit depth plays a pivotal role in defining this dynamic range.
Higher bit depths translate to a wider dynamic range, allowing for the faithful reproduction of both subtle nuances and powerful crescendos in music. This is essential for maintaining audio fidelity, especially in genres with a wide range of dynamics, such as classical music and jazz.
How Does Bit Depth Impact the Accuracy of Audio Playback?
The impact of bit depth on the accuracy of audio playback cannot be overstated. When you listen to music or any digital audio content, the bit depth of the source file has a profound influence on what you hear.
Higher bit depth in the source audio file means that the playback faithfully represents the original recording. It allows for the subtlest details and nuances to shine through, creating a more immersive and engaging listening experience. In essence, higher bit depth contributes to the accuracy and realism of audio playback.
Are There Industry Standards for Bit Depth in Digital Audio Recording?
In the world of professional audio recording, industry standards play a vital role in guiding the use of bit depth. While there’s flexibility in choosing bit depths based on specific requirements, certain standards are commonly followed.
For instance, most audio CDs use 16-bit resolution, which offers high-quality playback suitable for the majority of consumers. However, in the realm of studio recording and mastering, 24-bit and even 32-bit formats are commonly employed to ensure the highest level of fidelity.
What Are the Advantages of Using Higher Bit Depth in Audio Processing?
Using higher bit depth in audio processing offers several distinct advantages. These advantages extend to both recording and post-production stages, and they significantly impact the overall quality of audio content.
Enhanced Audio Fidelity
One of the primary advantages is enhanced audio fidelity. Higher bit depths provide more precision in capturing and reproducing audio, resulting in recordings that faithfully preserve the original sound. This is particularly important in professional music production and critical listening environments.
Greater Dynamic Range
Higher bit depths also grant a greater dynamic range, allowing for the faithful representation of a wide range of sound intensities. This is particularly beneficial in genres of music or audio content with stark differences in volume, as it ensures that both delicate subtleties and powerful peaks are accurately reproduced.
How Can I Optimize Bit Depth for Better Audio Resolution?
For those involved in audio production or seeking the best listening experience, optimizing bit depth is crucial. It’s not just about using the highest available bit depth but also considering the entire audio workflow and ensuring that bit depth aligns with specific needs.
Matching Bit Depth to Audio Source
When recording audio, it’s essential to match the bit depth to the dynamic range of the audio source. For instance, a live jazz performance with wide dynamic swings benefits from 24-bit recording, while a podcast with a more consistent volume may suffice with 16-bit. This approach minimizes bit-depth noise while preserving audio quality.
Post-Production Considerations
During post-production, maintaining a high bit depth throughout the editing and mixing process is advisable. Only when preparing the final distribution format, such as a CD or streaming file, should the audio be converted to a lower bit depth to match the destination format.
The Benefits of Greater Bit Depth in Digital Audio Systems
As technology advances, digital audio systems are offering higher bit depths as an option. But what are the practical advantages of embracing these extended bit depths?
Future-Proofing Audio
One significant advantage is future-proofing your audio recordings. With higher bit depths, your recordings are better equipped to stand the test of time. As playback systems and formats improve, your high-bit-depth recordings will continue to sound exceptional, ensuring that your music or audio content remains relevant for years to come.
Editing Flexibility
Greater bit depths also provide increased editing flexibility. Audio engineers can apply effects and processing without worrying as much about introducing quantization errors or compromising audio quality. This freedom allows for more creative experimentation during the mixing and mastering stages, ultimately leading to more polished and refined audio content.
In conclusion, digital bit depth is a critical factor in the world of audio, influencing both recording and playback quality. Understanding its importance, selecting the appropriate bit depth for various scenarios, and embracing higher bit depths when possible can lead to an audio experience that is richer, more immersive, and of the highest fidelity. Whether you’re a musician, audio engineer, or simply a music enthusiast, appreciating the role of bit depth can elevate your audio journey to new heights.
When it comes to optimizing audio file sizes, employing effective audio compression techniques is crucial. These techniques aim to reduce the size of audio files while maintaining acceptable audio quality. Here are some key audio compression methods:
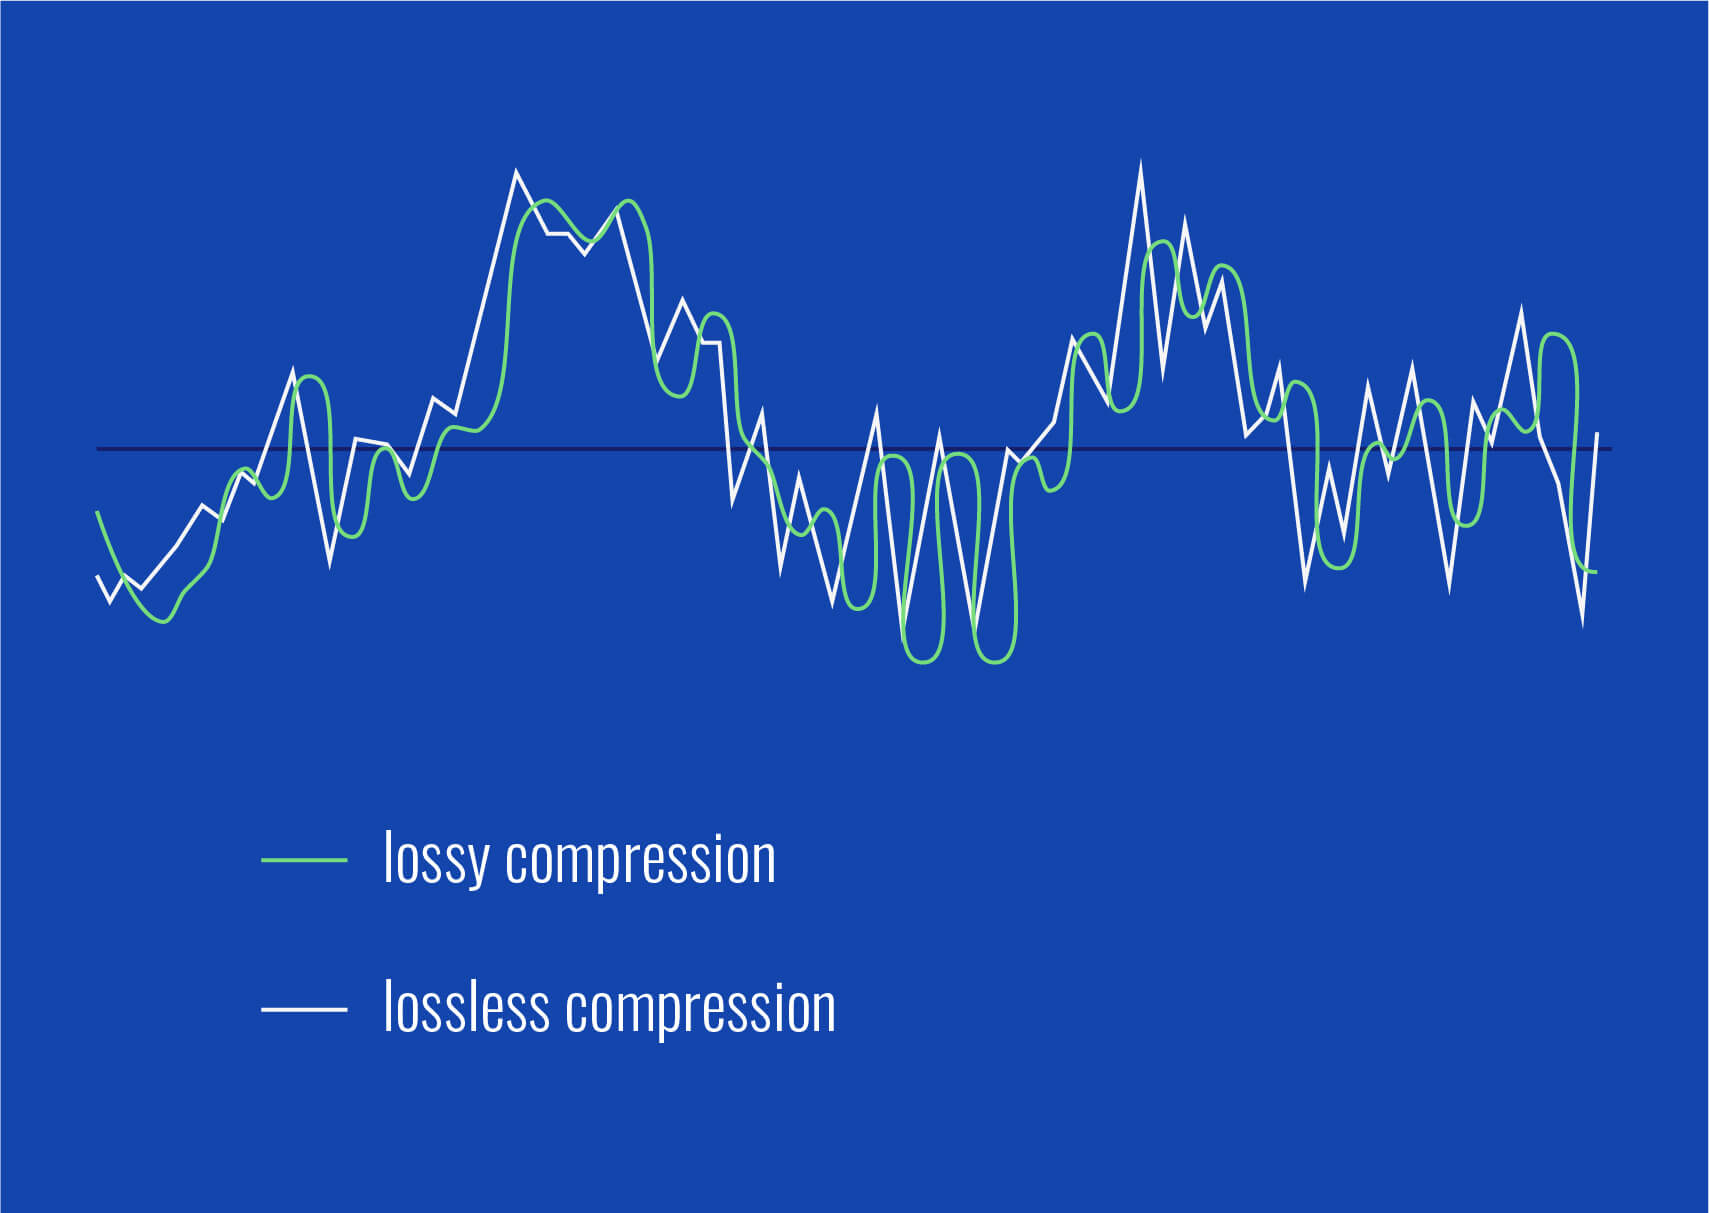
Lossless Compression: Lossless compression algorithms, such as FLAC (Free Lossless Audio Codec), reduce file sizes without compromising audio quality. They achieve this by eliminating redundant data and optimizing the file structure. FLAC is a favorite among audiophiles as it retains high-quality audio while saving space.
Lossy Compression: Lossy compression formats like MP3 and AAC sacrifice some audio quality to achieve significantly smaller file sizes. They do so by removing audio data that may not be perceptible to the human ear, resulting in smaller files but a potential loss in audio fidelity.
Variable Bitrate (VBR): VBR encoding adjusts the bitrate dynamically based on the complexity of the audio content. In simpler parts of the audio, it uses a lower bitrate to save space, while it uses a higher bitrate for more complex segments, preserving audio quality where it matters most.
Reducing audio file size
Reducing the size of audio files can be essential for various reasons, such as conserving storage space or improving the efficiency of data transmission. Here are some strategies to effectively reduce audio file sizes:
Bitrate Adjustment: Lowering the bitrate of an audio file decreases its size but can lead to a noticeable loss in audio quality. Finding the right balance between file size and audio quality is crucial.
Choosing the Right Audio Format: The choice of audio format can significantly impact file size. Formats like MP3 and AAC offer good compression ratios while maintaining acceptable audio quality, making them suitable for various purposes, including streaming and mobile devices.
Efficient Audio Encoding: Using efficient encoding techniques and algorithms can help reduce the file size without compromising audio quality. Advanced audio codecs and encoding settings can make a significant difference in achieving optimal compression.
Minimizing audio file size
Minimizing audio file size is essential for optimizing storage and ensuring smooth audio streaming. Here are some additional tips to achieve this:
Removing Unnecessary Data: Eliminating metadata and unused audio tracks can trim down the file size without affecting the core audio content. This is particularly useful for audio files with extensive metadata.
Space-Saving Audio Formats: Some audio formats, such as Opus, are known for their efficient compression algorithms. Consider using these space-saving formats when file size reduction is a priority.
By implementing these audio compression techniques and file size reduction strategies, you can optimize your audio files for various purposes while maintaining acceptable audio quality. Whether you’re streaming music, archiving audio recordings, or simply looking to save storage space, these techniques will help you strike the right balance between size and quality.
Final Words
Optimizing audio file sizes is a valuable skill in today’s digital age. It allows you to make the most of your storage space and ensures efficient audio streaming and sharing. Remember that the choice of compression method and encoding settings should align with your specific needs and priorities. Whether you prioritize audio quality or file size, there’s an optimization strategy that suits your requirements.
Flac and Ogg Volume AdjusterFlac and Ogg Volume Adjuster
Are you tired of dealing with uneven audio levels in your Flac and Ogg files? Well, you’re not alone. Many audio enthusiasts and professionals often face the challenge of maintaining consistent sound quality across their collections. In this article, I’ll delve into the world of Flac and Ogg volume adjustment and explore various methods to tackle this issue effectively.
Audio File Format Adjustments
Before we dive into volume adjustments, it’s crucial to understand the nature of Flac and Ogg audio formats. Flac, short for Free Lossless Audio Codec, and Ogg Vorbis are popular choices for storing high-quality audio. Flac provides lossless compression, preserving audio quality without sacrificing file size, while Ogg is known for its open-source nature and efficient compression.
Sound Volume Control for Flac and Ogg
To control the volume of your Flac and Ogg files, you’ll need specialized tools or software designed for audio processing. These tools allow you to adjust the volume levels without compromising the overall audio quality. Keep in mind that it’s essential to maintain a balance between amplifying the audio and preventing distortion.
Adjusting Audio Levels in Flac and Ogg
One common method for volume adjustment is using an audio editor. These editors offer precise control over the audio, enabling you to increase or decrease the volume as needed. It’s important to preview the changes and make incremental adjustments to achieve the desired result.
Whether you’re a music enthusiast or a professional sound engineer, the ability to adjust volume levels in Flac and Ogg files is invaluable. By understanding the intricacies of these audio formats and utilizing the right tools, you can ensure a consistent and enjoyable listening experience.
Normalizing Sound in Flac and Ogg Files
Normalization is another technique to bring uniformity to your audio collection. This process adjusts the volume of each file to a standard level, eliminating extreme variations. Normalization algorithms analyze the audio content and adjust the gain accordingly, making it ideal for batch processing large libraries.
Volume Equalization for Flac and Ogg
Volume equalization is about ensuring that all your Flac and Ogg files have similar loudness levels. This technique is essential when you’re creating playlists or organizing audio for playback. Volume equalization tools use various methods to balance the audio, providing a seamless listening experience.
Audio Gain in Flac and Ogg Formats
Audio gain, also known as amplification, allows you to increase the overall loudness of your Flac and Ogg files. This can be particularly useful if you have older recordings or content with low volume levels. However, it’s crucial to exercise caution and avoid over-amplification, which can lead to distortion.
Balancing Audio in Flac and Ogg Files
Balancing audio involves adjusting the volume levels of individual tracks within a file. This is handy when dealing with live recordings or albums where tracks may have varying loudness. Balancing tools provide a means to fine-tune each track’s volume to create a consistent listening experience.
Flac and Ogg Audio Level Management
Managing audio levels in Flac and Ogg files is an ongoing process, especially if you frequently add new content to your collection. Regularly reviewing and adjusting volume levels ensures that your audio library remains enjoyable and free from sudden volume spikes or drops.
Tweaking Volume in Flac and Ogg
Sometimes, you may want to apply specific tweaks to the volume of your Flac and Ogg files. This could involve emphasizing certain frequencies or applying dynamic range compression to enhance the audio quality. Experimenting with these tweaks can lead to a more personalized listening experience.
Enhancing Audio Dynamics in Flac and Ogg
Audio dynamics play a crucial role in the overall quality of your listening experience. Adjusting volume levels in Flac and Ogg files can help bring out the nuances in your music. By carefully managing audio dynamics, you can ensure that every note and sound is delivered with precision and clarity.
Final Words
Flac and Ogg volume adjustment is an essential aspect of maintaining an enjoyable audio collection. Whether you’re a music enthusiast or a professional, understanding the tools and techniques available can significantly enhance your listening experience. With the right approach, you can achieve balanced and consistent audio quality in your Flac and Ogg files.
When it comes to creating engaging video content, audio quality plays a crucial role. Whether you’re a YouTuber, filmmaker, or just sharing videos with friends and family, ensuring that your audience can hear the content clearly is essential. This is where a “Video Volume Booster” comes into play. In this article, I’ll delve into various techniques and tips for enhancing the audio in your videos.
Increase Video Audio
One of the most common reasons people search for a “Video Volume Booster” is to increase the audio in their videos. Low audio volume can be frustrating for viewers, leading to them clicking away from your content. To address this, you can use video editing software to adjust the audio levels. Look for the audio volume control in your editing program and increase it to a suitable level. Be careful not to make it too loud, as it can result in distortion.
Enhance Video Sound
Enhancing the sound quality of your videos involves more than just increasing the volume. You should also focus on improving the overall audio clarity. This can be achieved by reducing background noise, such as wind or background chatter, during the recording process. Additionally, you can apply equalization to balance out frequencies and make voices and music more distinct.
Volume Adjustment for Videos
Adjusting the volume of your video can be done using various software tools. Some video editing software offers automatic audio normalization features that can balance audio levels across your video. This is particularly helpful if you have different audio sources in your video, such as interviews and background music.
Audio Enhancement Software
To simplify the process of boosting video volume and enhancing audio quality, you can explore audio enhancement software. These programs often come with a range of tools to improve audio, including volume adjustment, noise reduction, and equalization. Research and choose the software that best suits your needs.
Improve Video Audio Clarity
Clarity in audio is essential for effective communication in your videos. When viewers can hear every word clearly, they are more likely to engage with your content and stay engaged. In addition to adjusting volume, consider using subtitles or captions, especially if your video has important dialogue.
Audio Volume Boost Techniques
Beyond software solutions, there are physical techniques to boost audio volume during recording. Invest in a quality microphone and learn how to position it correctly to capture the best audio. You can also use external audio recorders to capture high-quality sound separately from your video and then synchronize it during editing.
Video Sound Amplification
Amplifying video sound involves careful consideration of the balance between voice, music, and other audio elements. Experiment with different audio levels to find the perfect mix for your content. Remember that what sounds good to you might not sound the same to your audience, so seeking feedback can be valuable.
Boosting Audio in Videos
When you’re looking to boost audio in your videos, don’t forget to listen critically to the results. Test your video on different devices and with various headphones or speakers to ensure that the audio quality meets your expectations.
Audio Enhancement Tips
To wrap it up, here are some quick tips for enhancing audio in your videos:
Record in a quiet environment to minimize background noise.
Use a high-quality microphone.
Experiment with audio editing software to find the right settings.
Seek feedback from viewers to fine-tune your audio.
Final Words
Enhancing the audio in your videos is essential for creating engaging and professional content. Whether you’re a beginner or an experienced creator, these techniques and tips can help you boost your video’s audio quality. Remember that clear audio enhances the overall viewing experience and keeps your audience coming back for more.
Boost the Volume of Lossy Audio FilesBoost the Volume of Lossy Audio Files
Amplify Sound in Lossy Audio Files
When it comes to enhancing the audio quality of your favorite songs or podcasts, you might find yourself dealing with lossy audio files. These files, while space-efficient, often suffer from reduced sound quality. Fortunately, there are ways to amplify the sound in lossy audio files, giving your listening experience a significant boost.
Lossy audio formats, such as MP3, AAC, or OGG, are designed to compress audio data to save storage space. However, this compression can lead to a loss of audio detail and a decrease in overall volume. To address this, you can use audio editing software to amplify the sound. By carefully adjusting the volume levels, you can make the audio more prominent and enjoyable. Just be cautious not to overdo it, as excessive amplification can lead to distortion.
Another effective way to amplify sound in lossy audio files is to use specialized audio processing tools. These tools often come with built-in volume normalization features that can help you increase the loudness while maintaining the audio’s quality. Whether you’re an aspiring musician, a podcast enthusiast, or simply looking to improve your music collection, amplifying sound in lossy audio files can breathe new life into your audio content.
Increase Volume of Compressed Audio
Compressed audio files have become the norm in today’s digital world due to their convenience and storage efficiency. However, one common drawback of these files is that they often lack the volume and punch of their uncompressed counterparts. If you’re wondering how to increase the volume of compressed audio, you’re in the right place.
To boost the volume of compressed audio files, you can start by using audio editing software. Most audio editing programs allow you to adjust the volume levels of individual tracks or sections of a file. Simply open your desired audio file in the software, locate the volume control, and gradually increase it until you achieve the desired loudness. Be cautious not to push the volume too high, as this can result in distortion and a loss of audio quality.
Additionally, consider using dynamic range compression (DRC) techniques. DRC helps balance the loud and quiet parts of an audio file, making it sound more consistent in volume. This technique is particularly useful when dealing with audio files that have uneven loudness levels. With the right adjustments, you can bring out the nuances in your compressed audio while maintaining clarity and preventing clipping.
By employing these techniques, you can effectively increase the volume of your compressed audio files, making them sound more vibrant and engaging.
Audio Volume Enhancement Techniques
Audio volume enhancement techniques are essential tools for anyone looking to improve the sound quality of their audio files, especially those in lossy formats. These techniques involve various methods to make audio files sound louder and more impactful.
One common technique is equalization, which allows you to adjust the balance of frequencies in your audio. By boosting certain frequency ranges, you can make your audio files sound fuller and more vibrant. This is particularly helpful for restoring lost detail in lossy audio files.
Another technique is the use of audio limiters and compressors. These tools help control the dynamic range of your audio, ensuring that loud parts aren’t too overpowering and quiet parts are audible. They can help you achieve a consistent and balanced volume throughout your audio file.
Additionally, you can explore mastering techniques. Mastering involves fine-tuning the overall sound of an audio file, including volume optimization. Professional mastering engineers use specialized software and hardware to enhance the loudness, clarity, and overall quality of audio recordings.
Enhance Audio Loudness in Lossy Formats
Enhancing audio loudness in lossy formats requires a combination of technical expertise and the right tools. Lossy formats like MP3 or AAC often sacrifice audio quality for smaller file sizes, which can result in lower volume levels. Here’s how you can address this issue effectively.
First, consider using audio editing software with volume normalization features. These features analyze the audio file and adjust the volume levels to ensure consistent loudness. This is particularly useful when dealing with a collection of lossy audio files with varying loudness levels.
Furthermore, explore dynamic range compression (DRC) to balance the audio’s dynamics. DRC reduces the difference between the loudest and quietest parts of an audio file, making it sound more uniform in volume. However, be cautious not to apply excessive compression, as it can lead to an unnatural and compressed sound.
Lastly, if you have a specific audio file that needs a volume boost, you can manually adjust the volume using your preferred audio editing software. Keep in mind that raising the volume too much may introduce distortion, so it’s crucial to find the right balance to enhance the loudness while preserving audio quality.
By utilizing these techniques, you can effectively enhance the audio loudness of your lossy format files and enjoy a more immersive listening experience.
Raise the Volume of Low-Quality Audio
Dealing with low-quality audio can be frustrating, especially when the volume is barely audible. Whether it’s an old recording or a poorly encoded audio file, there are ways to raise the volume and salvage the listening experience.
One approach is to use audio restoration software. These tools are designed to improve the quality of audio recordings, including boosting the volume. They often come with noise reduction features, which can help reduce background noise and further enhance the clarity of your audio.
Another option is to employ audio equalization. By adjusting the equalizer settings, you can emphasize the frequencies that are most critical for clarity and volume. Boosting the mid-range frequencies, for example, can make the vocals and instruments more prominent, resulting in a perceptible increase in volume.
If you have access to the original source of the audio, consider re-recording it or obtaining a higher-quality version. This approach eliminates the limitations of the existing low-quality audio file and ensures a better listening experience.
In summary, raising the volume of low-quality audio involves a combination of software tools and, when possible, improving the source material. These steps can help you enjoy clearer and louder audio, even from initially subpar recordings.
Boosting Sound Levels in Lossy Files
Boosting sound levels in lossy audio files is a common requirement for those looking to enhance their audio experience. Lossy formats, while efficient, often compromise on audio quality, resulting in lower volume levels. Here’s how you can effectively increase the sound levels in such files.
One of the simplest methods is to use audio editing software. Most audio editors provide volume adjustment controls that allow you to raise the volume of your lossy audio files. When doing this, be cautious not to push the volume too high, as it can lead to distortion and a loss of audio fidelity.
Additionally, you can explore the use of audio amplification plugins or tools. These specialized software options are designed to boost the loudness of audio files while minimizing the risk of distortion. They often come with presets and fine-tuning options to ensure optimal results.
When boosting sound levels, it’s essential to consider the intended playback environment. Different platforms and devices may have varying volume levels, so aim for a balance that ensures your audio remains clear and enjoyable across different systems.
By following these techniques and experimenting with volume adjustments, you can effectively boost sound levels in your lossy audio files and enjoy an improved listening experience.
Improving Audio Clarity in Compressed Formats
Improving audio clarity in compressed formats, such as MP3 or AAC, is a pursuit for audiophiles and music enthusiasts alike. While these formats offer excellent compression, they can sometimes sacrifice audio quality. Let’s explore how to enhance audio clarity in such files.
One approach is to use high-quality audio conversion tools. These tools can help you convert your compressed audio files into a lossless format, such as FLAC. Once in a lossless format, you can make edits and enhancements without further loss of audio quality. After the improvements, you can convert the file back to a compressed format with improved clarity.
Another technique involves applying equalization to your audio files. By fine-tuning the frequency balance, you can emphasize certain audio elements, such as vocals or instruments, and reduce any muddiness. This can result in clearer and more defined audio, even in compressed formats.
Furthermore, consider using noise reduction software to eliminate background noise and artifacts that may be present in your compressed audio. Reducing these unwanted elements can significantly enhance audio clarity.
Finally, if you have access to the original, uncompressed source of the audio, consider re-encoding it into a higher-quality compressed format. This can provide better clarity while still maintaining a smaller file size compared to lossless formats.
Enhancing audio clarity in compressed formats requires a combination of technical tools and careful adjustments. By experimenting with these techniques, you can achieve remarkable improvements in audio quality.
Loudness Enhancement for Lossy Audio
Loudness enhancement for lossy audio files can make a world of difference in your listening experience. Lossy formats, known for their space-saving benefits, often suffer from lower perceived volume levels. Here’s how you can effectively enhance the loudness of your lossy audio files.
One of the simplest methods is to use an audio player with built-in equalization settings. These settings allow you to boost specific frequency ranges, making the audio sound louder and more impactful. Experiment with different equalizer presets until you find the one that works best for your audio.
Another technique is to employ audio normalization. Many audio editing software tools provide normalization features that adjust the volume of your audio files to a consistent level. This ensures that all tracks play back at a similar loudness, enhancing the overall listening experience.
If you’re looking for a more advanced solution, consider using audio mastering techniques. Mastering involves fine-tuning the audio’s overall quality, including loudness optimization. Professional mastering engineers use specialized equipment and software to achieve the perfect balance of loudness and clarity.
Lastly, be mindful of the playback device you’re using. Some devices have built-in sound enhancements or equalization settings that can further enhance loudness. Experiment with these settings to find the right balance for your preferences.
By implementing these loudness enhancement techniques, you can breathe new life into your lossy audio files and enjoy them at a higher volume without sacrificing quality.
How to Make Quiet Audio Louder
Have you ever encountered audio that’s so quiet you strain to hear it even when you max out your volume controls? Learning how to make quiet audio louder is a valuable skill that can transform your listening experience.
One straightforward method is to use audio editing software. Open the quiet audio file in your chosen software and locate the volume adjustment controls. Gradually increase the volume until it reaches a comfortable level. Keep an eye on the audio waveform to ensure it doesn’t clip, which can result in distortion.
Another technique involves the use of audio normalization. This process analyzes the audio file and adjusts its volume to a consistent level, making quiet parts more audible without causing loud parts to become overly aggressive. Audio normalization is especially useful when you have multiple audio files with varying loudness levels.
Consider employing dynamic range compression (DRC) as well. DRC helps balance the dynamics of your audio, ensuring that the quietest parts are audible without overpowering the louder segments. However, use DRC judiciously to maintain natural audio quality.
Additionally, explore specialized audio enhancement software or plugins designed specifically for increasing the loudness of quiet audio. These tools often offer advanced algorithms to maximize loudness while minimizing distortion.
By mastering these techniques, you can effectively make quiet audio louder, bringing back the enjoyment in your audio content.
Audio Volume Optimization for Lossy Formats
Audio volume optimization for lossy formats is a crucial step to enhance the quality of your compressed audio files. These formats, while convenient, can suffer from reduced loudness. Let’s delve into the strategies for achieving audio volume optimization.
One method is to use audio editing software with volume adjustment capabilities. Open your lossy audio file in the software and increase the volume to your preferred level. Ensure that you maintain a balance between loudness and audio quality to prevent distortion.
Additionally, explore the use of volume normalization tools available in audio editing software. These tools analyze the audio and automatically adjust the volume to a consistent level. This is particularly useful when you have a collection of lossy audio files with varying loudness levels.
Dynamic range compression (DRC) is another technique to consider. DRC helps level out the loud and quiet parts of an audio file, resulting in a more uniform volume. However, exercise caution to avoid over-compression, which can lead to an unnatural sound.
Lastly, when exporting your audio, choose a higher bit rate if possible. This can improve the overall audio quality and contribute to better volume levels in lossy formats.
By applying these strategies for audio volume optimization, you can enjoy your favorite music and podcasts in lossy formats at a higher volume with improved clarity.
Final Words
In conclusion, whether you’re dealing with lossy audio files, compressed formats, or quiet audio, there are various techniques to boost volume and enhance your listening experience. Experiment with different methods, and remember to strike a balance between loudness and audio quality to achieve the best results. By mastering these techniques, you can enjoy your audio content at its fullest potential.
Boost the volume of lossless audio filesBoost the volume of lossless audio files
There are a few different approaches toing the volume of lossless audio files. One simple method is to use an audio editor to adjust the overall gain or amplitude of the tracks. Most audio software allows you to increaseibel for an entire file or selection. Raising it a few is usually sufficient for a subtle boost without risking clipping or distortion.
Amplify sound
Another option isify specific frequency ranges give the perception of increased volume without pushing the levels into the red example boosting low mids highs a couple dB can make quiet passages seem louder while keeping peak levels in check. You’ll want to be judicious to avoid unwanted harshness or fuzziness. Test any adjustments by switching between the original and files.
Louder audio</2>
Whetherizing an entire album oring a few choice tracks’s to listen critically and make incremental changes. Jumping the gain by 6 dB right off the bat may end up distorting the signal in certain sections. Take your time tweaking levels up or down just 1- dB a time listen closely for any clipping artifacts. You can always go additional amplification later if needed you’ve dialed it in.
Normalize volume
Many digital audio workstations include normalization features that can automatically increase or decrease the overall volume to target a level, like -1 dB FS. This helps ensure consistent loudness different tracks or albums. However, normalization alone may not enough of a volume boost for some listeners. In those cases combination of normalization followed by manual gain adjustments tends to work well.
Adjust gain
Fine- the gain structure is art and part science. As an audio engineer, I’ve found helpful over the years to visualize the waveform on the screen making level adjustments. how close certain transients are approaching 0 dB gives a visual cue for how much headroom remains.’s a process of trial and error to find the optimal balance of loudness versus potential clipping.
2>Enhance dynamics</2>
For a more sophisticated volume boost, you can use dynamic range compression to subtly enhance the perceived loudness without resorting to gain increases. A gentle mix of compression on peaks combined with upward on valleys brings up the average level while retaining the original dynamic signature. This to sound more natural than a simple amplification.
Optimize levels
Whether you’re prepping audio for streaming services or want your music collection to sound its best, taking the time to levels pays off like to an initial pass followed by rounds of selective gain adjustments, checking for clipping or distortions each step. Proper staging is key – you don’t to-process and damage the fidelity of yourless files in the process.
Balance levels
Especially when working with full album releases or multi-track recordings, maintaining a balanced mix paramount Boosting some elements too much can throw off the overall cohesion. I find it useful to A/B between the and processed versions, toggling back and forth to compare. This helps identify where adjustments may bewing the tonal balance or drawing attention away important parts of the.Loudness matching
For playlists, compilations or broadcast content, loudness matching a consistent volume between tracks without jarring changes. production tools let you analyze the integrated loudLUFS) of different files and apply normalization, compression or make-up gain to closely target a playback loudness like -16 LUFS. This results in a seamless, fatiguing-free listening experience from start to finish.
Equalize volume
Subtle EQ can also play a supporting role in optimizing levels. For example, a slight high-frequency boost bring up noise or sibilance without pushing other elements over the top. Or a touch more low-end fullness could enhance the perception of volume. It’s all about finding complementary techniques that work together harmoniously. With some trial and error, you can coax that last bit loudness from lossless files while preserving their pristine quality.
Final Words
In the end there’s right or wrong way to volume – it depends on your goals and source material. The most important things are to listen carefully, make incremental adjustments, and avoid damaging clipping at all costs lossless. Have patience and trust your ears. With some practice, you a good feel for optimizing in a natural, transparent way.