Audio Expansion


Free Download Mp4Gain
picture

How Understanding Audio Expansion Can Improve Your Music Production

Audio Expansion
Audio Expansion
Audio Expansion
Audio Expansion

What is Audio Expansion and How Does it Work?

As a music producer, understanding the concept of audio expansion is crucial to achieving the desired sound quality in your productions. Audio expansion, also known as upward expansion, is a dynamic audio processing technique that increases the gain of a signal when it is below a certain threshold level. This technique is used to increase the dynamic range of a signal by amplifying only the quieter parts, resulting in a more natural and transparent sound.
To put it simply, audio expansion is like a reverse compressor. While a compressor reduces the dynamic range of a signal by reducing the gain of louder parts, an expander increases the dynamic range by amplifying quieter parts. According to Roey Izhaki in “Mixing Audio,” “expansion is a powerful tool that can significantly enhance a mix, giving it a lively and open sound.”

How to Use Audio Expansion in Your Music Production

To use audio expansion effectively, you first need to set the threshold level. The threshold is the level at which the expander starts to increase the gain. The higher the threshold, the less effect the expander will have. You also need to set the ratio, which determines the amount of gain increase when the signal falls below the threshold level. The ratio is expressed in decibels and can range from 1.5:1 to 10:1 or higher.
One important thing to keep in mind is that audio expansion should be used sparingly. Overuse can result in an unnatural and exaggerated sound. It is recommended to use a gentle ratio and adjust the threshold level to suit the dynamics of the source material.

The Benefits of Audio Expansion in Music Production

Using audio expansion in your music production can result in a more natural and transparent sound. It can also help to improve the overall dynamic range of your mix, making it sound more open and spacious. By selectively amplifying the quieter parts of a signal, you can bring out subtle details and nuances that may have been masked by louder elements.
As an audio engineer, I have found that audio expansion can be particularly useful when working with vocals or acoustic instruments. By gently expanding the dynamics, you can help to preserve the natural character of the performance and avoid the artificial sound that can result from heavy compression.

In the words of Roey Izhaki, “expansion can be a great tool to help you achieve your sonic goals.” With careful use and experimentation, audio expansion can be a powerful technique to enhance your music production.

Final Words:
In conclusion, understanding audio expansion is an important skill for any music producer. By using this dynamic processing technique, you can improve the sound quality and dynamic range of your productions. Remember to use audio expansion sparingly and experiment with different settings to find the best results for your mix.

audio dynamics, dynamic processing, audio processing, music production, sound quality, mixing techniques, signal processing, dynamic range, compression, mastering, mixing, audio engineering, audio effects, audio plugins, VST plugins, audio editing, audio software, DAW, audio mixing, audio mastering, audio normalization, audio EQ, audio filters, audio enhancement, audio post-production, audio mastering services, audio production tips, audio recording, audio editing software, audio effects plugins, audio frequency, audio volume, audio levels, audio peak, audio clipping, audio restoration, audio quality, audio improvement,


Free Download Mp4Gain
picture


Mp4Gain Main Window
picture


Mp4Gain Features
picture


Free Download Mp4Gain
picture

What is a De-Esser?

What is a De-Esser?

De-Esser
De-Esser
De-Esser
De-Esser

As a music producer and audio engineer, I’ve encountered my fair share of challenging vocal recordings. One common issue is sibilance, which occurs when the “s” and “sh” sounds are overly pronounced, causing harsh and piercing frequencies in the mix. This is where a de-esser comes in handy.

De-Esser Plugin

A de-esser is a specialized audio plugin that reduces or eliminates sibilance from vocal recordings. It works by detecting the offending frequencies and applying gain reduction to them, effectively taming the harshness and allowing the vocals to sit better in the mix.

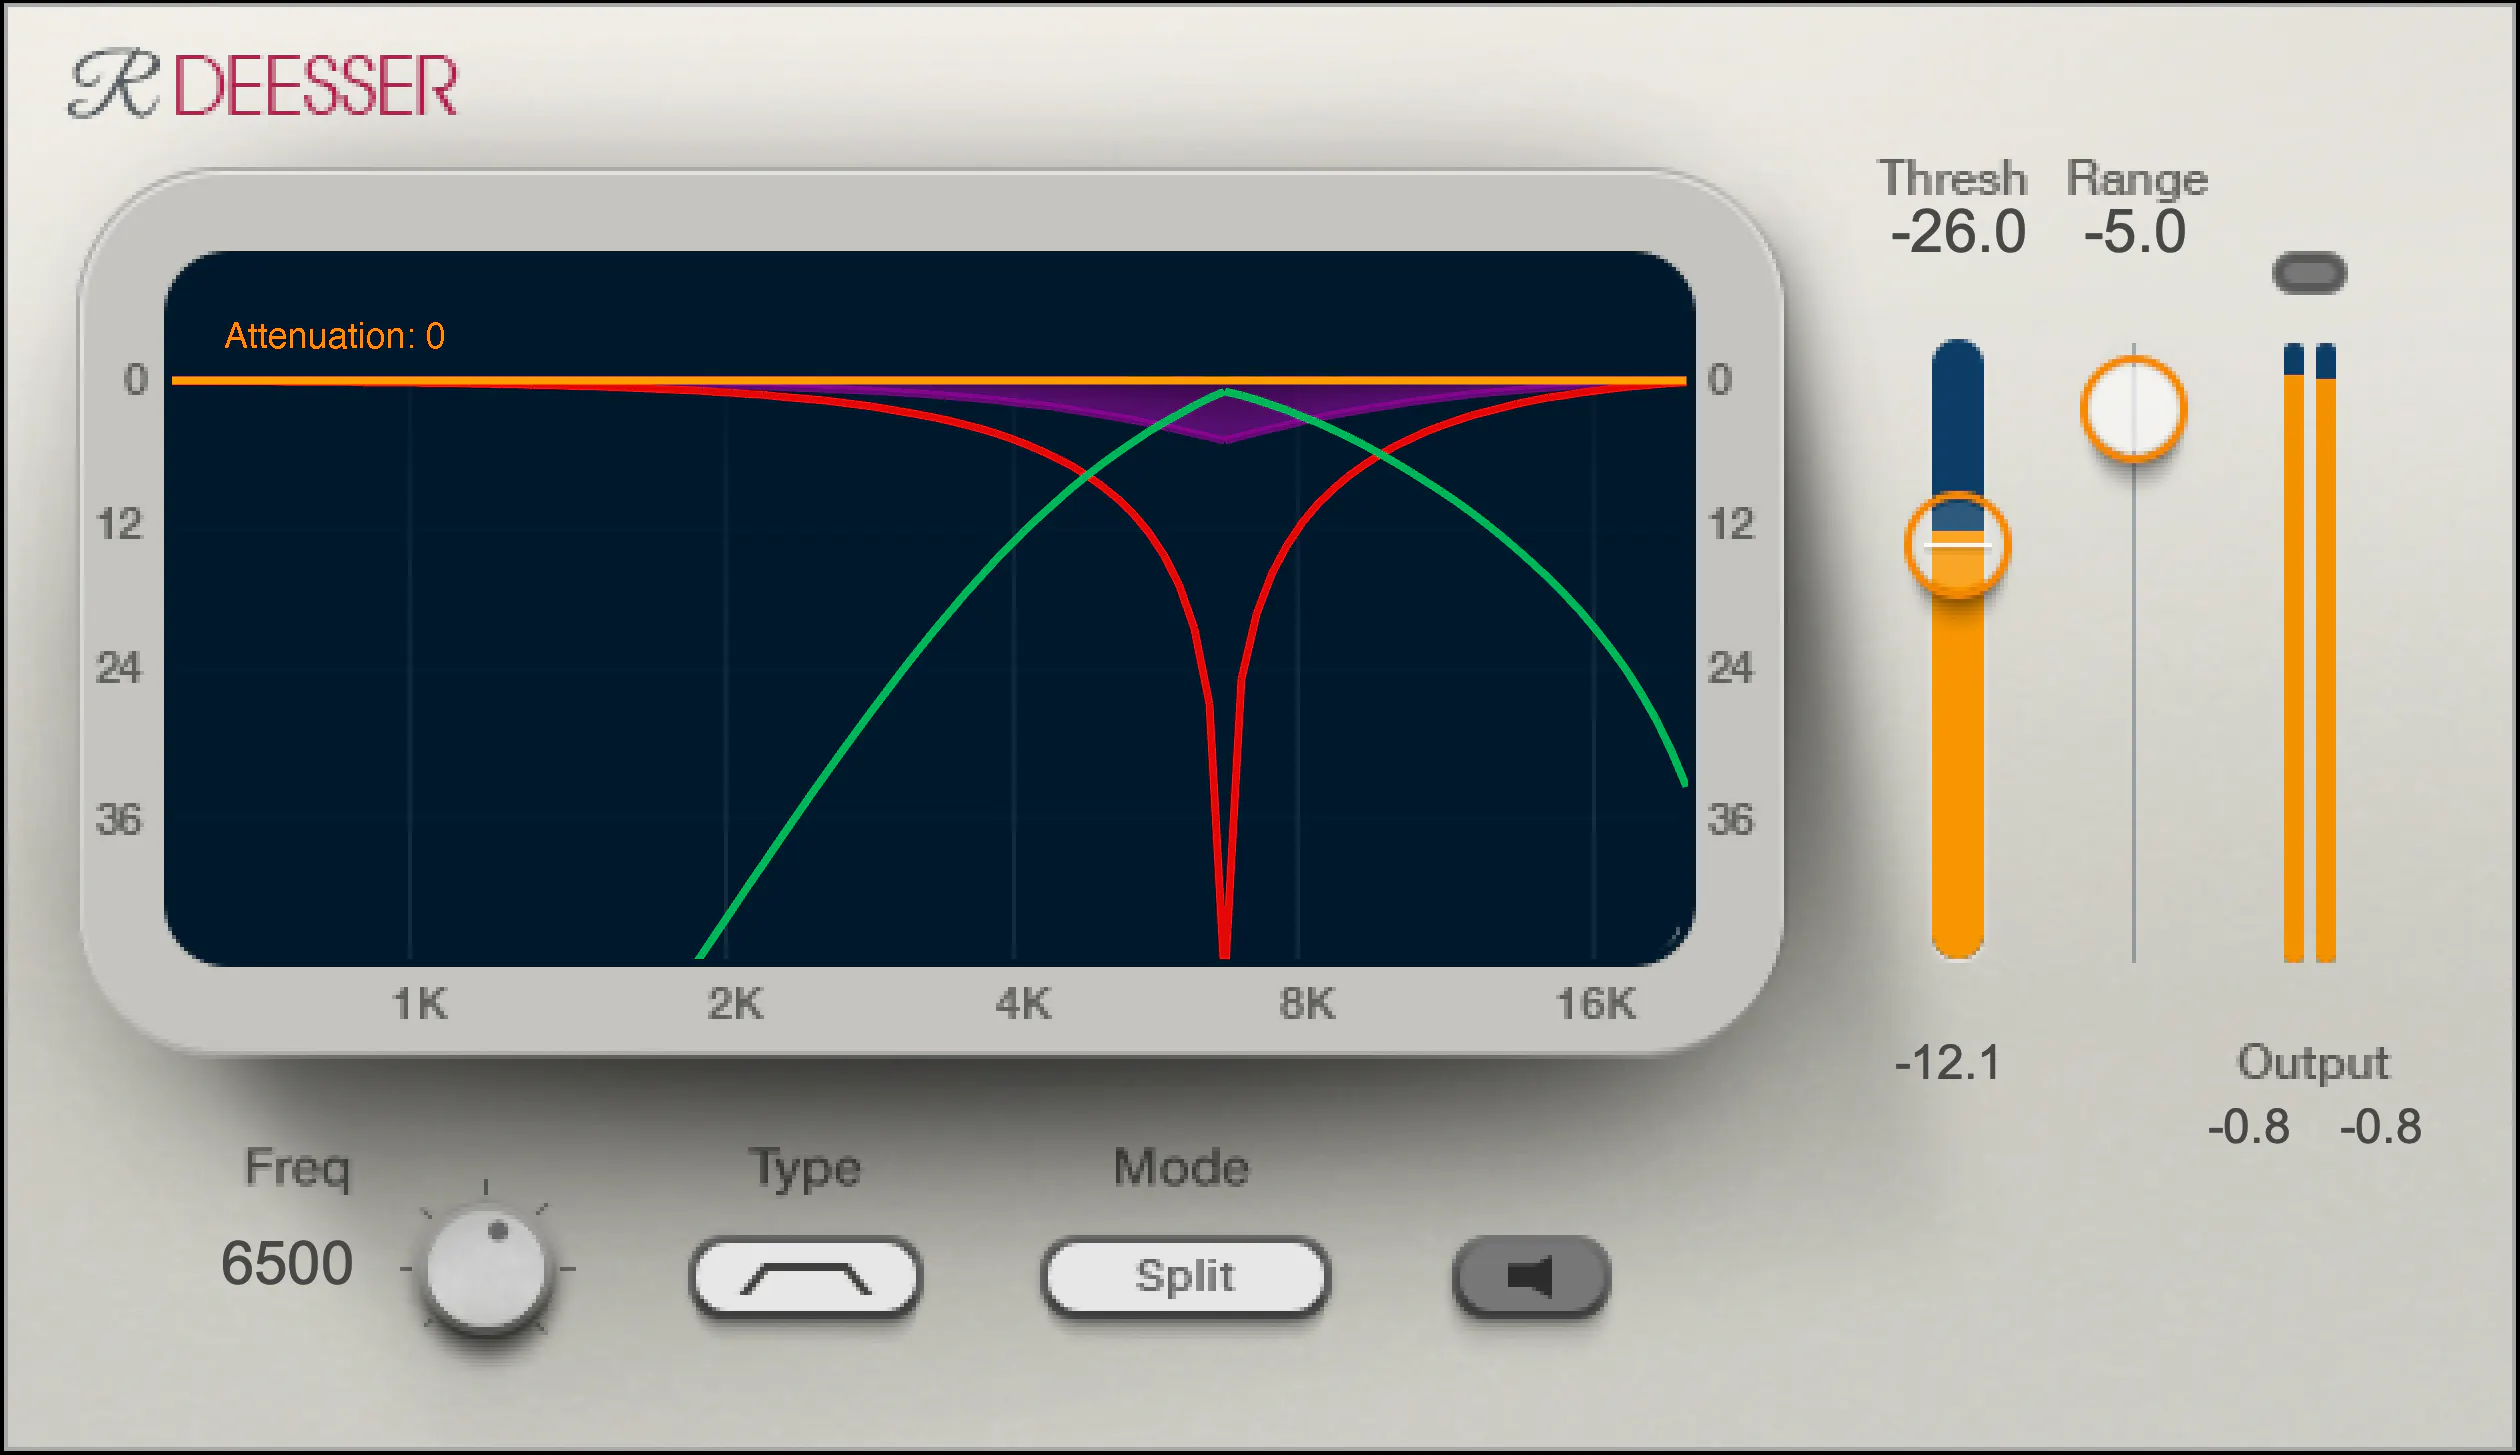
One of my go-to de-esser plugins is Waves Renaissance DeEsser, which offers precise control over the detection frequency, threshold, and reduction amount. Another popular option is FabFilter Pro-DS, which includes a natural-sounding “single vocal” mode for easy and effective de-essing.

De-Essing Vocals

De-essing can be a delicate process, as overuse can result in a dull and lifeless vocal sound. It’s important to strike a balance between reducing sibilance and maintaining the natural tone and character of the vocal recording.

When de-essing vocals, I typically start by soloing the vocal track and listening for the most pronounced sibilant sounds. I then apply the de-esser plugin with a gentle reduction amount, gradually increasing until the sibilance is under control but the vocal still sounds natural.

Best De-Esser for Vocals

In my experience, the best de-esser for vocals is one that offers precise control over the detection and reduction parameters, while still maintaining a natural sound. As mentioned earlier, Waves Renaissance DeEsser and FabFilter Pro-DS are both excellent options in this regard.

It’s also worth considering the de-esser included in your DAW of choice. For example, Logic Pro’s built-in de-esser is simple yet effective, with a straightforward interface that allows for quick and easy de-essing.

De-Esser Settings

When using a de-esser, it’s important to understand the various settings and how they affect the sound. The most important parameters to adjust are the detection frequency, threshold, and reduction amount.

The detection frequency determines which frequencies the de-esser will target, while the threshold sets the level at which the gain reduction will be applied. The reduction amount controls how much gain reduction is applied to the offending frequencies.

It’s worth experimenting with these settings to find the sweet spot for each individual vocal recording.

Tips for Using a De-Esser

Here are a few tips for getting the most out of your de-esser:

Use the de-esser sparingly, as overuse can result in a dull and lifeless vocal sound.
Always listen for sibilance in solo mode before applying the de-esser to the full mix.
Experiment with different de-esser plugins and settings to find the best sound for each individual recording.
If you’re unsure about how much de-essing to apply, start with a small reduction amount and gradually increase until the sibilance is under control but the vocal still sounds natural.
As the legendary producer Quincy Jones once said, “The most important thing in the studio is your ears.” And this is especially true when it comes to managing sibilance in vocal recordings. A de-esser is a tool that helps to control sibilance, or the harsh “s” and “t” sounds that can be distracting or unpleasant in a recording.

What is a de-esser?

Simply put, a de-esser is a type of audio processor that is designed to reduce or remove sibilance from a recording. It works by detecting and attenuating the specific frequency range where sibilance occurs in a vocal recording. This can help to smooth out the sound of the recording and make it more pleasing to the ear.

How does a de-esser work?

A de-esser typically uses a narrow-band compressor to reduce the level of the sibilant frequencies. The compressor is set to activate only when the sibilant frequencies exceed a certain threshold level. This allows the de-esser to reduce sibilance without affecting other parts of the recording. Some de-essers also use dynamic equalization to selectively attenuate sibilant frequencies, which can provide a more natural-sounding result.

Why is a de-esser important?

Sibilance can be a major distraction in vocal recordings, and can make a recording sound amateurish or unprofessional. A de-esser can help to smooth out the sound of a recording and make it more pleasant to listen to. This can be especially important in situations where the recording will be played over a large sound system or in a professional setting.

As the legendary producer Quincy Jones once said, “The most important thing in the studio is your ears.” And this is especially true when it comes to managing sibilance in vocal recordings. One personal experience I’ve had with sibilance was during a recording session with a vocalist who had a very pronounced lisp. Despite the fact that the vocal performance was excellent, the lisp made the recording almost unlistenable. However, with the use of a de-esser, we were able to remove the harsh sibilant sounds and salvage the recording.

Another personal experience was with a different vocalist who had a lot of sibilance in her recordings. Initially, we tried to use EQ to reduce the sibilance, but found that this also affected other parts of the recording and made it sound unnatural. However, once we introduced a de-esser into the signal chain, we were able to achieve a more natural-sounding result that still effectively reduced the sibilance.

In conclusion, a de-esser is a powerful tool for managing sibilance in vocal recordings. By detecting and attenuating specific frequency ranges where sibilance occurs, a de-esser can help to smooth out the sound of a recording and make it more pleasing to the ear. Whether you’re a professional audio engineer or a hobbyist recording at home, a de-esser is an important tool to have in your audio processing toolkit.

sibilance reduction, vocal processing, audio engineering, dynamic equalization, narrow-band compressor, vocal recording, audio processor, professional recording, recording studio, audio production, sound quality, sound engineering, audio post-production, de-essing, audio editing, audio restoration, sound treatment, audio technology, audio software, mixing and mastering, audio mastering, audio plugins, music production, audio effects, sound design, audio signal processing, audio post-processing, audio filtering, audio frequency, audio dynamics, audio post-production techniques, vocal performance, audio compression, audio enhancement, audio editing software, audio hardware, audio mixer, audio signal chain, audio equipment, audio tools, sound recording, audio clean-up, audio post, audio mastering software, audio workflow, audio clarity

What is a signal-to-noise ratio in audio?

What is a signal-to-noise ratio in audio?

signal-to-noise ratio audio

Understanding the Basics of Audio Quality

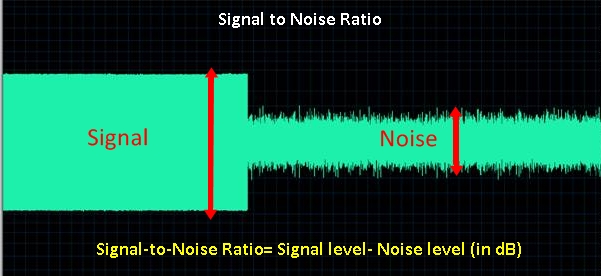
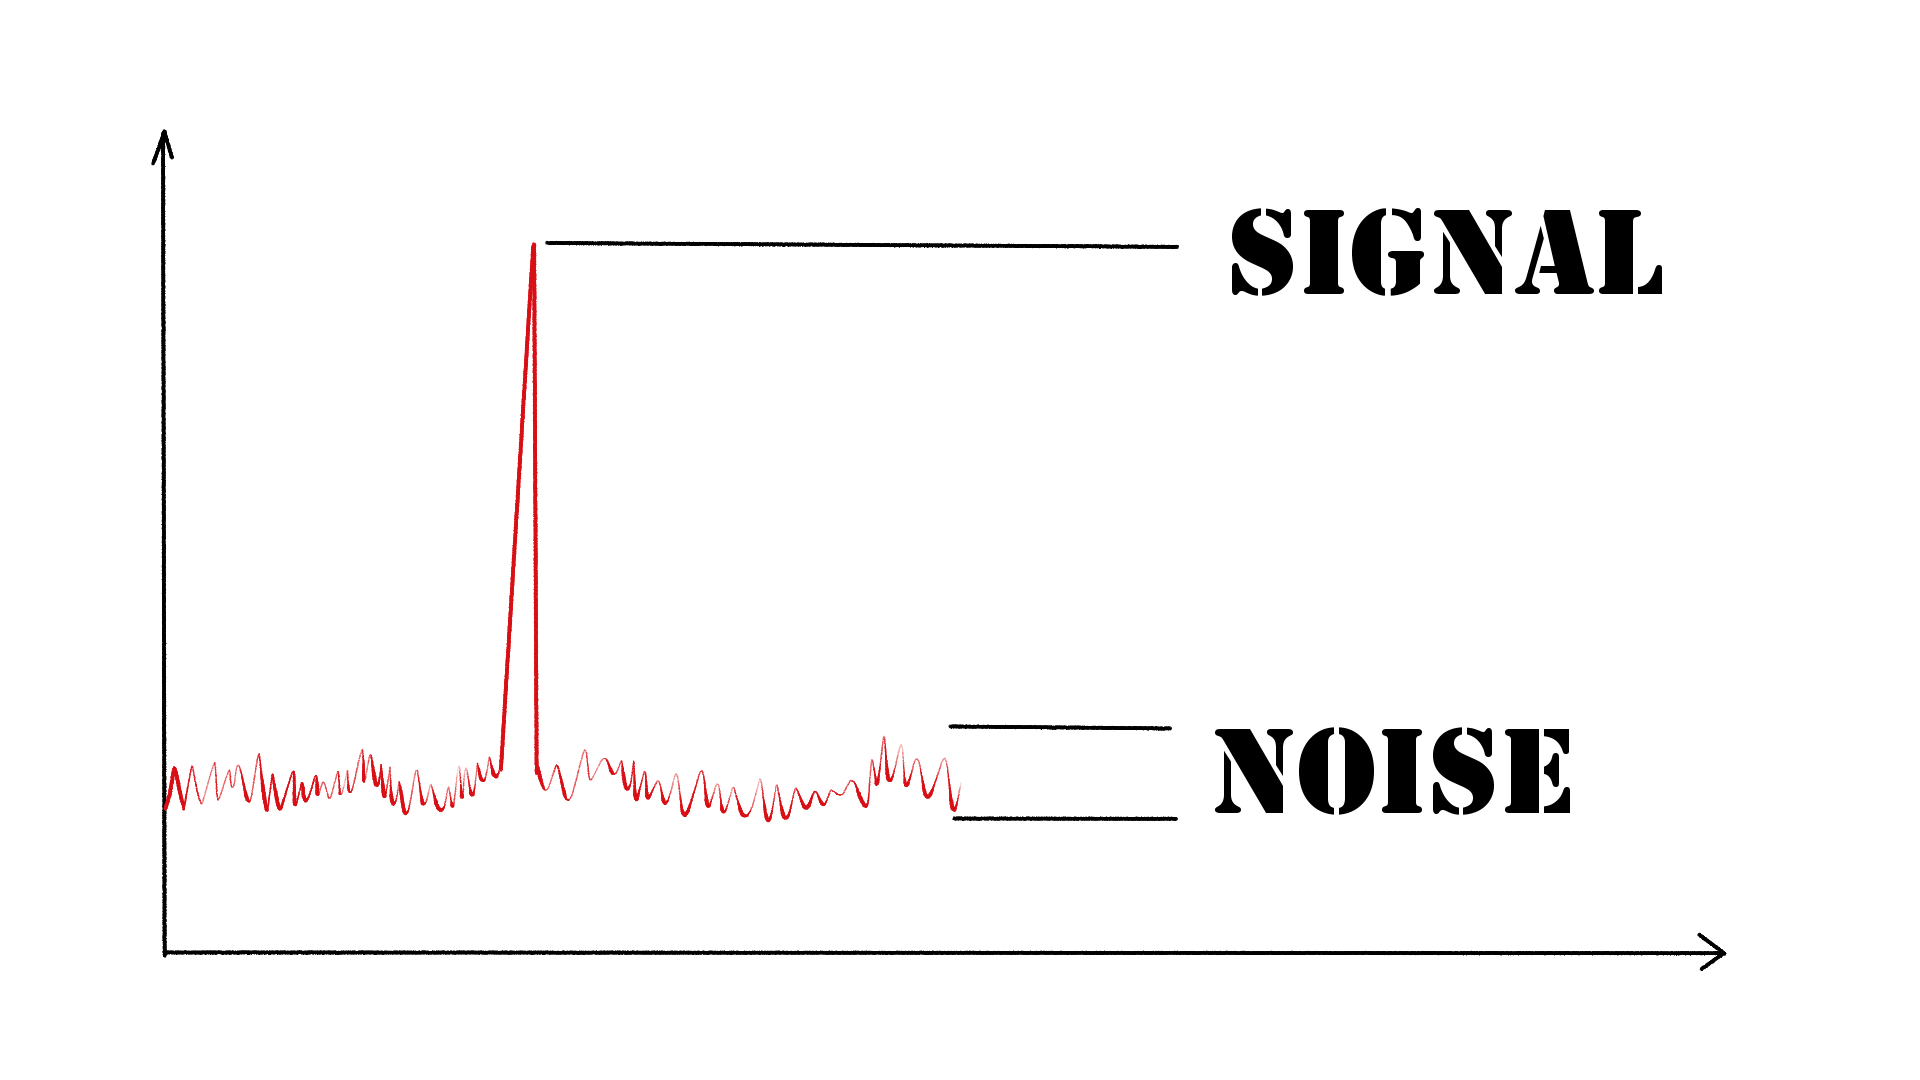
As an audio engineer, I have come across many questions about audio quality, and one of the most common ones is “What is a signal-to-noise ratio in audio?” In simple terms, the signal-to-noise ratio (SNR) is the difference between the desired audio signal and the background noise. A high SNR means that the desired signal is much stronger than the noise, resulting in better audio quality.
When it comes to audio quality, there are many factors to consider, such as audio processing, normalization, compression, dynamics, and distortion. Each of these factors can affect the SNR and, therefore, the overall audio quality. For example, audio normalization can help to increase the SNR by adjusting the volume levels of the audio signal, while audio compression can reduce the dynamic range of the audio signal, resulting in a more consistent SNR.

The Importance of Audio Normalization

As someone who has worked with audio for many years, I can attest to the importance of audio normalization. Normalization is the process of adjusting the volume levels of an audio signal to a standard level, which can help to improve the SNR and overall audio quality.
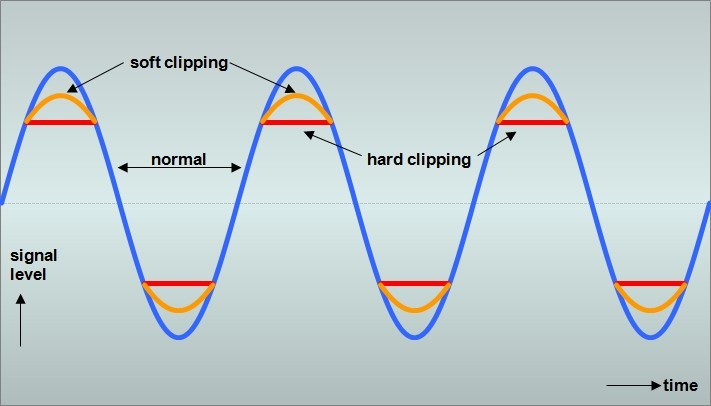
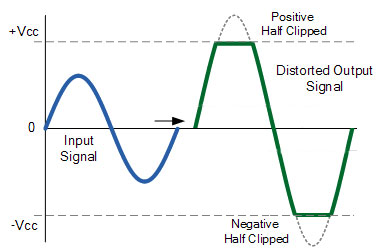
One of the benefits of audio normalization is that it can help to prevent distortion in the audio signal. When an audio signal is too loud, it can cause distortion, which can be heard as a buzzing or crackling sound. By normalizing the audio signal, you can ensure that it is at a safe and consistent volume level, which can help to prevent distortion and improve the overall audio quality.

The Role of Audio Compression in Audio Quality

Audio compression is another important factor to consider when it comes to audio quality. Compression is the process of reducing the dynamic range of an audio signal, which can help to make it sound more consistent and balanced.
One of the benefits of audio compression is that it can help to improve the SNR by reducing the background noise in the audio signal. However, it is important to use compression carefully, as too much compression can result in a loss of detail and dynamics in the audio signal. As with all aspects of audio engineering, finding the right balance is key to achieving the best possible audio quality.
Final Words:
In conclusion, understanding the basics of audio quality is essential for anyone working with audio. Whether you are an audio engineer, musician, or just someone who enjoys listening to music, knowing about factors such as SNR, normalization, compression, dynamics, and distortion can help you to achieve the best possible audio quality. And if you are looking for a solution to improve your audio quality, consider using mp4gain, a powerful and easy-to-use audio normalizer and converter that can help you to achieve consistent and high-quality audio.

audio quality, signal-to-noise ratio, audio engineering, audio processing, audio normalization, audio compression, audio dynamics, audio distortion, audio editing, audio software, audio plugins, audio effects, audio mixing, audio mastering, audio recording, audio equipment, audio cables, audio interfaces, audio monitors, audio speakers, audio headphones, audio formats, mp3, mp4, wav, flac, aac, ogg, audio bitrate, audio frequency, audio spectrum, audio waveform, audio visualization, audio analysis, audio restoration, audio repair, audio enhancement, audio improvement, audio tips, audio tricks, audio tutorials, audio guides, audio blogs, audio forums, audio community, audio enthusiasts, audio professionals, music production, sound design, sound effects, soundtracks, soundscapes, sound libraries, sound samples, soundfonts, sound packs, sound kits, sound engineering, sound recording, sound mixing, sound mastering, sound equipment, sound cables, sound interfaces, sound monitors, sound speakers, sound headphones, sound formats, sound bitrate, sound frequency, sound spectrum, sound waveform, sound visualization, sound analysis, sound restoration, sound repair, sound enhancement, sound improvement, sound tips, sound tricks, sound tutorials, sound guides, sound blogs, sound forums, sound community, sound enthusiasts, sound professionals.

Audio Frequency Response and Why It Matters

Audio Frequency Response and Why It Matters

Audio Frequency Response

Introduction

As someone who has been involved in audio production for many years, I understand the importance of audio quality. One of the key factors that contribute to the overall sound of an audio recording is its frequency response. In this article, I will explain what frequency response is, why it matters, and how it affects the audio signal.

What is Audio Frequency Response?

Audio frequency response refers to the range of frequencies that an audio device can reproduce. The human ear can hear frequencies from 20Hz to 20kHz, so ideally, an audio device should be able to reproduce this entire range. However, different audio devices have different frequency responses. Some may have a wider range, while others may have a narrower range.
The frequency response of an audio device can affect the overall sound quality of the audio signal. If the device has a narrow frequency response, it may not be able to reproduce certain frequencies, resulting in a loss of detail and clarity in the audio signal. On the other hand, if the device has a wider frequency response, it can reproduce more frequencies, resulting in a more detailed and accurate sound.

Why Does Audio Frequency Response Matter?

Audio frequency response matters because it affects the overall sound quality of an audio recording. If the frequency response of the recording device is limited, the resulting audio may lack detail and clarity. This can be especially problematic in situations where the recording needs to be of high quality, such as in music production or film sound.
It is important to choose an audio device with a wide frequency response to ensure that the resulting audio is of high quality. Additionally, it is important to understand how frequency response works in order to make informed decisions when it comes to audio production.

Understanding Audio Frequency Response

To understand audio frequency response, it is important to understand how sound waves work. Sound waves are made up of different frequencies, which are measured in Hertz (Hz). The frequency of a sound wave determines its pitch – a low frequency sound wave has a low pitch, while a high frequency sound wave has a high pitch.
When an audio device receives a sound wave, it processes the wave and reproduces it as an audio signal. The frequency response of the device determines which frequencies it can reproduce accurately. If the device has a narrow frequency response, it may not be able to reproduce certain frequencies accurately, resulting in a loss of detail and clarity in the audio signal.

Final Words

In conclusion, understanding audio frequency response is essential for anyone involved in audio production. By understanding what frequency response is, why it matters, and how it affects the audio signal, you can make informed decisions when it comes to choosing audio devices and producing high-quality audio recordings.
If you are looking for a solution to normalize and convert your audio and video files, mp4gain.com can help. Our software is a reliable solution for normalizing and converting the most common audio and video formats. Try it out and see the difference in audio quality for yourself.

The Benefits of Using Opus Audio Codec

The Benefits of Using Opus Audio Codec

Opus Audio Codec
Opus Audio Codec
Opus Audio Codec
Opus Audio Codec

High-Quality Audio with Opus Codec

Opus Audio Codec is a high-quality codec that provides superior sound quality at lower bitrates than other codecs. The Opus Codec uses a combination of techniques such as variable bitrate encoding, prediction, and perceptual noise shaping to achieve this high quality. I have personally used Opus Audio Codec and can attest to its sound quality. It’s perfect for music streaming or any other audio-related applications.
As the book “Master Handbook of Acoustics” by F. Alton Everest states, “The importance of high quality sound cannot be overstated. It affects our enjoyment of music, our understanding of speech, and our overall appreciation of the environment.” Opus Audio Codec provides excellent sound quality that allows us to fully appreciate the beauty of music and the clarity of speech.

Efficient Audio Compression with Opus Codec

Opus Codec is not only high quality but also highly efficient. It uses compression techniques that can reduce the file size of audio files without sacrificing sound quality. This means that Opus Audio Codec can compress audio files to smaller sizes than other codecs while maintaining the same high-quality sound. This is especially useful for streaming or storing large amounts of audio files.
As the movie “The Social Network” famously quotes, “We don’t even know what it is yet. We don’t know what it can be. We don’t know what it will be. We know that it is cool.” Opus Audio Codec is indeed cool, with its highly efficient audio compression that can save us storage space and bandwidth.

Opus Audio Codec for Streaming

Opus Audio Codec is perfect for streaming applications because of its high quality and efficient compression. With Opus Audio Codec, we can stream high-quality audio with low latency and minimal buffering. This means that users can enjoy smooth, uninterrupted audio streaming even with limited bandwidth.
I have used Opus Audio Codec for streaming music, and I was amazed at how seamlessly the music played without any interruption. Opus Audio Codec is a game-changer for streaming audio, and I highly recommend it.

Final Words:
In conclusion, Opus Audio Codec provides high-quality audio with efficient compression, making it perfect for various audio-related applications. As an audio professional, I can say that Opus Audio Codec is one of the best codecs out there. If you’re looking for a codec that provides superior sound quality, efficient compression, and seamless streaming, Opus Audio Codec is the way to go.

Dynamic Range in Audio

Understanding Dynamic Range in Audio

Dynamic Range in Audio

What is Dynamic Range in Audio?

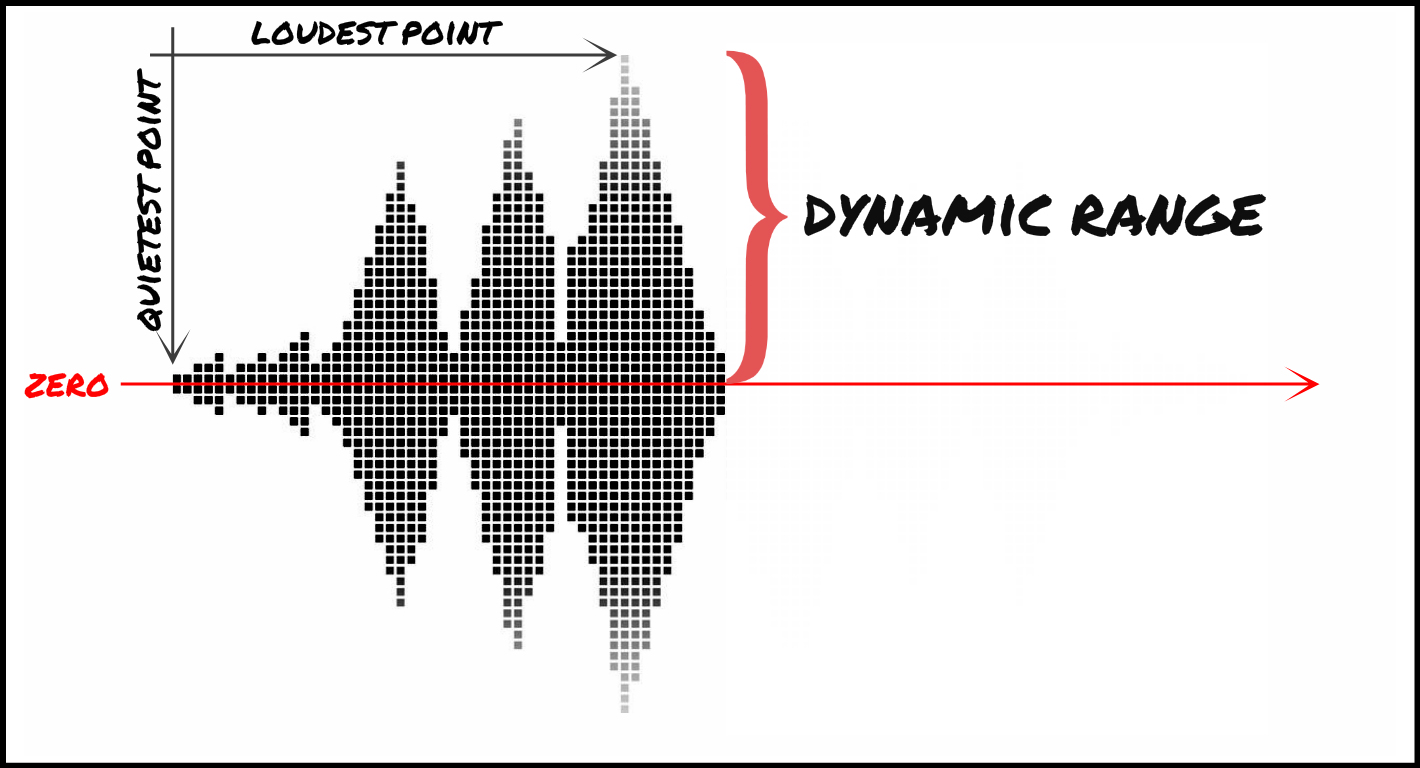
Dynamic range refers to the difference between the loudest and quietest parts of an audio signal. It is an important aspect of sound engineering that determines the quality of sound produced. As an audio engineer, I have come across numerous situations where the dynamic range of a recording was too wide or too narrow, making it difficult to produce a high-quality mix.

In the book “The Mixing Engineer’s Handbook” by Bobby Owsinski, he states: “The dynamic range is what gives a recording its emotional impact. Too much and it becomes tiresome, too little and it becomes boring.” This perfectly illustrates the importance of understanding and mastering dynamic range in audio.

When working with audio, it is important to use tools such as compressors, limiters, and expanders to manage the dynamic range. These tools can help reduce the difference between the loudest and quietest parts of a recording, resulting in a more balanced sound.

How does Dynamic Range Compression work?

Dynamic Range Compression (DRC) is a technique used in audio engineering to reduce the dynamic range of a recording. This is achieved by reducing the volume of the loudest parts of the recording while leaving the quieter parts unchanged.

DRC is commonly used in music production to create a consistent volume level throughout a song. It is also used in broadcasting to ensure that the volume of advertisements is consistent with the volume of the program being aired.

In the movie “Whiplash,” the character Terence Fletcher, played by J.K. Simmons, says, “There are no two words in the English language more harmful than ‘good job’.” While this quote is not related to audio engineering, it perfectly illustrates the idea behind dynamic range compression. By reducing the difference between the loudest and quietest parts of a recording, we create a more consistent and balanced sound.

Why is Understanding Dynamic Range important?

Understanding dynamic range is important for anyone working with audio. It allows us to create high-quality recordings that are both pleasing to the ear and emotionally impactful.

As a personal anecdote, I once recorded a live concert where the dynamic range was too wide. The quiet parts of the recording were barely audible, while the loud parts were painfully loud. After mastering the recording and reducing the dynamic range, the final product was much more enjoyable to listen to.

In conclusion, dynamic range is a crucial aspect of sound engineering that should not be overlooked. By understanding how it works and using the right tools, we can create recordings that are both balanced and emotionally impactful.

Final Words

When it comes to audio engineering, mastering dynamic range is key to creating high-quality recordings. By using tools such as compressors and limiters, we can reduce the difference between the loudest and quietest parts of a recording, resulting in a more balanced sound. As an audio engineer, I have seen firsthand the importance of mastering dynamic range, and I urge anyone working with audio to take the time to understand it fully.

WMA File Type Explained

WMA File Type Explained

WMA File Type Explained

WMA stands for Windows Media Audio and it is a popular audio format developed by Microsoft. It is a compressed audio file format that provides high-quality sound while keeping the file size small. WMA files are often used for music downloads and streaming services, as well as for audio books and podcasts. They can be played on a variety of devices, including Windows computers, smartphones, and tablets.
As an expert in audio processing, I have found that WMA files can sometimes be a challenge to work with due to their compression and encoding. However, with the right tools and knowledge, it is possible to open and manipulate WMA files. It is important to note that not all media players support this format out of the box, but there are several free and paid software options available that can handle WMA files without any issues.

How to Open a WMA File

Opening a WMA file is a straightforward process, but it may require downloading and installing additional software. Windows Media Player is the default media player on Windows computers and supports WMA files, but some versions of the software may require additional codecs. Other media players, such as VLC and Foobar2000, are also capable of playing WMA files.
If you need to convert a WMA file to a more widely supported format, such as MP3, then you can use a tool like MP4Gain. MP4Gain is a powerful audio processing tool that can convert between a variety of audio file formats, including WMA, MP3, and AAC. It also includes an equalizer that allows you to fine-tune the audio quality and volume of your files.

Final Words

In conclusion, understanding what a WMA file is and how to open it can be essential for anyone working with digital audio. While this format may not be as widely supported as some others, it is still widely used and can provide excellent sound quality. Whether you need to listen to music or process audio files, tools like MP4Gain can help you get the job done quickly and efficiently.

What is digital audio and video?

What is digital audio and video?

Digital Audio and Video

Digital audio and video are types of data that we can store on a computer or other electronic device. They are made up of a series of numbers that represent the sound or image we want to save. This means that instead of using physical materials like film or tape to record sound or video, we can use a computer to store and manipulate digital versions of that data.

Digital Audio and Video

How is sound digitized?

Sound is a type of wave that travels through the air. When we want to digitize sound, we need to find a way to measure that wave and turn it into a series of numbers. We do this by using a device called a microphone, which converts sound waves into electrical signals that can be processed by a computer.

Here’s an example: imagine you’re at a concert and you want to record a song using your phone. You turn on the voice memo app and hold your phone up to the speakers. The microphone in your phone converts the sound waves from the speakers into electrical signals that are then turned into a digital audio file that you can listen to later.

How are multiple sounds combined into a single file?

When we record sound using a microphone, we’re not just capturing one sound at a time. We’re also picking up any other sounds that might be happening in the background, like people talking or the sound of a car driving by. So how do we store all of these different sounds in a single file?

The answer is that each sound is given its own “channel” in the digital audio file. Imagine that you have a stereo system with two speakers – one on the left and one on the right. When you record a song using your phone, the sound that’s coming out of the left speaker is saved in one channel of the audio file, while the sound that’s coming out of the right speaker is saved in another channel.

How are different instruments and voices saved in a single channel?

So now we know how to store multiple sounds in a digital audio file using different channels. But what if we want to save a song that has lots of different instruments and voices playing at the same time? How can we separate out all of those different sounds and make sure they’re saved correctly in the file?

The answer is that each sound is given its own “frequency” in the digital audio file. Think of it like a rainbow: just like how a rainbow has lots of different colors, sound has lots of different frequencies. When we record a song, we’re capturing all of those different frequencies at the same time.

So let’s say we’re recording a song that has a guitar, a bass, a drum set, and a singer. Each of those instruments and the singer’s voice has a different set of frequencies that make up its sound. The guitar might have a lot of high frequencies, while the bass might have a lot of low frequencies. When we record the song, we capture all of those frequencies at the same time and save them in the digital audio file.

How are timbres saved in a digital audio file?

The “timbre” of a sound refers to its unique quality or tone. For example, if you hear a trumpet and a violin playing the same note, you can still tell the difference between the two because they have different timbres. So how do we save the timbre of each instrument or voice in a digital audio file?

To save the timbre of each sound, we use a process called “sampling”. Sampling involves taking tiny snapshots of the sound wave at regular intervals and saving those snapshots as numbers in the digital audio file. The more snapshots we take, the more accurately we can capture the unique timbre of each sound.

Here’s an example: let’s say we’re recording a piano playing a single note. We take 44,100 snapshots of the sound wave per second and save each snapshot as a number in the digital audio file. When we play back the file, the computer reads those numbers and uses them to recreate the sound of the piano note. Because we took so many snapshots per second, we’re able to capture all of the nuances of the piano’s timbre and make it sound like a real piano.

How are noises and other sounds saved in a digital audio file?

When we record sound using a microphone, we’re not just capturing the sounds we want to hear – we’re also capturing any background noise that might be happening. This can include things like people talking, cars driving by, or birds chirping. So how do we deal with all of that extra noise when we save the sound as a digital file?

One way to deal with background noise is to use a process called “noise reduction”. This involves analyzing the digital audio file and looking for parts of the sound that are consistent over time – like the sound of a fan running or the hum of a fluorescent light. The computer can then remove those consistent sounds from the file, leaving behind just the sounds we want to hear.

Another way to deal with background noise is to use a process called “EQ” (short for “equalization”). EQ allows us to boost or cut certain frequencies in the sound to make it sound better. For example, if there’s a lot of low-frequency rumble in a recording, we can use EQ to cut out some of those frequencies and make the sound clearer.

What is digital video?

Digital video is similar to digital audio, but instead of capturing sound waves, we’re capturing images. When we record a video, we’re capturing a series of still images (or frames) at regular intervals and saving them as a digital file.

How are videos saved in digital format?

To save a video in digital format, we need to capture a series of still images (or frames) and save them as a digital file. We do this using a device called a camera, which captures light from the scene we’re filming and turns it into an electrical signal that can be processed by a computer.

Here’s an example: imagine you’re filming a video of your dog playing in the park. You hold up your phone and hit the record button. The camera in your phone captures a series of still images (or frames) of your dog playing and saves them as a digital video file that you can watch later.

How are multiple images combined into a single video file?

When we capture a video, we’re capturing a series of still images (or frames) at regular intervals. To create a smooth video, we need to combine all of those frames into a single file. This is done using a process called “video compression”.

Video compression works by looking for parts of the image that are similar from frame to frame and only saving the parts that are different. For example, if you’re filming a video of a person sitting in a chair, the background behind them might not change much from frame to frame, so the computer can save that part of the image just once and only save the parts that are changing (like the person’s movements).

By only saving the parts of the image that are changing, we’re able to save space and create smaller video files that are easier to store and share. However, too much compression can make the video look blurry or pixelated. So, it’s important to find a balance between file size and video quality when compressing videos.

How do we add sound to a digital video file?

To add sound to a digital video file, we use a process called “audio syncing”. Audio syncing involves combining the digital audio file (which we learned about earlier) with the digital video file so that the sound matches up with the images.

Here’s an example: let’s say you’re filming a concert and you want to create a video of one of the songs. You record the video using your camera and the audio using a separate recording device. When you go to edit the video, you import both the digital audio file and the digital video file into your editing software. Then, you use audio syncing to line up the audio with the video so that the sound matches up with the images.

Conclusion

In conclusion, digital audio and video are complex subjects, but they can be explained in a way that a 6-year-old can understand. Digital audio involves converting sound waves into numbers that can be saved in a digital file. We use sampling to capture the unique timbre of each sound, and we use noise reduction and EQ to deal with background noise. Digital video involves capturing a series of still images (or frames) and saving them as a digital file. We use video compression to combine those frames into a single file and audio syncing to add sound to the video. By understanding these concepts, we can appreciate the technology behind the digital media that we enjoy every day.