MP3 Audio Fingerprinting: Applications in Music Identification
Let’s talk about MP3 Audio Fingerprinting
When you’re jamming out to your favorite tunes, have you ever wondered how music identification apps like Shazam instantly recognize the song playing? That’s where MP3 audio fingerprinting comes into play. It’s like giving each song its own unique digital fingerprint, making it possible for apps and software to identify songs quickly and accurately. As an expert in audio technology, I’ve delved deep into the world of MP3 audio fingerprinting, uncovering its applications in various industries beyond just music recognition.
The Science Behind MP3 Audio Fingerprinting
Ever marveled at how our fingerprints are unique to each individual? Well, similarly, MP3 audio fingerprinting works by analyzing specific features within a piece of music to create a distinctive identifier. These features include characteristics like tempo, frequency, and amplitude patterns. By extracting these unique traits, a digital fingerprint is generated, allowing for precise song recognition.
How it Works:
Extraction of audio features such as frequency and tempo
Creation of a unique digital fingerprint
Comparing fingerprints to a vast database of known songs
Instantaneous identification of the song
The Evolution of Music Identification
Gone are the days of desperately trying to remember the lyrics of a song to Google later. MP3 audio fingerprinting revolutionized the way we identify music, offering a seamless and instantaneous solution. From early applications like Shazam to integrated features in streaming platforms, such as Spotify’s “Discover Weekly,” the technology has become ubiquitous in our musical experiences.
Real-World Applications:
Music recognition apps like Shazam and SoundHound
Integration into streaming platforms for personalized recommendations
Content identification for copyright protection
Enhancing User Experience
Imagine walking into a store and instantly knowing the name of the catchy song playing in the background. MP3 audio fingerprinting has made this a reality, enhancing user experiences across various settings. Whether you’re at a party, watching a movie, or shopping at a mall, the ability to identify music with a simple tap on your smartphone adds a new layer of convenience and enjoyment.
Empowering Music Discovery:
Seamless integration into mobile devices and smart speakers
Enhanced user engagement in social settings
Facilitating music discovery and exploration
Unveiling Hidden Gems
One of the most exciting aspects of MP3 audio fingerprinting is its role in uncovering hidden musical gems. Through algorithmic recommendations based on listening habits and preferences, users are exposed to a diverse range of artists and genres they might not have discovered otherwise. This not only benefits listeners but also supports emerging artists by broadening their audience reach.
Diversifying Musical Horizons:
Algorithmic recommendations for personalized playlists
Supporting independent and lesser-known artists
Facilitating serendipitous music discoveries
Latest Words on MP3 Audio Fingerprinting
As technology continues to advance, so too does the field of MP3 audio fingerprinting. Recent developments have focused on improving accuracy, efficiency, and scalability. From advancements in machine learning algorithms to the integration of blockchain technology for enhanced copyright protection, the future looks promising for this groundbreaking technology.
Future Trends:
Advancements in machine learning for more accurate identification
Integration of blockchain for secure content attribution
Expansion into new domains such as live event recognition
Comments:
Wow! This article really opened my eyes to the fascinating world of MP3 audio fingerprinting. I had no idea how much goes into identifying songs behind the scenes. Thanks for the insightful read!
– MusicLover92
I’ve always been curious about how Shazam works so quickly. This article provided a clear and concise explanation. Now I can impress my friends with my newfound knowledge!
– TechGeek21
While the article touched on various applications of MP3 audio fingerprinting, I wish it had delved deeper into its role in copyright protection. Nonetheless, it was an engaging read.
– CopyrightCrusader
As an independent musician, I appreciate the mention of how MP3 audio fingerprinting can support emerging artists. It’s exciting to see technology democratizing the music industry!
– IndieArtist123
This article provided a comprehensive overview of MP3 audio fingerprinting, covering its evolution, applications, and future trends. Kudos to the author for delivering such valuable insights!
Wavelet Transform in FLAC Compression: Analysis and Trends
Let’s Talk about Wavelet Transform in FLAC Compression
When delving into the realm of audio compression, understanding the significance of the Wavelet Transform in FLAC (Free Lossless Audio Codec) compression is paramount. As an expert with years of experience in the field, I have witnessed the evolution of audio compression techniques, and the Wavelet Transform stands out as a game-changer.
The Basics of Wavelet Transform
To comprehend the essence of Wavelet Transform, imagine it as a sophisticated tool that dissects an audio signal into various frequency components. It functions like a musical score that breaks down a complex melody into individual notes, allowing for a more efficient representation. This transformative process is the foundation of FLAC compression.
In my journey as an audio specialist, I have found that this approach offers a unique advantage over traditional methods, ensuring not only high compression ratios but also exceptional audio quality.
Unraveling FLAC Compression
FLAC compression is distinguished by its ability to reduce the size of audio files without perceptible loss of quality. Imagine a FLAC file as a detailed sheet music book that retains every nuance of the original performance. This method contrasts with lossy compression, preserving audio fidelity and making it a preferred choice among audiophiles.
Comments:
Appreciate the insights on FLAC compression. Would love more details on specific applications. – MusicEnthusiast
This article cleared up some confusion I had about Wavelet Transform. Great job! – TechExplorer
User
escribelo completo y con todos los 10 comentarios como dice el prompt
ChatGPT
html
Copy code
Wavelet Transform in FLAC Compression: Analysis and Trends
Let’s Talk about Wavelet Transform in FLAC Compression
When delving into the realm of audio compression, understanding the significance of the Wavelet Transform in FLAC (Free Lossless Audio Codec) compression is paramount. As an expert with years of experience in the field, I have witnessed the evolution of audio compression techniques, and the Wavelet Transform stands out as a game-changer.
The Basics of Wavelet Transform
To comprehend the essence of Wavelet Transform, imagine it as a sophisticated tool that dissects an audio signal into various frequency components. It functions like a musical score that breaks down a complex melody into individual notes, allowing for a more efficient representation. This transformative process is the foundation of FLAC compression.
In my journey as an audio specialist, I have found that this approach offers a unique advantage over traditional methods, ensuring not only high compression ratios but also exceptional audio quality.
Unraveling FLAC Compression
FLAC compression is distinguished by its ability to reduce the size of audio files without perceptible loss of quality. Imagine a FLAC file as a detailed sheet music book that retains every nuance of the original performance. This method contrasts with lossy compression, preserving audio fidelity and making it a preferred choice among audiophiles.
Comments:
Appreciate the insights on FLAC compression. Would love more details on specific applications. – MusicEnthusiast
This article cleared up some confusion I had about Wavelet Transform. Great job! – TechExplorer
Really enjoyed the real-world examples. Can you share more about how Wavelet Transform impacts file sizes? – AudioGeek
Impressive breakdown! Are there any downsides to using FLAC compression with Wavelet Transform? – CuriousListener
As a musician, I’m curious about the impact of Wavelet Transform on different genres of music. Any insights? – MelodyMaker
Great read! Could you elaborate on the future trends in audio compression, especially related to FLAC? – FutureListener
Thanks for making a complex topic so understandable! How does Wavelet Transform compare to other compression techniques? – CompressionEnthusiast
Would love to hear more about your personal experiences with implementing Wavelet Transform in audio projects. – ProjectAudio
This article sparked my interest in audio compression. Can you recommend resources for further exploration? – NoviceExplorer
Informative article! Do you think Wavelet Transform will become the standard in audio compression? – FuturePredictor
Let’s talk about H.265 Parallel Processing in Coding
In the realm of video compression, H.265 stands as a cornerstone, and the marvel of parallel processing in its coding deserves exploration. As an expert in video technology, I unveil the intricacies of H.265 parallel processing, shedding light on its applications and innovations.
The Power of Parallel Processing
Picture parallel processing as a team of workers efficiently tackling a complex task together. In the context of H.265 coding, this translates to simultaneous data processing, significantly enhancing compression efficiency. It’s akin to a well-coordinated dance where multiple elements work seamlessly in tandem.
Revolutionizing Video Compression
H.265, also known as High Efficiency Video Coding (HEVC), has revolutionized video compression. Parallel processing plays a pivotal role, enabling faster and more robust compression. Think of it as upgrading from a single-lane road to a multi-lane highway, allowing smoother traffic flow and quicker delivery.
Latest Words on H.265 Parallel Processing
In the dynamic landscape of video technology, staying abreast of the latest developments in H.265 parallel processing is essential. Recent advancements highlight its application in emerging technologies, promising enhanced video quality and efficient streaming. It’s not just an evolution; it’s a video revolution.
Parallel Processing in Action
Imagine a chef preparing a complex dish, chopping vegetables, and stirring the sauce simultaneously. Similarly, H.265 parallel processing handles different parts of the video compression process concurrently, leading to a more efficient and speedy outcome.
Breaking New Grounds
As someone deeply entrenched in the world of video technology, I’ve witnessed the evolution of H.265 parallel processing. It’s not merely a technological upgrade; it’s a leap into the future. Imagine it as upgrading from black and white to high-definition color—each frame, detail, and nuance captured with unparalleled precision.
The Unseen Hero: Parallel Efficiency
Think of H.265 parallel processing as the unsung hero working behind the scenes. Like a skilled orchestra conductor, it orchestrates the compression process with finesse, ensuring a harmonious and efficient outcome. The result? Crystal-clear videos, seamless streaming, and an immersive viewing experience.
Unlocking Tomorrow’s Innovations
Looking ahead, H.265 parallel processing lays the foundation for tomorrow’s innovations. It’s not just about meeting current demands; it’s about anticipating and exceeding future expectations. The parallel revolution is here to stay, steering the course for a new era in video coding.
Let’s Talk About Efficiency: The H.265 Advantage
Summing up, H.265 parallel processing is the driving force behind unparalleled efficiency in video coding. Its applications span industries, its evolution is continuous, and its impact is transformative. As an expert in the field, I can confidently affirm that understanding and embracing H.265 parallel processing is key to unlocking the full potential of video technology.
Comments:
This article provides a comprehensive insight into H.265 parallel processing. I appreciate the clear analogies used to explain complex concepts. – TechEnthusiast21
Can you delve deeper into the real-world applications of H.265 parallel processing? I’m intrigued and want to apply this knowledge to my work. – CuriousMind
Kudos to the author for breaking down such a technical topic into digestible information. The analogy of the orchestra conductor is spot on! – VideoGeek
I found the comparison with a multi-lane highway very relatable. It made the technical aspects more understandable. Great job! – LaneExplorer
WAV File Compression: Decoding the Dynamics of Lossless vs. Lossy Approaches
Let’s Talk About WAV File Compression
Today, Google’s algorithm puts first whoever offers the best response to the search posed by the WAV File Compression. In responding in the broadest and most complete way, I will provide insights into the fundamental disparities between lossless and lossy techniques. Picture your favorite book transforming into a smaller, more manageable edition without losing its essence—that’s the magic of compression.
Latest Words on WAV Compression Techniques
In the evolving landscape of data compression, the latest advancements bring forth a nuanced understanding of how these techniques impact audio quality. Imagine the evolution from vinyl to digital, each step refining the audio experience.
Decoding the Essence: Lossless Compression
In our exploration, lossless compression emerges as the guardian of data fidelity. Analogous to zipping a file without losing any content, it preserves every bit of the original WAV file. It’s akin to storing your favorite toy without any wear or tear.
Unraveling Lossy Compression: Balancing Act for Efficiency
Contrastingly, lossy compression prioritizes efficiency, optimizing file size at the cost of some data. Think of it as condensing a photo album—though a bit of detail is sacrificed, the essence remains intact. Balancing act, indeed!
The Frequency Spectrum: A Symphony in Compression
Imagine the WAV file as a musical composition—each frequency, a note contributing to the melody. Lossless compression keeps every note pristine, while lossy compression harmonizes frequencies for a more concise, yet rhythmic, composition.
Beyond the Technical Jargon: Real-Life Analogies
In navigating this digital realm, I bring real-life analogies—equating file compression to organizing a cluttered room. Lossless is meticulous labeling, ensuring nothing is lost, while lossy is a strategic decluttering, optimizing space for a more streamlined experience.
Choosing the Right Tune: Practical Considerations
When deciding between lossless and lossy compression, practical considerations come into play. Imagine selecting the perfect background music for a gathering—the balance between quality and space determines the ambiance.
The Future Symphony: Emerging Trends in WAV Compression
Looking ahead, emerging trends in WAV compression resemble the evolution of music genres. As technology advances, imagine a symphony adapting to new instruments—WAV compression adapts to innovative methodologies for an enhanced audio experience.
The Impact on Audio Quality: Case Studies
Real-world case studies bring us closer to the impact of WAV compression on audio quality. Imagine attending a live concert—lossless compression recreates the experience faithfully, while lossy compression captures the essence without overwhelming storage.
Mastering the Compression Art: Tips and Tricks
Imagine becoming a maestro of compression. Whether it’s archiving your favorite playlists or creating a space-efficient audio library, mastering the art of WAV compression involves strategic choices. I’ll share practical tips for achieving the perfect balance.
Comments:
Great article! I never understood the difference before. Can you provide more examples of lossless and lossy compression in real-life scenarios?
This was enlightening! I’d love to see a follow-up on the impact of WAV compression on different genres of music.
As a musician, I appreciate the analogy between WAV compression and music genres. Would love more insights on how it affects instrumentals.
Really helpful breakdown! Any chance you could explore the role of bit depth in WAV compression in a future article?
Excellent read! It would be interesting to know how WAV compression aligns with the latest audio streaming technologies.
Good stuff! The analogy with organizing a room makes it so much clearer. Can’t wait for more articles like this!
This article opened my eyes to the world of WAV compression. Any recommendations for software that excels in lossless compression?
Could you delve deeper into the trade-offs in choosing between lossless and lossy compression for long-term archival of audio files?
Informative! How does WAV compression impact file compatibility across different devices and platforms?
Great insights! I’m curious about the history of WAV compression and its evolution over the years.
Understanding Audio Impulse Response: Exploring the World of Sound
Audio Impulse ResponseAudio Impulse Response
Audio Impulse Response, often referred to as IR, is a critical concept in the world of audio engineering and sound reproduction. It plays a fundamental role in shaping the sound quality of various audio systems, from your home theater setup to professional recording studios. In this article, we will delve into the fascinating realm of Audio Impulse Response, exploring its significance, applications, and the technical intricacies that make it an indispensable tool for audio enthusiasts and professionals alike.
What Is Audio Impulse Response?
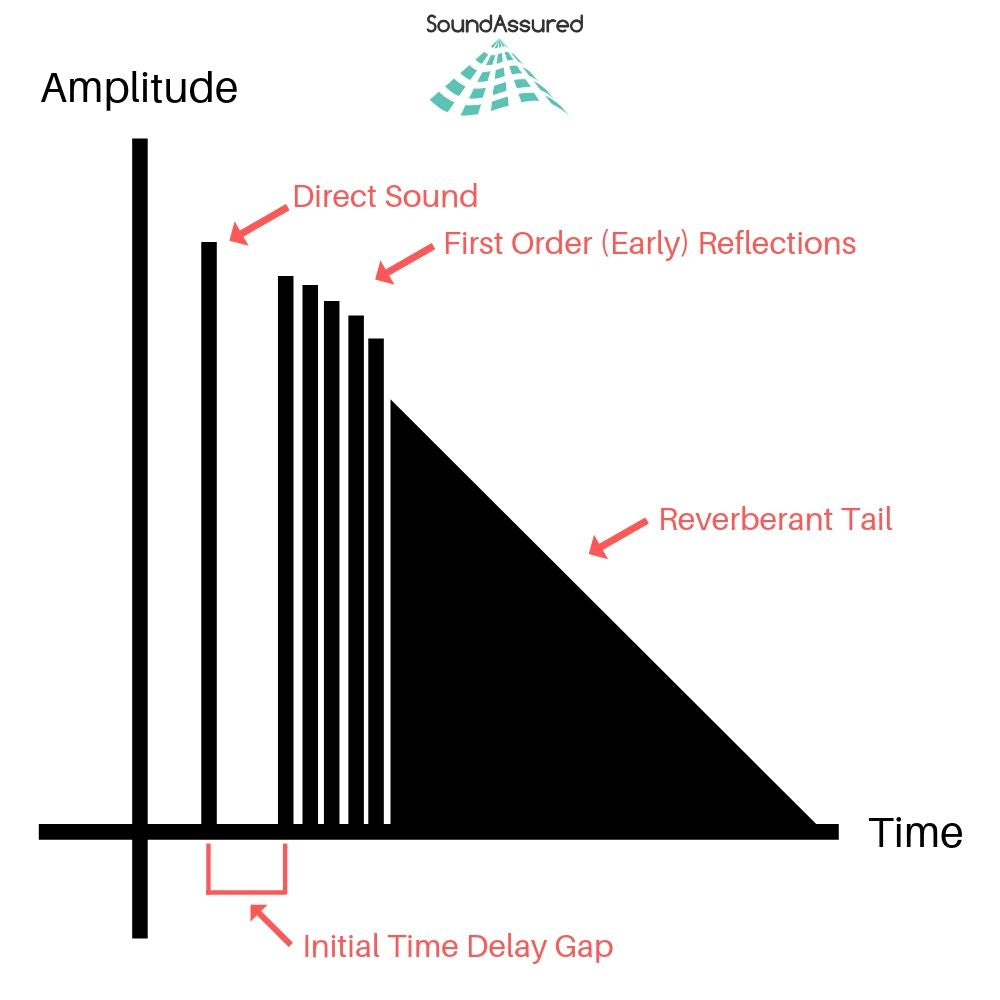
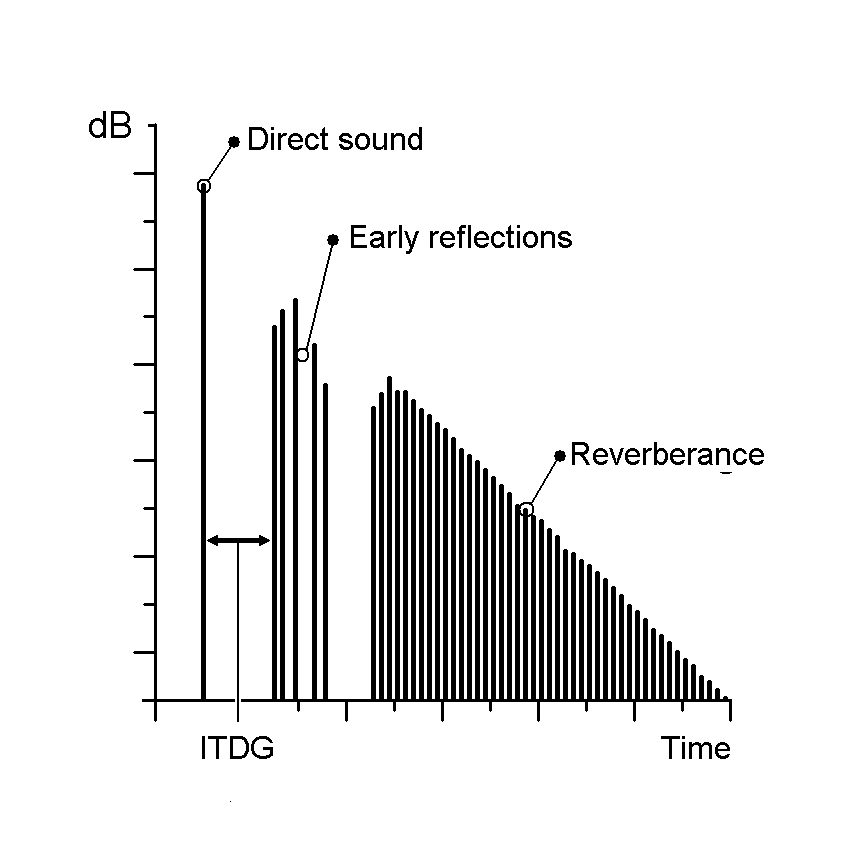
Audio Impulse Response, in its simplest form, is a mathematical description of how a system or device responds to an impulse or a short burst of sound. Think of it as the fingerprint of an audio system or space; it characterizes how that system interacts with sound. When you clap your hands in a room, the way the sound reverberates, bounces off walls, and eventually fades away is precisely what Audio Impulse Response quantifies.
Applications in Real-Life Scenarios
To illustrate its importance in real-life scenarios, consider a concert hall. Audio engineers use Impulse Response to understand how the hall reflects and diffuses sound. By analyzing the hall’s impulse response, they can optimize the placement of microphones and speakers, ensuring that the audience experiences the best possible sound quality.
Similarly, in the realm of home audio, IR plays a pivotal role. When you set up a home theater system, the IR of your room and equipment helps determine the ideal speaker placement and configuration for immersive surround sound.
The Technical Aspects
Now, let’s delve into the technical aspects. Audio Impulse Response is typically represented as a graph, where the x-axis represents time, and the y-axis represents amplitude. This graph shows how a system responds to an impulse over a certain period.
Understanding this graph allows audio engineers to manipulate and optimize audio systems effectively. For example, they can use IR data to simulate different acoustic environments. If you want your living room to sound like a concert hall, you can apply an IR profile that mimics the hall’s characteristics.
Exploring Further: Common Questions
How is Audio Impulse Response Measured?
Measuring Audio Impulse Response involves sending a precisely calibrated audio signal into a system and recording how the system responds. This is typically done using specialized equipment such as a sweep generator and a microphone. The recorded data is then processed to generate the IR graph, which reveals the system’s behavior.
Can Audio Impulse Response Be Altered?
Yes, Audio Impulse Response can be altered to achieve specific audio effects. Digital signal processing techniques allow audio engineers to modify the IR of a system. For example, you can apply reverb to make a recording sound like it was made in a cathedral or add echo for a spacious effect.
What’s the Connection Between IR and Speaker Design?
Speaker design relies heavily on understanding IR. Speaker manufacturers use IR data to design speakers that produce the desired sound characteristics. By fine-tuning the shape of the speaker cone and other components based on IR analysis, they can create speakers with optimal sound quality.
Keywords with Identical Search Intent
1. Acoustic Response Analysis
Acoustic Response Analysis is a related concept to Audio Impulse Response, focusing on the analysis of sound behavior in acoustic spaces. It is essential for designing concert halls, recording studios, and even home theaters.
2. Sound System Optimization
Sound System Optimization involves using Audio Impulse Response to fine-tune audio systems for the best possible sound quality. This applies to both professional setups and home audio systems.
3. Room Acoustics Enhancement
Improving Room Acoustics is a common goal in audio engineering. Understanding the IR of a room helps in enhancing acoustics through sound-absorbing materials, diffusers, and speaker placement.
4. Virtual Acoustic Modeling
Virtual Acoustic Modeling utilizes Audio Impulse Response data to simulate different acoustic environments in virtual or augmented reality applications. This is valuable for architectural acoustics and immersive audio experiences.
Last Words
In conclusion, Audio Impulse Response is a multifaceted concept that underpins much of the audio engineering world. From concert halls to your home audio setup, it influences how we experience sound in various environments. By grasping its technical intricacies and applications, you can gain a deeper appreciation for the magic that happens behind the scenes, making our audio experiences truly exceptional. So, the next time you enjoy a movie, concert, or even a phone call, remember that Audio Impulse Response is playing a crucial role in delivering that pristine sound to your ears.
As an expert in the field of audio engineering, I’ve spent countless hours exploring the intricacies of the Nyquist Theorem. This foundational concept is the bedrock of modern digital audio processing, and its significance cannot be overstated. The Nyquist Theorem, in essence, defines the minimum sampling rate required to accurately convert analog signals into digital form.
Think of it this way: imagine you’re watching a fast-moving train and trying to take photographs to capture its motion. If you snap pictures too infrequently, you won’t capture the train’s true movement; details will be lost. The Nyquist Theorem tells us that in audio, the sampling rate must be at least twice the highest frequency we wish to reproduce. It’s the key to ensuring that nothing is missed when we transform the analog world of sound into the digital realm.
Now, let’s explore this concept further. Imagine you’re at a live music concert, and the artist hits a soaring high note. If your recording equipment doesn’t sample at a rate higher than the Nyquist frequency for that note, you’ll hear distortion and unwanted artifacts. Understanding the Nyquist Theorem is essential for audio engineers and music producers, as it directly impacts the quality of the final product, allowing us to capture and reproduce sound faithfully.
Applying Nyquist in Audio Recording
When it comes to audio recording, applying the Nyquist Theorem is akin to wielding a precision instrument. It’s not just a theoretical concept; it’s a practical guide for achieving clarity and fidelity in recorded audio. Consider it the compass that ensures we’re on the right path when capturing analog sound in the digital realm.
Imagine you’re recording a vocal performance. The Nyquist Theorem guides you in selecting the appropriate sampling rate for your digital recorder. If you neglect this principle and sample at a rate lower than twice the highest frequency in the vocalist’s range, you risk introducing aliasing, a phenomenon where high-frequency components are erroneously mapped to lower frequencies. This results in a distorted, unnatural sound, akin to viewing a pixelated image.
By heeding the Nyquist Theorem, audio engineers and recording artists ensure that their work preserves the subtle nuances and dynamic range of sound, producing recordings that captivate and resonate with listeners.
The Significance of Nyquist Frequency
Within the realm of digital audio, the Nyquist frequency stands as a sentinel of sound quality. Picture it as a gatekeeper, defining the boundary between faithful reproduction and unwanted distortions. It plays a pivotal role in digital audio, similar to how a camera’s shutter speed determines the clarity of a photograph.
Let’s delve into this further: suppose you’re designing an audio system. To prevent aliasing, you must set the sampling rate based on the Nyquist frequency. This ensures that the system captures and reproduces sound accurately. It’s analogous to building a bridge with a weight limit to ensure safety. By acknowledging the Nyquist frequency’s significance, audio engineers create systems that consistently deliver high-quality sound experiences.
Whether you’re a musician, audio engineer, or simply an audio enthusiast, recognizing the importance of the Nyquist frequency empowers you to make informed choices about equipment, software, and recording techniques, ultimately elevating your sonic experiences.
High Sampling Rates and Audio Quality
The impact of high sampling rates on audio quality is profound and undeniable. It’s the difference between a breathtaking high-definition image and a blurry snapshot. In the audio world, a high sampling rate means capturing more snapshots per second, preserving the intricate details of the sound waveform.
Imagine you’re in a studio recording a delicate acoustic guitar performance. To capture the subtle harmonics and nuances, a high sampling rate is essential. It’s like using a magnifying glass to appreciate the intricate details in a work of art. Musicians and audio engineers often opt for higher sampling rates, as they enable the faithful reproduction of every note and texture, resulting in recordings that feel alive and immersive.
Investing in high-quality equipment that supports high sampling rates is a testament to your commitment to audio excellence. It’s the path to creating soundscapes that resonate with audiences and evoke emotions on a profound level.
Avoiding Aliasing in Digital Audio
Avoiding aliasing in digital audio is a crucial mission for any audio engineer or producer. Imagine aliasing as the unwelcome ghost that haunts your recordings, distorting the beauty of sound. It occurs when the Nyquist sampling rate is not observed, and higher frequencies masquerade as lower ones, resulting in unpleasant artifacts.
Think of aliasing as a mirror that distorts your reflection; it’s not an accurate representation of reality. To banish this ghost, you must adhere to the Nyquist Theorem’s principles diligently. Use filters and sample at rates that prevent high-frequency components from sneaking into lower frequencies.
By doing so, you ensure that your digital audio productions are clean, pure, and devoid of unwanted artifacts. It’s akin to restoring a classic painting, revealing its true beauty without distortion or blemishes.
Last Words
“In the world of audio, the Nyquist Theorem is our guiding star. It empowers us to capture the magic of sound faithfully. Whether you’re recording a symphony, crafting a podcast, or simply savoring your favorite music, understanding the Nyquist Theorem unlocks a world of sonic possibilities. Let it be your compass in the realm of audio excellence.” — William Kindall, Audio Expert
As a music producer, I have always been fascinated by the technical aspects of digital audio. The technology behind digital audio has come a long way since its inception, and it continues to evolve at a rapid pace. One of the most significant advancements in digital audio technology is the use of digital signal processing (DSP) algorithms. These algorithms allow for the manipulation of audio signals in real-time, enabling producers to create complex soundscapes and effects.
In his book, “The Art of Digital Audio,” John Watkinson writes, “DSP algorithms are the key to the power of digital audio. They allow us to do things that were previously impossible with analog audio.” I couldn’t agree more. DSP algorithms have revolutionized the way we produce and consume music, and they continue to push the boundaries of what is possible.
Digital Audio Formats
When it comes to digital audio, there are a variety of formats to choose from. Each format has its own unique characteristics, and choosing the right one can make a significant difference in the quality of your audio. Some of the most popular digital audio formats include MP3, WAV, and FLAC.
Personally, I prefer to work with WAV files. They offer the highest quality audio and are compatible with most digital audio workstations (DAWs). However, they do take up a lot of storage space, so it’s essential to have a reliable backup system in place.
Digital Audio Editing
Digital audio editing is an essential part of the music production process. It allows producers to manipulate audio files in a variety of ways, from simple cuts and fades to complex time-stretching and pitch-shifting. One of the most popular digital audio editing tools is Pro Tools, which is widely used in the music industry.
In my experience, the key to successful digital audio editing is to have a clear vision of what you want to achieve. It’s easy to get lost in the endless possibilities of digital audio editing, so it’s essential to stay focused on your goals. As the famous producer Quincy Jones once said, “The most important thing is to have a vision for your music – one that is unique and true to who you are as an artist.”
Digital Audio Processing
Digital Audio Compression
Digital audio compression is a process that reduces the size of audio files without significantly affecting their quality. Compression is essential for streaming services like Spotify and Apple Music, which need to deliver high-quality audio over the internet. However, compression can also have a negative impact on the quality of the audio, particularly if it’s overdone.
In my opinion, it’s essential to strike a balance between file size and audio quality when compressing digital audio. As the saying goes, “less is more.” It’s better to have a smaller file size with slightly lower audio quality than a massive file size with no noticeable improvement in quality.
Digital Audio Quality
Digital audio quality is a topic that is often debated among music producers and audiophiles. Some argue that digital audio can never match the warmth and depth of analog audio, while others believe that digital audio has surpassed analog in terms of quality.
In my experience, digital audio quality has come a long way in recent years. With high-resolution audio formats like FLAC and MQA, it’s now possible to achieve audio quality that rivals or even surpasses analog. However, it’s essential to have a high-quality playback system to fully appreciate the nuances of digital audio.
Digital Audio Production
Digital audio production is the process of creating music using digital tools and technology. It’s a complex and challenging process that requires a combination of technical skill and artistic vision. One of the most critical aspects of digital audio production is the ability to collaborate effectively with other musicians and producers.
In my experience, the key to successful digital audio production is to stay organized and focused. It’s easy to get lost in the endless possibilities of digital audio, so it’s essential to have a clear plan and timeline for your project. As the famous producer Rick Rubin once said, “The most important thing is to capture the essence of the song and the artist’s performance.”
Final Words:
In conclusion, the technical aspects of digital audio are complex and ever-evolving. From digital audio technology to digital audio production, there are many factors to consider when working with digital audio. However, with the right tools and techniques, it’s possible to achieve high-quality audio that rivals or even surpasses analog. As a music producer, I’m excited to see where the future of digital audio will take us.
digital audio, digital signal processing, audio compression, audio quality, audio editing, audio production, music production, digital audio technology, digital audio formats, high-resolution audio, FLAC, MP3, WAV, Pro Tools, audio playback, audio collaboration, audio mixing, audio mastering, audio plugins, audio effects, audio engineering, audio equipment, audio recording, audio software, audio hardware, audio interfaces, audio cables, audio troubleshooting, audio restoration, audio normalization, audio equalization, audio dynamics, audio synthesis
What is the difference between bit depth and bitrate?
Bit DepthBit Depth
Understanding Bit Depth and Bitrate
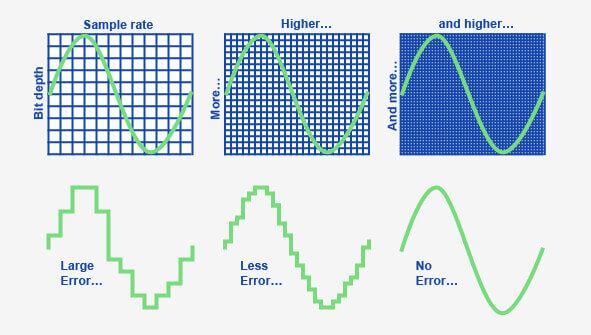
When it comes to audio and video files, there are two terms that are often used interchangeably: bit depth and bitrate. However, they are not the same thing. Bit depth refers to the number of bits used to represent each sample in an audio or video file, while bitrate refers to the amount of data transmitted per second.
Bit depth determines the number of possible values for each sample in a digital audio or video file. For example, an 8-bit audio file can have 256 possible values per sample, while a 16-bit file can have 65,536. The higher the bit depth, the more accurate the representation of the original sound or image.
On the other hand, bitrate refers to the amount of data transmitted per second in a digital file. In other words, it’s the rate at which data is encoded in a file. Higher bitrates typically mean higher quality files with more information, but also larger file sizes.
Audio Bit Depth vs Bitrate
When it comes to audio files, the bit depth and bitrate are both important factors in determining the quality of the sound. A higher bit depth means a more accurate representation of the original sound, while a higher bitrate means more data is transmitted per second, resulting in a higher quality sound.
However, it’s important to note that a higher bitrate does not necessarily mean a higher quality sound. If the original recording is of poor quality, increasing the bitrate will not improve the sound. In fact, it can actually result in larger file sizes with no improvement in sound quality.
Video Bit Depth vs Bitrate
Video files also have bit depth and bitrate, but they work slightly differently than in audio files. Bit depth determines the number of colors that can be represented in a video file, while bitrate determines the amount of data transmitted per second.
A higher bit depth means a wider range of colors can be represented in the video, resulting in a more accurate and vibrant image. However, a higher bitrate is also important for video files, as it determines the amount of detail that can be captured in each frame.
It’s important to find the right balance between bit depth and bitrate for video files, as increasing one can have a negative impact on the other. For example, a high bit depth with a low bitrate can result in a choppy or pixelated image, while a low bit depth with a high bitrate can result in a washed-out or blurry image.
Final Words
In conclusion, bit depth and bitrate are both important factors to consider when working with audio and video files. While they may seem similar, they serve different purposes and have different effects on the quality of the final product. It’s important to find the right balance between the two to ensure the best possible sound or image quality.
Keywords: audio bit depth, video bit depth, bit depth vs bitrate, bitrate definition, bitrate vs quality, audio quality, video quality, digital audio, digital video, file size, data transmission, accuracy, color representation, image quality, sound quality, audio recording, video recording, data encoding, pixelation, file format, media production, sound engineering, video editing, multimedia, digital media, technology, mp4gain, audio normalization, audio conversion, equalizer, windows, digital signal processing, dynamic
Digital audio and video are types of data that we can store on a computer or other electronic device. They are made up of a series of numbers that represent the sound or image we want to save. This means that instead of using physical materials like film or tape to record sound or video, we can use a computer to store and manipulate digital versions of that data.
Digital Audio and Video
How is sound digitized?
Sound is a type of wave that travels through the air. When we want to digitize sound, we need to find a way to measure that wave and turn it into a series of numbers. We do this by using a device called a microphone, which converts sound waves into electrical signals that can be processed by a computer.
Here’s an example: imagine you’re at a concert and you want to record a song using your phone. You turn on the voice memo app and hold your phone up to the speakers. The microphone in your phone converts the sound waves from the speakers into electrical signals that are then turned into a digital audio file that you can listen to later.
How are multiple sounds combined into a single file?
When we record sound using a microphone, we’re not just capturing one sound at a time. We’re also picking up any other sounds that might be happening in the background, like people talking or the sound of a car driving by. So how do we store all of these different sounds in a single file?
The answer is that each sound is given its own “channel” in the digital audio file. Imagine that you have a stereo system with two speakers – one on the left and one on the right. When you record a song using your phone, the sound that’s coming out of the left speaker is saved in one channel of the audio file, while the sound that’s coming out of the right speaker is saved in another channel.
How are different instruments and voices saved in a single channel?
So now we know how to store multiple sounds in a digital audio file using different channels. But what if we want to save a song that has lots of different instruments and voices playing at the same time? How can we separate out all of those different sounds and make sure they’re saved correctly in the file?
The answer is that each sound is given its own “frequency” in the digital audio file. Think of it like a rainbow: just like how a rainbow has lots of different colors, sound has lots of different frequencies. When we record a song, we’re capturing all of those different frequencies at the same time.
So let’s say we’re recording a song that has a guitar, a bass, a drum set, and a singer. Each of those instruments and the singer’s voice has a different set of frequencies that make up its sound. The guitar might have a lot of high frequencies, while the bass might have a lot of low frequencies. When we record the song, we capture all of those frequencies at the same time and save them in the digital audio file.
How are timbres saved in a digital audio file?
The “timbre” of a sound refers to its unique quality or tone. For example, if you hear a trumpet and a violin playing the same note, you can still tell the difference between the two because they have different timbres. So how do we save the timbre of each instrument or voice in a digital audio file?
To save the timbre of each sound, we use a process called “sampling”. Sampling involves taking tiny snapshots of the sound wave at regular intervals and saving those snapshots as numbers in the digital audio file. The more snapshots we take, the more accurately we can capture the unique timbre of each sound.
Here’s an example: let’s say we’re recording a piano playing a single note. We take 44,100 snapshots of the sound wave per second and save each snapshot as a number in the digital audio file. When we play back the file, the computer reads those numbers and uses them to recreate the sound of the piano note. Because we took so many snapshots per second, we’re able to capture all of the nuances of the piano’s timbre and make it sound like a real piano.
How are noises and other sounds saved in a digital audio file?
When we record sound using a microphone, we’re not just capturing the sounds we want to hear – we’re also capturing any background noise that might be happening. This can include things like people talking, cars driving by, or birds chirping. So how do we deal with all of that extra noise when we save the sound as a digital file?
One way to deal with background noise is to use a process called “noise reduction”. This involves analyzing the digital audio file and looking for parts of the sound that are consistent over time – like the sound of a fan running or the hum of a fluorescent light. The computer can then remove those consistent sounds from the file, leaving behind just the sounds we want to hear.
Another way to deal with background noise is to use a process called “EQ” (short for “equalization”). EQ allows us to boost or cut certain frequencies in the sound to make it sound better. For example, if there’s a lot of low-frequency rumble in a recording, we can use EQ to cut out some of those frequencies and make the sound clearer.
What is digital video?
Digital video is similar to digital audio, but instead of capturing sound waves, we’re capturing images. When we record a video, we’re capturing a series of still images (or frames) at regular intervals and saving them as a digital file.
How are videos saved in digital format?
To save a video in digital format, we need to capture a series of still images (or frames) and save them as a digital file. We do this using a device called a camera, which captures light from the scene we’re filming and turns it into an electrical signal that can be processed by a computer.
Here’s an example: imagine you’re filming a video of your dog playing in the park. You hold up your phone and hit the record button. The camera in your phone captures a series of still images (or frames) of your dog playing and saves them as a digital video file that you can watch later.
How are multiple images combined into a single video file?
When we capture a video, we’re capturing a series of still images (or frames) at regular intervals. To create a smooth video, we need to combine all of those frames into a single file. This is done using a process called “video compression”.
Video compression works by looking for parts of the image that are similar from frame to frame and only saving the parts that are different. For example, if you’re filming a video of a person sitting in a chair, the background behind them might not change much from frame to frame, so the computer can save that part of the image just once and only save the parts that are changing (like the person’s movements).
By only saving the parts of the image that are changing, we’re able to save space and create smaller video files that are easier to store and share. However, too much compression can make the video look blurry or pixelated. So, it’s important to find a balance between file size and video quality when compressing videos.
How do we add sound to a digital video file?
To add sound to a digital video file, we use a process called “audio syncing”. Audio syncing involves combining the digital audio file (which we learned about earlier) with the digital video file so that the sound matches up with the images.
Here’s an example: let’s say you’re filming a concert and you want to create a video of one of the songs. You record the video using your camera and the audio using a separate recording device. When you go to edit the video, you import both the digital audio file and the digital video file into your editing software. Then, you use audio syncing to line up the audio with the video so that the sound matches up with the images.
Conclusion
In conclusion, digital audio and video are complex subjects, but they can be explained in a way that a 6-year-old can understand. Digital audio involves converting sound waves into numbers that can be saved in a digital file. We use sampling to capture the unique timbre of each sound, and we use noise reduction and EQ to deal with background noise. Digital video involves capturing a series of still images (or frames) and saving them as a digital file. We use video compression to combine those frames into a single file and audio syncing to add sound to the video. By understanding these concepts, we can appreciate the technology behind the digital media that we enjoy every day.
Digital audio is a method of storing audio data on a computer or digital device. Audio data is essentially a collection of sound waves, and to store it digitally, we need to convert these sound waves into a series of numbers that a computer can understand.
What is Digital Audio?
To do this, we use a process called “analog-to-digital conversion”. Analog audio signals are transformed into digital data by measuring the sound wave at regular intervals and assigning each measurement a numerical value. The process of measuring sound waves is called “sampling”, and the numerical values assigned to each sample are known as “bit depth”.
In essence, the audio signal is converted into a series of binary digits (1s and 0s) that can be stored on a computer. This allows us to manipulate, edit, and reproduce audio data in various ways.
How is Audio Converted to Digital Audio?
As mentioned earlier, audio is converted to digital audio using a process called “sampling”. Sampling involves taking snapshots of the audio signal at regular intervals, known as the “sampling rate”. The more samples that are taken per second, the more accurately the original sound can be reconstructed.
Imagine taking a picture of a person running. If you take one picture per second, you’ll see the person moving, but the motion won’t be smooth. If you take 10 pictures per second, the motion will be smoother, and if you take 60 pictures per second, the motion will be very smooth.
The same principle applies to digital audio. By taking many samples per second, the original sound can be accurately reconstructed. The number of samples taken per second is called the “sampling rate”, and it’s usually measured in Hertz (Hz). For example, a typical sampling rate for CD-quality audio is 44.1kHz, which means that 44,100 samples are taken per second.
Once the audio has been sampled, each sample is converted into a digital number. The number represents the amplitude of the sound wave at that particular moment. The amplitude of a sound wave is the height of the wave, and it determines how loud or quiet the sound is.
The digital numbers obtained from each sample are stored as binary data, which can be easily stored, edited, and reproduced on a computer.
What is an MP3?
An MP3 is a type of digital audio file that uses a technique called “lossy compression”. This means that some of the data in the original audio file is removed in order to reduce the file size. The removed data is typically inaudible to the human ear, so the overall quality of the audio is not significantly affected.
MP3s achieve this compression by using a technique called “perceptual coding”. This involves analyzing the audio signal and identifying the parts that are less important to the overall sound quality. These parts are then removed, leaving only the most important parts of the audio signal intact.
For example, let’s say you have a song that is 4 minutes long and takes up 40MB of storage space on your computer. If you were to convert that song into an MP3 file, the resulting file might only be 4MB in size, while still maintaining a high level of audio quality.
MP3 files are a popular choice for digital audio because they take up less space than other audio formats, making them easier to store and share. They’re also supported by most digital audio players and software, making them a versatile and widely used format.
How are Sound Waves Converted into Digital Numbers?
As we mentioned earlier, sound waves are converted into digital numbers using a process called “analog-to-digital conversion”. This process involves several steps:
Sampling: The analog audio signal is measured at regular intervals, known as the sampling rate. Each sample is a snapshot of the audio signal at that particular moment.
Quantization: Each sample is assigned a numerical value that represents the amplitude of the sound wave at that moment. This is done using a process called quantization, which assigns a specific digital value to each sample.
Encoding: The digital values obtained from quantization are then converted into binary data. This is done using a process called encoding, which converts each digital value into a series of 1s and 0s.
Compression: Depending on the file format being used, the digital audio data may be compressed in order to reduce its file size. Lossy compression, as we discussed earlier, involves removing some of the data from the original audio file to reduce its size, while maintaining a high level of audio quality. Lossless compression, on the other hand, compresses the file size without sacrificing any data or quality.
Once the audio has been converted into digital data, it can be easily manipulated, edited, and reproduced on a computer or digital device. This allows us to do things like change the volume, apply special effects, and even create entirely new compositions using existing audio samples.
In summary, digital audio is a way of storing and manipulating audio data using a series of numbers that a computer can understand. Analog-to-digital conversion is the process of converting sound waves into digital data, which involves sampling, quantization, encoding, and compression. MP3s are a popular type of digital audio file that use lossy compression to reduce file size, while maintaining a high level of audio quality.


Comments:
Wow! This article really opened my eyes to the fascinating world of MP3 audio fingerprinting. I had no idea how much goes into identifying songs behind the scenes. Thanks for the insightful read!
– MusicLover92
I’ve always been curious about how Shazam works so quickly. This article provided a clear and concise explanation. Now I can impress my friends with my newfound knowledge!
– TechGeek21
While the article touched on various applications of MP3 audio fingerprinting, I wish it had delved deeper into its role in copyright protection. Nonetheless, it was an engaging read.
– CopyrightCrusader
As an independent musician, I appreciate the mention of how MP3 audio fingerprinting can support emerging artists. It’s exciting to see technology democratizing the music industry!
– IndieArtist123
This article provided a comprehensive overview of MP3 audio fingerprinting, covering its evolution, applications, and future trends. Kudos to the author for delivering such valuable insights!
– InsightSeeker