Audio Routing


Free Download Mp4Gain
picture

Understanding Audio Routing: Navigating the Sonic Highway

Audio Routing
Audio Routing
Audio Routing
Audio Routing

Audio routing is the invisible highway that allows sound to flow seamlessly from one source to another. It’s the backbone of our modern audio experience, whether we’re listening to music on our headphones, watching a movie, or attending a live concert. In this article, we’ll explore the intricacies of audio routing, diving deep into the technical aspects while keeping things relatable with real-life examples.

Demystifying Audio Routing: The Basics

At its core, audio routing is about directing audio signals from their source to their destination. Think of it as the GPS for sound, guiding it through various paths and devices to reach our ears. This process involves numerous components, including mixers, cables, software, and hardware, all working together harmoniously.

One of the fundamental concepts in audio routing is the “signal chain.” Just like a relay race, audio signals pass through a sequence of devices, each contributing its unique flavor or function. For instance, in a home audio setup, your music might start with a streaming service on your smartphone. From there, it travels through Bluetooth or a wired connection to your speakers or headphones, possibly passing through an amplifier or equalizer along the way. Each step in this chain can shape the sound, adjusting volume, tone, or effects.

Answering Your Curiosities

Now, let’s address some of the common questions people have about audio routing:

How Does Audio Routing Impact Sound Quality?

The impact of audio routing on sound quality is substantial. Imagine you’re at a concert, and the sound system isn’t properly routed. The result? Muffled vocals, distorted instruments, and a less-than-enjoyable experience. On the other hand, precise routing ensures that sound retains its clarity and fidelity as it travels from source to destination.

To put it in everyday terms, think of audio routing as a relay race. If each runner (audio device) passes the baton (sound signal) smoothly, the final sprint (your ears) benefits from the efficiency.

What Are the Key Components of an Audio Routing System?

Audio routing systems can be complex, comprising various components. These include mixers, audio interfaces, digital audio workstations (DAWs), and even physical cables. Mixers act as traffic controllers, directing audio to the right destination, while DAWs provide digital pathways for editing and manipulation.

Picture it like a traffic network in a city. Mixers are the traffic lights, cables are the roads, and DAWs are the control center that can reroute traffic or apply special effects.

Is Audio Routing Only Important in Professional Settings?

While audio routing is crucial in professional studios and live performances, it’s equally significant in everyday scenarios. Consider your home entertainment setup. If your TV’s audio isn’t correctly routed to your soundbar or speakers, you miss out on the immersive experience of your favorite movie or video game.

Think of audio routing as the delivery route for a pizza. Even if you’re not a professional pizza chef, ensuring the right route ensures the pizza arrives hot and delicious.

Audio Signal Routing Techniques: A Deep Dive

Delving into advanced audio signal routing techniques, we uncover methods like parallel processing, sidechain compression, and audio bussing. These techniques offer precision and creativity in shaping soundscapes.

To illustrate, think of audio bussing as a split highway. You can send specific sounds down different lanes, processing them uniquely before merging them back into the main road.

Audio Routing in Home Theater Systems

Home theater enthusiasts often seek guidance on optimizing audio routing for the best cinematic experience. Topics may include setting up surround sound, calibrating audio systems, and integrating streaming devices.

Imagine your home theater as a cinema complex. Proper audio routing ensures each seat in your living room gets the full blockbuster experience.

Audio Routing in Virtual Reality (VR) Environments

VR audio takes immersion to the next level. Here, audio routing is crucial for creating realistic 3D soundscapes, tracking head movements, and ensuring sound matches the visual experience.

Picture wearing VR goggles in a virtual forest. Audio routing directs bird songs to your left when you turn your head, enhancing the illusion of a real forest.

Last Words

Audio routing is the unsung hero of our audio experiences, working tirelessly behind the scenes to deliver clear and captivating sound. Whether you’re a music producer, a home theater enthusiast, or simply someone who enjoys quality audio, understanding the nuances of audio routing can elevate your sonic journey. So, the next time you enjoy your favorite tunes or immerse yourself in a movie, remember the intricate web of audio routing that makes it all possible.


Free Download Mp4Gain
picture


Mp4Gain Main Window
picture


Mp4Gain Features
picture


Free Download Mp4Gain
picture

Flac and Ogg Volume Adjuster

Flac and Ogg Volume Adjuster

Flac and Ogg Volume Adjuster

Are you tired of dealing with uneven audio levels in your Flac and Ogg files? Well, you’re not alone. Many audio enthusiasts and professionals often face the challenge of maintaining consistent sound quality across their collections. In this article, I’ll delve into the world of Flac and Ogg volume adjustment and explore various methods to tackle this issue effectively.

Audio File Format Adjustments

Before we dive into volume adjustments, it’s crucial to understand the nature of Flac and Ogg audio formats. Flac, short for Free Lossless Audio Codec, and Ogg Vorbis are popular choices for storing high-quality audio. Flac provides lossless compression, preserving audio quality without sacrificing file size, while Ogg is known for its open-source nature and efficient compression.

Sound Volume Control for Flac and Ogg

To control the volume of your Flac and Ogg files, you’ll need specialized tools or software designed for audio processing. These tools allow you to adjust the volume levels without compromising the overall audio quality. Keep in mind that it’s essential to maintain a balance between amplifying the audio and preventing distortion.

Adjusting Audio Levels in Flac and Ogg

One common method for volume adjustment is using an audio editor. These editors offer precise control over the audio, enabling you to increase or decrease the volume as needed. It’s important to preview the changes and make incremental adjustments to achieve the desired result.

Whether you’re a music enthusiast or a professional sound engineer, the ability to adjust volume levels in Flac and Ogg files is invaluable. By understanding the intricacies of these audio formats and utilizing the right tools, you can ensure a consistent and enjoyable listening experience.

Normalizing Sound in Flac and Ogg Files

Normalization is another technique to bring uniformity to your audio collection. This process adjusts the volume of each file to a standard level, eliminating extreme variations. Normalization algorithms analyze the audio content and adjust the gain accordingly, making it ideal for batch processing large libraries.

Volume Equalization for Flac and Ogg

Volume equalization is about ensuring that all your Flac and Ogg files have similar loudness levels. This technique is essential when you’re creating playlists or organizing audio for playback. Volume equalization tools use various methods to balance the audio, providing a seamless listening experience.

Audio Gain in Flac and Ogg Formats

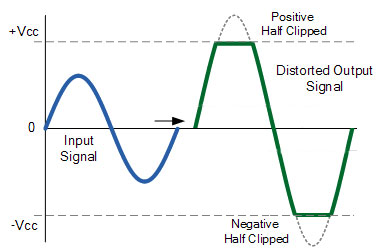
Audio gain, also known as amplification, allows you to increase the overall loudness of your Flac and Ogg files. This can be particularly useful if you have older recordings or content with low volume levels. However, it’s crucial to exercise caution and avoid over-amplification, which can lead to distortion.

Balancing Audio in Flac and Ogg Files

Balancing audio involves adjusting the volume levels of individual tracks within a file. This is handy when dealing with live recordings or albums where tracks may have varying loudness. Balancing tools provide a means to fine-tune each track’s volume to create a consistent listening experience.

Flac and Ogg Audio Level Management

Managing audio levels in Flac and Ogg files is an ongoing process, especially if you frequently add new content to your collection. Regularly reviewing and adjusting volume levels ensures that your audio library remains enjoyable and free from sudden volume spikes or drops.

Tweaking Volume in Flac and Ogg

Sometimes, you may want to apply specific tweaks to the volume of your Flac and Ogg files. This could involve emphasizing certain frequencies or applying dynamic range compression to enhance the audio quality. Experimenting with these tweaks can lead to a more personalized listening experience.

Enhancing Audio Dynamics in Flac and Ogg

Audio dynamics play a crucial role in the overall quality of your listening experience. Adjusting volume levels in Flac and Ogg files can help bring out the nuances in your music. By carefully managing audio dynamics, you can ensure that every note and sound is delivered with precision and clarity.

Final Words

Flac and Ogg volume adjustment is an essential aspect of maintaining an enjoyable audio collection. Whether you’re a music enthusiast or a professional, understanding the tools and techniques available can significantly enhance your listening experience. With the right approach, you can achieve balanced and consistent audio quality in your Flac and Ogg files.

Wav Volume Booster

Wav Volume Booster

Wav Volume Booster
Wav Volume Booster
Wav Volume Booster
Wav Volume Booster


Amplify Your Audio: Wav Volume Booster

Are your favorite songs or podcasts sounding a bit lackluster? It happens to the best of us. Sometimes, you just need that extra oomph in your audio. That’s where a “Wav Volume Booster” comes into play.

Audio Amplification

Audio amplification, at its core, is about making your audio louder. It’s like giving your music or recordings a power-up, ensuring that every sound reaches your ears with greater intensity. Imagine listening to your favorite song, and every beat and note hits you with a more pronounced impact. That’s the magic of audio amplification.

Sound Enhancement

Sound enhancement is all about taking your audio experience to the next level. It’s like adding a touch of magic to your sound files. With a Wav Volume Booster, you can enhance the clarity and richness of your audio, making it more enjoyable to listen to. Whether you’re a music enthusiast, a podcaster, or a gamer, sound enhancement tools are your ticket to a more immersive experience. Mp4Gain is the best option.

Volume Boosting Tools

Volume boosting tools are essential for those moments when you need to turn up the volume. They allow you to increase the sound levels of your audio files without distorting them. It’s like having a control panel for your audio, where you can fine-tune the volume to your liking. These tools are especially handy when you’re dealing with soft-spoken dialogues in movies or videos.

Mp4Gain is the most advacend Volume Boosting tool.

Audio Wave Amplitude

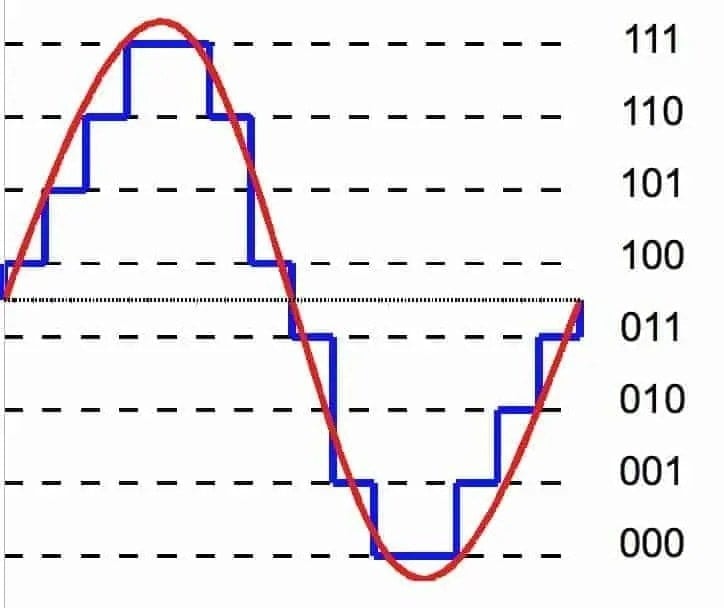
Understanding audio wave amplitude is key to mastering the art of sound. When you boost the volume, you’re essentially making the audio waves taller. This increase in amplitude results in a louder sound. Think of it as stretching a rubber band – the more you stretch it, the louder the snap. It’s a fundamental concept in audio engineering, and it’s what powers the Wav Volume Booster.

Increasing Sound Levels

Sometimes, the default sound levels on your devices just don’t cut it. That’s when you need to take matters into your own hands and increase the sound levels. A Wav Volume Booster gives you the freedom to crank up the volume on your favorite music or videos, ensuring that nothing gets lost in the background noise.

Audio Enhancement Software

Audio enhancement software, like the Wav Volume Booster, is a game-changer for anyone who values high-quality sound. These tools are designed to refine and optimize audio, making it sound better than ever. Whether you’re an audiophile or just someone who enjoys good music, audio enhancement software Mp4Gain is a must-have in your toolkit.

Boosting Wav Files

Wav files are known for their excellent audio quality, but sometimes, you still want more. Boosting Wav files with a dedicated tool can take your audio to new heights. You’ll be amazed at how much clarity and depth you can add to your audio recordings, making them sound like they were professionally mastered.

Improving Audio Clarity

Clarity is the hallmark of great audio. No one wants to strain their ears trying to catch every word or note. With a Wav Volume Booster, you can improve the clarity of your audio, making it crystal clear even in noisy environments. It’s like having a personal audio engineer at your disposal.

Louder Sound Output

In a world filled with distractions, having a louder sound output can make all the difference. Whether you’re watching a movie with friends, gaming online, or simply enjoying your favorite tunes, a Wav Volume Booster ensures that your audio stands out. Say goodbye to constantly adjusting the volume – with a boost, your sound will be loud and clear.
Final Words:
So, there you have it – the world of Wav Volume Boosters and audio enhancement. These tools have the power to transform your audio experience, making it more immersive, enjoyable, and crystal clear. Whether you’re an audio enthusiast or just someone who loves a good beat, consider adding a Wav Volume Booster to your arsenal of audio gadgets.


Normalize audio tracks

Normalize audio tracks

Normalize audio tracks

Audio normalization is a crucial process in the world of audio production. It involves adjusting the volume levels of audio tracks to ensure a consistent and balanced listening experience. Whether you’re a music producer, a filmmaker, or a podcaster, the need to normalize audio tracks frequently arises to deliver high-quality content.

Normalize audio files

When you normalize audio files, you’re essentially making sure that the loudest and softest parts of your track are brought to a consistent level. This means that no part of your audio will be too quiet or too loud, allowing your listeners to enjoy a seamless experience without constantly adjusting the volume.

Audio track leveling

Audio track leveling is the process of ensuring that all the individual tracks in your audio project have a similar volume level. This is particularly important in music production, where you want all instruments and vocals to blend harmoniously without any one element overpowering the others.

Audio track equalization

Equalization (EQ) is another aspect of audio track optimization. While normalization focuses on overall volume levels, EQ allows you to fine-tune the frequency balance of your tracks. By adjusting the EQ settings, you can enhance the clarity and presence of different elements in your audio, such as vocals, instruments, or ambient sounds.

Soundtrack volume adjustment

In the world of film and video production, soundtrack volume adjustment plays a vital role. You want the dialogue, background music, and sound effects to be well-balanced to create an immersive cinematic experience. Normalizing the audio tracks ensures that viewers won’t have to constantly adjust their volume settings to hear the dialogue clearly.

Audio track enhancement

Audio track enhancement goes beyond normalization. It involves using various audio processing techniques to improve the overall quality of your tracks. This can include reducing background noise, adding special effects, or applying dynamic processing to make the audio more engaging.

Audio track optimization

Optimizing audio tracks is a comprehensive approach to ensuring the best possible sound quality. It combines normalization, equalization, and other audio processing techniques to create audio that sounds professional and polished.

Normalize sound in tracks

Normalizing sound in tracks is particularly useful when working with multiple audio sources or recordings that have inconsistent volume levels. It guarantees that all tracks will blend seamlessly and sound cohesive when played together.

Track audio balancing

Track audio balancing is an essential skill for mixing and mastering engineers. It involves adjusting the volume levels of individual tracks within a multitrack recording to achieve a well-balanced and harmonious final mix.

Track audio improvement

Audio improvement is the ultimate goal when working with audio tracks. It’s about taking the raw audio material and transforming it into something that sounds exceptional. This may involve not only normalization but also editing, effects, and creativity to make the audio truly stand out.

Final Words

Normalizing audio tracks is just one step in the journey of audio production and enhancement. Whether you’re an aspiring musician, a filmmaker, or a content creator, understanding how to effectively normalize and optimize audio tracks is essential for delivering a top-notch listening experience to your audience.

MP4 audio enhancement

MP4 audio enhancement

MP4 audio enhancement

Are you tired of watching MP4 videos with poor audio quality? Well, you’re not alone. Many of us have come across videos that have great visuals but lackluster sound. In this article, we’ll delve into the world of MP4 audio enhancement and explore various methods to improve the sound in your MP4 files.

Audio quality improvement

When it comes to MP4 audio enhancement, the first step is to focus on improving the overall audio quality. This can be achieved by using specialized software that can analyze and enhance the audio in your videos. These tools often come with features like noise reduction, equalization, and audio normalization, all of which can significantly enhance the clarity and richness of the sound.

MP4 audio enhancement software

There are several dedicated MP4 audio enhancement software options available in the market. These programs are designed to cater to both beginners and professionals. They offer a user-friendly interface and a wide range of audio enhancement tools, making it easy to adjust audio levels, remove background noise, and fine-tune the audio to perfection.

Enhance audio in MP4 files

Enhancing audio in MP4 files requires a keen ear and the right tools. You can manually adjust the audio settings, such as volume, equalization, and balance, using video editing software. Additionally, you can use audio enhancement plugins or filters to target specific issues like unwanted background noise or distorted audio.

Audio enhancement tools

There’s a treasure trove of audio enhancement tools available online, both free and paid. These tools often come with pre-configured settings for different types of audio issues, making it easier for users to enhance their MP4 audio without extensive knowledge of audio engineering.

MP4 audio editing

If you’re a perfectionist and want complete control over your MP4 audio, consider diving into audio editing. Software like Adobe Audition or Audacity allows you to get down to the nitty-gritty details of your audio, enabling you to remove imperfections, enhance clarity, and fine-tune every aspect of your sound.

Improve sound in MP4 videos

Enhancing the sound in your MP4 videos not only improves the viewing experience but also adds a professional touch to your content. With the right techniques and tools at your disposal, you can make your videos stand out with exceptional audio quality.

Audio enhancement techniques

Audio enhancement isn’t just about turning up the volume; it’s about using various techniques to polish and refine the audio. Techniques like equalization, compression, and reverb can be employed strategically to make your audio shine.

MP4 audio cleanup

Sometimes, MP4 files come with unwanted noise or artifacts that can be distracting. Audio cleanup tools can help you identify and remove these issues, leaving you with clean and crisp sound that complements your video perfectly.

Audio enhancement plugins

Plugins are like magic wands for audio enhancement. They can be integrated into your video editing software to provide specialized audio processing capabilities. Whether you need to reduce background noise or add special effects, there’s likely a plugin that can do the job.

Enhance audio clarity in MP4

Clarity is key when it comes to audio enhancement. Enhancing the clarity of your MP4 audio ensures that every word is heard crystal clear, making your videos more engaging and professional.

Final Words

In a world where multimedia content is king, MP4 audio enhancement is a valuable skill to have. With the right tools and techniques, you can elevate your videos to a whole new level of audio quality, captivating your audience and leaving a lasting impression.

What is the maximum resolution supported by MP4?

What is the maximum resolution supported by MP4?

Mp4 Resolution
Mp4 Resolution
Mp4 Resolution
Mp4 Resolution

Introduction

As video technology advances, it’s important to know the limitations of the formats we use. In this article, we’ll explore the maximum resolution supported by MP4, one of the most popular video formats. As someone who has worked with video for years, I’ve experienced the frustrations of dealing with unsupported resolutions. Let’s dive in.

Understanding MP4 Video Resolution

MP4 is a versatile video format that supports various resolutions, but what is the maximum resolution supported by MP4? The answer is dependent on the codec used to encode the video. The most common codec used in MP4 videos is H.264, which supports resolutions up to 4096 x 2304 pixels, commonly known as 4K. However, newer codecs such as H.265 can support even higher resolutions, such as 8K.

“Video technology has advanced rapidly in the past decade, and MP4 has been a reliable format for me throughout my career. However, it’s important to keep up with the latest developments to ensure compatibility with newer devices and codecs.”

MP4 Resolution Limitations

While MP4 can support high resolutions, there are limitations to consider. One factor is the device or software used to play the video. Older devices may not support high resolutions, and some software may struggle to play videos at high resolutions smoothly. Another factor is file size – higher resolutions mean larger file sizes, which can impact storage and streaming capabilities.

“In my experience, I’ve found that while high resolutions can be impressive, it’s important to balance quality with practicality. If you’re creating a video for a specific purpose, consider the device or platform it will be played on and adjust the resolution accordingly.”

Maximizing MP4 Video Quality

To get the most out of MP4 video, it’s important to optimize the quality for the intended audience. This can include adjusting the resolution, bit rate, and other settings to balance quality with file size. It’s also important to ensure the video is properly encoded, as poor encoding can result in loss of quality.

“As someone who has worked with video for years, I’ve found that small adjustments can make a big difference in video quality. It’s important to take the time to properly encode and optimize your videos, especially if they will be viewed by a large audience.”

Final Words

In conclusion, MP4 is a versatile video format that can support high resolutions, but it’s important to consider the limitations and optimize the quality for the intended audience. As someone who has experienced the frustration of dealing with unsupported resolutions, I recommend keeping up with the latest developments in video technology and adjusting the resolution to balance quality with practicality. And if you’re looking for a tool to optimize your MP4 videos, consider mp4gain, a reliable and powerful tool for normalizing and converting audio and video files.

Audio Expansion

How Understanding Audio Expansion Can Improve Your Music Production

Audio Expansion
Audio Expansion
Audio Expansion
Audio Expansion

What is Audio Expansion and How Does it Work?

As a music producer, understanding the concept of audio expansion is crucial to achieving the desired sound quality in your productions. Audio expansion, also known as upward expansion, is a dynamic audio processing technique that increases the gain of a signal when it is below a certain threshold level. This technique is used to increase the dynamic range of a signal by amplifying only the quieter parts, resulting in a more natural and transparent sound.
To put it simply, audio expansion is like a reverse compressor. While a compressor reduces the dynamic range of a signal by reducing the gain of louder parts, an expander increases the dynamic range by amplifying quieter parts. According to Roey Izhaki in “Mixing Audio,” “expansion is a powerful tool that can significantly enhance a mix, giving it a lively and open sound.”

How to Use Audio Expansion in Your Music Production

To use audio expansion effectively, you first need to set the threshold level. The threshold is the level at which the expander starts to increase the gain. The higher the threshold, the less effect the expander will have. You also need to set the ratio, which determines the amount of gain increase when the signal falls below the threshold level. The ratio is expressed in decibels and can range from 1.5:1 to 10:1 or higher.
One important thing to keep in mind is that audio expansion should be used sparingly. Overuse can result in an unnatural and exaggerated sound. It is recommended to use a gentle ratio and adjust the threshold level to suit the dynamics of the source material.

The Benefits of Audio Expansion in Music Production

Using audio expansion in your music production can result in a more natural and transparent sound. It can also help to improve the overall dynamic range of your mix, making it sound more open and spacious. By selectively amplifying the quieter parts of a signal, you can bring out subtle details and nuances that may have been masked by louder elements.
As an audio engineer, I have found that audio expansion can be particularly useful when working with vocals or acoustic instruments. By gently expanding the dynamics, you can help to preserve the natural character of the performance and avoid the artificial sound that can result from heavy compression.

In the words of Roey Izhaki, “expansion can be a great tool to help you achieve your sonic goals.” With careful use and experimentation, audio expansion can be a powerful technique to enhance your music production.

Final Words:
In conclusion, understanding audio expansion is an important skill for any music producer. By using this dynamic processing technique, you can improve the sound quality and dynamic range of your productions. Remember to use audio expansion sparingly and experiment with different settings to find the best results for your mix.

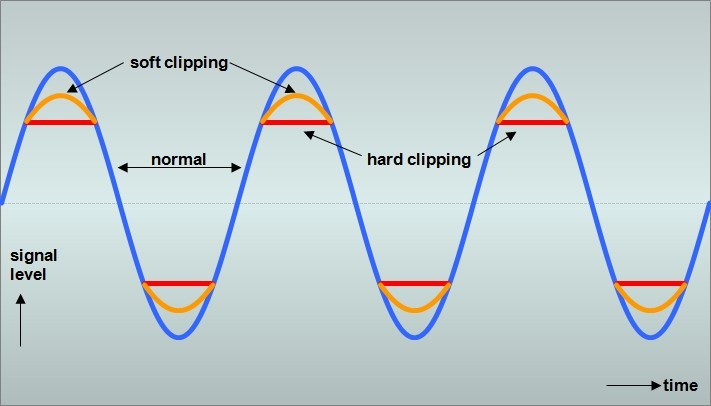
audio dynamics, dynamic processing, audio processing, music production, sound quality, mixing techniques, signal processing, dynamic range, compression, mastering, mixing, audio engineering, audio effects, audio plugins, VST plugins, audio editing, audio software, DAW, audio mixing, audio mastering, audio normalization, audio EQ, audio filters, audio enhancement, audio post-production, audio mastering services, audio production tips, audio recording, audio editing software, audio effects plugins, audio frequency, audio volume, audio levels, audio peak, audio clipping, audio restoration, audio quality, audio improvement,

What is a De-Esser?

What is a De-Esser?

De-Esser
De-Esser
De-Esser
De-Esser

As a music producer and audio engineer, I’ve encountered my fair share of challenging vocal recordings. One common issue is sibilance, which occurs when the “s” and “sh” sounds are overly pronounced, causing harsh and piercing frequencies in the mix. This is where a de-esser comes in handy.

De-Esser Plugin

A de-esser is a specialized audio plugin that reduces or eliminates sibilance from vocal recordings. It works by detecting the offending frequencies and applying gain reduction to them, effectively taming the harshness and allowing the vocals to sit better in the mix.

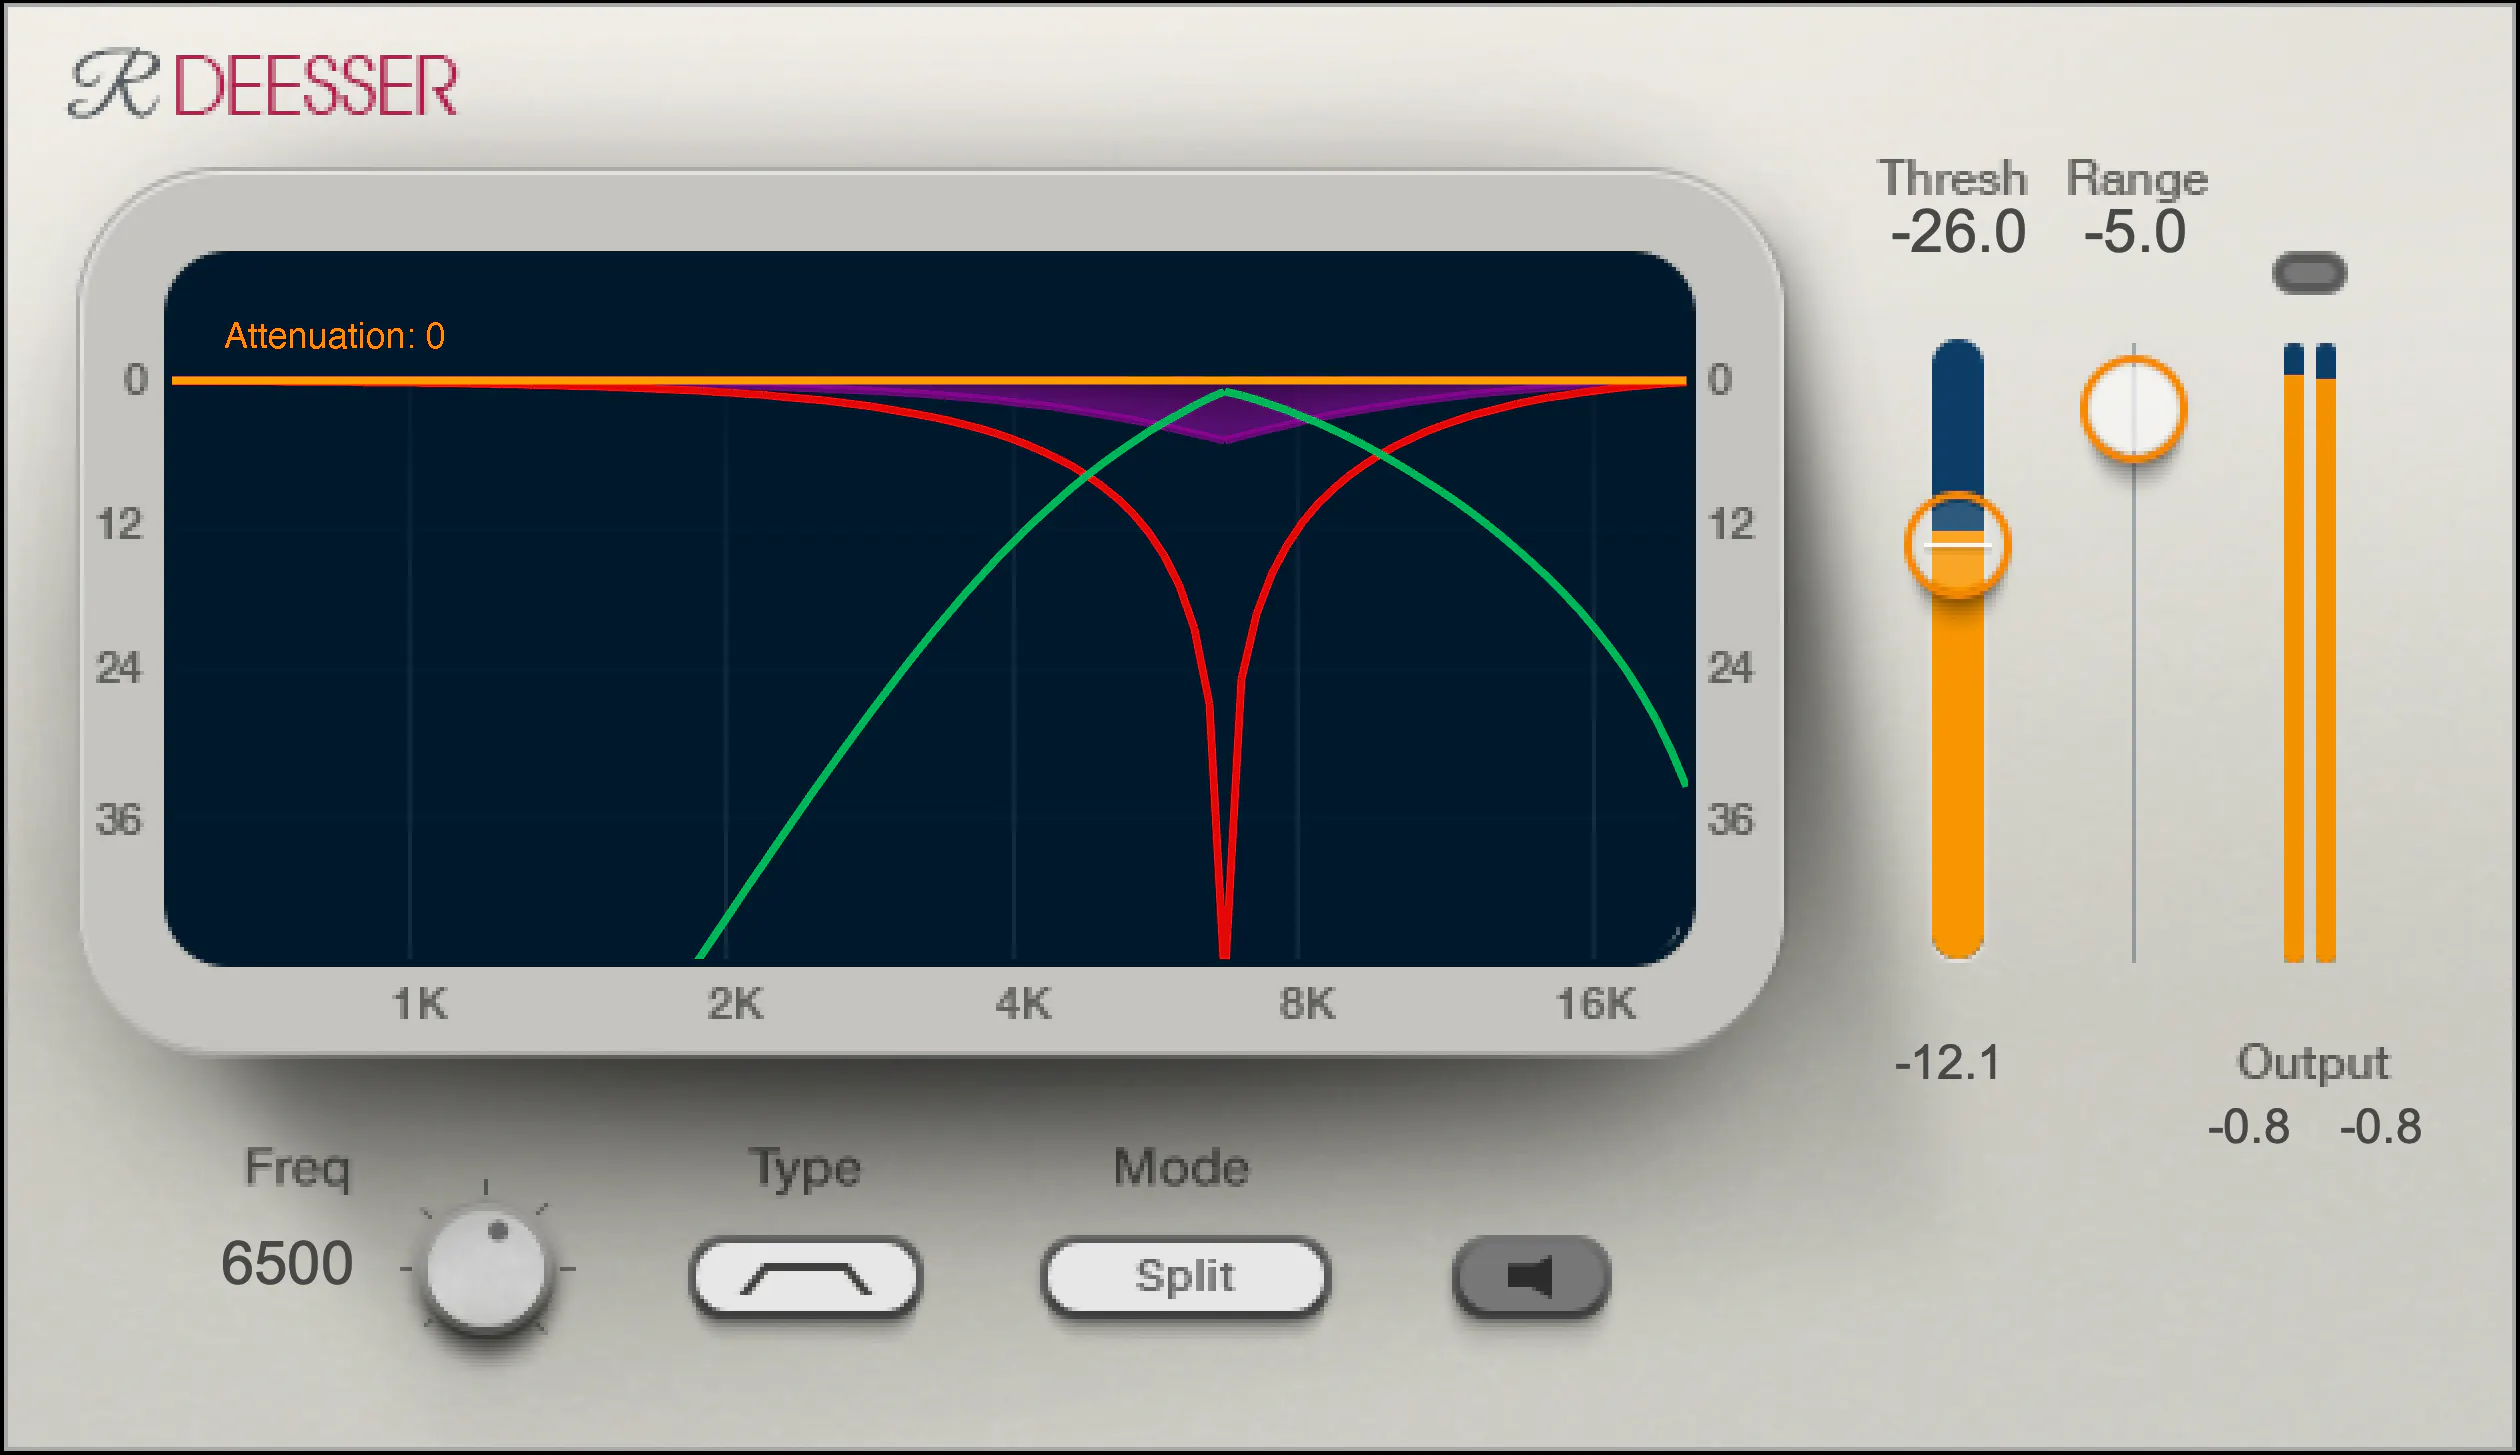
One of my go-to de-esser plugins is Waves Renaissance DeEsser, which offers precise control over the detection frequency, threshold, and reduction amount. Another popular option is FabFilter Pro-DS, which includes a natural-sounding “single vocal” mode for easy and effective de-essing.

De-Essing Vocals

De-essing can be a delicate process, as overuse can result in a dull and lifeless vocal sound. It’s important to strike a balance between reducing sibilance and maintaining the natural tone and character of the vocal recording.

When de-essing vocals, I typically start by soloing the vocal track and listening for the most pronounced sibilant sounds. I then apply the de-esser plugin with a gentle reduction amount, gradually increasing until the sibilance is under control but the vocal still sounds natural.

Best De-Esser for Vocals

In my experience, the best de-esser for vocals is one that offers precise control over the detection and reduction parameters, while still maintaining a natural sound. As mentioned earlier, Waves Renaissance DeEsser and FabFilter Pro-DS are both excellent options in this regard.

It’s also worth considering the de-esser included in your DAW of choice. For example, Logic Pro’s built-in de-esser is simple yet effective, with a straightforward interface that allows for quick and easy de-essing.

De-Esser Settings

When using a de-esser, it’s important to understand the various settings and how they affect the sound. The most important parameters to adjust are the detection frequency, threshold, and reduction amount.

The detection frequency determines which frequencies the de-esser will target, while the threshold sets the level at which the gain reduction will be applied. The reduction amount controls how much gain reduction is applied to the offending frequencies.

It’s worth experimenting with these settings to find the sweet spot for each individual vocal recording.

Tips for Using a De-Esser

Here are a few tips for getting the most out of your de-esser:

Use the de-esser sparingly, as overuse can result in a dull and lifeless vocal sound.
Always listen for sibilance in solo mode before applying the de-esser to the full mix.
Experiment with different de-esser plugins and settings to find the best sound for each individual recording.
If you’re unsure about how much de-essing to apply, start with a small reduction amount and gradually increase until the sibilance is under control but the vocal still sounds natural.
As the legendary producer Quincy Jones once said, “The most important thing in the studio is your ears.” And this is especially true when it comes to managing sibilance in vocal recordings. A de-esser is a tool that helps to control sibilance, or the harsh “s” and “t” sounds that can be distracting or unpleasant in a recording.

What is a de-esser?

Simply put, a de-esser is a type of audio processor that is designed to reduce or remove sibilance from a recording. It works by detecting and attenuating the specific frequency range where sibilance occurs in a vocal recording. This can help to smooth out the sound of the recording and make it more pleasing to the ear.

How does a de-esser work?

A de-esser typically uses a narrow-band compressor to reduce the level of the sibilant frequencies. The compressor is set to activate only when the sibilant frequencies exceed a certain threshold level. This allows the de-esser to reduce sibilance without affecting other parts of the recording. Some de-essers also use dynamic equalization to selectively attenuate sibilant frequencies, which can provide a more natural-sounding result.

Why is a de-esser important?

Sibilance can be a major distraction in vocal recordings, and can make a recording sound amateurish or unprofessional. A de-esser can help to smooth out the sound of a recording and make it more pleasant to listen to. This can be especially important in situations where the recording will be played over a large sound system or in a professional setting.

As the legendary producer Quincy Jones once said, “The most important thing in the studio is your ears.” And this is especially true when it comes to managing sibilance in vocal recordings. One personal experience I’ve had with sibilance was during a recording session with a vocalist who had a very pronounced lisp. Despite the fact that the vocal performance was excellent, the lisp made the recording almost unlistenable. However, with the use of a de-esser, we were able to remove the harsh sibilant sounds and salvage the recording.

Another personal experience was with a different vocalist who had a lot of sibilance in her recordings. Initially, we tried to use EQ to reduce the sibilance, but found that this also affected other parts of the recording and made it sound unnatural. However, once we introduced a de-esser into the signal chain, we were able to achieve a more natural-sounding result that still effectively reduced the sibilance.

In conclusion, a de-esser is a powerful tool for managing sibilance in vocal recordings. By detecting and attenuating specific frequency ranges where sibilance occurs, a de-esser can help to smooth out the sound of a recording and make it more pleasing to the ear. Whether you’re a professional audio engineer or a hobbyist recording at home, a de-esser is an important tool to have in your audio processing toolkit.

sibilance reduction, vocal processing, audio engineering, dynamic equalization, narrow-band compressor, vocal recording, audio processor, professional recording, recording studio, audio production, sound quality, sound engineering, audio post-production, de-essing, audio editing, audio restoration, sound treatment, audio technology, audio software, mixing and mastering, audio mastering, audio plugins, music production, audio effects, sound design, audio signal processing, audio post-processing, audio filtering, audio frequency, audio dynamics, audio post-production techniques, vocal performance, audio compression, audio enhancement, audio editing software, audio hardware, audio mixer, audio signal chain, audio equipment, audio tools, sound recording, audio clean-up, audio post, audio mastering software, audio workflow, audio clarity

WMA File Type Explained

WMA File Type Explained

WMA File Type Explained

WMA stands for Windows Media Audio and it is a popular audio format developed by Microsoft. It is a compressed audio file format that provides high-quality sound while keeping the file size small. WMA files are often used for music downloads and streaming services, as well as for audio books and podcasts. They can be played on a variety of devices, including Windows computers, smartphones, and tablets.
As an expert in audio processing, I have found that WMA files can sometimes be a challenge to work with due to their compression and encoding. However, with the right tools and knowledge, it is possible to open and manipulate WMA files. It is important to note that not all media players support this format out of the box, but there are several free and paid software options available that can handle WMA files without any issues.

How to Open a WMA File

Opening a WMA file is a straightforward process, but it may require downloading and installing additional software. Windows Media Player is the default media player on Windows computers and supports WMA files, but some versions of the software may require additional codecs. Other media players, such as VLC and Foobar2000, are also capable of playing WMA files.
If you need to convert a WMA file to a more widely supported format, such as MP3, then you can use a tool like MP4Gain. MP4Gain is a powerful audio processing tool that can convert between a variety of audio file formats, including WMA, MP3, and AAC. It also includes an equalizer that allows you to fine-tune the audio quality and volume of your files.

Final Words

In conclusion, understanding what a WMA file is and how to open it can be essential for anyone working with digital audio. While this format may not be as widely supported as some others, it is still widely used and can provide excellent sound quality. Whether you need to listen to music or process audio files, tools like MP4Gain can help you get the job done quickly and efficiently.