Audio sample rates and bit depths in MP4 files


Free Download Mp4Gain
picture

Audio sample rates and bit depths in MP4 files
Let’s talk about audio sample rates and bit depths in MP4 files

Understanding audio sample rates and bit depths in MP4 files is essential for anyone working with audio or video. These two elements directly impact audio quality, file size, and playback compatibility. As someone deeply familiar with digital audio, I’ve found that knowing how sample rates and bit depths function can help create better audio experiences. Think of them as the resolution and color depth of a photo—they define clarity and richness.

Sample rates determine how many times audio is measured per second, while bit depth defines the accuracy of those measurements. For example, recording a live concert at 44.1 kHz and 16-bit is like taking clear snapshots of the performance, capturing both nuances and dynamics. Yet, adjusting these parameters for MP4 files involves balancing quality, compatibility, and efficiency.

What are audio sample rates?

Sample rates are the backbone of digital audio. They represent the number of audio samples taken per second, measured in kilohertz (kHz). A common analogy I use is to think of sample rates as frames in a movie—the higher the frame rate, the smoother the video.

The most widely used sample rate is 44.1 kHz, suitable for CDs and most streaming platforms. However, higher sample rates like 48 kHz or 96 kHz are used in professional audio production for increased clarity. But does a higher sample rate always mean better sound? Not necessarily. Beyond 48 kHz, the human ear often can’t perceive the difference, though it may matter in certain editing contexts.

  • 44.1 kHz: Standard for CDs and MP3s.
  • 48 kHz: Common for video and film production.
  • 96 kHz and above: Used for high-resolution audio.

Explaining bit depth in digital audio

Bit depth is like the precision of a ruler—it dictates how finely audio signals are measured. A higher bit depth means more accurate representations of sound, especially during quieter moments. For instance, 16-bit audio provides 65,536 levels of dynamic range, while 24-bit allows over 16 million.

Imagine recording rain. At 16-bit, you’ll hear the general ambiance. At 24-bit, you’ll pick out subtle drops hitting different surfaces. This depth can elevate the listening experience but comes at the cost of larger file sizes.

  • 8-bit: Limited dynamic range, often used in retro games.
  • 16-bit: Standard for CDs and streaming audio.
  • 24-bit: Preferred for professional audio work.

How sample rates and bit depths affect MP4 audio

When encoding audio for MP4 files, sample rates and bit depths affect playback quality and compatibility. Lower settings save space but compromise audio fidelity. Higher settings preserve detail but may not work on all devices.

For example, I’ve optimized MP4 files by converting studio recordings at 96 kHz/24-bit to 48 kHz/16-bit. This reduced the file size while maintaining excellent quality. The key is to assess the intended use—streaming, archival, or professional editing.

Why does sample rate conversion matter?

Sample rate conversion is essential when integrating audio into MP4 files. If mismatched sample rates occur, playback issues such as clicks or distortion may arise. By ensuring consistent sample rates, you achieve smooth audio integration.

A practical tip I often share is to use 48 kHz for MP4 files intended for video. This aligns with the industry standard for syncing audio with visuals, ensuring better compatibility across platforms.

Choosing the right bit depth for MP4 audio

Selecting the right bit depth balances quality and practicality. For most MP4 files, 16-bit is sufficient, offering CD-quality audio with manageable file sizes. However, 24-bit may be preferable for professional audio projects where preserving dynamic range is crucial.

When I mix music for MP4, I consider the audience. Casual listeners prefer compact files, while audiophiles appreciate the richness of higher bit depths.

Does higher quality always mean better audio?

Higher sample rates and bit depths don’t always result in better audio for MP4 files. Factors like playback equipment, intended use, and file size constraints play significant roles. For instance, a 96 kHz/24-bit audio file on standard earbuds won’t sound dramatically different from a 48 kHz/16-bit file.

I often recommend testing files in real-world scenarios. Use different devices and listening environments to gauge the impact of your settings.

Common challenges with sample rates and bit depths

Dealing with sample rates and bit depths can be tricky. Common issues include mismatched settings, compatibility problems, and unnecessary file size increases. I’ve encountered cases where a 192 kHz file caused playback issues on older devices, requiring downsampling.

To avoid such challenges, use tools that simplify the process. Maintain consistency across your project and adhere to common standards like 48 kHz/16-bit for most MP4 files.

Latest words on audio sample rates and bit depths in MP4 files

Understanding audio sample rates and bit depths in MP4 files is vital for creating high-quality content. By balancing quality, compatibility, and efficiency, you can optimize your files for various applications. Remember, higher isn’t always better—choose settings that suit your goals.

If you’re looking for a simple way to manage these settings, Mp4Gain can help. It’s an effective tool for optimizing audio parameters in MP4 files, ensuring clarity and consistency without unnecessary complexity.

What are audio sample rates in MP4 files?

Audio sample rates in MP4 files determine the number of audio samples captured per second, impacting sound quality and file size.

Why is 44.1 kHz a standard sample rate?

44.1 kHz is standard because it meets CD-quality requirements, offering excellent audio fidelity without excessive file size.

What is the difference between 16-bit and 24-bit audio?

16-bit audio provides 65,536 levels of detail, while 24-bit offers over 16 million, enhancing dynamic range and clarity.

What sample rate is best for MP4 files?

48 kHz is the best sample rate for MP4 files, aligning with video industry standards and ensuring smooth audio-visual sync.

Does higher bit depth improve MP4 audio?

Higher bit depth improves audio detail but may not always be noticeable in casual listening scenarios.

Why is sample rate conversion important?

Sample rate conversion ensures smooth integration of audio into MP4 files, preventing playback issues.

Can I mix sample rates in one MP4 file?

Mixing sample rates in an MP4 file is not recommended as it can cause playback inconsistencies and sync issues.

Is 96 kHz better for MP4 files?

96 kHz offers higher audio resolution but may not provide noticeable benefits for MP4 files used in everyday playback.

What bit depth should I use for MP4 files?

16-bit is sufficient for most MP4 files, balancing quality and file size effectively for general use.

Does Mp4Gain help with audio optimization?

Mp4Gain simplifies audio optimization by managing sample rates and bit depths, ensuring consistent quality

across MP4 files.

Comments:

I always wondered what bit depth really meant, and this article finally cleared it up. Thanks for explaining it so well!

Why do some people use 192 kHz if most of us can’t hear the difference? I think that part could use more detail!

This helped me a lot with optimizing my podcast files. I had no idea about the importance of using 48 kHz for video files. Great tip!

Fantastic explanation! I’ve been working with MP4 files for years, and this is the most thorough guide I’ve seen so far.

I wish there was more info on which bit depth to use for specific use cases. Otherwise, really helpful article.

Man, this makes so much sense now. I was always confused about sample rates when making my YouTube videos. Thanks!

Great read! It’s interesting how higher sample rates don’t always mean better sound. Saved me a ton of storage space.

Very informative! I’m a beginner, and now I feel more confident adjusting audio settings in my files.


Free Download Mp4Gain
picture


Mp4Gain Main Window
picture


Mp4Gain Features
picture


Free Download Mp4Gain
picture

Joint Stereo Encoding in MP3

Joint Stereo Encoding in MP3

Joint Stereo Encoding in MP3

Let’s talk about Joint Stereo Encoding in MP3

When we talk about MP3 encoding, joint stereo is one of the most fascinating and efficient techniques used to compress audio files. As someone who’s been working with audio compression for years, I can confidently say that joint stereo plays a pivotal role in optimizing sound quality while reducing file size. This is crucial, especially when you’re dealing with a large collection of music or audio files on your device. For example, think about the way your smartphone stores your favorite playlists. Without joint stereo encoding, those files would take up more space without offering any noticeable improvement in quality.

In essence, joint stereo is a method where the stereo channels (left and right) in a song are not treated as entirely separate entities but are combined in such a way that only the differences between the two are stored. This is like packing the same amount of information into a smaller suitcase without losing any of the essential items. Joint stereo encoding does this by reducing redundancy between the left and right channels, resulting in smaller files with nearly identical sound quality.

It’s important to note that joint stereo encoding is not the same as regular stereo. While regular stereo encoding treats each channel independently, joint stereo takes advantage of the similarities between the two channels to save space. The result is a more efficient encoding process that doesn’t compromise the listener’s experience.

The Mechanics of Joint Stereo Encoding

When we dive deeper into how joint stereo encoding works, it helps to visualize how stereo sound is created. Typically, stereo sound involves two channels: one for the left ear and one for the right ear. However, in many audio tracks, the left and right channels are not radically different from each other. They may have similar instruments, vocals, or background sounds.

What joint stereo encoding does is compare these two channels and only store the parts that differ between them. For the common parts, the encoder only needs to store the data once. This is similar to how two almost identical pictures could be compressed by saving just one of them and recording only the differences for the second one. The result? A significant reduction in file size without a noticeable drop in audio quality.

The Process of Joint Stereo Encoding

  • The encoder analyzes both channels to find similarities and differences.
  • Similar parts of the channels are encoded as a single signal.
  • The differences between the channels are encoded separately, reducing the file size.
  • When decoding, the differences are applied to the common signal, restoring the stereo effect.

By compressing the audio this way, joint stereo encoding ensures that the stereo effect is preserved while minimizing the data needed for storage. This is a significant advantage when you’re trying to fit hundreds or even thousands of songs on a portable device with limited storage capacity.

Types of Joint Stereo Encoding: Mid/Side and Intensity Stereo

There are different types of joint stereo encoding methods that are used depending on the audio track and desired compression level. The two primary types you’ll encounter are Mid/Side (M/S) stereo and Intensity stereo. Both methods offer unique advantages, and understanding these differences is key to choosing the right encoding approach.

Mid/Side Stereo

  • In Mid/Side stereo encoding, the audio is split into two components: the “mid” (center) and the “side” (difference between left and right).
  • The “mid” signal contains information that is common between the left and right channels, while the “side” signal holds the differences.
  • This technique is effective for music that has a strong center sound, like vocals or bass, while allowing the side information to be compressed efficiently.

In my experience, Mid/Side stereo is particularly useful for music with a lot of central elements, like pop or rock tracks where vocals are mixed at the center. By compressing the side channels, the file size shrinks while maintaining clarity in the center of the mix.

Intensity Stereo

  • Intensity stereo encoding focuses on adjusting the volume of the stereo channels based on the perceived loudness of sounds.
  • It reduces the stereo effect for quiet sounds and increases it for louder sounds.
  • This method can save space without compromising the quality of louder parts of the track.

For instance, if you have a song where the guitar solo is prominent, intensity stereo encoding may maintain a full stereo effect for the solo, but reduce the stereo spread during quieter passages, like a soft vocal section. This type of encoding is particularly effective for genres like classical or ambient music, where the dynamic range varies widely throughout the track.

The Advantages of Joint Stereo Encoding

When it comes to audio compression, joint stereo encoding provides several key benefits. I’ve seen firsthand how it allows for more efficient storage without sacrificing the quality that listeners expect from high-quality MP3 files.

Efficient Use of Storage

  • Joint stereo encoding reduces file size significantly by exploiting redundancies between the two channels.
  • This is especially beneficial for users with limited storage space, such as on smartphones or portable music players.
  • Even when file size is reduced, the audio quality remains almost identical to that of traditional stereo encoding.

For example, when I compress a collection of high-quality MP3s for a long road trip, I rely heavily on joint stereo encoding to maximize my storage space. With joint stereo, I’m able to fit hundreds of tracks on my device without having to worry about sound quality degradation.

Sound Quality Preservation

  • Joint stereo encoding preserves the overall sound quality by focusing on the differences between the stereo channels.
  • In contrast to mono encoding, joint stereo ensures that listeners still experience a rich, dynamic soundstage.
  • Most importantly, the compression doesn’t affect the stereo effect that’s essential to enjoying a full, immersive listening experience.

As someone who frequently listens to music on headphones, the stereo effect is crucial to me. I find that even with joint stereo encoding, the balance between left and right channels remains intact, providing an enjoyable experience. It’s remarkable how the technology allows for compression without affecting the auditory experience.

Considerations for Using Joint Stereo Encoding

While joint stereo encoding offers clear benefits, it’s not always the best option for every type of audio. In some situations, particularly with high-fidelity audio or tracks that require precise stereo separation, other encoding methods might be preferable.

High-Fidelity Audio

  • For audiophiles or those with high-end audio equipment, joint stereo encoding may not always be sufficient.
  • The reduced separation between left and right channels can result in a less distinct stereo image.
  • In such cases, lossless encoding or regular stereo encoding might be more suitable to maintain optimal sound quality.

For example, when I listen to classical music or jazz with a wide stereo image, I often opt for uncompressed or higher bit-rate stereo encoding to preserve the detailed spatial arrangement of instruments. Joint stereo, while efficient, may compromise some of the subtle nuances in these genres.

Low-Bitrate Audio

  • At lower bitrates, joint stereo encoding can still provide excellent results in terms of file size reduction without a major loss in quality.
  • However, the compression artifacts may become more noticeable at bitrates lower than 128 kbps.
  • In these situations, a higher bitrate or alternative encoding techniques may be needed to preserve audio fidelity.

If you’re encoding audio for streaming or casual listening, lower bitrates with joint stereo encoding might be a good balance. But when I’m encoding for professional use or high-quality playback, I prefer to use higher bitrates to ensure that the audio remains as close to the original as possible.

Latest Words on Joint Stereo Encoding in MP3

Joint stereo encoding has transformed the way we experience and store audio, offering a balance between quality and compression. Whether you’re a casual listener, a music enthusiast, or a professional audio engineer, understanding the benefits and limitations of joint stereo encoding is crucial for making informed decisions about how you encode and manage your audio files.

With its ability to optimize space and preserve sound quality, joint stereo encoding is one of the most valuable tools in audio compression. As I’ve demonstrated in this article, it’s an essential technique for anyone looking to maximize storage and maintain an excellent listening experience, especially for music that doesn’t rely heavily on complex stereo separation.

While it’s not a one-size-fits-all solution, joint stereo encoding offers significant advantages in most scenarios, particularly for everyday music listening. However, for those with more specialized needs, other encoding methods may be worth exploring. In all cases, it’s important to consider your specific requirements and select the encoding technique that best meets them.

When it comes to MP3 encoding, joint stereo is one of the most effective ways to achieve high-quality audio at a smaller file size, and it remains a staple of audio compression today.

Frequently Asked Questions about Joint Stereo Encoding in MP3

What is Joint Stereo Encoding in MP3?

Joint stereo encoding in MP3 is a compression technique that reduces file size while preserving sound quality. It works by encoding the similarities between the left and right audio channels as a single signal, while only storing the differences separately. This method allows for more efficient use of space without sacrificing the stereo effect, making it ideal for music and audio tracks with similar left and right channels.

How does Joint Stereo Encoding work?

Joint stereo encoding works by analyzing both the left and right channels of audio to identify the parts that are similar. The encoder then stores the common information only once, and the differences between the two channels are encoded separately. When decoding, the differences are applied to the common signal, restoring the full stereo effect for the listener.

What are the different types of Joint Stereo Encoding?

There are two main types of joint stereo encoding: Mid/Side stereo and Intensity stereo. In Mid/Side encoding, the audio is split into a central “mid” signal and a “side” signal that carries the differences between the left and right channels. Intensity stereo adjusts the stereo effect based on the perceived loudness of the audio, reducing the stereo separation for quieter sounds and enhancing it for louder ones.

What are the advantages of using Joint Stereo Encoding?

Joint stereo encoding offers several benefits, including reduced file sizes while maintaining high audio quality. It is especially useful for portable devices with limited storage, as it maximizes space without sacrificing the stereo effect. Joint stereo ensures that audio files retain their immersive listening experience, even at lower bitrates.

Can Joint Stereo Encoding affect audio quality?

At most bitrates, joint stereo encoding does not significantly affect audio quality. However, at lower bitrates, compression artifacts may become noticeable, especially in tracks with complex stereo separation. For high-fidelity audio or genres requiring precise stereo positioning, lossless encoding or standard stereo encoding might be a better option.

Is Joint Stereo Encoding suitable for all types of music?

Joint stereo encoding is highly effective for most types of music, especially tracks where the left and right channels share significant similarities, such as pop, rock, and electronic music. However, for genres like classical or ambient music, where a wide stereo image is essential, other encoding methods or higher bitrates might be preferable to preserve the full stereo effect.

What is the best bitrate for Joint Stereo Encoding?

For most listeners, a bitrate of 128 kbps to 192 kbps is sufficient when using joint stereo encoding. At these bitrates, the file sizes are reduced significantly, while the sound quality remains good. For higher-quality audio, especially in genres where detailed stereo separation is important, higher bitrates such as 256 kbps or 320 kbps are recommended.

How does Joint Stereo Encoding compare to Mono or Stereo Encoding?

Mono encoding combines the left and right channels into a single channel, drastically reducing file size but at the cost of losing the stereo effect. Regular stereo encoding treats both channels independently, resulting in larger file sizes compared to joint stereo. Joint stereo encoding strikes a balance, maintaining a full stereo experience while reducing file size by exploiting the similarities between the two channels.

Comments:

This article really opened my eyes to how joint stereo encoding works. I’ve been using MP3s for years, but I never really understood the technical side of it. Thanks for explaining everything so clearly! – Mike R.

I had no idea about Mid/Side stereo until I read this! It sounds like a great way to compress audio without losing quality. I might try it next time I’m encoding music. – Sarah J.

It’s amazing how joint stereo can save so much space without compromising sound quality. I’ve always used stereo encoding, but now I’m going to give joint stereo a try. – Tom H.

I’ve always wondered why MP3 files are smaller but still sound good. This article explained it perfectly. – Dave L.

I’ve used joint stereo for a while now, but I didn’t realize how much it can impact sound quality at lower bitrates. This article definitely helped me understand it better. – Emily G.

I’ve been encoding a lot of audio for a podcast, and the tips on joint stereo were super helpful. I’m going to implement this on my next set of files. – John K.

Interesting read! I didn’t know that joint stereo could be problematic for audiophiles. I’m going to keep that in mind when working with high-quality audio. – Chris M.

This is one of the most detailed explanations of joint stereo I’ve read. Very helpful! – Jenna T.

Thanks for the insights! I’ve always been curious about how compression works, and now I understand joint stereo much better. – Mark F.

I never realized that the differences between the left and right channels could be compressed so efficiently. I’ll have to try joint stereo next time I encode something. – Alex B.

I appreciate the real-life examples you used. They made the technical details so much easier to understand. – Rick D.

I’ve been having issues with audio quality at low bitrates. This article really helped explain why that happens and how joint stereo can help. – Steve A.

I was always confused about the difference between stereo and joint stereo. This article cleared things up! – Olivia P.

Great breakdown of the different joint stereo types! I’m definitely going to experiment with Mid/Side encoding next time. – Greg W.

Variable Bitrate Encoding in M4A

Variable Bitrate Encoding in M4A

Variable Bitrate Encoding in M4A

Let’s Talk About Variable Bitrate Encoding in M4A

When it comes to audio quality and storage efficiency, variable bitrate (VBR) encoding in M4A is one of the smartest choices for creating digital music files that sound great and don’t take up much space. The idea is simple: instead of keeping the data rate constant, VBR adjusts to match the complexity of the audio. That way, simpler segments require less data while detailed sections use more. It’s like packing a suitcase—use only what you need to fit everything in! This article will dive into the hows and whys of VBR in M4A, exploring how it can improve listening experiences, make storage more efficient, and maintain high-quality sound without hogging memory.

Understanding Variable Bitrate (VBR) in M4A Format

VBR encoding is different from constant bitrate (CBR) encoding because it lets the bitrate shift based on the needs of each part of the audio. For example, in a song with quiet and loud sections, CBR would use the same amount of data regardless of whether it’s a whisper or a blast of sound. VBR, on the other hand, adapts, giving more data to complex parts and less to simpler ones. M4A files, often used for iTunes and Apple Music, support VBR and are excellent for keeping audio files both compact and high-quality. This flexibility is especially helpful for streaming services or mobile devices where storage is a premium.

How VBR Works in Digital Audio

VBR encoding analyzes each segment of a track and determines how much data to allocate. Here’s how it usually breaks down:

  • Silence or low-complexity segments

    These don’t need much data, so VBR saves space by using a lower bitrate.

  • High-complexity segments

    Here, VBR allocates more data to capture intricate sounds like a symphony’s crescendo or a guitar solo.

  • Middle-complexity segments

    In these, VBR finds a balance, applying just enough bitrate to keep the audio quality consistent without overloading it.

This approach makes VBR encoding ideal for M4A, especially when you want music that sounds as good as possible without taking up more space than necessary.

Advantages of Using VBR Encoding in M4A

VBR in M4A offers several key benefits:

  • High-quality sound with efficient file size

    VBR ensures that sound quality remains consistent, especially in complex musical pieces, while keeping file sizes down.

  • Efficient storage

    Since VBR allocates data based on necessity, you get an optimized file that doesn’t waste storage.

  • Better for streaming

    VBR allows for smoother streaming, especially in low-bandwidth situations, because the file adapts dynamically.

For anyone looking to optimize their digital music library, VBR in M4A is a clear choice, offering more control over both quality and storage.

Comparing VBR and CBR Encoding in M4A

When deciding between VBR and CBR encoding for M4A files, there are some clear distinctions:

  • Constant Bitrate (CBR)

    As the name implies, CBR keeps the same bitrate throughout, which is good for predictable file sizes but can result in wasted space on simple audio sections.

  • Variable Bitrate (VBR)

    VBR adapts based on the complexity of each segment, making it more efficient for file size and quality.

For example, if you have a song with a lot of silent or quiet parts, CBR would use the same amount of data as it would for loud, complex parts. VBR only uses data as necessary, making it a better choice for quality and efficiency in most cases.

Choosing the Right Bitrate Settings for M4A VBR Encoding

Selecting the best bitrate settings can feel like balancing a scale. Too low, and you lose sound quality; too high, and file sizes increase without much benefit. Typically, 128 kbps to 192 kbps is optimal for M4A VBR, but for high-quality audio, 256 kbps might be worth it. Just like deciding how much memory to put in a computer, there’s a sweet spot where you get the best of both worlds.

Real-Life Scenarios: When to Use VBR in M4A

Some situations make VBR the perfect choice:

  • Music with mixed complexity

    Songs that shift between quiet and intense parts benefit greatly from VBR, as the bitrate can adjust dynamically.

  • Audiobooks

    Audiobooks, with long stretches of consistent speech, don’t need high bitrates constantly. VBR keeps file size low without sacrificing voice clarity.

  • Podcasts

    Similar to audiobooks, podcasts have segments where the bitrate can drop during less complex sections.

In each case, VBR helps make the audio experience more efficient without losing the quality of important parts.

File Size and Storage Benefits of VBR in M4A

VBR in M4A files can save quite a bit of storage over time. While it varies depending on the complexity of each audio track, VBR encoding generally results in smaller file sizes than CBR encoding without compromising on sound quality. For anyone with a large audio library or limited storage on their devices, VBR encoding in M4A is a wise choice.

Optimizing VBR Encoding for Streaming

For streaming, VBR offers a unique advantage: it can adapt to bandwidth limitations, providing a smoother experience even with fluctuating internet speeds. Many streaming platforms now prefer VBR for its ability to offer consistent quality without sacrificing efficiency. For example, when listening to a song on a lower-speed connection, VBR encoding allows the quality to adjust rather than stalling playback. This adaptability makes it ideal for music streaming services that rely on efficient data transfer.

How M4A VBR Encoding Impacts Sound Quality

Sound quality in M4A files can benefit greatly from VBR encoding. Since VBR allocates bitrate based on the audio complexity, it can make music sound rich and full without using more data than necessary. This means that even on lower storage devices, you can enjoy a high-quality audio experience.

Latest Words on Variable Bitrate Encoding in M4A

Variable bitrate encoding in M4A is a powerful tool for managing audio quality and file size effectively. By adjusting to the complexity of the audio, VBR keeps storage needs low while delivering top-notch sound. Whether it’s for streaming, podcasts, or simply optimizing your music library, VBR in M4A strikes the right balance between quality and efficiency. When you’re ready to manage your audio files with the same balance of quality and file size, using a tool like Mp4Gain can help you set and fine-tune these settings to suit your needs.

Comments:

Never thought M4A could sound so good with variable bitrate. I’ve been using CBR forever and didn’t realize what I was missing out on.

This article breaks down bitrate so well. I’ve been trying to understand why my music files take so much space, and this explained it clearly!

VBR sounds like it could be a game-changer for my music collection. I’ve got limited storage on my phone, so every bit saved counts.

Great info here. Been wondering why some files are bigger than others even when they’re the same length. Now I know it’s the bitrate differences!

I need help setting up my audio files to use VBR. Anyone know how to change from CBR to VBR in existing M4A files?

This explained things better than other articles I read. I actually understand why VBR would save space now. Thanks!

So helpful! I never knew about VBR for podcasts—definitely going to try it out since I’m always tight on space.

Does VBR affect battery life when streaming music? I’ve heard mixed things.

My phone is always full of music files, so this might help me a lot. But how do I make sure VBR doesn’t hurt quality?

Wish I’d known about VBR sooner! Definitely switching to it for my playlists, especially for my workout mixes that are long but don’t need crazy high quality.

Was skeptical about VBR at first, but this really changed my mind. Thanks for explaining the pros and cons clearly!

Variable bitrate makes a lot of sense now. I’ll be converting my whole library to M4A VBR from now on.

For podcasts, this really does seem useful. Anyone tried it for audiobooks?

This info was super useful for someone like me who’s always on the road. Lower file sizes mean more songs on my phone.

What is the maximum resolution supported by MP4?

What is the maximum resolution supported by MP4?

Mp4 Resolution
Mp4 Resolution
Mp4 Resolution
Mp4 Resolution

Introduction

As video technology advances, it’s important to know the limitations of the formats we use. In this article, we’ll explore the maximum resolution supported by MP4, one of the most popular video formats. As someone who has worked with video for years, I’ve experienced the frustrations of dealing with unsupported resolutions. Let’s dive in.

Understanding MP4 Video Resolution

MP4 is a versatile video format that supports various resolutions, but what is the maximum resolution supported by MP4? The answer is dependent on the codec used to encode the video. The most common codec used in MP4 videos is H.264, which supports resolutions up to 4096 x 2304 pixels, commonly known as 4K. However, newer codecs such as H.265 can support even higher resolutions, such as 8K.

“Video technology has advanced rapidly in the past decade, and MP4 has been a reliable format for me throughout my career. However, it’s important to keep up with the latest developments to ensure compatibility with newer devices and codecs.”

MP4 Resolution Limitations

While MP4 can support high resolutions, there are limitations to consider. One factor is the device or software used to play the video. Older devices may not support high resolutions, and some software may struggle to play videos at high resolutions smoothly. Another factor is file size – higher resolutions mean larger file sizes, which can impact storage and streaming capabilities.

“In my experience, I’ve found that while high resolutions can be impressive, it’s important to balance quality with practicality. If you’re creating a video for a specific purpose, consider the device or platform it will be played on and adjust the resolution accordingly.”

Maximizing MP4 Video Quality

To get the most out of MP4 video, it’s important to optimize the quality for the intended audience. This can include adjusting the resolution, bit rate, and other settings to balance quality with file size. It’s also important to ensure the video is properly encoded, as poor encoding can result in loss of quality.

“As someone who has worked with video for years, I’ve found that small adjustments can make a big difference in video quality. It’s important to take the time to properly encode and optimize your videos, especially if they will be viewed by a large audience.”

Final Words

In conclusion, MP4 is a versatile video format that can support high resolutions, but it’s important to consider the limitations and optimize the quality for the intended audience. As someone who has experienced the frustration of dealing with unsupported resolutions, I recommend keeping up with the latest developments in video technology and adjusting the resolution to balance quality with practicality. And if you’re looking for a tool to optimize your MP4 videos, consider mp4gain, a reliable and powerful tool for normalizing and converting audio and video files.

MP3 finally goes into the public domain

MP3 finally goes into the public domain

mp3

Open Source

Mp3 Public Domain

Perhaps many did not think so, but the mp3 standard so well known to all had problems with the purity of patents. On April 23, 2017, the last patents expired and the format was finally free. Technicolor has officially stopped collecting royalties from manufacturers of software and embedded solutions.

License

Although hardware mp3 decoding is built into all other coffee machines, until recently its use in commercial projects required royalties from the developer: Fraunhofer Society. In 2005 alone, the amount paid was one hundred million euros. Most of the patents became invalid in the European Union in 2012. However, some of them continued to operate in the United States due to peculiarities of local law. What does this news bring to the community? At least now it will be possible to compile Gentoo and listen to music at the same time immediately on the base distribution. Many distributions will be able to provide support for the standard to the main repository. Now, for example, Ubuntu itself requires the installation of non-free components from a separate Ubuntu Restricted Extras meta-package to support mp3.

Bourbon vanilla vs vanillin

How does this standard, which has been the main standard in this area for 24 years, despite many more advanced free options? mp3 is in many ways similar in principle to its cousin in the photo world: JPEG. Due to the imperfection of our hearing aid and the peculiarities of psychoacoustics, it is possible to “discard” those parts of the audio spectrum that do not make a significant contribution to the musical pattern. In particular, in the illustration above, you can see how the amount of information encoded in the high-frequency region increases.

High frequencies are often sacrificed for the sake of preserving detail in the lower region – vocals, most instruments (thanks for the comment, KorDen32). Standard values ​​of cutoff frequencies for the lame encoder:

CBR 096 kbps: 14000 – 15000 Hz;
CBR 112 kbps: 15000-15600 Hz;
CBR 128 kbps: 16000 – 16500 Hz;
CBR 160 kbps: 16500-17500 Hz;
CBR 192 kbps: 18000-18700 Hz;
CBR 224 kbps: 19000-19400 Hz;
CBR 256 kbps: 19500-19700 Hz;
CBR 320 kbps: 20,000 – 21,000 Hz.

The method can be compared to the creativity of flavor chemists. You’ve probably noticed that strawberry gum is very conventionally strawberry, and there isn’t enough lemon in synthetic lemon tea. Any natural flavoring composition contains dozens and even hundreds of chemical compounds. But the main core generally creates only a very limited amount. So, for example, vanillin defines most of the aroma of natural vanilla, and if you don’t appreciate the subtle nuances too much, the remaining components can be neglected. mp3 uses the same principles, removing insignificant portions of the spectrum. Most people cannot tell the lossless formats by ear from the normally encoded 320kbps mp3s, which saves a lot of space when storing your media library.

Audio Coding: Secrets Revealed Part 2

Audio Coding: Secrets Revealed Part 2

Bit Depth

Bit depth

audio encoding

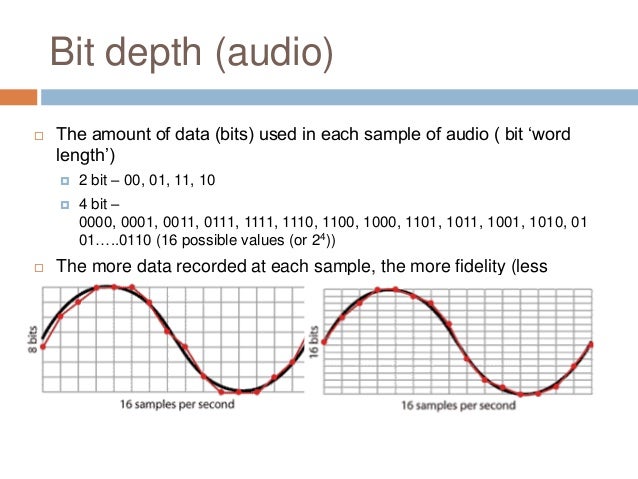
Along with the sample rate, there is the bit depth or depth of the sound. Bit depth is the number of bits of digital information to encode each sample. Simply put, the bit depth determines the “accuracy” of the input signal measurement. The larger the digit capacity, the smaller the error will be for each individual conversion from the magnitude of an electrical signal to a number and vice versa. With the smallest possible bit depth, there are only two options for measuring sound accuracy: 0 for full silence and 1 for full sound. If the bit width is 8 (16), then by measuring the input signal, 2 8 = 256 (2 16 = 65,536) different values ​​can be obtained.

Bit depth is fixed in the PCM codec, but for codecs that assume compression (eg MP3 and AAC), this parameter is calculated during encoding and may vary from sample to sample.

Bitrate
Bit rate is an indicator of the amount of information that one second of sound encodes. The higher it is, the less distortion and the closer the encoded composition is to the original. For linear PCM, the bit rate is very easy to calculate.

bitrate = sample rate × bit depth × channels

For systems like the Epiphan Pearl Mini that encode 16-bit (16-bit) linear PCM, this calculation can be used to determine how much additional bandwidth the PCM audio might require. For example, for stereo (two channels), the signal is digitized at 44.1 kHz at 16 bits and the bit rate is calculated as follows:

44.1 kHz × 16 bit × 2 = 1411.2 kbps

Meanwhile, audio compression algorithms like AAC and MP3 have fewer bits to transmit the signal (that’s their purpose), so they use low bit rates. Typically, the values ​​are in the range of 96 kbps to 320 kbps. For these codecs, the higher the bit rate you choose, the more audio bits you get per sample and the better the sound quality.

Sample rate, bit depth and bit rates in real life.
Audio CDs, one of the most popular early inventions for the general public for storing digital audio, used 44.1 kHz (20 Hz – 20 kHz, human ear range) and 16 bits. These values ​​were chosen to be able to save as much audio as possible to disk with good sound quality.

When video was added to audio and DVD and then Blu-ray discs came along, a new standard was created. DVD and Blu-Ray recordings typically use 48 kHz (stereo) or 96 kHz (5.1 surround) linear PCM format and 24-bit depth. These settings have been selected as ideal for keeping audio in sync with video while obtaining the best possible quality using the additional available disk space.

Our recommendations
CDs, DVDs, and Blu-Ray discs all have one goal: to provide the consumer with a high-quality playback engine. The goal of all developments was to provide high-quality audio and video without worrying about file size (if only it could fit on disk). Such quality could be provided by linear PCM.

In contrast, mobile media and streaming media have a completely different goal: to use the lowest bit rate, as low as possible, while still being sufficient to maintain acceptable quality for the listener. Compression algorithms are best suited for this task. You can follow the same principles for your records.

When recording audio from a video …
In case the record is used for the next on-ra-ki-bot, choose the 48 kHz PCM codec and the maximum bit depth (16 or 24) to provide the best audio quality. We recommend these parameters for Epiphan Pearl Mini.

When streaming audio from video …
With streaming or recording for later translation, good sound can be obtained with less bandwidth, using MP3 or AAC codecs with a frequency of 44.1 kHz and a bit rate of 128 kbit / s or higher. These parameters ensure that the sound is good enough without affecting the quality of the transmission.

Audio encoding: secrets revealed

Audio encoding: secrets revealed

Audio Encoding

Audio settings for video capture and transmission.

audio and video encoding

As people directly related to the AV sphere, we constantly talk about audio coding and audio codecs, but what is it? An audio codec is essentially a device or algorithm that can encode and decode a digital audio signal.

In practice, the audio waves that travel through the air are continuous analog signals. The signals are converted to digital form by a device called an analog-to-digital converter (ADC), and the reverse converter is called a digital-to-analog converter (DAC). The codec lies between these two functions and it is he who allows you to adjust some important parameters for the successful capture, recording and transmission of an audio signal: the codec algorithm, the sampling frequency, the bit width and the speed of the audio signal. data.

The three most popular audio codecs are Pulse-Code Modulation (PCM), MP3, and Advanced Audio Coding (AAC). The choice of codec determines the compression rate and the recording quality. PCM is a codec used by computers, CDs, digital phones, and sometimes SACD. The PCM signal source is sampled at regular intervals, and each sample is the digital amplitude of the analog signal. PCM is the simplest option for digitizing an analog signal.

With the correct parameters, this digitized signal can be completely converted back to analog without any loss. But this codec, which provides an almost complete identity with the original audio, is unfortunately not very cheap, which translates into very large file sizes, and such files are not suitable for streaming. We recommend using PCM to record digital images for your sources or when doing audio post-processing.

Fortunately, we always have the option of choosing a different codec that can compress digital data (rather than PCM) based on some helpful observations on the behavior of sound waves. But in this case, you have to make a compromise: all alternative algorithms are associated with “losses”, since it is impossible to completely restore the original signal, but nevertheless the result is still so good that most users will not be able to to catch the difference.

MP3 is an audio encoding format that uses a digital data compression algorithm that allows you to save the audio signal in smaller files. The MP3 codec is the most used by users to record and store music files. We recommend using MP3 to stream audio content as it requires less network bandwidth.

AAC is a newer audio encoding algorithm that is the successor to MP3. AAC has become the standard for MPEG-2 and MPEG-4 formats. In fact, this is also a digital data compression codec, but with less quality loss than MP3 when encoded with the same bit rate. We recommend using this codec for online streaming.

Sampling frequency (kHz, kHz)
Sample rate (or sample rate): the frequency with which the signal is digitized, stored, processed, or converted from analog to digital. Time sampling means that the signal is represented by several of its samples (samples) taken at regular intervals.

Measured in hertz (Hz, Hz) or kilohertz (kHz, kHz,) 1 kHz equals 1000 Hz. For example, 44,100 samples per second can be labeled 44,100 Hz or 44.1 kHz. The selected sample rate will determine the maximum playback frequency and, as follows from Kotelnikov’s theorem, to fully restore the original signal, the sample rate must be twice the highest frequency in the signal spectrum.

As you know, the human ear is capable of picking up frequencies between 20 Hz and 20 kHz. Given these parameters and the values ​​shown in the table below, you can understand why 44.1 kHz was chosen as the sampling frequency for CD and is still considered a very good frequency for recording.

There are several reasons for choosing a higher sample rate, although it may seem like a waste of time and effort to reproduce sound outside the range of human hearing. At the same time, 44.1 – 48 kHz will suffice for the average listener for a high-quality solution to most problems.

Audio encoding and processing

Audio encoding and processing

Encoding

Sound information.

ENCODING

Sound is a wave that travels through air, water, or other medium with a continuously changing intensity and frequency.

A person perceives sound waves (air vibrations) with the help of hearing in the form of sound of different volume and pitch. The higher the intensity of the sound wave, the louder the sound, the higher the frequency of the wave, the higher the pitch of the sound

The human ear perceives sound at a frequency of 20 vibrations per second (low sound) to 20,000 vibrations per second (high sound).

A person can perceive sound in a wide range of intensities, in which the maximum intensity is 10 14 times greater than the minimum (one hundred thousand billion times). A special unit “decibel” (dbl) is used to measure the volume of sound (Table 5.1). Decreasing or increasing the volume of the sound by 10 dB corresponds to a decrease or increase in the intensity of the sound by 10 times.

Table 5.1. Sound volume
Sonar Volume in decibels
Lower limit of human ear sensitivity 0
Whisper of Leaves 10
Conversation 60
Horn 90
Jet engine 120
Pain threshold 140
Sound time sampling. For a computer to process sound, a continuous audio signal must be converted to a discrete digital form using time sampling. A continuous sound wave is divided into separate small time sections, for each section a certain value of sound intensity is set.

Therefore, the continuous dependence of the loudness of the sound at time A (t) is replaced by a discrete sequence of loudness levels.

Sampling frequency.

A microphone connected to the sound card is used to record analog sound and convert it to digital format. The quality of the digital sound obtained depends on the number of measurements of the sound volume level per unit time, that is, the sampling frequency. The more measurements that are made in 1 second (the higher the sampling frequency), the more accurately the “ladder” of the digital audio signal repeats the curve of the dialogue signal.

The audio sample rate is the number of measurements of the volume of a sound in one second.

The audio sample rate can range from 8000 to 48000 sound volume measurements per second.

Audio encoding depth. Each “step” is assigned a specific value for the volume level of the sound. Loudness levels of sound can be viewed as a set of possible states N, for which a certain amount of information is needed to encode, which is called audio encoding depth.

Audio encoding depth is the amount of information required to encode the discrete volume levels of digital audio.

If the known encoding depth, the number of digital audio volume levels can be calculated using the formula N = 2 I. Let the sound encoding depth be 16 bit, then the number of sound volume levels is:

N = 2 I = 2 16 = 65 536.

During the encoding process, each sound volume level is assigned its own 16-bit binary code, the smallest sound level will correspond to the code 0000000000000000 and the highest, 1111111111111111.

The quality of digitized sound. The higher the sound sampling frequency and depth, the better the digitized sound will sound. The lowest quality of digitized sound, corresponding to the quality of telephone communication, is obtained at a sampling rate of 8000 times per second, a sampling rate of 8 bits, and by recording an audio track (“mono” mode). The highest quality digitized audio, corresponding to the quality of an audio CD, is achieved with a sampling rate of 48,000 times per second, a sampling rate of 16 bits, and the recording of two audio tracks (“stereo” mode ).

It should be remembered that the higher the quality of the digital sound, the greater the volume of information in the audio file. It is possible to estimate the information volume of a digital stereo sound file with a duration of 1 second with an average sound quality (16 bits, 24,000 measurements per second). To do this, the encoding depth must be multiplied by the number of measurements in 1 second and multiplied by 2 (stereo sound):

16 bits × 24,000 × 2 = 768,000 bits = 96,000 bytes = 93.75 KB.

Audio Coding: Secrets Revealed – Part 2

Audio Coding: Secrets Revealed – Part 2

AUDIO ENCODING

Audio settings for video capture and transmission.

AUDIO ENCODING

Sampling frequency (kHz, kHz)
Sample rate (or sample rate): the frequency with which the signal is digitized, stored, processed, or converted from analog to digital. Time sampling means that the signal is represented by several of its samples (samples) taken at regular intervals.

Measured in hertz (Hz, Hz) or kilohertz (kHz, kHz,) 1 kHz equals 1000 Hz. For example, 44,100 samples per second can be labeled 44,100 Hz or 44.1 kHz. The selected sample rate will determine the maximum playback frequency and, as follows from Kotelnikov’s theorem, to fully restore the original signal, the sample rate must be twice the highest frequency in the signal spectrum.

As you know, the human ear is capable of picking up frequencies between 20 Hz and 20 kHz. Given these parameters and the values ​​shown in the table below, you can understand why 44.1 kHz was chosen as the sampling frequency for CD and is still considered a very good frequency for recording.

There are several reasons for choosing a higher sample rate, although it may seem like a waste of time and effort to reproduce sound outside the range of the human ear. At the same time, 44.1 – 48 kHz will suffice for the average listener for a high-quality solution to most problems.

Bit depth
Along with the sample rate, there is the bit depth or depth of sound. Bit depth is the number of bits of digital information to encode each sample. Simply put, the bit depth determines the “accuracy” of the input signal measurement. The larger the digit capacity, the smaller the error for each individual conversion from the magnitude of an electrical signal to a number and vice versa. With the smallest possible bit depth, there are only two options for measuring sound accuracy: 0 for full silence and 1 for full sound. If the bit width is 8 (16), then by measuring the input signal, 2 8 = 256 (2 16 = 65,536) different values ​​can be obtained.

Bit depth is fixed in the PCM codec, but for codecs that assume compression (eg MP3 and AAC), this parameter is calculated during encoding and may vary from sample to sample.

Bitrate
Bit rate is an indicator of the amount of information that one second of sound encodes. The higher it is, the less distortion and the closer the encoded composition is to the original. For linear PCM, the bit rate is very easy to calculate.

bitrate = sample rate × bit depth × channels

For systems such as the Epiphan Pearl Mini that encode 16-bit (16-bit) linear PCM, this calculation can be used to determine how much additional bandwidth the PCM audio might require. For example, for stereo (two channels), the signal is digitized at 44.1 kHz at 16 bits and the bit rate is calculated as follows:

44.1 kHz × 16 bit × 2 = 1411.2 kbps

Meanwhile, audio compression algorithms like AAC and MP3 have fewer bits to transmit the signal (that’s their purpose), so they use low bit rates. Typically, the values ​​are in the range of 96 kbps to 320 kbps. For these codecs, the higher the bit rate you choose, the more audio bits you get per sample and the better the sound quality.

Sample rate, bit depth and bit rates in real life.
Audio CDs, one of the most popular early inventions for the general public for storing digital audio, used 44.1 kHz (20 Hz – 20 kHz, human ear range) and 16 bits. These values ​​were chosen to be able to save as much audio as possible to disk with good sound quality.

When video was added to audio and DVD and then Blu-ray discs came along, a new standard was created. DVD and Blu-Ray recordings typically use 48 kHz (stereo) or 96 kHz (5.1 surround) linear PCM format and 24-bit depth. These settings have been chosen as ideal for keeping the audio in sync with the video while obtaining the best possible quality using additional available disk space.

Our recommendations
CDs, DVDs, and Blu-Ray discs all have one goal: to provide the consumer with a high-quality playback engine. The goal of all developments was to provide high-quality audio and video without worrying about file size (if only it could fit on disk). Such quality could be provided by linear PCM.

By contrast, mobile media and streaming media have a completely different goal: to use the lowest bit rate possible, while still being sufficient to maintain acceptable quality for the listener.

Audio encoding: secrets revealed

Audio encoding: secrets revealed

audio encoding

Audio settings for video capture and transmission.

AUDIO ENCODING

As people directly related to the AV sphere, we constantly talk about audio coding and audio codecs, but what is it? An audio codec is essentially a device or algorithm that can encode and decode a digital audio signal.

In practice, the audio waves that travel through the air are continuous analog signals. The signals are converted to digital form by a device called an analog-to-digital converter (ADC), and the reverse converter is called a digital-to-analog converter (DAC). The codec lies between these two functions and it is he who allows you to adjust some important parameters for the successful capture, recording and transmission of an audio signal: the codec algorithm, the sampling frequency, the bit width and the speed of the audio signal. data.

The three most popular audio codecs are Pulse-Code Modulation (PCM), MP3, and Advanced Audio Coding (AAC). The choice of codec determines the compression rate and the recording quality. PCM is a codec used by computers, CDs, digital phones, and sometimes SACD. The PCM signal source is sampled at regular intervals, and each sample is the digital amplitude of the analog signal. PCM is the simplest option for digitizing an analog signal.

With the correct parameters, this digitized signal can be completely converted back to analog without any loss. But this codec, which provides an almost complete identity with the original audio, is unfortunately not very cheap, which results in very large file sizes, and such files are not suitable for streaming. We recommend using PCM to record digital images for your sources or when doing audio post-processing.

Fortunately, we always have the option of choosing a different codec that can compress digital data (rather than PCM) based on some helpful observations on the behavior of sound waves. But in this case, you have to make a compromise: all alternative algorithms are associated with “losses”, since it is impossible to completely restore the original signal, but nevertheless the result is still so good that most users will not be able to to catch the difference.

MP3 is an audio encoding format that uses a digital data compression algorithm that allows you to save the audio signal in smaller files. The MP3 codec is the most used by users to record and store music files. We recommend using MP3 to stream audio content as it requires less network bandwidth.

AAC is a newer audio encoding algorithm that is the successor to MP3. AAC has become the standard for the MPEG-2 and MPEG-4 formats. In fact, this is also a digital data compression codec, but with less quality loss than MP3 when encoded with the same bit rate. We recommend using this codec for online streaming.