Mp3: Joint Stereo and Stereo modes


Free Download Mp4Gain
picture

Mp3: Joint Stereo and Stereo modes
Mp3: Joint Stereo and Stereo modes

What is Mp3?

Mp3 is a popular audio format that is widely used for music and other audio files. It is a compressed audio format that allows for smaller file sizes without sacrificing audio quality. Mp3 uses a lossy compression algorithm that removes some of the audio data that is deemed less important to the human ear. This results in a smaller file size, but also a slight reduction in audio quality.
Personally, I have been using Mp3 for many years to store and listen to my music collection. I have always been impressed with the quality of the audio, even at lower bitrates. However, I have also noticed that some Mp3 files sound better than others, even when they have the same bitrate. This is where Joint Stereo and Stereo modes come into play.

Joint Stereo vs Stereo modes

Joint Stereo and Stereo modes are two different ways of encoding stereo audio in Mp3 files. Stereo mode is the traditional way of encoding stereo audio, where each channel (left and right) is encoded separately. Joint Stereo, on the other hand, uses a more advanced encoding technique that takes advantage of similarities between the left and right channels to reduce the amount of data that needs to be encoded.
In my experience, Joint Stereo mode can produce better sounding Mp3 files than Stereo mode, especially at lower bitrates. This is because Joint Stereo mode is able to preserve more of the original audio data, resulting in a more accurate representation of the original audio. However, not all Mp3 encoders support Joint Stereo mode, so it is important to check the settings of your encoder to ensure that it is being used.

Conclusion

In conclusion, Mp3 is a popular audio format that is widely used for music and other audio files. Joint Stereo and Stereo modes are two different ways of encoding stereo audio in Mp3 files, with Joint Stereo mode being the more advanced and potentially better sounding option. If you are looking to create high-quality Mp3 files, it is important to understand the differences between these two modes and to choose the one that best suits your needs.
Final words: Mp3 is a versatile and widely used audio format that can provide high-quality audio at lower file sizes. By understanding the differences between Joint Stereo and Stereo modes, you can create Mp3 files that sound great and take up less space on your device.

Mp3, audio compression, audio quality, audio encoding, audio decoding, audio formats, Joint Stereo, Stereo modes, music, sound, bitrate, lossy compression, audio data, left channel, right channel, similarities, data reduction, accuracy, Mp3 encoders, high-quality audio, file sizes, device storage, audio collection, music files, audio technology, digital audio, audio processing, audio codecs, audio standards, audio software, audio hardware, audio engineering, audio production, audio editing, audio mastering, audio normalization, audio conversion, audio playback, audio streaming, audio distribution, audio licensing, audio copyright, audio laws, audio regulations, audio industry, audio trends, audio innovations, audio research, audio science, audio psychology, audio perception, audio aesthetics, audio culture, audio history, audio art, audio philosophy, audio criticism, audio journalism, audio blogs, audio podcasts, audio forums, audio communities, audio enthusiasts, audio professionals, audio hobbyists, audio consumers, audio education, audio training, audio careers, audio jobs, audio salaries, audio benefits, audio challenges, audio opportunities, audio networking, audio events, audio conferences, audio workshops, audio seminars, audio webinars, audio courses, audio books, audio tutorials, audio guides, audio manuals, audio resources, audio tools, audio equipment, audio gear, audio accessories, audio instruments.


Free Download Mp4Gain
picture


Mp4Gain Main Window
picture


Mp4Gain Features
picture


Free Download Mp4Gain
picture

What is a De-Esser?

What is a De-Esser?

De-Esser
De-Esser
De-Esser
De-Esser

As a music producer and audio engineer, I’ve encountered my fair share of challenging vocal recordings. One common issue is sibilance, which occurs when the “s” and “sh” sounds are overly pronounced, causing harsh and piercing frequencies in the mix. This is where a de-esser comes in handy.

De-Esser Plugin

A de-esser is a specialized audio plugin that reduces or eliminates sibilance from vocal recordings. It works by detecting the offending frequencies and applying gain reduction to them, effectively taming the harshness and allowing the vocals to sit better in the mix.

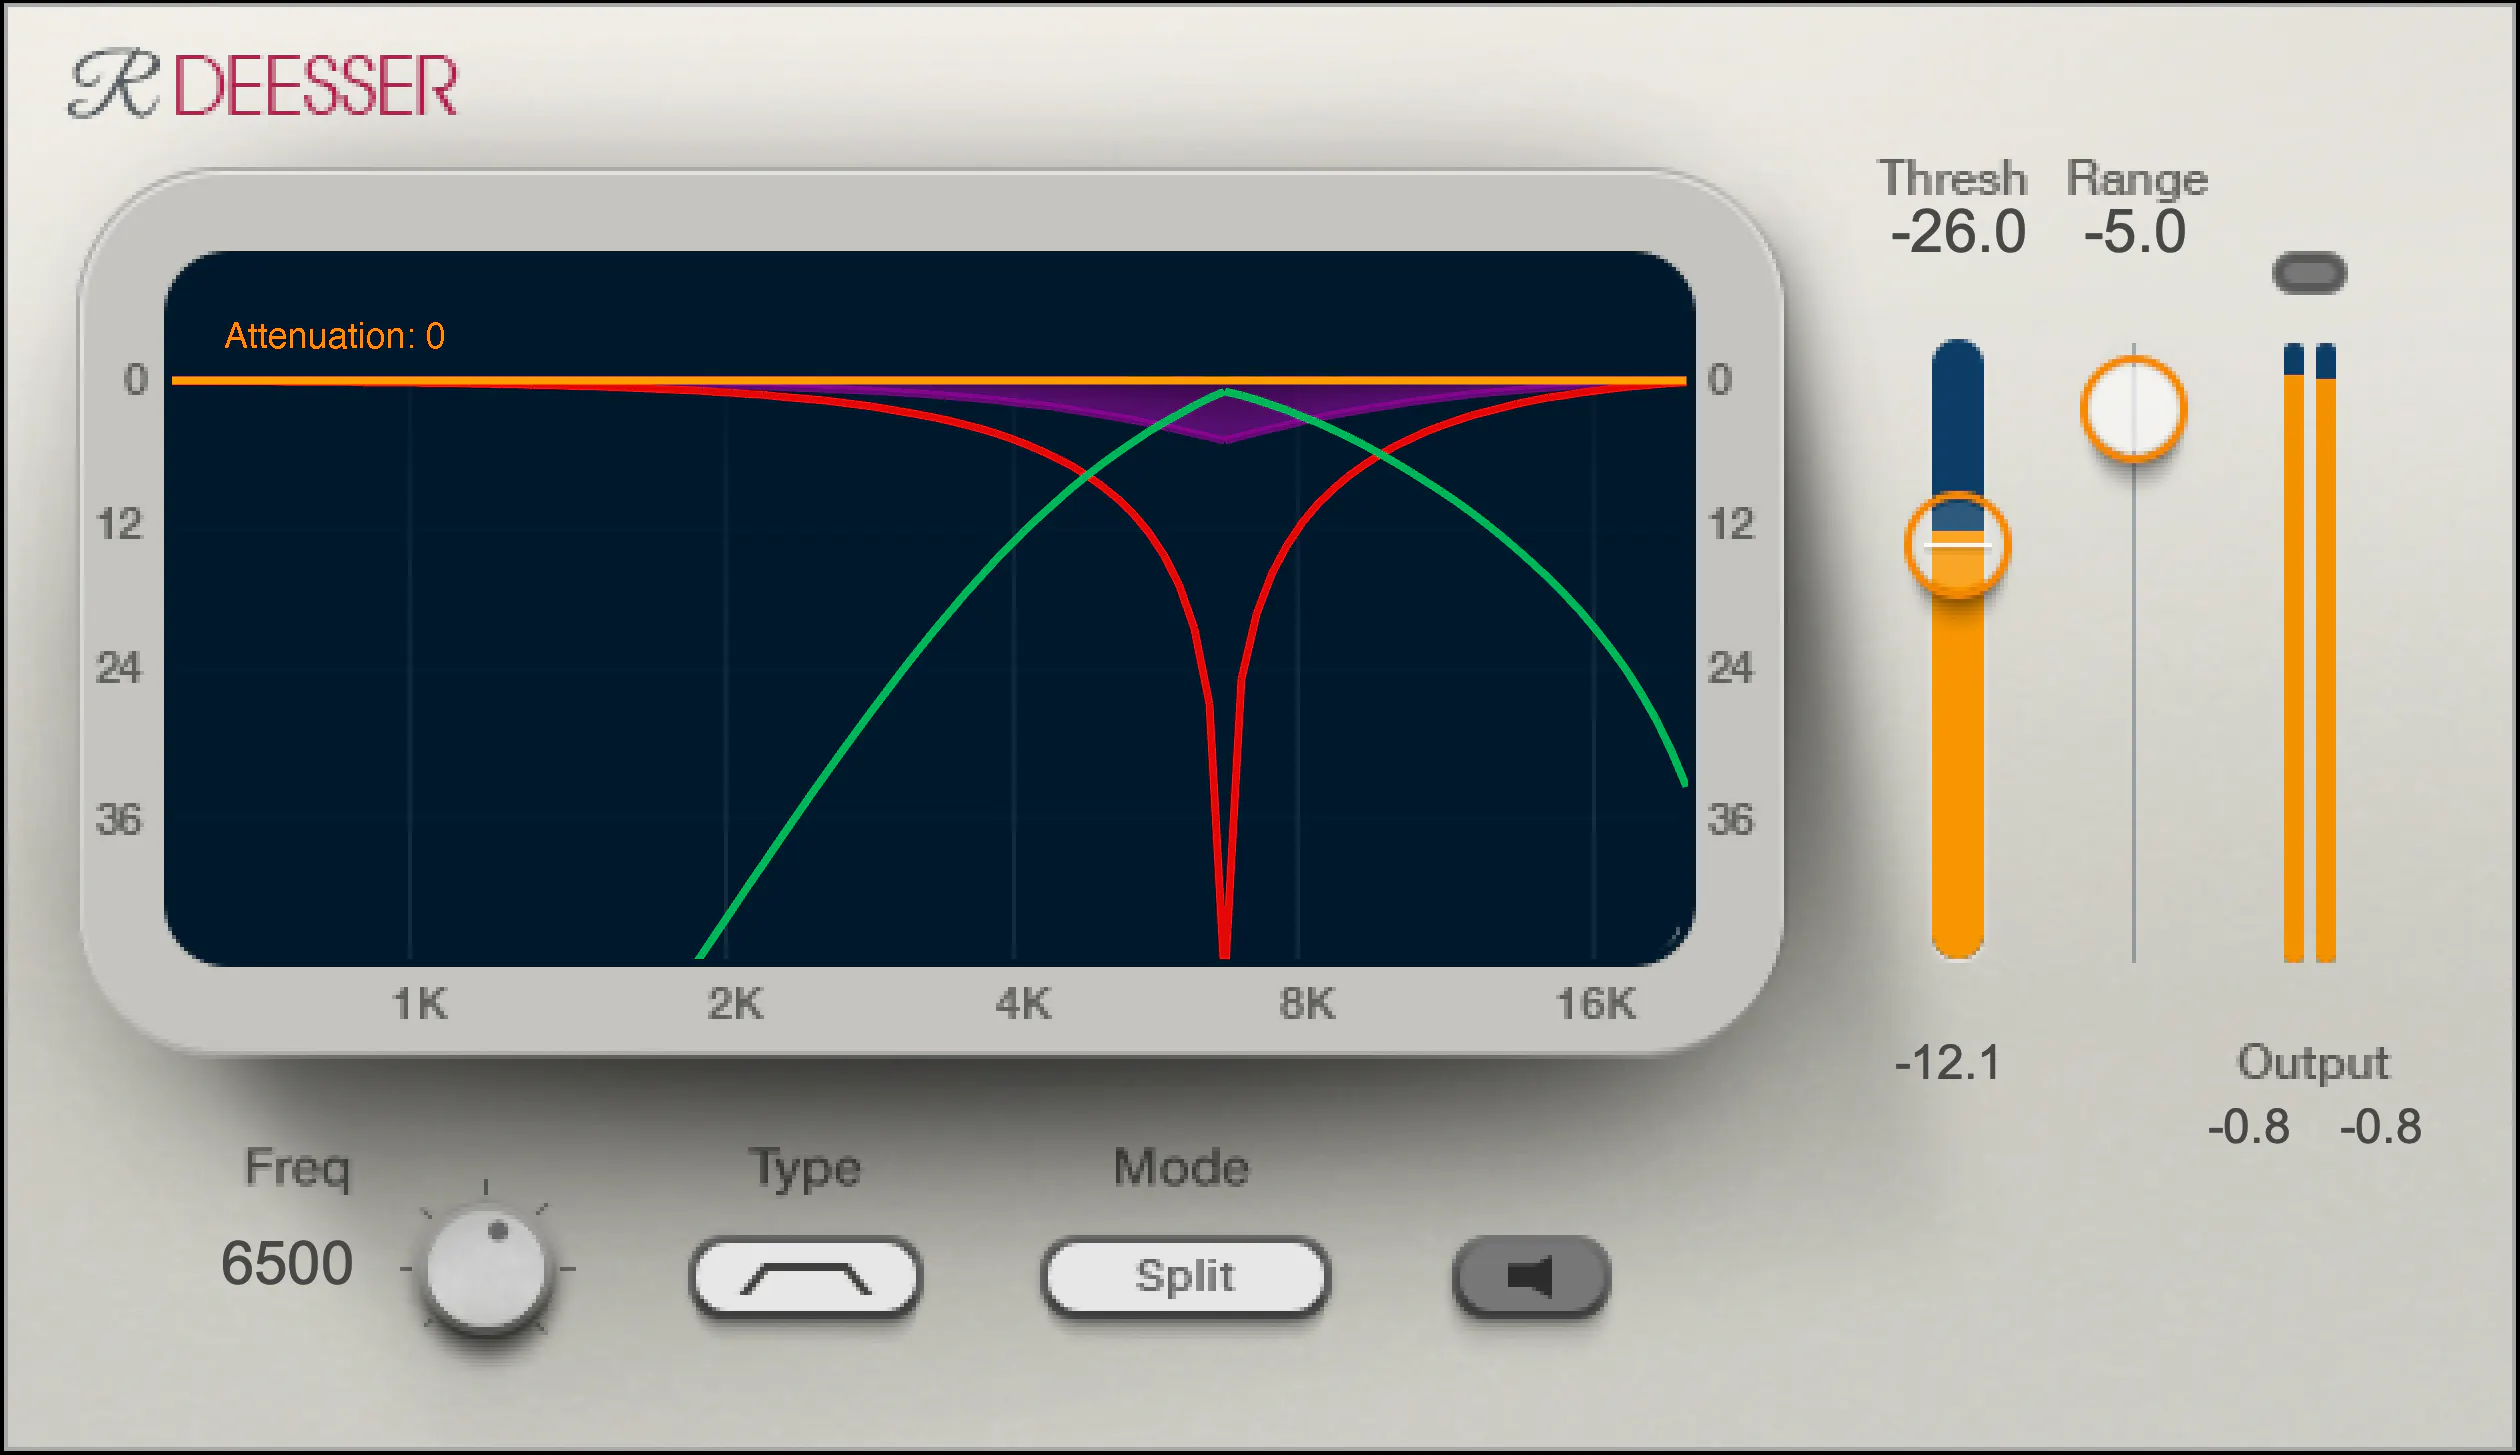
One of my go-to de-esser plugins is Waves Renaissance DeEsser, which offers precise control over the detection frequency, threshold, and reduction amount. Another popular option is FabFilter Pro-DS, which includes a natural-sounding “single vocal” mode for easy and effective de-essing.

De-Essing Vocals

De-essing can be a delicate process, as overuse can result in a dull and lifeless vocal sound. It’s important to strike a balance between reducing sibilance and maintaining the natural tone and character of the vocal recording.

When de-essing vocals, I typically start by soloing the vocal track and listening for the most pronounced sibilant sounds. I then apply the de-esser plugin with a gentle reduction amount, gradually increasing until the sibilance is under control but the vocal still sounds natural.

Best De-Esser for Vocals

In my experience, the best de-esser for vocals is one that offers precise control over the detection and reduction parameters, while still maintaining a natural sound. As mentioned earlier, Waves Renaissance DeEsser and FabFilter Pro-DS are both excellent options in this regard.

It’s also worth considering the de-esser included in your DAW of choice. For example, Logic Pro’s built-in de-esser is simple yet effective, with a straightforward interface that allows for quick and easy de-essing.

De-Esser Settings

When using a de-esser, it’s important to understand the various settings and how they affect the sound. The most important parameters to adjust are the detection frequency, threshold, and reduction amount.

The detection frequency determines which frequencies the de-esser will target, while the threshold sets the level at which the gain reduction will be applied. The reduction amount controls how much gain reduction is applied to the offending frequencies.

It’s worth experimenting with these settings to find the sweet spot for each individual vocal recording.

Tips for Using a De-Esser

Here are a few tips for getting the most out of your de-esser:

Use the de-esser sparingly, as overuse can result in a dull and lifeless vocal sound.
Always listen for sibilance in solo mode before applying the de-esser to the full mix.
Experiment with different de-esser plugins and settings to find the best sound for each individual recording.
If you’re unsure about how much de-essing to apply, start with a small reduction amount and gradually increase until the sibilance is under control but the vocal still sounds natural.
As the legendary producer Quincy Jones once said, “The most important thing in the studio is your ears.” And this is especially true when it comes to managing sibilance in vocal recordings. A de-esser is a tool that helps to control sibilance, or the harsh “s” and “t” sounds that can be distracting or unpleasant in a recording.

What is a de-esser?

Simply put, a de-esser is a type of audio processor that is designed to reduce or remove sibilance from a recording. It works by detecting and attenuating the specific frequency range where sibilance occurs in a vocal recording. This can help to smooth out the sound of the recording and make it more pleasing to the ear.

How does a de-esser work?

A de-esser typically uses a narrow-band compressor to reduce the level of the sibilant frequencies. The compressor is set to activate only when the sibilant frequencies exceed a certain threshold level. This allows the de-esser to reduce sibilance without affecting other parts of the recording. Some de-essers also use dynamic equalization to selectively attenuate sibilant frequencies, which can provide a more natural-sounding result.

Why is a de-esser important?

Sibilance can be a major distraction in vocal recordings, and can make a recording sound amateurish or unprofessional. A de-esser can help to smooth out the sound of a recording and make it more pleasant to listen to. This can be especially important in situations where the recording will be played over a large sound system or in a professional setting.

As the legendary producer Quincy Jones once said, “The most important thing in the studio is your ears.” And this is especially true when it comes to managing sibilance in vocal recordings. One personal experience I’ve had with sibilance was during a recording session with a vocalist who had a very pronounced lisp. Despite the fact that the vocal performance was excellent, the lisp made the recording almost unlistenable. However, with the use of a de-esser, we were able to remove the harsh sibilant sounds and salvage the recording.

Another personal experience was with a different vocalist who had a lot of sibilance in her recordings. Initially, we tried to use EQ to reduce the sibilance, but found that this also affected other parts of the recording and made it sound unnatural. However, once we introduced a de-esser into the signal chain, we were able to achieve a more natural-sounding result that still effectively reduced the sibilance.

In conclusion, a de-esser is a powerful tool for managing sibilance in vocal recordings. By detecting and attenuating specific frequency ranges where sibilance occurs, a de-esser can help to smooth out the sound of a recording and make it more pleasing to the ear. Whether you’re a professional audio engineer or a hobbyist recording at home, a de-esser is an important tool to have in your audio processing toolkit.

sibilance reduction, vocal processing, audio engineering, dynamic equalization, narrow-band compressor, vocal recording, audio processor, professional recording, recording studio, audio production, sound quality, sound engineering, audio post-production, de-essing, audio editing, audio restoration, sound treatment, audio technology, audio software, mixing and mastering, audio mastering, audio plugins, music production, audio effects, sound design, audio signal processing, audio post-processing, audio filtering, audio frequency, audio dynamics, audio post-production techniques, vocal performance, audio compression, audio enhancement, audio editing software, audio hardware, audio mixer, audio signal chain, audio equipment, audio tools, sound recording, audio clean-up, audio post, audio mastering software, audio workflow, audio clarity

Audio Frequency Response and Why It Matters

Audio Frequency Response and Why It Matters

Audio Frequency Response

Introduction

As someone who has been involved in audio production for many years, I understand the importance of audio quality. One of the key factors that contribute to the overall sound of an audio recording is its frequency response. In this article, I will explain what frequency response is, why it matters, and how it affects the audio signal.

What is Audio Frequency Response?

Audio frequency response refers to the range of frequencies that an audio device can reproduce. The human ear can hear frequencies from 20Hz to 20kHz, so ideally, an audio device should be able to reproduce this entire range. However, different audio devices have different frequency responses. Some may have a wider range, while others may have a narrower range.
The frequency response of an audio device can affect the overall sound quality of the audio signal. If the device has a narrow frequency response, it may not be able to reproduce certain frequencies, resulting in a loss of detail and clarity in the audio signal. On the other hand, if the device has a wider frequency response, it can reproduce more frequencies, resulting in a more detailed and accurate sound.

Why Does Audio Frequency Response Matter?

Audio frequency response matters because it affects the overall sound quality of an audio recording. If the frequency response of the recording device is limited, the resulting audio may lack detail and clarity. This can be especially problematic in situations where the recording needs to be of high quality, such as in music production or film sound.
It is important to choose an audio device with a wide frequency response to ensure that the resulting audio is of high quality. Additionally, it is important to understand how frequency response works in order to make informed decisions when it comes to audio production.

Understanding Audio Frequency Response

To understand audio frequency response, it is important to understand how sound waves work. Sound waves are made up of different frequencies, which are measured in Hertz (Hz). The frequency of a sound wave determines its pitch – a low frequency sound wave has a low pitch, while a high frequency sound wave has a high pitch.
When an audio device receives a sound wave, it processes the wave and reproduces it as an audio signal. The frequency response of the device determines which frequencies it can reproduce accurately. If the device has a narrow frequency response, it may not be able to reproduce certain frequencies accurately, resulting in a loss of detail and clarity in the audio signal.

Final Words

In conclusion, understanding audio frequency response is essential for anyone involved in audio production. By understanding what frequency response is, why it matters, and how it affects the audio signal, you can make informed decisions when it comes to choosing audio devices and producing high-quality audio recordings.
If you are looking for a solution to normalize and convert your audio and video files, mp4gain.com can help. Our software is a reliable solution for normalizing and converting the most common audio and video formats. Try it out and see the difference in audio quality for yourself.

How can I prevent aliasing and harmonic distortion in audio?

How can I prevent aliasing and harmonic distortion in audio?

Digital Audio Aliasing


Digital Audio Aliasing


Introduction

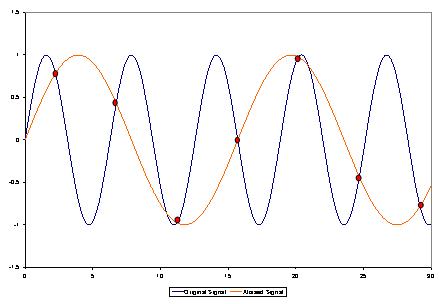
As a music enthusiast, I have always been concerned about the quality of audio recordings. Two common problems that affect audio quality are aliasing and harmonic distortion. Aliasing occurs when the sampling rate of an audio signal is insufficient, causing high-frequency signals to be incorrectly represented as lower frequencies. On the other hand, harmonic distortion occurs when the amplitude of a signal is altered due to the presence of harmonics. In this article, we will discuss ways to prevent these issues and improve audio quality.

What is aliasing and how to prevent it?

Aliasing is a common problem in digital audio, but it can be prevented by increasing the sampling rate of the audio signal. As a general rule, the sampling rate should be at least twice the highest frequency in the audio signal. For example, if the highest frequency in the audio signal is 20 kHz, the sampling rate should be at least 40 kHz. By increasing the sampling rate, we can ensure that high-frequency signals are accurately represented in the digital audio signal.

My personal experience

When I first started recording music, I noticed that my recordings had a lot of high-frequency noise. After doing some research, I realized that this was due to aliasing. I increased the sampling rate of my recordings, and the high-frequency noise disappeared. Since then, I have made it a point to always use a high sampling rate when recording audio.

What is harmonic distortion and how to reduce it?

Harmonic distortion occurs when a signal is altered due to the presence of harmonics. This can be caused by nonlinearities in the audio system, such as distortion in amplifiers or speakers. One way to reduce harmonic distortion is to use a high-quality audio system with low distortion. Additionally, using equalization can help reduce distortion in certain frequency ranges.

Quote from a book

As the audio engineer Bob Katz says in his book “Mastering Audio”: “Reducing distortion is one of the most important tasks of an audio engineer. Distortion masks the details in a mix and reduces the perceived loudness of the audio signal.”

Improving audio quality

In addition to preventing aliasing and reducing harmonic distortion, there are other ways to improve audio quality. One way is to use a high-quality audio codec when encoding audio files. Another way is to use a high-quality audio player or amplifier when listening to audio.

My personal opinion

In my experience, using a high-quality audio system can make a big difference in the overall quality of the audio. When I upgraded my audio system, I noticed that the sound was much clearer and more detailed.

Conclusion

Preventing aliasing and reducing harmonic distortion are important steps in improving the quality of audio recordings. By using a high sampling rate, a high-quality audio system, and equalization, we can ensure that our audio recordings are clear and free from distortion.

Final words

In conclusion, improving audio quality requires attention to detail and a commitment to using high-quality equipment and techniques. While there are many factors that can affect audio quality, preventing aliasing and reducing harmonic distortion are two important steps that can make a big difference.


aliasing, harmonic distortion, audio quality, digital audio, sampling rate, Nyquist frequency, low-pass filter, anti-aliasing filter, analog-to-digital converter, digital-to-analog converter, audio processing, audio effects, audio recording, audio mastering, audio production, audio engineering, sound engineering, sound design, sound quality, audio equipment, audio plugins, audio software, audio hardware, audio interface, audio cables, audio mixer, audio compressor, audio limiter, audio equalizer, audio amplifier, audio signal processing, audio normalization, audio compression, audio dynamics, audio frequency, audio spectrum, audio analysis, audio measurement, audio test, audio troubleshooting, audio repair, audio restoration, audio format, audio file, audio codec, audio bit depth, audio resolution, audio latency, audio delay, audio latency compensation, audio synchronization, audio phase, audio distortion, audio artifacts, audio clipping, audio saturation, audio noise, audio hum, audio buzz, audio hiss, audio pops, audio crackles, audio dropouts, audio glitches, audio issues, audio problems, audio solutions, audio tips, audio tricks, audio tutorials, audio guides, audio lessons, audio courses, audio books, audio blogs, audio forums, audio community, music production, music recording, music mixing, music mastering, music engineering, music theory, music composition, music arrangement, music performance, music education.

How to Convert MP3 to AAC: Exploring the Technicalities of the Advanced Audio Codec

How to Convert MP3 to AAC: Exploring the Technicalities of the Advanced

MP3 to AAC
MP3 to AAC

Audio Codec


MP3 to AAC
MP3 to AAC


The History of AAC

Advanced Audio Coding (AAC) is a widely used audio codec, designed to be the successor of the MP3 format. It was first introduced by the Moving Picture Experts Group (MPEG) as part of MPEG-2 and later extended as MPEG-4 Part 3. Since its release in 1997, AAC has been recognized for its superior audio quality and compression efficiency.

The development of AAC began in 1988 as part of an international collaboration called the Audio Coding Joint Technical Committee (JTC), consisting of experts from several organizations, including AT&T, Fraunhofer Society, and Sony. The goal was to create an audio codec that could deliver high-quality audio while using less bandwidth and storage space than MP3, which was the dominant audio format at the time.

The result of this collaboration was the creation of the MPEG-2 AAC standard in 1994, which was later extended as MPEG-4 Part 3 to include additional features. Today, AAC is supported by a wide range of devices and platforms, including Apple’s iTunes, iPod, and iPhone, as well as Android devices and various media players.

How AAC Works

AAC is a lossy compression codec, meaning that it achieves high compression rates by discarding some of the audio data. However, unlike MP3, which relies on a perceptual coding algorithm to remove irrelevant audio data, AAC uses a more advanced coding algorithm that takes into account the psychoacoustic properties of human hearing.

AAC achieves this by dividing the audio signal into different frequency bands and applying different quantization noise to each band, based on the sensitivity of human hearing at different frequencies. The result is a more efficient use of the available data rate, allowing AAC to deliver higher audio quality at the same bit rate as MP3.

AAC is also a format container, meaning that it can contain audio data encoded in various formats, including stereo, 5.1 surround sound, and even lossless formats like Apple Lossless and FLAC. This flexibility makes AAC a versatile audio format that can be used for a wide range of applications, from music streaming to professional audio production.

Converting MP3 to AAC Using Mp4Gain

Mp4Gain is a versatile audio and video conversion tool that supports a wide range of formats, including MP3 and AAC. With Mp4Gain, you can convert your MP3 files to AAC quickly and easily, without losing any audio quality.

What is a container format?

A container format is a type of file format that can store different types of data in a single file. In the case of audio and video files, a container format is used to package the different types of data that make up the file, including the video and audio streams, metadata, and any subtitles or closed captions.

The benefits of using AAC

AAC has several benefits over other audio formats. Firstly, it offers improved sound quality at lower bitrates than MP3, which means that files can be compressed to a smaller size without sacrificing quality. This is particularly important for mobile devices with limited storage capacity.

Secondly, AAC offers better performance at high bitrates, making it a popular choice for professionals who need high-quality audio, such as musicians, producers, and sound engineers.

Another benefit of using AAC is that it supports up to 48 channels of audio, compared to MP3’s limit of 2 channels. This makes AAC a popular choice for high-end surround sound systems and immersive audio experiences.

Finally, AAC is widely supported by a range of devices and software, including Apple devices, Android devices, and popular media players like VLC and QuickTime.

How to convert MP3 to AAC with Mp4Gain

Now that you understand the benefits of using AAC, you may want to convert your MP3 files to AAC to take advantage of these benefits. Fortunately, Mp4Gain makes it easy to do this.

To convert MP3 to AAC with Mp4Gain, follow these simple steps:

    1. Open Mp4Gain and select the “Audio Converter” option from the main menu.
    2. Click the “Add Files” button and select the MP3 files you want to convert to AAC.
    3. Select “AAC” as the output format from the list of available formats.
    4. Choose the desired bitrate, sampling rate, and channel configuration for the output file. You can also choose to normalize the volume if you want.
  1. Click the “Convert” button to start the conversion process.

Once the conversion process is complete, you will have high-quality AAC files that can be played on a wide range of devices and media players.

Conclusion

AAC is a high-quality audio format that offers several benefits over other formats, including improved sound quality at lower bitrates, better performance at high bitrates, support for multiple channels of audio, and wide compatibility with devices and software.

If you want to take advantage of these benefits, Mp4Gain makes it easy to convert your MP3 files to AAC. With its simple interface and powerful conversion capabilities, Mp4Gain is the perfect tool for anyone who wants to create high-quality, versatile audio files.