How can I prevent aliasing and harmonic distortion in audio?


Free Download Mp4Gain
picture

How can I prevent aliasing and harmonic distortion in audio?
Digital Audio Aliasing


Digital Audio Aliasing


Introduction

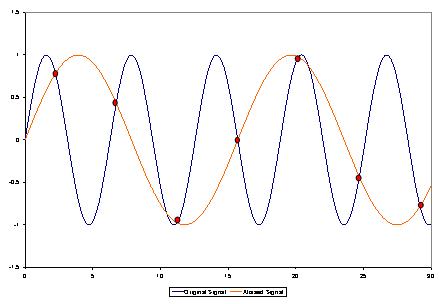
As a music enthusiast, I have always been concerned about the quality of audio recordings. Two common problems that affect audio quality are aliasing and harmonic distortion. Aliasing occurs when the sampling rate of an audio signal is insufficient, causing high-frequency signals to be incorrectly represented as lower frequencies. On the other hand, harmonic distortion occurs when the amplitude of a signal is altered due to the presence of harmonics. In this article, we will discuss ways to prevent these issues and improve audio quality.

What is aliasing and how to prevent it?

Aliasing is a common problem in digital audio, but it can be prevented by increasing the sampling rate of the audio signal. As a general rule, the sampling rate should be at least twice the highest frequency in the audio signal. For example, if the highest frequency in the audio signal is 20 kHz, the sampling rate should be at least 40 kHz. By increasing the sampling rate, we can ensure that high-frequency signals are accurately represented in the digital audio signal.

My personal experience

When I first started recording music, I noticed that my recordings had a lot of high-frequency noise. After doing some research, I realized that this was due to aliasing. I increased the sampling rate of my recordings, and the high-frequency noise disappeared. Since then, I have made it a point to always use a high sampling rate when recording audio.

What is harmonic distortion and how to reduce it?

Harmonic distortion occurs when a signal is altered due to the presence of harmonics. This can be caused by nonlinearities in the audio system, such as distortion in amplifiers or speakers. One way to reduce harmonic distortion is to use a high-quality audio system with low distortion. Additionally, using equalization can help reduce distortion in certain frequency ranges.

Quote from a book

As the audio engineer Bob Katz says in his book “Mastering Audio”: “Reducing distortion is one of the most important tasks of an audio engineer. Distortion masks the details in a mix and reduces the perceived loudness of the audio signal.”

Improving audio quality

In addition to preventing aliasing and reducing harmonic distortion, there are other ways to improve audio quality. One way is to use a high-quality audio codec when encoding audio files. Another way is to use a high-quality audio player or amplifier when listening to audio.

My personal opinion

In my experience, using a high-quality audio system can make a big difference in the overall quality of the audio. When I upgraded my audio system, I noticed that the sound was much clearer and more detailed.

Conclusion

Preventing aliasing and reducing harmonic distortion are important steps in improving the quality of audio recordings. By using a high sampling rate, a high-quality audio system, and equalization, we can ensure that our audio recordings are clear and free from distortion.

Final words

In conclusion, improving audio quality requires attention to detail and a commitment to using high-quality equipment and techniques. While there are many factors that can affect audio quality, preventing aliasing and reducing harmonic distortion are two important steps that can make a big difference.


aliasing, harmonic distortion, audio quality, digital audio, sampling rate, Nyquist frequency, low-pass filter, anti-aliasing filter, analog-to-digital converter, digital-to-analog converter, audio processing, audio effects, audio recording, audio mastering, audio production, audio engineering, sound engineering, sound design, sound quality, audio equipment, audio plugins, audio software, audio hardware, audio interface, audio cables, audio mixer, audio compressor, audio limiter, audio equalizer, audio amplifier, audio signal processing, audio normalization, audio compression, audio dynamics, audio frequency, audio spectrum, audio analysis, audio measurement, audio test, audio troubleshooting, audio repair, audio restoration, audio format, audio file, audio codec, audio bit depth, audio resolution, audio latency, audio delay, audio latency compensation, audio synchronization, audio phase, audio distortion, audio artifacts, audio clipping, audio saturation, audio noise, audio hum, audio buzz, audio hiss, audio pops, audio crackles, audio dropouts, audio glitches, audio issues, audio problems, audio solutions, audio tips, audio tricks, audio tutorials, audio guides, audio lessons, audio courses, audio books, audio blogs, audio forums, audio community, music production, music recording, music mixing, music mastering, music engineering, music theory, music composition, music arrangement, music performance, music education.


Free Download Mp4Gain
picture


Mp4Gain Main Window
picture


Mp4Gain Features
picture


Free Download Mp4Gain
picture

What is digital audio and video?

What is digital audio and video?

Digital Audio and Video

Digital audio and video are types of data that we can store on a computer or other electronic device. They are made up of a series of numbers that represent the sound or image we want to save. This means that instead of using physical materials like film or tape to record sound or video, we can use a computer to store and manipulate digital versions of that data.

Digital Audio and Video

How is sound digitized?

Sound is a type of wave that travels through the air. When we want to digitize sound, we need to find a way to measure that wave and turn it into a series of numbers. We do this by using a device called a microphone, which converts sound waves into electrical signals that can be processed by a computer.

Here’s an example: imagine you’re at a concert and you want to record a song using your phone. You turn on the voice memo app and hold your phone up to the speakers. The microphone in your phone converts the sound waves from the speakers into electrical signals that are then turned into a digital audio file that you can listen to later.

How are multiple sounds combined into a single file?

When we record sound using a microphone, we’re not just capturing one sound at a time. We’re also picking up any other sounds that might be happening in the background, like people talking or the sound of a car driving by. So how do we store all of these different sounds in a single file?

The answer is that each sound is given its own “channel” in the digital audio file. Imagine that you have a stereo system with two speakers – one on the left and one on the right. When you record a song using your phone, the sound that’s coming out of the left speaker is saved in one channel of the audio file, while the sound that’s coming out of the right speaker is saved in another channel.

How are different instruments and voices saved in a single channel?

So now we know how to store multiple sounds in a digital audio file using different channels. But what if we want to save a song that has lots of different instruments and voices playing at the same time? How can we separate out all of those different sounds and make sure they’re saved correctly in the file?

The answer is that each sound is given its own “frequency” in the digital audio file. Think of it like a rainbow: just like how a rainbow has lots of different colors, sound has lots of different frequencies. When we record a song, we’re capturing all of those different frequencies at the same time.

So let’s say we’re recording a song that has a guitar, a bass, a drum set, and a singer. Each of those instruments and the singer’s voice has a different set of frequencies that make up its sound. The guitar might have a lot of high frequencies, while the bass might have a lot of low frequencies. When we record the song, we capture all of those frequencies at the same time and save them in the digital audio file.

How are timbres saved in a digital audio file?

The “timbre” of a sound refers to its unique quality or tone. For example, if you hear a trumpet and a violin playing the same note, you can still tell the difference between the two because they have different timbres. So how do we save the timbre of each instrument or voice in a digital audio file?

To save the timbre of each sound, we use a process called “sampling”. Sampling involves taking tiny snapshots of the sound wave at regular intervals and saving those snapshots as numbers in the digital audio file. The more snapshots we take, the more accurately we can capture the unique timbre of each sound.

Here’s an example: let’s say we’re recording a piano playing a single note. We take 44,100 snapshots of the sound wave per second and save each snapshot as a number in the digital audio file. When we play back the file, the computer reads those numbers and uses them to recreate the sound of the piano note. Because we took so many snapshots per second, we’re able to capture all of the nuances of the piano’s timbre and make it sound like a real piano.

How are noises and other sounds saved in a digital audio file?

When we record sound using a microphone, we’re not just capturing the sounds we want to hear – we’re also capturing any background noise that might be happening. This can include things like people talking, cars driving by, or birds chirping. So how do we deal with all of that extra noise when we save the sound as a digital file?

One way to deal with background noise is to use a process called “noise reduction”. This involves analyzing the digital audio file and looking for parts of the sound that are consistent over time – like the sound of a fan running or the hum of a fluorescent light. The computer can then remove those consistent sounds from the file, leaving behind just the sounds we want to hear.

Another way to deal with background noise is to use a process called “EQ” (short for “equalization”). EQ allows us to boost or cut certain frequencies in the sound to make it sound better. For example, if there’s a lot of low-frequency rumble in a recording, we can use EQ to cut out some of those frequencies and make the sound clearer.

What is digital video?

Digital video is similar to digital audio, but instead of capturing sound waves, we’re capturing images. When we record a video, we’re capturing a series of still images (or frames) at regular intervals and saving them as a digital file.

How are videos saved in digital format?

To save a video in digital format, we need to capture a series of still images (or frames) and save them as a digital file. We do this using a device called a camera, which captures light from the scene we’re filming and turns it into an electrical signal that can be processed by a computer.

Here’s an example: imagine you’re filming a video of your dog playing in the park. You hold up your phone and hit the record button. The camera in your phone captures a series of still images (or frames) of your dog playing and saves them as a digital video file that you can watch later.

How are multiple images combined into a single video file?

When we capture a video, we’re capturing a series of still images (or frames) at regular intervals. To create a smooth video, we need to combine all of those frames into a single file. This is done using a process called “video compression”.

Video compression works by looking for parts of the image that are similar from frame to frame and only saving the parts that are different. For example, if you’re filming a video of a person sitting in a chair, the background behind them might not change much from frame to frame, so the computer can save that part of the image just once and only save the parts that are changing (like the person’s movements).

By only saving the parts of the image that are changing, we’re able to save space and create smaller video files that are easier to store and share. However, too much compression can make the video look blurry or pixelated. So, it’s important to find a balance between file size and video quality when compressing videos.

How do we add sound to a digital video file?

To add sound to a digital video file, we use a process called “audio syncing”. Audio syncing involves combining the digital audio file (which we learned about earlier) with the digital video file so that the sound matches up with the images.

Here’s an example: let’s say you’re filming a concert and you want to create a video of one of the songs. You record the video using your camera and the audio using a separate recording device. When you go to edit the video, you import both the digital audio file and the digital video file into your editing software. Then, you use audio syncing to line up the audio with the video so that the sound matches up with the images.

Conclusion

In conclusion, digital audio and video are complex subjects, but they can be explained in a way that a 6-year-old can understand. Digital audio involves converting sound waves into numbers that can be saved in a digital file. We use sampling to capture the unique timbre of each sound, and we use noise reduction and EQ to deal with background noise. Digital video involves capturing a series of still images (or frames) and saving them as a digital file. We use video compression to combine those frames into a single file and audio syncing to add sound to the video. By understanding these concepts, we can appreciate the technology behind the digital media that we enjoy every day.

How to Convert MP3 to AAC: Exploring the Technicalities of the Advanced Audio Codec

How to Convert MP3 to AAC: Exploring the Technicalities of the Advanced

MP3 to AAC
MP3 to AAC

Audio Codec


MP3 to AAC
MP3 to AAC


The History of AAC

Advanced Audio Coding (AAC) is a widely used audio codec, designed to be the successor of the MP3 format. It was first introduced by the Moving Picture Experts Group (MPEG) as part of MPEG-2 and later extended as MPEG-4 Part 3. Since its release in 1997, AAC has been recognized for its superior audio quality and compression efficiency.

The development of AAC began in 1988 as part of an international collaboration called the Audio Coding Joint Technical Committee (JTC), consisting of experts from several organizations, including AT&T, Fraunhofer Society, and Sony. The goal was to create an audio codec that could deliver high-quality audio while using less bandwidth and storage space than MP3, which was the dominant audio format at the time.

The result of this collaboration was the creation of the MPEG-2 AAC standard in 1994, which was later extended as MPEG-4 Part 3 to include additional features. Today, AAC is supported by a wide range of devices and platforms, including Apple’s iTunes, iPod, and iPhone, as well as Android devices and various media players.

How AAC Works

AAC is a lossy compression codec, meaning that it achieves high compression rates by discarding some of the audio data. However, unlike MP3, which relies on a perceptual coding algorithm to remove irrelevant audio data, AAC uses a more advanced coding algorithm that takes into account the psychoacoustic properties of human hearing.

AAC achieves this by dividing the audio signal into different frequency bands and applying different quantization noise to each band, based on the sensitivity of human hearing at different frequencies. The result is a more efficient use of the available data rate, allowing AAC to deliver higher audio quality at the same bit rate as MP3.

AAC is also a format container, meaning that it can contain audio data encoded in various formats, including stereo, 5.1 surround sound, and even lossless formats like Apple Lossless and FLAC. This flexibility makes AAC a versatile audio format that can be used for a wide range of applications, from music streaming to professional audio production.

Converting MP3 to AAC Using Mp4Gain

Mp4Gain is a versatile audio and video conversion tool that supports a wide range of formats, including MP3 and AAC. With Mp4Gain, you can convert your MP3 files to AAC quickly and easily, without losing any audio quality.

What is a container format?

A container format is a type of file format that can store different types of data in a single file. In the case of audio and video files, a container format is used to package the different types of data that make up the file, including the video and audio streams, metadata, and any subtitles or closed captions.

The benefits of using AAC

AAC has several benefits over other audio formats. Firstly, it offers improved sound quality at lower bitrates than MP3, which means that files can be compressed to a smaller size without sacrificing quality. This is particularly important for mobile devices with limited storage capacity.

Secondly, AAC offers better performance at high bitrates, making it a popular choice for professionals who need high-quality audio, such as musicians, producers, and sound engineers.

Another benefit of using AAC is that it supports up to 48 channels of audio, compared to MP3’s limit of 2 channels. This makes AAC a popular choice for high-end surround sound systems and immersive audio experiences.

Finally, AAC is widely supported by a range of devices and software, including Apple devices, Android devices, and popular media players like VLC and QuickTime.

How to convert MP3 to AAC with Mp4Gain

Now that you understand the benefits of using AAC, you may want to convert your MP3 files to AAC to take advantage of these benefits. Fortunately, Mp4Gain makes it easy to do this.

To convert MP3 to AAC with Mp4Gain, follow these simple steps:

    1. Open Mp4Gain and select the “Audio Converter” option from the main menu.
    2. Click the “Add Files” button and select the MP3 files you want to convert to AAC.
    3. Select “AAC” as the output format from the list of available formats.
    4. Choose the desired bitrate, sampling rate, and channel configuration for the output file. You can also choose to normalize the volume if you want.
  1. Click the “Convert” button to start the conversion process.

Once the conversion process is complete, you will have high-quality AAC files that can be played on a wide range of devices and media players.

Conclusion

AAC is a high-quality audio format that offers several benefits over other formats, including improved sound quality at lower bitrates, better performance at high bitrates, support for multiple channels of audio, and wide compatibility with devices and software.

If you want to take advantage of these benefits, Mp4Gain makes it easy to convert your MP3 files to AAC. With its simple interface and powerful conversion capabilities, Mp4Gain is the perfect tool for anyone who wants to create high-quality, versatile audio files.