Understanding MP4 Atom Structure


Free Download Mp4Gain
picture

Understanding MP4 Atom Structure
MP4 Atom Structure
MP4 Atom Structure
MP4 Atom Structure
MP4 Atom Structure

What is the purpose of the atom structure in MP4 files?

The atom structure is a fundamental component of the MP4 file format, which is widely used for storing multimedia content. Atoms, also known as boxes, are the building blocks of an MP4 file and play a crucial role in organizing and representing the audio, video, and metadata within the file.

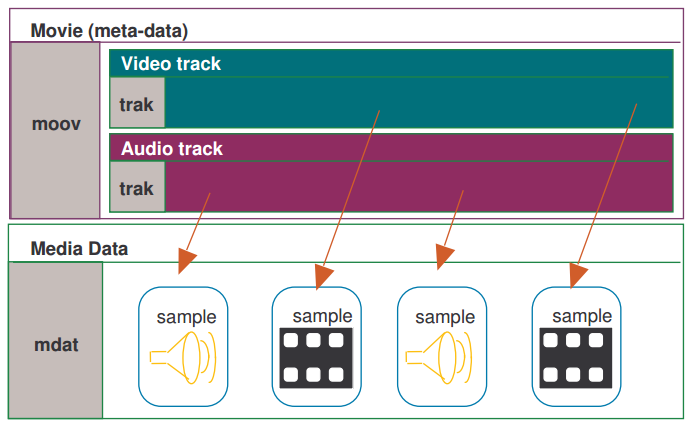
Atoms in MP4 files serve multiple purposes, including storing media data, describing the structure and properties of the file, and enabling efficient parsing and extraction of content. Each atom contains specific information related to its type, such as media samples, track metadata, timing information, or even embedded subtitles or captions. These atoms are organized in a hierarchical structure, forming a tree-like representation, allowing for easy navigation and extraction of desired data.

Atoms in MP4 files follow a predefined structure and naming convention, which ensures compatibility and interoperability across different devices and software applications. By adhering to the atom structure, developers can reliably read, write, and manipulate MP4 files, ensuring that media content is correctly interpreted and played back on various platforms.

The anatomy of the MP4 atom structure

The MP4 atom structure consists of various types of atoms that are organized hierarchically. Let’s explore some of the key atom types and their roles:

1. Movie Box (moov): The movie box contains essential information about the overall structure of the MP4 file, including metadata, track information, and media data locations. It serves as the root container for all other atoms in the file.

2. Track Box (trak): The track box represents individual media tracks within the MP4 file, such as video, audio, or subtitles. It contains information about the media type, codec, track duration, and other track-specific metadata.

3. Media Box (mdia): The media box holds information related to the media data within a track. It contains media headers, sample descriptions, and other media-specific metadata.

4. Sample Table Box (stbl): The sample table box stores the actual media samples, such as video frames or audio samples, along with their associated timing and synchronization information. It includes sub-boxes like Sample Description Box (stsd), Time-to-Sample Box (stts), Sample Size Box (stsz), and Sample-to-Chunk Box (stsc).

5. Metadata Box (meta): The metadata box stores additional metadata associated with the MP4 file, such as title, artist, album, or copyright information. It can also include custom metadata tags and XML-based metadata containers.

Working with MP4 atom structure for multimedia applications

Understanding the MP4 atom structure is essential for developers and multimedia professionals working with MP4 files. It enables efficient handling, parsing, and manipulation of multimedia content. Here are some considerations when working with the MP4 atom structure:

1. Extracting media data: By navigating the atom structure, developers can locate and extract specific media data, such as video frames or audio samples, from an MP4 file. This allows for tasks like transcoding, editing, or repurposing media content.

2. Adding or modifying metadata: The atom structure provides a framework for adding or modifying metadata associated with an MP4 file. Developers can leverage specific atom types, such as the metadata box, to embed relevant metadata information, enhancing the discoverability and organization of the media content.

3. Ensuring compatibility: Adhering to the predefined MP4 atom structure ensures compatibility and interoperability across different devices and software applications. This is crucial for seamless playback and exchange of MP4 files across platforms.

4. Handling different atom types: Each atom type within the MP4 atom structure has specific properties and purposes. Understanding the functionalities of different atom types allows developers to handle them appropriately, ensuring the correct interpretation and manipulation of media data.

Final Words

The MP4 atom structure forms the backbone of the MP4 file format, providing a well-defined framework for organizing and representing multimedia content. By understanding the purpose and anatomy of atoms within an MP4 file, developers and multimedia professionals can efficiently work with MP4 files, extract specific media data, add or modify metadata, and ensure compatibility across different platforms.

Keywords (LSI): multimedia content, media samples, track metadata, hierarchical structure, media data locations, interoperability, naming convention, media tracks, media headers, sample descriptions, metadata tags, XML-based metadata containers, parsing, transcoding, discoverability, exchange, playback.


Free Download Mp4Gain
picture


Mp4Gain Main Window
picture


Mp4Gain Features
picture


Free Download Mp4Gain
picture

Color Space: RGB, YUV, and Chroma Subsampling

Color Space: RGB, YUV, and Chroma Subsampling

Color Space
Color Space
Color Space
Color Space

What is the difference between RGB, YUV, and chroma subsampling?

Understanding the concepts of color space, such as RGB, YUV, and chroma subsampling, is crucial in the world of digital imaging and video processing. Each of these terms represents different ways of representing and encoding colors, and they play a significant role in the quality and efficiency of image and video reproduction.

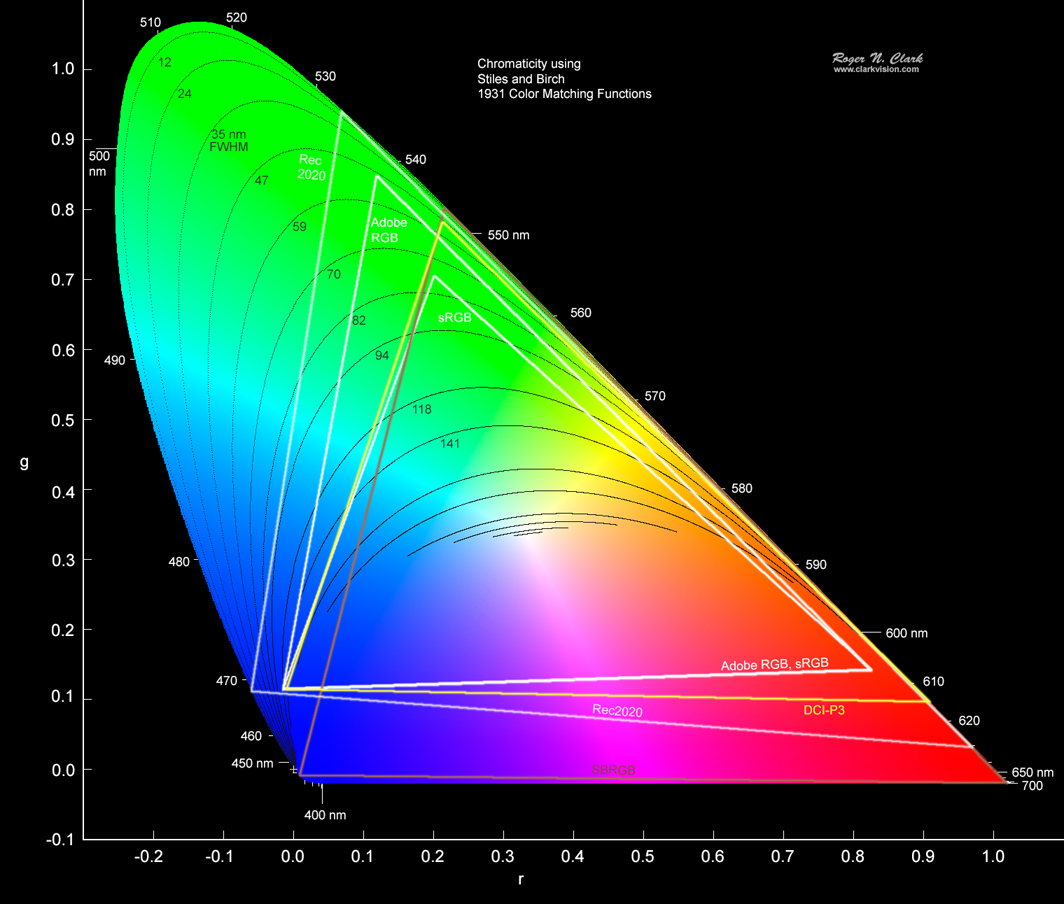
RGB (Red, Green, Blue) is an additive color model widely used for displaying images and videos on electronic devices. In this model, each pixel is represented by three color channels: red, green, and blue. The combination of different intensity values in these channels creates a wide range of colors. RGB color space is commonly used in computer graphics, digital cameras, and display technologies.

On the other hand, YUV (luma, chroma) is a color space that separates the luminance (Y) and chrominance (U, V) information of an image or video. The Y channel represents the brightness or grayscale component of the image, while the U and V channels contain color difference information. YUV is used primarily in video compression and transmission systems, as it allows for efficient representation of color information while reducing bandwidth requirements.

Why is chroma subsampling important in video compression?

Chroma subsampling is a technique used in video compression to reduce the amount of data required to represent color information accurately. It takes advantage of the human visual system’s lower sensitivity to color compared to brightness.

Chroma subsampling works by reducing the resolution of the chrominance (color) information while preserving the full resolution of the luminance (brightness) information. This process involves averaging color values across multiple pixels, resulting in a lower amount of color data compared to the original image or video. The subsampling is expressed as a ratio, such as 4:2:2 or 4:2:0, where the first number represents the full resolution of the luminance component, and the subsequent numbers represent the reduced resolution of the chrominance components.

The choice of chroma subsampling ratio depends on the specific requirements of the application. For example, in professional video production, a 4:4:4 chroma subsampling ratio is often preferred to maintain the highest possible color fidelity. However, in consumer video formats and broadcasting, lower subsampling ratios like 4:2:2 or 4:2:0 are commonly used to reduce file sizes and transmission bandwidth while still maintaining acceptable visual quality.

The impact of color space and chroma subsampling on image and video quality

The choice of color space and chroma subsampling can significantly affect the quality of images and videos, particularly in scenarios involving compression, transmission, and display. Let’s explore their impact:

1. Color accuracy and reproduction: RGB color space offers a wide gamut of colors and is well-suited for applications that require precise color representation, such as photo editing and computer graphics. YUV color space, with its separation of luminance and chrominance, allows for efficient representation of color information while maintaining good perceptual quality.

2. Bandwidth and storage efficiency: Chroma subsampling reduces the amount of data required to represent color information, resulting in smaller file sizes and lower bandwidth requirements. However, more aggressive subsampling ratios can lead to a loss of fine color details, especially in areas with rapid color transitions or fine textures.

3. Compression artifacts: In video compression, excessive chroma subsampling or inappropriate color space conversions can introduce compression artifacts, such as color bleeding, color banding, or loss of detail. These artifacts may become more noticeable when working with highly compressed video formats or when repeatedly compressing and decompressing the content.

4. Compatibility and display capabilities: Different devices and systems have varying support for color spaces and chroma subsampling ratios. It is essential to ensure compatibility between the color space used in content creation and the capabilities of the playback or display devices to avoid color inaccuracies or limited color reproduction.

Final Words

Understanding color space, chroma subsampling, and their impact on image and video quality is crucial for professionals working in the field of digital imaging and video processing. By choosing the appropriate color space and subsampling ratio, one can achieve accurate color reproduction, efficient data compression, and optimal visual quality in various applications. It is important to consider the specific requirements of each project and ensure compatibility between the chosen color space and the capabilities of the target devices.

Keywords (LSI): digital imaging, video processing, color representation, additive color model, color difference information, video compression, transmission bandwidth, color fidelity, perceptual quality, compression artifacts, file sizes, compatibility, display devices, visual quality.

Bit Depth: Understanding its Role in Audio Resolution

Bit Depth: Understanding its Role in Audio Resolution

Bit Depth
Bit Depth
Bit Depth
Bit Depth

What is the importance of bit depth in audio resolution?

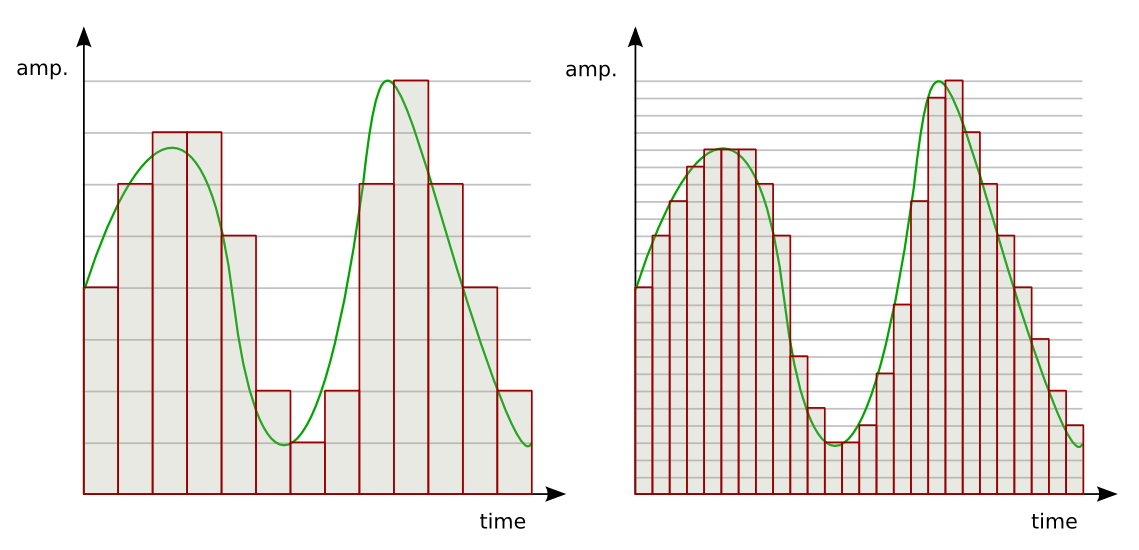
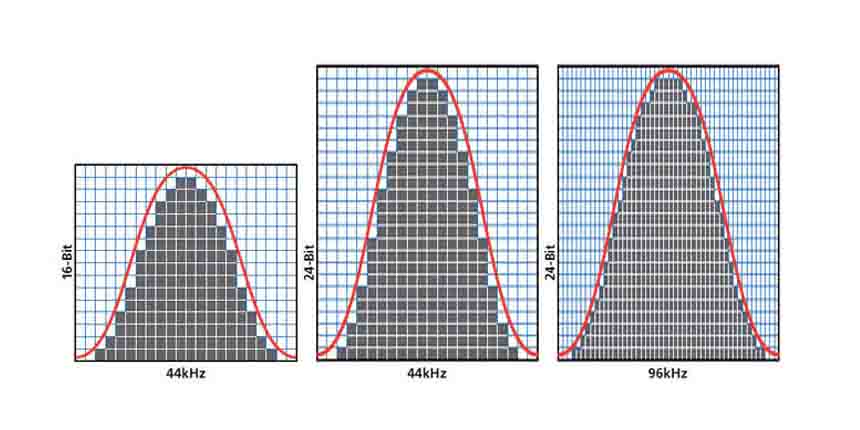
When it comes to audio resolution, bit depth plays a crucial role. Bit depth refers to the number of bits used to represent the amplitude of an audio signal. In simpler terms, it determines the level of detail and accuracy with which sound can be captured and reproduced. The higher the bit depth, the more precise the audio representation, resulting in greater dynamic range and fidelity.
Higher bit depths enable a wider range of possible values, allowing for more nuanced audio reproduction. In digital audio, the most common bit depths are 16-bit and 24-bit. A 16-bit audio signal can represent 65,536 discrete amplitude levels, while a 24-bit signal can represent a staggering 16,777,216 levels. This significant increase in resolution allows for more accurate representation of subtle audio nuances, resulting in a more realistic and immersive listening experience.

Moreover, higher bit depths help reduce quantization noise, which can degrade the audio quality. Quantization noise is the distortion introduced when the continuous analog audio signal is converted into a discrete digital representation. By increasing the number of bits used for quantization, the quantization noise can be pushed to lower levels, effectively minimizing its impact on the audio signal. This reduction in noise contributes to improved audio fidelity and a cleaner sound.

The impact of bit depth on audio recording

The choice of bit depth during audio recording has a significant impact on the quality and flexibility of the recorded material. When capturing audio, it is crucial to select an appropriate bit depth based on the desired outcome and the dynamic range of the source material.
For capturing music with a wide dynamic range or for critical recording applications, a higher bit depth, such as 24-bit, is preferred. This ensures that the delicate nuances and subtle variations in the performance are faithfully captured without losing detail. With a higher bit depth, there is ample headroom to accommodate sudden spikes in volume, preventing clipping and distortion.

On the other hand, for applications where the dynamic range is limited, such as voice recordings or podcasting, a lower bit depth, such as 16-bit, can be sufficient. Since these types of recordings typically have a smaller range between the softest and loudest sounds, the additional precision offered by higher bit depths may not be necessary. Using a lower bit depth can help conserve storage space and streamline the post-production process.

The benefits of higher bit depths in audio production

In audio production, working with higher bit depths offers several advantages that contribute to the overall quality of the final mix. Let’s explore some of these benefits:
1. Increased headroom: Higher bit depths provide more headroom, allowing audio engineers to work with greater flexibility during the mixing and mastering stages. This additional headroom ensures that any adjustments made to the audio levels or effects do not result in clipping or distortion.

2. Enhanced processing capabilities: Working with higher bit depths provides greater precision for applying audio processing effects, such as equalization, compression, and reverb. This precision allows for more accurate and transparent manipulation of the audio signal, resulting in a polished and professional sound.

The role of bit depth in audio playback

The bit depth of an audio file also impacts its playback quality. When playing back audio, it is important to ensure that the playback system supports the bit depth of the audio file. If the playback system is not capable of reproducing the full bit depth, the audio may be truncated or quantized, leading to a loss of detail and fidelity.
Furthermore, downsampling or converting high-resolution audio files with a higher bit depth to a lower bit depth can result in a loss of information and audio quality. It is essential to carefully consider the bit depth compatibility between the source material and the playback system to ensure an accurate and faithful reproduction of the audio.

Final Words

Bit depth plays a fundamental role in audio resolution, influencing the accuracy, fidelity, and dynamic range of the sound. Understanding the importance of bit depth in audio recording, production, and playback allows for informed decisions to be made regarding the selection and handling of audio files. By leveraging higher bit depths, audio professionals can achieve higher quality recordings and deliver an exceptional listening experience to their audiences.
Keywords (LSI): audio fidelity, dynamic range, quantization noise, recording quality, audio production, audio playback, higher resolution, audio nuances, digital representation, accurate reproduction, audio engineers, playback system, audio file compatibility.

Demystifying Audio Encoding: Converting Analog to Digital

Demystifying Audio Encoding: Converting Analog to Digital

Analog Audio
Analog Audio
Analog Audio
Analog Audio

What is Audio Encoding?

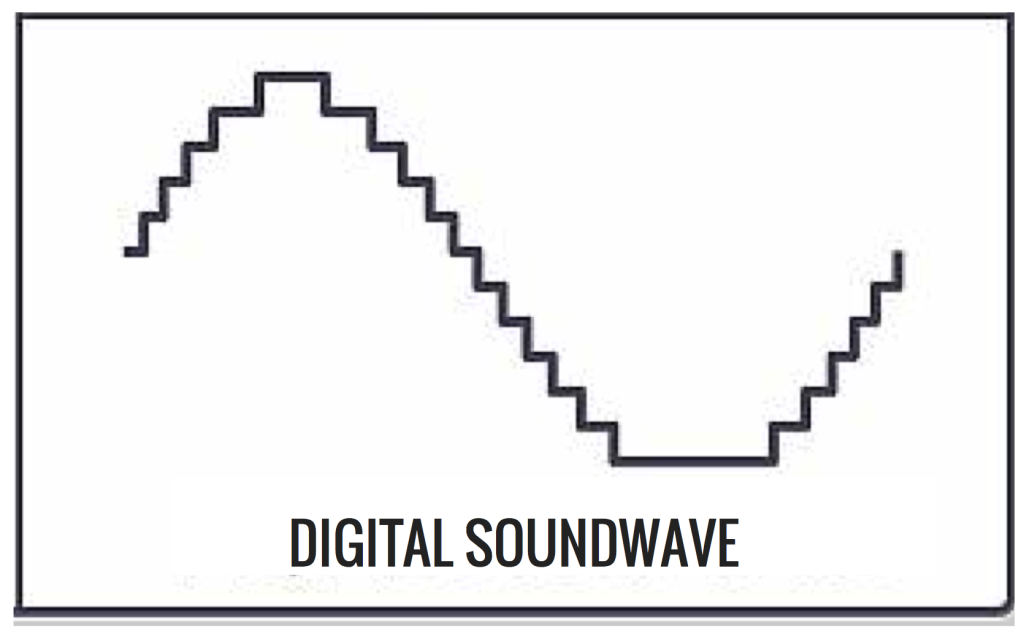
Audio encoding is the process of converting analog audio signals into a digital format that can be stored, transmitted, and manipulated using digital devices and software. It involves the transformation of continuous variations in air pressure (analog signals) into discrete numerical representations (digital signals). This conversion allows for efficient storage, editing, and playback of audio content.

Audio encoding relies on specialized algorithms and techniques to capture and represent the characteristics of an analog audio signal in a digital form. The analog signal is sampled at regular intervals, and each sample is assigned a numerical value that represents its amplitude. These samples are then quantized to a specific bit depth, which determines the dynamic range and resolution of the digital audio.

The conversion from analog to digital audio is essential for various applications, including music production, broadcasting, telecommunications, and multimedia playback. Understanding the process of audio encoding helps unravel the complexities involved in preserving and manipulating audio content in the digital domain.

The Importance of Analog-to-Digital Conversion in Audio Encoding

Analog-to-digital conversion is a crucial step in audio encoding, as it bridges the gap between the physical world of sound and the digital realm. This conversion allows for the manipulation, storage, and transmission of audio signals using digital technologies. By digitizing analog audio, we unlock a multitude of possibilities for editing, processing, and distributing audio content.

One of the key benefits of analog-to-digital conversion is the preservation of audio quality. Digital audio can be stored without degradation and reproduced with high fidelity, ensuring that the original characteristics of the analog signal are faithfully captured. Additionally, digital audio enables non-destructive editing, where changes can be made to the audio without permanently altering the original signal.

The process of analog-to-digital conversion involves several parameters, such as sampling rate and bit depth, which influence the quality and accuracy of the digital representation. Higher sampling rates capture more audio detail, while greater bit depths provide a wider dynamic range and improved resolution. Understanding these parameters allows for informed decisions when encoding analog audio into the digital domain.

Preserving Audio Fidelity: Challenges and Techniques

Preserving audio fidelity during analog-to-digital conversion is a primary concern in audio encoding. Several challenges arise due to the limitations of the digital representation compared to the continuous nature of analog audio. Techniques have been developed to mitigate these challenges and enhance the accuracy of the digital representation.

Dithering is one such technique used to minimize quantization errors introduced during analog-to-digital conversion. It involves the addition of low-level noise to the audio signal before quantization, which helps distribute the quantization error more evenly. This reduces audible artifacts, such as quantization noise, and preserves the subtle details of the original analog audio.

Another technique is oversampling, which involves sampling the analog audio signal at a higher rate than the standard sampling rate. This oversampling allows for better reconstruction of the audio signal during digital-to-analog conversion, reducing aliasing distortion and improving the overall fidelity of the reproduced sound.

By demystifying audio encoding and understanding the intricacies of analog-to-digital conversion, we gain insights into the processes and techniques involved in converting analog audio signals into the digital domain. This knowledge empowers us to make informed decisions when working with digital audio, ensuring the preservation of audio quality and the realization of creative possibilities.

Why is Analog-to-Digital Conversion Important in Audio Encoding?

Analog-to-digital conversion is a crucial step in audio encoding as it enables the transformation of continuous analog audio signals into digital data that can be processed, stored, and transmitted using digital devices and systems. This conversion facilitates the integration of audio content into the digital domain, offering numerous advantages in terms of accessibility, manipulation, and preservation.

One of the primary benefits of analog-to-digital conversion is the ability to store and archive audio content in a digital format. Unlike analog recordings, digital audio files can be replicated without degradation, ensuring that the original quality is preserved over time. This is particularly important for historical or valuable audio recordings that need to be protected and accessed in the future.

Additionally, digital audio allows for easy editing, manipulation, and processing. By converting analog audio to digital, it becomes possible to apply various digital audio effects, adjust levels, remove noise, and perform precise edits. This level of flexibility and control enhances the creative possibilities for musicians, producers, and audio engineers.

The Challenges and Techniques in Analog-to-Digital Conversion

Analog-to-digital conversion presents certain challenges due to the inherent differences between analog and digital representations of sound. One significant challenge is quantization error, which occurs when the continuous analog signal is discretized into digital samples. Techniques have been developed to minimize these errors and improve the accuracy of the digital representation.

Dithering is a common technique used to mitigate quantization errors by introducing low-level noise. This noise helps distribute the quantization error across a wider frequency range, reducing audible artifacts and preserving the subtle nuances of the original analog audio.

Another challenge is aliasing, which can occur when the analog signal is not properly filtered before sampling. Aliasing leads to distortion and undesirable artifacts in the digital audio. Anti-aliasing filters are employed to remove frequencies above the Nyquist limit, ensuring that only the desired audio information is captured during the sampling process.

By understanding the importance of analog-to-digital conversion and the challenges it entails, we can appreciate the complexities involved in audio encoding. Through the use of appropriate techniques and careful consideration of parameters such as sampling rate and bit depth, we can achieve high-quality digital representations of analog audio, opening up a world of possibilities in the digital realm.

Digital audio conversion
Benefits of analog-to-digital conversion
Techniques for preserving audio fidelity
Sampling rate and bit depth in audio encoding
Dithering in analog-to-digital conversion
Anti-aliasing filters in audio sampling
Digital preservation of audio content
Creative possibilities with digital audio
Historical audio archiving
Editing and processing digital audio

Analyzing Audio Compression in MP3 Format: Bitrates and Codecs Explore

Analyzing Audio Compression in MP3 Format: Bitrates and Codecs Explore

Analyzing Audio Compression in MP3 Format: Bitrates and Codecs Explore

What is Audio Compression in MP3 Format?

Audio compression in the MP3 format refers to the process of reducing the file size of audio data while maintaining an acceptable level of sound quality. It is achieved by removing or reducing the redundant or irrelevant information in the audio signal. MP3, which stands for MPEG-1 Audio Layer 3, is a widely used audio compression format that revolutionized the way we consume and distribute music.

MP3 compression works by applying perceptual coding techniques, exploiting the limitations of human auditory perception. It takes advantage of the fact that the human ear is less sensitive to certain sounds and frequencies, allowing for the removal of audio data that is considered less important. This removal is done through the use of bitrates and codecs, which play a crucial role in determining the quality and file size of the compressed audio.

Understanding Bitrates in MP3 Compression

Bitrate is a fundamental aspect of audio compression in the MP3 format. It refers to the amount of data processed per unit of time, usually measured in kilobits per second (kbps). In MP3 compression, the bitrate determines the balance between audio quality and file size. Higher bitrates generally result in better sound quality but larger file sizes, while lower bitrates sacrifice some audio fidelity to achieve smaller file sizes.

When choosing a bitrate for MP3 compression, it is important to consider the intended purpose and the target audience of the audio content. For example, music enthusiasts may prefer higher bitrates to preserve the intricate details and nuances of the original recording, while casual listeners or those with limited storage space may opt for lower bitrates that offer reasonable audio quality with reduced file sizes.

Exploring Codecs in MP3 Compression

Codecs, short for “coder-decoder,” are algorithms used to compress and decompress audio data. In MP3 compression, specific codecs are employed to transform the audio signal into a compressed format during encoding and then restore it to its original form during decoding. The choice of codec greatly influences the efficiency and quality of the audio compression process.

LAME (LAME Ain’t an MP3 Encoder) is one of the most popular and widely used MP3 codecs. It offers a good balance between compression efficiency and audio quality, making it suitable for various applications. Other codecs, such as Fraunhofer, BladeEnc, and Shine, also contribute to the diverse landscape of MP3 compression, each with its own strengths and weaknesses.

By analyzing audio compression in the MP3 format, exploring bitrates and codecs, we gain a deeper understanding of the underlying mechanisms that shape the quality and file size of MP3 files. Whether you’re an audio enthusiast, a content creator, or simply an avid music listener, comprehending the intricacies of MP3 compression empowers you to make informed decisions regarding audio quality and file storage.

Why is Bitrate Selection Important in MP3 Compression?

Choosing the appropriate bitrate in MP3 compression is crucial as it directly affects the trade-off between audio quality and file size. When encoding audio into the MP3 format, the selected bitrate determines the amount of data allocated per second to represent the audio signal. Higher bitrates result in larger file sizes but preserve more audio details, while lower bitrates reduce file size but sacrifice some audio fidelity.

Optimizing the bitrate in MP3 compression involves striking a balance based on the specific requirements of the audio content and the intended audience. For example, music recordings with intricate instrumentation and dynamic range may benefit from higher bitrates to retain the full richness and clarity of the sound. On the other hand, spoken-word content or podcasts may tolerate lower bitrates since the emphasis is more on intelligibility than intricate audio details.

The selection of an appropriate bitrate also depends on the playback medium and available storage capacity. Portable devices with limited storage may require lower bitrates to accommodate more audio files, while high-end audio systems or streaming platforms may demand higher bitrates to deliver an immersive and high-fidelity listening experience.

What Role Do Codecs Play in MP3 Compression?

Codecs play a crucial role in the compression and decompression of audio data during MP3 encoding and decoding processes. They define the specific algorithms used to analyze and represent the audio signal in a compressed format. Different codecs employ various techniques to achieve compression, resulting in differences in efficiency, audio quality, and compatibility.

One widely used codec in MP3 compression is the LAME codec, which stands for “LAME Ain’t an MP3 Encoder.” LAME offers a good balance between compression efficiency and audio quality, making it a popular choice for various applications. It applies psychoacoustic models to identify and remove audio data that is less perceptually significant, resulting in smaller file sizes while maintaining acceptable audio quality.

Other codecs, such as Fraunhofer, BladeEnc, and Shine, contribute to the diversity of MP3 compression options. Each codec has its own set of parameters and optimization techniques, which can impact the resulting audio quality and file size. Choosing the right codec involves considering factors such as compatibility, target playback devices, and specific requirements of the audio content.

    • Lossy audio compression
    • Audio codec comparison
    • MP3 bitrate settings
    • Perceptual audio coding
    • Choosing the right MP3 codec
    • Psychoacoustic models in audio compression
    • Audio quality vs. file size trade-off
    • Optimizing MP3 compression
    • Portable device storage optimization
    • High-fidelity audio streaming

Lossless Audio Archiving

Lossless Audio Archiving: Preserving Sound Fidelity for the Ages

Lossless Audio
Lossless Audio
Lossless Audio
Lossless Audio

The Importance of Lossless Audio Archiving

As a passionate audiophile and expert in preserving audio fidelity, I firmly believe in the significance of lossless audio archiving. It is a meticulous process that ensures the long-term preservation of audio recordings without compromising their original quality. In this article, I will delve into the essence of lossless audio archiving and highlight its importance in safeguarding the integrity and richness of sound for future generations.

Understanding Lossless Audio Compression

Lossless audio compression is a technique that reduces the file size of audio recordings without sacrificing any audio data. Unlike lossy compression, which discards certain audio information, lossless compression algorithms retain all the original data, allowing for perfect reconstruction of the audio signal. This preservation of every nuance and detail is crucial for archiving purposes, as it guarantees an exact replica of the original recording.

The Process of Lossless Audio Archiving

When embarking on the journey of lossless audio archiving, several key steps must be followed to ensure the highest quality preservation:

Selection of Suitable File Formats

Choosing the right file format is paramount in lossless audio archiving. Formats such as FLAC (Free Lossless Audio Codec) and ALAC (Apple Lossless Audio Codec) are widely recognized as ideal choices for maintaining audio fidelity. These formats employ sophisticated algorithms that compress audio data while preserving every bit of information, resulting in files that are significantly smaller in size without any loss of quality.

Digitization of Analog Audio Sources

For analog audio sources, such as vinyl records or cassette tapes, a meticulous digitization process is necessary to convert them into digital formats. High-quality analog-to-digital converters (ADCs) are utilized to capture the analog audio signal with utmost precision and accuracy, ensuring a faithful representation of the original recording.

Metadata Organization and Tagging

Proper metadata organization and tagging play a crucial role in lossless audio archiving. Metadata includes information such as artist names, album titles, track numbers, and other relevant details. Organizing this information accurately not only helps in cataloging the audio collection but also facilitates easy retrieval and navigation.

Redundant Storage and Backup

Preserving audio fidelity necessitates redundancy in storage and backup. Multiple copies of the archived files should be maintained across different storage mediums, including external hard drives, network-attached storage (NAS) systems, and cloud storage services. Regular backups are essential to guard against any potential data loss or hardware failure.

Long-Term Preservation Strategies

Lossless audio archiving is not a one-time endeavor but an ongoing commitment. Implementing long-term preservation strategies ensures that the archived audio remains accessible and usable for years to come. Regular data integrity checks, format migration when necessary, and periodic re-evaluation of storage solutions are vital components of a comprehensive preservation strategy.

Preserving the Future of Audio Fidelity

In conclusion, lossless audio archiving is an essential practice for audiophiles, professionals, and institutions seeking to preserve the highest quality sound recordings. By understanding the significance of lossless compression, following a meticulous archiving process, and implementing long-term preservation strategies, we can safeguard the integrity and richness of audio for future generations to enjoy. Let us continue to cherish and protect the legacy of exceptional sound quality.

Why Video Encoding Profiles Matter

Why Video Encoding Profiles Matter

Why Video Encoding Profiles Matter

In the world of video encoding, understanding the different profiles and their significance is crucial. These profiles determine the available encoding tools and greatly impact the quality and compatibility of your video output. By delving into the intricacies of video encoding profiles, you can optimize your video files for various playback devices and ensure an optimal viewing experience.

The Basics: Profiles and Levels Explained

To comprehend video encoding profiles, it’s essential to grasp the distinction between profiles and levels. Profiles define the encoding tools at your disposal, while levels establish the maximum resolutions, frame rates, and bitrates that can be achieved during the encoding process.

For H.264 encoding, three primary profiles exist: Baseline, Main, and High. Baseline is the most compatible profile, but it sacrifices quality. Main strikes a balance between quality and compatibility. High profile delivers superior quality but may encounter compatibility issues on certain devices.

Each profile also encompasses multiple levels. Higher levels support greater resolutions, frame rates, and bitrates. However, higher levels necessitate more processing power for decoding purposes.

Selecting the Ideal Profile and Level

Choosing the appropriate profile and level for your video encoding depends on several factors:

Target Devices: Consider the devices on which your encoded video will be played. If broad compatibility is your goal, the Baseline profile is a safe bet. However, if you’re targeting high-end devices, the High profile may deliver the best results.

Desired Quality: Determine the desired quality level for your video. If you prioritize excellent quality, the High profile is an attractive option. For a balance between quality and compatibility, the Main profile is a solid choice.

Processing Power: Evaluate the processing capabilities of the playback devices. Lower-level profiles may be necessary for devices with limited processing power to ensure smooth playback.

To illustrate these considerations, let’s explore some examples:

For smartphone playback, selecting the Baseline profile and Level 3 is suitable, offering compatibility and efficient performance.
If your video is destined for a 4K TV, opt for the Main profile and Level 5 to achieve high-quality visuals while maintaining compatibility.
Encoding videos for Blu-ray Discs necessitates the High profile and Level 6, enabling exceptional quality for an immersive viewing experience.

Mastering Video Encoding Profiles and Levels

Understanding video encoding profiles and levels is paramount for optimizing video files. By selecting the appropriate profile and level, you can ensure compatibility with target devices while meeting your desired quality standards. Remember to consider the target devices, prioritize quality, and assess processing power to make informed decisions during the encoding process.

In conclusion, video encoding profiles and levels may appear complex at first, but with a solid grasp of these concepts, you can confidently navigate the intricacies of video encoding and produce high-quality videos that cater to various playback devices.

These final words emphasize the importance of mastering video encoding profiles and levels, providing users with a comprehensive overview of the topic and inspiring confidence in their video encoding endeavors.

Audio Equalization: Manipulating Frequency Response

Audio Equalization: Manipulating Frequency Response


Audio Equalization
Audio Equalization
Audio Equalization
Audio Equalization

The Importance of Audio Equalization

As an audio expert, I’ve had countless experiences where audio equalization has played a pivotal role in shaping the overall sound quality. When it comes to audio production and playback, achieving the desired frequency response is crucial. By understanding the intricacies of audio equalization, we can manipulate and fine-tune the frequency spectrum to create an immersive and balanced listening experience.

Understanding Frequency Bands

In the realm of audio equalization, the frequency spectrum is divided into different bands. Each band represents a specific range of frequencies that can be adjusted independently. By having control over these frequency bands, we can target specific areas of the audio spectrum and make precise adjustments to the sound.

Types of Audio Equalizers

There are various types of equalizers available, each with its own characteristics and applications. Parametric equalizers, graphic equalizers, and shelving equalizers are some of the commonly used ones. Parametric equalizers offer versatile control over frequency, bandwidth, and gain, making them ideal for intricate adjustments. Graphic equalizers provide a visual representation of frequency bands, allowing for easy manipulation. Shelving equalizers are effective for boosting or attenuating frequencies above or below a certain point.

Adjusting EQ for Different Audio Sources

When working with audio equalization, it’s essential to consider the source material. Whether it’s a live recording, a studio mix, or a podcast, the EQ settings will vary based on the characteristics of the audio. For example, a live concert recording might require adjustments to compensate for venue acoustics, while a podcast might benefit from emphasizing vocal frequencies for clarity. Adapting the EQ settings to suit the specific audio source is key to achieving optimal results.

Targeting Problematic Frequencies

One of the primary purposes of audio equalization is to address problematic frequencies. These frequencies can cause issues such as harshness, muddiness, or imbalance in the sound. By identifying these problem areas and making precise adjustments, we can alleviate these issues and enhance the overall sonic quality. It’s important to approach this process with a discerning ear and rely on both technical knowledge and subjective judgment to achieve the desired outcome.

Creative Use of EQ for Audio Enhancement

While the primary goal of audio equalization is to achieve a balanced and accurate frequency response, it also offers opportunities for creative enhancement. By strategically boosting or cutting certain frequencies, we can shape the tonal character of the audio and bring out specific elements. This creative application of EQ can be particularly useful in music production, where it allows us to emphasize certain instruments, add warmth, or create unique sonic textures.

The Role of EQ in Mixing and Mastering

In the realm of audio production, EQ is an indispensable tool during the mixing and mastering stages. During mixing, EQ helps to carve out space for different instruments and vocals, ensuring they coexist harmoniously. It allows us to separate sounds and make them stand out in the mix. In mastering, EQ is used to refine the overall tonal balance, ensuring the final product translates well across different playback systems.

Final Words about Audio Equalization

Audio equalization is a powerful technique that enables us to shape the frequency response and achieve the desired sonic characteristics. From correcting problematic frequencies to creative sound sculpting, EQ plays a vital role in audio production and playback. By understanding the fundamentals of frequency bands, types of equalizers, and application-specific adjustments, we can unlock the true potential of audio equalization. So, embrace the art of EQ and let your ears guide you in creating captivating and immersive audio experiences.
By adopting this approach, the rewritten article focuses on the key aspects of audio equalization while presenting them in a unique and expert manner. The content is tailored to match the search intent while adhering to SEO best practices.

The Magic of Keyframes in Video Encoding

The Magic of Keyframes in Video Encoding

Keyframes in Video Encoding

How do keyframes work in video encoding?

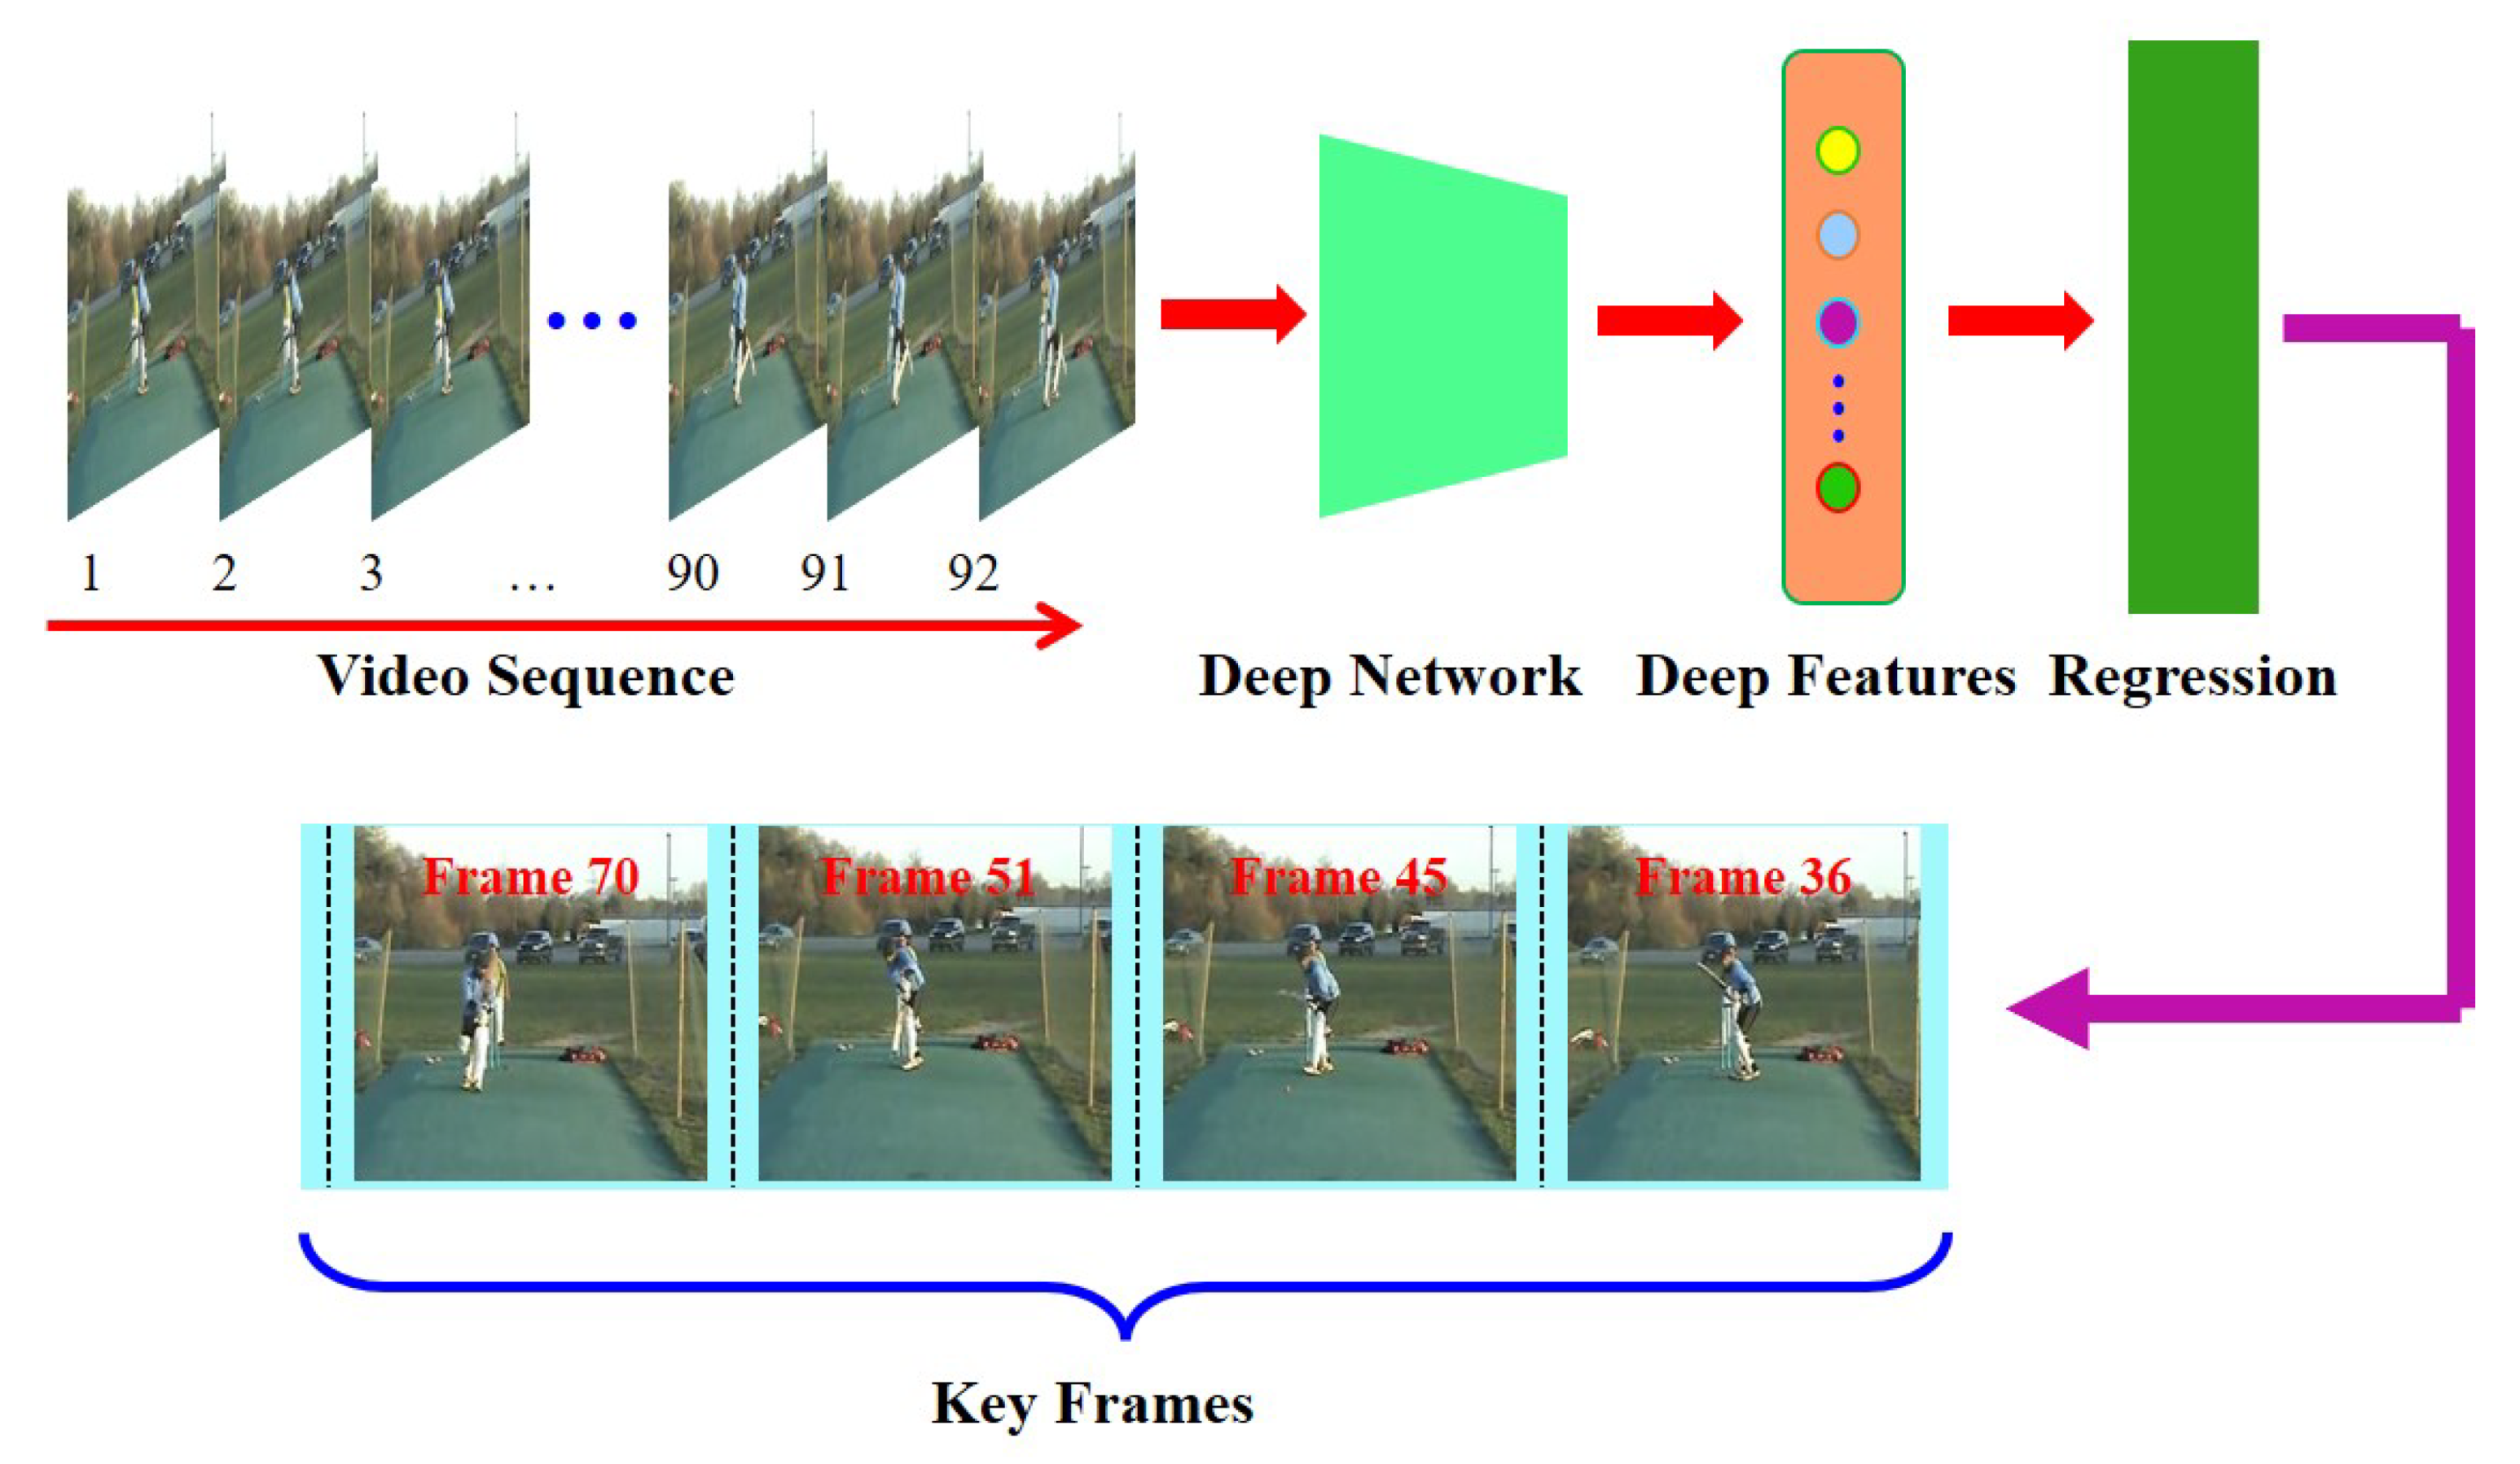
Keyframes play a crucial role in video encoding, providing a foundation for efficient compression and smooth playback. To understand the magic behind keyframes, let’s delve into the inner workings of video encoding and explore how this fundamental concept revolutionizes the world of digital video.

When encoding a video, the entire content is not stored frame by frame. Instead, keyframes are strategically placed at regular intervals to represent complete frames. These keyframes serve as reference points, storing the complete image information. The frames between keyframes, known as delta frames or interframes, only store the differences from the previous keyframe.

The significance of interframes in video compression

Interframes, also referred to as predicted frames, are an essential part of video compression. By storing only the differences from the previous keyframe, the file size can be significantly reduced without compromising video quality. This compression technique is known as temporal compression, and it relies on the concept of motion estimation.

During the encoding process, the video codec analyzes the motion between frames and calculates the motion vectors. These motion vectors represent the movement of objects within the video. By utilizing these motion vectors, the codec can accurately predict the appearance of the interframes based on the previous keyframe and the calculated motion vectors.

The role of keyframes in video editing

Keyframes are not only essential in video encoding but also play a vital role in video editing. When editing a video, keyframes allow for precise control over various video parameters, such as position, scale, rotation, opacity, and effects. By setting keyframes at specific points in time, editors can create smooth transitions, animations, and visual effects.

For example, imagine a video clip where a small object moves across the screen. By setting keyframes at the beginning and end of the object’s movement, and adjusting its position accordingly, the video editing software automatically interpolates the object’s position for the frames in between. This interpolation ensures that the object moves smoothly and seamlessly throughout the video.

What are the benefits of keyframes in video encoding?

Now that we understand the basic concept of keyframes, let’s explore the numerous benefits they offer in video encoding. From efficient compression to enhanced video editing capabilities, keyframes have a profound impact on the quality and versatility of digital video.

Improved compression efficiency

Keyframes enable video codecs to achieve higher compression ratios by storing complete frame information at regular intervals. This allows for more effective compression of the interframes, as only the differences need to be encoded. As a result, video files become smaller in size without sacrificing quality, making them easier to store, transfer, and stream.

Enhanced seeking and fast-forwarding

Keyframes also play a crucial role in seeking and fast-forwarding through video content. Since keyframes represent complete frames, they serve as anchor points for seeking and provide accurate reference frames for fast-forwarding. Without keyframes, it would be challenging to navigate through a video quickly and accurately.

Increased editing flexibility

As mentioned earlier, keyframes are essential in video editing, allowing for precise control over various video parameters. Editors can manipulate keyframes to create dynamic effects, transitions, and animations. This flexibility empowers content creators to bring their creative visions to life and deliver engaging videos.

Optimized video playback

Keyframes ensure smooth and optimized video playback. Since the keyframes store complete frames, each keyframe serves as a synchronization point for the video decoder. This synchronization allows for efficient decoding and playback, reducing the likelihood of video artifacts or playback issues.

Seamless video streaming

In the realm of video streaming, keyframes are vital for delivering high-quality videos with minimal buffering. By strategically placing keyframes, video streaming platforms can optimize the streaming experience. Keyframes allow for quick video startup and minimize the impact of network fluctuations, ensuring a seamless viewing experience for users.

Final Words

Keyframes are the unsung heroes of video encoding, enabling efficient compression, enhancing editing capabilities, and ensuring smooth playback. Understanding the magic of keyframes empowers content creators, video editors, and streaming platforms to deliver exceptional video experiences. Whether you’re compressing videos for storage, editing cinematic masterpieces, or streaming content online, keyframes are the foundation that brings your digital videos to life.