Increase Video Sound Quality: Tips and Techniques


Free Download Mp4Gain
picture

Increase Video Sound Quality: Tips and Techniques

Video Sound Quality
Video Sound Quality

Video content has become an integral part of our lives. From entertainment to education, videos are an essential medium for communication. However, poor sound quality can ruin the viewing experience and distract the audience from the video’s message. Therefore, it is crucial to ensure the video’s sound quality is clear, crisp, and loud enough. In this article, we will discuss some tips and techniques to increase the video sound quality and enhance the viewing experience.

Video Sound Quality
Video Sound Quality

Understanding Video Sound Quality

Before we delve into tips and techniques to improve video sound quality, let’s first understand the basics of video sound quality. Video sound quality is determined by several factors, including sample rate, bit depth, and compression. The sample rate refers to the number of audio samples captured per second, while bit depth refers to the number of bits used to represent each audio sample. Compression, on the other hand, refers to the reduction in audio data size to minimize the file size.

Another critical factor that affects video sound quality is the audio codec used to compress the audio data. Different audio codecs have varying levels of compression and affect the audio quality differently. Therefore, it is essential to choose the appropriate audio codec for your video.

Optimizing the Audio Recording

The first step to improve video sound quality is to optimize the audio recording. A high-quality audio recording is critical to ensuring that the audio quality remains intact throughout the video production process. Here are some tips for optimizing the audio recording:

  • Use a High-Quality Microphone: A high-quality microphone can significantly improve the audio recording quality. Therefore, invest in a good quality microphone that suits your recording needs.
  • Eliminate Background Noise: Background noise can significantly affect the audio recording quality. Therefore, record the audio in a quiet environment and use a noise-canceling microphone or software to eliminate background noise.
  • Set the Recording Levels: Setting the recording levels correctly can prevent clipping and ensure that the audio remains clear and crisp throughout the recording.

Editing the Audio

After recording the audio, it’s time to edit it to further enhance the sound quality. Audio editing involves removing unwanted noise, adjusting the volume, and applying various effects to the audio. Here are some tips for editing the audio:

  • Remove Unwanted Noise: Use noise reduction software to remove unwanted noise from the audio. Audacity is a free, open-source software that can be used for this purpose.
  • Adjust the Volume: Adjusting the volume levels is crucial to ensure that the audio is loud enough and balanced. Use a compressor to even out the volume levels and a limiter to prevent clipping.
  • Apply Audio Effects: Applying audio effects can significantly enhance the audio quality. For example, use equalization to adjust the frequency levels or add reverb to create a more natural-sounding audio.

Choosing the Right Audio Codec

Choosing the right audio codec is critical to ensure that the video’s sound quality is not compromised during compression. Different audio codecs have varying levels of compression and affect the audio quality differently. Therefore, it is essential to choose the appropriate audio codec for your video. Here are some popular audio codecs used for video production:

  • PCM: PCM is a lossless audio codec that provides the highest audio quality but results in large file sizes.
  • MP3: MP3 is a popular audio codec that provides good quality audio while keeping file sizes relatively small. However, when it comes to video sound quality, MP3 is not the best choice. This is because MP3 was designed for compressing audio only, and when it is used to compress video audio, the quality of the audio is reduced significantly. Therefore, it is best to avoid using MP3 for video sound.
  • AAC: AAC (Advanced Audio Coding) is another popular audio codec that is widely used for compressing audio files. It is known for providing good audio quality while keeping file sizes relatively small. AAC is also commonly used for compressing audio in video files. However, it is important to note that not all AAC codecs are created equal, and some codecs may provide better audio quality than others. Therefore, it is important to choose the right AAC codec when compressing video audio.
  • FLAC: FLAC (Free Lossless Audio Codec) is an audio codec that provides high-quality audio compression without any loss in audio quality. It is a popular choice among audiophiles who value audio quality above all else. However, because FLAC is a lossless audio codec, it is not suitable for compressing video audio, as the resulting file sizes would be too large. Therefore, it is best to use FLAC only for audio files and not for video sound.
  • AC3: AC3 (Audio Codec 3) is a popular audio codec that is commonly used for compressing audio in video files. It is known for providing good audio quality while keeping file sizes relatively small. AC3 is also capable of encoding multi-channel audio, making it a good choice for surround sound audio. However, because AC3 is a proprietary codec, it may not be supported by all devices and software. Therefore, it is important to check whether the target device or software supports AC3 before using it to compress video audio.

    2. Use a High-Quality Microphone

    One of the most important factors that affect video sound quality is the microphone used to record audio. A low-quality microphone can result in poor audio quality, even if the audio codec used to compress the audio is of high quality. Therefore, it is important to use a high-quality microphone when recording audio for video.

    There are many different types of microphones available, each with its own strengths and weaknesses. Some of the most common types of microphones used for recording audio for video include:

    • Shotgun Microphones: Shotgun microphones are directional microphones that are designed to capture audio from a specific direction. They are commonly used for recording audio in outdoor environments or in noisy environments where background noise can be a problem. Shotgun microphones are also commonly used for recording dialogue in movies and TV shows.
    • Lavalier Microphones: Lavalier microphones are small microphones that are worn on the body, typically on the lapel or collar. They are commonly used for recording audio in interviews or in situations where the microphone needs to be hidden from view. Lavalier microphones are also commonly used in TV and film production.
    • Condenser Microphones: Condenser microphones are high-quality microphones that are commonly used for recording audio in studios. They are known for their sensitivity and accuracy and are capable of capturing a wide range of frequencies. Condenser microphones require a power source, either from a battery or from an external power supply.
    • Dynamic Microphones: Dynamic microphones are durable and rugged microphones that are commonly used for recording audio in live performances and on stage. They are less sensitive than condenser microphones but can handle high sound pressure levels without distortion.
    • Microphone placement: Proper microphone placement is crucial for capturing high-quality audio. The distance and angle of the microphone from the sound source can significantly affect the sound quality. Microphones should be positioned close to the sound source for a clear and detailed sound, but not so close that they pick up unwanted sounds or distortions. For example, when recording vocals, the microphone should be placed around six inches away from the singer’s mouth and slightly off-axis to minimize popping sounds.

      Improving Video Sound Quality in Post-Production

      After recording the audio, the next step is to enhance the audio quality in post-production. Here are some ways to improve video sound quality in post-production:

    • Noise reduction: Background noise such as hum, hiss, and air conditioning noise can be reduced or eliminated using noise reduction software. Many video editing software tools have built-in noise reduction plugins that can help to reduce unwanted noise.
    • Equalization: Equalization or EQ is the process of adjusting the frequency balance of audio to improve its quality. With EQ, you can boost or reduce specific frequencies to improve the overall sound quality. For example, boosting the bass frequencies can add warmth and depth to the audio, while reducing the high frequencies can eliminate harsh sounds.
    • Compression: Compression is the process of reducing the dynamic range of audio by lowering the volume of loud sounds and increasing the volume of soft sounds. This can help to even out the audio levels and make the sound more consistent. However, over-compression can result in a flat and lifeless sound, so it’s important to use compression carefully.
    • Loudness normalization: Loudness normalization is the process of adjusting the audio levels to ensure that they are consistent and compliant with industry standards. This helps to avoid sudden changes in volume between different videos or audio tracks. Many video editing software tools have built-in loudness normalization features that can help to achieve consistent audio levels.

      Conclusion

      Improving video sound quality is essential to creating a high-quality video. By using the right equipment, recording techniques, and post-production tools, you can significantly improve the audio quality of your videos. Remember to consider factors such as microphone type, placement, and environment when recording audio, and use post-production techniques such as noise reduction, EQ, compression, and loudness normalization to further enhance the audio quality. Finally, while there are many software tools available to help improve audio quality, be sure to use them judiciously and focus on getting the best possible audio quality during recording to avoid having to rely too much on post-production editing. One tool that you might find helpful for improving audio quality is MP4Gain, which can help to normalize audio levels and improve the overall sound quality.


Free Download Mp4Gain
picture


Mp4Gain Main Window
picture


Mp4Gain Features
picture


Free Download Mp4Gain
picture

Audio Bit Depth Explained

Audio Bit Depth Explained


Audio Bit Depth Explained

Bit Depth

Audio Bit Depth Explained

When it comes to producing or enjoying high-quality audio, understanding bit depth is essential. This technical aspect of digital audio determines the level of precision and accuracy with which sound is captured and reproduced. For sound engineers and audiophiles alike, a deep understanding of bit depth is a must-have skill for creating and experiencing truly exceptional sound.

What is Bit Depth?

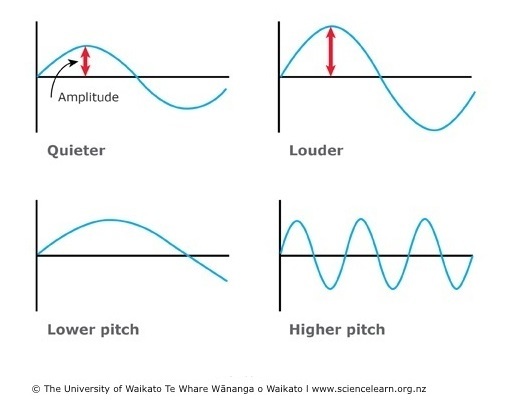
Bit depth refers to the number of bits used to represent each sample in a digital audio file. Each sample represents the amplitude of the audio signal at a specific point in time. The bit depth determines the range of values that can be used to represent the amplitude of each sample. A higher bit depth provides a larger range of possible values, resulting in a more accurate representation of the audio signal. This, in turn, leads to a higher-quality audio recording.

Common bit depths used in audio recording and production include 16-bit, 24-bit, and 32-bit. The most common bit depth used in consumer audio devices is 16-bit, while 24-bit and 32-bit are more commonly used in professional audio production.

How Does Bit Depth Affect Audio Quality?

The bit depth of an audio recording has a significant impact on its overall quality. A higher bit depth provides a more accurate representation of the audio signal, resulting in a more natural and lifelike sound. With a higher bit depth, the audio signal can be recorded and processed with greater precision and accuracy, allowing for a wider dynamic range and more nuanced expression.

On the other hand, a lower bit depth can result in quantization errors, which can introduce distortion and noise into the audio signal. This can result in a loss of detail and clarity, particularly in quiet or complex passages of music.

Bit Depth and Dynamic Range

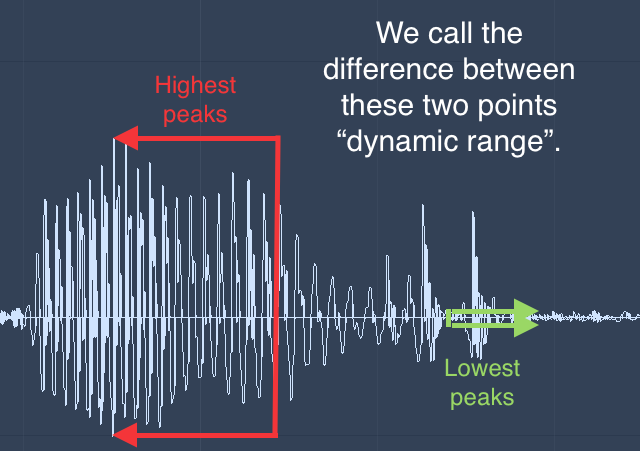
The dynamic range of an audio recording refers to the difference between the loudest and softest parts of the recording. A higher bit depth allows for a wider dynamic range, as the signal can be recorded with greater accuracy and precision. This means that even the softest parts of the recording can be captured with a higher level of detail and clarity, resulting in a more natural and lifelike sound.

For example, a recording of a classical music performance with a wide dynamic range may require a higher bit depth to capture the full range of dynamics and expression. Without a sufficient bit depth, the softer parts of the performance may be lost, resulting in a less engaging and less satisfying listening experience.

Conclusion

Understanding bit depth is crucial for anyone involved in the production or enjoyment of high-quality audio. By providing a more accurate representation of the audio signal, a higher bit depth can result in a more natural and lifelike sound, with a wider dynamic range and more nuanced expression. While a lower bit depth can result in quantization errors and a loss of detail and clarity, particularly in quiet or complex passages of music.

Overall, it is important to choose the appropriate bit depth for each recording or production, based on the dynamic range and complexity of the audio signal. By doing so, sound engineers and audiophiles can ensure that the audio they create or enjoy is of the highest quality possible.

As a final recommendation, we suggest using MP4Gain to adjust the volume and equalization of your digital audio files, ensuring that they are optimized for playback on a variety of devices and systems.

How to Convert M4A to MP3: The Ultimate Guide

How to Convert M4A to MP3: The Ultimate Guide

M4A to MP3
M4A to MP3

As music enthusiasts, we often come across different audio formats, such as M4A and MP3. While M4A files provide better quality sound than MP3 files, they are not as widely compatible as MP3 files. Therefore, converting M4A to MP3 is essential to ensure compatibility with various devices and media players. In this article, we will provide you with a comprehensive guide on how to convert M4A to MP3.

M4A to MP3
M4A to MP3

The Difference Between M4A and MP3

  • M4A: M4A is an audio file format that is commonly used for music downloaded from the iTunes Store or Apple Music. M4A files are encoded using Advanced Audio Coding (AAC) and are known for their high-quality sound. M4A files are also relatively small in size, making them perfect for streaming.
  • MP3: MP3 is a widely used audio file format that was introduced in the early 1990s. MP3 files are encoded using MPEG-1 Audio Layer III compression, which significantly reduces the file size while maintaining reasonable audio quality. MP3 files are compatible with a wide range of devices and media players, making them a popular choice for music enthusiasts.

While M4A files provide better quality sound than MP3 files, they are not as widely compatible as MP3 files. Many devices and media players do not support M4A files, which makes converting M4A to MP3 necessary for compatibility.

The History of M4A

M4A is a file format that was introduced by Apple in 2003 as a successor to the MP3 format. M4A files are encoded using Advanced Audio Coding (AAC) compression, which provides better sound quality than MP3 files at the same bit rate. M4A files were initially designed for use with Apple’s QuickTime media player and were intended to be a more advanced replacement for the MP3 format.

Since its introduction, the M4A format has gained popularity among music enthusiasts, especially those who use Apple devices. Today, many music streaming services, such as Apple Music and Spotify, use the M4A format to stream high-quality music to their subscribers.

How to Convert M4A to MP3

There are several ways to convert M4A to MP3, including using software, online services, or mobile apps. In this section, we will show you how to convert M4A to MP3 using the popular software, MP4Gain.

  • Step 1: Download and install MP4Gain on your computer.
  • Step 2: Launch MP4Gain and click on the “Add Files” button to add the M4A files you want to convert.
  • Step 3: Select the output format as MP3 and choose the output folder.
  • Step 4: Click on the “Convert” button to start the conversion process.

MP4Gain is a popular software that allows you to convert audio and video files to different formats, including MP3. It is easy to use and offers high-quality conversions. However, there are many other software options available, and you may choose the one that works best for you.

Conclusion

Converting M4A to MP3 is essential to ensure compatibility with various devices and applications that do not support the M4A format. Although both formats offer high-quality audio, MP3 is more widely supported and can be played on a variety of devices, making it the preferred format for most users.

There are several methods for converting M4A to MP3, including using dedicated software or online conversion services. It is important to note that some of these methods may result in a loss of audio quality or other issues, so it is essential to choose a reliable and reputable method for the best results.

In this article, we have covered the basics of M4A and MP3 formats, as well as the reasons why you may want to convert M4A to MP3. We have also provided step-by-step instructions for converting M4A files to MP3 using iTunes, as well as alternative methods such as using dedicated conversion software.

Finally, we recommend using MP4Gain to optimize your MP3 files after conversion, as it can improve the overall sound quality and ensure consistent volume levels across all your audio files.

We hope this article has been helpful in explaining how to convert M4A to MP3 and providing the information you need to make an informed decision about which conversion method is best for you. Remember to choose a reliable method and always back up your original files before conversion to avoid any loss of data.

How to Optimize MP3 Quality

How to Optimize MP3 Quality

How to Optimize MP3 Quality

MP3 is one of the most popular digital audio formats worldwide. Its widespread use is due to its small file size, which makes it easy to store and share music. However, this compression also reduces the quality of the audio file. To get the most out of your MP3s, you need to optimize them for the best possible quality. Here is a comprehensive guide on how to optimize your MP3 quality.

How to Optimize MP3 Quality

Understanding MP3 Compression

MP3 is a lossy audio compression format that reduces the file size of an audio track by discarding some of the audio data. This process is called compression. The amount of data discarded depends on the compression rate used when the MP3 was created. Higher compression rates result in smaller file sizes but also reduce the quality of the audio. The compression rate is measured in kilobits per second (kbps). A higher kbps rate means better sound quality but larger file sizes.

Choosing the Right Bitrate

The most important factor that affects the quality of an MP3 file is the bitrate. The bitrate determines the amount of data that is used to represent one second of audio. The higher the bitrate, the more data is used to represent the audio, resulting in better sound quality. However, higher bitrates also mean larger file sizes.

The recommended bitrate for MP3 files is 320 kbps. This provides excellent sound quality, but the file size is relatively large. If you’re short on storage space or want to upload your music to a streaming service, you may need to use a lower bitrate.

For most listeners, a bitrate of 128 kbps is sufficient for casual listening. This produces a relatively small file size and decent sound quality. However, if you have a good set of headphones or speakers, you may want to use a higher bitrate to get the most out of your music.

Using Variable Bitrate Encoding

Variable Bitrate (VBR) encoding is an MP3 encoding method that uses a different bitrate for different parts of the audio file. This allows the encoder to use a higher bitrate for complex parts of the music and a lower bitrate for simpler parts, resulting in a better overall sound quality.
VBR encoding produces smaller file sizes than constant bitrate encoding while maintaining similar sound quality. This makes it a good option if you want to save space without sacrificing too much sound quality.

Avoiding Transcoding

Transcoding is the process of converting an audio file from one format to another. For example, converting a WAV file to an MP3. Transcoding can reduce the quality of the audio file, especially if you’re converting from a lossy format like MP3 to another format. Each time you transcode an audio file, you lose some of the audio data, resulting in a lower quality sound. Therefore, it’s best to avoid transcoding MP3 files whenever possible.

Normalization

Normalization is a process that adjusts the volume of an audio file to a standard level. It ensures that all tracks have the same perceived loudness, making it easier to listen to music without constantly adjusting the volume. Normalization can also help prevent distortion, which can occur when the volume is too high.

There are many software tools available that can normalize MP3 files, including MP4Gain. However, it’s important to note that normalization can sometimes reduce the dynamic range of the music, resulting in a less natural sound.

Conclusion

Optimizing MP3 quality requires a careful balance between file size and audio fidelity. By following the tips and techniques discussed in this article, you can enhance the sound quality of your MP3 files without significantly increasing their size.

To summarize, start by selecting a high-quality source file, such as a CD or a lossless audio format. When converting to MP3, choose a high bitrate and use a variable bitrate setting for maximum efficiency. Use a low-pass filter to remove high-frequency noise, and avoid using equalization unless necessary. Lastly, consider using software like MP4Gain to further enhance the volume and overall sound quality of your MP3 files.

By taking these steps, you can create MP3 files that sound great and take up less space on your device or online storage. Whether you’re a music enthusiast, a podcast creator, or just someone looking to optimize their audio collection, these tips will help you achieve the best possible sound quality for your MP3 files.

Digital Audio File Formats: Everything You Need to Know

Digital Audio File Formats: Everything You Need to Know

Digital Audio File Formats

Digital audio file formats have become ubiquitous in the modern era of music and sound. They allow for easy storage, distribution, and manipulation of audio data. However, with so many different formats available, it can be challenging to know which one to use for a particular purpose. This article aims to provide a comprehensive guide to digital audio file formats, explaining what they are, how they work, and which ones are best suited for different use cases.

Digital Audio File Formats

What Are Digital Audio File Formats?

Digital audio file formats are a type of computer file that contains digital audio data. They are used to store, distribute, and manipulate audio data in a variety of contexts, such as music production, broadcasting, and online streaming. Audio data is typically recorded and stored in an analog format, such as magnetic tape or vinyl records. Digital audio file formats allow this data to be converted into a digital format, which can be stored and manipulated using computers and digital audio software.

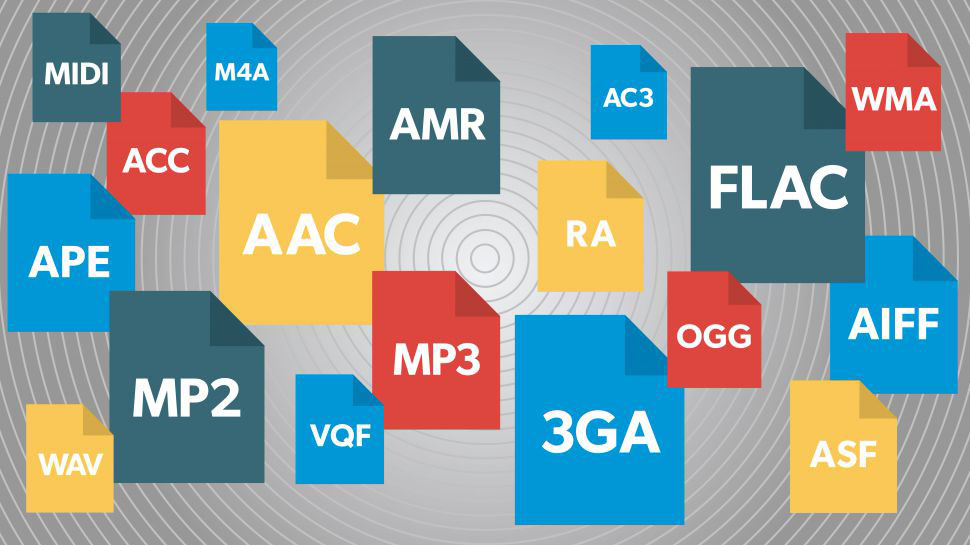
There are many different digital audio file formats available, each with its own characteristics and intended uses. Some of the most common formats include:

  • MP3
  • WAV
  • AIFF
  • FLAC
  • ALAC
  • AAC

How Do Digital Audio File Formats Work?

Digital audio file formats work by converting analog audio data into a digital format. This involves sampling the audio data at regular intervals and converting each sample into a binary code that can be stored on a computer. The most common way of doing this is to use pulse-code modulation (PCM), which involves measuring the amplitude of the audio signal at regular intervals and converting it into a binary code.

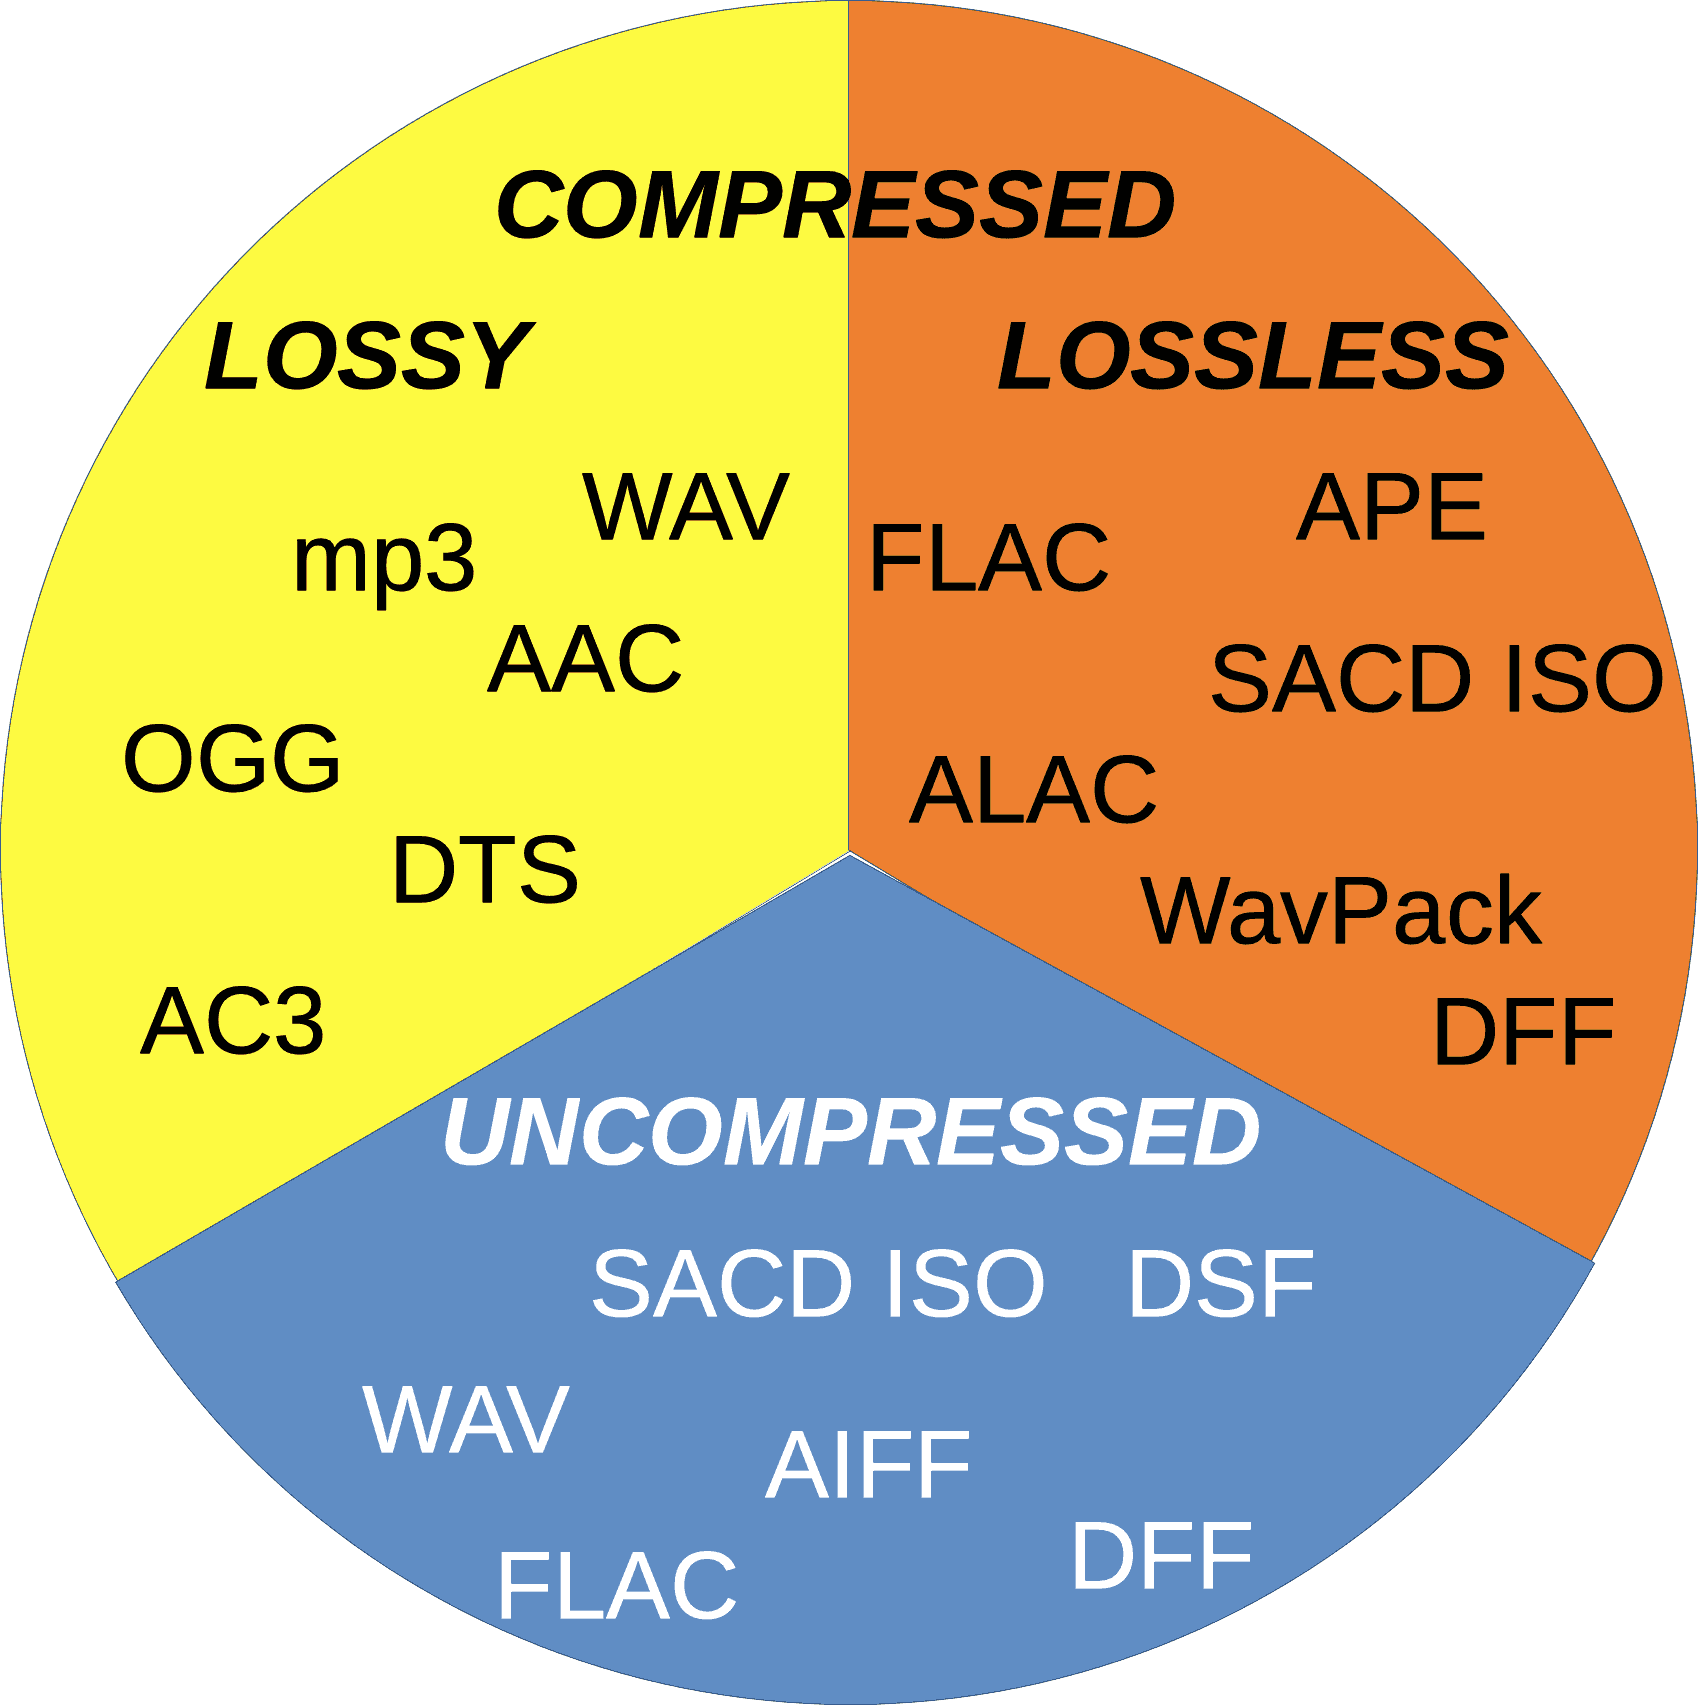
Once the audio data has been converted into a digital format, it can be stored on a computer in a digital audio file format. Different formats use different encoding schemes to compress the audio data and reduce the file size. Some formats, such as MP3, use lossy compression, which means that some of the audio data is lost during the compression process. Other formats, such as FLAC, use lossless compression, which means that all of the audio data is retained during compression.

Which Digital Audio File Format Should You Use?

The choice of digital audio file format depends on a variety of factors, such as the intended use of the audio data, the desired sound quality, and the available storage space. Some of the most common use cases and the recommended file formats for each are:

Music Production

When producing music, it is essential to use a high-quality, uncompressed audio format to ensure that the final mix sounds as good as possible. The recommended format for music production is WAV or AIFF, which are both uncompressed, lossless formats that retain all of the audio data.

Online Streaming

For online streaming, it is important to use a format that can be streamed easily over the internet without using too much bandwidth. The recommended format for online streaming is MP3, which uses lossy compression to reduce the file size while retaining a high level of sound quality.

High-Resolution Audio

For high-resolution audio, it is important to use a format that can retain all of the audio data without introducing any compression artifacts. The recommended formats for high-resolution audio are FLAC and ALAC, which are both lossless, uncompressed formats.

Streaming Audio Formats

Streaming audio formats have become increasingly popular in recent years, with the rise of music streaming services such as Spotify, Apple Music, and Tidal. These services use various audio formats to stream music over the internet.

MP3

MP3 is one of the most popular audio formats for streaming music due to its small file size and good quality. MP3 is a lossy format, which means that it compresses the audio data by discarding some of the information that is deemed less important to the listener. The resulting file size is much smaller than a lossless format such as WAV or FLAC, but there is a tradeoff in audio quality. Most streaming services use MP3 as the default format for streaming music due to its widespread compatibility and low bandwidth requirements.

AAC

AAC stands for Advanced Audio Coding, and it is a lossy audio codec that is widely used for music streaming and downloading. AAC is the default audio codec for Apple devices and is used by popular music streaming services such as Spotify, Tidal, and YouTube. AAC is similar to MP3 in terms of file size and quality, but it is more efficient in its compression algorithm, resulting in better sound quality at the same bitrate. AAC is also capable of supporting higher bitrates than MP3, making it a popular choice for high-quality streaming.

FLAC

FLAC is a lossless, uncompressed audio format that is popular among audiophiles and music enthusiasts due to its high-quality sound and ability to retain all of the original audio data. While FLAC files are much larger than lossy formats such as MP3 and AAC, they offer superior sound quality that is comparable to the original studio recording. FLAC is not commonly used for streaming due to its large file size, but it is popular for downloading high-quality music files.

ALAC

ALAC stands for Apple Lossless Audio Codec, and it is a lossless audio format that is similar to FLAC but is optimized for use with Apple devices. ALAC is compatible with most Apple devices and can be used with iTunes to download and stream high-quality music. ALAC is not as widely supported as FLAC, but it is a popular choice for Apple users who want to retain the original sound quality of their music files.

Conclusion

Digital audio file formats have come a long way since the early days of digital music, with new formats and technologies continually being developed to improve sound quality and file size. Each format has its advantages and disadvantages, and the choice of format will depend on the intended use of the audio file. For streaming music over the internet, lossy formats such as MP3 and AAC are the most commonly used due to their small file size and widespread compatibility. For high-quality audio, lossless formats such as FLAC and ALAC are recommended to retain all of the original audio data without introducing compression artifacts. Ultimately, the choice of format will depend on the listener’s preferences and the intended use of the audio file.

When it comes to adjusting the volume of your digital audio files, one useful tool is mp4gain. Mp4gain is a software tool that allows you to normalize the volume of your audio files to a consistent level, eliminating the need to adjust the volume manually. This can be particularly useful when dealing with files from different sources that may have different volume levels. Mp4gain is easy to use and can help to improve the listening experience of your digital music collection.

Audio Codec Comparison: A Comprehensive Guide for Audio Geeks

Audio Codec Comparison: A Comprehensive Guide for Audio Geeks

Audio Codec Comparison

Introduction

Audio codecs play a significant role in digital audio technology, as they are responsible for compressing and decompressing digital audio files. The use of audio codecs is essential to reduce the file size of audio files, making them easier to store, share, and transfer over the internet.

However, with the numerous audio codecs available in the market, it can be challenging to choose the right one for your needs. In this article, we will provide a comprehensive guide on the most popular audio codecs available today, their features, and their pros and cons.

What is an Audio Codec?

An audio codec is a software program or algorithm that compresses and decompresses digital audio data. The term codec stands for coder-decoder, and it is responsible for reducing the file size of digital audio files by removing redundant and irrelevant information from the file while retaining the original sound quality as much as possible.

Without an audio codec, digital audio files would be too large to store or transfer over the internet, which would be impractical. Therefore, audio codecs are essential for digital audio technology to function effectively.

Types of Audio Codecs

  • Lossy Audio Codecs

    Lossy audio codecs are designed to reduce the file size of digital audio files by discarding information that is considered irrelevant or redundant for human hearing. Lossy codecs achieve compression by applying psychoacoustic models that analyze the human auditory system’s limitations and remove sounds that are inaudible or less audible to the human ear. The most popular lossy audio codecs are:

    • MP3
    • AAC
    • OGG
    • WMA
  • Lossless Audio Codecs

    Lossless audio codecs compress digital audio files without discarding any information. Lossless codecs achieve compression by using sophisticated algorithms that analyze and encode the original audio data without affecting its quality. Lossless codecs are preferred for archiving or storing audio files that require the highest possible sound quality. The most popular lossless audio codecs are:

    • FLAC
    • ALAC
    • WAV
    • AIFF

Popular Audio Codecs

MP3

MP3 is the most popular audio codec in the world, and it has been around since the 1990s. MP3 stands for MPEG Audio Layer III, and it is a lossy audio codec that compresses digital audio files by removing sounds that are less audible to the human ear. MP3 is compatible with almost all audio players and devices and is widely used for music streaming, downloading, and sharing over the internet.

The main advantage of MP3 is its small file size, which makes it easy to store and transfer over the internet. However, MP3’s main drawback is its reduced sound quality, especially for audio files that contain a wide range of frequencies or dynamic range. MP3 files are prone to audio artifacts, such as compression artifacts, and they can sound flat or distorted compared to the original audio file.

AAC

AAC stands for Advanced Audio Coding, and it is a lossy audio codec that is widely used for music streaming and downloading. AAC is the default audio codec for Apple devices and is used by popular streaming services such as Spotify, Tidal, and YouTube. AAC is also used for high-definition digital television and radio broadcasting, as well as in various video formats such as MP4 and M4V.

FLAC

FLAC stands for Free Lossless Audio Codec, and as the name suggests, it is a lossless audio codec. FLAC is designed to compress audio files without losing any data or quality. It is an open-source codec that can be used on any platform and supports metadata, tagging, and album cover art. FLAC is a popular codec for archiving audio files and for audiophiles who want to preserve the original quality of their music. However, because FLAC files are larger than compressed audio files, they are less suitable for streaming and downloading over the internet.

ALAC

ALAC stands for Apple Lossless Audio Codec, and it is a lossless audio codec that is similar to FLAC. ALAC is the default audio codec for Apple devices and is supported by iTunes and other Apple software. Like FLAC, ALAC is designed to compress audio files without losing any data or quality. However, because ALAC is only supported by Apple devices and software, it is less widely used than FLAC.

Opus

Opus is a relatively new audio codec that was standardized by the Internet Engineering Task Force (IETF) in 2012. Opus is a versatile codec that can be used for a wide range of audio applications, including music streaming, voice chat, and video conferencing. It is designed to provide high-quality audio at low bitrates and can adapt to changing network conditions. Opus is an open-source codec that is supported by most modern web browsers and operating systems.

DSD

DSD stands for Direct Stream Digital, and it is a high-resolution audio codec that is used for digital recordings of analog audio sources. DSD uses a 1-bit sampling method that is different from traditional PCM-based codecs. DSD recordings have a high sampling rate and a wide frequency response, which allows them to capture more of the original sound than other codecs. DSD is used primarily by audiophiles and is supported by high-end audio equipment and software.

Conclusion

Choosing the right audio codec depends on your specific needs and preferences. If you want to compress your audio files for streaming or downloading, then lossy codecs such as MP3 or AAC are a good choice. If you want to preserve the original quality of your music, then lossless codecs such as FLAC or ALAC are a better option. Opus is a versatile codec that can be used for a wide range of audio applications, and DSD is a high-resolution codec that is ideal for audiophiles. Ultimately, the choice of codec depends on your personal preferences and the specific requirements of your project or application.

One tool that can be useful for managing and adjusting audio files is MP4Gain. MP4Gain is a software that allows you to normalize and adjust the volume of MP3, MP4, FLAC, and other audio files. It can be used to ensure that all of your audio files have the same volume level, which can be particularly useful for creating playlists or for streaming audio files. MP4Gain is available for Windows and it is a simple and effective tool for managing your audio files.

Dynamic range compression

Dynamic range compression

Dynamic range compression


Dynamic range compression, also known as simply “compression,” is a common technique used in audio processing to reduce the dynamic range of an audio signal. In this article, we will explore the concept of dynamic range compression, how it works, and its applications in music production and sound engineering.

Dynamic range compression

What is Dynamic Range Compression?

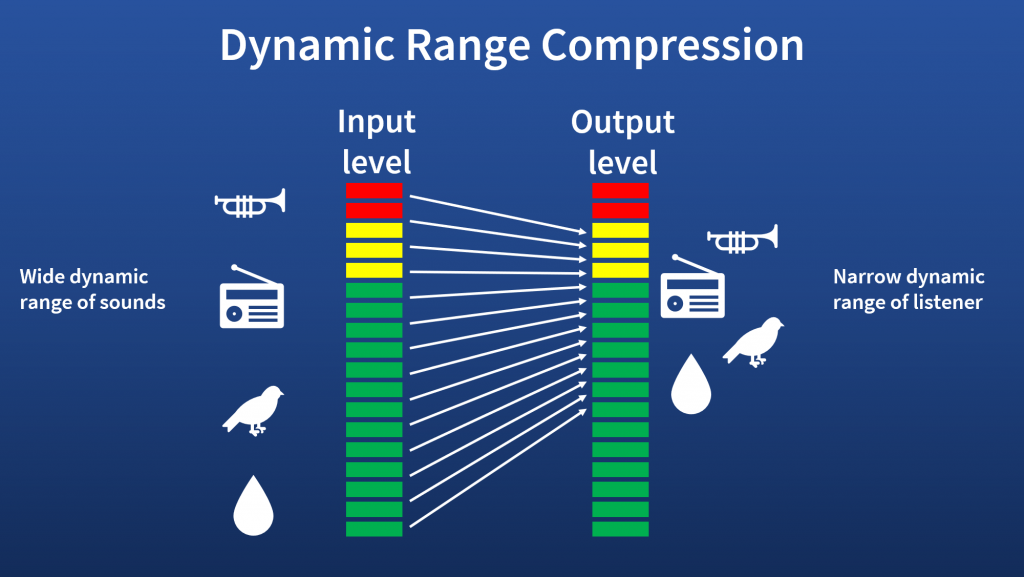
Dynamic range refers to the difference between the loudest and softest parts of an audio signal. In music production and sound engineering, it is desirable to have a wide dynamic range to create a more natural and dynamic sound. However, some musical genres, such as rock or electronic music, rely on a more consistent volume level throughout the song, which can be achieved through compression.

Dynamic range compression is a process that reduces the difference between the loudest and softest parts of an audio signal, resulting in a more consistent volume level. Compression works by lowering the volume of the loudest parts of the signal and boosting the volume of the softest parts, effectively “compressing” the dynamic range.

How Does Dynamic Range Compression Work?

Dynamic range compression works by applying a gain reduction to the audio signal when the volume exceeds a certain threshold. The threshold is set by the user and determines at what volume level the gain reduction will start to occur. Once the threshold is reached, the compressor reduces the gain of the signal by a set amount, called the ratio.

For example, if the threshold is set to -10 dB and the ratio is set to 2:1, then any part of the signal that exceeds -10 dB will be reduced in volume by half. So if a part of the signal that was originally at -8 dB is now reduced by half, it will be brought down to -11 dB.

Applications of Dynamic Range Compression

Dynamic range compression is used in a variety of applications in music production and sound engineering. Here are some of the most common applications:

Leveling the Volume of a Mix

When mixing a song, it is common for certain parts of the track to be louder than others, such as the chorus being louder than the verses. Compression can be used to level out the volume of the mix and make it more consistent.

Adding Punch to Drums and Percussion

Compression can be used to add punch and impact to drums and percussion by bringing out the attack of the sound. By setting a fast attack time and a high ratio, the compressor can reduce the volume of the sustain portion of the sound, while leaving the attack relatively untouched.

Controlling the Dynamics of Vocals

Vocals are one of the most important elements in a song, and dynamic range compression can be used to control their dynamics. By compressing the vocals, you can make them more consistent in volume, while still retaining the natural dynamics of the performance.

Managing Peaks in Audio Recordings

When recording audio, it is common for certain parts of the signal to exceed 0 dB, which can cause clipping and distortion. Compression can be used to manage these peaks and prevent clipping, allowing for a cleaner and more dynamic recording.

Conclusion

Dynamic range compression is a powerful tool for music production and sound engineering, allowing for a more consistent and controlled sound. By understanding how compression works and its various applications, you can use it to enhance your recordings and mixes. While there are many software options available for dynamic range compression, one that we recommend is MP4Gain, which provides a user-friendly interface and a variety of compression options to suit your needs.

The Science Behind Digital Audio Levelers

The Science Behind Digital Audio Levelers

audio leveling
audio leveling

When it comes to creating high-quality audio recordings, one of the most important considerations is maintaining consistent volume levels. Digital audio levelers are software tools designed to automatically adjust the volume of an audio track, ensuring that it remains at a consistent level throughout. But how do these tools actually work, and what is the science behind their operation? In this article, we’ll take a deep dive into the world of digital audio levelers, exploring the principles that underpin their operation and the key factors that affect their effectiveness.

audio leveling
audio leveling

Understanding Audio Levels

Before we dive into the world of digital audio levelers, it’s important to first understand the basics of audio levels. At its most basic, audio level refers to the amplitude of a sound wave, which is usually measured in decibels (dB). When recording audio, it’s important to ensure that the levels remain consistent throughout the recording, as fluctuations in volume can be jarring to the listener and can even cause distortion or clipping.

Traditionally, maintaining consistent audio levels required manual adjustments by the sound engineer or producer, who would listen to the recording and adjust the levels in real-time to ensure that they remained consistent. However, with the advent of digital audio technology, this process has become increasingly automated, with digital audio levelers offering a more streamlined and efficient solution.

How Digital Audio Levelers Work

So how do digital audio levelers actually work? At their most basic, digital audio levelers operate by analyzing the incoming audio signal and adjusting the volume level to ensure that it remains consistent. There are several different methods that levelers can use to accomplish this, but most operate using one of two primary techniques: peak normalization or RMS normalization.

Peak Normalization

Peak normalization is a technique that involves analyzing the audio signal and identifying the highest peak amplitude. The leveler then adjusts the volume level so that the highest peak is at a predetermined level, typically 0 dB. This ensures that the loudest part of the audio track is as loud as possible without causing distortion or clipping.

RMS Normalization

RMS normalization is a more complex technique that involves analyzing the average level of the audio signal over time. Rather than focusing on the highest peak, the leveler looks at the entire signal and adjusts the volume level to ensure that the average level remains consistent. This can help to ensure that the audio track maintains a more consistent volume level overall, even if there are individual peaks that exceed the average level.

Factors Affecting Leveler Effectiveness

While digital audio levelers can be incredibly effective at maintaining consistent audio levels, there are several factors that can affect their overall effectiveness. One of the most important of these factors is the dynamic range of the audio signal. Dynamic range refers to the difference between the loudest and quietest parts of an audio signal. If the dynamic range is too wide, it can be difficult for a leveler to maintain consistent levels without causing distortion or clipping.

Another factor that can affect leveler effectiveness is the type of audio being recorded. For example, speech recordings may require a different approach than music recordings, as the natural dynamic range of speech is typically narrower than that of music. Similarly, different genres of music may require different approaches, as the dynamic range of a rock song may be different from that of a classical piece.

Conclusion

During the last decades, digital audio levelers have become essential tools for the music industry, broadcasting, film, and TV production. They help ensure that the audio output meets specific standards, and the sound quality is consistent across different playback systems. As we have seen, digital audio levelers are sophisticated devices that incorporate various algorithms to analyze and adjust the audio levels, making them essential for modern media production.

The most widely used digital audio leveler, MP4Gain, has proven to be effective and reliable. With its advanced algorithms and intuitive user interface, MP4Gain simplifies the process of optimizing audio levels, making it accessible even to non-technical users. However, there are many other options available in the market, each with its own unique features and benefits.

When selecting a digital audio leveler, it is important to consider the specific needs and requirements of your project. Factors such as budget, level of technical expertise, and desired features should be taken into account. Additionally, it is crucial to stay informed about new developments and advancements in the field of digital audio levelers, as technology is constantly evolving.

In conclusion, digital audio levelers play a critical role in ensuring the quality and consistency of audio output across different playback systems. They are powerful tools that incorporate advanced algorithms to analyze and adjust audio levels, making them essential for modern media production.