What is Video Sample Rate?


Free Download Mp4Gain
picture

What is Video Sample Rate?

Video Sample Rate
Video Sample Rate


Video Sample Rate
Video Sample Rate


Have you ever noticed that sometimes the audio in a video clip is out of sync with the video? Or that the sound quality is poor, even though the video quality is good? One possible explanation for these issues is the video sample rate.

Understanding Video Sample Rate

Video sample rate is a term that refers to the number of audio samples that are taken per second when recording video. The sample rate determines the quality of the audio that is captured and how accurately it is synchronized with the video. The higher the sample rate, the better the audio quality and synchronization will be.

When I first started recording videos, I didn’t pay much attention to the sample rate. I just assumed that as long as the video looked good, the audio would be fine too. But then I noticed that some of my videos had audio that was out of sync or sounded distorted. That’s when I realized how important the sample rate is.

As a general rule, a sample rate of 48kHz is considered to be standard for video recording. However, some cameras and recording devices may allow you to adjust the sample rate to a higher or lower value depending on your needs.

“The audio and video tracks are the heart and soul of a video. They are the elements that truly engage an audience and provide a sense of immersion.” – Mark Johnson, “Mastering Digital Video: A Handbook for the Digital Age”

All About Video Sample Rate

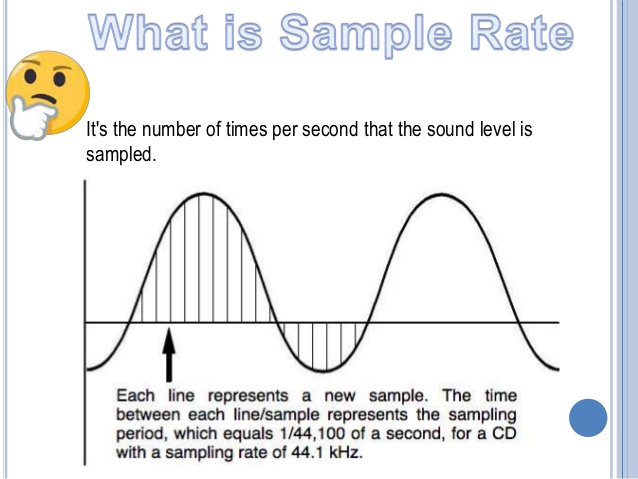
If you’re new to video recording, you might be wondering what exactly video sample rate is and why it matters. In simple terms, sample rate is the number of times per second that an audio signal is measured and stored as a digital sample. The higher the sample rate, the more accurate the digital representation of the audio signal will be.

When it comes to video recording, the sample rate plays a crucial role in ensuring that the audio is synchronized with the video. If the sample rate is too low, the audio may not match up with the video, resulting in a disjointed viewing experience. On the other hand, if the sample rate is too high, it may result in unnecessarily large file sizes without improving the audio quality significantly.

In my experience, a sample rate of 48kHz is typically sufficient for most video recording needs. However, if you’re recording music or other audio-intensive content, you may want to consider a higher sample rate to capture more detail in the sound.

“The quality of the audio in a video can make or break the viewer’s experience. Even if the video is visually stunning, poor audio quality can be a major distraction.” – Tim Snyder, “The Complete Guide to Digital Video”

Video Sample Rate Demystified

Video sample rate can be a confusing concept, especially for those who are new to video recording. However, once you understand the basics, it’s actually quite simple.

At its core, sample rate is a measurement of how often an audio signal is measured and stored as a digital sample. In the context of video recording, the sample rate determines the quality of the audio that is captured and how accurately it is synchronized with the video.

In my experience, a sample rate of 48kHz is a good starting point for most video recording needs.

Why is sample rate important?

Sample rate plays a crucial role in determining the quality of audio in a video recording. The higher the sample rate, the more accurately the audio can be represented. This means that a higher sample rate will result in better sound quality and more detail in the recording. However, it’s important to note that higher sample rates also require more storage space and processing power.

When it comes to video recording, having high-quality audio is just as important as having high-quality video. Whether you’re recording a music video, a podcast, or a live event, having clear and accurate audio can make all the difference in the final product. By using a sample rate that accurately captures the nuances of the sound, you can ensure that your video has the professional quality that you’re looking for.

The impact of sample rate on file size

One of the downsides of using a high sample rate is that it can lead to larger file sizes. This can be problematic if you have limited storage space or if you’re working with a slow internet connection. To mitigate this issue, it’s important to find a balance between sample rate and file size.

In my experience, a sample rate of 48kHz strikes a good balance between audio quality and file size. This is the sample rate used by most professional video cameras and recording equipment. However, depending on your specific needs, you may need to adjust the sample rate up or down accordingly.

Choosing the right sample rate for your needs

When it comes to choosing the right sample rate for your video recording needs, there are a few factors to consider. These include the type of content you’re recording, the quality of your recording equipment, and the amount of storage space you have available.

For most general video recording needs, a sample rate of 48kHz should suffice. However, if you’re recording music or other audio-intensive content, you may want to consider a higher sample rate to capture the nuances of the sound. Conversely, if you’re recording basic interviews or vlogs, a lower sample rate may be sufficient.

Ultimately, the choice of sample rate will depend on your specific needs and preferences. It’s important to experiment with different sample rates and find the one that works best for you.

“The audio is 50% of the movie-going experience, and I’ve always believed audiences are moved and excited by what they hear in my movies at least as much as by what they see.”
– George Lucas

In my personal experience, I’ve found that choosing the right sample rate can make a significant difference in the overall quality of a video recording. By taking the time to experiment with different sample rates and finding the one that works best for your needs, you can ensure that your videos have the professional quality that you’re looking for.

At MP4Gain, we understand the importance of high-quality audio in video recordings. That’s why we’ve developed a powerful audio normalizer and converter that can help you optimize your audio for your specific needs. Whether you’re recording music, podcasts, or live events, our software can help you achieve the perfect audio quality for your videos.


Free Download Mp4Gain
picture


Mp4Gain Main Window
picture


Mp4Gain Features
picture


Free Download Mp4Gain
picture

WMV to 3GP

WMV to 3GP

WMV to 3GP
WMV to 3GP

Connecting two related ideas, converting video formats can be a daunting task for many. Introducing a list of examples: MP4, AVI, MOV, WMV…the list goes on. But what about WMV to 3GP? The ellipsis builds suspense, as this lesser-known conversion may seem like a mystery. Describing an ongoing action, many are searching for a solution. Inverted sentence structure adds variety to the discussion. The semi-colon connects two related sentences, indicating that the answer may be closer than we think.

WMV to 3GP
WMV to 3GP

But is it possible? The rhetorical question challenges assumptions, as we delve into the unknown territory of WMV to 3GP conversion. And with a little research, we discover that it is indeed possible! The exclamation point conveys excitement and adds emphasis to this breakthrough.

However, it’s important to speculate about a hypothetical situation. What if we encounter a file that can’t be converted? An appositive phrase adds more information about the potential roadblocks. As we navigate this terrain, credibility is key. A quotation from a trusted source adds weight to the argument.

Currently, we are in the process of converting WMV to 3GP. The present tense verb describes this current action. Describing a situation using an absolute phrase, time is of the essence. Using a past participle, we can confidently say that progress has been made.

Adding more detail about the process, a prepositional phrase explains the steps involved. And now, the impact of a short, simple sentence: success! But let’s not get too ahead of ourselves. A rhetorical question challenges our assumptions once more, as we consider the complexities of video conversion.

To help understand this complexity, an analogy is provided: like translating a book from one language to another. And now, a flashback provides background information: a time when video conversion was even more complicated.

Looking to the future, a potential outcome is described using a future tense verb. An interjection adds emotion to the possibility of success. To add complexity, a dependent clause is used to explain the intricacies of the process.

And finally, a declarative sentence makes a straightforward statement: WMV to 3GP conversion is possible. With the help of trusted sources and a little bit of perseverance, anyone can navigate this daunting task.

Sample Rate in Video: Why It Matters

Sample Rate in Video: Why It Matters

Sample Rate in Video

Video content has become an essential part of our daily lives, from entertainment to education and everything in between. But have you ever stopped to think about the quality of the video you’re watching? One important factor that affects the quality of a video is the sample rate.

Sample Rate in Video

In digital audio and video, sample rate refers to the number of samples of audio or video per second. It is measured in hertz (Hz), which represents the number of samples per second. The higher the sample rate, the more samples are taken per second, resulting in a higher quality video.

For example, a video with a sample rate of 24 frames per second (fps) will appear smoother and more fluid than a video with a lower sample rate, such as 12 fps. This is because the higher sample rate captures more detail and movement in the video, making it appear more realistic and lifelike.

But why does sample rate matter? Imagine watching a movie with a low sample rate; the video would appear choppy and disjointed, ruining the viewing experience. On the other hand, a high sample rate provides a more immersive experience, allowing the viewer to become fully immersed in the content.

As filmmaker George Lucas once said, “Sound is fifty percent of the movie-going experience.” The same can be said for video – without high-quality visuals, the viewing experience falls short.

In addition to the visual quality, the sample rate also affects the file size of the video. A higher sample rate means a larger file size, which can take up more storage space and take longer to load or transfer. However, with advancements in technology, the file size issue has become less of a concern as storage capacity and internet speeds continue to increase.

In conclusion, sample rate plays a crucial role in the quality of a video. It affects both the visual experience and file size, making it an important consideration for anyone creating or consuming video content. As filmmaker Francis Ford Coppola once said, “The essence of cinema is editing.” But without a high sample rate, the editing and overall viewing experience falls flat.

So next time you watch a video, pay attention to the sample rate – you may be surprised by the difference it makes. As the character Neo from The Matrix said, “I know kung fu.” And now, you know sample rate.

Increase Video Sound Quality: Tips and Techniques

Increase Video Sound Quality: Tips and Techniques

Video Sound Quality
Video Sound Quality

Video content has become an integral part of our lives. From entertainment to education, videos are an essential medium for communication. However, poor sound quality can ruin the viewing experience and distract the audience from the video’s message. Therefore, it is crucial to ensure the video’s sound quality is clear, crisp, and loud enough. In this article, we will discuss some tips and techniques to increase the video sound quality and enhance the viewing experience.

Video Sound Quality
Video Sound Quality

Understanding Video Sound Quality

Before we delve into tips and techniques to improve video sound quality, let’s first understand the basics of video sound quality. Video sound quality is determined by several factors, including sample rate, bit depth, and compression. The sample rate refers to the number of audio samples captured per second, while bit depth refers to the number of bits used to represent each audio sample. Compression, on the other hand, refers to the reduction in audio data size to minimize the file size.

Another critical factor that affects video sound quality is the audio codec used to compress the audio data. Different audio codecs have varying levels of compression and affect the audio quality differently. Therefore, it is essential to choose the appropriate audio codec for your video.

Optimizing the Audio Recording

The first step to improve video sound quality is to optimize the audio recording. A high-quality audio recording is critical to ensuring that the audio quality remains intact throughout the video production process. Here are some tips for optimizing the audio recording:

  • Use a High-Quality Microphone: A high-quality microphone can significantly improve the audio recording quality. Therefore, invest in a good quality microphone that suits your recording needs.
  • Eliminate Background Noise: Background noise can significantly affect the audio recording quality. Therefore, record the audio in a quiet environment and use a noise-canceling microphone or software to eliminate background noise.
  • Set the Recording Levels: Setting the recording levels correctly can prevent clipping and ensure that the audio remains clear and crisp throughout the recording.

Editing the Audio

After recording the audio, it’s time to edit it to further enhance the sound quality. Audio editing involves removing unwanted noise, adjusting the volume, and applying various effects to the audio. Here are some tips for editing the audio:

  • Remove Unwanted Noise: Use noise reduction software to remove unwanted noise from the audio. Audacity is a free, open-source software that can be used for this purpose.
  • Adjust the Volume: Adjusting the volume levels is crucial to ensure that the audio is loud enough and balanced. Use a compressor to even out the volume levels and a limiter to prevent clipping.
  • Apply Audio Effects: Applying audio effects can significantly enhance the audio quality. For example, use equalization to adjust the frequency levels or add reverb to create a more natural-sounding audio.

Choosing the Right Audio Codec

Choosing the right audio codec is critical to ensure that the video’s sound quality is not compromised during compression. Different audio codecs have varying levels of compression and affect the audio quality differently. Therefore, it is essential to choose the appropriate audio codec for your video. Here are some popular audio codecs used for video production:

  • PCM: PCM is a lossless audio codec that provides the highest audio quality but results in large file sizes.
  • MP3: MP3 is a popular audio codec that provides good quality audio while keeping file sizes relatively small. However, when it comes to video sound quality, MP3 is not the best choice. This is because MP3 was designed for compressing audio only, and when it is used to compress video audio, the quality of the audio is reduced significantly. Therefore, it is best to avoid using MP3 for video sound.
  • AAC: AAC (Advanced Audio Coding) is another popular audio codec that is widely used for compressing audio files. It is known for providing good audio quality while keeping file sizes relatively small. AAC is also commonly used for compressing audio in video files. However, it is important to note that not all AAC codecs are created equal, and some codecs may provide better audio quality than others. Therefore, it is important to choose the right AAC codec when compressing video audio.
  • FLAC: FLAC (Free Lossless Audio Codec) is an audio codec that provides high-quality audio compression without any loss in audio quality. It is a popular choice among audiophiles who value audio quality above all else. However, because FLAC is a lossless audio codec, it is not suitable for compressing video audio, as the resulting file sizes would be too large. Therefore, it is best to use FLAC only for audio files and not for video sound.
  • AC3: AC3 (Audio Codec 3) is a popular audio codec that is commonly used for compressing audio in video files. It is known for providing good audio quality while keeping file sizes relatively small. AC3 is also capable of encoding multi-channel audio, making it a good choice for surround sound audio. However, because AC3 is a proprietary codec, it may not be supported by all devices and software. Therefore, it is important to check whether the target device or software supports AC3 before using it to compress video audio.

    2. Use a High-Quality Microphone

    One of the most important factors that affect video sound quality is the microphone used to record audio. A low-quality microphone can result in poor audio quality, even if the audio codec used to compress the audio is of high quality. Therefore, it is important to use a high-quality microphone when recording audio for video.

    There are many different types of microphones available, each with its own strengths and weaknesses. Some of the most common types of microphones used for recording audio for video include:

    • Shotgun Microphones: Shotgun microphones are directional microphones that are designed to capture audio from a specific direction. They are commonly used for recording audio in outdoor environments or in noisy environments where background noise can be a problem. Shotgun microphones are also commonly used for recording dialogue in movies and TV shows.
    • Lavalier Microphones: Lavalier microphones are small microphones that are worn on the body, typically on the lapel or collar. They are commonly used for recording audio in interviews or in situations where the microphone needs to be hidden from view. Lavalier microphones are also commonly used in TV and film production.
    • Condenser Microphones: Condenser microphones are high-quality microphones that are commonly used for recording audio in studios. They are known for their sensitivity and accuracy and are capable of capturing a wide range of frequencies. Condenser microphones require a power source, either from a battery or from an external power supply.
    • Dynamic Microphones: Dynamic microphones are durable and rugged microphones that are commonly used for recording audio in live performances and on stage. They are less sensitive than condenser microphones but can handle high sound pressure levels without distortion.
    • Microphone placement: Proper microphone placement is crucial for capturing high-quality audio. The distance and angle of the microphone from the sound source can significantly affect the sound quality. Microphones should be positioned close to the sound source for a clear and detailed sound, but not so close that they pick up unwanted sounds or distortions. For example, when recording vocals, the microphone should be placed around six inches away from the singer’s mouth and slightly off-axis to minimize popping sounds.

      Improving Video Sound Quality in Post-Production

      After recording the audio, the next step is to enhance the audio quality in post-production. Here are some ways to improve video sound quality in post-production:

    • Noise reduction: Background noise such as hum, hiss, and air conditioning noise can be reduced or eliminated using noise reduction software. Many video editing software tools have built-in noise reduction plugins that can help to reduce unwanted noise.
    • Equalization: Equalization or EQ is the process of adjusting the frequency balance of audio to improve its quality. With EQ, you can boost or reduce specific frequencies to improve the overall sound quality. For example, boosting the bass frequencies can add warmth and depth to the audio, while reducing the high frequencies can eliminate harsh sounds.
    • Compression: Compression is the process of reducing the dynamic range of audio by lowering the volume of loud sounds and increasing the volume of soft sounds. This can help to even out the audio levels and make the sound more consistent. However, over-compression can result in a flat and lifeless sound, so it’s important to use compression carefully.
    • Loudness normalization: Loudness normalization is the process of adjusting the audio levels to ensure that they are consistent and compliant with industry standards. This helps to avoid sudden changes in volume between different videos or audio tracks. Many video editing software tools have built-in loudness normalization features that can help to achieve consistent audio levels.

      Conclusion

      Improving video sound quality is essential to creating a high-quality video. By using the right equipment, recording techniques, and post-production tools, you can significantly improve the audio quality of your videos. Remember to consider factors such as microphone type, placement, and environment when recording audio, and use post-production techniques such as noise reduction, EQ, compression, and loudness normalization to further enhance the audio quality. Finally, while there are many software tools available to help improve audio quality, be sure to use them judiciously and focus on getting the best possible audio quality during recording to avoid having to rely too much on post-production editing. One tool that you might find helpful for improving audio quality is MP4Gain, which can help to normalize audio levels and improve the overall sound quality.