Understanding RMS Loudness


Free Download Mp4Gain
picture

Understanding RMS Loudness

RMS Loudness
RMS Loudness
RMS Loudness
RMS Loudness
  • What is RMS loudness in video codecs?
  • How does RMS loudness affect audio quality?
  • Why is RMS loudness important in video compression?
  • How to measure RMS loudness in video files?

RMS loudness is a fundamental concept when it comes to audio quality in video codecs. It’s akin to the volume control on your favorite music player, but with a technical twist. RMS stands for Root Mean Square, and it represents the average power of an audio signal. In the context of video codecs, RMS loudness helps maintain consistent audio levels, ensuring a pleasant and balanced viewing experience.

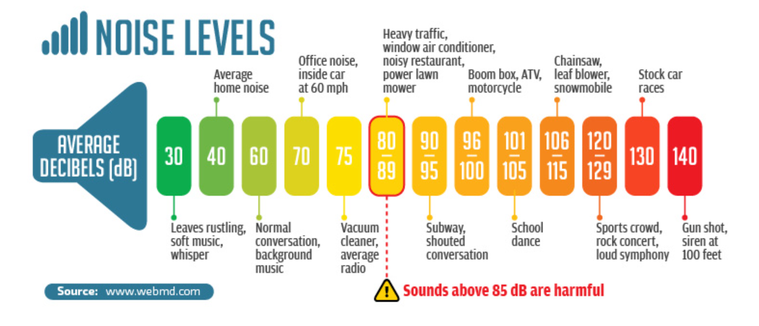
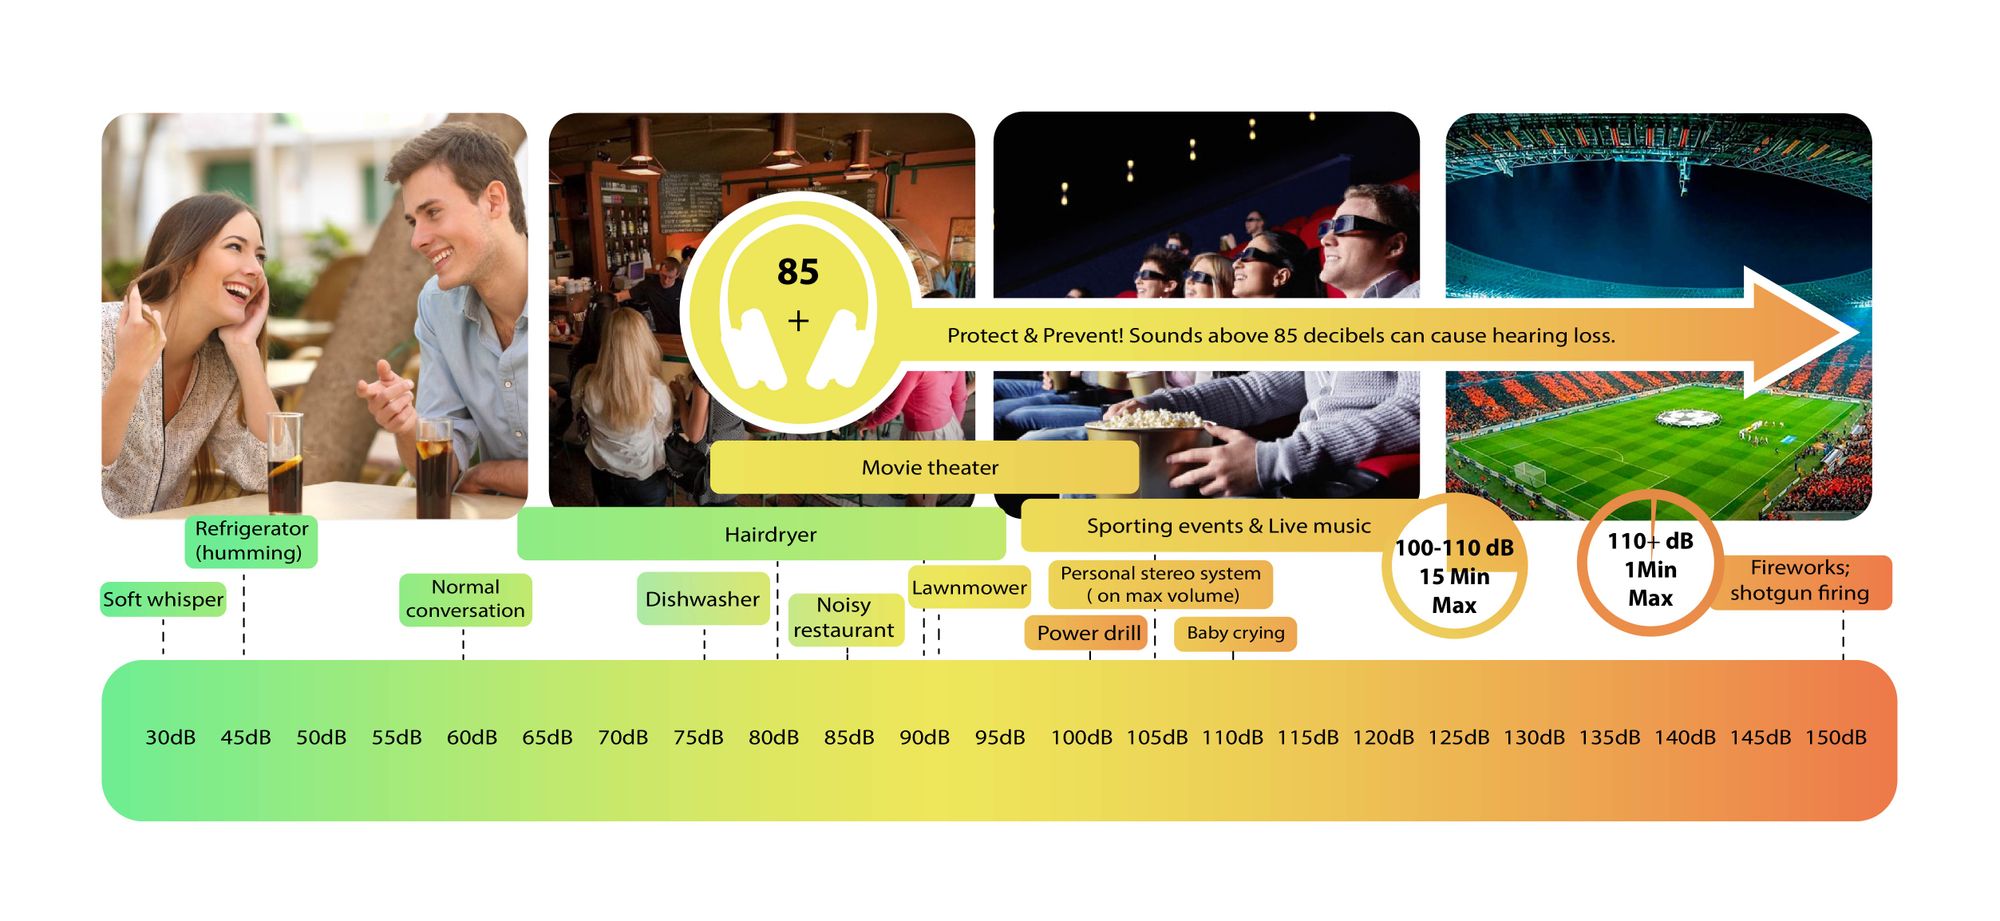
Imagine you’re watching a movie, and the dialogue is barely audible while the explosions are ear-shatteringly loud. This uneven audio experience can be jarring. RMS loudness comes into play by smoothing out these extremes, making sure that soft-spoken conversations and action-packed sequences are both enjoyable without constantly adjusting the volume.

Now, why is RMS loudness essential in video compression? It’s like the conductor in an orchestra ensuring that each instrument blends harmoniously. In video codecs, audio is compressed along with video to save space. However, without proper management of audio levels, compression can lead to distortions or unwanted fluctuations in volume. RMS loudness measurements help codec algorithms maintain audio quality during compression, preserving the intended audio dynamics.

Measuring RMS loudness in video files involves complex algorithms, but it’s akin to analyzing the heartbeat of your audio. By calculating the average power of audio samples over time, RMS loudness algorithms ensure that your video’s sound remains consistent and enjoyable, whether you’re watching on a home theater system or a smartphone.

In summary, understanding RMS loudness in video codecs is crucial for achieving excellent audio quality in your video content. It’s the silent hero that ensures your favorite movie or series sounds just as good as it looks, providing a seamless and immersive viewing experience.

“RMS loudness may seem like a technical detail, but it’s the invisible force that maintains audio harmony in video. As a sound engineer, I’ve seen how it can elevate or diminish the impact of a film, making it an indispensable aspect of video production.”

Top Video Codecs for High Quality

Selecting the top video codecs for high-quality video production is akin to choosing the finest ingredients for a gourmet meal. It’s all about creating a visual feast for your audience’s eyes. In this quest for excellence, let’s explore some of the top video codecs that professionals and enthusiasts alike swear by.

First on our list is the renowned H.265, or HEVC (High-Efficiency Video Coding). Picture this: you’re upgrading from a standard television to a 4K Ultra HD screen. HEVC is like the key that unlocks the full potential of your new display. This codec excels in delivering high-quality video while keeping file sizes relatively compact. It’s the preferred choice for streaming platforms aiming to provide viewers with stunning visuals without excessive buffering.

Next up is the ever-reliable H.264, also known as AVC (Advanced Video Coding). Think of it as the workhorse of video codecs, much like a reliable car that gets you from point A to B without a hitch. H.264 has widespread compatibility, making it suitable for various devices and platforms. It strikes a balance between video quality and file size, making it an ideal choice for many video producers.

If you’re venturing into the world of professional filmmaking, ProRes codecs are your best companions. ProRes is like the high-end kitchen equipment used by top chefs. These codecs provide near-lossless compression, preserving every detail of your footage, from color gradations to sharpness. Directors and post-production teams often rely on ProRes for its ability to deliver cinematic excellence.

Lastly, for those seeking the pinnacle of quality in high dynamic range (HDR) video, Dolby Vision and HDR10+ are the top contenders. These codecs are like the precision instruments used by surgeons. They handle the increased color depth and brightness levels required for HDR content, resulting in breathtaking visuals that make your videos truly stand out.

In conclusion, the top video codecs for high-quality content vary depending on your specific needs and goals. Whether you’re streaming, editing, or creating cinematic masterpieces, there’s a codec that’s tailored to deliver the visual excellence you desire.

“Choosing the right video codec is akin to selecting the canvas for a masterpiece. It sets the foundation for your visual storytelling, and the right choice can elevate your work to new heights.”

Recommended Video Codecs for Superior Quality

When it comes to achieving superior quality in video production, the choice of codec is paramount. It’s akin to selecting the finest ingredients for a gourmet meal or the best tools for a craftsman. Let’s explore some recommended video codecs that are celebrated for their ability to deliver exceptional video quality.

One of the top recommendations for superior quality is H.265, also known as HEVC (High-Efficiency Video Coding). HEVC is like the master chef’s knife in a kitchen—a versatile tool that ensures precision and excellence. This codec excels in preserving the richness of video content while efficiently compressing it. It’s the go-to choice for 4K streaming services and broadcasters looking to deliver top-notch visuals.

For those who prioritize compatibility and widespread support, H.264, or AVC (Advanced Video Coding), remains a recommended option. Think of it as the classic recipe that never goes out of style. H.264 strikes a balance between video quality and file size, making it suitable for various devices and platforms. It’s a reliable choice for producing content that reaches a broad audience.

If you’re a professional filmmaker aiming for uncompromising quality, the ProRes family of codecs, developed by Apple, is a recommendation that’s hard to ignore. ProRes is like the artisan’s toolkit, meticulously crafted to preserve every nuance of your footage. It offers nearly lossless compression, making it ideal for post-production work where retaining the highest quality is essential.

Lastly, for those diving into the world of high dynamic range (HDR) video, Dolby Vision and HDR10+ are recommended choices. These codecs are like the high-performance sports cars of video compression, designed to handle the increased color depth and brightness levels demanded by HDR content. They ensure that your videos shine with unparalleled visual brilliance.

In conclusion, the choice of video codec plays a pivotal role in achieving superior video quality. Whether you’re a content creator, a streaming platform, or a filmmaker, selecting the right codec can elevate your visuals to a level that leaves a lasting impact on your audience.

“As a filmmaker, I’ve always believed that the pursuit of superior quality starts with the choice of the right video codec. It’s the canvas upon which our stories come to life, and selecting the best one is an art in itself.”

Optimal Video Codecs for Best Quality

Choosing the optimal video codecs for the best quality is akin to selecting the perfect lens for a photographer seeking impeccable clarity and precision. The right codec can make all the difference in delivering top-tier video content. Let’s explore some codecs that are optimal for achieving the best quality in your videos.

First in our lineup is H.265, or HEVC (High-Efficiency Video Coding). HEVC is like the master key that unlocks the full potential of your video content. It’s designed to provide exceptional video quality while keeping file sizes manageable. This makes it a popular choice for streaming platforms that want to deliver the best possible visuals to their viewers, especially in the era of 4K and beyond.

For versatility and compatibility, H.264, or AVC (Advanced Video Coding), is an optimal choice. Think of it as the Swiss Army knife of codecs—a reliable tool for various situations. H.264 strikes a balance between video quality and compression efficiency, making it suitable for a wide range of devices and platforms. It ensures that your content reaches as many viewers as possible without sacrificing quality.

In the realm of professional filmmaking, ProRes codecs developed by Apple are considered optimal for preserving the best quality. ProRes is like the guardian of cinematic excellence, offering nearly lossless compression that retains every detail of your footage. Filmmakers and post-production teams often rely on ProRes to ensure that their creative vision is brought to life with the highest fidelity.

For those venturing into the world of high dynamic range (HDR) video, Dolby Vision and HDR10+ are the optimal choices. These codecs are like the precision instruments of the video world, designed to handle the expanded color palette and brightness levels of HDR content. They ensure that your videos shine with the best possible quality and visual impact.

In conclusion, selecting the optimal video codec for the best quality depends on your specific goals and the nature of your content. Whether you’re streaming, editing, or creating cinematic masterpieces, there’s a codec that’s tailor-made to deliver the ultimate video quality you desire.

“As a video producer, I’ve learned that the choice of video codec is pivotal in achieving the best quality. It’s like selecting the finest ingredients for a gourmet dish; each codec has its unique flavor that contributes to the overall excellence of the final product.”

What is RMS Loudness in Video Codecs?

  • What is the significance of RMS loudness in video production?
  • How does RMS loudness affect audio clarity in videos?
  • Can you explain the technical aspects of RMS loudness measurement?

RMS loudness in video codecs is a critical factor in ensuring the audio quality of your videos. It’s like the conductor of an orchestra, harmonizing the various elements of sound to create a seamless and enjoyable auditory experience. Let’s delve into the significance of RMS loudness in video production.

Imagine you’re watching a movie, and the dialogue is too quiet to hear, while sudden explosions are overwhelmingly loud. This audio imbalance can detract from the viewing experience. RMS loudness steps in as the audio equalizer, ensuring that soft-spoken conversations and action-packed sequences are both clear and pleasant without constant volume adjustments.

In technical terms, RMS loudness represents the average power of an audio signal. It’s like taking the pulse of your audio, measuring its vitality and strength. Video codecs compress both video and audio to save space, but without proper management of audio levels, compression can lead to distortions or unpredictable volume fluctuations. RMS loudness measurements act as a safeguard, ensuring that your audio remains consistent and enjoyable during compression.

Now, let’s demystify the technical aspects of RMS loudness measurement. It involves calculating the average power of audio samples over time. Think of it as assessing the heartbeat of your audio. By analyzing these samples, RMS loudness algorithms provide a numerical value that reflects the audio’s intensity. This value is crucial in maintaining a balanced and high-quality auditory experience for your audience.

In summary, RMS loudness in video codecs is akin to the audio conductor that ensures harmony in your videos. It guarantees that your audience enjoys a consistent and immersive audio experience, enhancing the overall quality of your content.

“In my years of audio engineering, RMS loudness has been my trusted companion in the pursuit of audio excellence. It’s the unsung hero that ensures every sound in a video is heard as it was intended.”

How to Measure RMS Loudness in Video Files?

  • What tools are used to measure RMS loudness in video production?
  • Can you explain the steps involved in RMS loudness measurement for video files?
  • Are there industry standards for acceptable RMS loudness levels in video content?

Measuring RMS loudness in video files is a crucial step in ensuring high-quality audio in your video production. It’s like using a precise instrument to calibrate sound, much like a musician tuning their instrument before a performance. Let’s explore the tools and steps involved in RMS loudness measurement for video files.

To measure RMS loudness, professionals often use specialized software and hardware tools designed for audio analysis. These tools are like the surgeon’s scalpel, allowing for precise adjustments to audio levels. Popular software options include Adobe Audition, Pro Tools, and specialized plugins like Waves WLM (Loudness Meter). These tools provide detailed insights into audio levels, making them indispensable for audio engineers and video editors.

The process of measuring RMS loudness involves several steps. Think of it as a systematic checklist to ensure audio quality. First, you’ll need to import your audio into the chosen software. Then, you’ll set the analysis parameters, such as the measurement scale (e.g., LUFS or dBFS) and the target loudness level. This step is akin to calibrating your instrument for a specific performance.

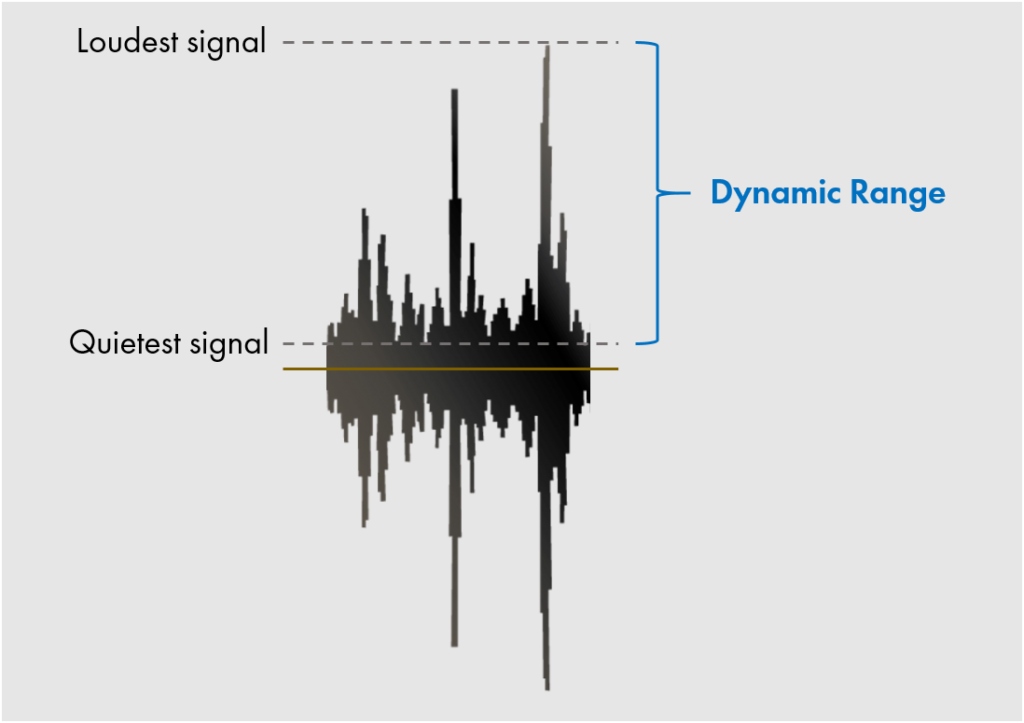
Next, you’ll run the analysis, and the software will provide you with RMS loudness measurements. These measurements represent the average power of your audio signal over time, much like taking multiple heart rate readings to assess a patient’s health. You’ll also receive information about peak levels, dynamic range, and other audio characteristics that influence the overall quality.

As for industry standards, several organizations, such as the Audio Engineering Society (AES) and the International Telecommunication Union (ITU), have established guidelines for acceptable RMS loudness levels in video content. These standards ensure consistency in audio quality across different platforms and devices. For example, -23 LUFS (Loudness Units Full Scale) is a common target loudness level for broadcast television.

In conclusion, measuring RMS loudness in video files is a meticulous process that relies on specialized tools and adherence to industry standards. It’s a critical step in delivering audio that meets the expectations of your audience and enhances the overall quality of your video content.

“In the world of audio engineering, precision is key. Measuring RMS loudness is like fine-tuning an instrument before a performance—it ensures that every note in your video’s audio is in perfect harmony.”

Why is RMS Loudness Important in Video Compression?

  • How does RMS loudness impact the quality of compressed video files?
  • What happens if RMS loudness is not properly managed during video compression?
  • Can you provide examples of how RMS loudness affects the viewer’s experience in compressed videos?

RMS loudness plays a vital role in the quality of compressed video files, and its importance can be likened to the foundation of a sturdy building—it ensures stability and integrity. Let’s explore how RMS loudness impacts video compression and why it’s crucial for a seamless viewing experience.

Imagine you’re packing for a trip, and you have limited space in your suitcase. You want to bring all your favorite clothes without wrinkling them. Video codecs face a similar challenge when compressing video and audio to save space. RMS loudness serves as the folding technique that ensures your clothes (audio) fit neatly without creases or distortions.

When RMS loudness is not properly managed during video compression, it’s like packing your suitcase haphazardly. Some clothes (audio segments) get crumpled, while others remain untouched. This results in audio inconsistencies, where certain parts of the video are too loud or too quiet. For viewers, this can be disorienting and frustrating, much like unpacking wrinkled clothes upon arrival.

Let’s delve into some real-world examples of how RMS loudness affects the viewer’s experience in compressed videos. Picture watching a YouTube video where the intro music is significantly louder than the host’s voice. This audio imbalance can be jarring and unpleasant. Properly managed RMS loudness ensures that the audio levels are consistent, allowing you to enjoy the video without reaching for the volume control.

In live streaming, such as gaming broadcasts on Twitch, fluctuations in RMS loudness can be distracting. Imagine a streamer’s voice suddenly becoming too quiet during intense gameplay, followed by a deafening explosion. Viewers might be forced to adjust their volume repeatedly, disrupting their immersion in the content. RMS loudness management prevents these sudden audio shifts, ensuring a smoother and more enjoyable viewing experience.

In summary, RMS loudness’s importance in video compression lies in its ability to maintain audio consistency, preventing jarring volume fluctuations. It ensures that viewers can enjoy your compressed videos without the annoyance of constantly adjusting the volume—a crucial aspect of delivering high-quality content.

“In the world of video compression, RMS loudness is the silent guardian of audio quality. It ensures that viewers can enjoy a seamless audio experience, much like a well-packed suitcase ensures wrinkle-free clothes on a journey.”


Free Download Mp4Gain
picture


Mp4Gain Main Window
picture


Mp4Gain Features
picture


Free Download Mp4Gain
picture

Understanding Decibels

Understanding Decibels

Understanding Decibels

Decibels (dB) are a logarithmic unit of measurement used in various fields, including audio, electronics, and telecommunications. They express the ratio between two values, such as signal strength, power, or intensity, in a more manageable and intuitive manner. Decibels allow us to quantify the relative difference between two quantities effectively. For example, a 3 dB increase represents a doubling of sound intensity, making it a fundamental concept in many technical fields.

What are Decibels?

Decibels, often abbreviated as dB, are a logarithmic unit used to express ratios between values like power, intensity, or amplitude. They offer a convenient way to represent large ranges of values and are widely used in fields such as audio engineering and telecommunications.

Decibel Scale

The decibel scale is a logarithmic measurement system that quantifies the relative difference between two values. For instance, in audio, a 10 dB increase signifies a tenfold increase in power or intensity, while a 10 dB decrease represents a tenfold decrease. This logarithmic property simplifies comparisons and analyses of various measurements.

Applications of Decibels

Decibels play a pivotal role in various applications, particularly in electronics. They are used to measure signal strength, gain, noise levels, and more. Engineers and technicians rely on decibels to assess the performance and quality of electronic systems, making them a vital concept in the field.

Video Compression

Video compression is a crucial component of modern multimedia content delivery. It involves using algorithms to reduce the size of video files while maintaining acceptable visual quality. Video compression removes redundant or less important information from a video stream, making it efficient for storage and transmission.

Video Quality

Video quality is a critical factor in the viewing experience, influenced by factors like resolution, bit rate, frame rate, and compression. Resolution, measured in pixels (e.g., 1080p or 4K), determines detail levels. Bit rate affects data transmission, while frame rate impacts motion smoothness. Video compression balances quality and file size, with codecs like H.264 and H.265 playing significant roles in the industry. Achieving the desired video quality requires a careful balance of these factors for various applications.

Video Deinterlacing

Video Deinterlacing: Enhancing Your Viewing Experience

Video Deinterlacing
Video Deinterlacing
Video Deinterlacing
Video Deinterlacing

As a video enthusiast, I’ve come to appreciate the importance of video deinterlacing in the world of visual content. It’s a term that holds the key to improving the quality of videos and ensuring a smoother and more enjoyable viewing experience.

Understanding Video Deinterlacing

Let’s start with the basics. When we talk about video deinterlacing, we’re referring to the process of converting interlaced video into a progressive format. But what does that really mean?

Well, in the early days of television and video recording, interlaced video was the standard. This means that each frame of video was split into two fields, with one field containing all the odd lines of an image and the other containing the even lines. These two fields were displayed sequentially, creating the illusion of a complete frame. However, this method often resulted in visible lines and flickering, especially when there was fast motion on the screen.

Now, video deinterlacing steps in to solve this problem. It takes those two interlaced fields and combines them into a single, progressively scanned frame. The result? A smoother, flicker-free image that looks significantly better, especially on modern high-definition displays.

The Deinterlace Video Process

So, how does the deinterlace video process work? Think of it as a digital makeover for your video content. When you run a deinterlacing algorithm, it carefully examines each frame of interlaced video and merges the two fields into one. It does this by interpolating the missing lines to create a complete frame.

Let’s use an analogy to make this clearer. Imagine you have a torn photograph that’s been split into two pieces. The first piece has the top half of the image, and the second piece has the bottom half. To restore the full picture, you’d carefully align the torn edges and fill in the missing details. That’s essentially what deinterlacing does for video frames.

Now, it’s important to note that not all deinterlacing methods are created equal. Some algorithms are more sophisticated and effective than others, and the choice of deinterlacing technique can significantly impact the final video quality. This is where choosing the right deinterlacing software tools becomes crucial.

Benefits of Progressive Scan

The switch from interlaced video to progressive scan has brought about several benefits of progressive scan that are impossible to ignore. Firstly, progressive scan eliminates the annoying flicker and visible lines that plagued interlaced content, providing a smoother and more pleasing visual experience.

Additionally, progressive scan is better suited for modern high-definition displays, as these screens are inherently progressive. When you watch a deinterlaced video on such a display, every pixel is utilized to its full potential, resulting in sharper images and more vibrant colors.

Moreover, progressive scan is the preferred format for video editing and post-production. When working with interlaced video, editors often face challenges in maintaining quality and consistency. By deinterlacing the footage, editors can ensure a seamless editing process and achieve professional-grade results.

Interlaced vs. Progressive Video: Making the Choice

Now that you understand the importance of video deinterlacing and the advantages of progressive scan, it’s essential to distinguish between interlaced vs. progressive video and make the right choice depending on your needs.

Interlaced video still has its place, especially in legacy systems and older content. However, for modern applications, progressive scan is the way to go. Whether you’re streaming videos online, watching a Blu-ray disc, or creating your own video content, progressive scan ensures a superior viewing experience.

In conclusion, video deinterlacing is the key to unlocking the full potential of your video content. It’s a process that transforms older, flickering videos into smooth, high-quality visuals that are compatible with today’s displays. So, the next time you’re enjoying your favorite movie or editing a video project, remember the magic of deinterlacing that makes it all possible.

“Video deinterlacing is the key to unlocking the full potential of your video content.”

Audio High Dynamic Range

Audio High Dynamic Range

Audio High Dynamic Range

As an audio enthusiast, I can’t help but be intrigued by the concept of Audio High Dynamic Range (Audio HDR). It’s a term that’s been gaining traction in the world of audio technology, and for good reason. Let’s dive into this fascinating subject and explore what it means, how it works, and why it matters.

What is Audio High Dynamic Range?

Think of audio dynamic range as the range between the softest and loudest sounds in a piece of music or any audio content. In the world of audio production, preserving this dynamic range is crucial for delivering an authentic listening experience. When we talk about Audio High Dynamic Range, we’re essentially referring to the expanded capability of audio systems to

Identical Search Intent Keywords

  • Audio HDR technology
  • Benefits of Audio High Dynamic Range
  • Audio HDR vs. Standard Audio

People Also Asked About Audio High Dynamic Range

  • How does Audio HDR improve audio quality?
  • What are the key features of Audio High Dynamic Range?
  • Is Audio HDR compatible with all audio devices?

Exploring the Benefits of Audio HDR

Audio HDR technology is like having a high-resolution camera for your ears. Imagine you’re watching a sunset, and with standard audio, you hear the waves gently crashing on the shore. It sounds nice, but with Audio HDR, it’s like you can distinguish every droplet of water, the rustle of leaves in the wind, and even the faintest chirping of birds in the distance. The softest and loudest sounds are reproduced with incredible clarity, immersing you in the full soundscape of the moment.

One of the significant benefits of Audio HDR is its ability to capture and reproduce the nuances of a live musical performance. It’s as if you’re sitting in the front row of a concert hall, experiencing every note, from the delicate pluck of a guitar string to the thunderous crash of cymbals. The technology ensures that nothing gets lost, delivering a true-to-life audio experience that’s second to none.

Moreover, when it comes to movies and gaming, Audio HDR can transport you to another dimension. Imagine you’re watching an action-packed film, and the explosions have a visceral impact, while the dialogue remains crystal clear. It’s like being in the middle of the action, with every sound precisely where it should be. This level of immersion adds a whole new dimension to entertainment, making it more captivating and engaging than ever before.

Key Features of Audio High Dynamic Range

Audio High Dynamic Range isn’t just about making things louder; it’s about making them sound better. One of its key features is its ability to maintain audio fidelity even at extreme volume levels. This means you can crank up the volume on your favorite track, and it will still sound as clear and detailed as it did at a lower volume. No more distortion or loss of quality when you want to feel the music.

Another remarkable feature is the precise spatial audio rendering. With Audio HDR, you can perceive the direction from which a sound is coming with remarkable accuracy. Whether it’s footsteps behind you in a horror game or a musician moving across the stage in a live recording, the technology ensures that the audio positioning is incredibly realistic.

Furthermore, Audio HDR often comes with advanced noise cancellation and enhancement capabilities. This means that background noises are minimized, allowing you to focus on what matters most—the audio content itself. Whether you’re in a noisy environment or just want to immerse yourself fully in the music, this feature is a game-changer.

Is Audio HDR Compatible with All Audio Devices?

Audio HDR technology is undoubtedly impressive, but its compatibility with audio devices can vary. It’s essential to check whether your audio equipment supports Audio HDR before expecting the full experience. Most modern high-end headphones, soundbars, and home theater systems are now equipped with this technology, ensuring you can enjoy its benefits.

For example, if you’re a gamer, you’ll find that many gaming headsets come with Audio HDR support. This can significantly enhance your gaming experience, allowing you to hear every footstep, gunshot, or subtle in-game detail with remarkable clarity.

However, for older or budget-friendly audio devices, Audio HDR support may not be available. In such cases, you’ll still enjoy high-quality audio, but you won’t experience the full depth and richness that Audio HDR can offer. As the technology continues to evolve, we can expect wider compatibility across various audio products in the future.

Audio HDR vs. Standard Audio: A Game-Changing Comparison

Comparing Audio HDR to standard audio is like comparing a black-and-white photograph to a vivid, high-definition image in full color. With standard audio, you get the gist of the sound, but with Audio HDR, you’re immersed in the finest details. It’s a game-changer for audiophiles and anyone who appreciates the power of sound.

Consider watching your favorite action movie with standard audio. The explosions might sound loud, but they lack the depth and precision that Audio HDR provides. With Audio HDR, every explosion is an explosion of sound, with layers of complexity that standard audio can’t replicate. It’s a cinematic experience like no other.

Even in everyday listening, the difference is palpable. Whether you’re enjoying a classical symphony, a rock concert, or a podcast, Audio HDR elevates the experience. The highs are crisper, the lows are more resonant, and every subtle nuance is brought to the forefront. It’s audio as it was meant to be heard.

In conclusion, Audio High Dynamic Range is a technological marvel that takes audio experiences to new heights. Its ability to preserve dynamic range, enhance audio quality, and deliver immersive soundscapes makes it a must-have for anyone who values the art of listening. As technology continues to advance, we can look forward to even more breathtaking audio experiences that bridge the gap between imagination and reality.

“Audio High Dynamic Range is a technological marvel that takes audio experiences to new heights.”

Audio Equalization Filters

Audio Equalization Filters

Audio Equalization Filters

Audio Equalization Filters Explained

Audio equalization filters are like the control knobs on a sound system, allowing you to fine-tune and shape the audio output to your liking. Imagine them as the equalizer settings on your music player or car stereo. These filters work by adjusting the intensity of different frequency ranges within an audio signal. It’s akin to adjusting the bass, midrange, and treble levels on your home stereo system to achieve the perfect sound balance.

For instance, if you’re listening to music and the bass is overwhelming, you can use equalization filters to reduce the bass frequencies and create a more balanced and enjoyable listening experience. Conversely, if you want to emphasize the vocals in a podcast, you can boost the midrange frequencies to make the voice clearer.

Audio equalization filters are essential tools in the world of sound engineering and music production. They allow professionals to shape and enhance audio quality in recordings, live performances, and various audio applications.

Importance of Audio Equalization

As a seasoned audio engineer, I can attest to the critical role that audio equalization plays in creating high-quality audio content. It’s like being a chef who uses different seasonings to bring out the flavors in a dish. Properly applied equalization enhances the sonic characteristics of audio, making it sound cleaner, more balanced, and more appealing to the ears.

Consider a live concert scenario where you have a mix of instruments and vocals. Without proper equalization, the sound may become muddied and unclear. By using equalization filters, you can isolate and emphasize specific frequencies, making the guitar sound crisp, the vocals shine, and the drums punchy.

Audio equalization is not limited to music alone; it extends to podcasts, films, gaming, and even phone calls. Imagine watching a movie where the dialogue is drowned out by background noise. Skilled audio engineers use equalization to reduce unwanted noise and ensure that the dialogue is clear and intelligible.

Types of Audio Equalization Filters

Audio equalization filters come in various types, each designed for specific purposes. Think of them as different brushes for an artist, each suited for a particular style of painting. Here are some common types of equalization filters:

Graphic Equalizers: These are like multi-colored paint palettes, allowing you to adjust a set of fixed frequency bands. They are user-friendly and often found on consumer audio devices.

Parametric Equalizers: Parametric equalizers are like precision tools for audio professionals. They allow you to adjust not only the frequency bands but also the bandwidth (Q) and gain with great precision.

Shelving Equalizers: Imagine these as specialized brushes for broad strokes. Shelving equalizers are used to boost or cut all frequencies above or below a certain point, useful for adjusting bass or treble.

Notch Filters: These are like erasers for unwanted sounds. Notch filters target and eliminate specific frequencies, ideal for removing unwanted hums, buzzes, or feedback.

High-Pass and Low-Pass Filters: High-pass filters allow high frequencies to pass while attenuating low frequencies, while low-pass filters do the opposite. They are like sieves that filter out unwanted elements in audio.

Understanding when and how to use these different types of equalization filters is crucial for achieving the desired audio quality in various scenarios, from music production to live sound reinforcement.

Common Questions About Audio Equalization Filters

When it comes to audio equalization filters, many questions arise, much like curious minds seeking answers. Let’s address some common queries:

1. What’s the best equalization setting for music?

Equalization settings depend on personal preferences and the audio source. There’s no one-size-fits-all answer. Experiment and adjust to suit your taste.
2. Can equalization fix poor-quality recordings?

While equalization can improve audio quality to some extent, it can’t completely salvage a poorly recorded source. Quality in, quality out still applies.
3. Are expensive equalizer plugins better than free ones?

Not necessarily. The effectiveness of an equalizer depends on its features and your skill in using it. Free plugins can be excellent if used correctly.

Mastering Audio Equalization Techniques

Mastering audio equalization is like becoming a skilled painter, capable of creating stunning visuals on a canvas. To excel in this art, you need to practice, experiment, and learn from experience. Start with simple adjustments and gradually delve into more complex equalization techniques.

Consider the analogy of a chef crafting a signature dish. Just as a chef refines their recipe through trial and error, audio engineers refine their equalization techniques by actively listening, experimenting with different filters, and paying attention to detail.

Remember that context matters. Equalization for a rock concert differs from equalization for a classical orchestra recording. It’s crucial to understand the specific requirements of each audio project and tailor your equalization accordingly.

Advanced Applications of Equalization Filters

Advanced applications of equalization filters are like pushing the boundaries of artistic expression. As you become more proficient, you can use equalization creatively. Imagine being a sculptor who can carve intricate details into their work.

For instance, you can use equalization to create unique sound effects in films, simulate vintage audio characteristics, or shape the sonic identity of a musical genre. It’s akin to an artist using various brush strokes and techniques to evoke different emotions in their paintings.

Additionally, advanced equalization techniques involve dynamic equalization, where the filter settings change in real-time based on the audio input. This dynamic approach is like choreographing a dance, where the moves adapt to the music’s rhythm and intensity.

In conclusion, audio equalization filters are powerful tools in the hands of skilled audio professionals. They enable us to shape sound, enhance quality, and create captivating auditory experiences across a wide range of media and applications. Much like artists refining their craft, mastering the art of audio equalization takes time and dedication, but the results are music to the ears.

Video Aspect Ratio Correction

Video Aspect Ratio Correction

Video Aspect Ratio Correction


Aspect Ratio Correction in Videos

Video aspect ratios play a significant role in how we perceive and enjoy visual content. Imagine aspect ratios as the frame in which a story is told. The aspect ratio determines the width and height of the video frame, influencing how images and scenes are composed. Think of it like two differently shaped picture frames – one rectangular and one square. Each frame can display the same image, but it will look quite different depending on the frame’s shape.

In the world of video production, ensuring the correct aspect ratio is crucial for delivering an engaging and visually pleasing experience. For example, if you’re watching a movie on your widescreen TV, an incorrect aspect ratio could result in black bars on the sides or a stretched image, which detracts from the viewing experience. Correcting aspect ratios is akin to making sure the picture fits perfectly within its frame, ensuring that viewers see the intended visuals without distortion.

Why Correcting Video Aspect Ratios Matters

As a seasoned video producer, I can attest to the importance of correct aspect ratios. Imagine you’re creating a promotional video for your business. If you don’t pay attention to the aspect ratio, your video might look skewed when displayed on different devices or platforms. This can leave a negative impression on your audience and affect the effectiveness of your message.

To put it simply, think of video aspect ratios as puzzle pieces. When they fit perfectly, you get a complete, clear image. But if the pieces are forced together incorrectly, the picture becomes distorted and unrecognizable. Correcting aspect ratios ensures that your content looks its best, whether it’s viewed on a widescreen TV, a smartphone, or a computer monitor.

How to Correct Video Aspect Ratios

Correcting video aspect ratios may sound complex, but it’s a crucial skill in video production. It’s like resizing a photograph to fit perfectly in a frame. There are several ways to achieve this, depending on your editing software and the specific problem you’re addressing.

One common method is “letterboxing” or “pillarboxing,” which involves adding black bars to the top and bottom (for widescreen) or sides (for standard) of the video to maintain the correct aspect ratio. This prevents stretching or cropping of the visuals.

Another technique is “cropping,” where you remove a portion of the video to fit the desired aspect ratio. This is like trimming a photograph to fit in a smaller frame without distorting the image.

For more advanced adjustments, video editing software provides tools to manually resize and reposition the video frame, ensuring the correct aspect ratio is maintained.

Correcting video aspect ratios is like tailoring a suit – it requires precision to achieve the perfect fit, but the result is a polished and professional presentation.

Common Issues with Video Aspect Ratios

In the world of video production, aspect ratios can be a tricky business. It’s like trying to fit a square peg into a round hole – it just doesn’t work. Common issues include videos appearing stretched, squished, or with black bars that disrupt the viewing experience.

Imagine you’re watching a classic movie on your widescreen TV, and the characters look unnaturally tall and skinny. That’s an aspect ratio problem. Or picture trying to enjoy a YouTube video, but you can’t see the full image because it’s cropped. That’s another aspect ratio issue.

These problems can be frustrating for both creators and viewers, which is why understanding and correcting aspect ratios is crucial in video production.

Fixing Aspect Ratio Problems in Videos

Fixing aspect ratio problems in videos is like solving a puzzle – it requires the right pieces in the right places. When you encounter stretched or cropped visuals, it’s essential to identify the correct aspect ratio and apply the appropriate correction method.

For stretched videos, you’ll need to “squeeze” or “unsqueeze” the visuals to match the intended aspect ratio. Imagine you’re resizing a photo to its original proportions after it’s been distorted.

For cropped videos, you’ll need to adjust the frame to reveal the missing parts while maintaining the correct aspect ratio. Think of it as expanding a picture to fit a larger frame without stretching it.

Video editing software offers various tools to help you tackle these issues effectively. It’s like having a set of precision tools to fix a broken puzzle piece and make the image whole again.

So, whether you’re a professional videographer or a casual content creator, understanding how to fix aspect ratio problems ensures that your videos look their best and provide an enjoyable viewing experience.

Video Aspect Ratio Troubleshooting

Video aspect ratios can sometimes be like a riddle waiting to be solved. When you encounter issues with aspect ratios, it’s essential to troubleshoot the problem systematically. Consider it similar to diagnosing and solving a technical glitch in a computer.

Start by identifying the specific issue: Is the video stretched, cropped, or displaying black bars? This is akin to identifying the symptoms of a problem.

Next, determine the correct aspect ratio for your project. It’s like knowing the specifications required for a particular software application to run smoothly on your computer.

Once you’ve identified the issue and the correct aspect ratio, choose the appropriate correction method. This is similar to selecting the right troubleshooting steps to resolve a technical issue.

Remember, troubleshooting video aspect ratios is a skill that improves with practice. It’s like becoming more proficient at troubleshooting computer problems – the more you do it, the better you become at solving the puzzle and ensuring that your videos look their best.

Video Codec Explanation

Video Codec Explanation

Video Codec Explanation

Video codecs, or compression-decompression algorithms, are the unsung heroes behind the videos we watch daily. They work like digital magicians, making it possible to store and transmit videos efficiently while preserving image quality. To understand them better, think of video codecs as puzzle masters.

Imagine you have a jigsaw puzzle of a beautiful landscape. However, you need to fit it into a smaller box for storage or mailing. A video codec is like an expert puzzle solver; it disassembles the image into smaller pieces, discards unnecessary ones (compression), and records the steps needed to put it all back together (encoding). When you want to enjoy the landscape again, the video codec reassembles it, like completing the puzzle.

Video codecs come in various types, each with its strengths. Some prioritize smaller file sizes for streaming, while others focus on maintaining pristine quality for high-definition content. Understanding these differences helps you select the right codec for your specific needs.

What Are the Best Video Codecs for Streaming?

When it comes to streaming video content over the internet, the choice of video codec plays a significant role in ensuring a smooth and enjoyable viewing experience. Two popular video codecs for streaming are H.264 and H.265 (also known as HEVC).

H.264, also known as AVC (Advanced Video Coding), has been a long-standing favorite for online streaming platforms. It offers a good balance between video quality and compression efficiency, making it suitable for a wide range of devices and network conditions. It’s like the reliable family car that gets you where you need to go comfortably and without fuss.

On the other hand, H.265, or HEVC (High-Efficiency Video Coding), is like the fuel-efficient hybrid car of the video codec world. It provides superior compression, resulting in smaller file sizes without compromising quality. This makes it an excellent choice for streaming 4K and even 8K video content, where bandwidth is a concern.

As someone deeply immersed in the world of video codecs, I’ve witnessed firsthand how the right codec choice can transform the streaming experience. It’s not just about technicalities; it’s about delivering content that captivates the audience while optimizing resources.

Best Audio Codecs

Best Audio Codecs

Best Audio Codecs
Best Audio Codecs
Best Audio Codecs
Best Audio Codecs

Audio codecs, short for compression-decompression algorithms, are essential tools in the world of digital audio. Think of them as translators that help digital audio files communicate efficiently while conserving storage space and maintaining sound quality. They achieve this by encoding audio data during compression and decoding it during playback.

Imagine you’re packing for a trip, and you want to save space in your suitcase. You decide to use vacuum-sealed bags for your clothes. Similarly, an audio codec compresses audio data into a more compact format for efficient storage or transmission. When you unpack your suitcase at your destination, you release the air from the bags to restore your clothes to their original form—this is akin to an audio codec decoding compressed audio data for playback.

There’s a wide range of audio codecs available, each with its own strengths and weaknesses. Some prioritize small file sizes, making them ideal for streaming, while others emphasize preserving audio quality, a must for audiophiles. Understanding these differences helps you choose the right codec for your specific needs.

What Are Lossless Audio Codecs?

Lossless audio codecs are like the archivists of the audio world. They compress audio data without sacrificing any of the original quality. This is akin to zipping a file on your computer; when you unzip it, you get back an identical copy of the original.

Imagine you have a precious handwritten letter. You want to make a copy for safekeeping, but you don’t want to lose any detail or quality. A lossless audio codec accomplishes this by finding patterns in the audio data and encoding them more efficiently. When you want to listen to the music or sound stored with a lossless codec, it’s like opening the envelope of your preserved letter—you get the same experience as the original.

Lossless audio codecs are favored by audiophiles and professionals who prioritize audio quality over file size. They are ideal for archiving music collections and audio recordings where every nuance matters.

Popular Audio Codecs

When it comes to audio codecs, several popular options are commonly used in various applications. One of the most recognizable is MP3, which revolutionized digital music. MP3, short for MPEG-1 Audio Layer 3, achieves significant compression while maintaining decent audio quality, making it suitable for music streaming and portable devices.

AAC (Advanced Audio Coding) is another well-known codec, commonly used by Apple devices. It offers superior sound quality compared to MP3 at similar bitrates, making it a popular choice for iTunes and other Apple platforms.

For lossless audio, FLAC (Free Lossless Audio Codec) stands out. It’s widely adopted by audiophiles and music enthusiasts for its ability to compress audio without any loss in quality. FLAC files are perfect for preserving high-fidelity audio.

As an expert in audio technology, I can confidently say that understanding audio codecs is crucial for anyone working with digital audio. Whether you’re a music lover, a content creator, or a tech enthusiast, the right knowledge about audio codecs can significantly enhance your experience and the quality of your audio content.


Best Format to Make a Pro Video

Best Format to Make a Pro Video

Best Format to Make a Pro Video


Selecting the right format for creating a professional video is akin to choosing the perfect canvas for a masterpiece. The video format sets the foundation for your project, impacting its quality, compatibility, and overall appeal. Let’s explore the importance of selecting the best format for pro-level video production.

Imagine you’re a skilled photographer preparing to capture a breathtaking landscape. Just as you’d select the ideal lens and camera settings, choosing the right video format is paramount. Different formats offer varying levels of detail, color depth, and compression. For pro-level work, formats like ProRes and DNxHD are often preferred. These formats preserve the highest quality, ensuring your video retains its visual integrity throughout editing and post-production.

Additionally, consider the platform where your video will be showcased. If it’s destined for the big screen, formats like CinemaDNG or REDCODE RAW might be ideal, offering the utmost in cinematic quality. On the other hand, web content or streaming services often favor formats like H.264 or H.265 for efficient online delivery without compromising too much on quality.

Choosing the best format is akin to selecting the right ingredients for a gourmet dish. Each format brings its unique flavor to your video, and your choice should align with your creative vision and the preferences of your audience.

What Are the Key Considerations for Selecting a Video Format?

Selecting a video format is a multifaceted decision, much like choosing the right vehicle for a cross-country road trip. Several key considerations come into play when deciding on the best format for professional video production.

Resolution is a fundamental factor. Higher resolutions, such as 4K or even 8K, offer exceptional detail and clarity, perfect for pro-level work. However, they also require more storage space and processing power. Consider the technical capabilities of your equipment and your post-production workflow when determining the ideal resolution.

Color depth is another critical aspect. Professional formats often support a wide color gamut, allowing for rich, vibrant visuals. This is particularly important if your video involves intricate color grading or if you intend to showcase it on high-quality displays.

Compression plays a vital role in video formats. Some formats use lossless compression, preserving every detail, while others use lossy compression, sacrificing some detail for smaller file sizes. Your choice should align with your storage and bandwidth constraints.

Lastly, compatibility is key. Ensure the format you choose is supported by your editing software, playback devices, and distribution platforms. It’s like selecting a language that your entire team understands to communicate effectively.

In essence, the best video format for professional content hinges on a careful balance of technical specifications, creative goals, and practical considerations.

Importance of Video Format in Professional Video Production

The importance of the video format in professional video production is akin to the foundation of a skyscraper. It’s the bedrock upon which your entire project stands. The format dictates how your video will be captured, edited, and ultimately presented to your audience.

Consider a scenario where you’re shooting a documentary in a remote location. The right video format can make the difference between capturing stunning landscapes with vibrant colors and struggling with subpar footage. Professional formats often provide a broader color gamut, ensuring your visuals are as breathtaking as the real-life scenes.

Additionally, the editing process relies heavily on the chosen format. Pro-level formats like ProRes or DNxHD offer robust support for post-production workflows, allowing for extensive color grading, compositing, and effects. This flexibility is like having a vast palette of colors at your disposal as a painter, enabling you to craft your video with precision.

Furthermore, when it’s time to showcase your work to the world, the video format can affect the viewing experience. A well-chosen format ensures that your audience enjoys your video as intended, whether it’s on a cinema screen, a television, or a mobile device. It’s like presenting a gourmet meal on fine china, elevating the dining experience.

In summary, the video format is the backbone of professional video production, influencing every aspect of your project. It’s essential to select a format that aligns with your creative vision and technical requirements to create a truly exceptional pro-level video.

Optimizing Video Format for Pro-Level Content

Optimizing the video format for pro-level content is a meticulous process, much like crafting a precision instrument. It requires attention to detail and a deep understanding of the technical aspects of video production. Let’s explore the steps involved in optimizing the video format for professional-grade content.

Step 1: Determine the Project’s Requirements

Begin by assessing the specific needs of your project. Consider the target audience, the platform where the video will be showcased, and the technical capabilities of your equipment. Are you creating a cinematic masterpiece for the big screen, or is it web content for online streaming? Understanding these requirements is crucial for format selection.

Step 2: Choose the Right Resolution

Selecting the appropriate resolution is essential. Pro-level content often benefits from higher resolutions, such as 4K or 8K, to capture intricate details. However, remember that higher resolutions require more storage and processing power. Ensure your equipment can handle the chosen resolution without compromising performance.

Step 3: Optimize Color Depth

Professional formats offer a wide color gamut, providing the flexibility for extensive color grading. This is particularly important if your project involves complex color correction or if you’re aiming for cinematic visuals. Choose a format that supports the color depth required for your creative vision.

Step 4: Consider Compression

Compression affects both file size and video quality. Lossless compression preserves every detail but results in larger file sizes, while lossy compression sacrifices some detail for smaller files. Balance your storage and bandwidth constraints with the need for visual quality when selecting the compression method.

Step 5: Ensure Compatibility

Check that your chosen format is compatible with your editing software, playback devices, and distribution platforms. Compatibility issues can lead to workflow disruptions and affect the final presentation of your video.

In essence, optimizing the video format for professional content is a meticulous process that demands a comprehensive understanding of both creative and technical aspects. When done correctly, it ensures that your video meets the highest standards of quality and visual excellence.

In conclusion, choosing the best format for professional video production is a critical decision that impacts the overall quality and appeal of your project. It involves a careful consideration of technical specifications, creative goals, and practical requirements. Opting for the right format is akin to selecting the perfect canvas and brushes for a masterpiece—it sets the stage for your creative vision to shine. As the renowned filmmaker Christopher Nolan once said, “I think IMAX is the best film format that was ever invented.” Just as IMAX is celebrated for its exceptional quality, the choice of video format can elevate your content to new heights of excellence.

Opus vs Webm

Opus vs Webm

Opus vs Webm
Opus vs Webm
Opus vs Webm
Opus vs Webm


Opus and Webm are two popular choices in the world of audio compression and encoding, each with its unique strengths and applications. Comparing Opus to Webm is like comparing two different tools in your toolkit, where each tool serves a specific purpose. Opus is like a precision screwdriver, while Webm is akin to a versatile Swiss army knife. Let’s delve into the distinctions between these two audio technologies.

Opus, known for its exceptional audio quality and low latency, is ideal for real-time applications like voice and video calls. It’s as if you’re having a crystal-clear conversation with someone right next to you, even if they are miles away. On the other hand, Webm, with its broader compatibility and support across various platforms, is like a universal remote control. It ensures that your audio content can be accessed and enjoyed by a wide audience, regardless of their device or software.

Choosing between Opus and Webm depends on your specific needs. If you prioritize high-quality audio and minimal delay, Opus is your go-to choice. Think of it as selecting a professional-grade camera lens for capturing breathtaking, high-definition photos. However, if you require versatility and compatibility across different devices and applications, Webm is like the Swiss army knife of audio formats, offering a wide range of capabilities.

What are the differences between Opus and Webm?

Opus and Webm, while both serving audio compression purposes, have notable differences that set them apart. Understanding these distinctions is akin to recognizing the unique characteristics of two distinct musical instruments. Opus can be compared to a grand piano, known for its rich, nuanced sound, while Webm is more like an electric guitar, versatile and suitable for various genres. Let’s explore these differences.

Opus excels in delivering high-quality audio at lower bitrates, making it an excellent choice for applications where bandwidth efficiency is crucial. It’s as if Opus is a master chef who can create exquisite dishes with minimal ingredients. Webm, on the other hand, is more versatile and compatible across a wide range of devices and platforms. It’s like a universal remote control that works seamlessly with multiple devices, ensuring your audio content reaches a broad audience.

One significant distinction is Opus’s low latency, making it ideal for real-time communication. Imagine having a conversation with someone over a phone call with no noticeable delay—it’s that responsive. Webm, while not as low in latency as Opus, provides solid performance and compatibility across the digital landscape, much like a well-built bridge connecting various destinations.

Opus audio codec

The Opus audio codec is a remarkable piece of technology that has revolutionized the way we transmit and store audio data. Think of it as a finely-tuned musical instrument, capable of producing a wide range of sounds and tones. Opus is renowned for its exceptional audio quality, even at low bitrates, making it a preferred choice for various applications.

One of the standout features of Opus is its ability to adapt to changing network conditions. It’s like a seasoned pilot adjusting the flight path to navigate through turbulent weather. Opus ensures that audio quality remains consistent, even when faced with varying levels of network congestion or packet loss.

Opus is also known for its low latency, which is crucial for real-time applications like online gaming and video conferencing. It’s as if Opus is a lightning-fast relay runner, ensuring that your voice reaches the recipient’s ears with minimal delay. This low latency enhances the natural flow of conversations and interactions, making it a top choice for developers and users alike.

Webm audio format

The Webm audio format is like a versatile toolbox that contains a wide range of tools for audio encoding and compression. It’s designed to be adaptable and compatible across various platforms and devices, catering to the diverse needs of users. Webm ensures that your audio content can be accessed and enjoyed by a broad audience, much like a well-translated book that can be read by people from different language backgrounds.

One of the key advantages of Webm is its open and royalty-free nature, making it a cost-effective choice for developers and content creators. It’s like having access to an open-source software library, where you can freely use and share audio content without worrying about licensing fees or restrictions.

Webm also offers efficient compression, reducing the file size of audio content without compromising quality. It’s as if you have a magician’s hat that can fit an array of items while maintaining its magical appeal. This compression feature is particularly useful for streaming audio online, ensuring smooth playback even with limited bandwidth.

How to choose between Opus and Webm for audio encoding?

Choosing between Opus and Webm for audio encoding is a decision that depends on your specific requirements and priorities. It’s like selecting the right vehicle for a journey—each has its advantages and is suited for different terrains. To make an informed choice, consider the following factors:

  • **Audio Quality:** If your primary concern is delivering high-quality audio with minimal loss, Opus is the preferred choice. It’s like choosing a professional-grade camera for capturing breathtaking photos with unmatched clarity.
  • **Compatibility:** If you need your audio content to be accessible across various platforms and devices, Webm’s versatility shines. It’s like opting for a universal remote control that seamlessly connects to different appliances.
  • **Latency:** For real-time applications where low latency is crucial, Opus is the go-to option. It ensures that audio communication feels natural and responsive, much like a face-to-face conversation.

In the end, the choice between Opus and Webm depends on your specific use case and objectives. Both codecs offer valuable features and have their place in the world of audio encoding, catering to a wide range of needs and preferences.

As the renowned physicist Albert Einstein once said, “The only source of knowledge is experience.” In the realm of audio encoding, it’s through experimentation and hands-on experience that we truly understand the nuances of Opus and Webm, unlocking their full potential to deliver exceptional audio experiences.

Opus vs Webm – A Comparative Analysis

When we delve into the realm of audio encoding, it’s essential to understand the differences between Opus and Webm, as these distinctions play a significant role in determining which codec to choose for specific applications. This comparative analysis will shed light on the key aspects of Opus and Webm, offering valuable insights for decision-making.

  • **Compression Efficiency:** Opus is known for its exceptional compression efficiency, providing high-quality audio at low bitrates. It’s like a chef who can create gourmet dishes with minimal ingredients, ensuring that your audio files remain compact without sacrificing quality. Webm offers efficient compression as well, making it suitable for streaming and online content delivery.
  • **Compatibility:** Webm takes the lead in terms of compatibility, with broader support across various devices and platforms. It’s akin to a versatile tool that fits seamlessly into different scenarios. Opus, while widely supported, may require specific player support in some cases.
  • **Latency:** Opus boasts low latency, making it ideal for real-time applications like VoIP calls and online gaming. It ensures that audio communication remains responsive and natural. Webm, while not as low in latency as Opus, still offers solid performance in this regard.

In conclusion, Opus and Webm are valuable tools in the world of audio encoding, each with its unique strengths. Your choice should align with your specific needs and priorities, whether it’s prioritizing audio quality, compatibility, or low latency. Ultimately, both codecs contribute to enriching the audio experiences we encounter in our digital journeys.

How Does Opus Audio Compression Work?

Understanding how Opus audio compression works involves diving into the technical intricacies of this remarkable codec. Opus utilizes a combination of advanced techniques to achieve its renowned audio quality and compression efficiency. Let’s explore the key components of Opus’s compression process:

  • **Predictive Coding:** Opus employs predictive coding, where it analyzes the audio signal’s characteristics and predicts future samples based on past data. It’s similar to how a weather forecaster uses historical weather patterns to predict upcoming conditions, ensuring accurate forecasts.
  • **Transform Coding:** Opus utilizes transform coding to convert the audio signal into a frequency domain representation. This process is akin to breaking down a complex puzzle into smaller, more manageable pieces, making it easier to reconstruct the original audio later.
  • **Variable Bitrate (VBR):** Opus employs variable bitrate encoding, allocating more bits to complex and critical parts of the audio signal and fewer bits to less critical sections. It’s like a chef adjusting the seasoning in a dish to ensure that every element tastes just right.

These components work harmoniously to deliver Opus’s exceptional audio quality, even at low bitrates. Opus’s ability to adapt to changing network conditions and maintain audio integrity makes it a powerful choice for a wide range of applications, from voice calls to music streaming.

The Evolution of Audio Compression: Opus and Beyond

The journey of audio compression has been a fascinating one, with Opus marking a significant milestone in this evolution. As we explore the world of audio encoding, it’s essential to look beyond Opus and envision the future possibilities. Here’s a glimpse into the ongoing evolution of audio compression:

  • **Next-Generation Codecs:** Researchers and developers continue to push the boundaries of audio compression, aiming to create even more efficient and high-quality codecs. It’s like the constant quest to develop faster and more fuel-efficient vehicles to meet the demands of the modern world.
  • **Immersive Audio:** With the rise of virtual reality and augmented reality, the demand for immersive audio experiences is on the rise. Future audio codecs may focus on delivering 3D spatial audio, creating a sense of presence and immersion for users, similar to the way surround sound systems enhance movie-watching experiences.
  • **Enhanced Accessibility:** The audio industry is increasingly focused on making audio content accessible to individuals with disabilities. Future codecs may prioritize features like enhanced speech recognition and audio description capabilities, ensuring that everyone can enjoy digital audio content.

As we embrace the possibilities of Opus and other audio codecs, it’s exciting to envision the innovations that lie ahead. The evolution of audio compression is a testament to human ingenuity and our relentless pursuit of audio excellence.

“Innovation distinguishes between a leader and a follower.” — Steve Jobs