What is a Frequency Response Curve?


Free Download Mp4Gain
picture

What is a Frequency Response Curve?

Frequency Response Curve


As an audio enthusiast, I have always been intrigued by the concept of frequency response. Understanding how audio equipment responds to different frequencies can help us make informed decisions when selecting audio equipment for our home entertainment systems or professional audio setups. In this article, we will explore what a frequency response curve is, how it is measured, and why it is important.

What is Frequency Response?

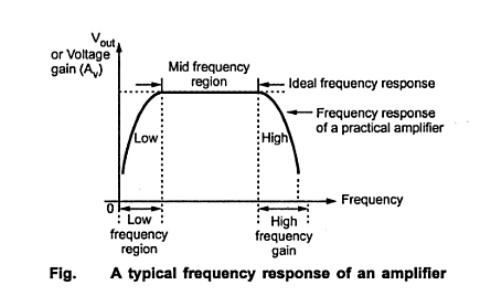
Frequency response refers to how a device responds to different frequencies in the audio spectrum. Every audio system, from speakers to headphones to amplifiers, has a unique frequency response curve that determines how it reproduces audio. The frequency response curve is a graphical representation of the device’s ability to reproduce audio across the frequency spectrum, from the lowest to the highest frequencies.

Understanding frequency response is essential when selecting audio equipment. A device with a flat frequency response curve will produce audio that is faithful to the original recording, while a device with an uneven frequency response curve may color the audio in ways that can be pleasing or unpleasant to the listener.

As the audio engineer and author Bob Katz puts it: “Frequency response is the foundation of all audio. It governs the timbre of sound, the tonal balance of music, the perceived depth and space of a recording, and the fidelity of musical instruments and voices.”

How is Frequency Response Measured?

Frequency response is measured using a test tone generator and a microphone. The test tone generator produces a sine wave at a specific frequency, which is then played through the audio device being tested. The microphone records the output of the device, and the resulting waveform is analyzed to determine the device’s frequency response.

The frequency response curve is typically plotted on a graph, with frequency on the horizontal axis and amplitude on the vertical axis. A flat frequency response curve will show a straight line across the graph, while an uneven frequency response curve will show peaks and dips in the line.

Why is Frequency Response Important?

Frequency response is important because it determines how audio equipment reproduces sound. A device with a flat frequency response curve will reproduce audio faithfully to the original recording, while a device with an uneven frequency response curve may color the audio in ways that can be pleasing or unpleasant to the listener.

Understanding frequency response is especially important when mixing and mastering music. A flat frequency response curve in the monitoring system ensures that the engineer is hearing the audio as accurately as possible. This allows the engineer to make informed decisions about levels, EQ, and other aspects of the mix.

In the words of the mastering engineer and author Bob Ludwig: “A great mix can only be made with a great monitoring system, and that starts with a flat frequency response.”

Final Words

Frequency response is a fundamental concept in the world of audio. Understanding how audio equipment responds to different frequencies can help us make informed decisions when selecting equipment and mixing and mastering music. By measuring the frequency response curve, we can determine a device’s ability to reproduce audio across the frequency spectrum. A flat frequency response curve ensures that the audio is reproduced faithfully to the original recording, while an uneven frequency response curve can color the audio in ways that can be pleasing or unpleasant to the listener.

Audio frequency response, Frequency response testing, Frequency response analysis, Understanding frequency response, Frequency response definition, Frequency response chart, Frequency response curve, Audio equipment, Selecting audio equipment, Mixing and mastering music, Test tone generator, Bob Katz, Bob Ludwig, Monitoring system, EQ, Amplitude, Sine


Free Download Mp4Gain
picture


Mp4Gain Main Window
picture


Mp4Gain Features
picture


Free Download Mp4Gain
picture

How do you choose which frequencies to boost or cut on an equalizer?

How do you choose which frequencies to boost or cut on an equalizer?

How do you choose which frequencies to boost or cut on an equalizer?

Understanding Frequency Bands

When it comes to choosing which frequencies to boost or cut on an equalizer, the first step is to understand the different frequency bands. Equalizers typically have a series of sliders or knobs that allow you to adjust the levels of different frequency bands. The most common frequency bands are bass, midrange, and treble. Bass frequencies are typically between 20Hz and 250Hz, midrange frequencies are between 250Hz and 4kHz, and treble frequencies are between 4kHz and 20kHz. Understanding how these frequency bands affect the sound is key to choosing which frequencies to boost or cut.

Identifying Problem Frequencies

Once you understand the frequency bands, the next step is to identify which frequencies are causing problems in the sound. This can be done by listening carefully to the audio and paying attention to which frequencies are too loud or too quiet. For example, if the bass is too boomy, you may need to cut the low frequencies using the equalizer. If the vocals are too harsh, you may need to cut the midrange frequencies. Identifying the problem frequencies is key to choosing which frequencies to boost or cut.

Making Subtle Adjustments

Once you’ve identified the problem frequencies, it’s time to start making adjustments using the equalizer. The key is to be patient and make subtle adjustments. It’s important to remember that equalization is not a magic fix for all audio problems. In some cases, you may need to address the underlying issue before using the equalizer. As the music producer Quincy Jones once said, “Equalization is like a microscope. You can see everything, but you can also ruin everything.” With that in mind, use the equalizer to make small adjustments to the sound, and listen carefully to the results. Over time, you’ll develop a better understanding of how to choose which frequencies to boost or cut.
Final Words:
In conclusion, choosing which frequencies to boost or cut on an equalizer can be a powerful tool for improving the sound of your music or audio content. By understanding the different frequency bands, identifying the problem frequencies, and making subtle adjustments, you can achieve a more balanced and natural sound. And if you’re looking for a reliable and effective equalizer software, I highly recommend checking out mp4gain. It’s a great solution for normalizing and converting audio and video files, with an integrated equalizer that can help you achieve the perfect sound.


equalizer, frequencies, boost, cut, selection, adjustment, control, manipulation, management, modification, optimization, bass, midrange, treble, sound, problem, loud, quiet, vocals, harsh, subtle, adjustments, microscope, ruin, Quincy Jones, balanced, natural, reliable, effective, software, mp4gain, normalize, convert, files, integrated, solution, perfect, sound.

How do you use an equalizer to fix audio problems?

How do you use an equalizer to fix audio problems?

How do you use an equalizer to fix audio problems?

Understanding Equalizer Settings

When it comes to using an equalizer to fix audio problems, the first step is to understand the different settings. Equalizers typically have a series of sliders or knobs that allow you to adjust the levels of different frequency bands. The most common types of equalizers are graphic equalizers and parametric equalizers. Graphic equalizers are simpler to use, as they display the frequency response of the audio signal in a graphical interface. Parametric equalizers are more complex, but offer more control over the sound. Understanding how to use these settings is key to fixing audio problems.

Identifying Audio Problems

Before you can use an equalizer to fix audio problems, you need to identify what those problems are. Common audio problems include muddiness, harshness, sibilance, and boomy bass. These issues can be caused by a variety of factors, such as poor microphone placement, room acoustics, or low-quality equipment. Once you’ve identified the problem, you can use the equalizer to target the specific frequency bands that are causing the issue. For example, if you’re dealing with boomy bass, you can cut the low frequencies using the equalizer.

Using the Equalizer to Fix Audio Problems

Once you’ve identified the problem and understand the equalizer settings, it’s time to start fixing the audio. The key is to be patient and make subtle adjustments. It’s important to remember that equalization is not a magic fix for all audio problems. In some cases, you may need to address the underlying issue before using the equalizer. As the music producer Rick Rubin once said, “Equalization is a tool, not a crutch.” With that in mind, use the equalizer to make small adjustments to the sound, and listen carefully to the results. Over time, you’ll develop a better understanding of how to use the equalizer to fix audio problems.
Final Words:
In conclusion, using an equalizer to fix audio problems can be a powerful tool for improving the sound of your music or audio content. By understanding the different equalizer settings, identifying the audio problems, and making subtle adjustments, you can achieve a more balanced and natural sound. And if you’re looking for a reliable and effective equalizer software, I highly recommend checking out mp4gain. It’s a great solution for normalizing and converting audio and video files, with an integrated equalizer that can help you achieve the perfect sound.

equalizer, audio, problems, settings, troubleshooting, sound, enhancement, correction, improvement, sliders, knobs, frequency, bands, graphic, parametric, muddiness, harshness, sibilance, boomy bass, microphone, placement, acoustics, equipment, patient, subtle, adjustments, tool, crutch, music, producer, Rick Rubin, balanced, natural, reliable, effective, software, mp4gain, normalize, convert, files, integrated, solution, perfect, sound.

What are the different types of audio equalizers

What are the different types of audio equalizers?

audio equalizers
audio equalizers
audio equalizers
audio equalizers

Graphic Equalizers

I’ve always been a fan of graphic equalizers. They allow you to adjust the levels of different frequency bands, giving you more control over the sound. As the name suggests, graphic equalizers use a graphical interface to display the frequency response of the audio signal. This makes it easy to see which frequencies need to be boosted or cut. In the words of the legendary music producer Quincy Jones, “Equalization is the magic key to good sound.”

Parametric Equalizers

Parametric equalizers are a bit more complex than graphic equalizers, but they offer even more control over the sound. With a parametric equalizer, you can adjust the center frequency, bandwidth, and gain of each individual band. This allows you to target specific problem areas in the frequency spectrum. I’ve found that parametric equalizers are particularly useful for fixing issues with vocals, which can often sound harsh or nasal.

Mastering Equalizers

Mastering equalizers are a special type of equalizer that are used in the final stages of music production. They are designed to make subtle adjustments to the overall sound of a mix, rather than targeting specific problem areas. Mastering equalizers are often used to add warmth, depth, and clarity to a mix. As the mastering engineer Bob Katz once said, “Equalization is the final touch that can make or break a mix.”

Equalizer Presets

Equalizer presets are pre-configured settings that are designed to work well with specific types of music or audio content. For example, you might have a preset for rock music, which boosts the bass and treble frequencies. Or you might have a preset for podcasts, which emphasizes the midrange frequencies. I’ve found that presets can be a great starting point for adjusting the sound, especially if you’re not sure where to begin.

Equalizer Settings

When it comes to equalizer settings, there’s no one-size-fits-all solution. The best settings will depend on the specific audio content you’re working with, as well as your personal preferences. That being said, there are some general guidelines that can help. For example, it’s usually a good idea to cut frequencies that are causing problems, rather than boosting them. And it’s important to be subtle with your adjustments, as too much equalization can lead to a distorted or unnatural sound.
Final Words:
In conclusion, audio equalizers are a powerful tool for shaping the sound of your music or audio content. Whether you’re using a graphic equalizer, a parametric equalizer, or a mastering equalizer, the key is to be patient and experiment with different settings. And if you’re looking for a reliable and effective equalizer software, I highly recommend checking out mp4gain. It’s a great solution for normalizing and converting audio and video files, with an integrated equalizer that can help you achieve the perfect sound.

What is a signal-to-noise ratio in audio?

What is a signal-to-noise ratio in audio?

signal-to-noise ratio audio

Understanding the Basics of Audio Quality

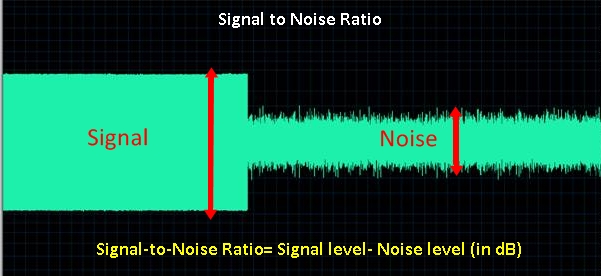
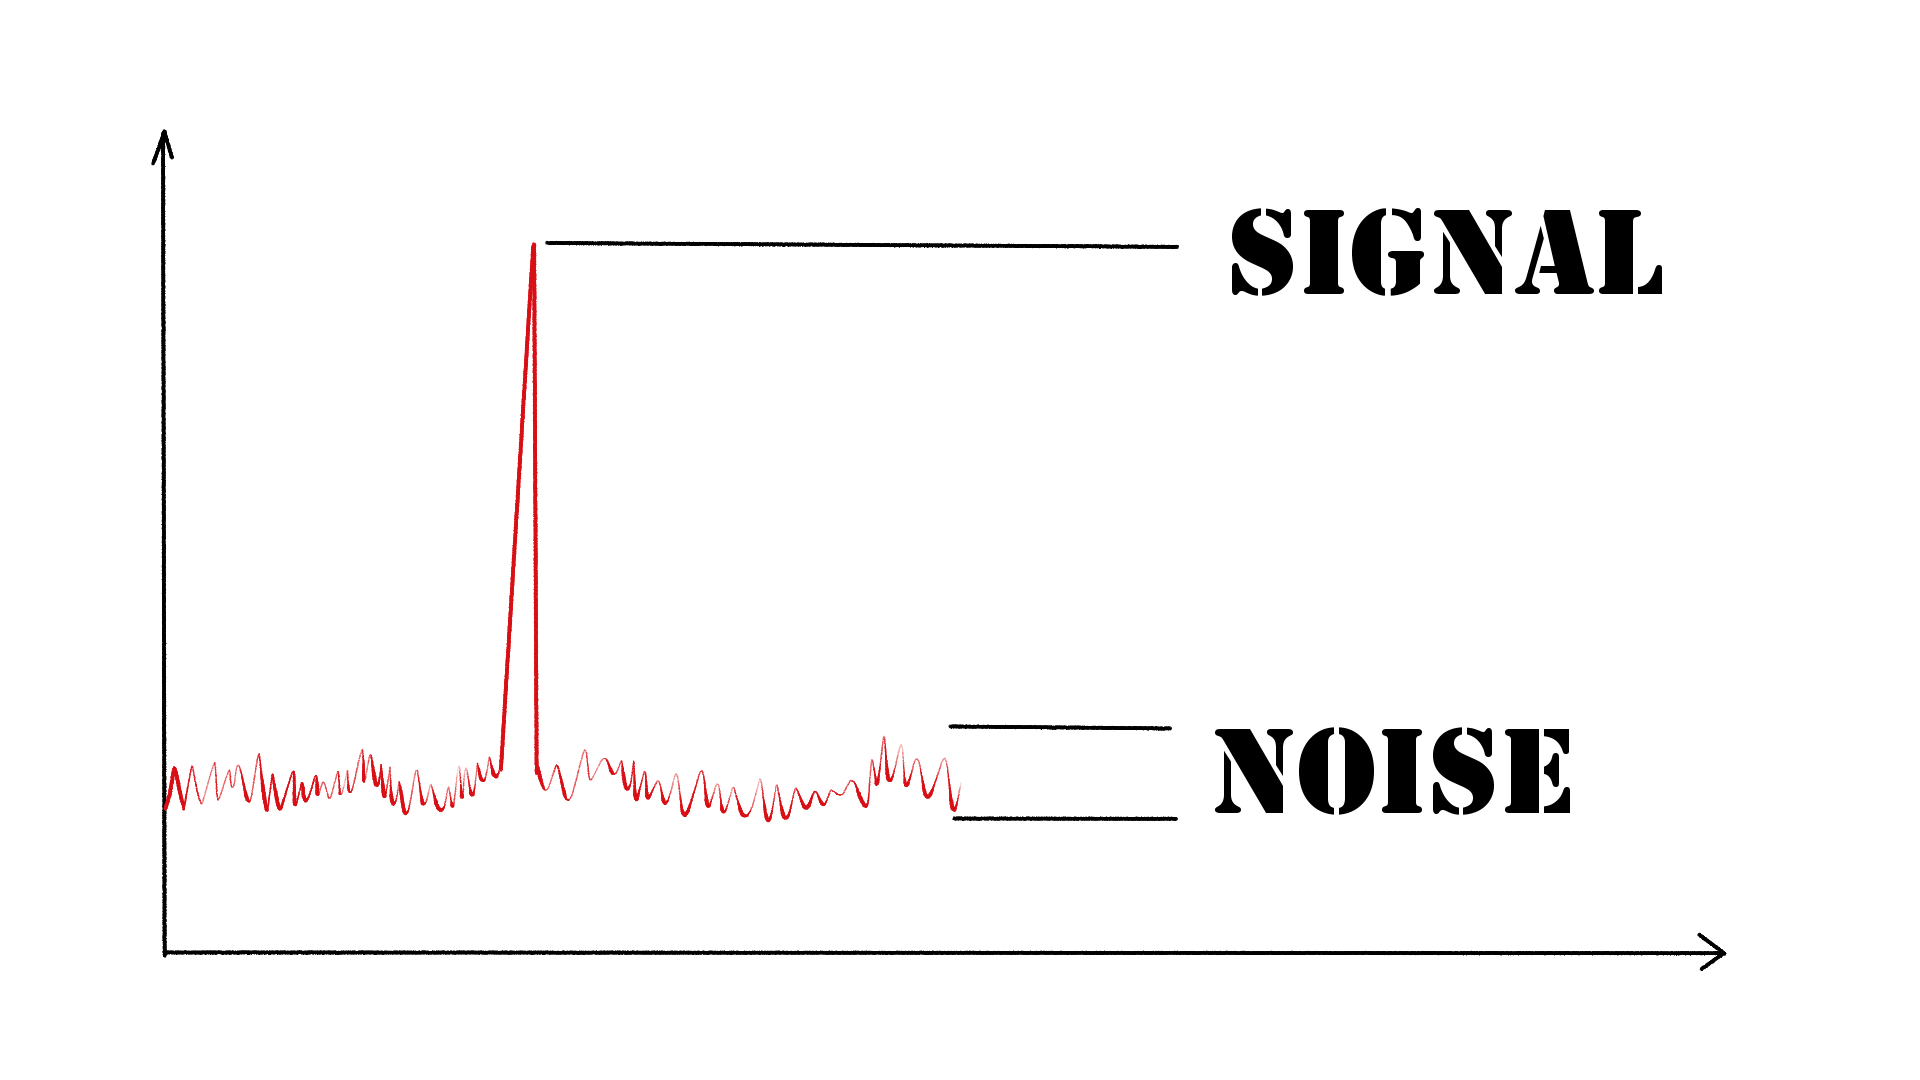
As an audio engineer, I have come across many questions about audio quality, and one of the most common ones is “What is a signal-to-noise ratio in audio?” In simple terms, the signal-to-noise ratio (SNR) is the difference between the desired audio signal and the background noise. A high SNR means that the desired signal is much stronger than the noise, resulting in better audio quality.
When it comes to audio quality, there are many factors to consider, such as audio processing, normalization, compression, dynamics, and distortion. Each of these factors can affect the SNR and, therefore, the overall audio quality. For example, audio normalization can help to increase the SNR by adjusting the volume levels of the audio signal, while audio compression can reduce the dynamic range of the audio signal, resulting in a more consistent SNR.

The Importance of Audio Normalization

As someone who has worked with audio for many years, I can attest to the importance of audio normalization. Normalization is the process of adjusting the volume levels of an audio signal to a standard level, which can help to improve the SNR and overall audio quality.
One of the benefits of audio normalization is that it can help to prevent distortion in the audio signal. When an audio signal is too loud, it can cause distortion, which can be heard as a buzzing or crackling sound. By normalizing the audio signal, you can ensure that it is at a safe and consistent volume level, which can help to prevent distortion and improve the overall audio quality.

The Role of Audio Compression in Audio Quality

Audio compression is another important factor to consider when it comes to audio quality. Compression is the process of reducing the dynamic range of an audio signal, which can help to make it sound more consistent and balanced.
One of the benefits of audio compression is that it can help to improve the SNR by reducing the background noise in the audio signal. However, it is important to use compression carefully, as too much compression can result in a loss of detail and dynamics in the audio signal. As with all aspects of audio engineering, finding the right balance is key to achieving the best possible audio quality.
Final Words:
In conclusion, understanding the basics of audio quality is essential for anyone working with audio. Whether you are an audio engineer, musician, or just someone who enjoys listening to music, knowing about factors such as SNR, normalization, compression, dynamics, and distortion can help you to achieve the best possible audio quality. And if you are looking for a solution to improve your audio quality, consider using mp4gain, a powerful and easy-to-use audio normalizer and converter that can help you to achieve consistent and high-quality audio.

audio quality, signal-to-noise ratio, audio engineering, audio processing, audio normalization, audio compression, audio dynamics, audio distortion, audio editing, audio software, audio plugins, audio effects, audio mixing, audio mastering, audio recording, audio equipment, audio cables, audio interfaces, audio monitors, audio speakers, audio headphones, audio formats, mp3, mp4, wav, flac, aac, ogg, audio bitrate, audio frequency, audio spectrum, audio waveform, audio visualization, audio analysis, audio restoration, audio repair, audio enhancement, audio improvement, audio tips, audio tricks, audio tutorials, audio guides, audio blogs, audio forums, audio community, audio enthusiasts, audio professionals, music production, sound design, sound effects, soundtracks, soundscapes, sound libraries, sound samples, soundfonts, sound packs, sound kits, sound engineering, sound recording, sound mixing, sound mastering, sound equipment, sound cables, sound interfaces, sound monitors, sound speakers, sound headphones, sound formats, sound bitrate, sound frequency, sound spectrum, sound waveform, sound visualization, sound analysis, sound restoration, sound repair, sound enhancement, sound improvement, sound tips, sound tricks, sound tutorials, sound guides, sound blogs, sound forums, sound community, sound enthusiasts, sound professionals.

CBR vs ABR for MP3 Files

CBR vs ABR for MP3 Files

CBR vs ABR
CBR vs ABR
CBR vs ABR
CBR vs ABR


As a music producer and audio engineer, I have spent countless hours working with MP3 files and experimenting with different encoding settings. One of the most important decisions when encoding an MP3 file is whether to use constant bitrate (CBR) or average bitrate (ABR).

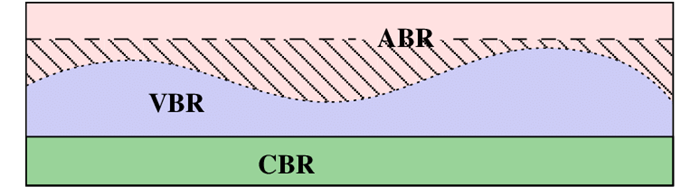
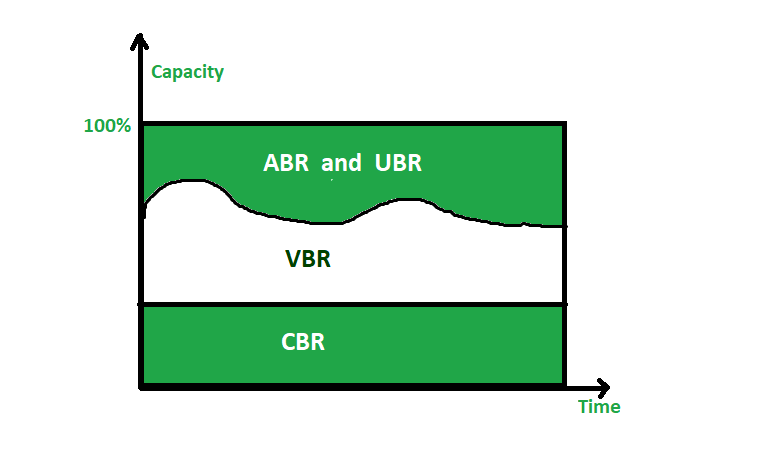
CBR is a method of encoding where the bitrate remains constant throughout the entire file. This means that the file size will be consistent, but the quality may suffer in more complex sections of the audio. ABR, on the other hand, adjusts the bitrate dynamically based on the complexity of the audio, resulting in a more consistent quality throughout the file.

Both CBR and ABR have their advantages and disadvantages, and the choice between the two will depend on the specific context and desired outcome.

Difference Between CBR and ABR

The difference between CBR and ABR for MP3 files lies in the way the bitrate is allocated throughout the file. CBR maintains a constant bitrate, while ABR adjusts the bitrate dynamically based on the complexity of the audio.

As a music producer and audio engineer, I have experimented with both CBR and ABR and have found that the choice between the two will depend on the specific context and desired outcome. CBR may be preferable for files where consistency in file size is important, while ABR may be preferable for files where consistent quality is more important.

Ultimately, the choice between CBR and ABR will depend on the specific needs of the project and the desired outcome.

CBR vs ABR Bitrate

The bitrate is a critical aspect of MP3 encoding, and the choice between CBR and ABR can have a significant impact on the resulting bitrate. CBR maintains a constant bitrate throughout the file, while ABR adjusts the bitrate dynamically based on the complexity of the audio.

As a music producer and audio engineer, I have found that the choice between CBR and ABR bitrate will depend on the specific needs of the project. CBR may be preferable for files where consistency in file size is important, while ABR may be preferable for files where consistent quality is more important.

Ultimately, the choice between CBR and ABR bitrate will depend on the specific context and desired outcome.

CBR vs ABR Quality

The quality of an MP3 file is a critical aspect of audio encoding, and the choice between CBR and ABR can have a significant impact on the resulting quality. CBR maintains a constant bitrate throughout the file, while ABR adjusts the bitrate dynamically based on the complexity of the audio.

As a music producer and audio engineer, I have found that the choice between CBR and ABR quality will depend on the specific needs of the project. CBR may be preferable for files where consistency in file size is important, while ABR may be preferable for files where consistent quality is more important.

Ultimately, the choice between CBR and ABR quality will depend on the specific context and desired outcome.

CBR vs ABR Encoding

The encoding process is a critical aspect of MP3 file creation, and the choice between CBR and ABR can have a significant impact on the resulting file. CBR maintains a constant bitrate throughout the file, while ABR adjusts the bitrate dynamically based on the complexity of the audio.

As a music producer and audio engineer, I have found that the choice between CBR and ABR encoding will depend on the specific needs of the project. CBR may be preferable for files where consistency in file size is important, while ABR may be preferable for files where consistent quality is more important.

Ultimately, the choice between CBR and ABR encoding will depend on the specific context and desired outcome.

Decay Time in Sound

Decay Time in Sound

Decay Time
Decay Time
Decay Time
Decay Time

Decay time is a critical aspect of sound that can greatly affect its quality and character. As a sound engineer and musician, I have spent countless hours tweaking decay times to achieve the perfect sound for a recording or performance.

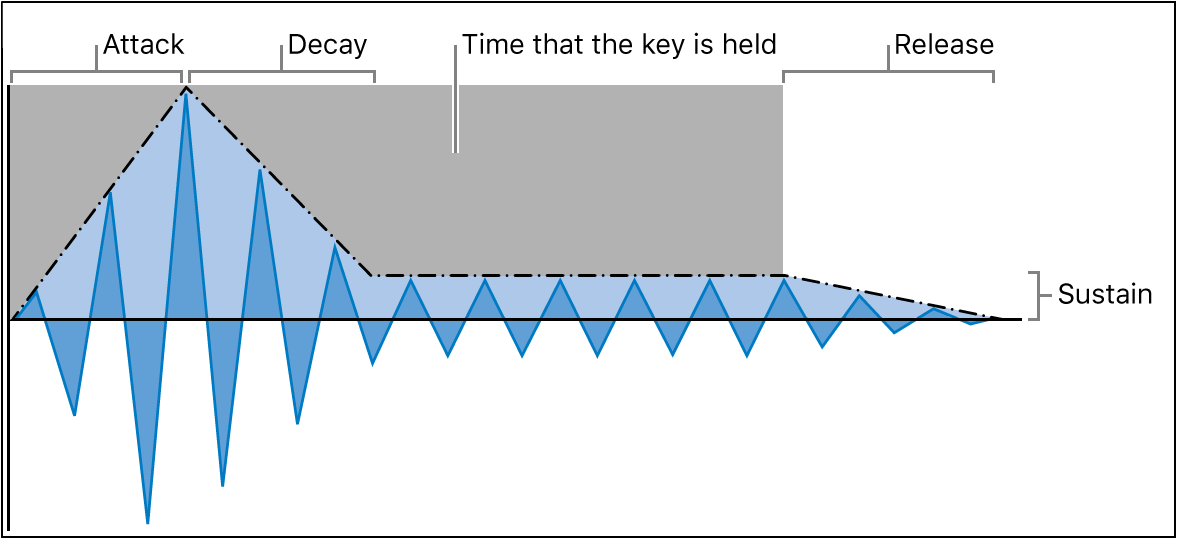
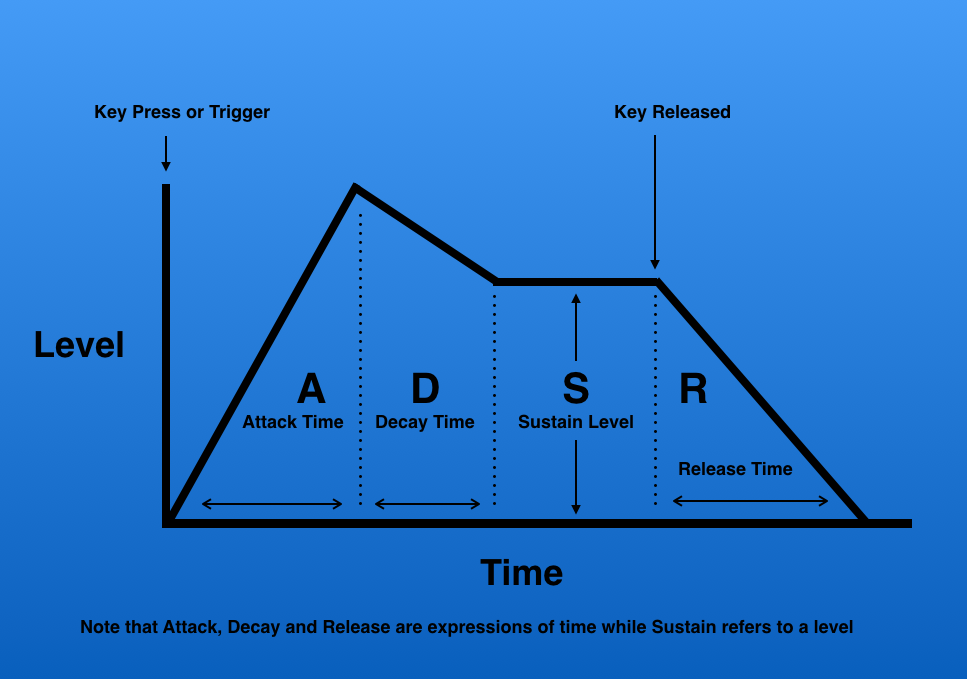
Decay time refers to the amount of time it takes for a sound to fade away after it has been produced. This can be affected by a variety of factors, including the size and shape of the room, the materials used in the construction of the room, and the type of sound source.

As with many aspects of sound, there is no one-size-fits-all approach to decay time. The ideal decay time will depend on the specific context and desired effect, and may require experimentation and adjustment to achieve.

Sound Decay Time

Sound decay time is a measure of how quickly a sound fades away after it has been produced. This can be affected by a variety of factors, including the size and shape of the room, the materials used in the construction of the room, and the type of sound source.

As a musician and sound engineer, I have spent countless hours tweaking decay times to achieve the perfect sound for a recording or performance. Whether it’s adjusting the reverb on a vocal track or fine-tuning the decay time on a snare drum, the right decay time can make all the difference in the final product.

As with many aspects of sound, there is no one-size-fits-all approach to decay time. The ideal decay time will depend on the specific context and desired effect, and may require experimentation and adjustment to achieve.

Effect of Decay Time on Sound

The effect of decay time on sound can be profound, and can greatly affect the quality and character of a recording or performance. A longer decay time can create a sense of spaciousness and depth, while a shorter decay time can create a more focused and intimate sound.

As a sound engineer and musician, I have experimented with a wide range of decay times to achieve different effects. Whether it’s creating a lush, reverberant sound for a ballad or a tight, punchy sound for a rock song, the right decay time can make all the difference.

As with many aspects of sound, the effect of decay time will depend on the specific context and desired effect. Experimentation and adjustment are key to finding the right decay time for a given situation.

Decay Time Definition

Decay time is a measure of how quickly a sound fades away after it has been produced. It is an important aspect of sound that can greatly affect its quality and character.

As a sound engineer and musician, I have spent countless hours tweaking decay times to achieve the perfect sound for a recording or performance. Whether it’s adjusting the reverb on a vocal track or fine-tuning the decay time on a snare drum, the right decay time can make all the difference in the final product.

As with many aspects of sound, there is no one-size-fits-all approach to decay time. The ideal decay time will depend on the specific context and desired effect, and may require experimentation and adjustment to achieve.

Decay Time in Music

Decay time is a critical aspect of music that can greatly affect its quality and character. Whether it’s the decay time of a snare drum or the reverb on a vocal track, the right decay time can make all the difference in the final product.

As a musician and sound engineer, I have spent countless hours tweaking decay times to achieve the perfect sound for a recording or performance. Whether it’s creating a lush, reverberant sound for a ballad or a tight, punchy sound for a rock song, the right decay time can make all the difference.

As with many aspects of sound, there is no one-size-fits-all approach to decay time in music. The ideal decay time will depend on the specific context and desired effect, and may require experimentation and adjustment to achieve.