WebM: everything you need to know about the Google format


What is the WebM?

WebM is a container format (with extension * .webm) for multimedia files, that is, for videos and audio files. In the same container the video codecs VP8 and VP9 are used, as well as the Vorbis and Opus audio codecs. At the Google I / 0 2010 conference, the company announced its plan for WebM to be an alternative to the existing MP4 format with its H.264 codec from the beginning. The consumer can use the latter at no cost when watching a video, but developers who want to work with the codec must pay the license fees. On the contrary, WebM is an open source project with which anyone can work without paying rights for it.

WebM is designed for use with HTML5. The VP8 and VP9 codecs are designed so that in those cases where considerable compression must be carried out, the extraction can still occur with little computing power. The objective of this design is to allow the reproduction of Internet videos on virtually any device (regardless of whether it is a desktop computer, a tablet, a smartphone or a multimedia device such as a Smart TV). It is not surprising that YouTube, being a subsidiary of Google, converts all its videos to the WebM format, regardless of the format of the original file. Despite everything, YouTube still supports H.264 for those who cannot play WebM.

WebM has become a political issue within the Internet community. While Google tries hard to consolidate this audio and video format, other important market players such as Apple or Microsoft cling to formats like MP4. The main reason is, above all, the patent system: both software companies use a group of MPEG-LA patents, since it is responsible for maintaining the patents of the used codecs and charging royalties for them. Google is trying to circumvent these patents with WebM.

This situation has already led to legal problems in the past, the VP8 codec being the point of contention. Several companies have criticized that their codec patent has been ignored. Google would have reached an agreement with MPEG LA, however, Nokia is not part of this patent pool and believes its rights have been ignored. A first lawsuit, in which the company faced its competitor HTC before the courts, whose devices support V8, was dismissed by the Mannheim regional court.

WebM vs. MP4: advantages and disadvantages

While WebM is relatively young, MP4 (MPEG-4 Part 14) and H.264 have been used for many years. Due to its age, this format and the codec have become a standard: you will find few applications that do not support MP4. In addition to Internet services and PC and MAC software, many other devices (such as camcorders) can also use MP4. The high degree of acceptance makes the format interesting for both manufacturers and users.

But Google has been marked somewhat with the open source character of WebM: using the format is no cost to manufacturers, developers or end users. In addition, the software is distributed under an open BSD license.

The fabric behind the MP4 or H.264 license is opaque: most users, even those who create videos in a professional way, do not know if they have a valid license with the purchase of hardware or software or if any video violates The license right. WebM eliminates this confusion. The MPEG LA already announced in 2010 that the use of the H.264 codec would also be free in the future, provided that the videos created were already free for users.

For many users, the performance of both formats is more important than the controversies surrounding their patents: it is for some reason that H.264 has positioned itself as the leader of the codecs in recent years. The quality of MP4 videos of this encoding is generally considered very good. H.265 exceeds it in some aspects. WebM also convinces with the image and audio quality, but VP8 does not reach the level of H.264. To what extent the image quality of VP9 approaches H.265 (also known as HEVC) is a controversial issue; some believe that both are equal, while others say that the quality of VP9 does not reach that of H.264.

Two other determining characteristics when comparing codecs are the file size and the speed of encoding and decoding. Both directly influence the utility: for fast data transmission over the Internet, the size should be kept as small as possible. This is especially relevant in the mobile Internet field. H.264 has a bad reputation for creating, in comparison, large files. At the same time, decoding on the user’s site

What is a codec? Audio and video compression


Check our codecs and containers guide to not confuse you anymore. Learn what formats suit you.

Has it happened to you that you download a video file and then you can’t use it on your player? Or that you finally finish editing your video clip and it takes years to upload to the Internet? You might think it’s a problem with your file. You are not in error, only that the question is more specific: it is the codec and container you are using.

Perhaps they are somewhat strange terms, but they are gaining more and more publicity due to the growing online video and audiovisual production community. So if you plan to start your career as a youtuber, take into account the information, because if you end up with a final video with a weight of 1 GB it will not be fun to wait for it to upload…

In this guide we will explain what each of these elements consists of and how they work. We will talk about both: video and audio.

What is a codec?

Those who are dedicated to video editing know very well that storage space can be a problem. It is better to have the material you record in its original format, but most of the time this implies a considerable amount of GB of space. For example, if you record an hour of content with a high-definition camera you may need … up to 410 GB! This is complicated to keep it, much more if you want to transmit to other media. It is here that the subject gets interesting.

The term codec refers to the process of compression and decompression of video or audio. It is a tool that encodes the video through algorithms and converts it into information. This way you can decrease the file size.

The choice of codec depends on different factors. You should take into account mainly the means of reproduction for the final product. However, coding is not enough for reproduction, it is also necessary to “package” the information to be able to present it. We are talking about containers.

What are those containers?

Suppose you just finished editing a video. The final file contains both images and audio, so you need a way to display it just as you prepared it. This “package” is basically what many refer to when they talk about the format of a file. Then, a container can accept different codecs, while players can use certain containers. For example, the VLC player accepts almost all containers.

Lossless and lossless codecs (lossy and lossless)

There are different types of compression, as we will see later. However, all of them can be divided into two categories: with or without loss. Loss of what? Quality. For example, in the case of audio files, it is not the same to listen to a song in FLAC (Free Lossless Audio Codec) format to one in MP3 (MPEG Audio Layer III). The first is coded in such a way that almost no information is lost at the time of compression, that is, fidelity is maintained.

The same goes for the video. When you want to save storage space, files with loss are compressed, that is, lossy. This makes them much easier to manage. However, it is inevitable to deal with the loss of data and, therefore, fidelity of the image or audio. On the other hand, when you want to maintain the highest possible quality and you have no problem of space, compressors are used without loss or lossless. Again, it all depends on the purpose of your file.

Digital video formats: how to differentiate them

As with text documents, photographs or audios, digital video is available in different formats or extensions.

In this sense, today we find DVD and Blu-Ray, although some of us still keep in an old VHS closet and maybe some Betacam.

But a second meaning or meaning of video formats refers to their encoding, since in digital video, as with a computer program, any file is written in a certain code.

In videos, the code influences image quality, sound quality, whether or not it includes subtitles and, especially, the relationship between quality and file size.

Thus, today we consume digital audiovisual content through physical discs (DVD, Blu-Ray), through streaming and through IPTV (Internet television), but we also handle digital video files, especially for content that we generate ourselves.

Next we will review the most common digital video formats that we can find, what is their origin and what benefits they offer. I apologize in advance for the gibberish of acronyms.

AVI

We start with the most popular format that we will find. Video files with an .AVI extension have their origin in a format that was launched in 1992 and is so popular that most smart TVs, DVD / Blu-Ray players, video game consoles and operating systems play it.

AVI is an acronym for Audio Video Interleave and not many know that it was created by Microsoft as a digital alternative without dependence on a physical format such as the then popular DVD.

Among its advantages, it allows you to include several audio channels and host content generated with different codecs (AC3 or MP3 for audio, DivX or Xvid for video), which can be an advantage but also an inconvenience with which players.

MP4

MP4 or MPEG-4 is one of the most modern formats, launched in 1998 as a standard for playing video and audio in a single digital file.

MPEG stands for Moving Picture Experts Group, the expert group that has established digital audio and video standards and was formed by two international organizations, the ISO (International Organization for Standardization) and the IEC (International Electrotechnical Commission).

In summary, the MPEG and MPEG-2 format were launched in 1993 and 1995 respectively as standards for encoding digital audio and video. To understand each other, any DVD offers its audiovisual content in MPEG-2.

MP4 also supports several audio channels, but has the advantage of allowing more image and sound quality in a less heavy file, as it compresses data better. Apple, for example, opts for this format and derivatives for its iTunes content.

Related to MP4 we can find M4V (video) or M4A (audio).

MKV

The MKV video format is an open format, free to pay rights, and whose full name is Matroska, like traditional Russian dolls.

MKV saw the light at the end of 2002 and has become popular thanks to the fact that within a single MKV file we can store, together with the audio channel, several channels or audio tracks and several subtitle tracks.

Like MP4, it offers very good audio and video quality in a small space. And as a curiosity, the WebM format that allows you to integrate online video via HTML, is inspired by Matroska.

FLV

The FLV or Flash Video format was created by Macromedia, and subsequently acquired by Adobe. This format is usually found as an FLV or SWF extension.

Like the other Flash content, FLV videos are designed for online playback from the browser through Adobe Flash Player.

As we saw in a previous article, Flash will stop developing in 2020, although we still find pages that use it.

MOV

I said before that Apple is currently betting on MP4 (and AAC) to facilitate multimedia content. But its star format for many years was MOV.

MOV, from QuickTime Movie, is also called QuickTime File Format, and today it is still the default format of QuickTime, the macOS video player.

This format can also be found in many digital video cameras, since it offers very good quality

Audio quality: Bitrate in MP3 files

In many cases, the term Bitrate is used, which is the bit rate per second that a multimedia file (Audio or Video) has. Currently the MP3 music format is one of the most widespread (Although there are currently other more current formats such as OGG Vorbis, AAC, Flac, Monkey Audio, …) however the audio quality is variable, this is due to the characteristics with which the MP3 in question has been compressed, including:

Mode: It can be of two types mainly:

Mono: With a single channel (The right and left channel go together, not separated which gives worse audio quality).

Stereo: Two channels (Right and Left, improve audio quality).

Sampling frequency:

Audio CDs use 44,100 Hz (22,050 Hz per channel), although there are higher frequencies such as 48,000 Hz used in DVDs and lower, the higher the frequency, the higher the quality.
Bits: Audio CDs have 16 Bits (Although MP3 can be compressed at a lower quality such as 8 Bits).
Bitrate (Bit Rate per second): Audio CDs have about 1,400 Kbps (44100 Hz * 16 Bits * 2 channels), meaning that an Audio CD would have a bitrate of 1,400 Kbps (In MP3 format the maximum Bitrate is 320 Kbps, however, it is assumed that an MP3 with a 128 Kbps Bitrate has a quality similar to CD, although in many cases to achieve a quality similar to CD it is necessary to use a Bitrate of 192 Kbps, and to obtain CD quality it is necessary use 256 Kbps or 320 Kbps).

Some of the most common Bitrates are:

8 Kbps Mono: Telephone Sound.
16 Kbps Mono: Better quality than shortwave.
32 Kbps Mono: Better quality than AM.
64 Kbps Stereo: Better quality than FM.
112 – 128 Kbps: Quality close to CD.
160 Kbps: Quality closer to CD.
192 Kbps: Virtually CD quality.
256 Kbps: Quality CD practically undisputed from an original CD.
320 Kbps: CD quality.

Coding method: It can be of two types:

VBR (Variable Bit Rate, Bit Rate Variable): Encodes the file in MP3 with a variable Bitrate.
CBR (Constant Bit Rate, Constant Bit Rate): Encodes the MP3 file with a fixed Bitrate.

In addition, another factor that influences the encoding of the MP3 file is the CODEC (Encoder-Decoder) used, one of the most common and the best result is LAME (Lame Ain’t an MP3 Encoder) which is also free.

One point to keep in mind is that if we recompress an MP3 file that originally has a 128 Kbps bitrate and convert them to 192 Kbps for example, audio quality is not really gained because the MP3 format has some quality loss (MP3 is a loss algorithm, also called lossy). which has occurred when converting the original file (Ex: CD Audio or a 320 Kbps MP3 to a 128 Kbps MP3) so this recompression does not make much sense since we will not gain in audio quality (As they say where there is no one can not get) and the only thing we will achieve in any case is to increase the initial size of the file.

The opposite case (Recompress a 320 Kbps MP3 file for example at 192 Kbps) if it makes some sense because in this case although we lose some audio quality we reduce the weight (Kilobytes or Megabytes) of each MP3 file somewhat.


In conclusion, it can be said that if we need to encode / compress an MP3 file with good quality, the “ideal” would be to do so:

To be able to start from an Audio CD, although an MP3 at 320 or 256 Kbps could also be valid for a recompression of the file.
In stereo mode (With two channels, right and left).
With at least 44100 Khz sampling rate and 16 Bits.
With a minimum bitrate of 192 Kbps or at most 256 Kbps (Using 320 Kbps would give higher quality but also increase the file size considerably).
Use the LAME Codec (Lame Ain’t an MP3 Encoder).

What it is and how to perform a volume normalization on your MP3


What it is and how to perform a volume normalization on your MP3

Have you ever heard the term audio normalization, without being sure of what it meant? As a lover of music and technology, I also encountered such a doubt many years ago. Basically, giving a short definition, it is about the standardization of the volume, or rather, of the audio spectrum with respect to other subjects, usually of the same disc.

And that, to put it more simply, is the equalization of the volume of the different tracks on a disc. The reasons are many, and usually if the tracks are extracted from the same job they already have the same volume and gain, but what happens if we want to make a mixtape? For example, we decided to make a compilation called The Best 100 Rock Songs in History. Surely have songs from The Beatles or The Rolling Stones, and therefore from different albums. Depending on the year, type of mastering, etc. etc., we can end up with a CD that contains many different volumes, something that can be annoying when listening. That is just one of the reasons to normalize our MP3 collection.

There are add-ons for players that allow us to normalize on the fly. In fact we can say that programs like Spotify already do this by means of the option to equalize volume of all the songs, however the application that I present below allows us to permanently normalize modifying MP3 files and many other formats, both audio and Of video..

This is Mp4Gain, which stands out for its simplicity of use and is presented under an interface that is ideal to understand exactly what a normalization is and see the before and after. When we open the application we find a window in which we have a grid, which will be populated when we add files or folders, and a keypad with various options.

How do we normalize? Simply change the gain through the specific menu for this.

By pressing OK the application will start working and save our files with the same gain, so it is ideal that before doing the first tests we make a backup. It must also be taken into account that it is an operation that can take time, something that depends on the speed of our processor, the number of issues to normalize and also the size and quality of them.

Audio normalization

Audio normalization

audio normalization

The normalization of the audio level is something that is achieved by applying a constant and maintained amount of gain, in volume, to an audio recording to bring the average peak amplitude to a desired level that has been previously defined. To which the same amount of gain is applied to the entire range, the signal-to-noise ratio generally does not change. Normalization differs from dynamic range compression, which applies different levels of gain to a recording so that the amplitude is within a minimum and maximum range. Standardization is one of the most common functions provided by a digital audio workstation.

Peak normalization

One type of normalization is peak normalization, in which the gain is changed to bring the highest PCM value or the highest peak of an analog signal to a given level.1

Since it only searches for the highest level, it does not take into account the apparent volume of the content. As such, peak normalization is generally used to change the volume in such a way as to ensure optimum use of the distribution medium in the mastering stage of a recording. loudness normalization.

Normalization of loudness

Another type of normalization is based on a loudness measure, in which the gain is changed to bring the average amplitude to an objective level. This average may be a simple measurement of average power, such as the RMS value, or it may be a measure of the loudness perceived by humans, such as that offered by ReplayGain.

Depending on the dynamic range of the content and the target level, the normalization of the loudness can lead to peaks that exceed the limits of the recording medium. Some software has the option of using dynamic range compression to avoid saturation when this happens. In this situation, the signal-to-noise ratio is altered.

volume booster

Modern Audio Normalization

Currently Mp4Gain uses an audio normalizationn that is more similar to that used in modern recording studios or live music group recitals.

It is a normalization of volume focused from a new perspective.

Under this new paradigm, not only does it achieve that all songs have the gain of loudness at the best possible level, but it also achieves that each instrument and / or voice obtains a level of gain that makes it audible. Achieve an optimized level of volume gain normalization.

There is no other normalizer in the market that obtains this level of result. People with training in hearing listening can easily notice the difference., very similar to that obtained with expensive hardware in radio stations or in recording studios or in recital consoles, combining limiters, modern compressors and other processors.
All these results that offer expensive hardware equipment, Mp4Gain does for a few dollars.

In fact, the opposite result is achieved than that achieved with masking, because with masking, which is a method used to compress music, you can no longer perceive some sounds that are behind a more audible sound, that is what is called masking, which leads to the loss of audio quality.

Mp4Gain manages to highlight hidden instruments and sounds, performing an audio normalization by frequency bands to achieve this.

That is why we say that Mp4Gain achieves the same results as those obtained through a series of hardware equipment (limiters, compressors, normalizers, etc.) that are very expensive, while Mp4Gain costs only a few dollars.

Digital Audio – Beginners guide

The Cost of a High Sampling Rate

Although it is true that high sampling rates produce better sound quality … that comes at a price.

That price translates into:

Higher processing load.
Less number of tracks.
Heavier audio files.
So you always give something in return. Professional studies can support higher sampling rates because they use better equipment.

But for most home studios, people often find that the standard 48 kHz configuration is the best.

Following…

4. Bit Depth

In order to understand what bit depth is, we first have to know what bits are.

A bit (or binary digit) is a single unit of binary code, with a value of 1 or 0.

The more bits, the more possible combinations. For example…

As you can see in the diagram below, 4 bits allow a total of 16 combinations.

4 bits

When used to encode information, each of these numbers is assigned a specific value.

As the number of bits increases, the possible values ​​grow exponentially.

4 Bits = 16 possible values
8 Bits = 256 possible values
16 Bits = 16,536 possible values
24 Bits = 16,777,215 possible values
With the bit depth in the digital audio, each value is assigned a specific amplitude of the waveform.

The greater the bit depth, the greater the volume increase between high and low … and a greater dynamic range in the recording.

A good rule of thumb is: for every extra bit, the dynamic range increases by 6dB.

For example:

4 Bits = 24 dB
8 Bits = 48 dB
16 Bits = 96 dB
24 Bits = 144 dB
In the end, what this means is that… the greater the bit depth, the less noise.

Because by adding more processing margin (or headroom), the useful signal (at the high end of the spectrum) can be recorded higher above the background noise (at the low end of the spectrum).

small vs large bit depths

Following…

5. Quantization Noise

Impressive that a 24-bit recording can result in almost 17 million possible values, right?

However, that remains much less than the infinite number of possible values ​​that exist in an analog signal.

Therefore, in almost all samples, the actual value is somewhere between two possible values. The solution of the converter is simply to round it or “quantify” it to the nearest value.

The resulting distortion, known as quantization noise, takes place in 2 phases of the recording process:

at the beginning, during the A / D conversion, and
at the end, during mastering
With mastering, the sampling frequency / bit depth of the final track is usually reduced by converting to the final digital format (CD, mp3, etc.).

When that happens, some of the information is erased and “re-quantized”, generating more distortion in the sound.

The most frequent solution to deal with this problem is …

6. Dither

When reducing a 24-bit file to 16 bits, the screen is used to mask much of the resulting distortion …

Adding a low level of “random noise” to the audio signal.

As it can be difficult to visualize the concept in audio, to explain it, we usually turn to the popular analogy of the screen plot.

Is that how it works:

When a color photo is converted to black and white, a mathematical estimate is made to determine if each color pixel should be “quantized” in a black pixel, or a white one …

As is the case when digital audio samples are quantized.

As you can see in this picture, the “before” photo is pretty bad, right?

dither

But with the plot …

a small number of white pixels are randomly distributed in black parts, and …
a small number of black pixels are randomly distributed in white parts …
By adding that “random noise” to the image, the “after” photo looks much better. Well, the screen in the audio works very similarly.

Following…

7. Latency

The GREAT PROBLEM of current digital studies is the amount of latency that accumulates in the signal chain, especially with DAWs.

With all the calculations that are processed, the audio signal takes time to leave the system between a few milliseconds and a few DOCENAS of milliseconds.

Between 0-11 ms of latency – it is short enough, so a normal person does not notice it.
Between 11-22 ms – an annoying delay is heard which it is difficult to get used to.
More than 22 ms – there is so much delay that it is impossible to play or sing at tempo with the track.
In a normal digital signal chain there are usually 4 phases that contribute to the total latency:

A / D conversion
DAW Buffer
Delay of the Plugins
A / D conversion
The A / D and D / A conversion are the least harmful, contributing to total latency with less than 5 ms.

But nevertheless…

The DAW buffer and certain plugins (including compressors and virtual instruments) can add up to 20, 30 or 40 ms or

Beginner’s Guide to Digital Audio for Recording Music

62c-digital audio When recording at home began to become popular …

It happened for a simple reason:

The analog equipment of the past decades was being slowly but inexorably replaced …

For a new generation of audio interfaces and other digital equipment that was cheaper and easier to use.

And that trend has continued since then.

Today … digital audio is the standard in almost all studios, both professional and amateur.

However, surprisingly, there are few people who really understand what it is about.

So let’s see what it is about:

1. The Rise of the Digital Age

binary code Although digital audio is the standard in today’s music …

It has not always been that way.

Originally, music information only existed as sound waves in the air.

Then, as technology progressed, people discovered new ways to convert that information to other formats, including:

notes on a page
electrical signals inside a cable
radio waves in the atmosphere
relief on vinyl records
But in the end, with the rise of computers, digital audio ended up being the dominant format in the music production industry, since it allowed copying and transporting songs in a simple and free way.

And the device that made all that possible was … the digital converter.

Let’s see how they work …

2. Digital Converters

In recording studios there are 2 types of digital converters:

Those that are an independent device, which are normally seen in more advanced studies, or …
Those that are integrated into the audio interfaces, which are usually seen in home studios.
To convert the audio to binary code, they take tens of thousands of samples (samples) per second to make an “approximate” image of the analog waveform.

The image is not accurate because in the intervals between samples, the converter basically has to guess what is happening.

Digital waveform

As you can see in the diagram, in which:

the red line is the analog signal, and …
the black line is the conversion …
The results are not perfect, but they are good enough to generate excellent sound quality.

How excellent? That depends largely on …

3. Sample Rate

Check out this image:

sample rate diagram

As you can see…

When taking more samples per second, the highest sampling rate:

Collect more real information,
Go less to the estimate, and
It generates a much more accurate image of the analog signal.
Logically, the end result is … better sound quality.

Let’s talk about specific data:

Normal sampling frequencies in professional audio range around:

44.1 kHz (audio CD)
48 kHz
88.2 kHz
96 kHz
192 kHz
The minimum of 44.1kHz is due to a mathematical principle known as …

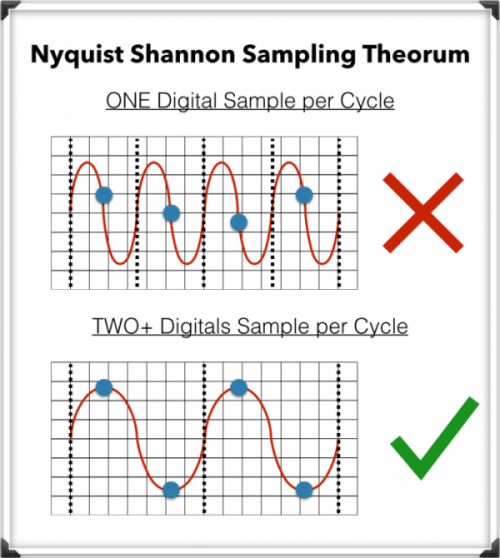
The Nyquist-Shannon Sampling Theorem

To record digital audio accurately, converters have to capture the entire human listening spectrum, which is between 20Hz – 20kHz.

According to the Nyquist-Shannon Sampling Theorem …

To capture a specific frequency, at least 2 samples are needed for each cycle … to measure both the upper and lower points of the sound wave.

That means that recording frequencies of up to 20kHz require a sampling rate of 40kHz or more, which explains why the audio CDs are just above that minimum, at 44.1kHz.

What is an audio compressor.

In the field of professional sound, a compressor is an electronic sound processor designed to reduce the dynamic range of the signal without noticing its presence too much. This task is done by reducing the system gain, when the signal exceeds a certain threshold.

Traditionally, compressors have been electronic equipment with one or two rack units, but software versions of them have appeared for some years.

A compressor acts in such a way that it attenuates the electrical signal by a certain amount (normally measured in decibels) and from a certain input level. The objective is to ensure that the resulting dynamic excursion is lower than the original, to protect certain equipment against possible signal peaks or, if it is a saturated sound, to try to hide the error.

Reasons to compress a signal

-Control the energy of the signal: The human ear is very sensitive, so the compression must be smooth and subtle so as not to capture it. This type of compression is used when there is a signal in which the intensity varies, so it is compressed to achieve a more constant signal within the values ​​assigned to it.

-Control the peak level of the signal: Often the equipment is limited, so the amplifiers can saturate and therefore be damaged. In this case the compression is used to control the signal and thus protect the equipment.

-Reduce the dynamic range of the signal: By attenuating the peaks of a signal, we reduce its dynamic range. Many devices are limited by the peaks, and this allows the RMS level of the signal to be raised.

Compressor Uses

In the field of music, its use ranges from applications for musical recordings to live sound. For example, it is often used to add more glued to the sound, an effect that is achieved by compressing the signal to subsequently apply a gain to the output of the device, which usually conceals possible interpretation failures by the artist, at least as Dynamic control refers. A compressor is highly recommended (and with certain musical styles, indispensable) for when using an electric bass. The slapping effect (hitting the strings with the finger) produces extremely high output peaks (20 dB or 10 times more than normal), which at low output levels generate distortion, and at high volumes (as in recitals) they can cause serious damage to the amplifier, and even the speaker (an excess of “excursion” can cause the speaker to tear from its suspension). Even in the (theoretical) case of a musical system with an infinite dynamic range, the difference, auditory speaking, using or not the compressor is imperceptible. Its use is also very frequent in voices, since not all singers use the appropriate technique so the signal level varies constantly.

-It is widely used in broadcasting, to improve the speaker’s diction.
-Compress during mastering improves the sound definition of the final mix.
-To protect the equipment (speakers).