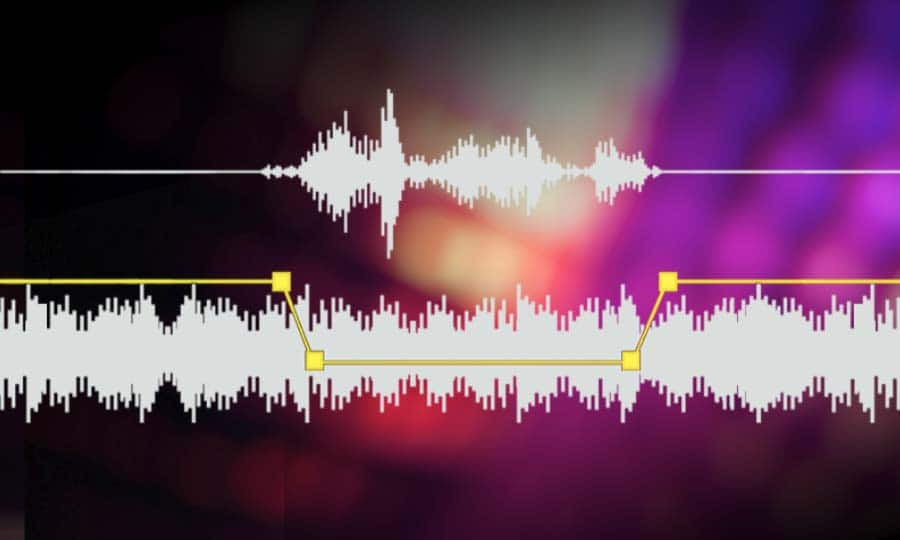
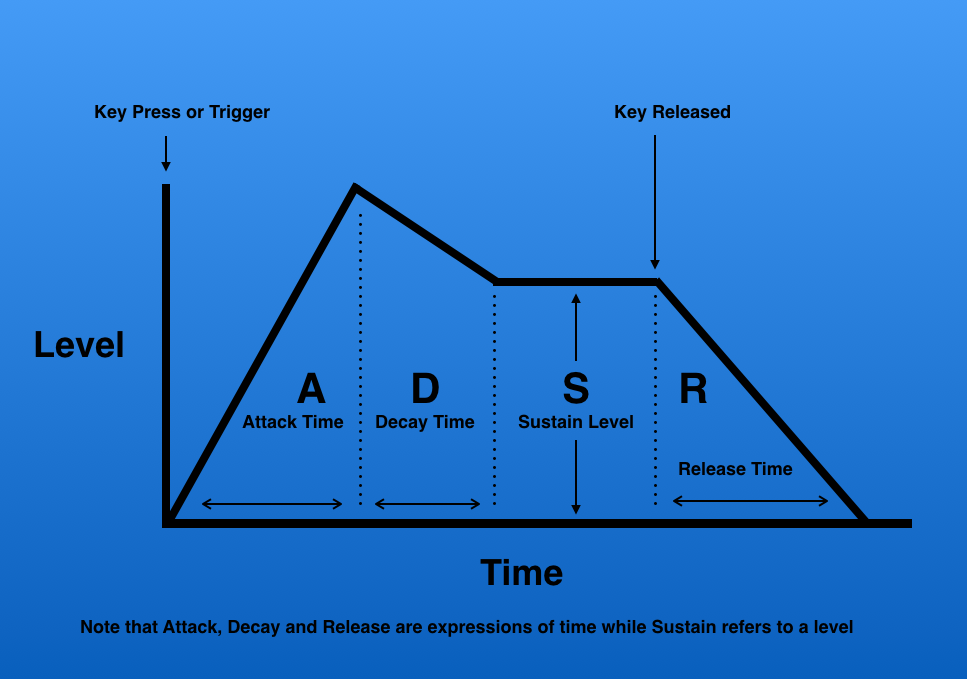
Audio ducking is a technique commonly used in digital audio to automatically reduce the volume of one audio track when another track starts playing. This technique is often used in video editing, where the voiceover track needs to be heard clearly while the background music or sound effects are playing.
How does audio ducking work?
Audio ducking works by using a compressor or an audio effect that automatically reduces the volume of one audio track when another track starts playing. The compressor detects the level of the “trigger” track (usually the voiceover track) and automatically lowers the volume of the “ducked” track (usually the music or sound effects track) to create a more balanced and clear sound.
One common way to set up audio ducking is to use sidechain compression, which allows you to use one track to “trigger” the compression on another track. This can be a powerful technique for creating a more dynamic and engaging audio mix.
Audio ducking in video editing
Audio ducking is often used in video editing to ensure that the voiceover track is heard clearly while the background music or sound effects are playing. By using audio ducking, you can create a more professional and polished sound for your videos.
One tip for using audio ducking in video editing is to adjust the timing and threshold settings to get the right balance between the voiceover and background audio. You may also want to experiment with different types of compression and other audio effects to achieve the desired sound.
As the famous director Alfred Hitchcock once said, “The length of a film should be directly related to the endurance of the human bladder.” This is where audio ducking can be a lifesaver, as it allows you to create a more engaging and immersive audio experience without overwhelming your audience with too much sound at once.
Best audio ducking plugins
There are many different audio ducking plugins available for digital audio workstations (DAWs) and video editing software. Some of the most popular plugins include:
Waves Vocal Rider
Sonnox Oxford Dynamic EQ
FabFilter Pro-DS
iZotope Neutron 3
Sound Radix Auto-Align
Each of these plugins offers unique features and capabilities for achieving the perfect audio ducking effect. Whether you’re a professional sound designer or a beginner video editor, there’s a plugin out there that can help you create the perfect audio mix.
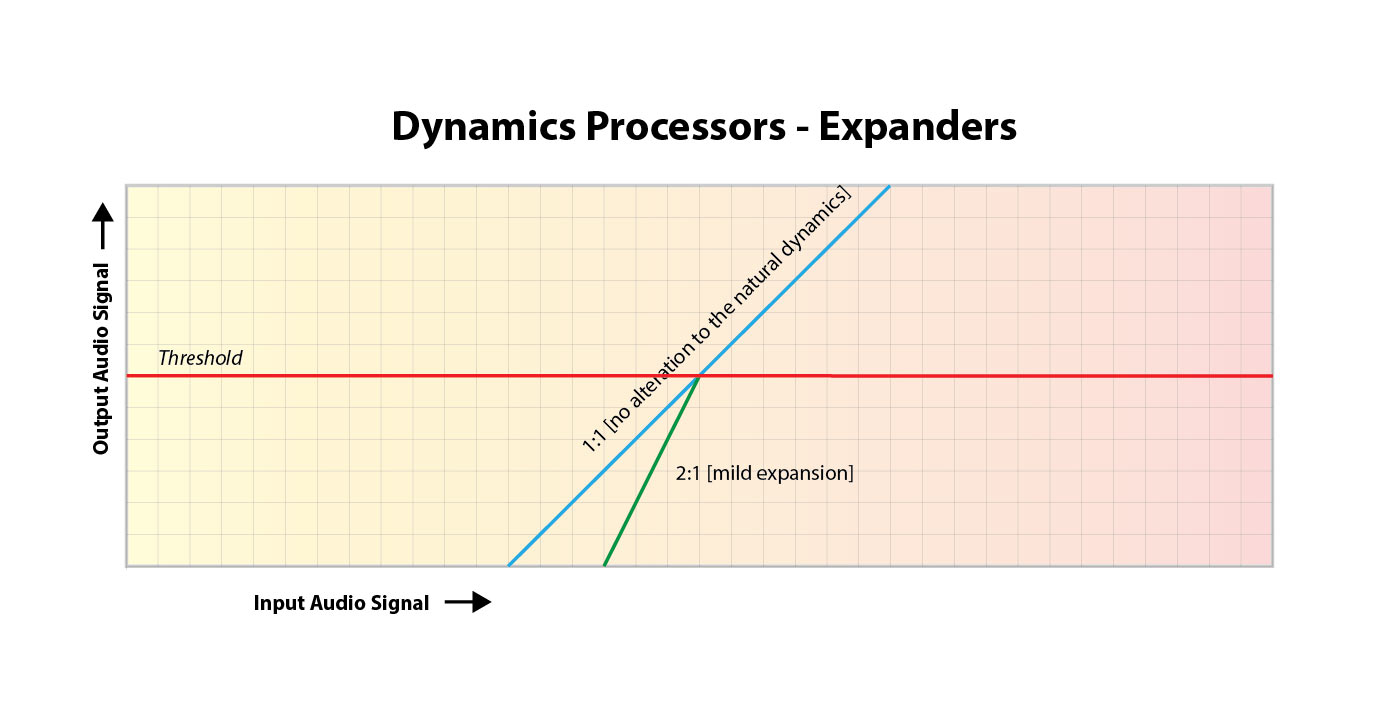
As a music producer, understanding the concept of audio expansion is crucial to achieving the desired sound quality in your productions. Audio expansion, also known as upward expansion, is a dynamic audio processing technique that increases the gain of a signal when it is below a certain threshold level. This technique is used to increase the dynamic range of a signal by amplifying only the quieter parts, resulting in a more natural and transparent sound.
To put it simply, audio expansion is like a reverse compressor. While a compressor reduces the dynamic range of a signal by reducing the gain of louder parts, an expander increases the dynamic range by amplifying quieter parts. According to Roey Izhaki in “Mixing Audio,” “expansion is a powerful tool that can significantly enhance a mix, giving it a lively and open sound.”
How to Use Audio Expansion in Your Music Production
To use audio expansion effectively, you first need to set the threshold level. The threshold is the level at which the expander starts to increase the gain. The higher the threshold, the less effect the expander will have. You also need to set the ratio, which determines the amount of gain increase when the signal falls below the threshold level. The ratio is expressed in decibels and can range from 1.5:1 to 10:1 or higher.
One important thing to keep in mind is that audio expansion should be used sparingly. Overuse can result in an unnatural and exaggerated sound. It is recommended to use a gentle ratio and adjust the threshold level to suit the dynamics of the source material.
The Benefits of Audio Expansion in Music Production
Using audio expansion in your music production can result in a more natural and transparent sound. It can also help to improve the overall dynamic range of your mix, making it sound more open and spacious. By selectively amplifying the quieter parts of a signal, you can bring out subtle details and nuances that may have been masked by louder elements.
As an audio engineer, I have found that audio expansion can be particularly useful when working with vocals or acoustic instruments. By gently expanding the dynamics, you can help to preserve the natural character of the performance and avoid the artificial sound that can result from heavy compression.
In the words of Roey Izhaki, “expansion can be a great tool to help you achieve your sonic goals.” With careful use and experimentation, audio expansion can be a powerful technique to enhance your music production.
Final Words:
In conclusion, understanding audio expansion is an important skill for any music producer. By using this dynamic processing technique, you can improve the sound quality and dynamic range of your productions. Remember to use audio expansion sparingly and experiment with different settings to find the best results for your mix.
As someone who has been working with digital audio for years, I can tell you that audio expansion is a concept that often gets overlooked, but it’s incredibly important to understand. In simple terms, audio expansion is the process of increasing the dynamic range of a digital audio signal. It involves adjusting the volume of quieter sounds so that they can be heard more easily, while keeping louder sounds at the same level. This results in a more natural and pleasing sound that is easier to listen to for long periods of time.
One great way to understand audio expansion is to think about it in terms of a movie soundtrack. Have you ever been watching a movie, and the dialogue is so quiet that you have to turn up the volume, but then the action scenes are so loud that you have to turn it down again? Audio expansion helps to balance out these differences, so that you can hear everything clearly without constantly adjusting the volume.
Expanding Digital Audio
So how does audio expansion work in the world of digital audio? The process involves applying gain to the quieter parts of the audio signal, while leaving the louder parts untouched. This can be done using specialized hardware or software, and there are many different algorithms that can be used to achieve the desired effect.
One thing to keep in mind is that audio expansion is not the same thing as compression. Compression is the process of reducing the dynamic range of a signal, while expansion is the process of increasing it. While they are both useful tools in the world of audio engineering, it’s important to understand the differences between them in order to use them effectively.
Understanding Audio Dynamics
At its core, audio expansion is all about dynamics. Dynamic range refers to the difference between the loudest and quietest parts of a signal. By expanding the dynamic range of a signal, you are making it easier to hear all of the different elements in the mix. This can be particularly useful in situations where the listener may be in a noisy environment, such as a car or a busy office.
As the legendary producer Quincy Jones once said, “The sound of music is the sound of emotions.” By understanding how audio expansion can help to enhance the emotional impact of a piece of music or a film soundtrack, you can take your work as an audio engineer to the next level.
Dynamic Range in Digital Audio
One of the challenges of working with digital audio is that it can be very easy to lose dynamic range during the recording and mixing process. This is because digital audio has a limited amount of headroom, which means that there is only so much room for the loudest sounds before they start to clip or distort.
Audio expansion can be a powerful tool for restoring some of that lost dynamic range. By carefully adjusting the gain of different parts of the signal, you can bring out subtle nuances in the mix that might otherwise be lost.
Audio Expansion in Depth
There is a lot more to audio expansion than we can cover in just a few paragraphs. If you’re interested in learning more about this important topic, I highly recommend checking out some of the excellent books and articles that have been written on the subject. One of my personal favorites is “Mixing Audio” by Roey Izhaki, which covers audio expansion in depth and provides a wealth of practical advice for audio engineers of all levels.
Expanding audio is a complex and multifaceted process that requires a deep understanding of sound engineering principles. One of the key challenges of audio expansion is managing the dynamic range of a recording. In order to prevent clipping and distortion, engineers must carefully adjust the volume levels of individual tracks and ensure that no single element is too loud or too quiet. Compression and limiting are often used to control the dynamic range of a mix, while expansion can be used to bring out the quieter parts of a recording and enhance its overall presence.
Another important aspect of audio expansion is the use of effects. Effects like reverb, delay, and chorus can add depth and dimension to a mix, while EQ can be used to shape the tone and balance of individual tracks. However, it’s important to use effects sparingly and purposefully, as too much processing can result in a muddy or cluttered sound.
Ultimately, the key to successful audio expansion is a deep understanding of sound engineering principles and a commitment to experimentation and creativity. Whether you’re a seasoned pro or a beginner, there’s always something new to learn and explore in the world of audio production.
Conclusion
In conclusion, audio expansion is a vital component of modern audio production that allows engineers to create rich, dynamic recordings that capture the full range of a musical performance. By carefully managing the dynamic range of a mix, using effects judiciously, and experimenting with different processing techniques, audio engineers can create recordings that sound great on a wide range of playback systems and capture the true essence of a musical performance. So if you’re interested in taking your audio production skills to the next level, be sure to explore the world of audio expansion and see what kind of creative possibilities await you.
Final Words
In the end, audio expansion is a fundamental part of modern audio production that can help you create recordings that truly stand out. By understanding the principles of dynamic range management, using effects creatively, and experimenting with different processing techniques, you can take your recordings to the next level and capture the full essence of a musical performance. And if you’re looking for a powerful tool to help you achieve your audio expansion goals, be sure to check out MP4Gain, the ultimate audio normalization and conversion software for Windows. With its intuitive interface, advanced processing algorithms, and wide range of supported formats, MP4Gain is the perfect tool for any audio production enthusiast looking to take their recordings to the next level.
As a music producer and audio engineer, I’ve encountered my fair share of challenging vocal recordings. One common issue is sibilance, which occurs when the “s” and “sh” sounds are overly pronounced, causing harsh and piercing frequencies in the mix. This is where a de-esser comes in handy.
De-Esser Plugin
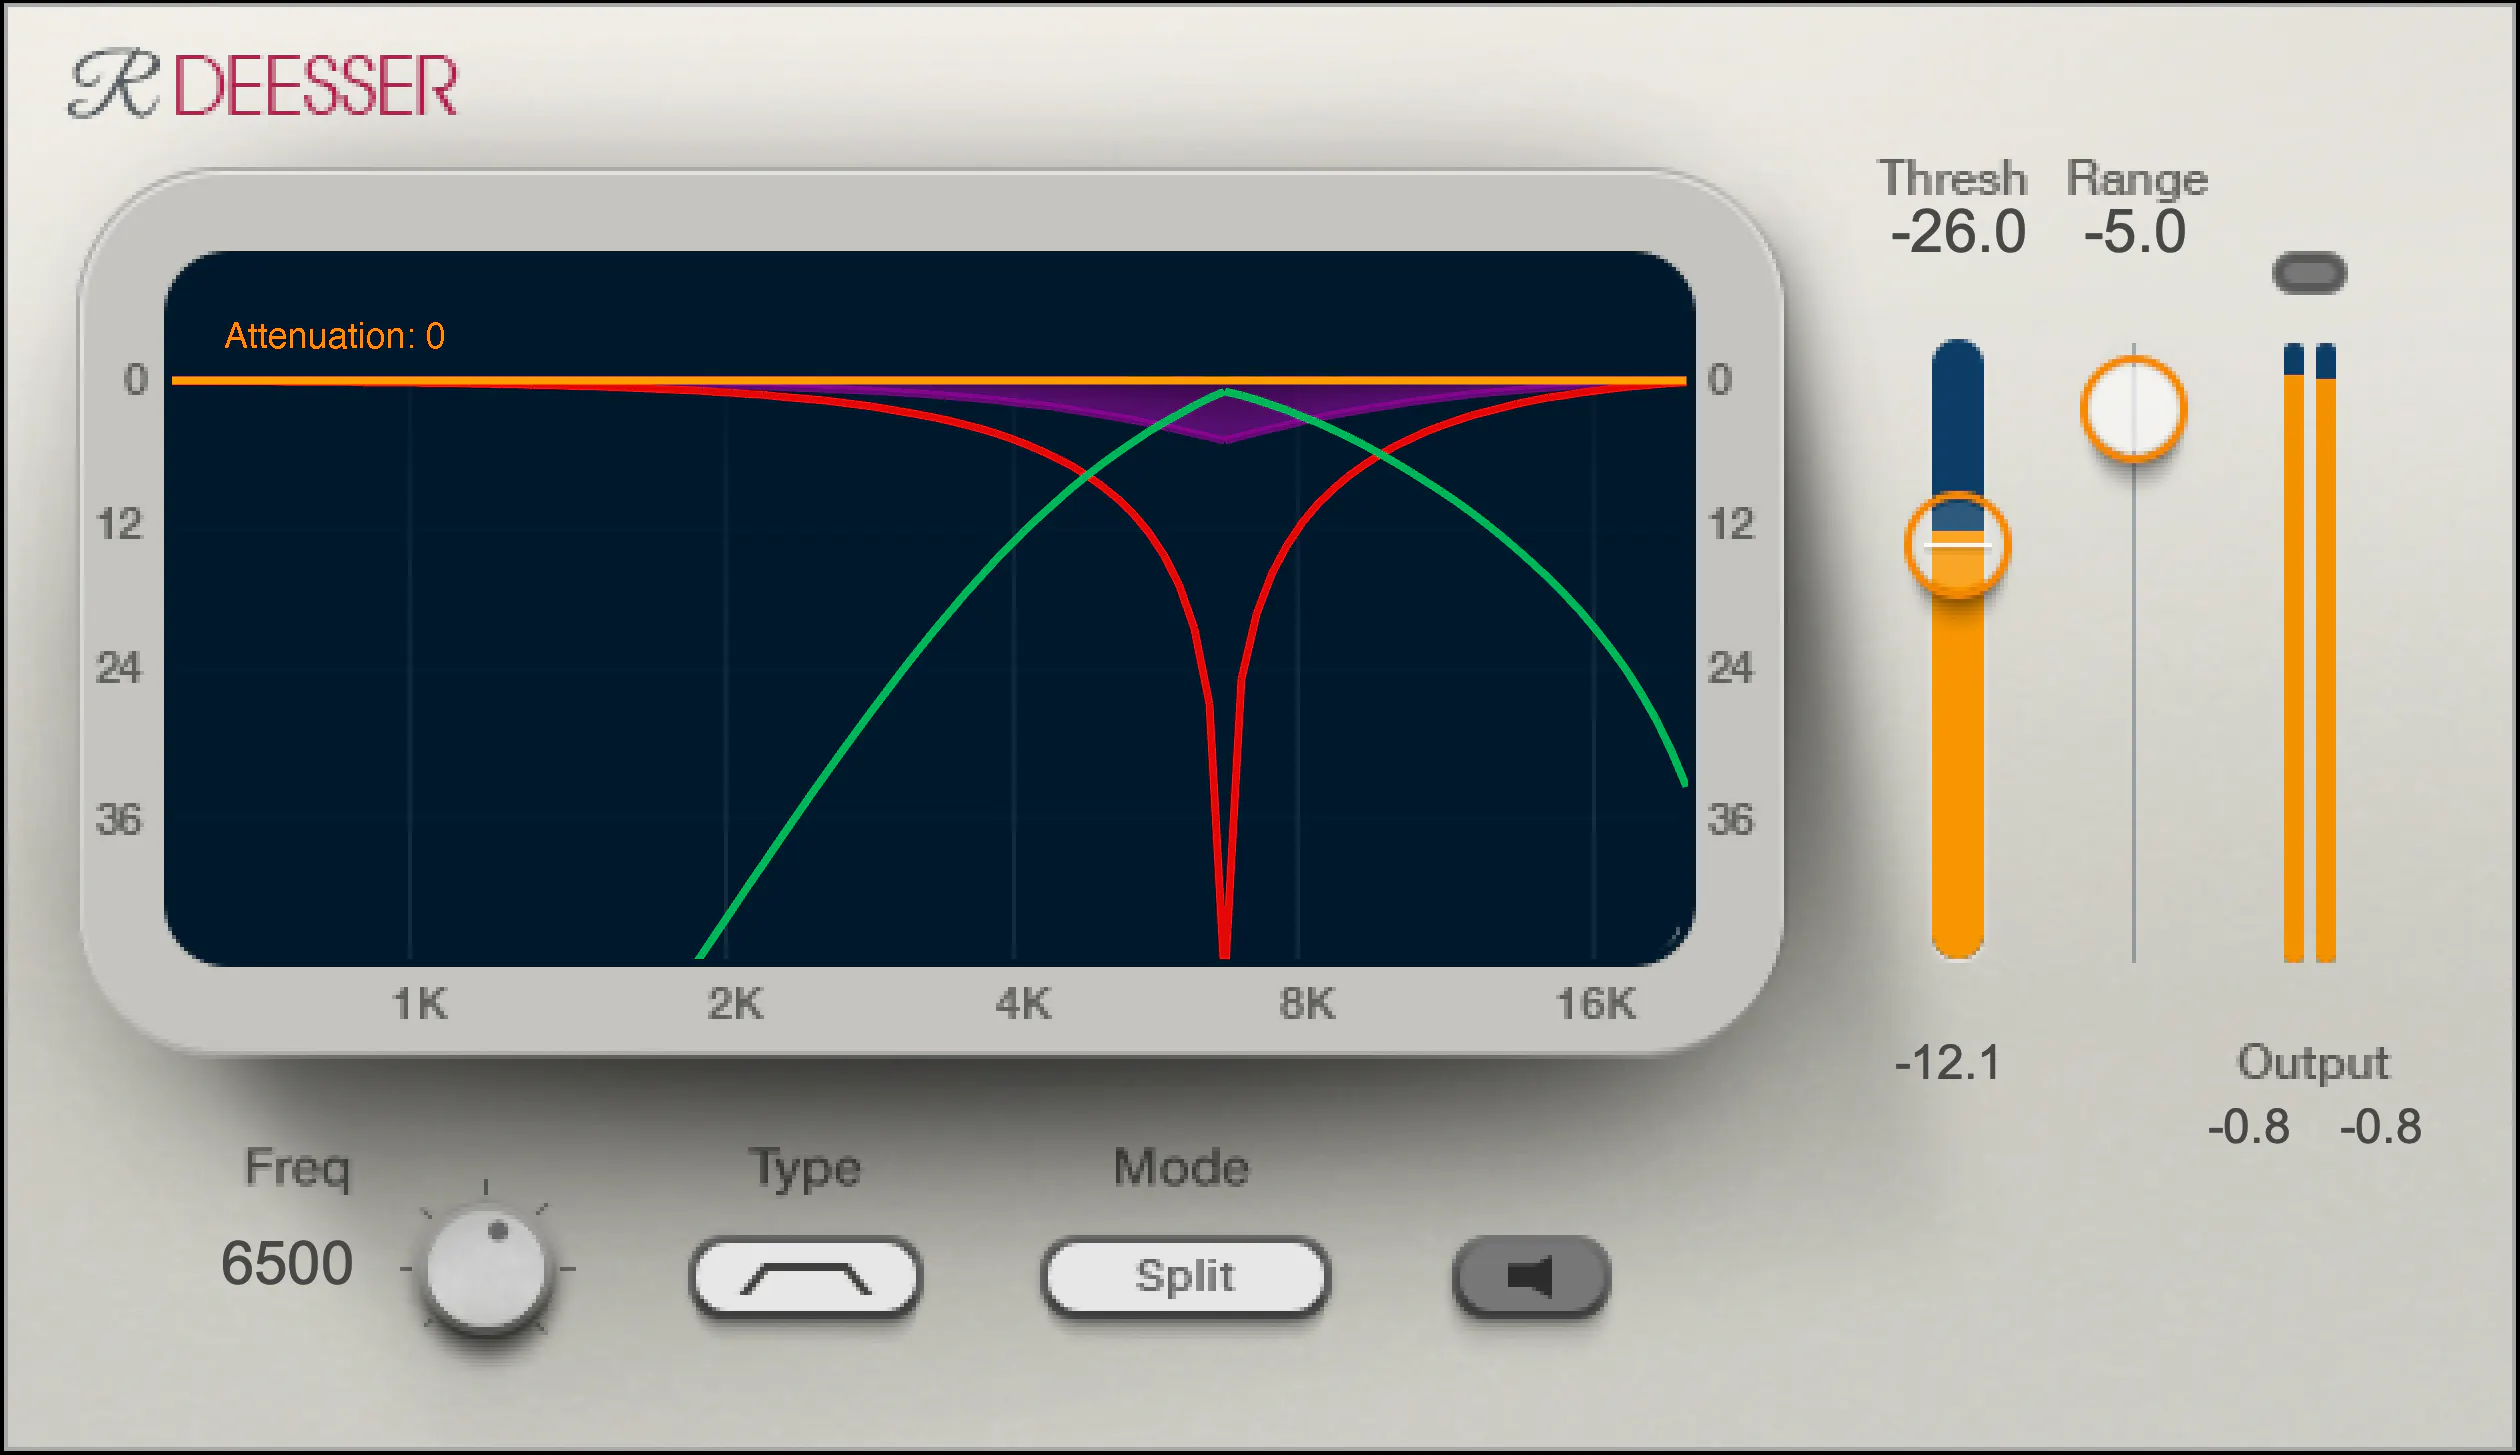
A de-esser is a specialized audio plugin that reduces or eliminates sibilance from vocal recordings. It works by detecting the offending frequencies and applying gain reduction to them, effectively taming the harshness and allowing the vocals to sit better in the mix.
One of my go-to de-esser plugins is Waves Renaissance DeEsser, which offers precise control over the detection frequency, threshold, and reduction amount. Another popular option is FabFilter Pro-DS, which includes a natural-sounding “single vocal” mode for easy and effective de-essing.
De-Essing Vocals
De-essing can be a delicate process, as overuse can result in a dull and lifeless vocal sound. It’s important to strike a balance between reducing sibilance and maintaining the natural tone and character of the vocal recording.
When de-essing vocals, I typically start by soloing the vocal track and listening for the most pronounced sibilant sounds. I then apply the de-esser plugin with a gentle reduction amount, gradually increasing until the sibilance is under control but the vocal still sounds natural.
Best De-Esser for Vocals
In my experience, the best de-esser for vocals is one that offers precise control over the detection and reduction parameters, while still maintaining a natural sound. As mentioned earlier, Waves Renaissance DeEsser and FabFilter Pro-DS are both excellent options in this regard.
It’s also worth considering the de-esser included in your DAW of choice. For example, Logic Pro’s built-in de-esser is simple yet effective, with a straightforward interface that allows for quick and easy de-essing.
De-Esser Settings
When using a de-esser, it’s important to understand the various settings and how they affect the sound. The most important parameters to adjust are the detection frequency, threshold, and reduction amount.
The detection frequency determines which frequencies the de-esser will target, while the threshold sets the level at which the gain reduction will be applied. The reduction amount controls how much gain reduction is applied to the offending frequencies.
It’s worth experimenting with these settings to find the sweet spot for each individual vocal recording.
Tips for Using a De-Esser
Here are a few tips for getting the most out of your de-esser:
Use the de-esser sparingly, as overuse can result in a dull and lifeless vocal sound.
Always listen for sibilance in solo mode before applying the de-esser to the full mix.
Experiment with different de-esser plugins and settings to find the best sound for each individual recording.
If you’re unsure about how much de-essing to apply, start with a small reduction amount and gradually increase until the sibilance is under control but the vocal still sounds natural.
As the legendary producer Quincy Jones once said, “The most important thing in the studio is your ears.” And this is especially true when it comes to managing sibilance in vocal recordings. A de-esser is a tool that helps to control sibilance, or the harsh “s” and “t” sounds that can be distracting or unpleasant in a recording.
What is a de-esser?
Simply put, a de-esser is a type of audio processor that is designed to reduce or remove sibilance from a recording. It works by detecting and attenuating the specific frequency range where sibilance occurs in a vocal recording. This can help to smooth out the sound of the recording and make it more pleasing to the ear.
How does a de-esser work?
A de-esser typically uses a narrow-band compressor to reduce the level of the sibilant frequencies. The compressor is set to activate only when the sibilant frequencies exceed a certain threshold level. This allows the de-esser to reduce sibilance without affecting other parts of the recording. Some de-essers also use dynamic equalization to selectively attenuate sibilant frequencies, which can provide a more natural-sounding result.
Why is a de-esser important?
Sibilance can be a major distraction in vocal recordings, and can make a recording sound amateurish or unprofessional. A de-esser can help to smooth out the sound of a recording and make it more pleasant to listen to. This can be especially important in situations where the recording will be played over a large sound system or in a professional setting.
As the legendary producer Quincy Jones once said, “The most important thing in the studio is your ears.” And this is especially true when it comes to managing sibilance in vocal recordings. One personal experience I’ve had with sibilance was during a recording session with a vocalist who had a very pronounced lisp. Despite the fact that the vocal performance was excellent, the lisp made the recording almost unlistenable. However, with the use of a de-esser, we were able to remove the harsh sibilant sounds and salvage the recording.
Another personal experience was with a different vocalist who had a lot of sibilance in her recordings. Initially, we tried to use EQ to reduce the sibilance, but found that this also affected other parts of the recording and made it sound unnatural. However, once we introduced a de-esser into the signal chain, we were able to achieve a more natural-sounding result that still effectively reduced the sibilance.
In conclusion, a de-esser is a powerful tool for managing sibilance in vocal recordings. By detecting and attenuating specific frequency ranges where sibilance occurs, a de-esser can help to smooth out the sound of a recording and make it more pleasing to the ear. Whether you’re a professional audio engineer or a hobbyist recording at home, a de-esser is an important tool to have in your audio processing toolkit.
When it comes to digital signal processing, one of the most important concepts is the Nyquist Frequency. Simply put, the Nyquist Frequency is the highest frequency that can be accurately represented in a digital signal. But what exactly does that mean? Let’s break it down.
Imagine you are listening to a song on a CD. The CD player reads the music as a series of 0s and 1s, which are then converted into electrical signals that can be played through speakers. But how does the CD player know what the music sounds like? It uses a process called sampling, which involves taking a snapshot of the music at regular intervals.
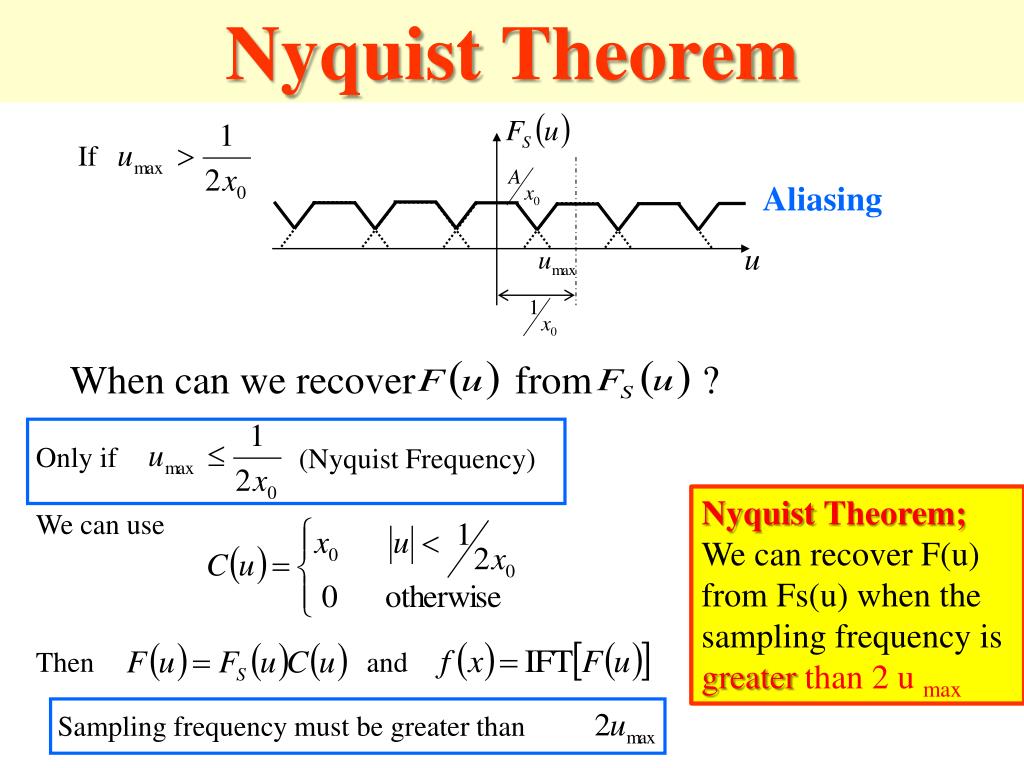
The Nyquist Frequency comes into play because of this sampling process. According to the Nyquist-Shannon sampling theorem, in order to accurately represent a signal in digital form, you need to sample it at least twice as fast as the highest frequency you want to represent. This means that if you want to accurately represent a signal that contains frequencies up to 20kHz (which is the upper limit of human hearing), you need to sample it at least 40,000 times per second.
Nyquist Rate: What You Need to Know
The Nyquist Rate is the minimum rate at which a signal must be sampled to accurately represent it in digital form. It is calculated by multiplying the highest frequency you want to represent by two. For example, if you want to represent a signal that contains frequencies up to 10kHz, the Nyquist Rate would be 20,000 samples per second.
It’s important to note that sampling a signal at a rate that is too low can result in a phenomenon called aliasing. Aliasing occurs when a higher frequency signal is incorrectly represented as a lower frequency signal. This can cause distortion and other unwanted effects in the digital signal.
To avoid aliasing and accurately represent a signal, it’s crucial to sample at or above the Nyquist Rate. In fact, many digital audio devices sample at rates much higher than the Nyquist Rate to ensure high-quality audio reproduction.
Analog-to-Digital Conversion: The Role of the Nyquist Frequency
Analog-to-digital conversion is the process of converting an analog signal (such as an audio waveform) into a digital signal that can be processed by a computer. This process involves sampling the analog signal at regular intervals and converting each sample into a digital value.
The Nyquist Frequency plays a crucial role in analog-to-digital conversion because it determines the minimum sampling rate required to accurately represent the analog signal in digital form. If the sampling rate is too low, the resulting digital signal will be inaccurate and distorted.
To ensure high-quality analog-to-digital conversion, it’s important to sample the analog signal at or above the Nyquist Rate. This will result in a digital signal that accurately represents the original analog signal and can be processed and manipulated with high precision.
As the famous engineer and inventor, Nikola Tesla said, “The day science begins to study non-physical phenomena, it will make more progress in one decade than in all the previous centuries of its existence.” The Nyquist Frequency is a prime example of the intersection of science and engineering, and its importance cannot be overstated.
Final Words
In conclusion, the Nyquist Frequency is a fundamental concept in digital signal processing that plays a crucial role in accurately representing analog signals in digital form. By understanding the Nyquist Frequency and its relationship to sampling
As an audio enthusiast, I have always been intrigued by the concept of frequency response. Understanding how audio equipment responds to different frequencies can help us make informed decisions when selecting audio equipment for our home entertainment systems or professional audio setups. In this article, we will explore what a frequency response curve is, how it is measured, and why it is important.
What is Frequency Response?
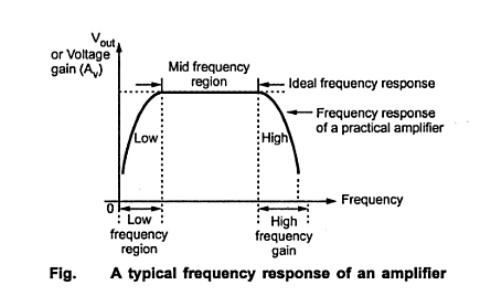
Frequency response refers to how a device responds to different frequencies in the audio spectrum. Every audio system, from speakers to headphones to amplifiers, has a unique frequency response curve that determines how it reproduces audio. The frequency response curve is a graphical representation of the device’s ability to reproduce audio across the frequency spectrum, from the lowest to the highest frequencies.
Understanding frequency response is essential when selecting audio equipment. A device with a flat frequency response curve will produce audio that is faithful to the original recording, while a device with an uneven frequency response curve may color the audio in ways that can be pleasing or unpleasant to the listener.
As the audio engineer and author Bob Katz puts it: “Frequency response is the foundation of all audio. It governs the timbre of sound, the tonal balance of music, the perceived depth and space of a recording, and the fidelity of musical instruments and voices.”
How is Frequency Response Measured?
Frequency response is measured using a test tone generator and a microphone. The test tone generator produces a sine wave at a specific frequency, which is then played through the audio device being tested. The microphone records the output of the device, and the resulting waveform is analyzed to determine the device’s frequency response.
The frequency response curve is typically plotted on a graph, with frequency on the horizontal axis and amplitude on the vertical axis. A flat frequency response curve will show a straight line across the graph, while an uneven frequency response curve will show peaks and dips in the line.
Why is Frequency Response Important?
Frequency response is important because it determines how audio equipment reproduces sound. A device with a flat frequency response curve will reproduce audio faithfully to the original recording, while a device with an uneven frequency response curve may color the audio in ways that can be pleasing or unpleasant to the listener.
Understanding frequency response is especially important when mixing and mastering music. A flat frequency response curve in the monitoring system ensures that the engineer is hearing the audio as accurately as possible. This allows the engineer to make informed decisions about levels, EQ, and other aspects of the mix.
In the words of the mastering engineer and author Bob Ludwig: “A great mix can only be made with a great monitoring system, and that starts with a flat frequency response.”
Final Words
Frequency response is a fundamental concept in the world of audio. Understanding how audio equipment responds to different frequencies can help us make informed decisions when selecting equipment and mixing and mastering music. By measuring the frequency response curve, we can determine a device’s ability to reproduce audio across the frequency spectrum. A flat frequency response curve ensures that the audio is reproduced faithfully to the original recording, while an uneven frequency response curve can color the audio in ways that can be pleasing or unpleasant to the listener.
Audio frequency response, Frequency response testing, Frequency response analysis, Understanding frequency response, Frequency response definition, Frequency response chart, Frequency response curve, Audio equipment, Selecting audio equipment, Mixing and mastering music, Test tone generator, Bob Katz, Bob Ludwig, Monitoring system, EQ, Amplitude, Sine
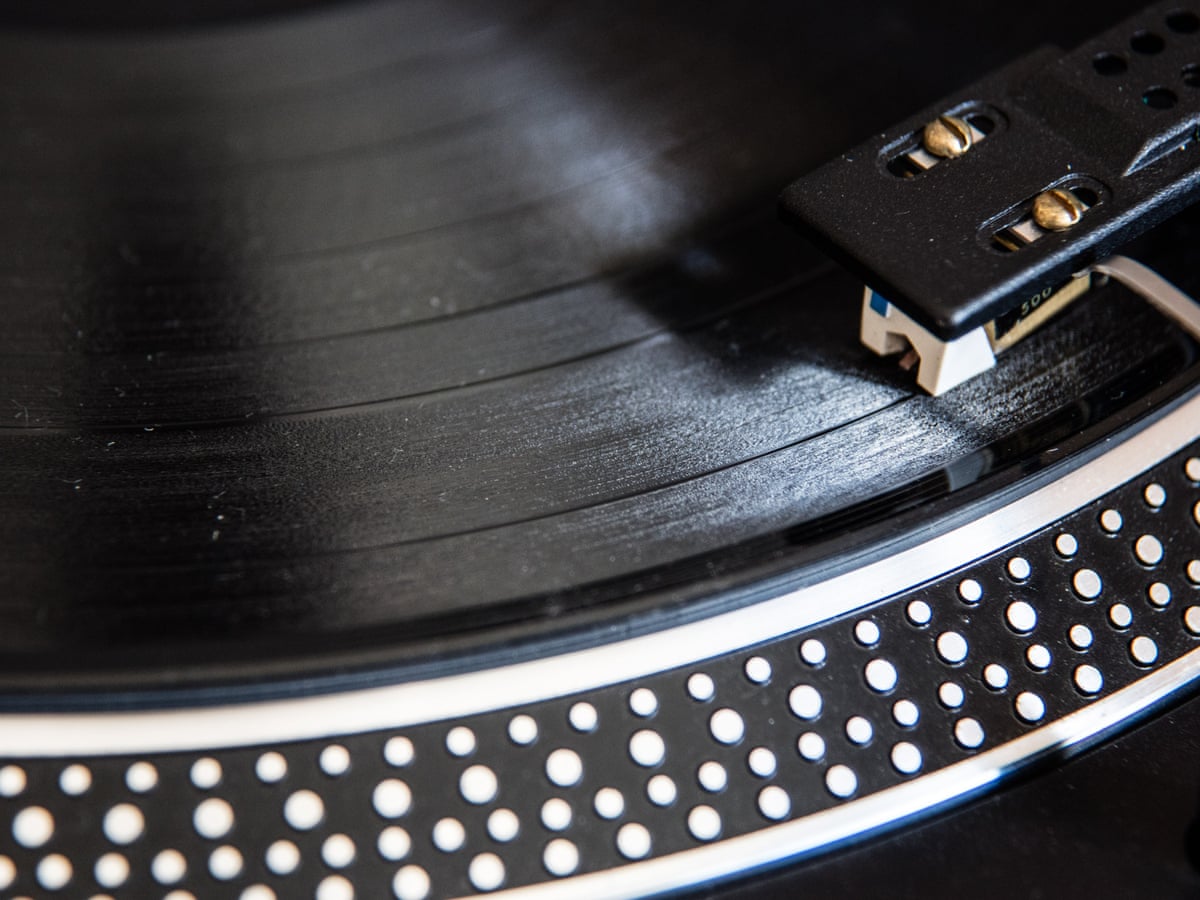
Bass is an essential component of any music recording, and it plays a crucial role in enhancing the overall sound quality. When you listen to vinyl records, the bass is what gives the music depth and warmth. A well-recorded bassline can add a unique character to the music, making it more enjoyable to listen to. Personally, I’ve always been a fan of vinyl records, and I’ve spent countless hours listening to my favorite albums. However, one of the common issues I’ve faced with vinyl records is the lack of bass. The recordings often sound flat, and the basslines are not as prominent as they should be.
As Simon Reynolds wrote in his book, “Energy Flash: A Journey Through Rave Music and Dance Culture,” “Bass is the pivot point of dance music. It’s what makes you move.” This quote perfectly sums up the importance of bass in music, and it’s no different when it comes to vinyl records. Without adequate bass, the music lacks energy and depth, making it less enjoyable to listen to.
How can I boost the bass on my vinyl records?
If you’re looking to boost the bass on your vinyl records, there are a few things you can do. Firstly, you can try adjusting the equalizer settings on your audio system. Most audio systems have an equalizer that allows you to adjust the bass, treble, and midrange frequencies. By boosting the bass frequencies, you can increase the bass on your vinyl records.
Another option is to use a bass booster or enhancer. These devices are designed to amplify the bass frequencies in your music, making the bass more prominent. However, it’s essential to be careful when using bass boosters, as they can sometimes distort the sound quality.
Personally, I’ve found that using a dedicated audio software like mp4gain can be the most effective way to boost the bass on my vinyl records. mp4gain is a powerful audio normalizer and converter that comes with an integrated equalizer. With mp4gain, you can optimize the bass frequencies on your vinyl records, giving them a much-needed boost.
Is boosting bass on vinyl records worth it?
Boosting the bass on your vinyl records can significantly improve the overall sound quality of your music. However, it’s essential to be careful not to overdo it. Too much bass can lead to distortion and other issues, ruining the listening experience. Therefore, it’s essential to use the right tools and settings to optimize the bass frequencies without compromising the overall sound quality.
In my experience, boosting the bass on vinyl records can be worth it, especially if you’re a fan of music genres that heavily rely on bass, such as hip-hop or EDM. A well-recorded bassline can make a significant difference in how the music sounds, and it can make the listening experience much more enjoyable.
Final words
Boosting the bass on your vinyl records is a simple yet effective way to improve the overall sound quality of your music. By adjusting the equalizer settings, using a bass booster, or using dedicated audio software like mp4gain, you can optimize the bass frequencies on your vinyl records, giving them a much-needed boost. However, it’s important to be careful not to overdo
When it comes to achieving the perfect bass level, it’s essential to understand what decibels (dB) are and how they affect sound. In simple terms, dB is a measure of the loudness or intensity of sound. The higher the dB, the louder the sound. When adjusting bass levels, it’s crucial to find the perfect balance between the volume and intensity of the bass.
In my personal experience, I found that boosting the bass to an extreme level can lead to distortion and damage to the speakers, which can affect the overall sound quality. That’s why it’s crucial to find the recommended dB level for boosting bass that provides optimal sound quality without compromising the speakers’ performance.
As Robert Greenberg said, “Bass is the basis of music. Without it, we cannot move.” Therefore, finding the perfect balance between the bass and other sound frequencies is crucial to achieving a quality listening experience.
How to Adjust Bass Levels
Adjusting bass levels can be a daunting task, especially if you’re not familiar with the process. However, it doesn’t have to be complicated. Here are a few tips to help you adjust your bass levels like a pro:
Start by adjusting the volume to a comfortable level.
Use a test track that has a prominent bass line to determine the ideal bass level.
Use an equalizer to adjust the bass frequencies.
Listen to the music and adjust the bass level until you achieve the perfect balance between the bass and other sound frequencies.
In my experience, using an equalizer is the most effective way to adjust bass levels. It provides greater control over the bass frequencies, allowing you to adjust them to the ideal level.
Perfect Bass Levels
Finding the perfect bass level can be a subjective matter as it depends on personal preferences and the type of music you’re listening to. However, there are a few general guidelines that you can follow to achieve the perfect bass levels.
According to audio experts, the ideal bass level should be around 70 dB, with a range of 60 to 80 dB. It’s also essential to ensure that the bass level doesn’t overpower the other sound frequencies. The goal is to achieve a well-balanced sound that allows each sound frequency to shine.
In conclusion, finding the recommended dB level for boosting bass requires a bit of experimentation and patience. However, once you find the perfect balance between the bass and other sound frequencies, you’ll enjoy a quality listening experience that enhances your favorite music’s depth and richness.
Final Words: Don’t forget that the key to achieving perfect bass levels is to experiment and find the right balance between the bass and other sound frequencies. Remember to take care of your speakers and avoid boosting the bass to an extreme level to prevent distortion and damage.
Decay time is a critical aspect of sound that can greatly affect its quality and character. As a sound engineer and musician, I have spent countless hours tweaking decay times to achieve the perfect sound for a recording or performance.
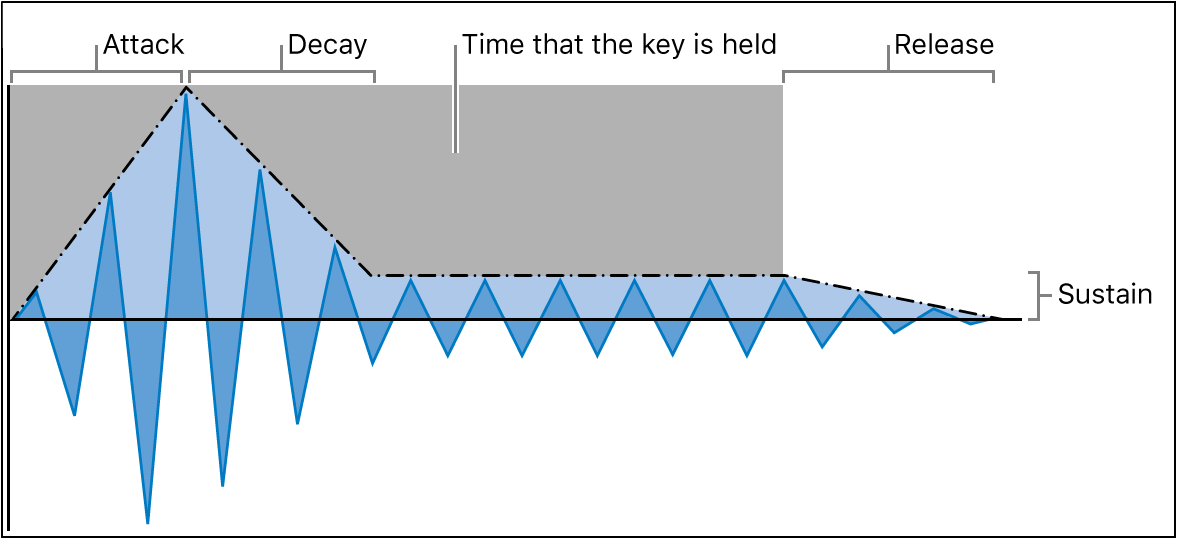
Decay time refers to the amount of time it takes for a sound to fade away after it has been produced. This can be affected by a variety of factors, including the size and shape of the room, the materials used in the construction of the room, and the type of sound source.
As with many aspects of sound, there is no one-size-fits-all approach to decay time. The ideal decay time will depend on the specific context and desired effect, and may require experimentation and adjustment to achieve.
Sound Decay Time
Sound decay time is a measure of how quickly a sound fades away after it has been produced. This can be affected by a variety of factors, including the size and shape of the room, the materials used in the construction of the room, and the type of sound source.
As a musician and sound engineer, I have spent countless hours tweaking decay times to achieve the perfect sound for a recording or performance. Whether it’s adjusting the reverb on a vocal track or fine-tuning the decay time on a snare drum, the right decay time can make all the difference in the final product.
As with many aspects of sound, there is no one-size-fits-all approach to decay time. The ideal decay time will depend on the specific context and desired effect, and may require experimentation and adjustment to achieve.
Effect of Decay Time on Sound
The effect of decay time on sound can be profound, and can greatly affect the quality and character of a recording or performance. A longer decay time can create a sense of spaciousness and depth, while a shorter decay time can create a more focused and intimate sound.
As a sound engineer and musician, I have experimented with a wide range of decay times to achieve different effects. Whether it’s creating a lush, reverberant sound for a ballad or a tight, punchy sound for a rock song, the right decay time can make all the difference.
As with many aspects of sound, the effect of decay time will depend on the specific context and desired effect. Experimentation and adjustment are key to finding the right decay time for a given situation.
Decay Time Definition
Decay time is a measure of how quickly a sound fades away after it has been produced. It is an important aspect of sound that can greatly affect its quality and character.
As a sound engineer and musician, I have spent countless hours tweaking decay times to achieve the perfect sound for a recording or performance. Whether it’s adjusting the reverb on a vocal track or fine-tuning the decay time on a snare drum, the right decay time can make all the difference in the final product.
As with many aspects of sound, there is no one-size-fits-all approach to decay time. The ideal decay time will depend on the specific context and desired effect, and may require experimentation and adjustment to achieve.
Decay Time in Music
Decay time is a critical aspect of music that can greatly affect its quality and character. Whether it’s the decay time of a snare drum or the reverb on a vocal track, the right decay time can make all the difference in the final product.
As a musician and sound engineer, I have spent countless hours tweaking decay times to achieve the perfect sound for a recording or performance. Whether it’s creating a lush, reverberant sound for a ballad or a tight, punchy sound for a rock song, the right decay time can make all the difference.
As with many aspects of sound, there is no one-size-fits-all approach to decay time in music. The ideal decay time will depend on the specific context and desired effect, and may require experimentation and adjustment to achieve.
As a musician and audio engineer, I’ve worked with WAV files extensively. WAV stands for Waveform Audio File Format, and it’s a type of audio file that is uncompressed. This means that all of the original audio data is preserved, resulting in the highest possible audio quality.
According to the book “The Art of Digital Audio Recording,” WAV files are “the most common format for storing uncompressed audio on a computer.” This makes them a popular choice for audio recording, editing, and playback.
Digital Audio
In today’s digital age, most audio is recorded and stored in a digital format. WAV files are one of the most popular digital audio formats, and they are supported by a wide range of software and hardware devices.
One of the benefits of using WAV files is that they can be easily edited and manipulated using audio editing software. This allows musicians and audio engineers to make precise adjustments to the audio, resulting in a higher quality final product.
Audio Quality
As someone who is passionate about audio quality, I always recommend using WAV files whenever possible. Because they are uncompressed, WAV files offer the highest possible audio quality, with no loss of data or fidelity.
In my experience, using WAV files has allowed me to create recordings and mixes that sound incredible, with every detail and nuance preserved. Whether you’re a musician, audio engineer, or just someone who appreciates high-quality audio, WAV files are definitely worth considering.
Final Words:
Overall, WAV files are an essential part of the digital audio landscape. Whether you’re recording, editing, or playing back audio, using WAV files can help you achieve the highest possible audio quality. And if you’re looking for a way to normalize and convert your audio files, I highly recommend checking out mp4gain.
Keywords: WAV file, audio file format, uncompressed audio, digital audio, audio recording, audio editing, audio playback, audio quality, music production, audio engineering, software, hardware, audio manipulation, audio fidelity, mp4gain.