MP3-to-MP4 Transcoding Quality Loss


Free Download Mp4Gain
picture

MP3-to-MP4 Transcoding Quality Loss
MP3-to-MP4 Transcoding Quality Loss

Let’s talk about MP3-to-MP4 transcoding quality loss

When you convert MP3 files to MP4, you might wonder what happens to the audio quality. Transcoding between formats can lead to loss of fidelity if you’re not careful. I’ve spent years working with digital audio, and one thing is clear: understanding how these formats work is essential to minimizing quality loss. Think of it like making a photocopy of a photo—you might get a usable result, but it won’t capture every detail of the original.

MP3 files are already compressed using lossy algorithms, which means some audio data has been permanently removed to reduce file size. When you transcode an MP3 to MP4, which can contain audio and video, you’re essentially re-encoding an already compressed file. This process can amplify artifacts such as muffled sounds, reduced clarity, or background noise.

Why transcoding can cause quality loss

Transcoding quality loss happens because the original MP3 compression removes data, and the MP4 re-encoding process adds its own layer of compression. Each step reduces the amount of audio information available. Imagine shrinking a high-resolution image twice—it may still look good, but the fine details will blur.

MP4 files are designed to handle audio and video streams, often optimized for compatibility with different devices and platforms. However, their compression methods might not preserve the nuances of the original MP3, especially if the settings aren’t properly adjusted.

Factors influencing audio quality during transcoding

Several factors determine how much quality is lost during MP3-to-MP4 transcoding. Understanding these can help you make better decisions.

  • Original MP3 quality: Lower bitrates in the source MP3 file leave less data to preserve during transcoding.
  • Target MP4 settings: Using low bitrates or incompatible codecs in the MP4 can degrade the sound further.
  • Transcoding tools: Some software programs handle compression better than others, reducing artifact buildup.

How to minimize quality loss

Reducing quality loss during MP3-to-MP4 transcoding is possible with the right approach. Over the years, I’ve learned some simple yet effective techniques to preserve audio fidelity.

Start with the highest-quality MP3 you have. If your MP3 file is already heavily compressed, transcoding will magnify the flaws. Aim for bitrates of 256 kbps or higher to ensure there’s enough data to work with.

Choose the right MP4 settings. Use a high audio bitrate (at least 192 kbps) to maintain quality. Selecting a lossless codec like AAC-LC instead of HE-AAC can also make a big difference.

Avoid transcoding more than once. Each conversion strips away more audio data, so working directly with the original file format whenever possible is ideal.

When transcoding is unavoidable

Sometimes, transcoding from MP3 to MP4 is necessary, like when you need to combine audio with video or adapt files for specific devices. In these cases, using the best tools and settings becomes even more critical.

Look for transcoding software that supports advanced settings for both MP3 and MP4. These tools often provide options to adjust bitrates, sample rates, and codecs, giving you greater control over the output quality.

Real-world applications of MP3-to-MP4 transcoding

In my experience, most people need MP3-to-MP4 transcoding for multimedia projects. For example, if you’re creating a slideshow or video montage, you might need to combine audio tracks with visual content. Choosing the right settings ensures your audience hears crisp, clear sound.

Another common use is optimizing files for streaming. MP4’s flexibility with audio and video streams makes it an excellent choice for platforms like YouTube or social media. However, understanding how transcoding affects your audio ensures the final product sounds professional.

Latest words on MP3-to-MP4 transcoding quality loss

Transcoding MP3 to MP4 doesn’t have to mean sacrificing quality if you take the right precautions. Always start with the best source material, select compatible codecs, and adjust settings to suit your needs. With these steps, you can preserve audio fidelity while benefiting from MP4’s versatility. If you need reliable tools for handling transcoding, Mp4Gain offers a simple and effective solution for professional results.

What causes quality loss in MP3-to-MP4 transcoding?

Quality loss occurs because MP3 is already a lossy format. When re-encoded into MP4, additional compression artifacts may appear, further degrading the sound.

Can you avoid quality loss when transcoding?

While complete preservation isn’t possible, you can minimize loss by starting with high-quality MP3s and using appropriate MP4 settings, such as high bitrates and compatible codecs.

What MP4 audio codec is best for preserving quality?

AAC-LC is the best codec for maintaining quality in MP4 files, offering a good balance between efficiency and fidelity.

Does transcoding multiple times worsen audio quality?

Yes, each transcoding pass removes more audio data, compounding quality loss. Avoid multiple conversions whenever possible.

What bitrate should I use for MP4 audio?

For most applications, use at least 192 kbps to maintain quality. Higher bitrates, like 256 kbps, are ideal for professional use.

Can MP4 files use lossless audio?

Yes, MP4 can include lossless audio codecs like ALAC or FLAC, although these increase file size significantly.

How does the sample rate affect transcoding?

Sample rates determine how accurately audio is captured. Mismatched rates between MP3 and MP4 can cause noticeable artifacts.

Should I convert MP3 to MP4 for video projects?

Yes, if combining audio with video. Ensure proper settings to avoid degrading the MP3 audio during conversion.

What are the best tools for MP3-to-MP4 transcoding?

Look for software that allows custom settings for bitrates, codecs, and sample rates, ensuring maximum control over the output.

Can transcoding improve the audio quality of an MP3?

No, transcoding cannot improve quality. Once data is lost during MP3 compression, it cannot be restored.

Comments:

Why does this always seem more complicated than it should be? I tried converting some old MP3s to MP4, and the sound got worse. Thanks for explaining why!

This article is packed with useful information. I didn’t know that using high bitrates could make such a difference. Definitely going to try that next time.

Honestly, I wish you’d go even deeper into the settings part. Which exact MP4 codecs should we avoid?

I work with audio editing, and I can confirm this advice is solid. Transcoding quality loss is a real problem if you don’t use the right settings.

Super helpful! I didn’t realize that re-encoding multiple times would keep degrading the quality. Makes total sense now.

Thanks for this breakdown. It’s good to know about AAC-LC—I’ve been using HE-AAC and wondering why it sounded off.

Wow, I’ve been doing this wrong for years. Thanks for shedding light on how MP3 quality affects the final MP4 output.

I used Mp4Gain for a recent project, and it worked like a charm! Didn’t expect such a difference in sound quality.


Free Download Mp4Gain
picture


Mp4Gain Main Window
picture


Mp4Gain Features
picture


Free Download Mp4Gain
picture

ENCODING PRINCIPLES OF THE MP3 FORMAT.

ENCODING PRINCIPLES OF THE MP3 FORMAT.

Mp3 Encoding

Mp3, or fully MPEG-1, 2 and 2.5 Layer 3, is one of the most popular and widespread standards for storing audio data.

MP3 ENCODING

In this article, we will not delve into the history of creation and further development, but will consider the basic principles of the standard and examples of its implementation.

The mp3 standard does not establish a specific compression algorithm to “encode” the source data, but rather describes the essence of the possible methods.

The quality of the result obtained depends on the modification of the algorithm used, embedded in any encoding program of the “codec”, and on the quality of the original audio data.

There are 3 most common modifications of the mp3 format, which differ in the compression ratio parameters of the original audio data.

Name
Modification of the rule
Data rate per second (bit rate) Possible sample rates
MPEG-1 layer 3
32 – 320 kbps 32000 Hz
44100 Hz
48000 Hz
MPEG-2 Layer 3 16 – 160 kbps 16000 Hz
22050 Hz
24000 Hz
MPEG-2.5 Layer 3 8 – up to 160 kbps 8000 Hz
11025 Hz

Processing begins with dividing the original audio signal into equal time intervals: equal frames, for example 0.05 or 0.26 seconds, after which each frame is analyzed and compressed according to general or individual parameters based on the data of the previous and next frames.

Most of the compression algorithms used are based on the perceptual characteristics of the human ear. Let’s consider the main options, which, as a rule, are applied in a complex way.

It is worth starting with the fact that, by ear, the average person is capable of perceiving a frequency range of approximately 10 Hz to 20,000 Hz. With growth, changes occur in the hearing aid and, for most, the sensitivity the higher frequency range decreases, as a result of which, in some mp3 modifications, during compression, all frequencies above 16000 hertz are cut off, which can significantly reduce the amount of information.

Audio recordings can be encoded in stereo (a surround sound effect that uses separate channels for the left and right speakers) or mono (the opposite of stereo). In mp3 format, different tracks are not recorded for each of your speakers, but information about the differences between the left and right channels.

In acoustics, there is a concept like “harmonics”, these are the frequencies of the “sounds” that sound together with the main and most prominent tone. For example, when hitting a drum, the loudest sound will be the tone and the minor, weaker, will be the harmonics.

After such a loud sound, the so-called “period of deafness” occurs, during a period of duration in which a person’s hearing practically does not respond to changes.

If in the intervals of the “deafness period”, remove all frequencies, then the errors of perception, will practically not allow to notice their absence, because of this, during compression, the weakest harmonics are cut off, located close to the most sounds. strong: tones.

A method is used to replace the near peak values ​​of the signal “peaks” (in terms of volume) with an average value.

There is a concept as bit rate: this is a value that characterizes the number of transmitted bits of information “units” during a period of time, usually one second.
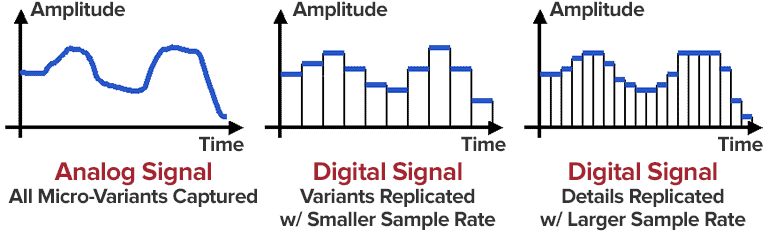
The higher the bit rate, the better the audio detail will be, as long as the original, uncompressed audio data is of high quality.

As you can guess, digital formats consist of certain code sequences, in other words of sequences 0 and 1.
To save space, frequent joins within a file are assigned unique identifiers that replace long sequences.

Thanks to such complex influences, it is possible to compress the original audio signal into one of the popular formats with loss of quality – the mp3 format.

Various experiments have been carried out many times in order to reveal how significant the differences are before and after compression in mp3. As tests have shown, differences, some similar moments were not always possible, quickly and to distinguish, even when reproduced on equipment with higher fidelity.

For those who have never had the opportunity to directly compare the original and compressed audio recording, in most cases it will take some time or even find obvious differences.

MP3 ENCODING

MP3 ENCODING

Mp3 encoding

The first step in encoding by the user is to specify a bit rate. This indicates the quality and at the same time the storage requirement of an MP3 file.

MP3 encoding

COMPRESSION RATES

With most recording programs, the quality of an MP3 file can be freely selected before recording begins. According to the Fraunhofer Institute, the CD quality of an MP3 file is a bit rate of 112 to 128 kbit per second, other measurements put CD quality at up to 160 kbit per second. However, the most used and sufficient for most listeners is 128 kbit.

In comparison, a corresponding CD quality for Layer 1 is 384 kbit / s and 256 kbit / s for Layer 2. A wave file works with a 1.4 Mbit / s bit rate and therefore works with roughly the same space requirements. as a CD audio track (CDA).

74 or 80 minutes of music can be put on a CD (depending on the size of the sound carrier), in MP3 format with a bit rate of 128 kbit / s, 11.5 or 12.4 hours would be possible.

PSYCHOACOUSTICS

MP3 audio compression relies on filtering out unnecessary information. Psychoacoustics is a science that deals with the perception of sound by the human ear.

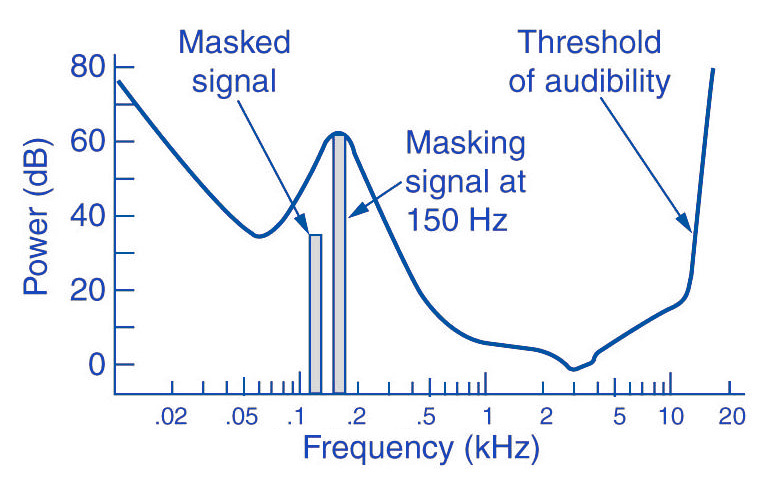
Eg: You are in a disco. Loud music blasts through huge speakers and you try to talk to each other. This is almost impossible unless you yell. In acoustics, this is called masking. To eliminate masking, the sound level of speech should be raised to such an extent that the interfering signal (in this case music) no longer covers it.

Processes like this belong to the fundamental areas of psychoacoustics.

Tones below this threshold are not heard and therefore become noise during MP3 recording (skipped).

The overlays work as follows: you have, for example (picture 2) a tone with 1 kHz (1) and another tone with 1.1 kHz, which is approximately 18 dB lower (2). The second shade is completely superimposed on the first. This also works for other weaker tones (see Fig. 2). Another tone with a frequency of 2 kHz, which is also 18 dB quieter than the first, would not overlap because it is just outside the threshold of the first tone.

Noise can be another compression option for MP3 recording. The fact that when a sound is digitized it cannot be sampled at an infinite frequency, a noise imperceptible to the human ear (quantization noise) is generated. It is used as a model for the MPEG audio layer and thus increases the noise around a tone. Above all, loud and short tones mask a certain range in the frequency range before and after themselves where the weakest signals would not be audible. With MP3 encoding, the noise level increases in this area, as if digitized at a lower resolution.

There is also masking in the temporal area: hearing needs a so-called “recovery time” for loud and quiet noises until it is fully functional again. This is especially noticeable with strong, short, and rapidly rising tones. After a delay of about 5 ms, the hearing threshold drops again and after about 200 ms it reaches the normal level, the so-called resting hearing threshold. This effect is called post-masking. The effect of pre-masking is less important, but even more impressive: it is based on the fact that the brain processes loud sounds more quickly than soft ones. To some extent, the strong impulse outweighs the silent one on the way to the brain. This results in a pre-masking time of up to 20 ms.

The above psychoacoustic algorithm is used in the following steps:
– Audio information is divided into subbands
– Subbands are reduced
– 16-bit samples are generated
– Samples are compressed
– Compressed samples are combined into blocks
– Coding according to Huffmann Procedure
: summary in tables

DIVIDED INTO SUBBANDS

Depending on the frequency of the acoustic information, it is divided into 32 subbands. The bands are of different sizes due to adaptation to the human ear according to a psychoacoustic model.

The division is done with the help of a polyphase filter. This means that the samples are decimated and filtered simultaneously.

In layers 1 and 2, the bands were the same size with a bandwidth of 625 Hz each. The reason for this division is to provide the algorithm with a better target.

SUBBAND ​​REDUCTION

The MP3 encoder now examines each of the subbands according to the psychoacoustic model for expendable frequencies. Here, the masking threshold is determined, then the subbands whose level is below this masking function are removed. Another reason for dropping an entire sub-band could be that it is inaudible due to the pitch, similar to a dog’s whistle.

CONVERSION INTO 16-BIT SAMPLES

The frequency bands are sampled and converted to 16-bit samples. Tones are broken down into digital signals and further processed as numerical values. The sample rate determines the length of the sample intervals. However, neither the measurement of the amplitude nor the size of the sampling intervals can be infinitely precise. For this reason, with analog-digital conversion, a value is rounded between two sample points. This results in rounding errors that are noted in what is known as quantization noise. This can be kept inaudible using the highest possible resolution: with 8-bit, a maximum of 256 levels can be displayed, with 12-bit and 4096 and with 16-bit 65536 individual steps, so that noise is not heard.

However, some samples are also digitized with a lower sample rate. In the eighth subband, for example, there is a tone with 1 kHz and 60 dB. The MPEG audio encoder now calculates the masking threshold and recognizes that it is 36dB lower. The acceptable signal-to-noise ratio here is 24 dB, which corresponds to a 4-bit resolution, since the two values ​​are directly related. Leaving one bit out of resolution increases the noise level by 6dB. Since an audio CD is generally digitized with 16 bits, considerable data reduction can be applied here.

SAMPLE COMPRESSION

The next step is to compress the samples further. However, this process no longer has anything to do with the original shades. From here on, compression is only data-driven.

Each sample consists of 16 bits, but not all of them are absolutely necessary to represent a level. For example, leading zeros can be omitted. If, for example, the value 0000011101010101 is obtained for a sample, the algorithm truncates the result to 11101010101. To reconstruct the original 16 bits from this information, the decoder needs two pieces of information: the scale factor and the bit allocation. The scale factor indicates where the remaining bits of the sample were in their original state. The bit mapping contains the information about how many bits are left in the sample, since you can no longer calculate with a fixed 16-bit number. However, if you were to store these values ​​individually for each sample, you wouldn’t gain much,

GROUPING THE SAMPLES

The 16-bit samples that were just created are now combined into blocks. There are two different block lengths for this purpose: the short blocks with twelve samples and the long blocks with 36 samples.

Long blocks are used for low frequencies. However, long blocks would not allow sufficient resolution at higher frequencies; short blocks are used here. In the so-called mixed block mode, long blocks are used for the two frequency bands with the lowest frequencies. For the remaining 30 frequency bands, it is the turn of the short blocks. This mode allows better frequency resolution in the low frequencies without paying tribute to the sampling frequency in the high frequencies.

HUFFMANN CODING

The last step in MP3 compression is Huffmann encoding. This algorithm is also used, for example, in packaging programs such as WinZip. The frequency of certain values ​​is important here. However, the subbands are organized in advance. Subbands with lower frequencies tend to contain significantly more values ​​than those with high frequencies. The subbands are divided into three groups according to their frequency. Each area has its own Huffmann tree (Fig. 3) to achieve the optimal compression factor.

As a first step, the encoder excludes high frequencies; encoding is not necessary here, as its size can be derived from those of the other two regions. The mid-frequency range is treated as is, and the low frequencies are again divided into three regions, each of which is assigned its own Huffmann tree. The appearance of a Huffmann tree is stored in the MP3 file.

The structure of a Huffmann tree works as follows: frequently occurring values ​​are given a short sequence of bits, while rare values ​​are given a long one, so the algorithm first determines the distribution of values ​​within the data to be compressed.

To determine what is known as the Huffman tree, you start with the two rarest values. They are assigned a “0” or a “1”. The two values ​​are summarized, in the order that they are now represented by the sum of their frequency. The same is true for the next two rarer values. This process ends when only one value remains. The result of this procedure is a tree structure. The encoding is based on this structure. Each branch on the left receives a 0, each branch on the right is identified by a “1”. In our little example, the least common would be

Value 4 represented by the sequence of bits 010. The most common value 6, on the other hand, is assigned a simple 1.

FRAMEWORK SUMMARY

The result of the above compression is summarized in so-called frames. Each of these frames contains 1152 samples (32 subbands x 36 samples). A frame consists of a header, a checksum check, the actual audio data, and in certain circumstances a so-called bit repository. Such a deposit arises when the samples within the frame can be compressed in such a way that the full theoretical number of bits in a frame is not required. The encoder can fall back on these buckets if the available bits are insufficient for a subsequent frame. A distinction must be made between two terms: frame size and frame length.

The size of the frame is determined by the number of samples and is constant within a layer. In Layer 1 format, this is always 384 samples per frame, in Layers 2 and 3 1152 per frame. However, the length of the frame may differ at Layer 3 due to the change in bit rate or the pool of unfilled bits. The frame also contains the aforementioned information about the scale factor and bit allocation to be able to reconstruct all the samples again.

A file header, as it is known from other file formats, does not exist in an MP3 file. In the case of an image file, a header would contain information about the entire image (e.g. size, color depth, resolution