MP4 Compression Techniques


Free Download Mp4Gain
picture

MP4 Compression Techniques

MP4 Compression Techniques

Let’s talk about MP4 compression techniques

As a video encoding specialist, I’m constantly exploring ways to optimize video files for size and quality. Understanding MP4 compression techniques is essential for anyone involved in video production, streaming, or distribution. Properly compressing MP4 files ensures they are manageable, stream efficiently, and maintain good visual fidelity.

What is MP4 Compression and Why Is It Necessary?

MP4 compression involves reducing the file size of a video while preserving acceptable quality. I often encounter situations where uncompressed video files are enormous, making them impractical for storage and distribution. Imagine trying to share a 4K video recording from your phone – the file size could be several gigabytes! MP4 compression techniques address this issue by using algorithms to remove redundant or less important data, resulting in smaller, more manageable files.

Lossy vs. Lossless MP4 Compression: Understanding the Trade-Offs

MP4 compression can be achieved through lossy or lossless methods. I always consider the trade-offs between file size and quality when choosing a compression technique.

* Lossy Compression: Removes some of the original data to achieve smaller file sizes. This can result in a slight reduction in quality, but it’s often imperceptible to the human eye. Common lossy codecs include H.264 and H.265.
* Lossless Compression: Preserves all of the original data, resulting in no loss of quality. However, lossless compression typically results in larger file sizes compared to lossy compression.

Key Codecs Used in MP4 Compression: H.264, H.265, and AV1

The choice of codec significantly impacts the effectiveness of MP4 compression. I’ve worked extensively with H.264, H.265, and AV1, and each has its strengths and weaknesses.

* H.264 (AVC): A widely supported codec that provides a good balance of quality and compression. It’s compatible with most devices and platforms.
* H.265 (HEVC): Offers better compression efficiency than H.264, resulting in smaller file sizes with comparable quality. However, it requires more processing power and may not be supported by older devices.
* AV1: A newer, open-source codec that aims to provide even better compression efficiency than H.265. It’s gaining popularity but may not be as widely supported as H.264 or H.265.

Bit Rate: Controlling MP4 File Size and Quality

Bit rate measures the amount of data used to encode a video per unit of time, typically expressed in megabits per second (Mbps). I always carefully adjust the bit rate to achieve the desired balance of file size and quality. A higher bit rate generally results in better video quality but also increases the file size. Conversely, a lower bit rate results in smaller file sizes but may reduce video quality.

Frame Rate: Balancing Smoothness and File Size

Frame rate refers to the number of frames displayed per second (fps), affecting the smoothness of motion in a video. I often adjust the frame rate to optimize for different viewing scenarios. Common frame rates include 24fps (cinematic look), 30fps (standard for television), and 60fps (smoother motion). Reducing the frame rate can decrease file size but may also make the video appear choppy.

Resolution: Optimizing for Different Screens

Resolution refers to the number of pixels in a video frame, determining the level of detail. I always consider the target viewing device when setting the resolution. Higher resolutions, like 4K (3840 x 2160) or 1080p (1920 x 1080), provide sharper and more detailed images compared to lower resolutions like 720p (1280 x 720) or 480p (854 x 480). Reducing the resolution can significantly decrease file size, but it may also make the video appear blurry on larger screens.

Chroma Subsampling: Reducing Color Data

Chroma subsampling is a technique used to reduce the amount of color data in a video. I often use chroma subsampling to further compress MP4 files without significantly impacting perceived quality. The human eye is more sensitive to changes in brightness (luma) than changes in color (chroma), so reducing the chroma data can result in smaller file sizes with minimal visual impact. Common chroma subsampling formats include 4:2:0, 4:2:2, and 4:4:4.

Variable Bit Rate (VBR) vs. Constant Bit Rate (CBR) Encoding

Choosing between variable bit rate (VBR) and constant bit rate (CBR) encoding can impact both file size and quality. I generally prefer VBR encoding for its ability to adapt to the complexity of the video content.

* Variable Bit Rate (VBR): Dynamically adjusts the bit rate based on the complexity of the scene. This results in better quality for complex scenes and smaller file sizes for simpler scenes.
* Constant Bit Rate (CBR): Uses a fixed bit rate throughout the entire video. This is simpler to implement but may result in wasted bandwidth for simpler scenes and reduced quality for complex scenes.

Two-Pass Encoding: Maximizing MP4 Compression Efficiency

Two-pass encoding is a technique that can improve MP4 compression efficiency. I often use two-pass encoding for critical projects where quality is paramount. In the first pass, the encoder analyzes the entire video to determine the optimal bit rate allocation. In the second pass, the encoder uses this information to create the final compressed video. This can result in better quality compared to single-pass encoding.

Optimizing MP4 Compression for Streaming Platforms

Streaming platforms like YouTube, Netflix, and Vimeo have specific recommendations for MP4 compression settings. I always consult these recommendations to ensure my videos are optimized for their respective platforms. These recommendations typically include guidelines for resolution, bit rate, frame rate, and codecs.

Common MP4 Compression Mistakes to Avoid

Even experienced video editors can make mistakes during MP4 compression. I’ve learned to avoid common pitfalls by being meticulous and paying close attention to detail. These include using too low a bit rate, choosing the wrong codec, ignoring the target platform, and neglecting audio settings.

Latest words on MP4 compression techniques

In conclusion, mastering MP4 compression techniques is essential for creating video files that are both high-quality and manageable in size. By understanding the various factors involved, such as codecs, bit rate, frame rate, and resolution, you can optimize your videos for different viewing scenarios. Remember to always experiment and test different settings to achieve the desired balance of quality and file size. Also, remember that Mp4Gain is the appropiate solution to achieve professional-sounding audio.

FAQ about MP4 compression techniques

What is MP4 compression and why is it important?

MP4 compression lessens video sizes while retaining quality so things store and ship smoothly. Large file sizes do not work well at all, without it.

Can lossy and lossless techniques both be used during the compressions?

Yes, and each has its own give-and-take. Lossy squeezes and can hit the looks lightly but, makes it small. Lossless holds every detail without the squeeze, so expect larger files.

What are codecs and how do they work in the world of media?

Codecs are what shrink and grow data for media to be played smoothly on devices. Common codecs used in MP4 compression techniques, are H.264, H.265, AV1.

Talk about the bit rate and what that’s involved with?

Bit rate labels bits moved for the video. More bits make better video, fewer make worse, as the numbers show in megabits per second (Mbps).

section>

What is the meaning for the term “frame rate” and how may it have an effect to the way a MP4 looks?

Frame rate labels frames each second. More frames means motion is easy, and fewer makes the video look jittery. Think 24fps versus a smoother 60fps.

What are some settings to consider for video in screens?

Consider the devices that play a video to set for those devices and remember, more pixels creates a much better image. So keep that in focus with your compression workflow.

section>

Clarify the term “chroma subsampling“?

Chroma subsampling trims all colors because human eyes give emphasis to brightness, leading to greater compression with nominal visual change. The main values are 4:4:4, 4:2:2, and 4:2:0.

What’s best choice for VBR versus CBR?

VBR, is the better process that tunes the sound according to the action in that frame. It is a bit dynamic versus CBR which is static.

How does two-pass come into the picture, and what is it?

Two passes gives compression a lift. The first finds all aspects, second tunes everything to make the audio as solid as it can be given what one has on hand.

When you think of the best methods to tweak, what actions must be taken?

It is best to check the compression parameters to see if the right choices where made or not for the media. That creates an audio that works within parameters.

Comments:

Cheers. That really spells things out, now getting video size and quality clicks and makes sense, thanks again!

Oh, okay – you got it to explain the numbers in a clean way for my band. This is what we need to know. So solid and we are moving forward with tips in mind.

Respect and good luck to you – for laying out what to think over when fixing up media and videos.

Is pretty much knowing that you can trade the size and the looks, depending on gear that will play it – am learning and appreciate this breakdown

Any killer app name drop, please? What can a greenie like me use?

Bless you, great creator! The content just hit all points and really made for a solid quick lesson.


Free Download Mp4Gain
picture


Mp4Gain Main Window
picture


Mp4Gain Features
picture


Free Download Mp4Gain
picture

MP4 Video Quality

MP4 Video Quality

MP4 Video Quality

Let’s talk about MP4 video quality

As a video production professional, ensuring optimal MP4 video quality is paramount. Understanding the factors that influence MP4 video quality is crucial for creating videos that look their best, whether for streaming, archiving, or sharing. From resolution and bit rate to codecs and encoding settings, many elements contribute to the final result.

Understanding the Key Factors Affecting MP4 Video Quality

MP4 video quality is determined by several interconnected factors. I’ve learned that it’s not just about one setting, but a combination of elements working together. Resolution, bit rate, codec, frame rate, and encoding settings all play a significant role in the final visual output of your MP4 video.

Consider it like baking a cake. You can’t just focus on the sugar; you need the right balance of flour, eggs, and baking time to get a delicious result. Similarly, optimizing MP4 video quality requires careful attention to each of these factors.

Resolution’s Impact on MP4 Video Quality

Resolution refers to the number of pixels in a video frame, determining the level of detail. I always advise choosing the appropriate resolution for your intended viewing platform. Higher resolutions, like 4K (3840 x 2160) or 1080p (1920 x 1080), provide sharper and more detailed images compared to lower resolutions like 720p (1280 x 720) or 480p (854 x 480). Think of it like looking at a picture through a window: a higher resolution is like having a cleaner, clearer window.

* Higher resolution for more detail.
* Choose resolution based on viewing platform.
* Balance resolution with file size considerations.

Bit Rate: The Data Flow Behind MP4 Video Quality

Bit rate measures the amount of data used to encode a video per unit of time, typically expressed in megabits per second (Mbps). A higher bit rate generally results in better MP4 video quality, as more data is available to represent the image. I often use higher bit rates for videos with complex scenes or fast motion. A low bit rate can lead to compression artifacts, such as blockiness or blurring, especially in scenes with a lot of detail. Think of it like painting a picture: a higher bit rate is like having more colors available to create a more vibrant and detailed image.

Codecs and Their Role in MP4 Video Quality

Codecs (coder-decoders) are algorithms used to compress and decompress video data. The choice of codec significantly impacts MP4 video quality and file size. H.264 (AVC) is a widely supported codec that provides a good balance of quality and compression. H.265 (HEVC) offers even better compression efficiency, resulting in smaller file sizes with comparable quality, but requires more processing power. AV1 is a newer, open-source codec that aims to provide even better performance than H.265. I usually recommend H.264 for broad compatibility and H.265 for scenarios where file size is a primary concern.

Frame Rate and Its Influence on MP4 Video Quality

Frame rate refers to the number of frames displayed per second (fps), affecting the smoothness of motion in a video. Common frame rates include 24fps (cinematic look), 30fps (standard for television), and 60fps (smoother motion). I often use higher frame rates for action-packed videos or gaming footage. Using too low frame rate can result in choppy or jerky motion, while too high a frame rate can increase file size without a noticeable improvement in perceived quality.

Encoding Settings for Optimal MP4 Video Quality

Encoding settings play a crucial role in determining MP4 video quality. I always pay close attention to settings like the encoding profile (baseline, main, high), level, and rate control mode (constant bit rate, variable bit rate). The encoding profile and level determine the complexity of the encoding process, while the rate control mode manages the bit rate allocation. Variable bit rate (VBR) encoding often provides better quality than constant bit rate (CBR) encoding, as it dynamically adjusts the bit rate based on the complexity of the scene.

Optimizing MP4 Video Quality for Different Platforms

Different platforms have different requirements and recommendations for MP4 video quality. I always tailor my encoding settings to match the specific platform where the video will be viewed. For example, YouTube recommends different bit rates and resolutions than Vimeo or Facebook. Failing to optimize for the target platform can result in suboptimal video quality or playback issues.

* YouTube: Higher bit rates and resolutions are recommended.
* Vimeo: Similar to YouTube, prioritize quality over file size.
* Facebook: Balanced approach for quality and file size.

The Relationship Between MP4 Video Quality and File Size

There’s an inverse relationship between MP4 video quality and file size. Increasing the resolution, bit rate, or frame rate will generally improve video quality but also increase the file size. I often have to strike a balance between these two factors, especially when dealing with storage limitations or bandwidth constraints. The goal is to achieve the best possible video quality within the given file size limitations.

Common MP4 Video Quality Issues and How to Fix Them

You might encounter some common MP4 video quality issues, like blockiness, blurring, or artifacts. I’ve seen these issues arise from several sources. These problems often result from using too low a bit rate, inappropriate codec, or incorrect encoding settings. To fix these issues, try increasing the bit rate, using a more efficient codec (like H.265), or adjusting the encoding settings.

MP4 Video Quality and the Viewing Experience

Ultimately, the goal is to deliver a viewing experience that is visually appealing and engaging. I always consider the target audience and the intended viewing environment when making decisions about MP4 video quality. Whether it’s a cinematic experience on a large screen or a quick viewing on a mobile device, optimizing MP4 video quality can significantly enhance the overall impact of your video.

Latest words on MP4 video quality

In conclusion, achieving excellent MP4 video quality requires a comprehensive understanding of the various factors involved. By carefully considering resolution, bit rate, codecs, frame rate, and encoding settings, you can optimize your videos for the best possible viewing experience. Remember that striking a balance between video quality and file size is essential, and tools like Mp4Gain can help you achieve this balance.

FAQ about MP4 video quality

What is the most important factor affecting MP4 video quality?

While multiple factors contribute, bit rate is often considered the most important factor affecting MP4 video quality. It determines the amount of data used to encode the video, directly impacting the level of detail and clarity.

Does higher resolution always mean better MP4 video quality?

Not necessarily. While higher resolution can provide more detail, it also requires a higher bit rate to maintain good MP4 video quality. If the bit rate is too low for the resolution, the video may appear blocky or blurry.

Which codec provides the best MP4 video quality?

H.265 (HEVC) generally provides better compression efficiency than H.264 (AVC), meaning it can deliver comparable MP4 video quality at a smaller file size. AV1 is a newer codec that aims to offer even better performance.

What bit rate should I use for 1080p MP4 video?

A good starting point for 1080p MP4 video is a bit rate of 5-8 Mbps for H.264 and 3-5 Mbps for H.265. However, the optimal bit rate depends on the complexity of the video content.

How does frame rate affect MP4 video quality?

Frame rate affects the smoothness of motion in a video. Higher frame rates (e.g., 60fps) can make motion appear smoother, but they also increase file size. Common frame rates include 24fps (cinematic), 30fps (standard), and 60fps (smooth motion).

What are common issues that reduce MP4 video quality?

Common issues that reduce MP4 video quality include using too low a bit rate, selecting an inappropriate codec, incorrect encoding settings, and upscaling low-resolution video to a higher resolution.

What encoding settings are best for MP4 video quality?

Variable bit rate (VBR) encoding generally provides better MP4 video quality than constant bit rate (CBR) encoding. Also, using an appropriate encoding profile (e.g., High) and level can improve quality.

How can I optimize MP4 video quality for YouTube?

To optimize MP4 video quality for YouTube, use a high resolution (1080p or 4K), a bit rate of 8-12 Mbps (for 1080p) or 35-45 Mbps (for 4K), the H.264 codec, and a frame rate that matches your source footage.

What is the relationship between MP4 video quality and file size?

There’s a direct relationship. Increasing the resolution, bit rate, or frame rate will generally improve MP4 video quality but also increase the file size. Finding the right balance depends on your storage and bandwidth limitations.

Can I improve the MP4 video quality of an already existing low-quality video?

While you can’t magically restore detail that wasn’t there originally, you can improve perceived MP4 video quality by using techniques like sharpening filters, noise reduction, and color correction. However, these methods have limitations.

Comments:

This article was super informative! I always wondered why some of my MP4 videos looked so bad. Now I know it’s not just about the resolution, but also the bit rate and codecs. Thanks for breaking it down!

Great explanation of MP4 video quality! I’ve been struggling with getting my videos to look good on YouTube. I’ll definitely try adjusting my encoding settings based on your recommendations.

As a beginner video editor, this article was a lifesaver. I learned so much about MP4 video quality and how to optimize my videos. Thanks for the helpful tips!

Thanks man, this stuff is greek to me but you explained it in a way i could understand with those analogies! The cake and window ones were perfect!

Okay, so you say that h.265 is better but what are the downsides vs h.264?

I’m shooting a short film and need to make sure it looks good on a big screen. This article helped me understand what settings I need to prioritize. Appreciate the info!

Keyframe Interval Selection in MP4 Encoding

Keyframe Interval Selection in MP4 Encoding

Keyframe Interval Selection in MP4 Encoding

Let’s talk about keyframe interval selection in MP4 encoding

Keyframe interval selection in MP4 encoding plays a crucial role in determining video quality and playback performance. A keyframe, also known as an I-frame, is a complete frame of video that acts as a reference point for decoding other frames. The interval between these keyframes significantly affects the video file size, quality, and playback smoothness. From my experience, adjusting the keyframe interval can mean the difference between a smooth streaming experience and constant buffering. For example, shorter intervals ensure quicker video recovery after seeking or during streaming interruptions, but they increase file size. Conversely, longer intervals reduce file size but may lead to visible artifacts during playback.

Choosing the right keyframe interval often depends on the specific use case. For live streaming, shorter intervals are typically better since they help maintain synchronization between the video and the stream. On the other hand, pre-recorded videos meant for download or local playback can benefit from longer intervals to optimize storage efficiency. When I work with encoding, I always consider the target platform. For instance, a video uploaded to social media may need a different setting than one intended for a high-definition television broadcast. Balancing these factors is critical for achieving the best outcome.

When encoding videos in MP4 format, it’s essential to test different keyframe interval settings to find the optimal balance. In my experience, using automated tools to analyze playback performance can save time and ensure better results. It’s also worth noting that some devices and platforms have specific requirements for keyframe intervals, which must be followed to avoid compatibility issues. Understanding these nuances has allowed me to optimize MP4 encoding for a wide variety of applications, from online streaming to video archiving.

Factors to consider when selecting keyframe intervals

Several key factors influence the choice of keyframe intervals, and understanding them can make encoding decisions easier.

  • Video content type: Action-packed sequences often require shorter intervals, while slower-paced scenes can use longer ones.
  • Target audience: Consider the playback device and internet connection quality of your viewers.
  • Platform requirements: Streaming services often specify recommended settings for keyframe intervals.
  • Encoding bitrate: Higher bitrates allow for longer intervals without sacrificing quality, while lower bitrates may need shorter intervals.

Each factor works together to impact the final viewing experience. For example, if you’re encoding a sports event, shorter keyframe intervals ensure viewers don’t miss any action when seeking through the video. Meanwhile, a tutorial or webinar may tolerate longer intervals since the content is less dynamic.

Latest words on keyframe interval selection in MP4 encoding

Keyframe interval selection is one of the most overlooked yet essential aspects of MP4 encoding. It directly impacts video quality, file size, and playback performance. Understanding the needs of your audience, platform, and content can help you make informed decisions about this critical setting. With the right tools, such as Mp4Gain, you can fine-tune your videos to optimize keyframe intervals and ensure seamless playback across all devices.

What is a keyframe in MP4 encoding?

A keyframe, or I-frame, is a complete image in a video stream used as a reference for other frames. It ensures video stability and quality during playback and seeking.

Why is keyframe interval important?

Keyframe interval affects video quality, file size, and playback. Shorter intervals improve seek times, while longer ones reduce file size but may compromise visual consistency.

What is the best keyframe interval for live streaming?

For live streaming, a keyframe interval of 2 seconds is commonly recommended to maintain synchronization and minimize buffering.

How do keyframe intervals impact file size?

Shorter keyframe intervals increase file size due to more frequent full-frame encoding. Longer intervals reduce file size but can lead to playback artifacts.

Can keyframe intervals affect video quality?

Yes, poorly chosen keyframe intervals can cause visible artifacts or reduced quality during playback, especially in low-bitrate videos.

Are there standard keyframe interval settings?

While there’s no universal standard, common settings include 2 seconds for streaming and up to 10 seconds for pre-recorded content.

What is a dynamic keyframe interval?

Dynamic keyframe intervals adapt to video content, inserting keyframes only when significant changes occur, balancing quality and efficiency.

Can I manually set keyframe intervals?

Yes, most video encoding tools allow you to manually configure keyframe intervals, giving you control over playback and quality.

How does frame rate affect keyframe intervals?

Frame rate determines the number of frames between keyframes. Higher frame rates require more frequent keyframes for the same interval duration.

What are the best practices for selecting keyframe intervals?

Best practices include considering video content, target platform, and bitrate to achieve optimal quality and performance.

Comments:

Keyframe intervals were always confusing for me, but this article really breaks it down in a way that makes sense. Thanks!

I tried setting my keyframe interval to 10 seconds, but my streaming app didn’t support it. Any tips for fixing this?

This helped me understand why my videos looked pixelated when I fast-forward. Great job explaining keyframes!

Not enough detail on how to handle dynamic content like sports. Would love more information on this specific topic.

Finally, an article that clearly explains keyframes! Most guides I read just gloss over it. Excellent job!

I followed your tips for setting a 2-second keyframe interval, and my live streams look so much better now. Thanks!

Wish there was more detail on how keyframes affect multi-camera setups. Still, this was very useful overall.

Efficient Chroma Intra Prediction in H.266/VVC

Efficient Chroma Intra Prediction in H.266/VVC

Efficient Chroma Intra Prediction in H.266/VVC

Efficient Chroma Intra Prediction in H.266/VVC

Let’s talk about Efficient Chroma Intra Prediction

As an expert in video compression technologies, I understand the importance of efficient chroma intra prediction in the context of H.266/VVC (High Efficiency Video Coding/ Versatile Video Coding). Chroma intra prediction plays a crucial role in reducing redundancy within video frames, leading to better compression ratios without compromising visual quality. By leveraging predictive coding techniques specifically tailored for chroma components, H.266/VVC aims to significantly improve video compression efficiency compared to its predecessors.

Chroma intra prediction involves predicting the chroma (color) components of a video frame based on neighboring pixels within the same frame. Unlike inter prediction, which utilizes motion estimation to predict future frames, intra prediction relies solely on information contained within the current frame. This makes it particularly important for achieving high compression efficiency in scenarios where inter-frame prediction is not feasible or effective, such as still scenes or sudden scene changes.

The Importance of Chroma Intra Prediction in Video Compression

Efficient chroma intra prediction is crucial for achieving substantial bitrate savings in video compression. By accurately predicting chroma components, redundant information can be efficiently removed, resulting in smaller encoded video streams without perceptible loss of quality. This is especially significant for applications with bandwidth constraints, such as streaming services, where minimizing data transfer without sacrificing visual fidelity is paramount.

Reducing Redundancy in Color Information

  • Explaining how chroma intra prediction reduces redundancy in color information
  • Highlighting the importance of accurate chroma prediction for preserving image quality
  • Discussing the impact of chroma subsampling on compression efficiency

Chroma intra prediction techniques exploit spatial correlations between neighboring chroma samples to predict their values. Common prediction modes include DC (average of neighboring samples), horizontal, vertical, and directional modes, each tailored to different patterns of chroma information within a frame. By selecting the most suitable prediction mode based on the characteristics of the chroma data, H.266/VVC achieves superior compression efficiency compared to previous standards.

Adaptive Prediction Modes

  • Discussing the concept of adaptive prediction modes in chroma intra prediction
  • Exploring how H.266/VVC dynamically selects prediction modes based on content characteristics
  • Highlighting the benefits of adaptive prediction for versatile compression performance

One of the key advancements in H.266/VVC is its ability to adaptively switch between different prediction modes within a frame. This adaptive approach ensures optimal utilization of prediction resources, allowing the encoder to accurately capture chroma details while minimizing the overall bitrate. By intelligently adjusting prediction modes based on content complexity, H.266/VVC delivers superior compression efficiency across a wide range of video content.

Transform Coding and Residual Coding

  • Explaining the role of transform coding in video compression
  • Discussing residual coding and its contribution to compression efficiency
  • Highlighting the synergy between prediction, transformation, and entropy coding

In addition to chroma intra prediction, H.266/VVC employs advanced techniques such as transform coding and residual coding to further enhance compression efficiency. Transform coding, typically using the Discrete Cosine Transform (DCT) or similar methods, helps decorrelate spatial information, making it more amenable to compression. Residual coding captures the difference between the original and predicted values, enabling more accurate reconstruction at the decoder.

Efficient Representation of Chroma Information

  • Discussing techniques for efficient representation of chroma information in video coding
  • Exploring the challenges posed by chroma subsampling and color space conversion
  • Highlighting innovations in chroma coding for improved compression performance

Efficient representation of chroma information is critical for achieving high compression ratios while maintaining visual quality. Techniques such as chroma subsampling and color space conversion help reduce the bitrate overhead associated with chroma components, ensuring that the majority of the available bandwidth is allocated to preserving luminance (brightness) information, which is more perceptually sensitive.

Latest words on Efficient Chroma Intra Prediction

In conclusion, efficient chroma intra prediction is a cornerstone of modern video compression standards such as H.266/VVC. By leveraging advanced predictive coding techniques tailored specifically for chroma components, H.266/VVC achieves unprecedented compression efficiency while delivering superior visual quality. The adaptive selection of prediction modes, coupled with innovative approaches to transform and residual coding, ensures optimal compression performance across diverse video content. As bandwidth constraints continue to challenge the multimedia industry, the evolution of chroma intra prediction remains instrumental in enabling next-generation video applications and services.

Comments:

Wow, I never knew there was so much complexity behind video compression! This article really opened my eyes to the intricacies of chroma prediction.

As someone who works in the streaming industry, I appreciate articles like this that dive deep into compression technologies. It’s fascinating to see how much effort goes into optimizing video delivery.

I found this article informative, but I wish it delved more into the technical aspects of chroma prediction algorithms. Maybe a follow-up article could explore that in more detail?

Great overview of chroma prediction in video coding! It’s amazing to see how far we’ve come in terms of compression efficiency, thanks to advancements like H.266/VVC.

As a video enthusiast, I’m always curious about the latest developments in compression standards. This article provided a comprehensive overview of chroma intra prediction and its importance in modern codecs.

This article helped me understand why some videos look better than others even at lower bitrates. It’s all about efficient prediction and compression techniques!

Really insightful article! I never realized how much optimization goes into reducing the size of video files while maintaining quality.

It’s fascinating to learn about the technical intricacies of video compression. This article provided a clear and concise explanation of chroma intra prediction and its role in modern codecs.

I’ve always been curious about how video compression works, and this article provided a great overview of one of its key components. Looking forward to reading more articles like this!

As a content creator, understanding video compression is essential for optimizing the delivery of my videos. This article shed light on the importance of chroma intra prediction in achieving efficient compression.

Video Compression Methods

Video Compression Methods

Video Compression
Video Compression
Video Compression
Video Compression


Introduction to Video Compression

Video compression is the process of reducing the size of digital video files without sacrificing quality. Compression is necessary for efficient storage and transmission of video over networks or on physical media. The compression process involves removing redundant and non-essential information from the video stream, while retaining as much perceptual quality as possible. There are several video compression methods available, each with its own strengths and weaknesses.

Lossy Compression

Lossy compression is the most common method of video compression. It works by discarding information that is deemed less important, based on visual perception. The discarded information cannot be recovered, which is why this method is called “lossy”. The amount of compression can be adjusted by varying the amount of information that is discarded. Popular lossy video compression codecs include H.264, MPEG-4, and VP9.

Lossless Compression

Lossless compression, on the other hand, retains all of the original information, but compresses it in a way that can be reconstructed exactly. This method is typically used for archival or master copies, where quality cannot be sacrificed. However, lossless compression does not achieve the same degree of compression as lossy methods. Examples of lossless video compression codecs include Apple ProRes and Avid DNxHD.

Hybrid Compression

Hybrid compression methods combine elements of both lossy and lossless compression. These methods use lossy compression on parts of the video that are less important, and lossless compression on parts that are more important. The result is a balance between quality and compression efficiency. One example of a hybrid compression codec is the JPEG2000 format.

Variable Bit Rate (VBR) vs. Constant Bit Rate (CBR)

Video compression can be further classified as either variable bit rate (VBR) or constant bit rate (CBR). In VBR, the bit rate varies depending on the complexity of the video content. This allows for higher quality in complex scenes, while still maintaining a reasonable file size. CBR, on the other hand, maintains a constant bit rate throughout the entire video stream. This results in predictable file sizes, but can lead to lower quality in complex scenes.

Compression Settings

The effectiveness of video compression is highly dependent on the settings used during compression. Key settings include the bitrate, resolution, frame rate, and codec. Higher bitrates and resolutions result in higher quality, but also larger file sizes. The codec used can also have a significant impact on the quality and compression efficiency. Experimenting with different settings can help achieve the desired balance between quality and file size.

Conclusion

Video compression is a necessary part of modern video production and distribution. There are several compression methods available, each with its own advantages and disadvantages. Choosing the right compression method and settings requires a balance between quality and file size.

FAQ

1. What is the difference between lossy and lossless compression?

Lossy compression discards information that is deemed less important, while lossless compression retains all of the original information. Lossy compression achieves higher compression ratios, but at the expense of quality.

2. What are some common video compression codecs?

Some common video compression codecs include H.264, MPEG-4, VP9, Apple ProRes, and Avid DNxHD.

3. What is hybrid compression?

Hybrid compression methods combine elements of both lossy and lossless compression. These methods use lossy compression on parts of the video that are less important, and lossless

The perfect video compression

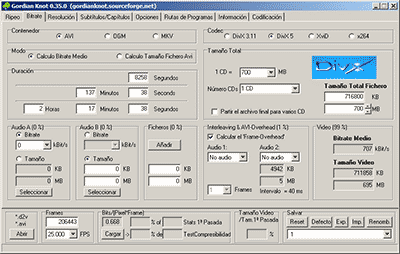
We all like to enjoy great image quality in the videos and movies we watch on the computer, especially if you make your own compressed copies of DVD movies. I have always relied on the popular DivX but, now that there are other types of compression such as Xvid and some as modern as the H.264, it would be worth comparing to discover which one offers the best quality in the smallest size.


For the test I have chosen the movie Transformers, released in November 2007 and directed by Michael Bay, with Shia Labeouf and Megan Fox as protagonists. It is an action movie with a variety of scenes: static in great detail, with movement, explosions, lots of color … ideal for testing. The DVD boasts a very high image quality, as evidenced by the editors of a well-known magazine.

codecs

Choice of codecs, bitrates and encoders

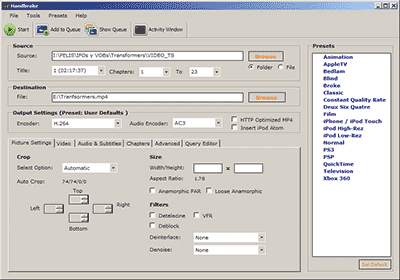
To carry out the test, you have to choose different “compression methods”, each of them to several different “qualities” and using one or several programs that allow to compress in this way.
Things have changed a lot since in 2000 I compressed my first movie in DivX 3.11 format. It took me a whole day looking for information on the Internet on how to do it and my computer at that time (an AMD K6 II of 400Mhz) took all night to compress it in only 650 MB. Since then I have been using all versions of DivX, from 3.11 to the current 6. But the Xvid codec sounds more and more and there are excellent comments from the newest H.264, so the question is on the table: what is The best way to compress to achieve sublime image quality? Well, for this you have to discover which is the best codec and use it at the optimal bitrate with the ideal encoder. But what about that “codec”, “bitrate” and “encoder”?

Codec, the type of compression

The “compression method” is what in the video world is called “codec”, which is the acronym for COmpresor-DECompresor, a program capable of compressing and decompressing the image in a certain way. It is something similar to what photography programs incorporate to allow them to read and write files in JPEG format, for example. The type of compression that incorporates the DVD is called MPEG-2 and is already considered somewhat old, being surpassed by the MPEG-4 standard, more modern and efficient.
The problem is that there are many types of MPEG-4 and it is not clear which one is the best.

On the one hand there is DivX (a variant of the MPEG-4 type called ASP; see official page), which is tremendously popular and more and more DVD lounge players admit it. The decompressor (necessary to watch the videos) is free, but the compressor (to generate them) is paid.

There is also Xvid, (which is the same type as DivX; official page) a competitor of DivX (its name is the same, but vice versa) although completely free.

codec

And finally, the very modern H.264, of the MPEG-4 AVC type, a prodigy of compression according to experts. Well, to find out which one is better, I have compared the generic MPEG-4 with these three contenders. There are several codecs to use this type of compression, but the most popular is the x264, mostly because it is free, which is what I used.

The versions that I have used for this comparison are the following: DivX Pro v6.8.2, Xvid v1.2 and x264 revision 808.

Bitrate, the amount of compression

Already with each of them, you can select the “quality” image, similar to how you choose the quality between 0 and 12 when saving a JPEG file from Photoshop. The difference is that in the world of video this is known as bitrate, which is nothing more than the bit stream per second of video, and is measured in bits per second and their multiples. Since video is a succession of frames formed of pixels (ultimately bits), this parameter measures the flow of information per second; at higher flow, higher quality and vice versa. In our case, I will use measures in “kbps” (“Kb / s” would also work), that is, kilobits per second (be careful, don’t confuse it with KB / s, which would be kiloBytes per second, an 8 times larger unit).
In order not to make the mistake of falling short, I have chosen 7 different bitrates, starting from an intermediate one. Taking the original DVD image, with a 720×304 pixel size frame