What is Audio Compression Threshold and How it Affects Sound Quality


Free Download Mp4Gain
picture

What is Audio Compression Threshold and How it Affects Sound Quality
Audio Compression
Audio Compression
Audio Compression
Audio Compression

Introduction

Audio compression is a technique used to reduce the dynamic range of an audio signal. It is commonly used in music production to make a recording sound louder and more impactful. However, compressing audio too much can lead to a loss of detail and a reduction in sound quality. In this article, we will explore the concept of audio compression threshold and how it affects sound quality.

Understanding Audio Compression

Audio compression is the process of reducing the dynamic range of an audio signal by attenuating the louder parts of the signal while leaving the quieter parts untouched. The main purpose of audio compression is to make the overall level of the audio signal more consistent, which can make it easier to listen to and mix with other tracks.

However, compression can also introduce artifacts such as pumping, breathing, and distortion, which can affect the quality of the sound. Therefore, it’s important to understand the parameters of audio compression, such as threshold, ratio, attack, and release, to achieve the desired sound.

“Compression is like a lens in photography. Just as a lens can bring certain parts of an image into focus while blurring others, compression can bring certain parts of an audio signal into focus while reducing the dynamic range.” – Bobby Owsinski, The Mixing Engineer’s Handbook

What is Audio Compression Threshold?

The compression threshold is the level at which the compressor starts to attenuate the audio signal. In other words, it’s the point at which the compressor kicks in and starts reducing the level of the audio signal. The threshold is usually set in decibels (dB), and it can range from -60 dB to 0 dB or higher.

Setting the compression threshold too low can result in over-compression, where the compressor is constantly active and the audio signal loses its natural dynamic range. On the other hand, setting the threshold too high can result in under-compression, where the compressor doesn’t kick in enough and the audio signal remains too dynamic. Therefore, finding the right compression threshold is crucial for achieving the desired sound.

“The compression threshold is the gatekeeper of the compressor. If you set it too low, the compressor will work too hard and the sound will lose its natural dynamics. If you set it too high, the compressor won’t work enough and the sound will be too dynamic.” – Bob Katz, Mastering Audio: The Art and the Science

How Compression Threshold Affects Sound Quality

The compression threshold can have a significant impact on the sound quality of an audio signal. Setting the threshold too low can result in a squashed and lifeless sound, while setting it too high can result in a dynamic and uncontrolled sound. Therefore, it’s important to find the right balance between dynamic range and consistency.

Additionally, different instruments and sounds require different compression thresholds. For example, a snare drum may require a higher threshold than a vocal track, as the snare drum has a shorter decay time and more transient peaks. Therefore, it’s important to adjust the compression threshold for each individual track to achieve the desired sound.

“The compression threshold is like a knife. Use it wisely,
Copy to Clipboard

clipboard emoji

User
continua donde te uedaste que fue en:

“The compression threshold is like a knife. Use it wisely,
ChatGPT

How to determine the right compression threshold

Determining the right compression threshold can be tricky, and it can take some trial and error to find the sweet spot. Here are a few tips to help you get started:

  • Start with a low threshold: A good starting point is a threshold of around -30dB. This will ensure that you are compressing the quieter parts of your audio, without squashing the louder parts.
  • Listen carefully: When you apply compression, listen carefully to the changes in the audio. You want to make sure that the compressor is not introducing any unwanted artifacts or distortion.
  • Experiment with different settings: Try adjusting the threshold up and down to see how it affects the audio. You may also want to experiment with the attack and release times, as well as the ratio setting.

Remember, there is no one-size-fits-all solution when it comes to compression. You will need to experiment to find the settings that work best for your particular audio.

“Compression is a great tool, but it’s easy to overdo it. Always err on the side of subtlety, and remember that sometimes a little goes a long way.”

– Brian Eno

The importance of a balanced mix

One of the most important aspects of audio compression is ensuring that your mix is balanced. If one element of the mix is too loud, you may be tempted to apply heavy compression to bring it down to the same level as the other elements. However, this can result in a dull and lifeless mix.

The key is to start with a well-balanced mix. This means that each element of the mix should be at a similar volume level, without any one element dominating the others. Once you have a balanced mix, you can then use compression to add subtle enhancements and make the mix sound even better.

“A good mix is all about balance. Each element of the mix should have its own space, and nothing should be too dominant.”

– Rick Rubin

The dangers of overcompression

While compression can be a powerful tool for enhancing the sound of your audio, it can also be easy to overdo it. Overcompression can result in a number of unwanted artifacts, including distortion, pumping, and breathing.

One of the main dangers of overcompression is the loss of dynamic range. Dynamic range refers to the difference between the loudest and quietest parts of your audio. When you apply too much compression, you reduce the dynamic range, resulting in a flat and lifeless sound.

Another danger of overcompression is the loss of transients. Transients are the short, sharp peaks in the audio that give it its punch and energy. When you apply too much compression, you can squash these transients, resulting in a dull and uninspired sound.

“Compression is a great tool, but it’s important to remember that it’s just one tool in the toolbox. Don’t rely on it too heavily, and always remember to use it in moderation.”

– Tony Maserati

Free Download Mp4Gain
picture


Mp4Gain Main Window
picture


Mp4Gain Features
picture


Free Download Mp4Gain
picture

Audio and Video Compression Basics

Audio and Video Compression Basics

Audio and Video Compression Basics


As we rely more and more on digital media, understanding the basics of audio and video compression becomes increasingly important. Compression is the process of reducing the size of digital files without sacrificing too much quality. Without compression, media files would take up a lot more space on our hard drives, making it difficult to store and share them. In this article, we’ll explore the fundamentals of audio and video compression and how it works.

Understanding Audio Compression

Audio compression is the process of reducing the dynamic range of an audio signal. Dynamic range is the difference between the quietest and loudest parts of a sound recording. Compression reduces this difference, making the quieter parts louder and the louder parts quieter. This is useful for improving the overall balance of a mix, and also for preventing distortion when the loudest parts of a recording exceed the maximum level of the recording medium.

Compression can be applied during recording or in post-production, using software tools like mp4gain. When done properly, compression can improve the clarity and punch of a recording, making it sound more polished and professional. However, overuse of compression can lead to a loss of detail and a “squashed” sound that lacks dynamics.

As musician David Byrne said in his book “How Music Works”:

“A good mix is one where the listener can hear and feel everything that the musicians and the engineer intended to be there.”

Understanding Video Compression

Video compression is the process of reducing the size of a video file by removing redundant or unnecessary data. This is done by encoding the video using a codec, which stands for “coder-decoder”. Codecs use complex algorithms to analyze each frame of a video and compress it in a way that minimizes the loss of quality.

There are two types of video compression: lossless and lossy. Lossless compression reduces the size of a video file without any loss of quality, but it’s not as effective as lossy compression in terms of file size reduction. Lossy compression, on the other hand, sacrifices some quality to achieve a smaller file size. The level of quality loss depends on the amount of compression applied.

When it comes to video compression, there are many factors to consider, including the resolution, bit rate, and frame rate. By adjusting these parameters, you can find the right balance between file size and quality for your particular needs.

As filmmaker and author Robert Rodriguez once said:

“Filmmaking is a chance to live many lifetimes.”

Compression Techniques for Audio and Video

There are many compression techniques used in audio and video, each with its own strengths and weaknesses. In audio, the most common type of compression is called “peak compression”, which reduces the volume of loud sounds that exceed a certain threshold. Another type of compression, called “multi-band compression”, divides the audio signal into multiple frequency bands and applies compression to each band separately.

For video compression, the most popular codecs are H.264 and HEVC (High-Efficiency Video Coding). H.264 is widely used for streaming video on the internet, while HEVC is more efficient but requires more processing

Audio Compression Techniques: Understanding the Basics

Audio Compression Techniques: Understanding the Basics

Audio Compression
Audio Compression
Audio Compression
Audio Compression

What is Audio Compression?

Audio compression is the process of reducing the size of digital audio files by removing redundant or unnecessary information, while maintaining the perceived quality of the original sound. This is done by using various algorithms that analyze and modify the audio data in a way that reduces its file size.

Types of Audio Compression Techniques

There are two main types of audio compression techniques: lossy and lossless.

Lossy Compression

Lossy compression algorithms are used to achieve high compression rates, but at the cost of some loss in quality. In lossy compression, some of the original audio data is discarded or modified in a way that reduces its size. The amount of data that is removed or modified depends on the compression algorithm used.

Some popular lossy compression algorithms include MP3, AAC, and WMA. These algorithms are commonly used for music streaming, online radio, and other applications where high compression rates are necessary.

Lossless Compression

Lossless compression algorithms are used to compress digital audio files without losing any information. These algorithms are designed to reduce the size of the file by removing redundancies in the data, but without modifying any of the original information.

Some popular lossless compression algorithms include FLAC, ALAC, and WAV. These algorithms are commonly used for high-quality music streaming and for archiving music collections.

How Audio Compression Works

Audio compression works by analyzing the original audio data and then modifying it in a way that reduces its size while maintaining its quality. This is done using various mathematical algorithms that compress the data.

The most common way to compress audio data is to use perceptual coding. This method takes advantage of the human ear’s limitations in hearing certain frequencies and sounds. By removing these sounds, the audio data can be compressed without the listener noticing any loss in quality.

Another method of audio compression is predictive coding. This method uses mathematical algorithms to predict the next sample in a waveform based on previous samples. The difference between the predicted sample and the actual sample is then compressed and stored.

Why Audio Compression is Important

Audio compression is important because it allows us to store and transmit audio data more efficiently. This means that we can store more audio files on our devices and transmit audio data faster over the internet. Without audio compression, it would be impossible to stream music or podcasts over the internet.

12 Common Questions About Audio Compression Techniques

1. What is the difference between lossy and lossless audio compression?

Lossy compression algorithms are designed to achieve high compression rates at the cost of some loss in quality, while lossless compression algorithms are designed to compress audio files without losing any information.

2. Which audio compression algorithm should I use?

The choice of audio compression algorithm depends on the intended use of the audio file. Lossy compression algorithms like MP3 and AAC are commonly used for music streaming and online radio, while lossless compression algorithms like FLAC and ALAC are commonly used for high-quality music streaming and archiving.

3. How much does audio compression affect the quality of the original sound?

The amount of quality loss in audio compression depends on the compression algorithm used and the degree of compression applied. Lossy compression algorithms generally result in some loss in quality, while lossless compression algorithms do not.

4. How can I tell if an audio file has been compressed?

You can usually tell if an audio file has been compressed by looking at its file extension. Lossy compressed files usually have extensions like MP3, AAC

How to choose the perfect compressor configuration

Compressors and how to use them, explained.

Compression is one of your most powerful mixing tools. It is the essential element behind any good mix.

But for your compressors to work, you must first understand what compression is.

It can seem intimidating to start learning such a broad subject, especially when the controls and how they affect the signal are difficult to understand in relation to the sound.

This article will help you understand what compression does, how to choose the perfect compressor setting, and some common mistakes to avoid.

But before…

What is compression in music?

Compression in music is the process of reducing the dynamic range of a signal. Dynamic range is the difference between the loudest and quietest parts of an audio signal.

audio compression

You must reduce the dynamic range of most audio signals to sound natural to a recording.

For example: imagine a whisper and a scream on the same audio track. If they had the same volume difference as they do in real life, it would be very annoying!

Compressors fix all of this by attenuating the loudest parts of the signal and boosting what is output so that the quieter parts are more noticeable.

Imagine a whisper and a scream on the same audio track. If they had the same volume difference as they do in real life, it would be very annoying!
Using compression
Experienced engineers often talk about how one compressor is more “musical” than another.

It is an important concept. Its dynamics is one of the fundamental aspects for its sound to be unique.

When you use a compressor to change the dynamics, the sound engineer becomes part of the musical performance.

If your compressors work properly, they will positively contribute to performance and improve recordings.

Transients: understanding high energy moments.

To understand compression, you need to know what transients are.

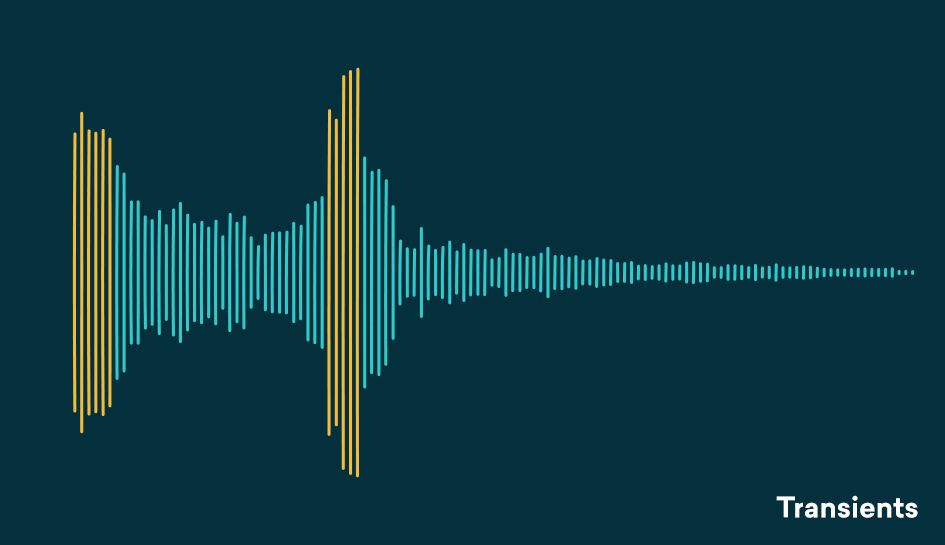
Transients are the first high-energy moments of a certain sound in its waveform. These explosions give our brain a lot of information about the quality of a sound.

Since transients are usually louder than the rest of the waveform, they are greatly influenced by compressors.

For example: think of a nice roaring trap. As soon as the trap enters, there is an initial peak in the waveform that narrows slowly. That initial energy spike is your transient.

transient compresor

Compression helps you find the perfect balance for a track that has good dynamic range with a beautiful, full body.
A waveform with good dynamics will have a lot of transients when some sounds hit and then decay in the composition. Transients and their final decay are what make a waveform similar to a fish bone.

There is even an overly dynamic trail. If your song is transient without a body, its sound will not be of interest to your ear.

The reverse is also true, no dynamics can lead to lifeless, exhausting sound for the human ear and a waveform that looks like a big brick.

Compression helps you find the perfect balance for a track that has good dynamic range with a beautiful, full body.

Limiter

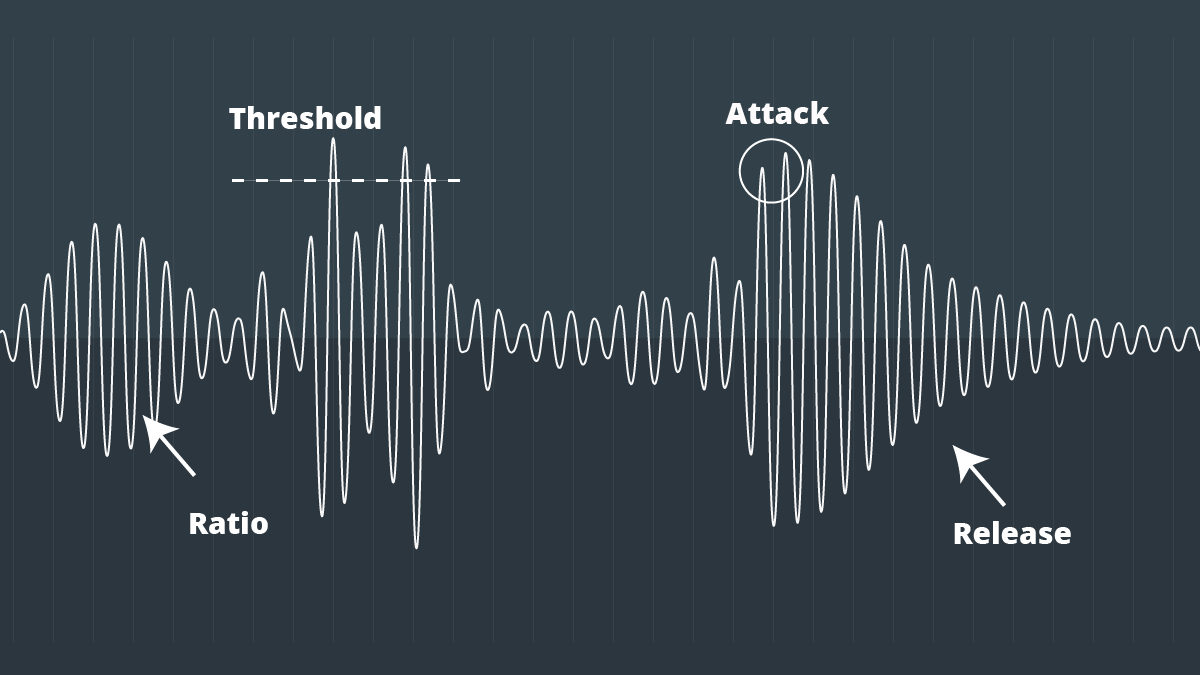
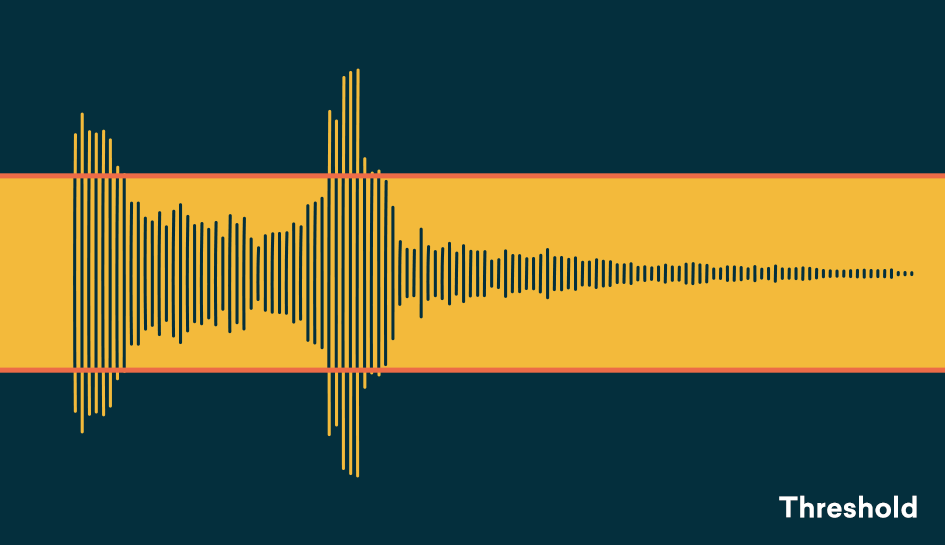
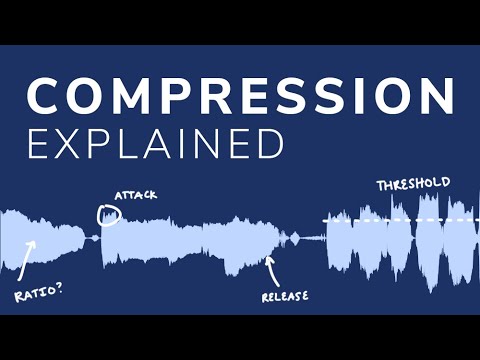
The threshold determines the signal level at which the compressor will start operating. The threshold is measured in dB, therefore any signal above the set threshold will be compressed.

When setting the threshold, decide what part of the signal you want to reduce.
With the threshold low, the compressor gain reduction is applied to a larger portion of the signal. Setting it higher affects only the most aggressive peaks and leaves the rest intact.

To determine what the perfect threshold is, think about what you’re trying to accomplish by compressing the audio and which parts of the signal are the most troublesome.

Are strong signal transients distracting you from the rest of your mix? Or maybe your final decadence is imperceptible in the mix?

A good rule of thumb for compression is “do no harm.”
Set the threshold to hear compressor operation on the part of the signal that needs to be addressed and not lowered.

Setting the perfect threshold will depend on your needs. Play the track and tweak it on the go to find the perfect amount.

Relationship

The ratio determines the amount of gain reduction applied by the compressor when the signal exceeds the threshold. It is called a relationship because it is expressed in comparison with the unaffected signal.

The higher the first number in the report, the greater the gain reduction factor.

For example, we can say that an uncompressed signal would have a 1: 1 ratio

What is the compressor and how does it work?

The compressor, together with the equalizer, is one of the most important and most used processors in professional audio, but its operation is not always so intuitive and knowing how to master the compression technique sometimes requires years of experience. In this new article we begin to explore this fundamental processor.

What is the compressor for?

First of all, let’s start to see what the compressor’s function is: to reduce the dynamic range of an audio track, that is, to decrease the distance in volume between the weakest signal and the strongest signal. Initially created to optimize recording on magnetic tape and to avoid saturation of the input stages, the compressor is still used today during recording and mixing. Reducing dynamic range also allows us to keep multiple tracks in the mix, such as a voice, for example, always at the same volume throughout the song so that they are not dominated by the other instruments in the most crowded sections, as well as to avoid Output saturation.

Compressor

Back to basics: what is the compressor and how does it work

The controls

Now let’s see in detail what the various compressor controls are and what they are for:
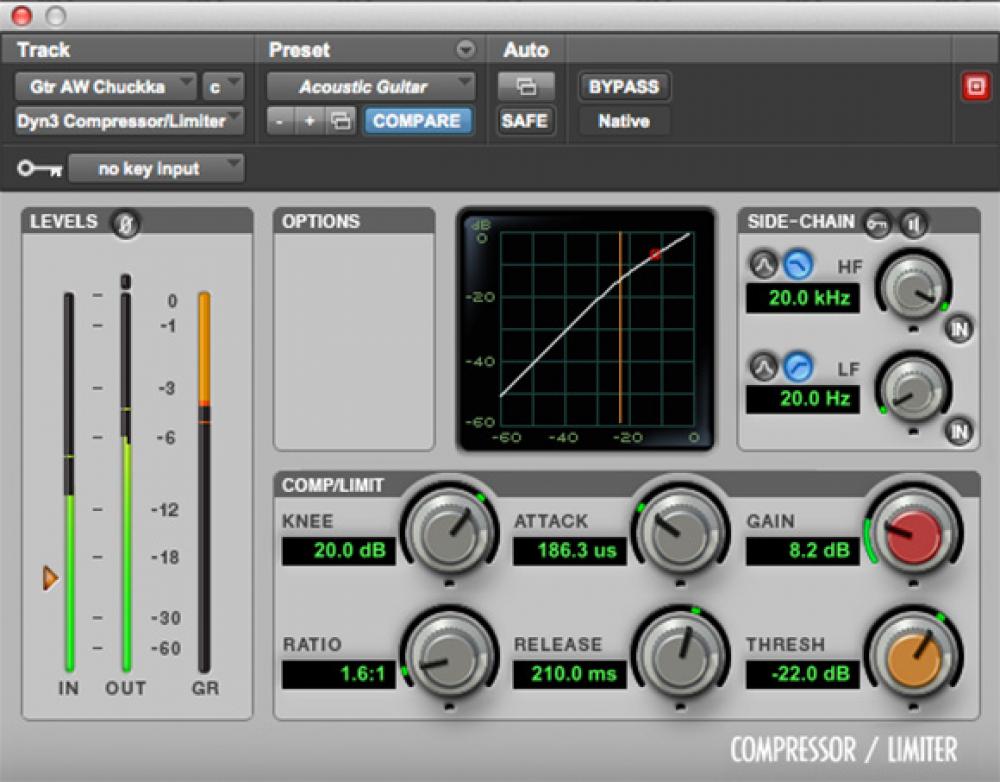
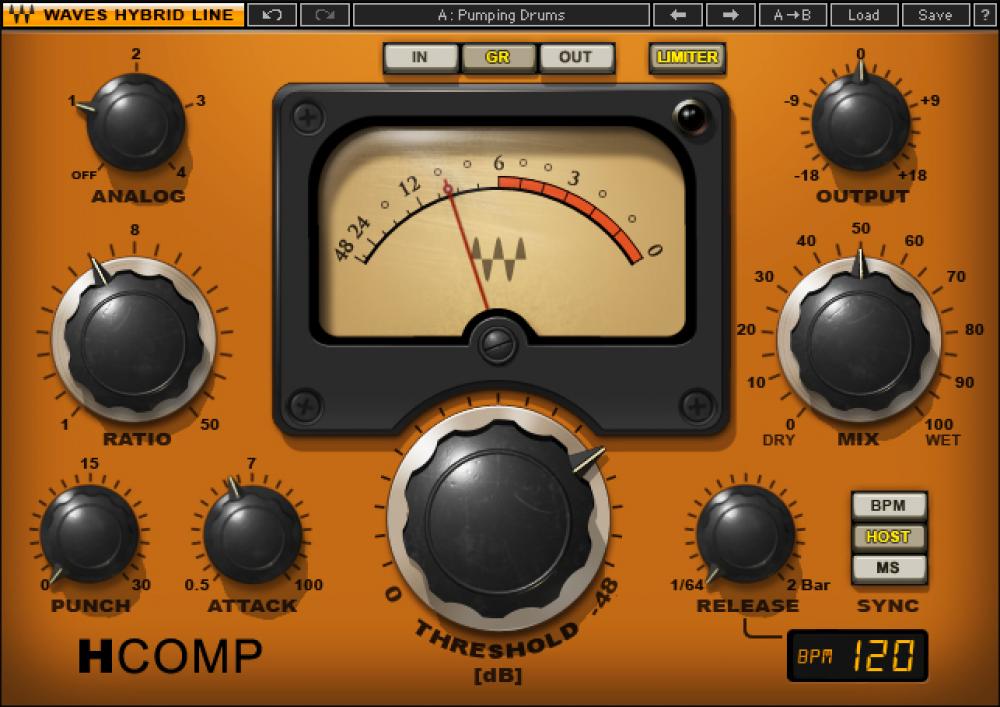
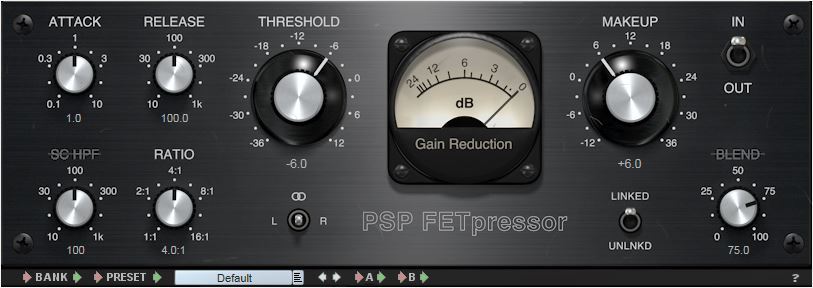
— Threshold: or threshold, expressed in dB, indicates the point beyond which the compressor begins to operate.
— Ratio: is the compression ratio and indicates how much the signal will compress when it exceeds the Threshold. For example, with a 2: 1 ratio, each signal that exceeds the threshold will be halved at the output, that is, every 2 dB at input 1 will be returned at the output.
— Make Up Gain: This is the output of the compressor and is used to recover the volume lost due to compression.
— Attack: expressed in milliseconds is the time it takes for the compressor to start once the signal has passed the threshold.
— Release: always expressed in milliseconds, it indicates the time it takes for the compressor to stop compression once the signal has returned below the threshold.
— Gain reduction meter: it is not a control but a visual indicator, led or pointer, which informs how much the signal is compressed, through a scale in dB.
— Bypass: shuts down the processor, making the signal pass through the machine without alteration.

With the advent of digital and accessories, we can find controls that not all hardware compressors have:
— Knee: indicates the type of curve at the point where the compressor begins to operate, which can be abrupt (Hard Knee), soft (Soft Knee) or various intermediate values.
— Automatic: sets the time control to which it refers (attack, release or both) automatically, depending on the input signal (program dependent).
— Sidechain eq or External Sidechain: Sidechain is the signal that drives the compression circuit, where in most cases it is the signal itself to compress, but sometimes it can be a version of the input signal with different equalization, for example without low frequencies, so that they don’t start the compressor too soon. Or it can be an external signal, such as the one used on the radio where the speaker’s voice signal drives a compressor on the background music signal, so it automatically turns off when it starts to speak (Ducking), or Classic Speaker Use to activate the compressor on various instruments in the mix or the Master Buss.
— Mix: used to mix the compressed signal with the original signal. This way, you can use Parallel Compression directly on the compressor, without having to use two mixer tracks (one for the dry signal and one for the compressed signal).
Back to basics: what is the compressor and how does it work

Compressor

Compressor or limiter?

What is the difference between a compressor and a limiter?

Essentially, the compression ratio: over 10 dB ratio, the processor is considered a limiter. A separate case is the Brickwall Limiter, a compressor with immediate attack and a compression ratio of infinity to 1, so that no signal can exceed the Threshold. It is mainly used on the master buses so as not to exceed 0dBFS on the output and then send the converters to clips.

Usage examples

As we already said, the compressor is used to keep the volume excursion under control. One track in the mix: in this case, using a fairly fast attack, slow release and not too aggressive ratio, allows us to compress the signal constantly and transparently, that is, without making your intervention feel excessively.
The compressor can also serve to emphasize the attack of a percussion instrument: in one case, for example, by setting a medium slow attack.

Audio normalization or compression

The function of a compressor is to reduce the dynamic range of the signal, that is, the level difference between the strongest and weakest signal parts.

Why compression or normalize?

At the time of analog, the limited dynamics of the main musical supports (vinyl, audio and video cassettes) did not allow to reproduce the dynamics of a classical, jazz or even rock orchestra in the case of the audio cassette. Therefore, the signal was compressed to avoid distortion in the transmission medium.

audio compression or normalization

Now that the music is converted to 16-bit or more, recorded in digital format, and then streamed to CD / DVD or downloaded, the dynamics of the media is enough to faithfully reproduce the dynamics of almost any orchestra. The old technical limitations have disappeared, therefore compression is no longer essential.

However, whatever the musical genre, some sources (voices) are compressed almost systematically. The goal of modern compression is therefore to optimize sound recording, either to get closer to reality or, conversely, to create a less faithful but denser, more controlled, more powerful sound, etc., or even a sound. totaly new.

And to do all this, the compressor is satisfied with a simple principle: it reduces dynamics by attenuating the signal level when the latter exceeds a given threshold level.

Level settings

– Threshold (threshold level, in dB)

This parameter determines the threshold level from which the compressor is triggered. As long as the input signal level remains below the threshold, the compressor does not start and no treatment is applied. As soon as the source signal exceeds the threshold level, compression is applied.

– Ratio (compression ratio)

The ratio determines the amount of level reduction applied to the part of the signal that exceeds the threshold level, the rest of the signal is not processed. Depending on the compressor, the ratio can vary from 1: 1 to Inf: 1. Quésaco?

Set up a compressor

With a 1: 1 ratio, no compression is applied, the level of the input signal is equal to that of the output signal. With a ratio of 2: 1, the level of the signal portion that exceeds the threshold is divided by 2 in the output signal. With a 3: 1 ratio, it is divided by 3, etc. When the compression ratio is infinite (Inf: 1 ratio), the compressor behaves like a limiter: the output signal never exceeds the threshold level, regardless of the input level.

Therefore, the compression intensity applied to the signal is a compromise between the threshold and the compression rate setting:

The lower the threshold, the larger the compressed signal portion.
The higher the ratio, the greater the level reduction applied to the signal portion above the threshold.
Depending on the compressors, you may find other parameters, for example, an input level setting instead of the threshold, or a gain setting (also called the offset or output level) that amplifies the signal to compensate for the drop in level resulting from compression.

Time settings

– Attack (attack, in ms)

Attack corresponds to the time the compressor needs to reach the given ratio when the signal level exceeds the threshold level. A quick attack of a few milliseconds triggers strong compression as soon as the signal level exceeds the threshold; With a slower attack, the compressor passes the first transients of the signal peaks, keeping one side alive and well cut.

Set up a compressor

– Launch (launch, in ms and s)

Release corresponds to the time the compressor needs to return to the 1: 1 unit ratio when the source signal falls below the threshold level. A quick launch of a few tens of ms allows the original character to stay alive. Slower relaxation improves instrument resonance and reverberation, but can cause compression of the first peak transients when the latter are close together.

– Knee (literally knee!)

The Knee parameter determines the increase in compression, that is, the transition between the compression ratio of the unit (1: 1, no compression) and the compression ratio set to ratio.

Applications

At the output, the compressor can be used as a limiter to control signal peaks and prevent distortion from occurring in the analog / digital conversion stage.
When taking and mixing, light compression can bring out weak parts of the signal and thus reveal certain details.
In the mix, the compressor allows you to increase the average level of the audio volume output.

Destructive compression vs non-destructive

Destructive compression is compression obtained by losing information. This means that if you extract the compressed signal with this technique, you will not find the start signal.

Destructive Vs Non-Destructive Audio compression

In destructive compression techniques, there are basically methods that take advantage of the properties of the human ear. The latter listens to frequencies between 20 Hz and 20 kHz. If a song contains frequencies outside this range, we can easily delete them without losing the audio quality because the ear does not hear them. In fact, frequencies between 2 kHz and 5 kHz are generally heard correctly. In fact, less than 5 dB is required to hear frequencies in this band, while more than 20 dB is required to hear frequencies below 100 Hz or above 10 kHz. These results can be used to reduce the size of the files. For example, we can conclude that all frequencies above 15 kHz are suppressed.

audio compression

MP3 also uses the principle of masked frequencies. If in a frequency group some have a much higher noise level than others, it is not necessary to keep the frequencies low – we will not hear them. Imagine yourself in your garden listening to the birds sing. The chord goes over your head (even very high). We no longer listen to birds because the sound they make is much quieter than that of the plane. It is as if the birds no longer exist or have stopped singing. Obviously, it is not necessary to code all the frequencies present in a song so that the human ear can always perceive it well. Finally like the two ways

What do we find among non-destructive techniques?

Mainly coding techniques.

Let’s explain. A sound is a frequency. A second of music is therefore a sequence of frequencies. Imagine that in the series of samples that make up a second of music (remember that there are 44,100), we have the same frequency several times in succession, for example 10 times. If instead of storing these 10 points, we only store 1 and the number of times it is repeated, we must encode 2 digits and not 10. If we also apply this method to frequencies which are no longer identical, but very dense together (so close that the average human ear cannot distinguish them), we can still save space. This time, the compression is destructive because we are replacing one frequency with another frequency (almost identical).

MP3 also uses the algorithm of Huffman (1952) as a method of encoding information. This method is used in all compression algorithms (compression of text files, compression of images, compression of sound). It is based on the use of a variable length code and the probability that an event (in this case a frequency) will occur. The more a frequency appears, the shorter the code (low number of bits to display it). The file is read for the first time and a table appears with the frequencies that appear and the number of times they appear. We derive the right code. This encryption was last used. It is the final phase of compression. This is non-destructive coding.

MP3 works on the properties of the ear, first to reduce the size of a part, then processes the stereo sound and possibly applies encodings which end with Huffman encoding.

The use of all the reduction options mentioned depends on the location you want to give within 1 minute of your tablet and therefore on the compression speed to apply.
To encode MP3 audio files, we are talking more in terms of bit rate than compression rate.
Bit rate is the number of bits allowed in 1 second.
Therefore, we have the following relationship: the more we want to compress a song (so that it takes up the least space possible), the lower the bit rate.

Choice of compression ratio (bit rate)

Obviously, the more you compress, the worse the sound quality.
You have to compromise the file size and audio quality.
This commitment can be dictated by your needs, but also by the use you want to make of your MP3 files. It may not even be demanding if your MP3s are intended for your portable music player and are too demanding to be listened to on a stereo system.

Mp3: Audio Compression.

Audio Digitization.

Sound is a continuous wave that propagates through air or other media, formed by
pressure differences, so that it can be detected by measuring the pressure level in a
point. Sound waves have the proper and measurable characteristics of waves in general,
such as reflection, refraction and diffraction. As it is a continuous wave, a
digitization process to represent it as a series of numbers. Currently, most of
the operations carried out on sound signals are digital, since both storage and
processing and transmission of the signal in digital form offers very significant advantages over
analog methods. Digital technology is more advanced and offers greater possibilities, less
sensitivity to transmission noise and ability to include error protection codes,
as well as encryption. With the appropriate decoding mechanisms, moreover, they can be treated
simultaneously signals of different types transmitted on the same channel. The disadvantage
main aspect of the digital signal is that it requires a much greater bandwidth than that of the signal
analog, hence an exhaustive study is carried out regarding data compression,
some of whose techniques will be the center of our study.
The digitization process consists of two phases: sampling and quantization. In the sampling,
Divide the time axis into discrete segments: the sampling frequency will be the inverse of time
that mediates between one measurement and the next. At this time the quantization is performed, which, in its
In the simplest way, it is simply to measure the signal value in amplitude and save it.

Nyquist’s theorem guarantees that the frequency necessary to sample a signal that has its
Higher components at a given frequency f is at least 2f. Therefore, the range being
higher than human hearing around 20 Khz., the frequency that guarantees a sampling
suitable for any audible sound will be about 40 Khz. Specifically, to get sound
High-quality frequencies of 44.1 Khz are used, in the case of CD, for example, and up to 48 Khz.
in the case of the DAT. Other typical values ​​are submultiples of the first, 22 and 11 Khz. According to
nature of the application of course the appropriate frequencies can be much lower
such that the voice process is usually carried out at a frequency of between 6 and 20 Khz. or
even less. Regarding quantization, it is evident that the more bits used for the
axis division of amplitude, the “finer” the partition will be and therefore the less error in attributing
a concrete amplitude to the sound at every moment. For example, 8 bits offer 256 levels of
quantization and 16, 65536. The dynamic range of human hearing is about 100 dB. The
axis division can be performed at equal intervals or according to a certain density function,
looking for more resolution in certain sections if the signal in question has more components in a certain
intensity zone, as we will see in the coding techniques.
The complete process is usually called PCM (Pulse Code Modulation) and so we
We will refer to it hereinafter. It has been described in a very simplistic way, mainly
because it is widely discussed and is well known, being the field of study of
this work. However, we will go into detail at any time that is necessary for the
development of the exhibition.
1.2 Coding and Compression.
Before describing compression and encoding systems, we must pause briefly.
analysis of human auditory perception, to understand why a quantity
Significant information that the PCM provides can be discarded. The heart of the matter,
as far as we are concerned, it is based on a phenomenon known as masking.
The human ear perceives a frequency range between 20 Hz. And 20 Khz. First of all, the
sensitivity is higher in the area around 2-4 Khz., so that the sound is more
hardly audible the closer to the ends of the scale. Second is the
masking, whose properties exhaustively use the most interesting algorithms:
when the component at a certain frequency of a signal has high energy, the ear cannot
perceive lower energy components at close frequencies, both lower and higher. TO
a certain distance from the masking frequency, the effect is reduced so much that
negligible; the range of frequencies in which the phenomenon occurs is called the critical band
(critical band). Components belonging to the same critical band influence each other and
they do not affect nor are affected by those that appear outside it

What is audio compression?

What is audio compression?

I have finally returned to the tutorials, we are going to talk about the compression of audio from the most basic to the most advanced, it is a subject that many as producers have had a hard time learning and understanding.

So what is audio compression and what can you do to help?

Basically, compression reduces the dynamic range of your recording by reducing the level of the loudest parts, which means that the noisy and silent parts are now closer together in volume and the natural volume variations are less obvious. The audio compressor unit can increase the overall level of this compressed signal.

So, the end result is that the quieter parts sound as if they had increased their volume to be closer to the louder parts. Dynamic changes in the volume of a recording are now under more control, and a side effect is that the overall level of the compressed recording can be increased within its mix. The recording will also be located within the entire mix much more easily.

What are the compression controls?

The compression device itself has many different controls that can affect the sound it is processing. We will review the main controls that are commonly found.

Input Gain
This controls the level of the signal entering the audio compressor.
Threshold
Compression reduces the overall level of the loudest parts of your recording. But how does the compressor know what part of the signal is “high” and what part of the signal is compressed? When setting the threshold.
The threshold sets the level at which the compressor starts and begins to change the recording dynamics. So, for example, if you set your threshold to -20 dB, everything below this level will not be affected by the compressor. But everything higher than this level (-20 dB) will be compressed.
Ratio
How much will the signal be compressed once it has exceeded this threshold? This is controlled with the relationship. The higher the ratio, the greater the compression.
The easiest way to show you how reason works is by showing you some numbers, if the ratio is 1: 1, there is no compression at all. On the other hand, if the ratio is set to 2: 1, for every 2 dB of sound that exceeds the threshold, you will get 1 dB of output above the threshold. So, if the signal exceeds the threshold by 10 dB, the compressor reduces this signal, so it is now 5 dB above the threshold.
If the ratio goes up to 8: 1, for every 8 dB of sound above the threshold you would get 1 dB of output above the threshold. Then, if the signal exceeds the threshold by 16 dB, the compressor reduces it, so only 2 dB exceeds the threshold.
Attack
This is the time it takes for the compressor to act on the input, once the sound level has exceeded the threshold. It is usually measured in milliseconds (ms).
Release
This is the time it takes for the compressor to let the signal return to normal once it has fallen below the threshold. Again, usually measured in ms.
Makeup
If the audio signal has been compressed, the overall level of the signal will be reduced. Increasing the output gain increases the level that comes out of the compressor, so the volume can more easily adapt to the levels of the rest of its tracks in its mix.
Knee
The soft compression of the knee is softer in the sound as it passes through the audio compressor: the change of uncompressed sound to compressed is softer. Hard knee compression is a more immediate and obvious effect.
Compressors are a very effective tool for us engineers, in the next post I will talk about the different types of compressors.