HOW TO CORRECTLY USE AN EQUALIZER


Free Download Mp4Gain
picture

An equalizer, concealer or equalizer in English, is a tool also used for recording, mixing or reinforcing sound, to increase or decrease the volume of certain frequency bands of a sound.

I – HARMONIC ANALYSIS OF SOUND

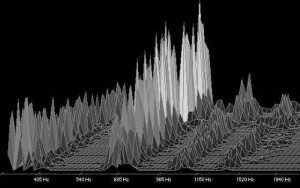
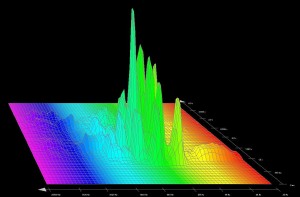
On the sound page, we have seen that the audible frequency spectrum, that is, the range of frequencies perceived by the human ear, extended from 16 to 20,000 Hz. Each sound has its own frequency spectrum corresponding to the “signature acoustics”. The 3 voiceprint examples below will allow you to practice frequency analysis.
equalizer
Example 1

This harmonic analysis is carried out from a wav file. There are 4 frequency bands (around 330, 660, 990, and 1600 Hz). We note that the 660 Hz band dominates with its strongest energy: it defines the dominant tone. The other bands are secondary tones. Voices are not the only voices featuring spectrums with particular dominant tones; This is also the case for musical instruments. This is what differentiates them from noises that also have secondary tones that overlap without any relationship between them.
Audio Equalizer

Example 2

Recording of a female voice characterized by a low-mid dominant spectrum. Low frequencies at the beginning of the low-mid range and in the bass register.

female_vote_equalizing
Example 3

Recording of a female voice, voiceover on television. The registration is more extensive in the range of low and low mids.

II – RECOGNIZING FREQUENCIES

The equalizer allows you to intervene in the frequency spectrum of a sound by increasing (increasing) or attenuating (cutting) certain bands. In this way, we can eliminate unnecessary or unpleasant frequencies, strengthen a voice, correct the instruments so that they do not overlap too much when playing simultaneously or create a musical style. Such manipulations must be exercised with discernment. Before embarking on frequency corrections, you must learn to recognize the most important frequencies of a sound. This will avoid big mistakes that could kill crucial ranges of the spectrum … A little too low or an exaggeration of the treble and the song will quickly transform into an amalgam of frequencies that will sound more like noise than music! In isolated sounds, identification of different frequency bands is relatively easy. Choose audio files for vocals or instruments instead of composite songs.

III – THE EQUALIZER SETTING

The correct setting of an equalizer is not obvious since there is no miracle recipe. Adjustments are just compromises for a set to keep its balance while making corrections on certain instruments. Musical tastes and sensibilities also influence the stages. Therefore, in this area it is difficult to give absolute rules, but we can reflect on the following points to avoid …

There is no need to cut entire ranges of the spectrum. Pay attention to strong fades in the mid range. You run the risk of getting a confusing set. Preferably make corrections in a very narrow spectrum or specific frequencies.

IV – GAIN OR  LIMITATER?

In a composition, most of the corrections correspond to attenuations that allow giving rise to each instrument. In some cases, a positive gain is applied to increase the presence of a voice or to give air to an ensemble. Corrections are generally between -6 dB and +6 dB, but we can also reserve a space for creativity by deviating from these values.


Free Download Mp4Gain
picture


Mp4Gain Main Window
picture


Mp4Gain Features
picture


Free Download Mp4Gain
picture

Difference between compressor and limiter

As we saw in previous articles on the operation of the compressor, the latter acts as an automatic volume, or more accurately, decreases the volume from a certain threshold, which has the consequence of reducing the dynamic range of a signal, attenuating the loudest sounds, bringing them closer to the weakest sounds.

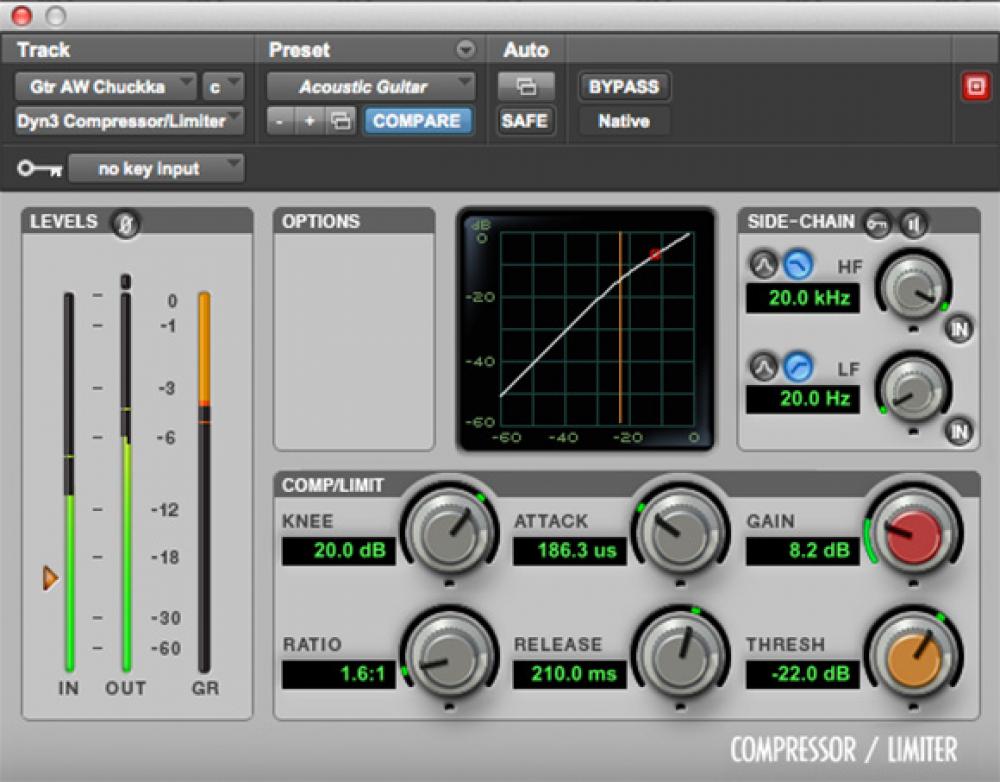
Compressor / Limiter

This makes the sound of an instrument more balanced and helps you maintain a stable level throughout a song, even if the musician varied their sound intensity during their performance.

The compressor:

A compressor uses the threshold setting to define the level from which compression will take place. Weaker signals or signals below this threshold will not be altered, while signals that exceed this threshold will simply decrease in volume.

The amount of signal attenuation depends on what is called the compression ratio or rate, which simply indicates the number of decibels that has been reduced compared to the input signal after crossing the threshold and, by the way, the number db to add to the output gain to have equal volume.

Difference between compressor and limiter

Without compression, a 1 dB increase in input is always equivalent to a 1 dB increase in output, but if you set a 4: 1 ratio, you will need a 4 dB increase in input level to get a gain of 1 dB at the output. The higher the ratio, the greater the degree of compression. A 1: 1 ratio means there is no compression. It is important to remember that the gain reduction only applies to signals that exceed the threshold. The weakest signals remain unchanged.

After the threshold and ratio, the other common compressor parameters are attack and release times, although some compressors do not provide these parameters. In other words, attack adjusts the compressor reaction time (how long it takes to reduce the gain) once the threshold is crossed, while the release time determines the time it takes for the gain to return to its original volume.

These controls must be carefully adjusted for different types of compressors to keep the compression effects transparent, although it is also possible to use more pronounced compression to create a particular effect. For example, setting very fast attack and release times causes an audible artifact known as the bulge effect, which can be used to give some dynamics or rhythm effects.

Difference between compressor and limiter
Some compressors only provide switchable fast / slow attack times, but the release time is generally adjustable. The only obvious exception concerns compressors that automatically adjust their release time according to the dynamics of the processed signal. Compressors with an “automatic” mode like the famous SSL are useful for sources whose dynamics vary during a song.

Since compression works by reducing the gain of strong signals, the compressor’s output is always weaker than its input. That’s why gain control is provided to bring the output to an appropriate level. Even if the output level is the same as the input level, the compressed signal will continue to appear stronger and stronger compared to the original signal, because even if the levels are the same, the average signal level (RMS) will increase and The weakest sounds that were originally below the threshold. Although the compressors only reduce the signals that exceed the threshold, the gain effect grants the role of the compressor as a device that increases the level of low sounds.

The limiter

The limiter works in exactly the same way as a compressor, except that it has an extremely high compression ratio (100: 1). This means that the peaks of a signal systematically stop at the threshold and cannot exceed it.

Difference between compressor and limiter

In many limiters (as in certain compressors), the threshold system is different from that described above. Rather than moving the threshold to match the input signal level and then using the output gain to find the original level, another approach is to define an output threshold and then vary the input gain to force it to reach the defined threshold or output level.

This allows the maximum maximum level to be set in advance, to limit and increase the average volume of a sound effectively in a single operation. This is the principle used during mastering treatment, for example, to obtain an RMS level without exceeding 0dbfs.

Loudness War

In 1973 came Raw Power, an album that punk icon Iggy Pop wanted to be the strongest in the world. But what exactly does the “strong” qualifier mean for a sound? How is this subjective sensation of acoustic power measured? How can we create it and, above all, what are the sacrifices? Why has music increased in volume in recent decades? Arm yourself with your most beautiful helmet and follow us in this report into the heart of the war for volume, a frantic race for the power of sound among producers, directors, musicians and engineers.

Loudness War

The origins of the volume war.

“How did it happen? Who is to blame? Of course, there are those who are more responsible than others and will have to account for it, but … If you are looking for a culprit, just look in a mirror. I know why Lo I did. I know you were scared. ”

The main argument of this decibel competition is taken from a psychoacoustic phenomenon: the human ear, if it is subjected to two identical pieces in all respects, will find that what is even a stronger decibel “sounds better”. The famous Fletcher-Munson curves partially explain this phenomenon: the weaker the sound, the less bass and treble are perceived. Therefore, a louder sound will not only appear linearly more powerful, but also richer “frequently”.

Loudness War

From there, to see an equivalence between “sounding louder” and “sounding better,” there is only one step, which music producers and radio directors in particular cheerfully crossed: the same tubes that loop through each other. All the Main stations, playing them higher was a way to stand out and attract new listeners. But holding them exclusively liable would be a mistake. In fact, like Iggy Pop, the artists themselves wanted to sound louder than their competitors. Sound engineers weren’t left out either: A well-known tip from mastering engineers who lacked time or inspiration was simply to assemble the mix a few decibels and go. Finally, the new millennium saw fans participate in the race, helped by the emergence of home schooling and the democratization of digital accessories.

“Too strong? Eat THIS.”

The popularization of mobile devices in the 1980s was also an important factor. Aboard the car radio and portable audio player, the radio and K7s come out of their living room and venture into the kitchen, take to the streets, take the car or plane, and rest on the beach. The sound must be more powerful in order to cover the background noise, and its dynamics (difference between the weakest and loudest sounds) is reduced to prevent the listener from doing the yo-yo with the volume button.

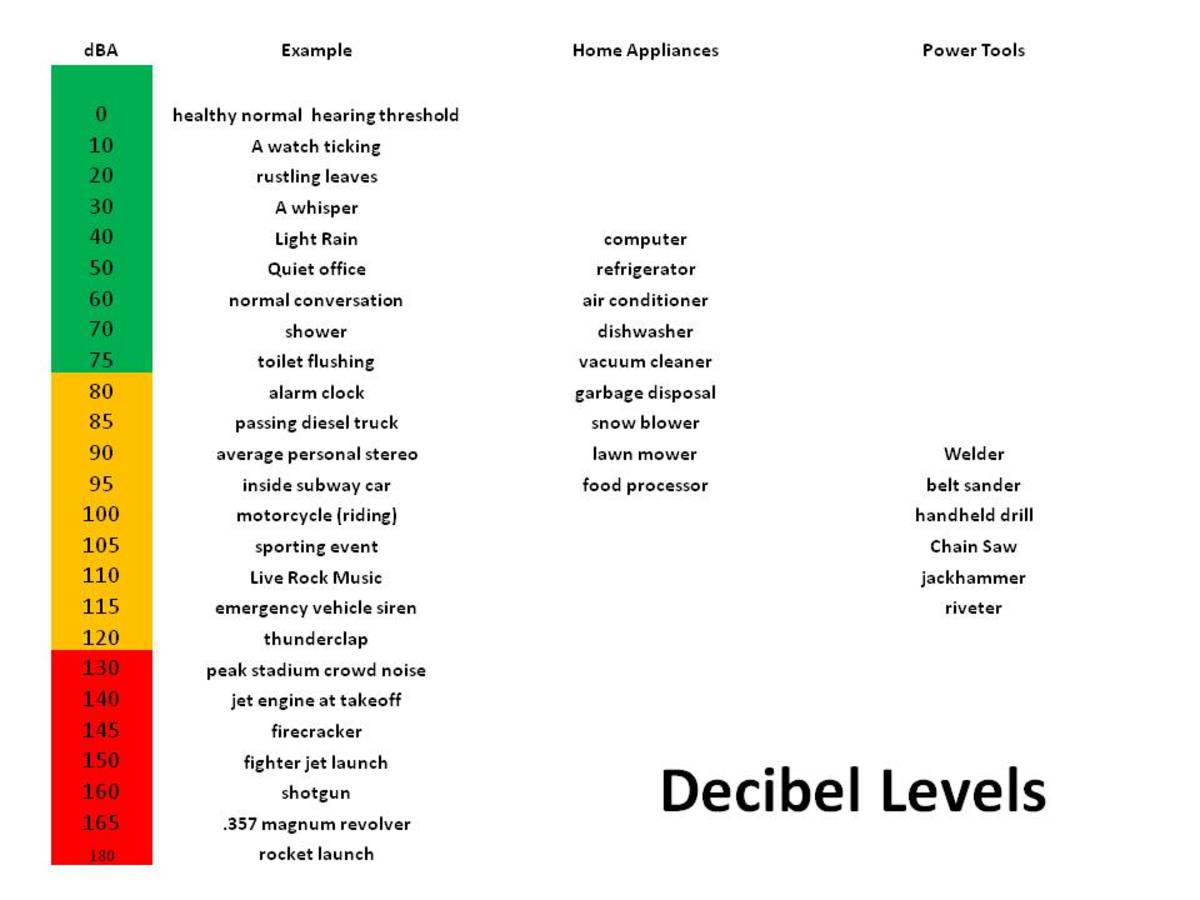
But frankly, basically, what would perpetual increase in noise be a problem? If the level increases, we just have to lower the knob! In fact, this oversupply would not mean any, provided it has an unlimited margin. Unfortunately, as with children, there are limits: the maximum dynamic range of a CD is 96 dB, radio levels around 60 dB, the speakers are separated above a certain sound pressure. , the consoles are saturated, not to mention our ears whose danger threshold is 90 dB, the pain threshold at 120 dB and the destruction threshold at 140 dB. How, then, to sound “stronger”, respecting the limits of the different formats and materials?

Stronger !

Here we are in the belly of the beast: how to offer a subjective sensation of greater power, without exceeding the maximum allowed sound level? And what exactly does it mean to sound “louder” when you can’t turn up the volume anymore?

Dynamic compression

Here’s the waveform for Norah Jones’ song Turn Me On: on the abscissa (horizontal), time, on the ordinate (vertical), amplitude, or volume. The peaks we see represent the loudest sounds, and the finest parts represent the weakest passages. The difference between the high amplitude signals and the others visually well marked, one does not even need to listen to the song to know that its dynamics are excellent. The mixture breathes and nuances are free to express themselves, in power as well as in softness. If we wanted to raise the level of this song in a classic way, by turning the knob or raising the faders, the amplitude of the peaks would quickly reach the maximum level, after which the signal would begin to distort. To increase the subjective level, therefore, it is necessary to decrease the difference between the peak of these peaks and the average level, then increase the overall volume – this is called dynamic compression.

The musicians’ guide to understanding decibels

Think about it … how many musicians really understand what decibels are?

Not many, right? And there is no surprise.

The truth is that decibels are confusing.

You could spend days reading about it in some college textbook and not even understand a concept.

The upside is that anyway … for audio recording, you need nothing more than the basics.

So, in today’s post, we will talk about the KEY points that all musicians should know.

I hope you find it useful.

First, let’s dispel a widespread myth:

Decibel is NOT a unit of measure for volume

It is not a unit of anything. It is a REPORT, and compares the value of one number with the value of another.

And although these numbers usually measure the sound level, it is not always the case. In music, decibels are also used to measure the voltage and power of instrumentation.

Decibels

Decibel is not a LINEAR measurement

Most units are LINEAR. For example, 2 meters is twice 1 meter long, and 4 meters is twice 2 meters long. Translating these numbers into a graph, they would form a straight line.

But decibels don’t work that way. Decibels are LOGARITHMIC units. If you’ve forgotten what you knew about high school logarithms, here is a very simple review:

With logarithmic numbers, each additional unit multiplies the number’s value exponentially. For example:

+ 3dB = power increases 2 times
+ 10dB = power increases 10 times
+ 60dB = power increases 1,000,000 times
It is empty? Well. That is why you need to understand this concept well:

The relationship between Decibel, Music and Sound

In music, decibels are a measure of the sound pressure level (SPL). For example, if at a rock concert the speakers are playing at 110dB, what it really means is that they are playing at 110dB SPL.

Decibels

Since decibels are just a ratio, 110dB should be read compared to another number: 0 SPL.

0 SPL is the standard level of atmospheric air pressure (20 micropascals). It is generally accepted as the lowest limit of human hearing, and is the benchmark for comparing sounds.

How decibels are used in recording equipment

The most common instrument you will deal with decibels in a recording studio is the sound level meter …

Present on various devices within a studio, such as DAW, audio interface, and others.

At the upper limit of the sound level meter, you will notice the wording 0 dBFS (short for “0dB full scale”). This is the highest possible signal level that the instrument can withstand before clipping or distortion.

Below this value, you will see increasing negative dBFS values, down to -∞ dBFS.

Depending on who will give you the advice, some may tell you to choose a value between -15dB and -6dB when setting the input values ​​for a recording. I consider -10dB a good compromise

Understanding decibels (part 1)

What does the decibel or db measure?

Decibels are widely used in audio and are often misinterpreted. These articles provide a practical understanding of the use of decibels in audio work. But first, some basic questions and answers about decibels.

What is a decibel?

A decibel is a tenth of a Bel, a level unit, named after Alexander Graham Bell. A Bel is a very large unit, so the prefix deci (one tenth) is used. A decibel uses a logarithmic scale, not a linear scale like volts or watts, see below.

There is no absolute level called the decibel. A decibel expresses a relationship. It is related to something. Unfortunately, what is related is often not mentioned when claiming a decibel reading. For example, the line out of the mixer may be -10dB, which generally means it is 10dB below 0dB.

Why decibels?

So why use a decibel? You may have noticed that the volume control on most hi-fi amps is marked in decibels, just like the marks on the mixer level controls. This is because our hearing range is so vast that, to use a linear scale, we must use numbers between 0 and 1,000,000!

Decibels are not linear

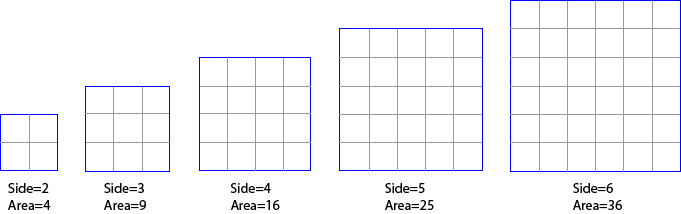
A secret to understanding decibels is to note that decibels are not linear. Another example of a nonlinear relationship is between the side of a square and the area of ​​a square.

decibels

divisible is not linear like square side and area In this example, you can see that increasing the lateral measurement does not have an equivalent increase in area, but a larger increase. Also, doubling the length of the side does not double the area, it is much more than double! This is an example of a nonlinear relationship: in this case, a small increase in the side refers to a different increase in the area. Decibels are similar. A small variation in decibels refers to a different variation in the relationship between the two levels compared.

Decibels express a relationship

When we talk about audio levels, we observe voltages or amplitudes of sound waves. (Note: Power measurements (such as power differences in an amplifier) ​​use a similar but different formula.) But without going into formulas, etc., we must accept the following summary of the linear relations of tensions and decibels. (I’m not showing formulas or calculations because I think most people skip them anyway, and if you like formulas any search engine will give you as many as you want)

What is the compressor and how does it work?

The compressor, together with the equalizer, is one of the most important and most used processors in professional audio, but its operation is not always so intuitive and knowing how to master the compression technique sometimes requires years of experience. In this new article we begin to explore this fundamental processor.

What is the compressor for?

First of all, let’s start to see what the compressor’s function is: to reduce the dynamic range of an audio track, that is, to decrease the distance in volume between the weakest signal and the strongest signal. Initially created to optimize recording on magnetic tape and to avoid saturation of the input stages, the compressor is still used today during recording and mixing. Reducing dynamic range also allows us to keep multiple tracks in the mix, such as a voice, for example, always at the same volume throughout the song so that they are not dominated by the other instruments in the most crowded sections, as well as to avoid Output saturation.

Compressor

Back to basics: what is the compressor and how does it work

The controls

Now let’s see in detail what the various compressor controls are and what they are for:
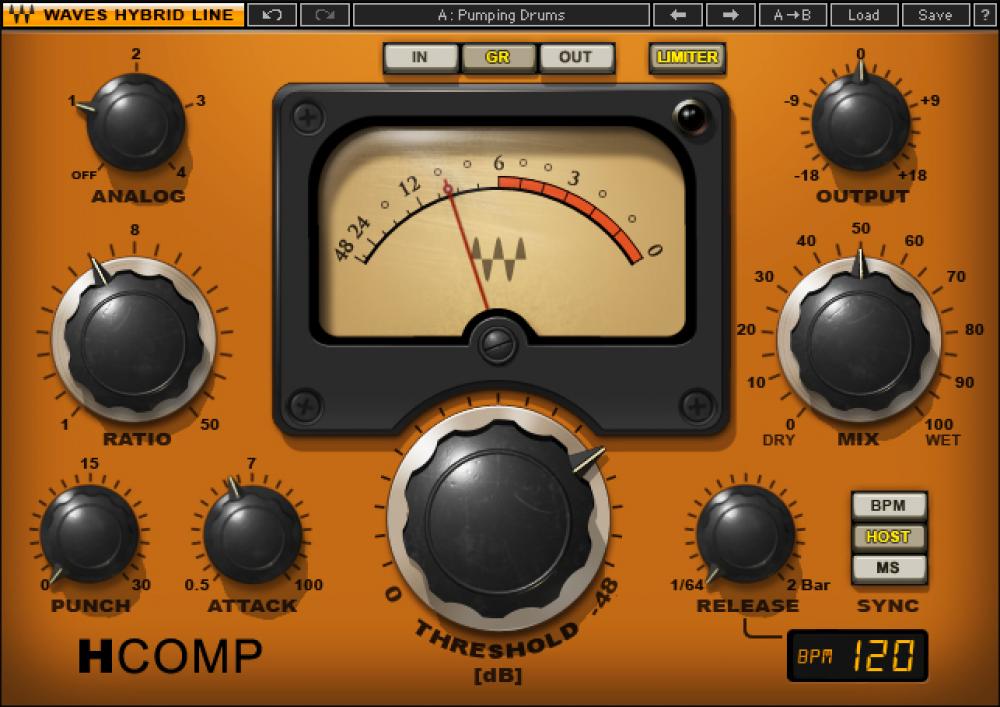
— Threshold: or threshold, expressed in dB, indicates the point beyond which the compressor begins to operate.
— Ratio: is the compression ratio and indicates how much the signal will compress when it exceeds the Threshold. For example, with a 2: 1 ratio, each signal that exceeds the threshold will be halved at the output, that is, every 2 dB at input 1 will be returned at the output.
— Make Up Gain: This is the output of the compressor and is used to recover the volume lost due to compression.
— Attack: expressed in milliseconds is the time it takes for the compressor to start once the signal has passed the threshold.
— Release: always expressed in milliseconds, it indicates the time it takes for the compressor to stop compression once the signal has returned below the threshold.
— Gain reduction meter: it is not a control but a visual indicator, led or pointer, which informs how much the signal is compressed, through a scale in dB.
— Bypass: shuts down the processor, making the signal pass through the machine without alteration.

With the advent of digital and accessories, we can find controls that not all hardware compressors have:
— Knee: indicates the type of curve at the point where the compressor begins to operate, which can be abrupt (Hard Knee), soft (Soft Knee) or various intermediate values.
— Automatic: sets the time control to which it refers (attack, release or both) automatically, depending on the input signal (program dependent).
— Sidechain eq or External Sidechain: Sidechain is the signal that drives the compression circuit, where in most cases it is the signal itself to compress, but sometimes it can be a version of the input signal with different equalization, for example without low frequencies, so that they don’t start the compressor too soon. Or it can be an external signal, such as the one used on the radio where the speaker’s voice signal drives a compressor on the background music signal, so it automatically turns off when it starts to speak (Ducking), or Classic Speaker Use to activate the compressor on various instruments in the mix or the Master Buss.
— Mix: used to mix the compressed signal with the original signal. This way, you can use Parallel Compression directly on the compressor, without having to use two mixer tracks (one for the dry signal and one for the compressed signal).
Back to basics: what is the compressor and how does it work

Compressor

Compressor or limiter?

What is the difference between a compressor and a limiter?

Essentially, the compression ratio: over 10 dB ratio, the processor is considered a limiter. A separate case is the Brickwall Limiter, a compressor with immediate attack and a compression ratio of infinity to 1, so that no signal can exceed the Threshold. It is mainly used on the master buses so as not to exceed 0dBFS on the output and then send the converters to clips.

Usage examples

As we already said, the compressor is used to keep the volume excursion under control. One track in the mix: in this case, using a fairly fast attack, slow release and not too aggressive ratio, allows us to compress the signal constantly and transparently, that is, without making your intervention feel excessively.
The compressor can also serve to emphasize the attack of a percussion instrument: in one case, for example, by setting a medium slow attack.

The difference between 16 and 24 bit depth

Analog / Digital Conversion

When you record a guitar into digital audio, the guitar’s analog signal is converted to digital signal for storage on your computer.

Since the analog signal can take an infinite number of values ​​while computers have limited capacity, it is sampled according to two parameters:

Sample Rate: This is the number of times per second when measuring an analog signal (often we are at 44,100 Hz, or 44,100 times per second)
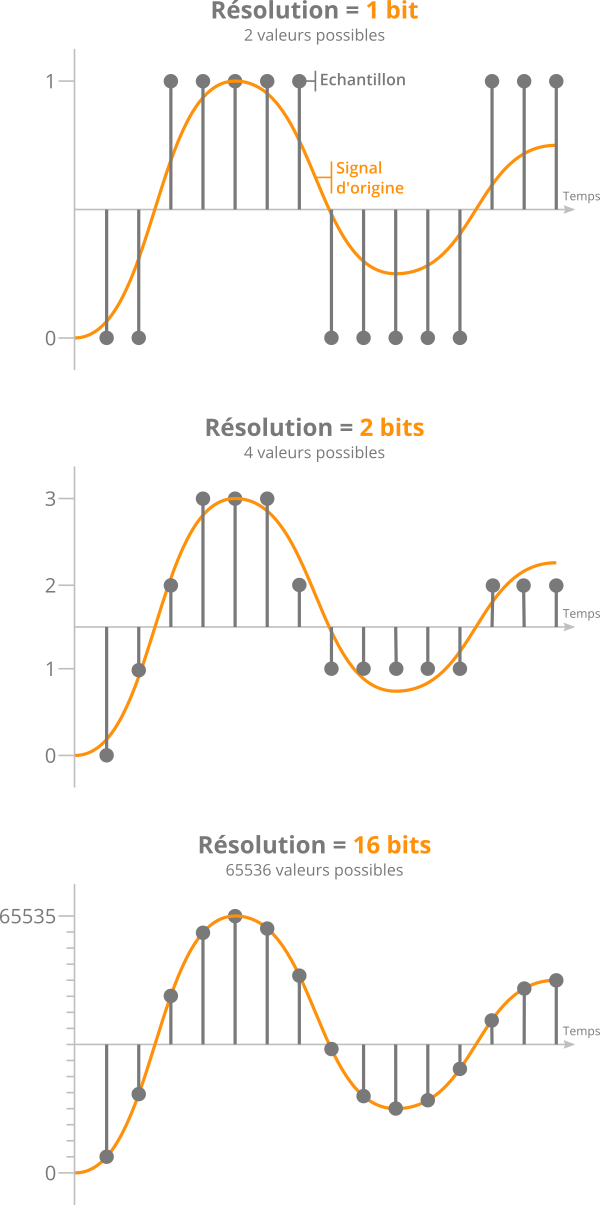
Resolution: defines the number of possible values ​​that the measured value can take and is measured in bits.
If its resolution is 1 bit, only two values ​​are possible: 0 and 1.

For each added resolution bit, the number of possible values ​​is multiplied by two:

2 bits = 4 values
3 bits = 8 values
16 bits = 65,536 values
24 bits = 16,777,216 values!
During recording, therefore, we will measure the incoming signal many times per second and complete this measurement according to the number of possible values.

Hypothetical example: Our resolution means that we can only store values ​​equal to 0 or 1. If the analog input signal is measured at 0.8, it will be rounded to 1. If it is measured at 0.2, then it will be rounded to 0.

Very simple, right?

As a result, the higher the resolution, the closer the recorded signal will be to the original signal. This is what you see in the following image:

bit depth

Effect of different bit resolutions on sampling precision

Also, one might think that 24-bit recording provides better quality than 16-bit. In fact, the resolution seems more accurate and the final signal more realistic.

However, this is not really what it should look like …

A history of noise

Previously, we saw that the values ​​measured from the original signal were rounded off during analog-to-digital conversion.

If we rebuild the signal to listen to it again once the values ​​have been rounded, we will notice that it is slightly different from the initial signal.

Quantization errors when sampling an audio sample

This phenomenon is called quantification error and it is inevitable.

If we isolate this error, we realize that it is actually noise, which is added to the signal.

If you increase the resolution (English bit depth) by adding precision bits, the error will be less, and therefore the noise will be less.

More precisely, for each bit added, the noise level is reduced by approximately -6 decibels (noise level = noise level).

In other words, for every 1 bit of resolution added, the dynamic range over which a signal can be correctly recorded increases by 6 dB.

Therefore, we deduce the following figures:

16 bit = 16 x 6 = 96 dB dynamic range
24 bit = 24 x 6 = 144 dB dynamic range
In the end, the only difference between 16 and 24 bits lies in the noise level. And therefore, in the dynamic range available for recording, “above” the noise level.

Normalize Mp4 Audio


Some years ago, I started a desperate race to equalize, level, normalize or boost the volume of the mp3s.

At the time that people downloaded dozens or hundreds of mp3s, it was quite apparent that there was a problem with the volume.

And that problem needed solution.

mp4 normlaizer

The first normalizers

Initially, normalizers emerged in a naive way based solely on volume peaks. Which produced an unsatisfactory result.

Little by little, they began to have new ideas and new approaches to face this disparity in volume levels that affected mp3s in a very notorious way.

REPLAYGAIN

The idea of ​​replaygain came up, which gained a lot of popularity. But he had his weak points. nor was it entirely efficient and satisfying.

In addition, with the passage of time, other audio formats emerged.

None have yet fully competed with mp3, but genwro that programs like Mp3Doctor were able to normalize other audio formats as well, not just mp3.

THE YOUTUBE BOOM AND THE VIDEO

And then the video had a boom (this boom is here to stay) and little by little, with the passage of time, people began to get used to a new format, mp4.

BUT the same volume issues soon arose in the mp4 audio as well as the major video formats.

mp4 audio normalize

Mp4Gain arose to normalize the volume level of the main audio formats but ALSO in the main video formats.

You can normalize the audio of an mp4, normalize the audio of an avi, etc. using Mp4Gain.

In fact it is the only software that is capable of doing this.

Little by little, as the video becomes more and more a central guest on the web, people will use the Mp4Gain more and more to maintain their volume levels without increasing or decreasing.

It even offers other functions like equalize, modifying the pitch without altering the tempo and vice versa.

It is a fact that mp4gain is the only and central program that has all these functions and the one that is being used by amateurs and professionals.

You can normalize the audio of your mp4s with Mp4Gain.

What is an audio compressor

You’ve certainly heard of compression before: you know it’s an essential effect for mixing, but at the same time, don’t you necessarily master every setting of your plugins?

This is normal: it is a somewhat complex subject. And if you don’t know exactly what effect each parameter has on the sound, you risk damaging your mixes rather than improving them.

Therefore, I advise you to take a few minutes to see what the different settings of your compressors correspond to, so that you can adjust them yourself: in fact, whether you use a compressor for mastering or an analog audio compressor, the settings they are generally still the same!


What is an audio compressor?

It is mainly an effect, as well as equalizers, reverbs, distortions, etc. It can take the form of an add-on or an external effects module.

In general, and although there are many possible ways to use a compressor, you can reduce the dynamic range of a recording or a complete mix. That is, reduce the gap between the loudest and weakest sounds on the track.

Hence the name, moreover: a compressor compresses the sound.An example of an external stereo compressor, the ART Pro Audio VLA II
For example, if we have a voice track with a significant level variation between the words, we can level the sound by attenuating the loudest parts.

Here is an example in pictures:

Ejemplo de compresión

Compression example

In the image above, there is no compression: the signal (the singer’s voice, for example) alternates between significant peaks and less strong elements.

In the image below, compression was used to attenuate these spikes. In fact, they are now at a level closer to the rest of the recording. The dynamic range has therefore been reduced.

Compression threshold

The Threshold parameter is particularly important for successful compression.

It is simply the level in decibels (dBFS) from which the compressor begins to operate; in other words, it attenuates the signal.

For example, if your recording reaches a maximum of -12 dBFS and you set its threshold to -6 dBFS, the signal will not be compressed. In fact, the threshold is higher than the signal (-6 dBFS> -12 dBFS). Conversely, if you set it to -20 dBFS, the portion of the signal above this threshold can be compressed.

Limiters: Features and Applications.


The limiter is a dynamic processing tool similar to compression. It is known to mastering engineers and is useful for optimizing the overall volume of a song. But this tool can also be useful for mixing when performing certain tasks that its cousin, the compressor, cannot perform as easily.

Audio limiter

Limiter mode compressors and brick wall limiters

A limiter is a processing module that allows you to quickly apply a very high compression ratio. In theory, any compressor that achieves a high compression ratio (say more than 20: 1) can be considered a limiter. In addition, different compressors (LA-2A, Neve 33609, DBX 160 …) provide a selector or have a section that allows them to act as a limiter.

However, these compressors generally do not allow to know exactly the maximum output volume. This is where brickwall type limiters come in. Brickwall limiters allow you to set a volume that will never be exceeded. With their immediate attack, they set up a brick wall that audio can never get through. This important feature, of course, makes it possible to avoid clipping during mastering, but also makes the limiter extremely effective when treating tracks with strong, short tips.

limiter audio

The configuration

The limiter offers fewer settings than its cousin the compressor. First, there is the threshold that determines from which point the signal will be limited. This threshold can be determined by a setting that sets the threshold or can be reached by increasing the input level. Another parameter, called “ceeling” or “output level”, allows you to configure the maximum output volume. With digital audio, this ceiling is expressed in negative dB. Therefore, a ceiling of -0.2 dB indicates that the maximum volume will be 0.2 dB below the digital zero point. Very often it contains a release that, like the compressor, determines the speed at which, by limiting it, it will stop operating. Of course, one or more meters are added to show the input and output volume and the degree of reduction.

Since they are often placed at the end of the general output (master bus, main bus, or mix bus), the limiting plugins often include “wobbly” selectors that provide the ability to reduce the sampling depth (24, 20, 16, 12 and sometimes 8 bits) to correspond to the final medium. For example, we use 16 bits for a CD.