What are “bit depth” and “sample rate”?


Free Download Mp4Gain
picture

What are “bit depth” and “sample rate”?

Bit Depth

I wrote it in the DTM project file settings and audio interface spec column, but I don’t understand the meaning …
Sample Rate

This time, we will answer those questions.

Here’s a quick rundown of “What is a Bit Rate / Sample Rate ?,” Explained by Professional Drummer / Engineer / Producer Ed Thorne.

Once you know this, you will be able to export the sound source in the appropriate format and you will be able to understand the criteria for the equipment that you will buy in the future.

Please take a look to the end!

What is bit-deapth?

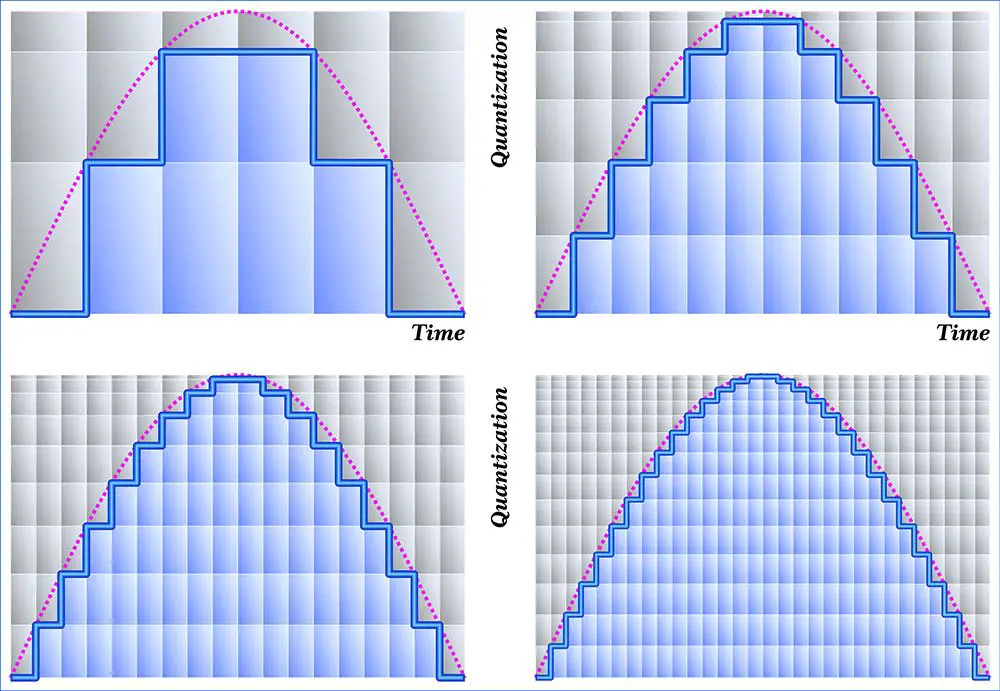
Bit depth refers to the range in which the dynamics (inflection) of the sound can be processed.

For example, if the bit depth is “16 bit”, the range up to 96 dB can be reproduced and processed from the silent state.

96dB is all about the volume when the audience is excited at the live venue.

On the other hand, if the bit depth is “24 bit”, the 144 dB dynamics can be reproduced and processed.

144dB is roughly the volume of a jet airplane.

Dynamics in the age of streaming

Not long ago, there were no limits to volume like today’s streaming services like YouTube and Spotify.

The louder the sound, the better the music itself, which is why producers always wanted to make it louder and bigger than any other music.

Today, many platforms where you can listen to music have volume restrictions, so the idea that “the more music you can play loud sounds, the better” has changed, and times have changed.

So, in this age, 16-bit or 24-bit might not make much of a difference.

The amount of data also changes

By the way, if the bit depth is high, the amount of data will change as well.

When recording a lot, you may want to consider this a bit.

What is the sample rate?

Next, I will explain the sample rate.

The sample rate is like the “resolution” of the audio.

The higher the sample rate, the more samples per second = you can hear better.

Requires double sample rate

One thing to note here is that you need twice the sample rate to hear sound at that frequency.

For example, if you want to hear a 1000 Hz (1 kHz) sound accurately and clearly, the sampling frequency must be at least 2000 Hz (2 kHz).

If the sample rate is less than twice the value of the sound you want to hear, “aliasing” will occur and the sound will not be processed accurately, such as crackle or noise.


Free Download Mp4Gain
picture


Mp4Gain Main Window
picture


Mp4Gain Features
picture


Free Download Mp4Gain
picture

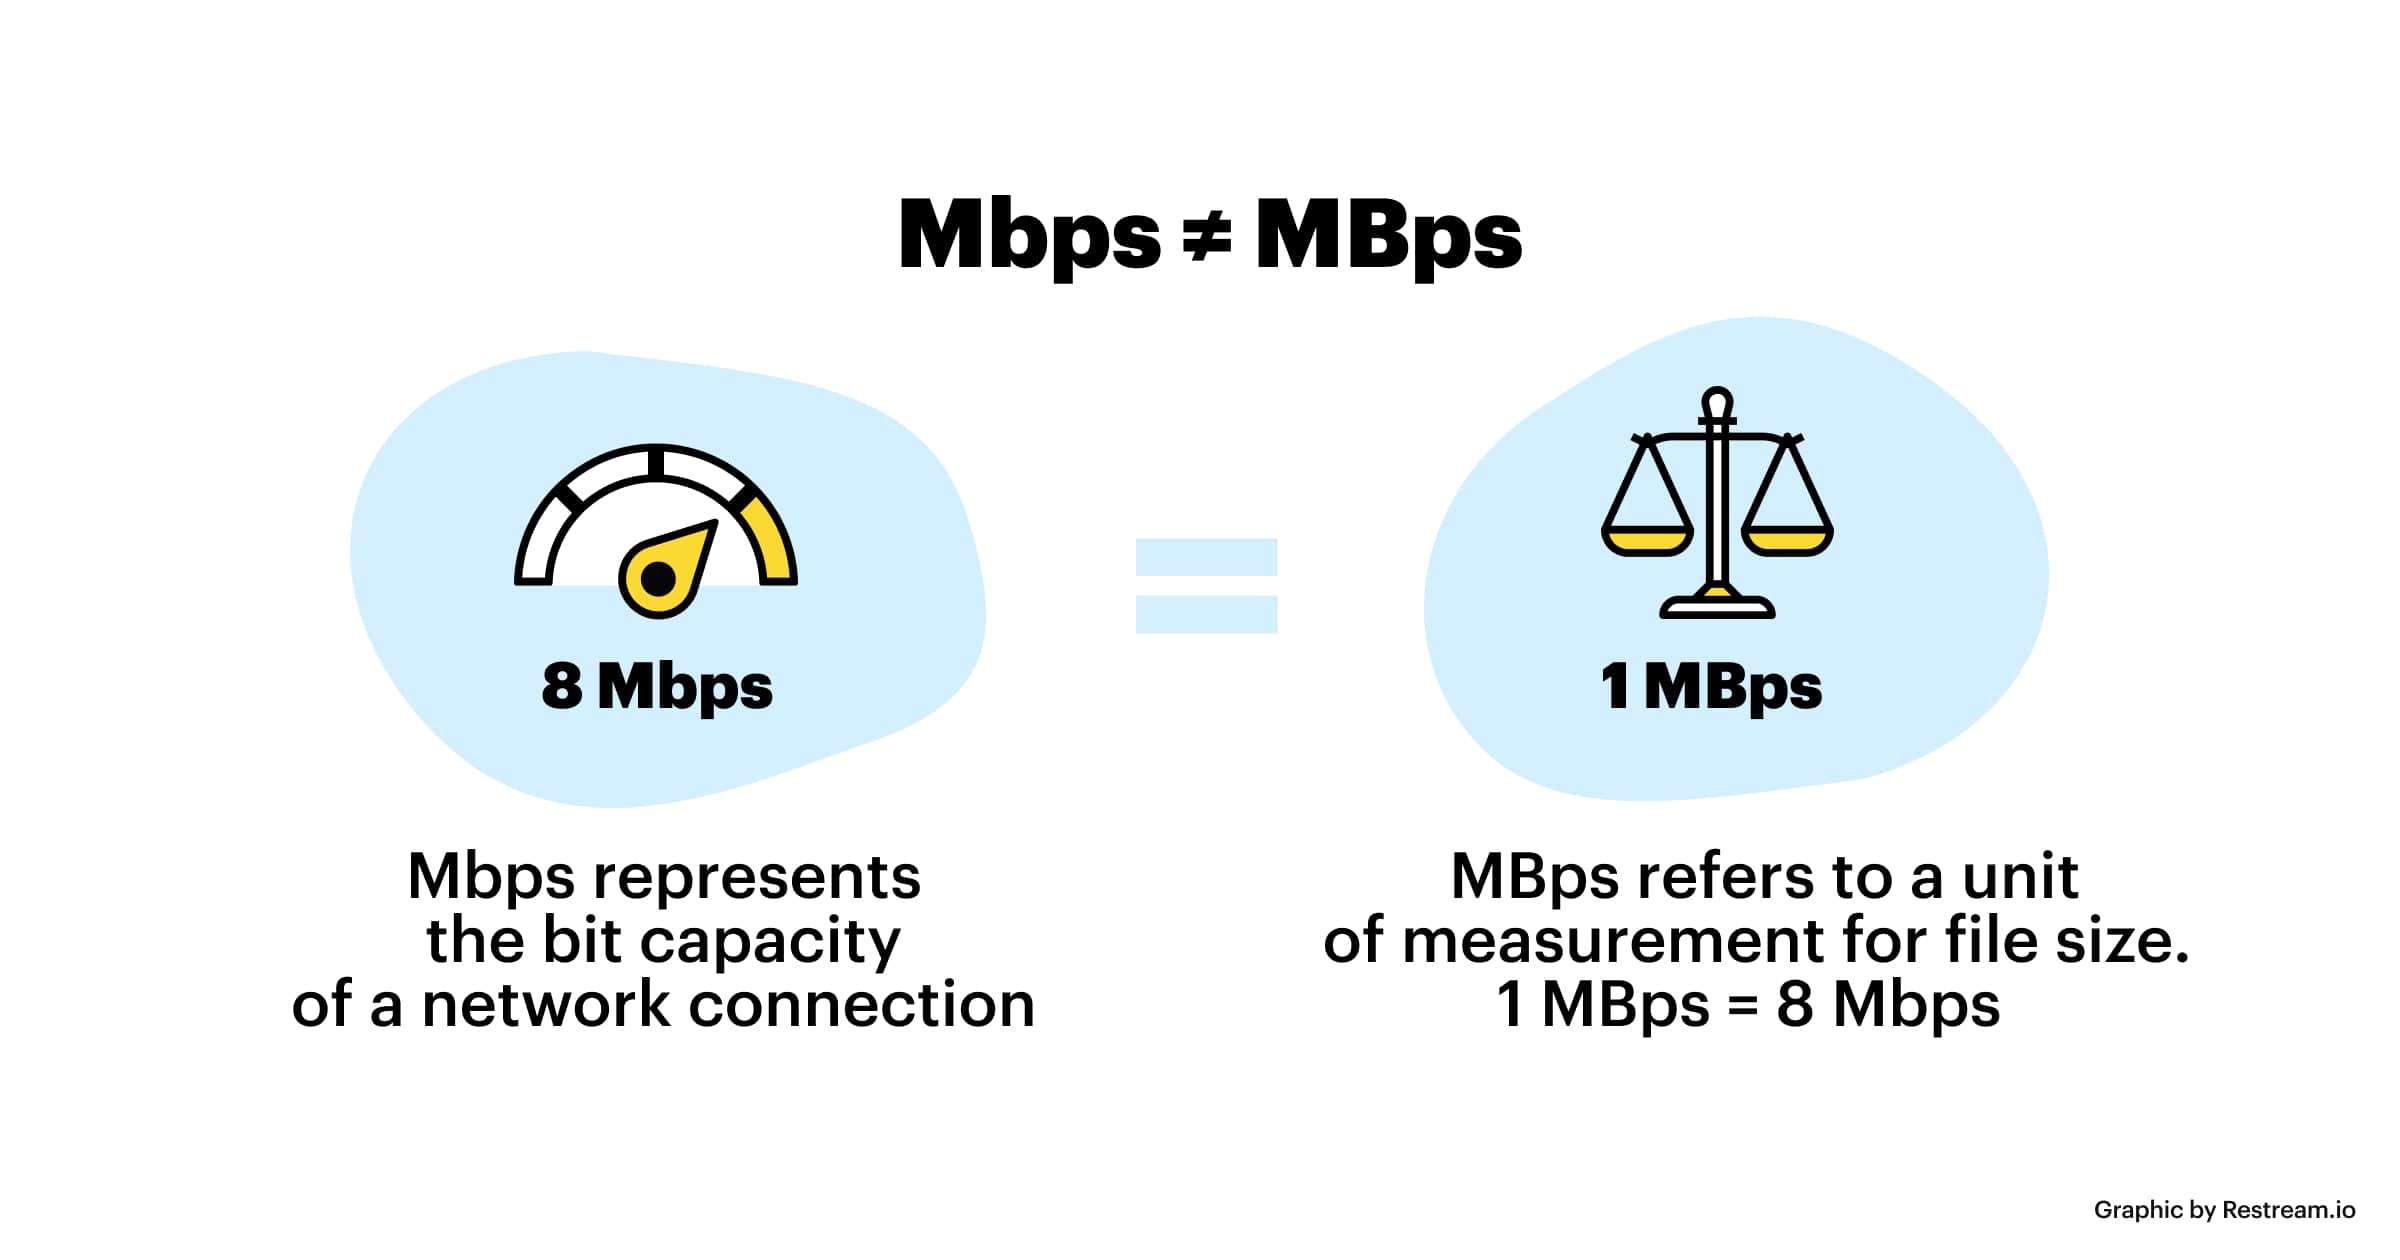
Video Distribution Advantages and Disadvantages of High Bitrate Part 2

Video Distribution Advantages and Disadvantages of High Bitrate Part 2

Bitrate

Let’s think about the optimal bitrate for each video.
When creating a video, you need to think about how to set the optimal codec, resolution, frame rate, and bit rate yourself.

Bitrate

Then
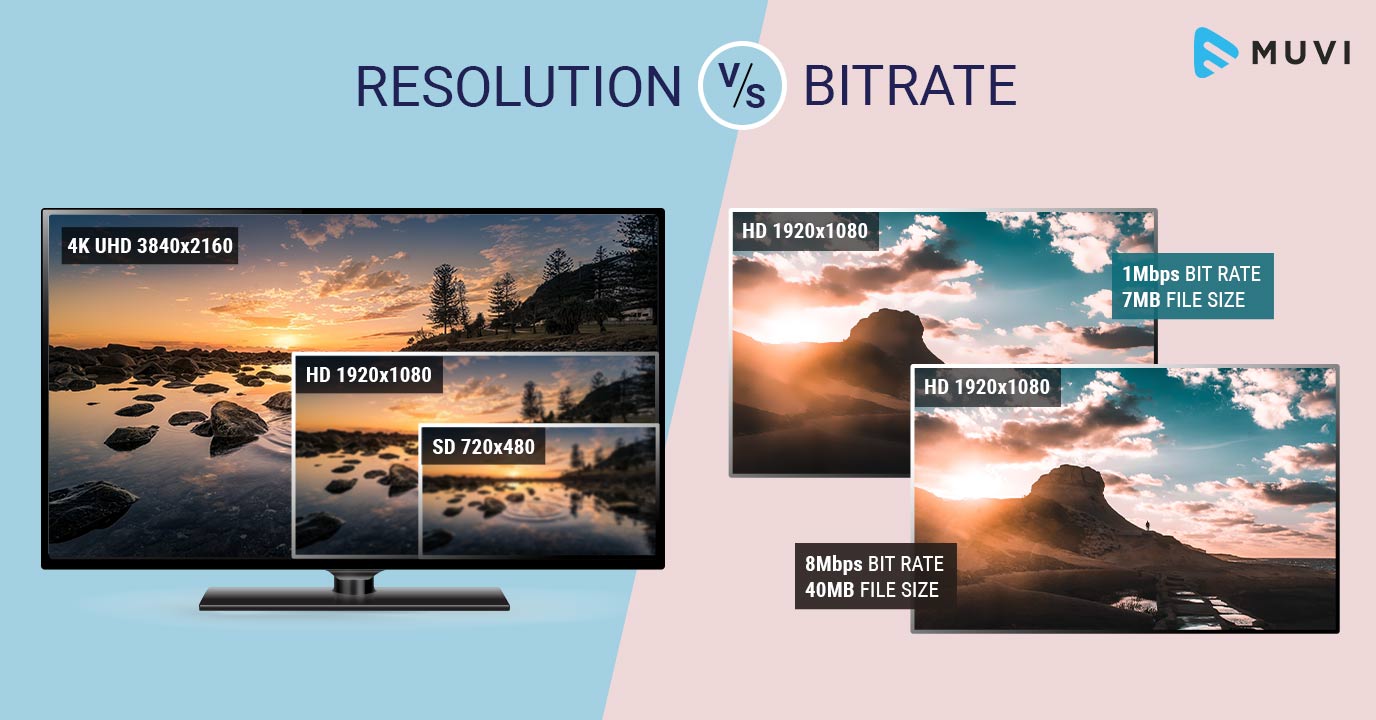
The higher the bit rate, the better the picture and sound quality.
If the bit rate is high, the network and the playback terminal will be overloaded.
Even if the bit rate is increased, the picture quality and sound quality should not be higher than that of the original video material.
It is useful to remember that.

Also, almost all video editing software, encoding software, YouTube, and other free video publishing services commonly used when creating and publishing videos have preset settings with preset codecs, resolutions, frame rates, and bit rates.

However, the image quality of the presets is not always optimal, so use this bit rate knowledge when you need to make fine adjustments.

Video distribution Advantages and disadvantages of a high bit rate

Video distribution Advantages and disadvantages of a high bit rate

Bitrate

The video bit rate is calculated separately for video and audio and added together.

Bit Rate

The sum of the video and audio bit rates is called the oval bit rate (total bit rate).

Expressed in a formula
Oval bit rate = video bit rate + audio bit rate

High bit rate benefits
The higher the bit rate, the better the picture and sound quality, and the lower the bit rate, the worse the picture and sound quality.
However, note that if the video bit rate is high, there are cases where the video bit rate is high and the image quality is good, but the audio bit rate is low and the sound quality is poor. On the contrary, there may be cases where the image quality is poor and the sound quality is good.

High bit rate video basically has the advantage of improving image quality and sound quality, but you also need to understand the disadvantages.

Disadvantages of high bit rate
The higher the bitrate, the more net bandwidth is consumed and the more playback load is applied.
For example, increasing the bit rate from 500 Kbps to 1000 Kbps doubles the net bandwidth usage and doubles the playback load or more.

It is easy to increase the bit rate for high image quality, but if you increase the bit rate too much, the CPU will become overloaded and you may not be able to reproduce it well, so be careful.

Especially when the radio wave of the smartphone is bad or the band is limited, it may not play smoothly at a high bit rate.

Even if the bit rate is increased, the image quality and sound quality do not improve above a certain level.
In fact, increasing the bit rate does not mean that the image quality and sound quality will increase without an upper limit.

For example, if the image quality of the original video material shot by the camera is 100, even if it is converted at a high bit rate by video editing software or encoding software, a high-quality video with a quality of 100 or more image of the original video will be created. You can not.

No matter how high the bit rate is, if the quality of the original video material is poor, the quality will not be better.

What is dither? When you use it?

What is dither? When you use it?

Audio Dither

Topics like loudness, compression and mastering are the main topics that interest all engineers.

Dithering

Dithering can be the subject of a slightly inaccessible topic, as it has a lot to do with the basics of digital audio.

However, applying the screening correctly is very simple and easy. A solid understanding of the “what to do” and “why to do” parts will eliminate the need to worry about hesitation in the future.

What is dithering?
Dithering is the addition of low-level noise to the audio to compensate for loss and reduce errors (noise) when changing the bit depth.

You may be feeling, “Why does adding noise make my recordings sound better? Noise is bad, isn’t it?”

Dither is not just a musical term, and the noise you add to complement it with dithering is actually similar to random fluctuations.

In fact, the word dither means “neural oscillation.” Its meaning comes from the way dither was discovered.

Engineers have found that computers in mechanical aircraft work with greater precision in flight than on the ground.

The vibrations from the aircraft engine actually improved the precision of the viscous moving parts of the machine.

The noise that dithering adds to the track works the same way. Helps improve the accuracy of digital audio files.

When should I use dithering?
Before we dive into dithering, let’s start with the best practices.

If you follow these three guidelines, you shouldn’t have a problem using dithering.

Never change the type of file you want to make unless necessary. If you’re tracking at 24-bit / 44.1 kHz, stick with that setting! If for some reason you need to lower the resolution, be sure to blur during the conversion.
Save the screening until the file is exported from your DAW. Dither only once during export.
If you are submitting the file for mastering, don’t hesitate if you can export the 32-bit floating file. In this case, mastering takes care of the dithering. When exporting anything other than 32-bit float, you must interpolate. This includes bounce files with the same bit depth as the recorded bit depth.
That is all! If you don’t want to think about dithering again, stop here and go back to your last project. But if you don’t feel familiar yet, or want to know why you should follow these rules, read on.

Here’s everything you wanted to know about dithering, but was afraid to ask.

When you select the bit depth, the precision of the file that you actually create during recording is selected.
Bit depth
Let’s start with the basics. Let’s talk about digital audio here!

A file created by a computer during recording is a digital representation of an analog signal connected to an audio interface.

Before you start recording, you need to select the sample rate and bit depth for your DAW session. Choosing a bit depth selects the precision of the file you actually create during recording.

Each bit added improves the resolution at which the ADC (analog / digital converter) needs to measure the level of the input signal.

Therefore, we recommend burning a 24-bit file for LANDR mastering. 24-bit is the best option available in most DAWs.

Reduce the impact of mistakes
Once the file is in your DAW, be careful when lowering the resolution. If you are not careful, reducing the bit depth will result in a digital error.

However, at some point in the process you need to lower the resolution. The reason is as follows.

DAWs perform calculations that boost faders, buses, and plug-ins at higher resolutions than audio files.

DAWs perform calculations that boost faders, buses, and plug-ins at higher resolutions than audio files.

This means that unless you export the file in 32-bit float, the resolution of the track will be lowered and you will get an error when exporting from your DAW.

Digital file errors cause problems that are directly related to the way real-world tracks sound, such as noise and distortion.

This distortion occurs only in the quietest part of the system’s dynamic range, but is corrected with proper blurring.

Normalize volume level – Boost the volume of your videos or audio files

Normalize volume level – Boost the volume of your videos or audio files

Boost video volume

When a person manages to put together a collection of videos or audio files, an urgent need is to normalize the volumes of these, because they will surely find very large differences in each video or file mp3, flac, aac, etc.

Normalize FLAC, OGG, AAC, MP3, VIDEOS

Normalize or Boost video’s volume level

For almost two decades, it became possible to normalize the volume of mp3s. Although with less modern algorithms than the ones used by Mp4Gain. (Although it is still available, if the user wishes, use Replay Gain, as an additional alternative within Mp4Gain).

Normalize video

But given the boom in the use of music videos or any other type, even videos that come from the user’s own cameras or editors, getting the video volume normalized, boosting the video volume, is an important need.

Mp4Gain is the answer and is capable of normalizing the main video formats (AVI, MPEG, MP4, 3GP, etc)

Normalize FLAC, OGG, AAC, MP3, etc.

On the other hand, the use of other formats in addition to mp3 has also generated the need to be able to normalize any of these (and other) audio formats.

Mp4Gain can do this too.

Normalize and convert video or audio files at the same time

You can also convert and normalize from one format to another. For example, normalize the audio of a video and at the same time convert it, let’s say MP3 or FLAC, OGG, etc.

It can even convert between different audio formats, while normalizing. The same happens with videos, you can normalize an MP4 and convert it to AVI simultaneously, or vice versa.

That is, you can convert between all your video and audio formats and at the same time normalize the volume, or not, you can simply convert or simply normalize, if you so decide.

Because nowadays, it is almost unthinkable to have a collection of videos or a collection of music in audio files and not normalize each of these to have them with the optimal volume, so that they sound as good as possible and at the appropriate volume.

Batch Normalize

You can even choose the “percentage” of normalize to be done to your video or audio file. On the other hand, you can additionally choose the dB you want as the final result. That is, the gamma of options is very wide, if you are an advanced user.

Because if you don’t want to do all these calculations, Mp4Gain does them automatically and normalizes the video or audio file with the push of a button.

Obviously you can normalize a single video or audio file or you can do it in batch normalize, normalizing how many you want to normalize the volume with a single click. You simply load how many videos or songs (you can load videos and songs at the same time) and a single click will be enough to complete the task in normalize batch.

Finally we comment that it can perform other functions such as correcting the equalization, modifying the pitch or tempo individually, etc.