What is dithering?


Free Download Mp4Gain
picture

What is dithering?

Error display
To understand what the above means, let’s take a look at what kind of error is occurring in the audio image.

dithering

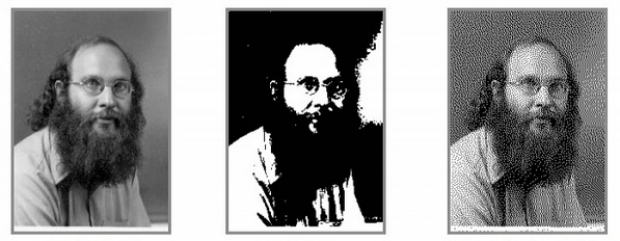
The image on the left is the original image. Similar to a file recorded in a DAW in full resolution.

True Centered Image takes those naive files and drastically reduces bit depth. Recognizing the image is quite difficult.

The image on the right has the same percentage of reduced bit depth, but with dithering applied.
Looks good! But how can you make a low resolution image look good with dithering?

When you reduce the resolution, you have to discard a lot of information in the file that expresses the details as closely as possible.

How that information is truncated is why dithering is important. Minimizing mistakes has a great impact.

Let’s take a closer look at the effect on the file if the information in the audio file is erased by reducing the bit depth.

Rounding up and down and rounding down numbers

Suppose you need to change a 24-bit file to a 16-bit file. All information in the original 24-bit file must be moved to the 16-bit space to fit.

That is, something must remain. But how can the damage be minimized?

The first option is to easily cut and adjust the numbers. This is called truncation and it is the most inaccurate way to solve the problem.

Instead of truncating the numbers, you can round them up or down to get closer to rendering 24-bit audio at 16-bit.

But what if the middle number should be rounded up or down? Try the golden rule. I will round every time a number appears on the road.

This way, you will at least have the right time. But you also know that you are wrong!

The noise (or random variation) that the dithering adds basically randomizes the rounding up and down decisions.

After dithering, the distortion produced by truncation or rounding down has a much less detectable effect.

After dithering, the distortion produced by truncation or rounding down has a much less detectable effect.
Diffuse heights
All this round-down hatching and mistakes may seem completely academic, but the correct hatching can make all the difference in the final work.

At the very least, adding dithering at the right point in your project is the closest thing to improving your mix with a single click, even with the slightest improvement.

As an engineer, you have to work hard to get the best possible sound. Do not miss the opportunity to improve it.

Now that you know the dither, go back to your DAW and bounce some tracks.


Free Download Mp4Gain
picture


Mp4Gain Main Window
picture


Mp4Gain Features
picture


Free Download Mp4Gain
picture

What is dither? When you use it?

What is dither? When you use it?

Audio Dither

Topics like loudness, compression and mastering are the main topics that interest all engineers.

Dithering

Dithering can be the subject of a slightly inaccessible topic, as it has a lot to do with the basics of digital audio.

However, applying the screening correctly is very simple and easy. A solid understanding of the “what to do” and “why to do” parts will eliminate the need to worry about hesitation in the future.

What is dithering?
Dithering is the addition of low-level noise to the audio to compensate for loss and reduce errors (noise) when changing the bit depth.

You may be feeling, “Why does adding noise make my recordings sound better? Noise is bad, isn’t it?”

Dither is not just a musical term, and the noise you add to complement it with dithering is actually similar to random fluctuations.

In fact, the word dither means “neural oscillation.” Its meaning comes from the way dither was discovered.

Engineers have found that computers in mechanical aircraft work with greater precision in flight than on the ground.

The vibrations from the aircraft engine actually improved the precision of the viscous moving parts of the machine.

The noise that dithering adds to the track works the same way. Helps improve the accuracy of digital audio files.

When should I use dithering?
Before we dive into dithering, let’s start with the best practices.

If you follow these three guidelines, you shouldn’t have a problem using dithering.

Never change the type of file you want to make unless necessary. If you’re tracking at 24-bit / 44.1 kHz, stick with that setting! If for some reason you need to lower the resolution, be sure to blur during the conversion.
Save the screening until the file is exported from your DAW. Dither only once during export.
If you are submitting the file for mastering, don’t hesitate if you can export the 32-bit floating file. In this case, mastering takes care of the dithering. When exporting anything other than 32-bit float, you must interpolate. This includes bounce files with the same bit depth as the recorded bit depth.
That is all! If you don’t want to think about dithering again, stop here and go back to your last project. But if you don’t feel familiar yet, or want to know why you should follow these rules, read on.

Here’s everything you wanted to know about dithering, but was afraid to ask.

When you select the bit depth, the precision of the file that you actually create during recording is selected.
Bit depth
Let’s start with the basics. Let’s talk about digital audio here!

A file created by a computer during recording is a digital representation of an analog signal connected to an audio interface.

Before you start recording, you need to select the sample rate and bit depth for your DAW session. Choosing a bit depth selects the precision of the file you actually create during recording.

Each bit added improves the resolution at which the ADC (analog / digital converter) needs to measure the level of the input signal.

Therefore, we recommend burning a 24-bit file for LANDR mastering. 24-bit is the best option available in most DAWs.

Reduce the impact of mistakes
Once the file is in your DAW, be careful when lowering the resolution. If you are not careful, reducing the bit depth will result in a digital error.

However, at some point in the process you need to lower the resolution. The reason is as follows.

DAWs perform calculations that boost faders, buses, and plug-ins at higher resolutions than audio files.

DAWs perform calculations that boost faders, buses, and plug-ins at higher resolutions than audio files.

This means that unless you export the file in 32-bit float, the resolution of the track will be lowered and you will get an error when exporting from your DAW.

Digital file errors cause problems that are directly related to the way real-world tracks sound, such as noise and distortion.

This distortion occurs only in the quietest part of the system’s dynamic range, but is corrected with proper blurring.